1
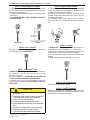
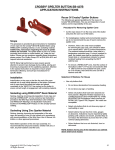
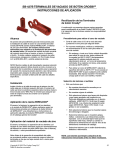
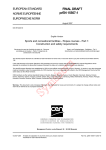
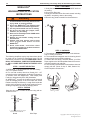
36
Understanding: The Crosby Group Product Warning (ev. 9/16/02)
WIRELOCK®
WARNINGS AND APPLICATION
INSTRUCTIONS
WARNING
•
Incorrect use of WIRELOCK® can result in an
unsafe termination which may lead to serious
injury, death, or property damage.
Do not use WIRELOCK® with stainless steel
rope in salt water environment applications.
Use only soft annealed iron wire for seizing.
Do not use any other wire (copper, brass,
stainless, etc.) for seizing.
Never use an assembly until the WIRELOCK®
has gelled and cured.
Remove any non-metallic coating from the
broomed area.
Sockets with large grooves need to have
those grooves filled before use with
WIRELOCK®.
•
•
•
•
•
•
•
STEP 3 - BROOMING
1. Unlay the strands of the wire rope and IWRC as far as
the seizing.
2. Cut out any fiber core.
3. Unlay the individual wires from each strand, including
the IWRC, completely, down to the seizing.
4. Remove any plastic material from broomed area.
Strand
Wire Rope
R e a d , u n d e r s t a n d, a n d f o l l o w t h e s e
instructions and those on product containers
before using WIRELOCK®.
The following simplified, step-by-step instructions should
be used only as a guide for experienced users. For full
information, consult our document WIRELOCK® TECHNICAL DATA MANUAL, WIRE ROPE USER MANUAL
by AISI and WIRE ROPE MANUFACTURERS CATALOGS.
STEP 1 - SOCKET SELECTION
1. WIRELOCK® is recommended for use with Crosby
416 - 417 Spelter Sockets.
2. For use with sockets other than Crosby 416 - 417
consult the socket manufacturer or Crosby Engineering.
3. Sockets used with WIRELOCK® shall comply with
Federal or International (CEN, ISO) Standards.
4. WIRELOCK®, as with all socketing media, depends
upon the wedging action of the cone within the socket
basket to develop full efficiency. A rough finish inside the
socket may increase the load at which seating will occur.
Seating is required to develop the wedging action.
STEP 4 - CLEANING
1. The method of cleaning will depend on the lubricant
and/ or coating on the wire.
2. The methods and materials used for cleaning should
comply with the current EPA regulations.
3. Consult the Wire Rope Technical Board, your Wire
Rope supplier or the Wire Rope Manufacturer for recommended materials and methods.
4. The currently recommended Trichlorethane does not
comply with the “Clean Air Act of 1990, Section 611,
Ozone Depletion Substances.”
STEP 2 - SEIZING
Seize the wire rope or strand as shown using soft annealed iron wire
4D
*
D MIN.
D MIN.
D
*
D
= 5D or 50d (d= Diameter of the largest
wire) WHICHEVER IS GREATER.
Strand
Wire Rope
Copyright © 2002 The Crosby Group, Inc.
All Rights Reserved
Understanding: The Crosby Group Product Warnings (ev. 9/16/02)
STEP 5 - POSITIONING OF SOCKET
1. Position socket over the broom until the wires are
LEVEL with the top of the socket basket or to a minimum
embedded length as shown.
2. Clamp rope and socket vertically ensuring alignment
of their axes.
3. CAUTION: DO NOT USE OVERSIZED SOCKETS
FOR WIRE ROPE.
37
STEP 8 - MIXING AND POURING
1. Mix and pour WIRELOCK® within the temperature
range of 48 degrees to 110 degrees F. Booster kits are
available for reduced temperatures.
2. Pour all the resin into a container containing all the
granular compound and mix thoroughly for two (2) minutes with a flat paddle.
3. Immediately after mixing, slowly pour the mixture
down one side of the socket until the socket basket is
full.
*
D
30 D STRAIGHT
BEFORE BEND
*
= 5D or 50d (d=Diameter of the largest
wire) WHICHEVER IS GREATER.
Strand
Wire Rope
STEP 6 - SEAL SOCKET
Seal the base of the socket with putty or plasticine to
prevent leakage of the WIRELOCK ®.
STEP 7 - WIRELOCK® KITS
1. WIRELOCK® kits are pre-measured and consist of two
(2) containers - one (1) with resin and one (1) with
granular compound.
2. Use the complete kit - NEVER MIX LESS THAN THE
TOTAL CONTENTS OF BOTH CONTAINERS.
3. Each kit has a shelf life clearly marked on each container and this must be observed. NEVER USE OUT OF
DATE KITS.
•
•
•
•
•
•
•
•
CAUTION
WIRELOCK® re s i n, i n liquid s ta te , is
flammable.
Chemicals used in this product can give off
toxic fumes and can burn eyes and skin.
Never use out-of-date material.
Use only in well-ventilated work areas.
Never breathe fumes directly or for extended
time.
Always wear safety glasses to protect eyes.
Always wear gloves to protect hands.
Avoid direct contact with skin anywhere.
Copyright © 2002 The Crosby Group
All Rights Reserved
STEP 9 - CURING
1. WIRELOCK will gel in approximately 15 minutes, in
a temperature range 65 degrees F. to 75 degrees F.
2. The socket must remain in the vertical position for an
additional ten (10) minutes after gel is complete.
3. The socket will be ready for service 60 minutes after
gelling.
4. Never heat sockets to accelerate gel or curing.
®
STEP 10 - RE-LUBRICATION
Re-lubricate wire rope as required.
STEP 11 - PROOF LOADING
Whenever possible, the assembly should be proof
loaded. All slings with poured sockets, in accordance with
ASME B30.9, shall be Proof Loaded.