1
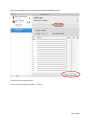
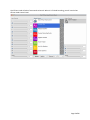
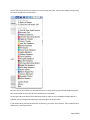
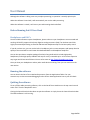
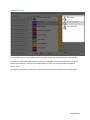
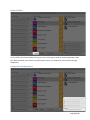
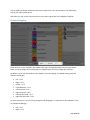
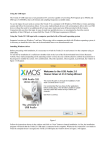
Mac OS X User’s Manual What is it? Out Of Your Head is audio processing software which reproduces the sound of speakers in a room while listening with headphones. It can simulate the playback from up to 8 speakers at once. It doesn’t just replicate the sound of the speakers, but more importantly it replicates the position of the speakers in the room. When you listen with headphones, the sound you hear will sound like you are not wearing headphones. Instead you will hear speakers in a room. Therefore, the sound is “out of your head” not inside your head like conventional headphone listening. This allows you to watch a movie on your computer or laptop using headphones, but hear the sound of a very high end surround sound theater system. You can finally watch a movie or listen to music from “real” speakers with the convenience of headphones. System Requirements This software is an audio processor that REQUIRES the use of headphones for listening. The better the headphones, the better the effect of the processor. An external headphone amplifier and an external DAC is HIGHLY recommended. It’s not required, but if you hear the difference good headphone gear can make, you will want to upgrade! (In our online store, we have very inexpensive headphones and DAC’s available for a complete turnkey system.) The current version of Out Of Your Head requires Mac OS X 10.8 or higher. If you are not sure what you have, just go to the Apple menu () and select “About this Mac”. Under the OS X title, you will see the version number. It should say 10.8 or higher. If not, please upgrade to the latest version of OS X. We will also have an iPhone/iPad app and an Android app. Hopefully those versions will be released some time in 2015. This software also does very complex audio processing which can take some processor power. On older, slower computers or laptops, you may find that the audio does not play back smoothly. It is possible that your computer is not fast enough. We do plan on speeding up and optimizing the processor to support slower computers. On Macs with Core 2 Duo processors or higher, you should not have a problem with processing power. FONGAUDIO.COM [email protected] The software supports up to 8 channels of audio. It is designed to work with all content from 2 channel stereo all the way up to 7.1 surround audio. For best results, use a media player that supports decoding surround sound audio, like XBMC or iTunes. Software Installation To install Out Of Your Head, you can download the latest version from our website: https://fongaudio.com/out-of-your-head-trial-download/. There is no cost. The trial is free. This file is a .dmg file and needs to be downloaded and run on your computer. Once you download the .dmg file, double click the Out_Of_Your_Head_Installer_1.X.dmg file to mount the disk image and open the disk in the Finder. To start the installation, just double click on the installer package. Just like most software installers, you will see an installation window pop-up. Carefully read through every single word of the License Agreement 2 or 3 times just to make sure you understand it. Then check “I accept…” and click “Install” to continue the installation. During the installation, you will see pop-up dialogue boxes. The software installs system level drivers and software, so the Mac is asking you if it’s OK. Just click “OK” when you see the windows pop-up. You will also need to enter an administrator login and password. If you don’t know that information, contact the person who set up your computer. You will see a “Finished” window. Just click OK. Right now, the software automatically installs on your main boot drive. In this directory: /Applications/ You can run the software from that location from a Finder window. Quick Start Guide Pre-Launch Configuration Before you launch Out Of Your Head, setup the speaker configuration. The Out Of Your Head driver must be set to a 7.1 speaker configuration. (You should do this even if you don’t plan on playing 5.1 or 7.1 media files. Page 2 of 25 Open the Audio MIDI Setup: Go to the Launchpad/Other/Audio MIDI Setup: Select the “OOYH (16ch)” device. Then click on the “Output” button. Then click on the “Configure Speakers…” button. Page 3 of 25 Once the Speaker Configuration window opens, click on the “Multichannel” button at the top and then select “7.1 Rear Surround” from the drop down menu on the right. Then click “Done” and close/quit the Audio MIDI Setup . Starting Out Of Your Head: Put on your headphones! Launch Out Of Your Head from the Applications folder. Page 4 of 25 Out Of Your Head will take a few seconds to launch. When it is finished launching, you will see the Out Of Your Head Control Panel: Page 5 of 25 You will also see an Out Of Your Head icon in the OS X top menu bar. You can also change settings using this menu instead of the Control Panel: But once you run the software, it automatically turns on the processing. (Out Of Your Head changes the OS X audio output device to Out Of Your Head when it is launched.) On the right side of the Out Of Your Head Control Panel, make sure your headphone output device is selected. You can change output devices just by clicking on the device name. If you need to bring the Control Panel back to the front, just select “Control Panel” from the Out Of Your Head menu in the top menu bar. Page 6 of 25 Open you favorite media player and play some music! (If you don’t hear any output to your headphones, try either switching Speaker Presets or Output Devices. If you still don’t hear any audio and you see audio on the audio level meters, then please see the Troubleshooting section of this manual.) If you don’t have a media player, you can download a free media player like XBMC (soon to be renamed Kodi) (http://xbmc.org/) for audio or video. We currently do not recommend using VLC Media Player for video. For 2 channel audio VLC is OK. The Mac version of VLC has a bug and does not map the channels properly for 5.1 or 7.1 surround content. The software is initially in “Trial Mode”. You can play any of the virtual speaker presets, but they will only play for 3 minutes. After that, the sound will stop. You can restart the 3 minute timer by selecting another preset. See the “Licensing” section In the User Manual section below to purchase a license and remove the 3 minute restriction. Page 7 of 25 User Manual Although the software is doing some very complex processing, its operation is actually quite simple. When the software is launched, it will automatically turn on the audio processing. When the software is exited, it will return your audio settings back to default. Before Running Out Of Your Head Headphones and DAC’s Since the OOYH software requires headphones, please make sure your headphones are connected and working. OOYH fully supports third-party digital to analog converters (DAC) for the best sound. We highly recommend purchasing an external USB DAC and headphone amp for the best quality sound. If you do not have one, you can use the built-in headphone jack on most computers and laptops. But the quality of the sound will be much lower than dedicated DAC’s and headphone amplifiers. You can also purchase a complete package from Darin Fong Audio which includes high quality headphones, and a high quality USB DAC and amp for a very reasonable price. It’s the least expensive way to get world class sound! Please visit our online store at http://www.fongaudio.com/store. Once you have your headphones and any other audio devices working. Then you can continue to the next section. Running the software You can launch the Out of Your Head audio processor from the Applications folder. For your convenience, we also recommend dragging the Out Of Your Head application icon to your OS X dock. Quitting the software To turn off the audio processing software, click on the Out Of Your Head icon on the top menu bar and select “Exit” from the drop down menu. Closing the Control Panel window does not quit the software. It simply closes the Control Panel window. The OOYH software is still running. Page 8 of 25 Changing the presets To change the preset or virtual speakers you are listening to, either click on the Out Of Your Head icon on the OS X menu bar to show the drop down menu: Or click on the preset you want on the Out Of Your Head Control Panel. Bypass Mode Page 9 of 25 On the Out Of Your Head Control Panel, you can check the Bypass Mode check box. This will turn off the Out Of Your Head processing so you can hear the audio unprocessed. In the Bypass mode, the Out Of Your Head software is completely out of the audio chain. Trial Mode The software is initially in “Trial Mode”. You can play any of the virtual speaker presets, but they will only play for 3 minutes. After that, the sound will stop. You can restart the 3 minute timer by selecting another preset. See the “Licensing” section below to purchase a license and remove the 2 minute restriction. Volume Control You can control the volume of the OOYH software using the Control Panel interface. Please see the “Control Panel” section below. You can also control the output volume by adjusting the volume control of your headphone output device or some media players will also let you control the volume from within the media player software. The Control Panel The easiest way to control the software is by using the Out Of Your Head Control Panel interface. Opening the Control Panel The Out Of Your Head Control Panel will open automatically when you launch Out Of Your Head. If the Control Panel is closed, you can open the Control Panel window by selecting “Control Panel” from the Out Of Your Head menu bar icon. Closing the Control Panel To close the Control Panel window, just click on the red “x” in the upper right corner of the window. Closing the window will NOT quit the program. The OOYH software will continue to run in the background. Page 10 of 25 The Control Panel Interface Hopefully the Control Panel is fairly straight forward to use. 1. 2. 3. 4. 5. 6. 7. 8. 9. 10. List of speaker presets Available audio output devices Channel mute on/off Input channel level control Master input level control (controls the level of all input channels at once) Audio processing bypass on/off (Turns off all audio processing) Input channel mapping control (used to map the audio inputs to different speakers) Output channel mute on/off Output channel level control Master output level control (controls the level of both output channels at once) Page 11 of 25 Preset list: In the middle section of the Out Of Your Head Control Panel window, you will see a scrolling list of all the installed speaker presets: Here is a description of the columns: • • • Effect Name – An icon and the name of the speaker preset Description – A brief description of what the speakers were that were used to create the preset. You can “hover” the mouse over the preset name to see a longer description of the preset. License – This column tells you if that preset is licensed or in trial mode. You will see a “trial mode” icon and “licensed” icon for the presets that have a valid license You can scroll the window down to see all the installed presets. Changing Presets To change presets, simply click on the preset you want to listen to. You can scroll the list down to see all the effects. The Out Of Your Head software will remember the last speaker preset you were using and select that preset the next time the Out Of Your Head software is launched. Page 12 of 25 Output Devices: In the Output Device list, you should see all the available sound output devices connected to your Mac. If you don’t see your output device listed, make sure it’s plugged in and powered on before you launch Out Of Your Head. Also, make sure your output device is listed in the “System Preferences/Sound” control panel. To change output devices, just click on the device you want Out Of Your Head to use for audio output. Page 13 of 25 Input channel levels: You can use this area to change the input volume levels of each audio channel. Just slide any of the sliders to adjust the volume level of each individual channel. You can also use the Master slider at the bottom to adjust all the channel levels at once. The Master slider will keep the relative levels between the channels the same. It simply applies the same offset to each channel equally. The check boxes are the mute on/off controls. You can mute the audio coming from each speaker individually. When the box is unchecked, audio is muted on that “speaker” channel. This is a good way to hear the individual speakers and their position in the room. You can also change the levels by typing in values into the input boxes. The values range from 0dB down to -96dB. The levels can also be adjusted if you are listening to loud movies or music to avoid any clipping or distortion. Page 14 of 25 Bypass Mode: To turn off the Out Of Your Head processing, just turn on the bypass mode by checking the Bypass check box. When activated, you will hear the audio unprocessed, as you would hear conventionally through headphones. Output Level Adjustment: Page 15 of 25 You can adjust the output audio levels just like the input levels. This controls the level of audio being sent to your audio output device. Alternately you can use the volume control on your audio output device or headphone amplifier. Channel Mapping: These controls are only needed if your media player app is sending the audio to the wrong channels. Often the Left and Right Surround speakers are swapped with the Left and Right Back speakers. By default, Out Of Your Head will load the “Default” channel mapping. This Default setting maps the channels accordingly: • • • • • • • • Left – CH 1 Right – CH 2 Center – CH 3 LFE(subwoofer) – CH 4 Left Surround – CH 5 Right Surround – CH 6 Left Rear Surround – CH 7 Right Rear Surround – CH 8 For your convenience, we have also preprogrammed “Mapping 1” to swap the surround speakers. They are mapped accordingly: • • Left – CH 1 Right – CH 2 Page 16 of 25 • • • • • • Center – CH 3 LFE(subwoofer) – CH 4 Left Surround – CH 7 Right Surround – CH 8 Left Rear Surround – CH 5 Right Rear Surround – CH 6 To switch between channel mappings, just click on the left drop down menu and select the mapping you want to use. To change the channel mapping, Follow these steps: 1. 2. 3. 4. Select the Channel Mapping you want to change. (The left menu) Select the channel you want to remap. (The center menu) Select the speaker channel you want to the Channel selected in the previous step to output to Repeat steps 2 and 3 for all 8 channels. Your changes are automatically saved whenever you change the Speaker Channel. Buying a License To purchase a license for a particular preset, double-click on the preset. This will open up a pop-up window that takes you to a link on our web store to purchase a license. Please see the “Licensing” section below for more detailed instructions. Licensing IMPORTANT: The first time you go online to purchase a license for a speaker preset, you MUST add the “Out Of Your Head license with preset” to your shopping cart FIRST. This item is the license for the Out Of Your Head software which comes with one free speaker preset. Then you can add additional presets to your cart if you want. When you purchase an Out Of Your Head license, the cost also includes one free speaker preset. To take advantage of the free preset, you have to pick a speaker preset in the options of the “Out Of Your Head license with preset” item. When you first install OOYH software, it is in “Trial Mode”. The software will stop processing audio every 3 minutes. When this happens, a “purchase license” pop up window will show. You can either purchase a license or Cancel the window and select a different preset. To allow longer than 3 minutes of playback, you must purchase a software license for the OOYH software and then a license for each preset. The licensing process requires an internet connection, so please purchase your licenses before taking a trip, etc. The licenses are tied to your specific e-mail address AND your computer. You will need a separate license for each preset on each computer. Licenses will not work if copied to another computer. Page 17 of 25 IMPORTANT: In order to “register” your computer and your e-mail address, you MUST initiate the purchase of a license from within the Out Of Your Head software the first time from the computer that you want to license. You cannot purchase a license from a different computer. Subsequent purchases can be done directly on the Darin Fong Audio web store without using this registration process. To register your computer and purchase a license, double-click on any unlicensed preset in the Out Of Your Head Control Panel. Make sure the preset you want to purchase is already selected. If not, select the right preset and then double-click on the Speaker Preset again to open the pop up window. You will then see a pop-up window like this: Enter your e-mail address in the space provided. NOTE: You must use the same e-mail address that you plan on using to create your account on the Darin Fong Audio web store to purchase your license. (If you accidentally entered the wrong e-mail address, just open the Purchase License window again and type in the right e-mail address.) Then click “OK”. Your web browser will open to the Darin Fong Audio web store on the page to purchase the Speaker Preset you selected. Before you can access the store, you must either login or create and account if it’s your first time. Please use the same e-mail address you typed in the pop-up windows above to create your account. If this is your first license you are purchasing, you cannot add just the Speaker Preset to your cart. You must first purchase an Out Of Your Head software license: Page 18 of 25 1. Go to the "Out Of Your Head License with Preset" item in the store: Click on "Out Of Your Head". Then select the third item on that page, "Out Of Your Head License with Preset" 2. On that page, select the speaker preset you want to buy in the drop down menu. 3. Then click "Add to Cart" to add the item to your shopping cart. 4. When you are ready to checkout, go to your shopping cart. If you are just purchasing a single Speaker Preset, simply add the item to your cart. You can add additional preset licenses to your order if you like. When you are done shopping, proceed to your Cart and complete the checkout process. Once you complete the checkout process, you will receive an e-mail with the license file attached. Copy that .lic file to your OS X account “Downloads” folder. NOTE: If you purchased multiple presets, you will only receive one license file. You receive one license per order, NOT per preset. IMPORTANT: The license file MUST be copied or saved to your OS X account “Downloads” folder. As long as the license file is copied to the right location AND the license was purchased from the computer that you want to license, the licensed presets should show a “Licensed” icon to the right of the Speaker Preset in the Out Of Your Head Control Panel and it will play longer than 3 minutes. Using Media Player Software 2 Channel Music For two channel music, you can use any software that plays audio. You can also us streaming audio services like Pandora. Multi-Channel Audio The OOYH software supports up to 7.1 channel audio. Because it runs as a virtual sound card, as long as your media player software can output to 7.1 channel audio hardware, then it should work with the OOYH software. Please consult your media player software instructions to set it to output decoded 7.1 channel audio. There may be specific output formats and settings to get multi-channel audio working with the OOYH software. We have tested Out Of Your Head with XBMC, iTunes, Audirvana, Amarra, Pure Music, and Netflix. Please see the Appendix for specific settings for the media players listed above. Page 19 of 25 Audio Synchronization/Lip Sync Because the Out Of Your Head software is doing some very complex audio calculations, there is some inherent delay in the processing. We are constantly trying to make it as fast as possible, but as of now, there is a delay of about 800ms, depending on the speed of your computer. What this means is that for watching movies, you will have to adjust the media player output to compensate for the audio processing delay. Most media player software has adjustments for syncing the audio with the picture. Generally, you should start with an audio delay of -250ms. What this means is that you want the media player to start the audio 250ms EARLY so that by the time the audio is delayed by 250ms during the audio processing, it will end up being in sync. You may have to play with the values since the delay can vary greatly from system to system. Not all media player software has audio sync adjustments. Please see the Appendix for specific settings for some more popular media player software. Uninstalling the Software To uninstall Out Of Your Head software, you use the provided “Out Of Your Head Uninstaller” app. You can open the Out Of Your Head Installer .DMG file to mount the install disk. In this disk image is an application called “Out Of Your Head Uninstaller”. Just double click on the uninstaller app. This will uninstall the application, and the driver. Manual driver uninstall If for some reason, Out Of Your Head does not get uninstalled, you can uninstall it manually: 1. It’s best to reboot your computer first. 2. Make sure Out Of Your Head is not running. (Make sure there is no Out Of Your Head icon in the top Menu Bar.) 3. Open a Terminal window. (You can launch Terminal from the /Applications/Utilities or /Applications/Other folder.) 4. Type in the following commands and enter your administrator password if prompted: sudo rm -rf ~/Library/Preferences/com.FongAudio.OOYH*.plist sudo kextunload /System/Library/Extensions/OOYH.kext sudo rm -rf /System/Library/Extensions/OOYH.kext sudo rm -rf /Library/Receipts/OutOfYourHead* sudo rm -rf /var/db/receipts/com.fongaudio.pkg.* sudo rm -rf "/Applications/Out Of Your Head.app" sudo rm -rf /Library/Application\ Support/Out\ Of\ Your\ Head/OOYHEngine.app sudo rm -rf "/Applications/OOYH-Engine.app" Page 20 of 25 Additional Notes 1. Do not change the surround settings for the Out Of Your Head audio device. It should be left on 7.1 channels. It doesn’t matter if you are only sending it 2.0 or 5.1 content. Out Of Your Head will just use the channels of audio being sent to it. There is no need to change the driver to match the source. 2. It’s possible that some of the presets with particularly loud audio will clip. You may hear clicking or something even as bad as loud static. You can try lowering the input or output levels in the Control Panel to eliminate any clipping. Troubleshooting What could possibly go wrong? Of course many of the problems you might encounter can be avoided by following the instructions in this manual. There are a lot of details especially pertaining to purchasing the licenses. There is no sound coming out of your headphones: There are many reasons why you might not be hearing the Out Of Your Head audio in your headphones: 1. Make sure your headphones will play music without Out Of Your Head running. Follow the instructions for your audio output system including your DAC, headphone amp, and media player software. 2. Then launch your media player software before launching Out Of Your Head. 3. See the Appendix and follow the steps for setting up your media player software. If your software is not listed, make sure: a. The audio output in the media player is set to either “follow Audio MIDI Setup” or output to the “OOYH (16ch)” device. b. Then make sure the maximum audio output sampling rate is 48kHz and 32bit. Set your media player app to down convert everything to 48kHz. c. Just to get things working, turn off all audio quality enhancements like “Direct Mode”, “Exclusive Mode”, “Integer Mode”, etc. (You can re-enable those features and test to see if it works with Out Of Your Head.) 4. Launch Out Of Your Head. 5. Start playing music in your media player. (Just to start, try playing 16bit/44.1 content) 6. You should see audio levels registering in the Out Of Your Head Control Panel. a. If you don’t see any audio levels during loud passages of audio, then try switching to another Output Device in the Out Of Your Head Control Panel on the right and then switch back to your desired output device. This should get the audio working to your headphones. 7. If you see audio levels, but do not hear any sound then: a. Try switching to another Speaker Preset. This should get the sound working to your headphones. Page 21 of 25 b. Try switching to another Output Device in the Out Of Your Head Control Panel on the right and then switch back to your desired output device. This should get the audio working to your headphones. If you still can’t get Out Of Your Head working, please e-mail us at [email protected] and we can help. The Out Of Your Head Menu Bar icon is gone: If you don’t see the Out Of Your Head icon in the OS X top Menu Bar then, then most likely Out Of Your Head is not running. If you know that Out Of Your Head is running, it’s possible the current application has too many menu items on the top Menu Bar and those menus are “covering” the Out Of Your Head menu icon. Generally if you bring the OS X “Finder” to the front, you should see the Out Of Your Head menu icon if Out Of Your Head is running. If you still suspect Out Of Your Head is running, you can open “/Applications/Other/Activity Monitor”. IN the list of programs running, you can look for a process called “OOYH”. Select this process and click on the “End Task” button to Quit or Force Quit Out Of Your Head . Page 22 of 25 Appendix A: Media Player Software Settings XBMC (Soon to be called Kodi): http://kodi.tv/ XBMC is a great all around app for playing both videos/movies and audio. It seems to handle just about any file format including 7.1 surround audio. Setup Notes: Basically setup XBMC to decode all content to 2.0 up to 7.1 audio. Also we must set it to downsample everything to 48kHz sampling rate. 1. 2. 3. 4. 5. 6. 7. 8. Go to SYSTEMS Menu Select Settings Select System at the bottom Select Audio Output Click the "Settings Level" button at the bottom to change it to "Advanced" Change number of channels to "7.1" Change "Output Configuration" to "Fixed" Change "Limit Sampling Rate" to "48.0" Most of the time, when you first launch XBMC, the audio will not play through Out Of Your Head. To get the audio output working, just change the Out Of Your Head Speaker Preset to another preset and back. Next we have to adjust the audio sync: 1. 2. 3. 4. 5. 6. Play a video file in XBMC While the video is playing, move the mouse over the screen to make the player controls appear Click on the “Speaker” audio icon on the player controls. Change the “Audio Offset” value to “Ahead by .250s”. Adjust this value until the audio is in sync with the video. Once you have the value set, click on “Set as default for all videos” at the bottom of the window. This will set the audio sync for all videos in the future. iTunes: https://www.apple.com/itunes/ iTunes will work great for music. There are no settings to change really. For video, iTunes does not have a manual audio sync adjustment. However, after testing, we have found that the audio sync is somewhat compensated for automatically. It’s not perfect, for it seems to be close enough to make watching videos/movies tolerable. Page 23 of 25 Audirvana: http://audirvana.com/ Audirvana is great for playing audio. It seems to handle just about any file format well. Setup Notes: Basically we must set Audirvana to down sample everything to 48kHz sampling rate and disable some of the advanced settings. 1. Open Preferences under the Audirvana menu. 2. Click on Audio System button along top 3. If the “Preferred Audio Device” is not set to “OOYH (16ch)”, click the “Change” button and change it to OOYH (16ch). 4. Down lower in the window, Uncheck Exclusive access mode 5. Uncheck "Direct Mode" 6. Uncheck use maximum I/O buffer 7. At bottom change "Max sample rate limit" to 48kHz 8. Close the Preferences. Amarra: http://amarra.com/ Amarra is great for playing audio. It seems to handle just about any file format well. We recommend using Amarra version 3.0 or higher since Amarra 3.0 supports real-time downsampling of high rez audio down to 48kHz for Out Of Your Head processing. Setup Notes: All we need to do is set Out Of Your Head as the audio output device in Amarra: 1. Open Audio Device Preferences under the File menu. 2. Then just click and drag the little “clock” icon next to the “OOYH (16ch)” device. 3. Close the Preferences. Netflix: http://netflix.com Netflix is great for streaming video, but unfortunately Netflix does not send 5.1 audio to it’s Mac player. However, it does allow changing the audio sync for Out Of Your Head processing. Setup Notes: All we need to do is adjust the audio sync in the Netflix player: Page 24 of 25 1. While a video is playing in Netflix, hold the SHIFT and OPTION keys down and click on the video to bring up the settings menu. 2. Click on “ A/V Sync Compensation” option. 3. Slide the slider to the right to change the sync value to 250ms. 4. Adjust the value until the audio is in sync with the video. (Give the player a few seconds to adjust the audio sync to the value you set.) 5. Close the settings window. Plex: http://plex.tv Plex is free media streaming software that allows you to stream audio and video from a Plex server to a Plex player. Generally you run a Plex server on a computer and then use a Plex client player to stream video and audio from your server. You can run the server and player on the same computer. Setup Notes: All we need to do is adjust the audio sync in the Plex Home Theater player: 1. When the Plex Home Theater Player launches, press the left arrow key on the keyboard. (Plex has no mouse support.) 2. Select Preferences. (Use the arrow keys and then press Enter.) 3. Press the left arrow and then the down arrow to get to the “gear” icon. 4. Press the right arrow and then down to the “Audio output” item. 5. Change the audio output to HDMI 6. Change the Audio Offset to 250ms. (You may have to tweak that value depending on your computer) 7. Uncheck all the options like Dolby, DTS, and LPCM. 8. Set “Audio Output Channels” to 7.1 9. Set “Audio Output Device” to “Default” 10. Hit the Esc key to exit the setup menus. VLC Media Player: http://www.videolan.org/ VLC works great for 2 channel audio. There are no adjustments necessary. At this time we cannot recommend using VLC for multichannel content like 5.1 or 7.1 media. For some reason VLC does non-standard channel mapping for surround audio and cannot be compensated for in Out Of Your Head. We will continue to monitor VLC updates to see if they ever fix their software. Page 25 of 25