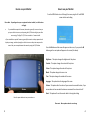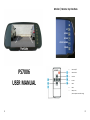
1
Monitor / Remote Key Functions UP MENU DOWN VIDEO CHANNEL POWER PS7006 USER MANUAL 1 1. Power On/Off 2. Video Channel 3. Decrease 4. Increase 5. Mode 6. Menu 7. Battery cover, (Remove plastic sheet before using) 2 How to use your Monitor How to use your Monitor Press the MENU button to scroll through the menu, using the UP and DOWN arrows to alter each setting Please Note - Depending on how your equipment has been installed , not all functions will apply. If you installation required 1 camera, the monitor generally turns on when you put your vehicle into reverse, and pressing the V1/V2 button will give you a blue screen saying “No Signal”. V1/V2 is never used in a 1 camera install. • If your installation required 2 cameras, generally the monitor is always powered and displays an image, and when placing the vehicle into reverse the picture swaps on the screen. And you can swap between the camera by using the V1/V2 button Press the M button and the menu will appear on the screen , if you press the M button again the next option will appear on the screen (Like above) Brightness - This option changes the brightness of the picture Contrast - This option changes the contrast of the picture Colour - This option changes the colour of the picture Mode - This option changes the screen size Tcon - This option changes the rotation of the screen Language - This option alters the language of the menu Volume - This option alters the volume if your camera has an audio function, if you camera does not have an audio function we recommend the volume to be off Reset - This option will reset the monitor back to the original settings Press the power button to turn your monitor on Please note - Menu options and order can change 3 4