1
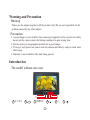
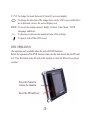
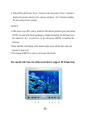
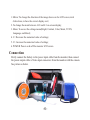
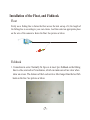
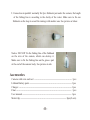
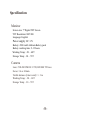
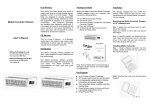
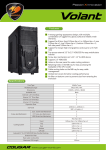
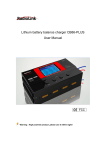
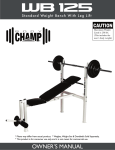
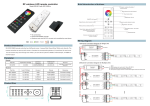
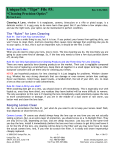
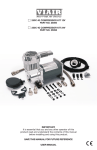
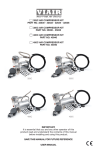
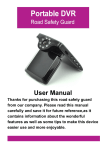
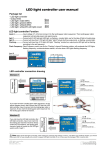
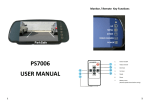
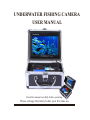
UNDERWATER FISHING CAMERA
USER MANUAL
Readthismanualcarefullybeforeoperating
Pleaserechargethebatterybeforeyourfirsttimeuse
Contents
WarningandPrecaution-------------------------------------------------------------2
Introduction--------------------------------------------------------------------------------2
Connection------------------------------------------------------------------------------- 6
InstallationofFloat andFishhook------------------------------------------ 7
Accessories-------------------------------------------------------------------------------8
Specification-----------------------------------------------------------------------------9
-1-
Warning and Precaution
Warning
Pleaseusetheadaptortogetherwiththeproductonly!Wearenotresponsibleforthe
problem caused by any other adaptor
Precaution
1.Agoodimageisnotavailablewhencamerajustoppositetothesun, alsoforsafety
do notputthecameraundertheblazing sunshineforquitealongtime;
2.Putthecameraataappropriatepositionforagoodimage;
3.Tokeepitwell-preserved,please wash the camera and cable by soap orwarm water
after using;
4.Warrantyisnotavailableiftheunitbeingopened; Introduction
The model without sun-visor
1
2
3
1 V1/V2
2
6
5
4
3 MENU
4
-2-
5 +6
V1/V2:Tochangethemodebetween 16:9 and 4:3 on screen display;
:Tochangethedirectionoftheimageshowson theLCDscreen,totallythere
are4 directions,tohavethecorrect displayonit;
MENU:Toaccessthesettingsmenuof Bright,Contrast,Color, Mode, TCON,
Language,andReset;
-&+:To decrease or increase the numericalvalueofthesettings;
:To power on & off the LCD screen; DVR OPERATION
(this operation only available when the unit with DVR function)
Before the operation of the DVR function, make sure the unit already has the SD card
in it. Press the button on the left side of the monitor to check the SD card, see picture
as below:
Press this button to
release the monitor
Insert the SD card here
-3-
Monitor with DVR function
1 REC/2 PLAY/+
3 MENU/EXIT
4
5
6
Operation of DVR
1. Settings: Press MENU button to access the settings, and press it again to change
the different menu of settings. Press the > & < buttons to change the items under
the each menu,and press PLAY to enter into the settings of the each item. The
REC/- & PLAY/+ buttons are to decrease & increase the numerical value of
settings. In settings of Time & Date, press PLAY to enter into the settings, then
press the > & < buttons to change the value of the time & date;
2. Video Recording: Press REC to record the video, and press it again to finish the
recording;
3. Play the Video: Press button of PLAY to play the recorded video continuously,
and press it pause. Press > & < buttons to display the next and previous recorded
video;
-4-
4. Take & Play the Picture: Press > button to take the picture. Press < button to
display the pictures taken by the camera, and press > & < buttons to display
the next and previous pictures;
NOTES:
1.After insert a new SD card or when the SD card has problem, press the button
of REC, the unit will check and display whether formatting the SD card, press
the button of > & < to select Yes or No, then press MENU to confirm the
selection;
2.Time and date will display at the bottom right corner all the time when the
monitor is power on;
3.The button of MENU is also to exit in any other mode
The model with Sun-visor(this model don’t support DVR function)
-5-
1. Mirror: To change the direction of the image shows on the LCD screen, total
4 directions, to have the correct display on it;
2. To change the mode between 16:9 and 4:3 on screen display;
3. Menu: To access the settings menu(Bright, Contrast, Color, Mode, TCON,
Language, and Reset);
4. V-: Decrease the numerical value of settings;
5. V+: Increase the numerical value of settings;
6. POWER: Power on & off the monitor LCD screen
Connection
Firstlyconnectthebatterytothepower input cable from the monitor, then connect
thepoweroutputcable&Videoinputconnectorsfromthe monitorwiththecamera.
Seepictureasbelow.
-6-
Installation of the Float, and Fishhook
Float
Firstlyuseafishinglinetofastenthefloatacrosstheholeontopofit,the lengthof
thefishinglineisaccording toyourownchoice.Andthenselect anappropriateplace
onthewireofthecameratofastenthefloat.See pictureasbelow
Fishhook
1.Connectioninseries:Normallyfix2pcsoratmost3pcsfishhookon thefishing
linein a line, and each at 5cm distance, which can make sureallareclearwhen
showonscreen.Thedistance oftheLeadcan bealitterlongerthanthelastfish
hookontheline.Seepictureas below
-7-
2.Connectioninparallel:normallyfix2pcsfishhookjustunderthe camera,the length
of the fishing line is according to the clarity of the water. Make sure to fix one
fishhookon thelooptoavoidthemixingwith anotherone.Seepictureasbelow Notice:DONOTfixthefishingline ofthefishhook
on the wire of the camera, which can destroy it.
Makesuretofixthefishingline onthe groovepart
attheendofthe camerabody.Seepictureat side
Accessories
Camerawithwireandreel --------------------------------------------------------1pcs
Lithium Battery pack --------------------------------------------------------------- 1pcs
Charger ------------------------------------------------------------------------------- 1pcs
Float ----------------------------------------------------------------------------------1pcs
Usermanual -------------------------------------------------------------------------1pcs
Metal clip-------------------------------------------------------------------- 8pcs(2 sets) -8-
Specification
Monitor
Screensize:7"Digital TFT Screen
TFTResolution:800*480
Language:English
Powersupply:DC12V
Battery:4500mAh Lithium Battery pack
Batteryworkingtime:9-12hours
WorkingTemp.:-20~60℃
StorageTemp.:-30~70℃ Camera
Lens:COLOR CMOS / CCD, HD 800 TV lines
Focus:3.6 or 4.0mm
Visibledistance(clearwater):1-3m
WorkingTemp.:-20~60℃
StorageTemp.:-30~70℃ -9-