1
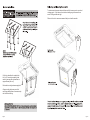
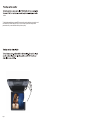
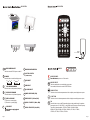
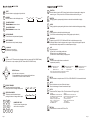
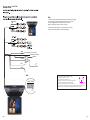
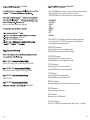
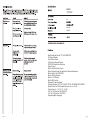
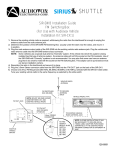
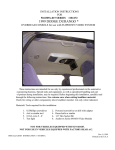
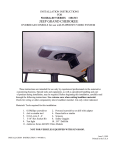
I
Standard precautions
I
I
AX1020
10.2” DVD Flip Down TFT Swivel Monitor
II
II
III
IV
V
V
2-3
3
OPTI MOUNT
3-5
6-7
8
-DVD
9
-MONITOR
10
OPTI MOUNT
USER MANUAL
11
11
Features
AX1020
Contents
Standard Precautions
Operating Precautions
Please read this manual carefully prior to the installation of your OPTI MOUNT mobile
entertainment system a M.E.C.P. CERTIFIED INSTALLER IS RECOMMENDED.
Turn the unit off when it is not in use.
The location of this unit should not be visible to the driver in any way.This is for rear
entertainment only. OPTI MOUNT assumes no liability for failure to follow the proper
installation recommendations.
Avoid dropping any metal objects or inflammable items into the monitor ventilation
slots.
Please keep this manual in a safe place for future reference.
Do not place objects on or suspend objects from power cord, as this may damage
the cord.
Safety Precaution
What is included?
In most countries it is against the law to watch TV [video] while driving it is
recommended to check with your local police for the law.
When first unpacking your new flipdown monitor, please check first that the package
contains all of the items below. If something is missing, contact the store where you
purchased the player.
Safe driving should always be your priority.
Do not attempt to modify or repair this unit it will void yourOPTI MOUNT warranty.
LCD Monitor Housing
If any repairs are needed, please contact OPTI MOUNT for a repair station near you.
Power Cable~Audio/Video Interconnect Cable
It is recommended when D.I.Y installation is done, disconnect the negative
battery terminal.
Wireless Remote Control with Battery
After installation is complete, check all connections prior to final assembly.
Metal Mounting Plate
No modifications to the unit or mounting hardware are permitted.
Operating Instructions Booklet
Installation
Screw Pack for Mounting Main Unit
If this installation requires modification to the vehicle, go to a M.E.C.P. CERTIFIED
INSTALLER.
Securing Main Unit to Beauty Ring
First choose a location that will not obstruct the drivers view.
The power source is 12V negative ground only.
Be sure not to install where the unit can get wet or high heat always after entering
a hot or extremely cold vehicle.
Wait for inside temperature to be comfortable before turning on the unit.
Carefully check the clearance in headliner to make sure there are no obstructions.
Route cables carefully, make sure they are free from sharp metal.
When mounting unit always use same tightness on all mounting hardware not to
deform housing.
Page I
Page II
To release monitor press release button carefully lower screen to your best
viewing angle. Once the monitor is at best viewing angle the screen can
swivel 10 degree left and right.
When unit is not in use we recommend that you close the monitor.
Cut hole in headliner for metal plate
to fit a 11/2 overlap is need for plate
carefully secure plate to headliner or
support beam [not roof].
Route cables using hardware supplied.
Align mounting holes secure unit to
mounting plate tighten all screws evenly
not to deform housing.
Page III
Page IV
screen.
To adjust the monitor image, press SEL to access the various adjustment controls such
such as BRIGHTNESS and CONTRAST. Use the Down/Up buttons to adjust each
parameter until you are satisfied with the picture quality.
Page V
- DVD SYSTEM
- DVD SYSTEM
1
2
3
4
5
6
SEL
UP
DOWN
PWR
FM
12
AV
MODE
EJECT
12
12
CH
PLAY/PAUSE/ENTER
CH
7
12
VOL
A-B
FUNCTION
8
12
10
6
12
9
12
11
12
SUBT ITL E
AUDIO
ANGLE
SCAN
PROGRAM
A-B
REPEAT
RECALL
MUTE
GOTO
RETURN
6 14
12
15
12 13
SETUP
(BATTERY: CR2025)
DVD REMOTE CONTROLLER
DVD POWER ON/OFF
This button turns the DVD system on and off.
- MONITOR
67 MONITOR OPEN SWITCH
SEL
DOWN
UP
PWR
68 CONTROL SWITCH
AV MODE
Press this button to select the display source.
DVD
AV1
HV-FDVP102
AV2
AV1
DVD
DVD SKIP FORWARD
Press this button to skip forward (chapters).
DVD PLAY/PAUSE
A) Press once: to start playing.
B) Press twice: to pause playing.
Page 2
DVD EJECT
Press this button to stop playing and
eject the disc.
MONITOR POWER
Press this button to power on or off the monitor.
69 DVD INPUT
SEL
HV-FDVP7
DVD SKIP BACKWARD
Press this button to skip backward (chapters).
66
(DOOR/OFF/ON)
10
6 USB INPUT
11
6 SD CARD INPUT
MONITOR SELECT
This button enables the on-screen display menu system.
Once enabled, this button is used as an ENTER button.
DOWN BUTTONS
This button is used to decrease parameters in the on-display screen display menu system.
12
6 DOME LIGHT LAMP (2EA)
UP BUTTONS
This button is used to increase parameters in the on-display screen display menu system.
13
6 VIDEO INPUT 2 (Yellow, RCA)
14
6 AUDIO “L” INPUT 2 (White, RCA)
15
6 AUDIO “R” INPUT 2 (Red, RCA)
FM
FM
Press this button to turn on the FM transmitter feature to have audio through for speakers.
Press again to turn off. With “FM ON” , using DOWN and UP button to select the frequency.
There are 14 channel available - 87.7MHz, 87.9MHz, 88.1MHz, 88.3MHz,
88.5MHz, 88.7MHz, 88.9MHz, 106.7MHz, 106.9MHz, 107.1MHz, 107.3MHz,
107.5MHz, 107.7MHz, 107.7MHz, 107.9MHz.
Page 3
- DVD SYSTEM
- DVD SYSTEM
FUNCTION
Press this button to have the DVD feature function as below, and press again to change into
numeric key pad. This key is switch for DVD feature function and numeric key pad.
EJECT
Press this button to stop playing and eject the disc.
AV
MODE
AV MODE
Press this button to select the display source.
DVD
AV2
AV1
HV-FDVP102
VOLUME INCREASE
Press this button to increase volume.
AV1
DVD
1
SUBTITLE
During in playback, repeat pressing this button to select the desired subtitle to display.
2
AUDIO
During in playback, repeat pressing this button to select the desired audio language to display.
3
ANGLE
Press this button to select the desired viewing angle.
(If a DVD disc contains multi-angle feature, viewing angles may be selected.)
HV-FDVP7
VOLUME DECREASE
Press this button to decrease volume.
SKIP BACKWARD
Press this button to skip backward (chapters).
SKIP FORWARD
Press this button to skip forward (chapters).
PLAY/PAUSE
A) Press once: to star playing.
B) Press twice: to pause playing.
SEARCH FORWARD
This button search forward and repeat
pressing the button to changes search speed.
SEARCH BACKWARD
This button search forward and repeat
pressing the button to changes search speed.
1
2
3
4
5
6
7
8
9
Page 4
6
REPEAT
Press this button multiple times to reach desired
repeat mode (see below).
*CD disc
Repeat Single Repeat the existing track
Repeat All
Repeat all tracks
Off
Repeat function off
*MP3 disc
Repeat One Repeat the existing track
Repeat All Repeat all tracks
Off
Repeat function off
SETUP
Press this button to setup the status of DVD. See “OSD MENU-DVD” in this manual for details.
MUTE
Press this button to mute (turn off) the audio output.
Press this button again to resume normal audio output.
2
4
20
8
GOTO
Set a desired Title, Chapter or Time. (This function does NOT apply to Mp3)
2
NUMERIC KEY PAD
Press the numeric key pad to input
data for disc or setup menu.
0
A-B
Set a display period.
A) Press once: to set a display period starts.
B) Press twice: to set a display period end.
C) Press third: to cancel the setting of display period.
NOTE: repeat functionality depends on different disc’s production
frormat. Some DVD discs do not allow repeat function.
In the disc menu or setup menu
* Press cursor buttons to move between the function items.
* Press ENETER button to confirm a selection.
CH
5
* DVD disc
Repeat Chapter Repeat the Chapter
Repeat Title
Repeat the Title
Off
Repeat function off
CURSOR buttons
CH
PROGRAM
Program to play a DVD,VCD, CD, WMA and MP3 disc in a desired sequence to play.
Pressing this button to have the program menu to appear. Using numeric keypad to input the
title number and the chapter number to be a desired sequence to play.
A-B
STOP
A) Press once: STOP memorizes the interrupt position (may resume with PLAY/PAUSE button)
B) Press twice: to stop completely. (Will NOT resume with PLAY/PAUSE button)
PLAY/PAUSE/ENTER
4
4
8
20
* DVD disc
Press GOTO button to select GOTO mode.
Press DOWN button highlight desired item.
TITLE – Input title number
CHAPTER – Input chapter number
TIME --:--:-- Input time hh:mm:ss
(Hour : Minute : Second)
Press ENTER button
*CD disc
Press GOTO button to select GOTO mode.
Press GOTO button again to Disc Search model.
TIME --:--:-- Input time hh:mm:ss
(Hour: Minute: Second)
TRACK — Input track number XXX
(Track Number)
Press ENTER button
RETURN
Press this button to return to the DVD disc Title.
Page 5
- DVD SYSTEM
Note:
1. Please remove the right-side of AX1020 dome light cover to define the door trigger.
If it’s positive trigger (+12 Volt), please put the switcher to the left - hand side.
If it’s ground trigger, please put the switcher to the right - hand side.
(Default in ground trigger, switcher to the right - hand side).
AUDIO OUTPUT
(RED)
AUDIO OUTPUT
2. Because of frequency interference, using multi monitors in your vehicle
with built in IR can create distortion to the audio of headphones.
OUTPUT
AUDIO
(RED)
1
AUDIO
1
*HV-FDVP7*
1
1
GREEN
ORANGE
NOTE:
This model has a selector switch for dome light trigger
connection (+12V or ground connection).
This switch allows you to select between +12V
and negative ground connection for your dome light trigger function.
Dome light trigger wire (+/-) connection
Constant +12V for dome light
BLUE
--
+
The selector switch is located by the left side dome light
(please remove the dome light lens cover to access the switch).
When the selector switch is set on position A the dome light trigger wire works with negative ground.
When the switch is set on position B the dome light trigger wire works with positive +12V.
FM Antenna
YELLOW
-3Amp.
RED
ACC
+12V
BLACK
*HV-FDVP102*
DOOR TRIGGER
NOTE:
This model has a selector switch for dome light trigger
connection (+12V or ground connection).
This switch allows you to select between +12V
and negative ground connection for your dome light trigger function.
-
+
The selector switch is located by the right side dome light
(please remove the dome light lens cover to access the switch).
When the selector switch is set on position A the dome light trigger wire works with negative ground.
When the switch is set on position B the dome light trigger wire works with positive +12V.
Page 6
Page 7
- SCREEN MONITOR
- DVD SYSTEM
1.Press the "POWER" key on monitor or remote controller to turn on the monitor.
2.Press the "SELECT" key on monitor or remote unit, the OSD
(ON SCREEN DISPLAY) menu will be shown on the display as below.
DVD
SETUP
SETUP
six
System Setup, Language Setup,
Audio Setup, Video Setup, Speaker Setup, Digital Setup.
SETUP
BRIGHTNESS
CONTRAST
COLOR
TINT
MIRROR
RESET
EXIT
SCALING
enter to sub-menus
3.Press "SELECT” key on monitor or remote unit to select the adjustment
item. Then press “UP " or "DOWN" key to adjust the new setting value.
Each adjustment item is shown as below:
press ENTER button to enter the selection
6
ENTER
confirm
*BRIGHTNESS Adjustment
Pressing UP key, the screen color gets more bright.
Pressing DOWN key, the screen color gets less bright.
SYSTEM SETUP
SOURCE TV SYSTEM
*CONTRAST Adjustment
Pressing UP key, the screen gets high intensity.
Pressing DOWN key, the screen gets lower intensity.
VIDEO
PASSWORD RATING DEFAULT
LANGUAGE SETUP
OSD LANGUAGE
AUDIO LANG SUBTITLE LANG MENU LANG
*TINT Adjustment
Pressing UP key, the screen gets greenish.
Pressing DOWN key, the screen gets reddish.
AUDIO SETUP
AUDIO OUT
*COLOR Adjustment
Pressing UP key, the screen color gets richer.
Pressing DOWN key, the screen color gets lighter.
KEY
VIDEO SETUP
SHARPNESS
*MIRROR Adjustment
Reverses the displayed image (useful with rear camera systems)
*RESET Adjustment
Returns all setting to factor values.
*EXIT Adjustment
Allows you to exit the OSD systems.
*SCALING Adjustment
Press “UP " or "DOWN" key to select the picture image to 16:9 or 4:3 display.
Page 8
Page 9
AX1020
10.2” DVD Flip Down
TFT Swivel Monitor
10.2”
800 x 600
350 NITS
High Resolution Screen TFT-LCD MONITOR
On Screen Display
Front Panel Control
Full Function Remote Control
NTSC/PAL Signal Auto Detection
Swivel Screen
Built-in 3 Position Dome Light
Built-in Infrared Audio Transmitter for Wireless Earphones
Built-in Slot-In HALF DIN DVD
Built-in SD Card Reader
Built-in 1.1 USB Host
Built-in FM Function
External A/V input available
Playback System: DVD, VCD, SVCD, CD-DA, CD-R/RW, MP3, MPEG4
Speed Control for Fast Forward/ Reverse: x2, x4, x8, x20
Zoom Screen: 2, 3, 4, 1/2, 1/3, 1/4, Off
2 A/V In, 1A/V Out (for HV-FDVP102)
1 A/V In, 1A/V Out (for HV-FDVP7)
Supporting Multi-Language
Page 10
Page 11