Transcript
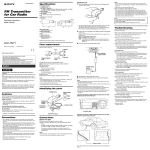
SHUTTLE
SIR-SWB Installation Guide
FM Switching Box
(For Use with Audiovox Vehicle
Installation Kit SIR-CK1)
1. Remove the existing vehicle radio as required, withdrawing the radio from the dashboard far enough to unplug the
antenna cable from the radio antenna jack.
2. Determine the position of the SIR-SWB FM Switching Box (usually under the dash near the radio), and mount it
in position.
3. Plug the male antenna output cable of the SIR-SWB into the existing vehicle radio antenna jack. Plug the vehicle side
radio antenna cable into the SIR-SWB antenna input connector.
NOTE: Some vehicles use a special dual antenna “Diversity" system. If the vehicle into which this system is being
installed has this type of antenna system, the antenna cable will not fit the socket on the FM modulator. Use of
the SIR-SWB with “Diversity" systems is not recommended. You may also find some cars have an antenna
plug that is too small to mate with the socket on the FM Switching Box. This adaptor can be purchased at most
car stereo installation centers.
4. Reposition the radio in the dashboard and secure it in place.
5. Plug the 3.5mm Stereo connector cable from the SIR-SWB into the “FM OUT” jack on the back of the SIR-CK1.
6. Choose one of four FM frequencies (88.1MHz, 88.3MHz, 88.5MHz or 88.7MHz), selected with the SIR-CK1 slide switch.
Tune your existing vehicle radio to the same frequency as selected by the slide switch.
VEHICLE RADIO
ANTENNA
FM SWITCHING
BOX SIR-SWB
TO SIR-SWB
ANTENNA
INPUT
VEHICLE RADIO (TYP)
FM OUT JACK
NOTE: MOUNT SIR-SWB UNDER
DASH BETWEEN CK1 AND
EXISTING VEHICLE RADIO
TO “FM OUT”
JACK ON BACK
OF SIR-CK1
3.5mm STEREO
CONNECTOR
SHUTTLE
CRADLE
SIR-CK1
TO EXISTING VEHICLE
RADIO ANTENNA JACK
FM FREQUENCY
SELECT SLIDE
SWITCH:
88.1 MHz
88.3 MHz
88.5 MHz
88.7 MHz
NOTE: IN SOME INSTALLATIONS IT MAY
BE NECESSARY TO INCLUDE AN ANTENNA CABLE ADAPTER (PURCHASED
SEPARATELY) IF THE EXISTING RADIO
ANTENNA CONNECTOR IS DIFFERENT IN
SIZE.
128-6891