1
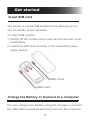
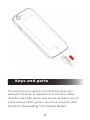
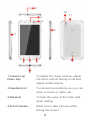
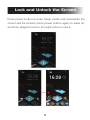
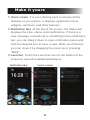
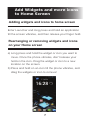
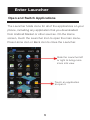
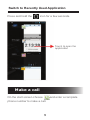
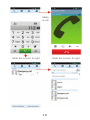
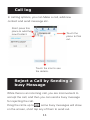
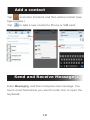
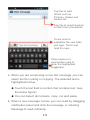
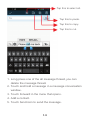
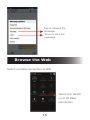
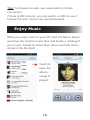
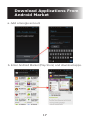
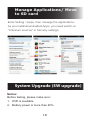
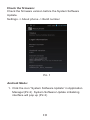
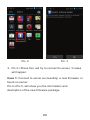
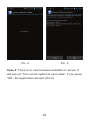
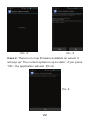
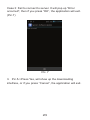
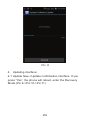
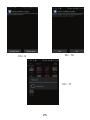
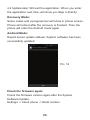
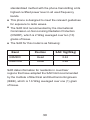
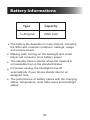
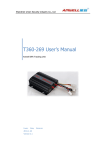
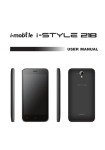
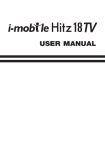
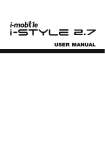
6.2 USER MANUAL Welcome Thank you for purchasing this product. For your cellular phone works properly, please follow the instructions in this manual. To prevent any possible incidents or malfunctions, please follow all safety warnings. Screen displays and illustrations in this user’s manual are designed to help you operate this phone to its optimum performance Contents Getting started ........................................................... Insert SIM card ...................................................... Charge the Battery or Connect to a computer ..... Keys and parts ......................................................... Lock and Unlock the Screen .................................... Make it yours ............................................................. Add Widgets and more icons to Home Screen ........ Adding widgets and icons to home screen .......... Rearranging or removing widgets and icons on your Home screen ............................................ Enter Launcher .......................................................... Open and Switch Applications ................................ Switch to Recently Used Application ...................... Make a call ................................................................. Call log ....................................................................... Reject a Call by Sending a busy Message ............... Add a contact .............................................................. Send and Receive Message(s) .................................. Browse the Web .......................................................... Enjoy Music ................................................................ Download Applications From Android Market ............ Manage Applications/ Move to SD card ..................... System Upgrade (SW upgrade) ................................. Maintenance & Safety ................................................ Specific Absorption Rate (SAR) information............... Battery Information ..................................................... Warranty Condition of Product ................................... 1 1 1 2 5 6 7 7 7 8 8 8 9 11 11 12 12 15 16 17 18 18 27 29 31 32 Get started Insert SIM card The phone is a Dual SIM mobile phone allowing you to use the facility of two networks. To insert SIM card(s): 1. Switch off the mobile phone and remove the rear cover and battery. 2. Insert the SIM card correctly in the card slot(s) (See figure below) SIM1 Card SIM2 Card Charge the Battery or Connect to a computer You can charge your battery using the charger or connect the USB cable (supplied with this phone) to the computer. Keys and parts The smart phone supports 3G Card and gives you marvelous feelings to experience on Camera, Video recorder, FM radio, Music and Sound recorder. Let you install various APPs, games, and more (supports APK format) by downloading from Android Market. 2 10 3 4 11 5 1 6 1.Volume Up/ Down Key 2.Headset port 3.Receiver 4.Front Camera 7 9 12 8 To adjust the ringer volume, adjust the voice volume during a call and adjust media volume. To connect an earphone so you can listen to music or radio, etc. To hear the voice of the other side when calling. Allow you to take pictures while facing the screen. Switch the phone on or off. Press and hold to open phone options menu. 6.Menu Key Open a list of options available in the current screen or application. 7.Home Key Go to home screen; Press and hold to open a window showing you most recently used applications. 8.Back Key Go back to the previous screen; Close the on-screen keypad, a dialog box, an options menu, or the notification panel. 9.USB jack To connect charger or USB data cable for data exchange. 10.Back Camera lens For taking photos. 11.Flashlight To take photos in low-light conditions. 12.Speaker To listen to music, and other sounds offered by your phone. 5.Power Key Lock and Unlock the Screen Press power button to enter Sleep mode and meanwhile the screen will be locked; press power button again to wake up and then drag the lock to the right side to unlock. Make it yours 1) Home screen: It is your starting point to access all the features on your phone. It displays application icons, widgets, shortcuts, and other features. 2) Notification Bar: At the top of the screen, the Status bar displays the time, status, and notifications. If there is a new message, missed call or something in the notification bar, you can drag it down to open notification panel and click the desired one to have a view. When you finished, you can close it by dragging the panel up or pressing “Back”. 3) Launcher: Touch the Launcher icon at the bottom of the screen to view all installed applications. Notification Bar Home screen Launcher Add Widgets and more icons to Home Screen Adding widgets and icons to home screen Enter Launcher and long press and hold an application till the screen vibrates, and then release your finger hold. Rearranging or removing widgets and icons on your Home screen a) Long press and hold the widget or icon you want to move. Once the phone vibrates, don't release your hold on the icon. Drag the widget or icon to a new location on the screen. b) Press and hold on an icon till the phone vibrates, and drag the widgets or icon to remove! Enter Launcher Open and Switch Applications The Launcher holds icons for all of the applications on your phone, including any application that you downloaded from Android Market or other sources. On the Home screen, touch the Launcher Icon to open the main menu. Press Home icon or Back icon to close the Launcher. Slide the Launcher left or right to bring more icons into view. Touch an application to open it. Switch to Recently Used Application Press and hold the icon for a few seconds. Touch to open the application Make a call On the start screen choose and enter a complete phone number to make a call. Make a call Slide the screen to right Slide the screen to right Call log In call log options, you can Make a call, add new contact and send message etc. Short press this place to add the new Contact. Touch the place to Dial out. Touch the icon to see the details. Reject a Call by Sending a busy Message While there is an incoming call, you are inconvenient to accept the call, and then you can send a busy message for rejecting the call. Drag the circle up to , some busy messages will show on the screen, short tap any of them to send out. Add a contact Tap and enter Contacts and then add a contact (see figure below.) Tap to add a new contact to Phone or SIM card. Send and Receive Message(s) Enter Messaging, and then compose new message. You touch a text field where you want to enter text, to open the keyboard. Tap this to add attach such as Pictures, Videos and Audios etc. Tap this to select desired contact from phonebook Touch once to capitalize the next letter you type. Touch and hold for caps. Press space or a punctuation mark to enter the highlighted suggestion a. When you are composing a new text message, you can select text for cutting or copying. The selected text is highlighted in blue. Touch the text field or portion that contains text. (see the below figure) You can Select all contexts, copy, cut and paste. b. When a new message comes, you can read by dragging notification panel and click the message, or entering Message to read it directly. Tap this to select all. Tap this to paste. Tap this to copy. Tap this to cut. 1. Long press one of the all message thread, you can delete the message thread. 2. Touch and hold a message in a message conversation window. 3. Touch Forward in the menu that opens. 4. Add a contact. 5. Touch Send icon to send the message. Tap to forward the message. Touch to lock the message. Browse the Web Switch on Data connection or WiFi Touch it to switch on or off Data connection Tips: To browse the web, you need switch on Data connection. If there is WiFi around, you can switch on WiFi to use it browse the web. Some may need password. Enjoy Music When you copy music to your SD card, the Music player searches the card for music files and builds a catalog of your music, based on information about each file that is stored in the file itself. Touch to open the album, songs or playlist. Download Applications From Android Market a. Add a Google account b. Enter Android Market (Play Store) and download apps. Manage Applications/ Move to SD card Enter Setting >Apps, then manage the applications. As you install downloaded Apps, you need switch on “Unknown sources” in Security settings. System Upgrade (SW upgrade) Notice: Before testing, please make sure: 1. WIFI is available. 2. Battery power is more than 40%. Check the firmware: Check the firmware version before the System Software Update. Settings -> About phone -> Build number Pic. 1 Android Mode: 1. Click the icon “System Software Update” in Application Manager(Pic.2) System Software Update initializing interface will pop up (Pic.3) Pic. 2 Pic. 3 2. Pic.3->Press Yes, will try to connect to server, 3 cases will happen: Case 1: Connect to server successfully, a new firmware is found on server. Pic.4->Pic.5, will show you the information and description of the new firmware package. Pic. 4 Pic. 5 Case 2:There is no new firmware available on server. It will pop up” The current system is up-to-date”, if you press ”OK”, the application will exit. (Pic.6) Pic. 4 Pic. 5 Case 2:There is no new firmware available on server. It will pop up” The current system is up-to-date”, if you press ”OK”, the application will exit. (Pic.6) Pic. 6 Case 3:Fail to connect to server. It will pop up "Error occurred", then if you press ”OK”, the application will exit. (Pic.7) Pic. 7 3. Pic.5->Press Yes, will show up the downloading interface, or if you press ”Cancel”, the application will exit. Pic. 8 4. Updating interface: 4.1 Update Now->Update confirmation interface. If you press ”Yes”, the phone will reboot, enter the Recovery Mode.(Pic.9->Pic.10->Pic.11) Pic. 10 Pic. 9 Pic. 11 4.2 Update later: Will exit the application. When you enter the application next time, will show you Step 4 directly. Recovery Mode: Some codes and a progress bar will show in phone screen. Phone will reboot after the recovery is finished. Then the phone will enter the Android mode again. Android Mode: Report server update statues: System software has been successfully updated. Pic. 12 Check the firmware again: Check the firmware version again after the System Software Update. Settings -> About phone -> Build number Pic. 13 Maintenance & Safety Please read and observe the following information for safe and proper use of your phone and to prevent damage. Also, keep the user guide in an accessible place at all the times after reading it. 1. After sales service Kindly refer to the Warranty Card provided in the sales package box. 2.Charger and Adapter Safety Charger and adapter are designed for indoor use only. 3.Battery Information and Care Please use the specific battery, otherwise it will cause explosion. Please dispose of your battery properly. Do not disassemble or short-circuit the battery. Keep the battery’s metal contacts clean. Recharge the battery after long periods of non-use to maximize battery life. Battery life will vary due to usage patterns and environmental conditions. The self-protection function of the battery cuts the power of the phone when its operation is in an abnormal status. In this case, remove the battery from the phone, reinsert it, and turn the phone on. 4.General Notice Using a damaged battery or placing a battery in your mouth may cause serious injury. Do not place items containing magnetic components such as a credit card, phone card, bank book, or subway ticket near your phone. The magnetism of the phone may damage the data stored in the magnetic strip. Talking on your phone for long period of time may reduce call quality due to heat generated during use. When the phone is not used for a long period time, store it in a safe place with the power cord unplugged. Using the phone in proximity to receiving equipment (i.e. TV or Radio) may cause interference to the phone. Do not immerse your phone in water. If this happens, remove the battery and take it to an Authorized Service Center. Do not paint your phone. The data saved in your phone might be deleted due to careless use, repair of the phone, or upgrade of the software. Please backup your important phone numbers. (Ring tones, text messages, voice messages, picture, and videos could also be deleted.) The manufacturer is not liable for damage due to the loss of data. Do not turn your phone on or off when the phone is close to your ear. Specific Absorption Rate (SAR) information Your phone has been designed to comply with applicable safety requirements for exposure to radio waves. These requirements are based on scientific organizations through periodic and thorough evaluation of scientific studies. These guidelines include safety margins designed to assure the safety of all persons, regardless of age and health. • The radio wave exposure guidelines employ a unit of measurement known as the Specific Absorption Rate, standardized method with the phone transmitting at its highest certified power level in all used frequency • • bands. This phone is designed to meet the relevant guidelines for exposure to radio waves. The SAR limit recommended by the international Commission on Non-Ionizing Radiation Protection (ICNIRP), which is 2 W/kg averaged over ten (10) • grams of tissue. The SAR for this model is as following: Band Position SAR 10g(W/kg) GSM900 Head 0.62 GSM1800 Head 0.66 SAR data information for residents in countries/ regions that have adopted the SAR limit recommended by the Institute of Electrical and Electronics Engineers (IEEE), which is 1.6 W/kg averaged over one (1) gram of tissue. Battery Informations Type Li-Polymer Capacity 2000 mAh • The battery life depends on many factors, including the SIM card, network conditions, settings, usage and enviorenment. • • • • Making calls, turning on the backlight and music player will consume more battery power. The standby time is shorter when the network is not available than in the standard status. For power saving, the backlight turns off automatically if your phone stands idle for an assigned time. The performance of battery varies with the charging status, temperature, local radio wave and backlight status. Condition of Waranty 1. Mobile phone device, portable charger, charger, memory card, wireless headset are in-warranty of 12 months after the date of purchase. 2. Battery, headset, USB data connector are inwarranty of 6 months after the date of purchase. 3. This warranty shall apply to mobile phone and accessory under “i-mobile” brands that are purchased from Shop namely, I-mobile by Samart and Authorized Distributor or Authorized Service Center as appointed in Thailand only. 4. The condition of the warranty for mobile phone and accessory that are purchased in other countries, except Thailand. It shall be applied in accordance with the applicable law. For Thailand, the purchaser acknowledges the end of warranty period as stated in the warranty sticker or purchase's record of i-mobile system. 5. Within the warranty period, maintenance or parts replacement is free of charge. Should be noted that i-mobile reserves the rights no return the damaged part. 6. i-mobile provides warranty for mobile phone and accessory with the terms and conditions that are stated in the law excluding the commerce, product satisfaction, lost of benefit or expected profit, loss or damages from the violation of personal rights in conversation, and working discontinuance or loss of information arising of the use or inability to use. 7. In cellular network / signal and sounds that are used with mobile phone and accessory is the service of independent operators, not i-mobile. Therefore, i-mobile will not be responsible for the working process, the readiness of the service, and the area covered. 8. Any mobile phone and accessories that are already repaired or had parts replacement, the warranty period will continue from the remaining warranty onward or 60 days from the repaired date whichever is longer. 9. Customer has to pay for the repair cost and cost of replacement parts provided that the said repair are not in the warranty conditions. 10. The warranty sticker on the mobile phone must not be torn, tattered, scraped or crossed out. THIS WARRANTY IS VOID UNDER THE FOLLOWING CONDITIONS 1. Mobile phone and accessory are damaged due to the abnormal use, improper use, being stored in the damped or overheated area, or other inappropriate environment, the interference that can cause damage, including unforeseeable accident, spill with liquid or food, or any actions that cause damages to mobile phone and accessories. 2. Mobile phone and accessory are damaged due to the natural disaster. 3. Mobile phone and accessory are repaired, changed parts, adjusted, modified, connected, customized without any authorization by i-mobile. 4. Using of mobile phone and accessory together with, or connect with the mobile phone or accessory that are neither provided nor certified by i-mobile including any accessory are inappropriate to use together with mobile phone and accessory. 5. Small alteration in the brightness and color on the screen might occur in each mobile phone and accessory, might results in bright or dark dots on the screen. This is called as pixel defect. It can occur when these pixels are malfunction and cannot be modified. T he Pixel defect of 2 pixels is considered acceptable. Small alteration in a picture taken by a camera might occur in each mobile phone and accessory is considered normal and it is not the camera module to be deemed as malfunction. 6. Editing, scarping, crossing over the IMEI number of the mobile phone or accessory, including the warranty number will be deemed as the termination of the warranty. 7. Damaging of the label, warranty sticker on the mobile will be deemed as termination of the warranty. 8. i-Mobile will not assure provided that the software from i-mobile will be up to your wishes or the working process of the software will not be discontinued or flawless. 9. i-mobile will not assured provided that the additional software to download or install by you for the purpose of work or entertainment will be up to your wishes without mistakes and flaw that is out of control of i-mobile. 10. The warranty and responsibilities of i-mobile are not covered the malfunction of any software or access of information from virus, or unauthorized access, which cause the damage in the banking transaction, E-banking, or any important information, or using the mobile phone illegally. 11. The warranty will not cover the loss of personal information during the use or during the installation, software remove, including applications, songs, videos, and any memberships that Customer has already purchased. 12. The warranty will not cover the responsibility of the loss of any personal information during the repair at Authorized Service center of i-mobile, including the applications, songs, videos, and any memberships that Customer has already purchased. 13. The warranty will not cover the damage that occurs from the use of any device under “i-mobile brand” with other products which are not the product of i-mobile. 14. The warranty will not cover any expenses in the co-ordination with i-mobile for solving the problem and the process of delivering for examination and repair service.