1
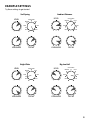
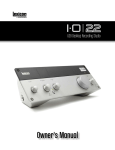
OWNER’S MANUAL
WARANTY
We at DigiTech® are very proud of our products and back-up each one we sell with the following warranty:
1. Please register online at digitech.com within ten days of purchase to validate this warranty. This warranty is valid only in the
United States.
2. DigiTech warrants this product, when purchased new from an authorized U.S. DigiTech dealer and used solely within the U.S., to
be free from defects in materials and workmanship under normal use and service. This warranty is valid to the original purchaser
only and is non-transferable.
3. DigiTech liability under this warranty is limited to repairing or replacing defective materials that show evidence of defect,
provided the product is returned to DigiTech WITH RETURN AUTHORIZATION, where all parts and labor will be covered up to a
period of one year (this warranty is extended to a period of six years when the product has been properly registered through
our website). A Return Authorization number may be obtained by contacting DigiTech. The company shall not be liable for any
consequential damage as a result of the product’s use in any circuit or assembly.
4. Proof-of-purchase is considered to be the responsibility of the consumer. A copy of the original purchase receipt must be
provided for any warranty service.
5. DigiTech reserves the right to make changes in design, or make additions to, or improvements upon this product without
incurring any obligation to install the same on products previously manufactured.
6. The consumer forfeits the benefits of this warranty if the product’s main assembly is opened and tampered with by anyone
other than a certified DigiTech technician or, if the product is used with AC voltages outside of the range suggested by the
manufacturer.
7. The foregoing is in lieu of all other warranties, expressed or implied, and DigiTech neither assumes nor authorizes any person to
assume any obligation or liability in connection with the sale of this product. In no event shall DigiTech or its dealers be liable for
special or consequential damages or from any delay in the performance of this warranty due to causes beyond their control.
NOTE: The information contained in this manual is subject to change at any time without notification. Some information contained
in this manual may also be inaccurate due to undocumented changes in the product since this version of the manual was completed.
The information contained in this version of the owner’s manual supersedes all previous versions.
TECHNICAL SUPPORT & SERVICE
If you require technical support, contact DigiTech Technical Support. Be prepared to accurately describe the problem. Know the serial
number of your device – this is printed on a sticker attached to the chassis. If you have not already taken the time to register your
product, please do so now at digitech.com.
Before you return a product to the factory for service, we recommend you refer to this manual. Make sure you have correctly
followed installation steps and operating procedures. For further technical assistance or service, please contact our Technical Support
Department at (801) 566-8800 or visit digitech.com. If you need to return a product to the factory for service, you MUST first contact
Technical Support to obtain a Return Authorization Number.
NO RETURNED PRODUCTS WILL BE ACCEPTED AT THE FACTORY WITHOUT A RETURN AUTHORIZATION NUMBER.
Please refer to the Warranty information, which extends to the first end-user. After expiration of the warranty, a reasonable charge
will be made for parts, labor, and packing if you choose to use the factory service facility. In all cases, you are responsible for
transportation charges to the factory. If the product is still under warranty, DigiTech will pay the return shipping.
Use the original packing material if it is available. Mark the package with the name of the shipper and with these words in red:
DELICATE INSTRUMENT, FRAGILE! Insure the package properly. Ship prepaid, not collect. Do not ship parcel post.
INTRODUCTION
Thanks for choosing the DigiTech® Polara reverb effect pedal. Polara was designed for the selective
guitarist who wants the highest quality reverb in a compact package. Polara provides such
distinguishing features as world famous Lexicon® reverb algorithms, true bypass, high voltage operation,
and stereo processing, making Polara an essential addition to the signal chain of players who know
about sound quality and demand the utmost in performance with superior tone and control.
Polara offers 7 genuine Lexicon® reverb types:
• ROOM
• PLATE
• REVERSE
• MODULATED
• HALO
• HALL
• SPRING
To use the Polara pedal, enable the effect with the Footswitch (the LED will light when the effect is
enabled). Adjust the LEVEL control to mix in the amount of reverb effect. Select the desired reverb type
with the REVERB TYPE selector control. Adjust the tone of the reverb with the LIVELINESS control and
the length of the reverb tail with the DECAY control. Set the TAILS switch to the ‘ON’ position if you want
the tails to decay naturally after switching the effect off. Or, set the TAILS switch to the ‘OFF” position if
you want the tails to end abruptly when switching the effect off.
FEATURES
•
•
•
•
•
•
•
7 Lexicon Reverbs
True Bypass
High Voltage Power Rails
Vacuum Switch
Compact Design
Solid Contruction
Included StompLock™
1
USER INTERFACE
1 2
TAILS
OFF
ON
MODULATED
LEVEL
12
REVERSE
HALO
PLATE
HALL
ROOM
3
SPRING
11
4
LIVELINESS
DECAY
10
9
5
6
7
8
1. Tails Switch
When this switch is set to the on position, reverb tails will decay naturally when the effect is
switched to bypass. When set to the off position, reverb decays will end abruptly when the effect is
switched to bypass.
2. DC Power Jack
Connect the specified Harman power supply (sold separately) to this jack. Be sure to use the proper
power supply for your area’s mains line voltage. See ‘Specifications’ on page 7 for power supply
model information.
3. Reverb Type Knob
Selects one of 7 Lexicon® reverbs:
• ROOM - Fast decaying reverb; great for a touch of ambience.
• PLATE - Renowned studio reverb found on classic recordings.
• REVERSE - Reverb in reverse; quietly crescendos to full volume.
• MODULATED - Lush modulating reverb ideal for chords.
• HALO - Shimmering reverb with cascading octave shifts.
• HALL - Large encompassing reverb with warm decay.
• SPRING - Classic “surf” reverb; great for Rockabilly too!
2
4. Decay Knob
Controls the length of time it takes for the reverb to fade out.
5. Input 1 (Mono)
Connect your instrument, the output of a pedal, or an amp effects send to this jack. Signals are
heard at both outputs when only the Input 1 (Mono) jack is used.
6. Indicator LED
Lights when the effect is turned on.
7. Input 2
Connect a second input to this jack for stereo operation. Inputs 1 and 2 are processed separately
through the Stereo Reverb effect then fed to Outputs 1 and 2 keeping true stereo separation
between channels.
8. Foot Switch
Turns the effect on and off.
9. Output 2
Connect this output to the input of a second guitar amplifier when a second amp is being used.
10. Output 1 (Mono)
Connect this output to the input of a single guitar amplifier or amp effects return.
11. Liveliness Knob
Controls the amount of high frequency response in the Reverb’s effect signal.
12. Level Knob
Controls the reverb level.
3
CONNECTION DIAGRAMS
Mono/Stereo Amplifier Setup
Amp 1
Harman
Power Supply
TAILS
OFF
ON
MODULATED
LEVEL
REVERSE
HALO
PLATE
IN
LIVELINESS
MONO/1 OUT
IN
HALL
ROOM
SPRING
DECAY
OUT
2 IN
2 OUT
Amp 2
MONO/1 IN
Other Effects
Use only unbalanced TS instrument cables for audio connections.
Optional
Amplifier Effects Loop Setup
Harman
Power Supply
FX SND
FX RTN
Amp
TAILS
OFF
ON
MODULATED
LEVEL
REVERSE
HALO
PLATE
HALL
ROOM
MONO/1 OUT
LIVELINESS
SPRING
DECAY
MONO/1 IN
OUT
Other Effects
IN
Use only unbalanced TS instrument cables for audio connections.
NOTE: If the amp effects loop has a mix control, set the mix to 100% full wet.
4
Optional
Ambient
Shimmer
EXAMPLE SETTINGS
Surf
Try these settings to get started.
Spring
Surf Spring
LEVEL
Ambient Shimmer
LEVEL
MODULATED
REVERSE
LIVELINESS
LIVELINESS
Bright
Plate
DECAY
Big Jazz Hall
MODULATED
HALO
PLATE
ROOM
SPRING
Big
Jazz Hall
Bright Plate
REVERSE
HALL
ROOM
SPRING
DECAY
HALO
PLATE
HALL
ROOM
LIVELINESS
REVERSE
HALO
PLATE
LEVEL
MODULATED
LEVEL
REVERSE
HALO
PLATE
HALL
ROOM
SPRING
DECAY
MODULATED
LIVELINESS
HALL
SPRING
DECAY
5
STOMPLOCK™
The included StompLock lets you lock your settings in place, while the open-top design lets you see
your settings.
To place the StompLock over the pedal knobs:
1. Set the knobs to your preferred settings.
2. Orient the StompLock so that it lines up with the knobs and gently push it over the top of the
knobs.
3. To remove the StompLock, gently lift it up and off the knobs.
6
SPECIFICATIONS
Interface
Controls: Level, Liveliness, Decay, Type, On/Off Tails, On/Off
Jacks: Input 1 (Mono), Input 2, Output 1 (Mono), Output 2
Inputs
Input Impedance:
Effect on: >1 MΩ (stereo), >500 kΩ (mono)
Effect off: True hardwire bypass
Outputs
Output Impedance:
Effect on: 1 kΩ
Effect off: True hardwire bypass
Physical
Dimensions:
4.40” (L) x 2.65” (W) x 2.0” (H)
Weight:
1.0 lbs.
Power
Power Requirements:
9 VDC external power supply
Power Consumption:
675 mW (< 75 mA @ 9 VDC)
Current Draw:
75 mA (typical at 9 VDC)
Power Supply Model:
PS0913DC-01 (US, JA, EU)
PS0913DC-02 (AU, UK)
Power Supply Polarity:
Power Supply Output:
9 VDC 1.3 A
7
PHONE: (801) 566-8800
WEB: digitech.com
SUPPORT: digitech.com/en-US/support
Polara Owner's Manual Rev A
© 2014 Harman. All rights reserved.
DigiTech is a registered trademark of Harman.