1
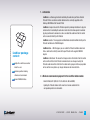
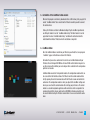
TM
user manual
Table of Contents
1 – Introduction.............................................................. page 3
2 – Minimum recommended equipment
for the Live Mixer Addon module........................... page 3
3 – Installation of the LiveMixer Addon
module........................................................................ page 4
TM
4 – LiveMixer Addon . ...................................................... page 4
5 - Registration .............................................................. page 5
6 - Cancelling the registration . ................................. page 6
7 - Main Configurator screen ...................................... page 7
8 – Setup menu ................................................................ page 8
9 – Midi Test . ................................................................. page 11
10 – LiveMixer control module ................................. page 11
L i v e M i x e r - u s e r m a n ua l - pag e
2
1 – Introduction
LiveMixer is a software application for controlling the audio mixer part from a Newtek
TriCaster XD from an external controler. Control surfaces currently supported are the
Behringer BCF2000 and the Yamaha 01V96i.
LiveMixer is designed to assist the TriCaster operator by allowing installation of a physical
control surface for controlling the audio mixer or to relieve the video operator’s work load
by giving control over to someone else, who can control the audio mixer from the control
surface connected directly to the TriCaster.
LiveMixer consists of 1 main program: LiveMixer Addon to install LiveMixer directly on the
TriCaster controller and a USB/Midi adapter.
LiveMixer package
content :
LiveXpert box with licence number
inside the cover
LiveMixer Addon. – With this plug-in you can control the TriCaster controller audio mixer
from a control surface directly connected to your TriCaster with a supplied USB/Midi
adaptor.
LiveMixer is bidirectional. This means that changes made in the interface from the control
surface will be reflected in the TriCaster environment and even changes made by the
TriCaster audio mixer will be reflected in the control surface program. In this way operators
will see on their own systems any changes whatsoever and who made them.
Livemixer pendrive including
software and user manuals
Roland USB Midi Interface
2 – Minimum recommended equipment for the Live Mixer Addon module
- NewTek TriCaster XD (300, 40, 410, 45x,460, 85x, 860 and 8000).
- Updating the TriCaster software to the most recent version available for the
corresponding model is recommended.
L i v e M i x e r - u s e r m a n ua l - pag e
3
3 – Installation of the LiveMixer Addon module
Wherever the program came from, by download or from a USB memory stick, you get a file
named “LiveMixer Addon” to be executed on the TriCaster on which you wish to connect
the control surface.
Start-up the TriCaster, and return to Windows desktop. Plug the LiveMixer pendrive into
one USB port. Double clic on the “LiveMixer Addon Setup” file folder. Double clic on the
application file named “LiveMixer Addon Setup” and follow the instructions from the
installation Wizard. Restart TriCaster when the installation is completed.
4 – LiveMixer Addon
Once the LiveMixer Addon is installed on your TriCaster you will note that a new program
“LiveMixer” appears in the Add-ons section of the TriCaster.
Remember that you need an audio mixer to be able to use LiveMixer Addon with your
TriCaster, either a Behringer BCF2000 or a Yamaha 01V96i and that before being able to
use these mixers with LiveMixer you must configure them as detailed in the configuration
guide for each console.
LiveMixer Addon consists of 2 independent modules, the configuration module which can
be accessed from the Add-Ons section of the TriCaster and the control module which is
strictly speaking the one that communicates with the TriCaster session and controls the
audio mixer. The configuration module is where you adjust all the LiveMixer settings and
where you can activate the control module after selecting your preferences. The control
module is a second background application, with no interface, which is responsible for
communicating with the chosen control surface (BCF2000 or Yamaha) and which must
be executed before starting the TriCaster session before it can use and control the audio
mixer.
L i v e M i x e r - u s e r m a n ua l - pag e
4
If you have not yet registered LiveMixer, when you execute the configurator in the Add-Ons
section you will see a message at the bottom of the screen and the central buttons (Start,
Stop and Autorun) will be disabled. It is not necessary to register the program; you can
configure LiveMixer preferences and check that communication with the control console
is correct, but you cannot activate the LiveMixer module allowing for use of LiveMixer in a
TriCaster session.
To register the program, enter the “About” section in the LiveMixer Addon.
5 - Registration
Clicking on “About” opens a form and if the program has not been registered click in the
lower part of the form on “Register” to access the registration forms. All the fields in this
window must be completed, with special attention to the serial number. Once all the data
has been entered, there are two methods of registering.
1 - Online Registration
This is the recommended method if the equipment is connected to the internet. The
program will be registered in a few seconds. Click on the button to activate this type of
registration and the program will attempt to connect to the LiveMixer license server; it will
check that the serial number is valid and not in service on another piece of equipment; if
everything is correct it will register the program. If any of the data entered is incorrect, the
incorrect box or boxes will turn red.
2 - Offline Registration
Connect to the internet from a workstation independent of the TriCaster and go to:
http://www.3dstorm.com/support2/registration?id=220, or go to the site
www.3dstorm.com, Support heading, under the heading Registration.
L i v e M i x e r - u s e r m a n ua l - pag e
5
Click the Software Activation button, complete all the fields to identify yourself, select
“LiveMixer” in the list of software to activate. Enter the installation code provided during
the Livemixer installation procedure. Then click the “Get activation code” button, which
will send an email to the address you have given. Transfer the code in the email to the
TriCaster in the “Activation Code” field.
If the code is correct you will see displayed: “Thank you for registering” and when you
click Accept the main window of the program will be displayed. If the code is incorrect the
message “Wrong Code” will display. In this case check that you have entered the correct
code. If you try several times to register the program unsuccessfully, contact technical
support at +33 5 57 262 262 or by email to: [email protected]
Please note that by registering a serial number either online or offline it will be locked for
use on this equipment and cannot be used on other equipment unless the registration is
cancelled. If you want to use LiveMixer on another TriCaster with the same serial number
you must first cancel the registration and release the serial number to be able to use it
again.
6 - Cancelling the registration
If you need to reinstall LiveMixer after changing the motherboard or hard disk or after a
replacement of the TriCaster, you must first deactivate the LiveMixer license. You will also
need to do this to reinstall LiveMixer after a system restore of your TriCaster.
To do this, select the LiveMixer About menu and click on the “Deactivate” button.
All the fields in this window must be completed, with special attention to the serial
number. Once all the data has been entered, there are two methods of registering.
L i v e M i x e r - u s e r m a n ua l - pag e
6
1 - Online Deactivation
This is the recommended method if the equipment is connected to the internet. The
program will be deactivated in a few seconds.
2 - Offline Deactivation
Connect to the link: http://www.3dstorm.com/support2/registration?id=221, or go to
the site www.3dstorm.com, Support heading, under the heading Registration.
Select “LiveMixer” in the list of software to be deactivated, enter the serial number and
deactivation code given by the LiveMixer program. Click on the “Software Deactivated”
button. You will receive a confirmation email right after and can reinstall your LiveMixer
license.
7 - Main Configurator screen
Executing the LiveMixer Addon configurator will give a window similar to the image bellow.
On the right is a coloured indicator that shows if all the program’s components are
installed correctly.
• If the LED is green, everything is correct.
• If it is yellow, one of the application’s components is installed incorrectly. The LiveMixer
control console can be used to control the audio mixer in the TriCaster but if changes are
made to the TriCaster audio mixer they will not be visible on the control console.
• If it is red, some critical components are not operating correctly and LiveMixer cannot
function.
If the LED is not green the program must be uninstalled following the same procedure that
was used to install the program and restart the installation. Use this procedure only, in
order to avoid losing the registration and program settings.
L i v e M i x e r - u s e r m a n ua l - pag e
7
8 – Setup menu
Clicking on the Setup button will open the wizard to configure the TriCaster model,
the control surface that you will use and its adjustments. The software adapts to your
preferences; it is also possible that some menus will not be displayed.
TriCaster Model
Model of TriCaster that you are going to connect to. This parameter adapts the Test
interface window to the model of TriCaster selected and lets manual adjustments be made
in the “Links Setup” menu before connecting to the TriCaster. The program automatically
detects the model and adjusts the program preferences according to the model detected.
Software Version
This wizard window only appears if the TriCaster model is 8000 and allows for choosing
between TriCaster V1 or V2 software. In addition to the TriCaster model, the software
automatically detects the software version.
Control Surface
In this window of the wizard choose one of the two control surface models. The Midi input
and output port must also be chosen. In principle the program automatically detects the
Midi port, but you can switch to manual mode and configure the ports in the drop-down
menus. If the software does not detect any valid port the configuration will not be able to
continue. However, if you have a Yamaha 01v96i, you will need to select whether you want
to control the software with general layer sections (1 - 16, 17 - 32 and Master) or with the
Remote layer.
L i v e M i x e r - u s e r m a n ua l - pag e
8
Settings of the BCF2000 Control Surface
If the BCF2000 is selected as the control surface, the software will attempt to detect it in
the system. If it doesn’t work, check all the cable connections and that the BCF2000 is
turned on and correctly configured, then press the button “TRY DETECT AGAIN” or close
and reopen this window. When the BCF has been detected, you can use the “Update
Behringer BCF2000 Setting” button to configure the BCF2000 and work with LiveMixer.
The 1st time you install the software and connect the BCF2000 it will be necessary to use
this option before using the BCF2000. In general, it is necessary to use this option when
you install a new program update.
Setting the Yamaha 01V96i control surface
In this window, you can check if communication between the control surface and the
software is correct, and to do this you must move one of the Yamaha’s faders. The
software should detect the presence of the Yamaha and the fader graph in the window
should move as well, following the movement of the Yamaha’s fader. If the Yamaha’s
fader is not detected and the fader in the window does not move, check the cables and
configuration of the Yamaha.
Link Mode
This window of the wizard is only available if you use the BCF2000 as control surface. You
have the choice between “Auto” and “Manual”. “Auto” is recommended. In this mode the
software will assign each audio channel of the TriCaster to a channel of the BCF2000 and
if there is any change in the TriCaster channels it will reassign the channels automatically.
This is the simplest mode to use, especially for beginning users and it is more powerful if
changes occur in the TriCaster channels.
L i v e M i x e r - u s e r m a n ua l - pag e
9
The “Manual” mode is a little more complicated to configure. However, you are able to
assign only the channels actually used.
In this window the TriCaster audio mixer channels can be manually mapped to the Control
Surface.
In the 1st column (TriCaster Line) are all the audio channels of the TriCaster; in the 2nd
(CS Page) and the 3rd (CS Line) a choice must be made in the page/channel combination
of the control surface that you want to use to control this TriCaster channel. Depending on
the control surface selected, the number of pages and the available lines are displayed
automatically.
With a BCF2000, you have 6 pages with 8 lines each. With the Yamaha 01V96i you have 3
pages in general mode and one page in “Remote” mode with 16 channels on each page.
To the left of the 1st column there is a check box for each of the TriCaster audio channels,
checked by default. If you uncheck this box the corresponding channel will not be used
and no correspondence will be able to be assigned on the control surface. Where TriCaster
channels have double tracks, the padlock icon to the right of the last column lets the
controls of both tracks be assigned to a single fader on the control surface. If the padlock
is open, each audio channel of the TriCaster can be assigned to one track of the control
surface.
In the TriCaster V1 software, there are pairs of channels in the inputs when they are in
micro mode; but in the TriCasTer V2 software all channels are paired.
It is not necessary to assign all the control surface channels to all the TriCaster channels,
only those needed.
From the “File” menu you can save or load configuration files and switch from one
configuration to another.
From the “Links” menu you can delete all assignments to restart a configuration or save
the configuration.
L i v e M i x e r - u s e r m a n ua l - pag e
10
9 – Midi Test
Once the settings in the “Setup” section have been made, this option allows for simulating
the TriCaster mixer and checking that the control surface is operating correctly. This is
especially useful the first time you use the program, since the settings are not accessible
from a TriCaster sessions so if the adjustments are not those desired it will be necessary
to close the session and return to the Add-Ons screen.
This window is a simulator of the audio mixer of the selected TriCaster model. If the control
surface is a BCF2000 and is detected correctly, the text “CS On” should appear in green at
the bottom of the window. If it is yellow it indicates that the Midi ports have been detected
but not the BCF2000. Then make sure that it is turned on and lit.
For the Yamaha, by default the indicator will be yellow until some of the volume controls
are moved and the indicator should then turn green.
If communication is correct, activating the control surface cursors should activate the
graphic cursors in the window. And conversely, activation of the graphic cursors should
activate the console cursors, unless you are using a Yamaha with the Remote layer that
does not have bidirectional communication.
Once it has been verified that the communication is correct, you can activate LiveMixer to
use in a TriCaster session.
10 – LiveMixer control module
So far we have only configured and checked the settings that we want to use with
LiveMixer; now we just activate the program’s control module which will run in the
background and manage communication with the TriCaster when we are in a production
session.
L i v e M i x e r - u s e r m a n ua l - pag e
11
From the configuration module you choose the options that will be sent to the control
module and you have the option of the “Start” button or the “Stop” button for the control
module.
When opening the configuration module, if the control module is in operation, the “Start”
button will be deactivated and the “Stop” button can be activated; the opposite is true if
the control module is stopped.
Note that the control module must be stopped to be able to change LiveMixer settings; if
we see that the “Setup” and “Test Midi” buttons are deactivated it means that the control
module is in operation. If the configuration needs to be changed the control module must
first be stopped with the “Stop” button.
The control module must be operating to be able to use LiveMixer in a session. If it is
stopped, clicking on “Start” will activate it. You can then close the configuration module
and start the TriCaster working session.
Once the control module has started it will continue to operate until you stop it manually
with the “Stop” button on the configuration module or you turn the TriCaster off. Even if
you change TriCaster session, the control module will continue to operate. If you activate
the “Autorun Enable” button the control module will start automatically, so that it will not
be necessary to enter the configuration module to activate the control module each time
the TriCaster is started. If you do not activate this option, you will have to manually activate
the control module with the “Start” button each time you start the TriCaster, before
entering the production session.
Once you are in the session and with the control engine operating, you must activate
communication between the TriCaster session and the selected control surface.
L i v e M i x e r - u s e r m a n ua l - pag e
12
Behringer BCF2000:
To activate communication, you must press the “Connection” button on the BCF2000 (See
the table of BCF2000 functions). If it connects, the connection button should blink and
the position of the BCF2000 volume cursors should change automatically to adjust the
values of the TriCaster audio mixer. You can then control the TriCaster audio mixer from
your BCF2000. If communication is established, pressing the connection button again
will disconnect and the audio mixer will no longer be controlled. If you close the TriCaster
session, the software will detect it and will also disconnect it.
If you press the connection button and it does not keep blinking, there is a problem with
communication or more likely the control module is not in operation.
Yamaha 01V96i:
To activate communication, you must move one of the Yamaha volume cursors for one of
the layers with which you have selected to work. If you are working with the general group
of layers the position of the Yamaha cursors should change automatically to match the
values of the TriCaster audio mixer; if you are working with the Remote layer they will not
match themselves. In either case, from this point you can control the TriCaster audio mixer
with your Yamaha. The control module will automatically disconnect when you close the
TriCaster session.
3D Storm is the distributor of NewTek products in EMEA and LiveXpert worldwide - 70, Avenue de Capeyron - 33160 Saint-Medard-en-Jalles, France
T: + 33 (0) 5 57 262 262 - F:+ 33 (0) 5 57 262 261 - [email protected]