1
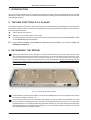
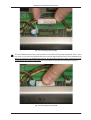
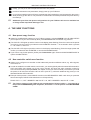
Upgrade Version 2.2
March 2002
ENGLISH
FCB1010
MIDI FOOT CONTROLLER
Upgrade Manual
MIDI FOOT CONTROLLER FCB1010
1. INTRODUCTION
This short manual should help you to upgrade your FCB1010 with a new firmware EPROM. It also provides
detailed information about all the new functions available after installing the new EPROM (32 kB type 27C256
or 64 kB type 27C512).
2. THE NEW FUNCTIONS AT A GLANCE
The FCB1010 software (version 2.2) offers useful new functions and tremendous advantages compared with its
predecessor software. These new functions simplify programming and expand the versatility of your FCB1010.
The new FCB1010 software
V
offers a preset copy function,
V
features a new controller switch-over function,
V
is complemented by new factory presets, which have been preprogrammed for the BEHRINGER V-AMP
and the BEHRINGER guitar amplifiers.
If you want to update your FCB1010 with these new functions, you have to swap the
EPROM (see Chapter 3).
3. EXCHANGING THE EPROM
1
Place your FCB1010 on a solid, flat base. Turn the FCB1010 around so you are looking at its reverse
side. Please make sure that you view the rear panel of your FCB1010 (featuring all connectors). Undo
all (14) screws on the reverse side of the device (see fig. 3.1). You can now open the FCB1010’s
housing by lifting the bottom panel before moving it into your direction. Please note that top and rear
panel remain connected by the ground cable. However, there is no need to remove the cable which
links the two panels.
Fig. 3.1: Removing the bottom panel
2
2
The EPROM is now directly accessible: you will see the EPROM that is to be exchanged on the bottom
next to the e-capacitor (see fig. 3.2).
3
First, use a pair of pincers to remove the hot melt adhesive on the short sides of the EPROM. You must
be very careful not to damage the PCB. Once the hot melt adhesive has been removed, you can grip the
EPROM between your thumb and index finger and lift it vertically off. (This prevents any damage to the
EPROM contacts.) If the EPROM is difficult to lift off, you can use either a small screwdriver or a special
pair of EPROM pliers to carefully loosen it.
MIDI FOOT CONTROLLER FCB1010
Fig. 3.2: Exchanging the EPROM
4
The new EPROM is placed in the same position on the PCB on the specially designated “track”. There
is a notch on one side of the EPROM: this notch must be aligned with the notch on the EPROM track!
When you press the new EPROM into position, be careful not to press too hard, otherwise the PCB
could become deformed or even break! It is not necessary to glue the new EPROM into position!
Fig. 3.3: Placing the new EPROM
3
MIDI FOOT CONTROLLER FCB1010
5
Finally, you can put on the back panel and screw it into position.
6
In order to activate the new parameters, simply power up your FCB1010.
7
If you want to load the new set of factory presets keep the footswitches 1 and 6 pressed for about 2.5 s
while powering up the device. This procedure overwrites all user-edited presets and replaces them by
new settings.
Additional sysex files with preset configurations for your FCB1010 will soon be available free
of charge under http://www.behringer.com.
4. THE NEW FUNCTIONS
4.1 New preset copy function
V Allows for simplified basic settings of your FCB1010 presets. Activate CONFIG in the GLOBAL SETUP
(see chapter 2.2 of your user’s manual). Now, press footswitch 5 to activate the copy function.
V (The VALUE 1 LED lights up and the number in the display starts flashing.) Enter the number of the preset
you wish to copy and confirm your selection with UP/ENTER. Presets 1 - 10 are stored in bank 0, presets
11 - 20 in bank 1, and so on.
V (The VALUE 2 LED lights up and the number in the display starts flashing.) Enter the target preset and
confirm your selection with UP/ENTER, or cancel with DOWN/ESCAPE.
V If you want to copy further presets, please press footswitch 5 again. Press and hold DOWN/ESCAPE to
quit the GLOBAL SETUP.
4.2 New controller switch-over function
V Allows you to configure one controller so that it alternately sends two different values, e.g. effect bypass,
drive on/off, etc.
V In order to enable the controller switch-over function, you need to globally select the same MIDI channel for
CNT1 and CNT2 (see chapter 2.2 of your user’s manual), and enter the same controller number for
CNT1 and CNT2 in the preset (NUMBER, see chapter 2.3.2 of your user’s manual). The first time you recall
the preset, it will send the controller value of CNT1 (VALUE 1), with each additional key press you can
alternate between CNT2 and CNT1.
V Example: Select preset 1 without DRIVE function on the BEHRINGER V-AMP—each time you press the
same button again, DRIVE will be switched on or off respectively:
PROG CHG 1 = 1, CNT 1 NUMBER = 26, VALUE 1 = 0, CNT 2 NUMBER = 26, VALUE 1 = 127
4
The factory presets of your FCB1010 are programmed as follows: banks 0 - 4 correspond to
the presets of BEHRINGER guitar amplifiers, and banks 5 - 9 to the presets of the BEHRINGER
V-AMP.
MIDI FOOT CONTROLLER FCB1010
The information contained in this manual is subject to change without notice. No part of this manual may be reproduced or
transmitted in any form or by any means, electronic or mechanical, including photocopying and recording of any kind, for any
purpose, without the express written permission of BEHRINGER Spezielle Studiotechnik GmbH.
BEHRINGER and V-AMP are registered trademarks. BEHRINGER Instrument Amplification is a Division of BEHRINGER.
ALL RIGHTS RESERVED. © 2002 BEHRINGER Spezielle Studiotechnik GmbH.
BEHRINGER Spezielle Studiotechnik GmbH, Hanns-Martin-Schleyer-Str. 36-38, 47877 Willich-Münchheide II, Germany
Tel. +49 (0) 21 54 / 92 06-0, Fax +49 (0) 21 54 / 92 06-30
5