1
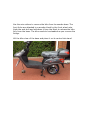
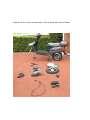
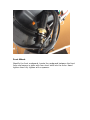
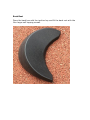
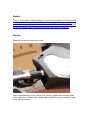
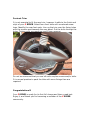
USER MANUAL AND ASSEMBLY INSTRUCTIONS Congratulations, once again, on buying an E RIDER Model 15!!!! USER MANUAL We are sure you will be excited by the delivery of your brand new bike and you will be eager to start using your E RIDER as soon as possible. However you will need to be a little patient as there are some important things to be done before you can ride it. Firstly, the bike cannot be fully assembled for safe delivery so please refer to our Assembly Instructions below and follow them closely to put your bike together safely. Secondly, during the time your E RIDER has been in transport and storage, its battery will have lost some charge. Before using the bike you must put the battery on charge. Plug the charger to a power socket and you should get a green light on the transformer. Attach the charger to the battery and this should turn red. Wait until it turns green again and it is now fully charged. The other important thing you must do is inflate your tyres to the correct pressure of 40psi. This can be done with any pump or compressor fitted with a Schrader fitment (same as for a car tyre). Finally, in case your E RIDER is lost or stolen please record this information to identify it: Frame Number:….................................................................................... Date of Purchase:…................................................................................... The frame number can be found behind the small grey plastic extrusion on the inside front panel of the bike. General Usage: With proper use and care your E RIDER will give many years of pleasurable service. The maximum load your bike is designed to carry is 135 kilograms. This should not be exceeded because it could make the bike unsafe to drive and doing so will invalidate your warranty. The E RIDER can be used in the wet or snow, but braking distances will be longer in adverse conditions and you should take care to allow for this. It is alright for the bike to get wet, but please make sure that the motor is never submerged in water. This may cause it to short circuit and result in serious damage which would not be covered by warranty. It is also good practice to fully charge your battery every three days in cold weather. If your E RIDER is unused for a long period or if you have a spare battery, which is not regularly used, you must fully charge the battery at least every two months. If you wish to remove the battery from the bike for charging, first remove the foot mat. Unlock the battery locking strut with the ignition key and lift up the case. Remove the internal plug from the underside of the battery. After charging, replace the battery in the bike making sure you plug it in once again and lock the battery in place. Please DO NOT use any other charger than the one supplied with your bike. Also do not modify the bike in any way or replace any parts from other suppliers. We cannot accept responsibility for damage or failure caused by products which are not specifically made for use with the E RIDER. Operation: When you are ready to ride your E RIDER, check first that the motor is unlocked. Go to the left side of the rear wheel and locate the blue motor lock. Using the key with the red button make sure that the motor is unlocked. The rear wheel will not turn when the motor is locked. If you are doing this in the dark, pressing the red button provides a small light to assist in inserting the key. Now you should sit on the bike to adjust your mirrors and check that you can see behind you from your riding position. The bike can now be started using either the ignition key or the remote control. To switch on the bike with the key, locate the power key socket below and to the right of the handlebars. Select the ignition key. Insert the key and turn to the 'ON' position. The information display will light up and you are ready to go. The throttle is operated by the right handle on the handlebar. To start your E RIDER without inserting the key, press the start key button on your remote twice. You will see the panel light up and you are ready to go by turning the throttle on the right handlebar handle as above. On the left handlebar handle you will find three control buttons: Top: Middle: Bottom: Red button operating the lights Slider switch to operate the indicators Warning horn When riding downhill you must have the E RIDER switched on even if you are not using the throttle and even if the battery is not in the bike. Otherwise the motor will generate enough electricity to damage the controller beyond repair and this damage would not be covered by the warranty. Don't be concerned that the bike continues to drive when you release the throttle. The controller continues to provide power to the motor for six seconds after the throttle is released. You just need to brake to reduce speed. Your E RIDER will travel along flat roads at about 21 -23 kilometers per hour. It will slow down as you go uphill and may increase speed a little downhill. On steeper hills it will sometimes be necessary to assist the motor by pedaling. The degree of pedaling required depends on the weight of the rider as well as other factors such as the amount of charge in the battery. On a full charge your E RIDER has a range of approximately one and a half riding hours, but again this will depend on many factors such as terrain, temperature and weight carried. Remote: Buttons from the right: First: Second: Third: Fourth: Set Alarm Switch Off Bike Locator Start (Press twice) ASSEMBLY INSTRUCTIONS For its safe transit, your E RIDER has been secured to a wooden base and enclosed in sturdy packaging. It will be necessary to fit together those parts which could not be in their working position during transit. You will need the following tools: A pair of scissors A pair of sturdy pliers or wire cutters A large, cross head screwdriver 2 x 10mm open end spanners A 15mm open end spanner (for pedals) A 17mm open end spanner (for side stand) An adjustable spanner may be used in place of the 15mm & 17mm spanners Assembly can be completed by one person, but a second pair of hands will be helpful at some stages. Unpacking: You will find the charging cable threaded along the outside of the packaging and this is to allow the battery to be kept in good condition during transit and storage. Movement during shipping often results in this cable becoming scuffed however in most cases this is not a problem. If you believe that there is excessive damage to the cable please contact us to get a replacement and it will be very helpful if you are able to include a picture of the damage when reporting the problem. Carefully remove the cardboard packaging and unwrap all of the parts from their protective covering. When cutting the adhesive tape take care not to damage paintwork. Identify the parts and ensure that none of the smaller items are discarded with the packing. Use the wire cutters to remove the bike from its wooden base. The front forks are attached to a wooden block by the front wheel axle. Undo the axle bolt and withdraw it from the block to release the bike fully from the base. The bike needs to be steadied as you remove the fixings. Lift the bike clear of the base and place it on its centre kick stand. Unpack all the other components. This is what you should have. You should also have the following bolts and screws. Assembly: Handlebars: Locate the securing bolt at the top of the handlebar stem and remove it, taking care not to drop the nut. Turn the front wheel to the side to assist access. Slide the handlebars onto the stem and manipulate them until the bolt hole lines up. Put the bolt through the assembly and hand tighten with two 10mm spanners. Ensure that the handlebars are firmly secured and correctly at right angles to the front wheel. Turn to the full extent in each direction to ensure free movement. Front Wheel: Identify the front mudguard. Locate the mudguard between the front forks and secure in place with four short bolts into the forks. Hand tighten then fully tighten with a spanner. Take the front wheel and ease the brake mechanism into the drum. Line up the wheel centre with the end of the forks. Feed the axle bolt through the fork end and the wheel until you can locate larger aluminium spacer inside the forks. Push the axle through the wheel. (Click text for video) Put the smaller spacer onto the axle then push it fully through the left fork. Add the washer then tighten the axle bolt using two spanners. Rotate the wheel to see that it is turning freely and not rubbing. At this stage the brake should be tested and adjusted if necessary. Nose Cone: Before fitting the nose cone you need to connect the indicator connector block. Then select four smaller self tapping screws and your screwdriver. Line up the front fascia so that the screw holes match to their securing points. Half tighten each of the screws. Ease the fascia all round to ensure it is correctly aligned and then fully tighten. Back Rest Open the back box with the ignition key and fit the back rest with the four larger self tapping screws Pedals: Take a 15mm open ended spanner. Locate one pedal to its fixing point on the crank. Ensure that the thread is engaged correctly without cross threading and tighten with the spanner. Please note that the left pedal will tighten anti-clockwise and the right pedal clockwise. Mirrors: Identify the mirror securing holes. Having pressed the mirror bolts fully home, tighten the securing nut with a spanner. Before fully tightening, adjust the mirror angle to suit your riding position. Footrest Trim: It is not essential to fit the rear trim, however it adds to the finish and style of your E RIDER. Select four short bolts with crosshead screw tops. Identify the rear foot rests. Line up the trim over the fixing holes with the circular part towards the rear wheel. Put the bolts through the holes. Tighten with a screwdriver and 10mm spanner. Do not be concerned that you are left with surplus screws and/or bolts. It is normal practice to pack the bike with more fixings than are required. Congratulations!!! Your E RIDER is ready for its first full charge and then a road test. Enjoy it, and thank you for becoming a member of the E RIDER community.