1
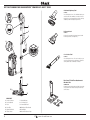
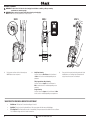
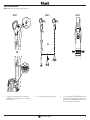
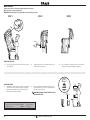
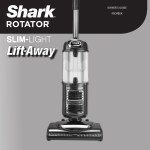
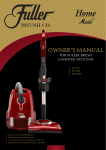
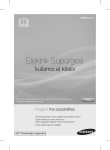
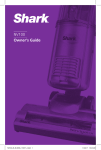
Model
NV680UKT
™
w w w.sharkclean.eu
0800 862 0453
Contents
Thank you for
purchasing the Shark®
Rotator™ Powered
Lift-Away™ True Pet.
NV680UKT
Getting to Know Your Shark® Rotator™ Powered Lift-Away™ True Pet Vacuum����������������������������������������������������������������������������������3
Assembly����������������������������������������������������������������������������������������������������������������������������������������������������������������������������������������������4
Upright Cleaning����������������������������������������������������������������������������������������������������������������������������������������������������������������������������������5
What Does the Brushroll Indicator Light Mean?���������������������������������������������������������������������������������������������������������������������������������5
Above Floor Cleaning.��������������������������������������������������������������������������������������������������������������������������������������������������������������������������6
Changing Floor Nozzles������������������������������������������������������������������������������������������������������������������������������������������������������������������������7
Powered Lift-Away™ Cleaning�������������������������������������������������������������������������������������������������������������������������������������������������������������8
Lift-Away™ Cleaning�����������������������������������������������������������������������������������������������������������������������������������������������������������������������������8
Maintenance���������������������������������������������������������������������������������������������������������������������������������������������������������������������������������������9
Empty the Dust Cup��������������������������������������������������������������������������������������������������������������������������������������������������������������������������9
Clean the Filters��������������������������������������������������������������������������������������������������������������������������������������������������������������������������������9
Check for Blockages������������������������������������������������������������������������������������������������������������������������������������������������������������������������10
Trouble-Shooting Guide���������������������������������������������������������������������������������������������������������������������������������������������������������������������11
Warranty��������������������������������������������������������������������������������������������������������������������������������������������������������������������������������������������14
TECHNICAL SPECIFICATIONS:
Voltage:
220-240V~, 50/60Hz
Main Body Motor Watts: 850W
Power Nozzle Watts: 80W
RECORD THIS INFORMATION:
Model Number:�����������������������������������������
Date of Purchase (Keep receipt):
______________________________________________________
RECOMMENDED FILTER CLEANING SCHEDULE:
See the MAINTENANCE section for filter cleaning instructions
Foam filter:
Felt Filter:
HEPA Filter:
XFF650 XFF650 XHF650 Every 3 months
Every 3 months
Every 12 months
This appliance complies with the WEEE-Directive 2012/19/EU on the disposal of electrical and electronic equipment (WEEE).
This marking indicates that this product should not be disposed with other household wastes throughout the EU. To prevent possible harm
to the environment or human health from uncontrolled waste disposal, recycle it responsibly to promote the sustainable reuse of material
sources. To return your used device, please use the return and collection systems or contact the retailer where this product was purchased.
They can take this product for environmental safe recycling.
This appliance complies with the European directives for electromagnetic compatibility (EMC) 2004/108/EC and its revisions, as well as Low Voltage
Directive (LVD) 2006/95/EC and its revisions.
1
w w w.sharkclean.eu
READ ALL INSTRUCTIONS BEFORE USE
IMPORTANT SAFEGUARDS
When using an electrical appliance, basic safety precautions should always be
observed, including the following:
WARNING
This appliance is not intended for use by persons with reduced physical, sensory or
mental capabilities, or lack of experience and knowledge, unless they have been given
supervision or instruction concerning use of the appliance by a person responsible for
their safety.
Children shall not use or play with this appliance. Close supervision is necessary to
keep appliance out of reach of children during use.
CAUTION
THE POWER NOZZLE, WAND, HOSE, AND HANDLE CONTAIN ELECTRICAL
CONNECTIONS:
• These are not serviceable parts.
• Do not use to vacuum any liquids.
• Do not immerse in water when cleaning.
• Prior to use, inspect hose, handle/wand for damage. Discontinue using if damaged.
WARNING
TO REDUCE THE RISK OF FIRE, ELECTRIC SHOCK OR INJURY:
1 DO NOT use outdoors or on wet surfaces.
2Unplug from electrical outlet when not in use and before cleaning or servicing.
3 Inspect power cord or plug for any damage before use. DO NOT use vacuum cleaner with a
damaged cord or plug.
4 DO NOT use if the appliance is not working, has been dropped, dropped into water,
damaged or left outdoors.
5 NO SERVICEABLE PARTS. Incorrect re-assembly or repair can cause a risk of electrical
shock or injury to persons when the appliance is used. Contact Customer Service.
6The hose contains electrical wires. Do not use when damaged, cut or punctured.
7DO NOT pull or carry vacuum cleaner by the cord or use the cord as a handle.
8 DO NOT unplug by pulling on cord; to unplug, grasp the plug, not the cord.
9 DO NOT handle plug or vacuum cleaner with wet hands.
10DO NOT run the vacuum cleaner over the power cord, close a door on the cord or pull cord
around sharp corners.
11 The use of an extension cord is not recommended.
12 DO NOT leave vacuum cleaner unattended when plugged in.
13 Keep cord away from heated surfaces.
14 Turn off all controls before plugging or unplugging the vacuum cleaner.
15Always turn off the vacuum cleaner before connecting or disconnecting power nozzle.
16Store your vacuum cleaner with the power cord secured around the two cord holders.
GENERAL USE
17 Use only as described in this manual.
18DO NOT put any objects into openings. DO NOT use with any opening blocked; keep free
of dust, lint, hair, and anything that may reduce air flow.
19 Keep your work area well lit.
20Keep the vacuum cleaner moving over the carpet surface at all times to avoid damaging
the carpet fibers.
21DO NOT place vacuum cleaner on unstable surfaces such as chairs or tables.
22 DO NOT use without dust cup and/or filters in place.
23 DO NOT step on, run over, or bend hose. The hose is powered by electrical wires that may
be damaged as a result.
HOSE ATTACHMENTS
24DO NOT use if air flow is restricted; if the air paths, the hose, or the accessories become blocked,
turn the vacuum cleaner off. Remove all obstructions before you turn on the unit again.
25Keep the end of the hose and accessory openings away from face and body.
26Keep cleaning tools and hose suction openings away from hair, face, fingers, uncovered
feet, or loose clothing.
27Only use manufacturer’s recommended attachments.
DUST CUP/FILTERS/ACCESSORIES
Before turning on the vacuum:
28Make sure that all filters are thoroughly dry after routine cleaning.
29Make sure that dust cup and all filters are in place after routine maintenance.
30Make sure accessories are free of blockages.
31Use only manufacturer’s recommended accessories and replacement parts.
GENERAL CLEANING
32DO NOT pick up large-sized objects.
33DO NOT pick up hard or sharp objects such as glass, nails, screws or coins that could
damage the vacuum cleaner.
34 DO NOT use to pick up drywall dust.
35DO NOT pick up smoking or burning objects such as hot coals, cigarette butts, fireplace
ash or matches.
36DO NOT pick up flammable or combustible materials such as lighter fluid, gasoline, or
kerosene or use vacuum in areas where they may be present.
37DO NOT pick up toxic solutions such as chlorine bleach, ammonia, or drain cleaner.
38DO NOT use in an enclosed space where vapors are present from paint, paint thinner,
moth-proofing substances, flammable dust or other explosive or toxic materials.
39DO NOT vacuum up any liquids.
40DO NOT immerse vacuum cleaner in water or other liquids.
41DO NOT use outdoors or on wet surfaces; use only on dry surfaces.
42Use extra care when cleaning on stairs.
43 Remove brushroll from unit before rinsing.
SAVE THESE INSTRUCTIONS
FOR HOUSEHOLD USE ONLY
0800 862 0453
2
GETTING TO KNOW YOUR SHARK ROTATOR® POWERED LIFT-AWAY™ SPEED
Articulated Upholstery Tool
312FV680
1
Two cleaning tools in one. The stiff bristle brush gets
stuck-on debris off a multitude of surfaces. Remove
the bristles to reveal an upholstery tool for removing
stubborn pet hair from upholstery and more.
2
3
4
Pet Power Brush
188FLI680
Designed for removal of pet hair and ground in dirt
from carpeted stairs and upholstery.
5
6
7
Wand Release
2-in-1 Crevice Tool
189FLI680
Two cleaning tools in one. The crevice tool gives you
extended cleaning reach for small spaces, while the
dusting brush cleans a multitude of surfaces.
8
9
Dust-Away™ Hard Floor Attachment &
Microfiber Pad
XGNWL580EU
10
Durable enough for big crumbs and debris, but gentle
enough for the most delicate dusting on hard wood
and tile floors.
12
11
MAIN UNIT
1Surface Selector
2Suction Control
3Hose
4 Hose Clip
5 Upper Cord Hook
6 Power Switch
3
7 Wand Release
8 Lift-Away Pod
9 Lower Cord Hook
10 Motorised Floor Nozzle
11Headlights
12 Brushroll Indicator Light
w w w.sharkclean.eu
ASSEMBLY
STEP 2
STEP 3
STEP 4
STEP 5
SLIDE
STEP 1
CLICK
1Place the selected floor nozzle on the floor and insert
the wand.
2
Insert the handle into the wand.
3Slide the pod onto the wand.
4Slide the hose clip into the notch at the back of the
wand.
0800 862 0453
5Insert the 2-in-1 crevice tool and articulated upholstery
tool into the accessory posts as shown.
TIP: For quick cord access, rotate upper hook down and
remove cord. Rotate back for cord storage.
4
UPRIGHT CLEANING
WARNING: T o reduce the risk of electric shock, unplug the unit before assembling, adding or removing
attachments or converting modes.
WARNING: Always ensure the power is OFF before plugging and unplugging.
NOTE: DO NOT use to pick up drywall dust or fireplace ash.
STEP 1
STEP 2
STEP 3
Floor Selector
Suction Control
Max
1Plug in power cord into electrical outlet and press
POWER button to turn vacuum on.
Min
2
Hard Floor Cleaning
Set Floor Selector to Hard Floor and Suction Control
to Max for full suction or variable depending on user
preference.
Thick Carpet & Area Rugs Cleaning
Set Floor Selector to Carpet and Suction Control to
Min for reduced suction or variable depending on user
preference.
Carpet Cleaning
Set Floor Selector to Carpet and Suction Control to Max
for full suction or variable depending on user preference.
WHAT DOES THE BRUSHROLL INDICATOR LIGHT MEAN?
5
•Solid Green: The brushroll is on and working as it should.
•Solid Red: There is a jam in the brushroll area. Turn your vacuum off and remove the blockage.
•*Flashing Red: The motorised floor nozzle is overheating. Turn your vacuum off and wait for it to cool down.
*See Troubleshooting section for further instructions.
w w w.sharkclean.eu
3Place your left foot gently on the floor nozzle and tilt the
handle back to start cleaning. Note: The brushroll will
only spin once the vacuum is reclined back.
ABOVE FLOOR CLEANING
NOTE: DO NOT use to pick up drywall dust or fireplace ash.
STEP 1
STEP 2
STEP 3
OR
Suction Control
Max
OR
Min
Wand Release
1For above floor cleaning with the hose, press the WAND or
HANDLE release (depending on the amount of reach required)
then lift handle up.
2Insert wand or handle directly into desired tool.
0800 862 0453
3This unit is equipped with SUCTION CONTROL to help when
dusting delicate objects or drapery. Located at base of the
handle, slide the SUCTION CONTROL tab to minimise suction.
Be sure to close again for maximum suction.
6
CHANGING FLOOR NOZZLES
Use the motorised floor nozzle for deep cleaning carpets and picking up large debris on hard floors.
Use the Dust-Away™ to pick up debris and wipe away fine dust in one easy step.
DUST-AWAY ™
STEP 1/STEP 2
MOTORISED FLOOR NOZZLE
STEP 3
CLICK
Wand Release
1Press the WAND RELEASE button to remove the wand from the motorised floor
nozzle.
2Insert the wand into the Dust-Away™.
7
3Press the LIFT-AWAY button to lift the pod off the motorised floor nozzle.
NOTE: F or best results, ensure that the SUCTION CONTROL is set to MAX.
w w w.sharkclean.eu
POWERED LIFT-AWAY ™ CLEANING
LIFT-AWAY ™ CLEANING
STEP 1
STEP 2
Extension Wand
OR
OR
1Press LIFT-AWAY button to lift the pod off the floor
nozzle.
2Insert the HANDLE into either the the motorised floor
nozzle or the Dust-Away™.
Insert the WAND into either the motorised floor nozzle
or the Dust-Away™.
TIPAttaching the HANDLE directly into the nozzles makes
cleaning stairs easy.
1Attach the desired accessory directly into the HANDLE.
TIPFor an extended reach, attach the desired accessory into
the WAND.
TIPUsing the vacuum in Powered Lift-Away mode gives you
extended reach for cleaning under furniture and in tight
spaces.
0800 862 0453
8
MAINTENANCE
To keep your vacuum’s suction power optimal, follow these instructions.
Make sure unit is off and cord unplugged.
IMPORTANT: Allow ALL filters to dry completely before replacing into the vacuum.
STEP 1
STEP 2
STEP 3
EMPTY THE DUST CUP
1Pull up on the dust cup release latch and lift the dust
cup off the pod.
2Holding the dust cup over a rubbish bin, press the
bottom empty release latch.
3Press the top dust cup release latch to access the dust
screen and remove built-up debris as required.
FOAM FILTER
CLEAN THE FILTERS
1With the dust cup removed, remove and rinse the foam
and felt filters every 3 months. Let air dry completely
before replacing. Hand wash only. Tap loose dirt off
filters between washes as needed.
2Once a year open the filter grill and remove and
rinse the HEPA filter. Let air dry completely before
replacing. Hand wash only.
WARNING: DO NOT PICK UP FIREPLACE ASH
OR DRYWALL DUST.
RECOMMENDED FILTER CLEANING SCHEDULE:
Pre-motor Filter Kit (Foam & Felt): XFF680 Every 3 months
Post Motor Filter: XHF680 Every year
9
w w w.sharkclean.eu
FILTER FRAME
FELT FILTER
HEPA
MAINTENANCE
To keep your vacuum’s suction power optimal, follow these instructions.
Make sure unit is off and cord unplugged.
STEP 1
STEP 2
STEP 3
STEP 4
CHECK FOR BLOCKAGES
1Use a coin to unlock the 3 locks on the
bottom of the floor nozzle.
2A portion of the base is removable to
allow for better access to the brush
roll and exposure to the airway. Shine
a torch from the bottom to check for
possible blockage in the airway.
3Remove any string, carpet fibers or
hair that may be wrapped around
the brush roll. There is a groove on
the brush bar that allows a pair of
scissors to cut across it to loosen
up the debris.
0800 862 0453
4To reassemble, replace base by
lining it up along the front of the
nozzle. Push down to snap into
place. Lock the 3 locks.
10
TROUBLE-SHOOTING GUIDE
Vacuum is not picking up dirt. No suction or light suction
• C heck filters to see if they need cleaning. Follow instructions for rinsing and drying the filters before re-inserting back into the
vacuum.
• Dust cup may be full; empty dust cup.
• C heck hose, hose connections, nozzles, and accessories for blockages; clear blockages if required.
• Remove any string, carpet fibers or hair that may be wrapped around the brushroll.
Vacuum lifts area rugs• Turn off the unit to disengage the brushroll and restart with the POWER button for suction only cleaning.
• Suction is powerful. Take care when vacuuming area rugs or rugs with delicately sewn edges.
• Turn off the unit and disengage the area rug from the brushroll and restart the unit.
Brush roll does not spin
• If brush roll indicator light on the floor nozzle turns red, the brush roll has stopped spinning. Immediately turn off and unplug
vacuum, disconnect the nozzle and remove blockage before reconnecting and turning vacuum back on.
• Pull the handle toward you and release the floor nozzle to disengage the auto-off feature.
• Make sure that the carpet height selector is not on the HARD FLOOR setting.
• Immediately turn off and unplug vacuum, disconnect the nozzle and remove blockage before reconnecting and turning vacuum back on.
Vacuum turns off on its own or indicator light flashes red
• T his vacuum cleaner is equipped with a motor protective thermostat. If for some reason your vacuum overheats, the thermostat
will automatically turn the suction motor off. Should this occur, perform the following steps to restart the thermostat:
1. Turn the unit off.
2. Unplug the vacuum.
3. Empty the dust cup and clean filters (see page previous page)
4. Check for blockages in hose, accessories and inlet openings.
5. Allow the unit to cool for a minimum of 45 minutes.
6. Plug in the vacuum.
7. Restart the unit by turning the power on.
Note: If vacuum still does not start, contact Customer Service at: 0800 862 0453.
11
w w w.sharkclean.eu
NOTES
0800 862 0453
12
NOTES
Euro-Pro and Shark are registered trademarks of Euro-Pro Operating LLC.
Rotator, Dust-Away and Lift-Away are trademarks of Euro-Pro Operating LLC.
13
w w w.sharkclean.eu
WARRANTY TERMS AND CONDITIONS
When a consumer buys a product in the UK, they get the benefit of legal rights relating to the quality of the product (your “statutory rights”). You can enforce these rights against your retailer. However, at
Shark we are so confident about the quality of our products that we give you an additional manufacturer’s warranty of up to five years. These terms and conditions relate to our manufacturer’s warranty
only – your statutory rights are unaffected.
The conditions below describe the prerequisites and scope of our warranty. They do not affect your statutory rights or the obligations of your retailer and your contract with them.
Shark® Guarantees
A household appliance like a vacuum cleaner constitutes a sizeable investment. Your new machine needs to work properly for as long as possible. The guarantee it comes with is an important
consideration - and reflects how much confidence the manufacturer has in its product and manufacturing quality.
Every Shark® machine comes with a free parts and labour guarantee. Our customer service helpline (0800 862 0453) is open from 9.00am to 6.00pm Monday - Friday. It’s free to call, and you’ll be put
straight through to a Shark representative. You’ll also find online support at www.sharkclean.eu/uk.
How do I register my extended Shark® guarantee?
You can register your guarantee online within 28 days of purchase. To save time, you’ll need the following information about your machine:
• Serial number (on the machine rating label)
• Date you purchased the machine (receipt or delivery note)
• To register online, please visit www.sharkclean.eu/uk/register-guarantee
IMPORTANT
• Both the 12 months and the extended 2 years guarantee will only cover your product from the date of purchase.
•Please keep your receipt at all times. Should you need to use your extended guarantee we will need your receipt to verify the information you have supplied to us is correct. The inability to produce
a valid receipt may invalidate your guarantee.
What are the benefits of registering my free Shark® guarantee?
When you register your guarantee we’ll have your details to hand if we ever need to get in touch. You can also receive tips and advice on how to get the best out of your Shark® vacuum and hear the
latest news about new Shark® technology and launches.
If you register your guarantee online, you’ll get instant confirmation that we’ve received your details.
How long are new Shark® machines guaranteed for?
Our confidence in our design and quality control means that your new Shark® vacuum cleaner is guaranteed for a total of three years. (12 months plus an extended warranty of 2 years).
What is covered by the free Shark® guarantee?
Repair or replacement of your Shark® machine (at Shark®’s discretion), including all parts and labour. A Shark® guarantee is in addition to your legal rights as a consumer.
What is not covered by the free Shark® guarantee?
• Blockages – For details of how to unblock your vacuum cleaner, please refer to the Operating Manual.
• Normal wear and tear such as brush bar, fuse, belt, batteries etc.
•Accidental damage, faults caused by negligent use or care, misuse, neglect, careless operation or handling of the vacuum cleaner which is not in accordance with the Shark® Operating Manual
supplied with your machine.
• Use of the vacuum cleaner for anything other than normal domestic household purposes.
• Use of parts not assembled or installed in accordance with the operating instructions.
• Use of parts and accessories which are not Shark® Genuine Components.
• Faulty installation (except where installed by Shark®).
• Repairs or alterations carried out by parties other than Shark or its agents.
What happens when my guarantee runs out?
Shark® does not design products to last for a limited time. We do appreciate that there may be a desire for our customers to want to repair their vacuum cleaners after the warranty has elapsed. In this
case please contact our free phone customer service help line and ask about our out warranty program, on 0800 862 0453.
Where can I buy genuine Shark® spares and accessories?
Shark® spares and accessories are developed by the same engineers who developed your Shark® vacuum. You’ll find a full range of Shark® spares and replacement parts for all Shark® machines at
www.sharkclean.eu/uk/parts. Accessories are at www.sharkclean.eu/uk/accessories.
Please remember that using non-Shark® spares invalidates your guarantee.
0800 862 0453
14
Euro-Pro Europe Limited
15 Mariner Court
Calder Park
Wakefield
WF4 3FL
Freephone 0800 862 0453
www.sharkclean.eu
NV680UKT_150807_2
© 2015 Euro-Pro Operating LLC
Illustrations may differ from actual product. We are constantly striving to
improve our products, therefore the specifications contained herein are
subject to change without notice.
Printed in China