1
Copyright 2009, WaverlyStreet Software. All rights reserved.
I
Purchase Order Help
Table of Contents
Part I Introduction
1
Part II Vendor & Ship To Addresses - Simple
1
Part III Vendor & Ship To Addresses - Advanced
2
Part IV Adding / Changing Stock Items
5
Part V Adding Line Items to Orders
7
Part VI Combine Requisitions Into Bulk Orders
9
Part VII Discount, Sales Tax, and Shipping
10
Part VIII Comments, Other Fields
12
Part IX Working with Orders
12
Part X Importing orders created on another
computer
15
Part XI Currency Conversion
17
Part XII Assemblies
18
Part XIII Receiving Tools
21
Part XIV Printing Purchase Orders
21
Part XV Email Options
23
Part XVI List Refresh Indicator
24
Part XVII Locking Orders and User Levels
25
Part XVIII Configuration
26
Part XIX Multiple Configurations
31
Part XX Change the Wording Used on Forms
32
Part XXI "Fine Print" - extended terms & conditions
33
Copyright 2009, WaverlyStreet Software. All rights reserved.
Contents
II
Part XXII Printing with headers and footers
34
Part XXIII Setting Initial PO Number
36
Part XXIV Approval Process (optional)
36
Part XXV Reports
38
Part XXVI Data Export
40
Part XXVII Import / Export Stock Items
40
Part XXVIII Data backup / restore
42
Part XXIX Technical Notes
43
Part XXX How to Buy "Purchase Order"
44
Part XXXI Get Your Vendors to Maintain Stock Items For
You
45
Part XXXII License - disclaimer of warranty
46
Index
0
Copyright 2009, WaverlyStreet Software. All rights reserved.
II
1
1
Purchase Order Help
Introduction
Purchase Order is an affordable solution for small and medium size companies that handle their
equipment acquisitions via purchase order. If you've been wanting to get away from using pre-printed
forms but haven't been able to find any reasonably priced purchasing software, this may be the answer.
Our program is stand-alone - not an add-in module for some complicated & expensive "enterprise" accounting
package. It simply saves you time writing Purchase Orders, period.
Purchase Order can either be installed on a single machine and store it's data locally, or installed on multiple
machines and use a shared data directory.
The program may be freely evaluated fifty times, to make sure it meets your requirements.
2
Vendor & Ship To Addresses - Simple
Purchase Order offers a choice of two different ways to handle customer & ship-to addresses.
The Simple method described below is quick to use, but limited in terms of using the contact information for
other purposes. The Advanced method (next topic 2 ) uses the same data format as our contacts program,
ShareCon, and thus gives you much more flexibility.
The Simple method:
Copyright 2009, WaverlyStreet Software. All rights reserved.
Vendor & Ship To Addresses - Simple
2
To add a new Customer or Ship To address, click the mouse in the appropriate field and type in the company
name. Then TAB down to the multi-line address box and fill in the shipping address and phone numbers (if
desired), and click the save button. Each time you save an address it will then be available for re-use in the
drop-down fields.
If you place a valid email address in the address field, the SMTP send email function will pick it up.
New and changed addresses will also be saved whenever you save a document.
To delete an address from the system, right click on it and select Delete.
3
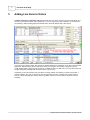
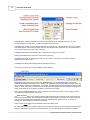
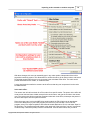
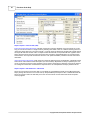
Vendor & Ship To Addresses - Advanced
Purchase Order offers a choice of two different ways to handle customer & ship-to addresses.
The Advanced method described below uses the same data format as our contacts program, ShareCon, and
thus gives you much more flexibility.The Simple method (previous topic 1 ) is quick to use, but limited in terms
of using the contact information for other purposes.
The Advanced method:
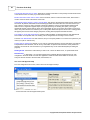
PO can directly use WaverlyStreet's "ShareCon" name & address program data. This allows much more
flexibility, since ShareCon is a "full featured" contacts application. To use ShareCon format data, make sure the
Copyright 2009, WaverlyStreet Software. All rights reserved.
3
Purchase Order Help
box is checked on the configuration form:
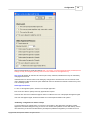
When using ShareCon data, entering customer & ship-to addresses is handled a bit differently. On the main
form, the address save buttons are replaced with ShareCon icons:
To add a new address, click the ShareCon button when the company name field is blank. To select a saved
address, drop down the company name box and select. To edit an existing address, select it, then click the
ShareCon button. This will bring up a * simplified ShareCon contact edit form:
Copyright 2009, WaverlyStreet Software. All rights reserved.
Vendor & Ship To Addresses - Advanced
4
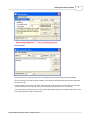
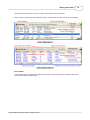
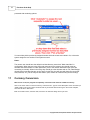
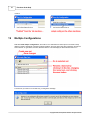
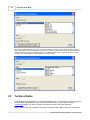
Most of the fields should be self-explanatory. The ones which might not be are as follows:
Records are classified with one of four "types" - "Public, Individual", "Public, Organization", "Private, Individual",
and "Private, Organization". Select one of the four radio buttons to set this. The public / private distinction
specifies whether the record is for general distribution, or just for your own use. Public and Private are displayed
in different colors on screen. The individual / organization distinction controls how the record will be displayed on
screen (by the person's name, or the organization name).
The Keyword fields enable you to further classify records into quick-display groups. Each record may have up to
three keywords. When you are first starting out, type keywords into the boxes. You only need to type them once,
though, because as you add more records the keywords will be available for selection in the drop-down list.
A real time-saver on the new record screen is the Scratch Pad (click on "Description" to toggle it on and off). The
Scratch pad is a convenient spot to temporally paste a chunk of text from another program, and then cut and
paste pieces of it into the ShareCon record fields. For example, suppose you get an email from someone, and
wish to record a ShareCon record for them; use the mouse to copy the information from the email message, then
paste it in the Scratch Pad. Now you can cut the name(s), organization name, email address, etc. from the pad
to the correct fields, without having to switch back and forth from ShareCon to the email client. The contents of
the Scratch Pad are erased when the new record screen is closed.
* In the full version of ShareCon, many more options are available. Both ShareCon and Purchase Order can be
used to add / edit records; ShareCon can do much more with the data including phone dialing, keeping notes,
creating lists, etc., etc.
Note that you do not need to have the full version of ShareCon in order to use ShareCon format data in
Purchase Order.
Copyright 2009, WaverlyStreet Software. All rights reserved.
5
4
Purchase Order Help
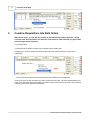
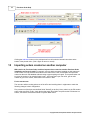
Adding / Changing Stock Items
Stock items consist of 6 fields:
Category - this is simply a tag to help you find things or remind you of what they are for. Examples might be
"Store Fixtures", "Cleaning Supplies", etc. (Does not print out on the purchase order.)
Vendor - the vendor from whom you buy this item at a particular unit price. If you buy the same item from
different vendors, make a copy of it for each one. (Does not print out on the purchase order.)
Unit (of measure) - for example "each", "box", "lb", "ft", "pack of 3", "lot", etc.
Part Number up to 60 characters (optional). Is placed before the description on orders.
Description - up to 120 characters. Note that this can be expanded upon after a stock item is added to an
order.
Unit Cost - how much one unit of the item costs. Note that you do not need to figure in discounts here - use the
list price, and specify your discount in the order.
You may either sit down and add a whole list of stock items at once, or do them on an as-needed basis as you
make purchase orders. Either way, once an item is in the stock list it can be re-used in any purchase order
simply by double-clicking it.
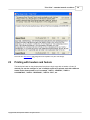
To print out stock lists, see the options under Reports.
Copyright 2009, WaverlyStreet Software. All rights reserved.
Adding / Changing Stock Items
Purchase Order can import and export Stock Item data. Details here
40
6
.
It is best to first put the vendor's name and address in the system, then select them in the upper section with
"Show Only Stock Items For The Current Vendor" checked. In this way, the vendor's name will automatically
show in the stock item vendor field in the bottom section.
When you are first starting out, you must type in Categories and Units. As you add more items you will be able to
select these fields from the drop-down lists (and never type them again).
Get all the fields correct and click the New button to save a new item, or the Save button to save changes to an
item.
If you have a number of items with similar descriptions, save time by clicking on one of them to load the
description, make your changes, and click the new item button.
Reusing "one-time" items
In the item list on individual orders there is an option to add "one time" items. Sometimes you may want to recall
one of these special items and order it again. To see them, right click on the stock items list and select "Show
past one-time items".
Copyright 2009, WaverlyStreet Software. All rights reserved.
7
5
Purchase Order Help
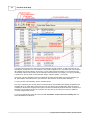
Adding Line Items to Orders
To add a stock item to a purchase order simply double-click on it (in the stock item list) and it will appear as a
line item in your purchase order, with a quantity of 1. If you are only buying a few of this item, you can increase
the quantity by double clicking again (each double-click in the stock item list adds 1 item above).
If you are buying a larger number, then add one by double-clicking, then double-click on the item in the Purchase
Order's list. This will bring up the line item editor, where you can type in any quantity, change the unit cost,
modify the description, change the unit of measure, or delete the item from that order. (You may also access this
by right-clicking and selecting "Edit this item" from the pop-up menu.)
Sometimes you may be quoted a lump-sum figure on a large quantity of something (x number of lineal feet, x
number of gallons, etc.); but you don't know (nor care) what the unit cost is. However, the program needs to
know in order to add things up correctly. Click the [?] button next to the unit cost figure to show the unit cost
calculator:
Copyright 2009, WaverlyStreet Software. All rights reserved.
Adding Line Items to Orders
8
One-Time Items
Note that whenever you add or change items, the extended pricing and order total are instantly adjusted.
Also note that when you select an item for editing you can make it's description MUCH longer than is allowed in
the stock items list.
To add a special, one-time item to an order, simply right-click anywhere in the Purchase Order's list, and select
"Add one time item" from the pop-up menu. Fill in the quantity, cost, description, etc., and click OK.
If you have added a one-time item to an order and then realize that it ought to be a stock item, right click it on the
order's listing and select "Add to stock item list".
Copyright 2009, WaverlyStreet Software. All rights reserved.
9
6
Purchase Order Help
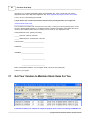
Combine Requisitions Into Bulk Orders
With version 2.3.01, you can take any number of requisitions and combine them into a single
purchase order. Use this feature in a multi-user environment to make sure that you get the best
prices through volume discounts.
To use this feature:
1) Click the new PO button to create your new blank bulk purchase order.
2) Right-click in the PO's empty item list (the upper half of the screen) and select "Insert whole
requisitions".
... The PO item list and the saved PO list will both shift to a different color background.
3) Now click once on each requisition you wish to add to the bulk order. The items will be added to the
order. Same items will cause the quantity to increase on existing line items in the order. The requisition
numbers (on the lower list) will be crossed out.
Copyright 2009, WaverlyStreet Software. All rights reserved.
Combine Requisitions Into Bulk Orders
10
4) When you have added all the requisitions you want to combine, again right-click in the PO's item list
and select "Quit inserting requisitions". You will be presented with a dialog showing the requisition
numbers processed, and options on what to do with them (the requisitions) to finish up.
7
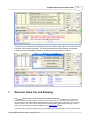
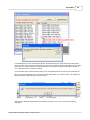
Discount, Sales Tax, and Shipping
The two-box Discount, Tax 1, and Tax 2 fields all operate the same way. The little box on the left is for a
multiplier to indicate the percentage. For example, if your vendor gives you a 25% discount, enter .25 in the
discount multiplier field, and the larger discount field on the right will automatically reflect this. If you are paying
sales tax of 6.5%, enter .065 in the tax multiplier field, and the calculation will be made accordingly. The tax
fields can be renamed and given default multipliers on the configuration 26 form.
If you don't want the program to figure this for you, but instead wish to manually enter in a value, then leave the
Copyright 2009, WaverlyStreet Software. All rights reserved.
11
Purchase Order Help
little box blank, and enter numbers in the larger boxes. When the little fields are blank (or zero), no automatic
calculations will be made.
The Shipping field simply accepts a typed value (no automatic calculations are made on it).
The default settings do not figure tax on shipping costs:
If shipping is taxable in your area, this can be changed in configuration
26
:
Copyright 2009, WaverlyStreet Software. All rights reserved.
Comments, Other Fields
8
12
Comments, Other Fields
By: - This is the name of the person creating / authorizing the order. Names entered here are saved for re-use in
a drop-down box.
On Site (date) - the date you want the materials to arrive. Use the little button to show a calendar to select from.
Via: - how you want the order shipped. For example "motor freight", "your truck", "pick up", etc. Items entered
here are saved for re-use in a drop-down box.
FOB: - (free on board) the point at which the responsibility for the shipment passes from the seller to the buyer.
For example, "factory", "jobsite", or a specific place. Items entered here are saved for re-use in a drop-down box.
Terms: - payment terms. For example, "net 10", "cash", etc. Items entered here are saved for re-use in a
drop-down box.
Order Date - the date of the order. Use the little button to show a calendar to select from.
"Account, Spare, Job Number" - these three fields can be used for your own internal tracking requirements,
however you see fit. All three can be renamed on the configuration 26 form, and you can chose whether or not
they are printed on forms as well. Note that you can use these fields to sort saved POs, to make them easier to
find later on. Items entered here are saved for re-use in a drop-down box.
Comments - this shows up at the bottom of orders, just above the signature line. Examples might include
"Prepay and add shipping and any applicable sales taxes.", "If unable to ship by the date specified please call
123 456 7890 immediately!", etc. Items entered here are saved for re-use in a drop-down box.
9
Working with Orders
There are six command buttons in the upper right corner which handle creating new orders, copying them,
saving, etc. Here is a rundown on what each does:
Copyright 2009, WaverlyStreet Software. All rights reserved.
13
Purchase Order Help
The New button creates a completely new order with all fields except the order date cleared. If you have
unsaved changes in another order, you will be prompted to save them first.
The Copy button creates a new PO with all fields filled in just as they are. This is a big time saver if you regularly
write similar orders, need to write the same order for many different ship-to addresses, etc. Just create the first
one (or select a previously saved order), and copy it!
The Wipe button has the same effect as New, except does not assign a new number.
Preview / Print displays the order as-is in the preview / print form.
The Save button saves all changes to the order you are working on, and also to the vendor and ship-to
addresses (if changed or new).
The Help button displays this help file (same as pressing the F1 key).
Across the top of the screen are three "status" choice controls:
Requisition simply makes it so the order says "REQUISITION" on it and Purchase Order makes it say
"PURCHASE ORDER" (the default). This is useful if your organization has several people who create orders, but
only one person authorized to release them. For example, a project manager might put together orders for all the
things he needs, saving them as requisitions, and let the purchasing agent know. Then the purchasing agent can
simply set the order list to only display requisitions, and process them easily.
Mark orders as Partly Received if only some of the items on the order have come in. This is simply to remind
you to follow up on the remainder of the order.
The Mark Received check box is useful for tagging orders which have been received, and no longer need to be
visible for normal operations. Save with this box checked and these items can be hidden from view on the main
order list. They can always be brought back in view (for duplicating them, general look-up, etc.) simply by
checking the "Received (Both)" box above the order list.
Orders can be locked
25
to prevent accidental changes from being made.
All orders that you save can be pulled up later for re-printing and/or copying. Click on the Saved Orders bar (just
below the Total field) to see the list. As mentioned above, you can select which items are listed here with the
Copyright 2009, WaverlyStreet Software. All rights reserved.
Working with Orders
14
three check boxes, Requisitions, Purchase Orders, and Received / Party Rec'd (Both).
Click the same bar (which now says "Stock Items List"), or double-click any order to return to normal display.
General Notes
You may keep a set of "general notes" attached to each order. There are two places where the notes can be
viewed and/or edited, as shown below:
Copyright 2009, WaverlyStreet Software. All rights reserved.
15
Purchase Order Help
Clicking the Add Notes button on the print/preview form will make the internal notes show at the
bottom of the printed order. (Click it again to return to normal)
10
Importing orders created on another computer
With version 4x, Purchase Order is able to import orders created on another Purchase Order
installation and sent via email. For example, a buyer with the program installed on their laptop can
create orders out in the field and email them to the main office. There, an assistant can import the
orders into the main PO database without having to type anything over again. The imported order can
be given the number of an existing (blank) order - in this way the buyer can call in, get an order
number to give to the vendor, then create it and send it in later.
For the remote user:
The user who will be creating orders out of the office and emailing them in might want to make the
following changes in their configuration.
First, name one of the three user-defined fields "Order#" (or the like). Next, make it so the PO number
prefix is that user field. Finally, check the box that says "Print ONLY the prefix as the 'PO Number' on
orders", and set the email send method to "System MAPI client".
Copyright 2009, WaverlyStreet Software. All rights reserved.
Importing orders created on another computer
16
With these changes, this user can essentially type in any order number, independent of the built in
sequential numbering system. This allows them to call into the office, get an order number, and issue a
PO with that number when they are not connected to the main data at the office. The order can be
printed and handed to the vendor, or emailed to them.
A copy should also be emailed to someone at the office so that they can incorporate it into the main
PO data structure.
In the main office:
The remote user will call in and ask for a PO number for a specific vendor. The person in the office will
create a new order and leave it blank except for the vendor name, and give the number to the remote
user. The remote user will then email the completed order back to the office, whereupon the person in
the office will import it into the system as follows:
Since the remote user is using the MAPI client email method, the PO will arrive as an attachment.
Click on the attachment (in your email program) and save it on your hard disk. Then in the PO
program, select 'File, Import requisition' and locate the saved attachment. Click it, and select 'Open' in
the file dialog. The complete order will appear in the upper half of the main form, just as if it have been
created locally. It will show (PEND) in the PO number field. Click the Save button, and you will be
Copyright 2009, WaverlyStreet Software. All rights reserved.
17
Purchase Order Help
presented with numbering options:
You can either pick the previously assigned number which the remote user called in for, or have the
system assign the next number in the system as usual.
Notes:
The remote user should have the default local data directory set as their "Main data folder" in
configuration. When they are in the office and connected to the network, they should create an
alternate data set and have it's "Main data folder" point to the network data folder other users are
connecting to normally. When in the office, they should go to the alternate and run File, Data Backup,
choosing their local data directory as the Target. In this way, they will carry with them the current PO
data, stock list, etc., just as everyone else sees it (well, current as of the time they ran the backup).
11
Currency Conversion
With version 3.1.02, the program can optionally convert the order total into a different currency.
Click on the word "Total:" to show the currency conversion form. Type in a short description of the conversion (ie:
"USD > EUR"), look up the current conversion rate at your favorite rate site and type in the correct multiplier,
then click the Save / Exit button.
Back on the main screen, save the order, and view it to make sure things are as you want.
Copyright 2009, WaverlyStreet Software. All rights reserved.
Currency Conversion
18
The last description and multiplier you use are saved for re-use.
The converted amount is ONLY printed at the bottom of the order - it is not stored for any reporting
functions.
12
Assemblies
With version 3.1, Purchase Order includes automatic order creation functions based on Assemblies lists.
For example, suppose you manufacture a line of widgets. Each model of widget requires a certain number of
parts, from various suppliers. With the PO Assemblies functions, you first create a list of parts for one of each
model widget you build. Then when it's time to order parts for a production run, you simply select the correct
parts lists, input a quantity of each model you need to buy for, and the program automatically creates purchase
orders for each vendor for the total quantity of parts required.
Each item on an assembly list must first be put in the program as a normal stock item
5
.
To get started, select the menu item File, Assemblies, Create / edit assemblies. The Assembly Edit form
will show:
Copyright 2009, WaverlyStreet Software. All rights reserved.
19
Purchase Order Help
The lower half of the form is the same as the stock items list in the main program. To add a stock item to your
assembly list, double-click on it in the lower list. If the quantity required is not 1, then double-click it on the upper
list to display the line item edit form. On this form you may either change the quantity or remove the item from
the assembly. Note that the quantity can be fractional (in decimal format). For example, you may buy something
in packs of ten, but only need 1 for this particular widget - make the quantity .1 (one tenth).
At any time, type in a descriptive name for the assembly and click the save button; the program will save your
list. (Note that the name will receive a ".poa" extension - this stands for "purchase order assembly". )
To view a printout of the assembly, click the View/Print button.
Note: if you change the price of stock items in the stock item list, they DO NOT automatically get updated in the
assembly list(s). To update them, select each list in turn and click the price update button. When the process
completes, it will show the changed prices in blue. It will also show assembly list items that were not found in the
stock list in red. Assembly list items do not have to be in the stock list, but their prices cannot be updated or
manually changed if they are not.
To use your assembly lists, select the menu item File, Assemblies, Create orders from assembly lists. The
Select Assemblies form will show:
Copyright 2009, WaverlyStreet Software. All rights reserved.
Assemblies
20
The assembly lists you have created will be listed on the left side of the form. (Note the question about prices
being up to date; if not, click the Cancel button and go back to the assembly edit form and update them.) Doubleclick names on the left to add them to the production list on the right side. They will initially have a quantity of
zero - double-click them to change the quantity.
If you click either OK or Cancel with the quantity at zero, the assembly will be removed from the production list.
When you have the quantities correct, click the Generate Orders button, and confirm the fact. The program will
then generate the orders and tell you what it has done:
Click OK, then display the Saved Orders list. Pick each new order in turn, check it, and fill in the missing
information.
Copyright 2009, WaverlyStreet Software. All rights reserved.
21
13
Purchase Order Help
Receiving Tools
Purchase Order has several features to help with receiving and tracking the status of orders.
- On the print/preview form 21 , click the "no price" button to display and print out a copy of your orders
with no prices on them. Give this copy to the receiver to mark up on the loading dock.
- When orders come in, use the "Partly Received" and "Fully Received" check boxes to segregate
them from open orders and pending requisitions.
- To keep partially received orders straight, you may edit the individual line items. The "X" and "Rec'd"
columns on the individual PO listings come into play:
These columns are adjusted by double-clicking the line items to being up the line items edit box and
filling in the quantity received field at the bottom of the form:
14
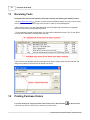
Printing Purchase Orders
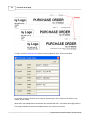
To preview and/or print out your purchase orders click the Print / Preview button
This will bring up the Print / Preview form, with the current order loaded.
on the main form.
Copyright 2009, WaverlyStreet Software. All rights reserved.
Printing Purchase Orders
22
The Configuration button allows you to tweak the font, page "fit" values, etc. in real time and see the results
immediately.
The Save button allows you to save a copy of the order in a different folder (if desired, not necessary).
The Print button brings up the standard Windows print dialog.
The Print Envelope button brings up a handy envelope printing utility.
The Email button brings up your choice of email options
your system's default MAPI email client.
23
- either the built-in direct method (best choice), or
The Price/No Price button toggles the display between a normal version of the order (with prices) and a special
version that has no prices on it. Use the no-price version as a receiving check list, etc.
The Notes/No Notes button toggles the display between a normal version of the order (without internal notes)
and a special version with the internal notes appended to the bottom.
Printing a set with headers & footers:
You may configure custom headers and footers 34 to print on your orders. Once you have set that up, print them
by selecting the menu item from the print/preview form:
Copyright 2009, WaverlyStreet Software. All rights reserved.
23
15
Purchase Order Help
Email Options
Purchase Order can send documents via email in two different manners. You can pick the method you wish
to use on the configuration form:
The default method is Direct via SMTP server.
This gives the best-looking result on the receiving end with most email programs because the email body is
actually in true .HTML format, with your logo graphic encoded right in. The first time you use the method, you
must specify an SMTP server:
Copyright 2009, WaverlyStreet Software. All rights reserved.
Email Options
24
By default, you are sent a "Blind Carbon Copy" (BCC) of the order so that you can file it in your email program's
normal "sent items" folder.
Note that if you put your vendor's email address in their PO "To:" record (along with company name and surface
address), the direct email option will find it and automatically put it in the email "To:" field for you!
You may put multiple addresses in all address fields, separated by commas.
You may also attach a file to the e-mail with the File Attachment button [...] below the memo field (not shown).
Use this to send things like W9 forms, etc.
The other method is System MAPI client.
This method starts up your default MAPI system email program (such as Outlook) and adds the document and
your logo graphic as attachments. The drawback of this is that the recipient must go through some extra steps in
their end to view the order.
16
List Refresh Indicator
Purchase Order uses a colored indicator (red/green>) to tell you whether or not you need to refresh the Saved
Orders and Stock Items lists in a multi-user environment. If the indicator is red, that means that another user has
either added a new item or made a change to an existing one, and the change does not show on your display
yet.
Copyright 2009, WaverlyStreet Software. All rights reserved.
25
Purchase Order Help
It is not necessary to refresh before creating a new order - the program will get the correct next number even if
your display is not current.
Also note that you can hit the refresh button whenever you want, even if the indicator is green.
You would certainly want the indicator green before making any reports.
The purpose of this is simply to eliminate un-necessary refreshing (and speed up operation) in a multi-user
environment.
17
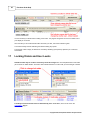
Locking Orders and User Levels
Individual orders may be "locked" so that they cannot be changed. This is accomplished with a lock button
just to the left of "Order Details". The button also indicates whether or not the order you are looking at is locked.
The ability to lock and unlock orders is determined by one's "user level", which can be set on the
configuration 26 form.
Copyright 2009, WaverlyStreet Software. All rights reserved.
Locking Orders and User Levels
26
The levels are as follows:
1) read and make reports only
2) create requisitions only, cannot lock or unlock
3) full control
By default, new users are set at level three. After the program is purchased, the user level cannot be changed
without the program registration key as a password.
If you wish to allow small orders to bypass the approval process altogether, type in a monetary threshold
number. Any order below that amount will be approved by default.
18
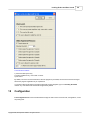
Configuration
The Configuration form can be accessed either through the main screen menu item File, Configuration, or from
the printing form.
Copyright 2009, WaverlyStreet Software. All rights reserved.
27
Purchase Order Help
It is divided into six general areas, as follows:
Purchase Order Appearance
If you wish to change from the default font, "Arial", click the [...] button and select another. Note that not all fonts
print the same way as they display in the viewer!
Your company information is shown in the upper left corner of all orders. You may either use text for this, or
select a graphic file to use instead. If you use a graphic, make sure it does not exceed roughly 300 wide x 100
tall.
If you want the printed name of the person authorized to sign orders to appear above the signature line, enter it
in the Buyer's name field.
If you wish to include a scanned graphic image of your signature, create it with a scanner and a paint program,
then specify it in the Signature Graphic area. Make sure the box is checked as well. The maximum width of the
graphic should be a bit less than 1/2 the over-all width of the form, or around 300 pixels.
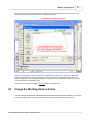
Printer "Fit" Adjustments
Purchase Order creates .html documents (web pages, essentially) and displays them in a scaled-back web
browser for preview and printing. If your printed output does not look like you want it too, these three adjustments
Copyright 2009, WaverlyStreet Software. All rights reserved.
Configuration
28
may be helpful. Each is changed by clicking the [+] or [-] buttons, or returned to the default setting with the little
"default" button.
"Over-all width of form" adjusts just that - over-all width. The default is 640, which works well with most printers
set at their default margin widths.
"Bottom of form spacing" adjusts the placement of the totals and the signature line on your forms. It is literally the
number of blank lines inserted between the top of the form and the bottom. The program counts the number of
line items your order contains, subtracts that from this figure, and inserts blank lines. The goal is to make it so
most purchase orders fit neatly on a single page. If your orders are spilling onto two printed pages (even though
they only have a few line items on them) then decrease this value. If the signature line is always further up than
you want it to be, increase the value. Obviously, if you have a great many line items on a single order, it will go to
two (or more) no matter what.
"Characters in description lines" is related to bottom of form spacing, over-all width, and your font selection. If
your line item descriptions are so long that they wrap to more than one line, then one less blank space needs to
be inserted to keep the bottom of the form in place. This value is an estimated average number of characters
each line item description contains. Think of this as the "fine" adjustment, after you have settled on a font and an
over-all width.
"Top of form spacing" pushes the entire document down from the top of the paper. This is useful if you wish to
print Purchase Orders on pre-printed letterhead stock - adjust the value until the PO does not print over your
letterhead. Note that you will need to decrease the bottom of form spacing a corresponding amount.
If you have called the configuration form from the Preview / Print form, then the "Rewrite" button will be enabled.
Click it, and the order will be re-displayed immediately so that you can check it's appearance, printing
characteristics, etc.
Other Settings
You may specify a fixed prefix for all PO numbers. Possible uses might be to differentiate between regional
offices of the same company, or to flag order numbers with your company acronym (making them easier to
locate in other systems). If the field is empty, it is not used at all.
You may also have one of the three user defined fields act as the PO number prefix. To do this, just click the
appropriate field number button (1, 2, or 3).
Both types of prefixes may be used at the same time (the fixed one will come first, followed by the user defined
field).
Print ONLY the prefix as the "PO Number" on orders: If this checked, then the PO number as printed on orders
will only contain the prefix, not the actual order number assigned and used by the system. This is only intended
to be used by remote users who are emailing orders into the main office 15 .
Default tax multipliers - enter a decimal value here and it will be inserted into all new orders automatically.
Use "On Hand" column in stock items listing: This optional feature adds another column in the Stock Items list
which you may use to keep track of how many of each item you have on-hand. It's entirely manual - right-click on
any item to adjust the quantity.
Tax shipping charges: This is a "global" change that makes the program add shipping costs and material costs
together before calculating tax. By default, this is not done (no tax is figured on freight costs). If shipping
charges are taxable for you, check this box and re-start the program. If in a multi-user environment, make sure
everyone is set the same!
Do not use document number on requisitions: This optional feature simply makes it so the document number is
not printed on your requisitions.
Do not insert part numbers before descriptions: By default, part numbers are placed before descriptions when
stock items are added to orders. Checking this option turns that off.
Print line item line numbers on orders: If checked, each line item is given a line number on the order. Makes it
easier to discuss orders over the phone if they have lots of items on them.
Copyright 2009, WaverlyStreet Software. All rights reserved.
29
Purchase Order Help
Print Quantity Received Info on orders: When this is checked, information on the quantity received will be shown
in the "Quant" column of orders (if you mark items received).
Mention that internal notes exist on orders: If this is checked, and if an order has internal notes, there will be a
mention of the fact down at the bottom of the order.
Automatically refresh Category, Vendor, and Unit fields: This refers to the drop-down fields used for creating new
stock items. By default, these fields are automatically populated with values taken from the stock items as you
work. However, if there are many hundreds of stock items listed the process of automatically updating these
fields can have a significant negative impact on program speed. By un-checking this option, you may get
dramatically quicker program start-up times. Since these fields are only of use during the creation of new stock
items, many users will not even notice they are not being filled. When this option is turned "off" a small [!] button
will appear just to the left of the Category drop-down; clicking this will populate the fields as before.
Print "ASAP" if on-site date is left blank: If checked, orders with blank an otherwise blank on-site date field will
show "ASAP" on the printed order. The wording can be changed with the "wording on forms" feature.
The three user defined fields can all be renamed, and you can specify whether or not each one is printed on your
orders (or is just for "internal use").
Program start-up password: If desired, you can enter in a password which the program will require upon start-up.
The password is case-sensitive, and can be any combination of alpha-numeric characters. If the password is
forgotten, the second set of six characters in your registration key can be used instead (after purchasing the
program).
Sending E-mail: Check the e-mail method you wish to use - Direct via SMTP server, or System MAPI client.
Data Directory: In this section, you can select a Main and an (optional) ShareCon data directory for each
configuration. Purchase Order is a multi-user application. Select the same shared folder for all users, and
everyone will have access to the same data, saved orders, etc.
User Level and Approval Setup
From the configuration form's menu, select "User level and approval setup":
... to show the User Level and Approval Setup form:
Copyright 2009, WaverlyStreet Software. All rights reserved.
Configuration
30
Click the Change button to modify the settings. Note - for security, once the program has been purchased, these
settings can only be changed by entering in the second six characters of the registration key.
User Level: By default, all users are set at level 3 (full control). If desired, individual users may be restricted by
changing their user level.
Individual users can also be locked out of making any changes to the stock items list. Just un-check the "This
user is allowed to modify the stock list" option. Restricted users can still add one-off items to orders if they need
to do something special.
Order Approval Process
To "turn on" the approval system, check the box "Require Approvals".
Pick one of the 5 items to specify how many approvals are required.
Check the box "This user is allowed to approve orders" to make this user one of the people with approval rights.
If the user has approval rights, furnish their initials. Do not have duplicate initials in the system!
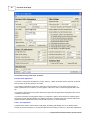
"Publishing" configuration for others to adopt
If you are setting up for multiple users, you can save a lot of effort by using this feature. Get all the printing,
appearance, and other settings the way you want on one machine, then "publish" it to the data directory. On the
other machines, just set the main data directory and adopt the published configuration you created on the 1st
Copyright 2009, WaverlyStreet Software. All rights reserved.
31
Purchase Order Help
machine:
19
Multiple Configurations
You can create multiple configurations, each with it's own data folder and other options. Use these to keep
different company department purchasing activities separate, but at the same time allow supervision through the
same interface. To get started, click File, Alternate data set. This will display the Alternate Data Sets form:
The first time you enter into a new data set, you will get this message:
Copyright 2009, WaverlyStreet Software. All rights reserved.
Multiple Configurations
32
Click OK, and then go into configuration again. Note that now the configuration form will show the name of the
alternate up at the top. Select and/or create a new data directory for it:
Make any other changes you wish, and SAVE the configuration. From then on, you will be able to select this
alternate configuration, with all it's unique settings, simply by selecting it on the alternate data set form. The
different configurations are completely independent of one another. They have separate numbering sequences,
and must be backed up separately as well.
A single user can be assigned a different user level
20
25
in each configuration.
Change the Wording Used on Forms
You may change all of the words and phrases Purchase Order uses on the forms it creates. To access this
feature, select Configuration, then on the configuration form File, Change the wording used on forms.
Copyright 2009, WaverlyStreet Software. All rights reserved.
33
Purchase Order Help
There are default sets built in for English, French, German, and Spanish, plus you can modify individual items as
you wish. If you are working in a shared data directory, changing the wording at one station carries over to all
others (after they re-start).
21
"Fine Print" - extended terms & conditions
Orders may include one or two fixed blocks of text (the "fine print", so to speak). To edit/enable the "fine
print", click the button on the configuration form.
Copyright 2009, WaverlyStreet Software. All rights reserved.
"Fine Print" - extended terms & conditions
Note that each data directory
22
31
34
configuration has separate "fine print" and settings.
Printing with headers and footers
The basic print button on the print/preview form prints a single copy with no header or footer. If
desired, you can also configure a "set" of multiple copies to be printed, each with a different
header and/or footer printed on it. For example, "COPY 1 - VENDOR", "COPY 2 ACCOUNTING", "COPY 3 - RECEIVING", "COPY 4 - FILE", etc.
Copyright 2009, WaverlyStreet Software. All rights reserved.
35
Purchase Order Help
To begin, click the Headers/Footers button on the configuration form. This form will show:
Your printer will print 1 sheet for each "Copy #x" checked (up to five). Each one can have it's own
header, footer, or both.
(Note that in the example above the headers are preceded with "&b" - this makes them right-justified.)
The setup information is stored in the data directory, and common to all users.
Copyright 2009, WaverlyStreet Software. All rights reserved.
Printing with headers and footers
36
To print the set, select the menu item on the print/preview form:
23
Setting Initial PO Number
If you have already been using numbered purchase orders and wish to continue in the same sequence,
double-click on the "No:" label (just left of the PO number field). Doing this will temporarily un-lock the field so
that you can type in a starting number other than "000001". Make sure you type in a six-place number including
leading zeros.
Save the order, and confirm that it shows up in the saved purchase orders list at the bottom of the screen.
From here on out your PO numbers will go up from the starting number, in line with your old system.
DO NOT use this feature regularly! It is only intended to be used ONCE, idealy when you first start using
the system.
24
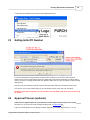
Approval Process (optional)
If desired, the program may be set up so that orders must be approved before they can be issued. To turn
this option "on", go to the User Level and Approval Setup form in configuration 26 .
There are several differences in the program interface, depending on whether approvals are "on" or "off".
Copyright 2009, WaverlyStreet Software. All rights reserved.
37
Purchase Order Help
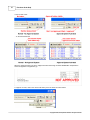
In the top right corner:
... on the saved orders list:
When the approval system is in place, unapproved orders have a big red "NOT APPROVED" stamped down
where the signature is supposed to go:
To approve an order, click on the check mark button just to the left of the order number:
Copyright 2009, WaverlyStreet Software. All rights reserved.
Approval Process (optional)
38
... this form will show:
On this form anyone can see who has already approved the order and whether or not additional approval is
required. Users who are configured to grant approval can do so, and they may also revoke their own approval if
need be.
Approvals may be granted or revoked even if an order is locked.
If you wish to allow small orders to bypass the approval process altogether, type in a monetary threshold
number on the User Level and Approval setup form 25 . Any order below that amount will be approved by
default.
25
Reports
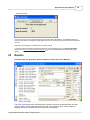
Purchase order can generate a number of reports. See the menu item "Reports":
The Order Detail reports show each listed order's number, the three user-defined fields, the order
date, the vendor, and the total amount of each order. It also totals up all the orders, breaks out
shipping and taxes, and shows the net total (less tax and shipping).
Copyright 2009, WaverlyStreet Software. All rights reserved.
39
Purchase Order Help
Check Include notes in above reports to have the internal notes included in the order detail report(s).
The Line Item reports look at all the listed orders and extracts their individual line items. Identical items
are grouped together into a single line, with the total quantity found in all the orders. For each unique
item the report shows quantity, unit (of measure), part number & description, unit cost, and total cost. It
then shows a grand total (which will match the net total in an Order Detail report on the same orders).
Note: the line item options will first display the items on an interim form. On this form you may click any
column header to sort the items the way you want them displayed in the report. When you have them
sorted, click the Report button on the interim form.
IMPORTANT: In both the detail and line item reports, only the orders currently shown in the
saved orders list are included! So, for example, if you wish to see only what you actually bought
during a certain month, first uncheck "Requisition", "Purchase Order", and "Partly Received" above the
saved orders list, leaving only "Fully Received" checked. Then select File, Date Range and set the two
dates to encompass the month you are after. The saved orders list will now show only fully received
orders placed during that month; make a report, and it will only contain those orders.
To narrow down your report to only a certain vendor, destination, buyer, or one of the three user
defined fields, first select ANY order which contains the attribute you are after. For example, in the
picture above, I've selected a random order shipped to Dave's Big Stores, under the Tools account,
Home region, job number 1205. If I select "Order details - all for current job number", I'll get a report
showing all currently listed orders for job number 1205.
The Vendor list and Destination list items do just what they sound like they will do.
The Stock List reports work similarly to the order reports in that to narrow down to a certain vendor or
category you first select any random stock item in from the category or vendor you're after. If you have
"Use on hand column in stock items listing" selected in configuration, the stock reports will show the
quantities on hand and their value.
All of the reports are displayed on the same print/preview screen the orders are, and can be printed,
saved, or e-mailed from there just like a PO.
If you need more flexibility, all report data may be exported into your spreadsheet program. Simply
click the .XLS button on the report print/preview form:
... click it, select a filename, and the data will be exported. The program will even offer to try to start
your spreadsheet program and display it.
Copyright 2009, WaverlyStreet Software. All rights reserved.
Reports
26
40
Data Export
Purchase Order can export basic data on saved purchase orders in comma-separated values format (.CSV) for
use in other programs such as spreadsheets. Select the menu item File, Data Export.
Fields included in the export file are as follows:
PO Number
Job Number
Order Date
Vendor
Ship To
Order Total
Shipping
Tax
Net
Discount
List (cost of items before discount & tax)
27
Import / Export Stock Items
Purchase Order can import and export Stock Item data in several different formats. You can take the list of stock
items created at one Purchase Order installation and transfer it to another, thus saving all the data entry work.
Vendors - create lists of all your products and email the data to your customers who use our Purchase
Order program!
See the menu items File, Export stock items data and File, Import stock items data.
Copyright 2009, WaverlyStreet Software. All rights reserved.
41
Purchase Order Help
Import / Export in native format (.SID)
Export stock items data (.SID format): includes only the items currently displayed on the stock items list. In this
way you can narrow it down to a single vendor by selecting that vendor in the "To:" field and checking the box to
"Show Only Stock Items For The Current Vendor". If a single vendor is selected the program will suggest naming
the export file with that vendor's name. If multiple vendors are selected, the export file will have a generic name.
Simply select the menu item File, Export stock items data, accept the suggested filename (or provide another)
and click Save. The export file will have the extension ".sid" (stock items data). Create the file and email it to its
destination.
Import stock items (.SID format): looks at the new records to determine if they are duplicates. A duplicate has the
same Vendor name AND the same Description (not case sensitive). Duplicates are always replaced by the new
record. In this way the export / import operation may be used to change prices, categories, and units of measure
for existing items. New items contained in the import file which are not duplicates are simply added to the list.
Import / Export in tab-delimited or .CSV format
Stock List can import any list of items that you can display in a spreadsheet program (such as Microsoft Excel).
Simply arrange the columns in the correct order (in the spreadsheet) and export a .CSV or tab-delimited text file.
Stock List can then read in the data and put it in the correct format for our Purchase Order and/or Proposal /
Invoice programs.
Copyright 2009, WaverlyStreet Software. All rights reserved.
Import / Export Stock Items
42
Step by step instructions:
1) In your spreadsheet program (Microsoft Excel for example), arrange the data in the five (or six) columns
shown below, and in the order shown below.
Category | Vendor | Unit (of measure) | Description | Unit Cost | Quant. On Hand (optional)
2) Select (in the spreadsheet) menu item File, Save As and pick either ".CSV (Comma Delimited)" or "Text (Tab
Delimited)" for the "Save as type:" value. Give a file name, click the "Save" button, and quit the spreadsheet
program.
3) Start Purchase Order, and select "File, Import .CSV or tab delimited format". On the import form, click the
correct button (.CSV or Tab Delimited) and find that file you just created. Purchase Order will import the data and
display if for checking.
4) If the data looks good, you can either incorporate it directly into the data Purchase Order is currently using
with the Merge w/ Stock List button, or save it as a separate .SID format file with the Export SID button.
Prior to running any import operation it is strongly suggested that a complete data backup
28
42
is done.
Data backup / restore
Purchase Order includes convenient data backup and restore functions. These are accessed through the menu
items File, Data backup and File, Data restore.
Copyright 2009, WaverlyStreet Software. All rights reserved.
43
Purchase Order Help
As with any computer program, it is a very good idea to backup your data from time to time so that if the disk
drive containing the main data folder fails, you won't lose everything. (And all drives WILL fail eventually!) Note
that in the screenshot above the backup Target is on a different machine than the Source. Should the server
("\D5r3p7) fail, I will be able to restore all data to a new server easily.
29
Technical Notes
Purchase Order must be installed on individual workstations, not on a file server. It becomes multi-user
when the Main Data Directory is set to a common shared directory on your network, from the
configuration 26 form. All users must have full read-write access to the shared directory.
Upon installation and/or if not present, the program creates a folder in which to store it's configuration
Copyright 2009, WaverlyStreet Software. All rights reserved.
Technical Notes
44
settings and some other information. This folder goes in the Application Data area, typically:
C:\Documents and Settings\[user's name]\Application Data\WaverlyStreet
In the WaverlyStreet folder will be:
po3x.cfg
whatsnew.dat
po3x-1.cfg
datasets.dat
envelope.cfg
the start-up configuration file
internal info for the built-in "check what's new" reminder
additional data set configuration files (if used) (-1, -2, -3, etc.)
the list of alternate data sets (if used)
envelope printing settings (only after you have used the envelope printing utility)
Also upon installation, a default data directory is created within the WaverlyStreet folder. Typically:
C:\Documents and Settings\[user's name]\Application Data\WaverlyStreet\po_data
After the program has been run through all it's operations, it will have created the following files in the
data directory:
po_data.v2dat main index file
po_stock.dat
stock items data file
li.dat
list of users logged into the directory
po_addy.dat
addresses
by_field.dat
com_field.dat
fob_field.dat
gln_field.dat
jno_field.dat
ter_field.dat
udf_field.dat
via_field.dat
"by" drop-down list
"comments" drop-down list
"FOB" drop-down list
user field drop-down
user field drop-down
"terms" drop-down list
user field drop-down
"via" drop-down list
fineprint1.txt
fine print 1
fineprint2.txt
fine print 2
form_words.txt words on form list
headfoot.cfg
batch printing headers and footers
po_top.gif
the default top graphic file
It will also create a subfolder in the data folder named for the current year (\2006, \2007, etc. The
individual purchase orders each have an .htm file, which are contained in these yearly folders. The .
htm files are named [po number].htm. Also present will be files named _[po number].htm (preceding
underscore) - these are the no-price versions of the orders. The top graphic file will also appear here
after the first order is created.
Whenever a different main data folder is selected in configuration, all the above files will be created if
they don't already exist there.
30
How to Buy "Purchase Order"
In order to use "Purchase Order" beyond the 50 use trial period, you must buy it from WaverlyStreet. It
only costs $239.00 US for the first user, and only $100.00 US for each additional. When you buy, we will
Copyright 2009, WaverlyStreet Software. All rights reserved.
45
Purchase Order Help
generate for you a matching Registration Name and Registration Key, which you will then enter into the
appropriate boxes under Help, Enter Registration Key. Once registered, all program functions are restored.
To buy, use one of the following two methods:
1) If you wish to use a credit card, and have internet access you may purchase on line right now:
"Purchase Order" Order Form
2) If you wish to use surface mail, send a check, money order, or cash (US funds only please) for the correct
amount to WaverlyStreet Software, 277 W. Brighton Road, Columbus Ohio 43202, United States. Be sure to
include a return address (either surface or email) so we can send you your registration code!
Surface Mail Order Form: (please print clearly)
______ First User - $239.00, US funds.
______ Additional Users - $100.00 Each, US funds.
Total enclosed: ___________________________
COMPANY: ______________________________
ADDRESS:______________________________
_______________________________
_______________________________
Mail to: WaverlyStreet Software, 277 W. Brighton Road, Columbus, Ohio 43202 (US)
Thanks for your support!
31
Get Your Vendors to Maintain Stock Items For You
The Stock List Utility is an inexpensive companion program which creates item catalogs for IMPORT into
Copyright 2009, WaverlyStreet Software. All rights reserved.
Get Your Vendors to Maintain Stock Items For You
46
Purchase Order.
Creates a list and data import file that can be emailed to customers using a built-in mail form, and uploaded to a
web site using a built-in FTP utility. Click here to download Stock List and try it out!
32
License - disclaimer of warranty
Great care has been taken to make sure that "Purchase Order" is a solid and dependable computer program.
The program is written in Microsoft Visual Basic version 5 (SP3), and the installation is performed by Inno Setup
5.1.5. The program, installation, and un-installation have been extensively tested on several in house machines
and also by a number of outside "beta testers". However, it is simply not possible to test on every conceivable
hardware/operating system combination, and so therefore it is impossible to say for sure that "Purchase Order"
will function flawlessly on your system.
License - disclaimer of warranty:
Prior to installing "Purchase Order" (hereinafter referred to as the SOFTWARE) you agreed to the license terms
and other provisions contained herein:
The SOFTWARE and accompanying documentation are protected by United States copyright law and also by
international treaty provisions. In exchange for the purchase price, WaverlyStreet grants you a limited license to
install and use the SOFTWARE on a single computer. You are explicitly prohibited from copying, renting,
leasing, selling, modifying, decompiling, disassembling, or transferring the program license to others. Any such
unauthorized use shall result in immediate and automatic termination of this license. All rights not expressly
granted here are reserved to WaverlyStreet.
NO WARRANTY - THE SOFTWARE IS PROVIDED ON AN "AS IS" BASIS. WAVERLYSTREET DISCLAIMS
ALL WARRANTIES RELATING TO THE SOFTWARE, WHETHER EXPRESSED OR IMPLIED, INCLUDING
BUT NOT LIMITED TO ANY IMPLIED WARRANTIES OF MERCHANTABILITY OR FITNESS FOR A
PARTICULAR PURPOSE. NEITHER WAVERLYSTREET NOR ANYONE ELSE WHO HAS BEEN INVOLVED IN
THE CREATION, PRODUCTION, OR DELIVERY OF THE SOFTWARE SHALL BE LIABLE FOR ANY
INDIRECT, CONSEQUENTIAL, OR INCIDENTAL DAMAGES ARISING OUT OF THE USE OR INABILITY TO
USE THE SOFTWARE, EVEN IF WAVERLYSTREET HAS BEEN ADVISED OF THE POSSIBILITY OF SUCH
DAMAGES OR CLAIMS. THE PERSON USING THE SOFTWARE BEARS ALL RISK AS TO THE QUALITY AND
PERFORMANCE OF THE SOFTWARE.
WaverlyStreet's maximum liability under this Agreement for all damages, losses, costs and causes of actions
from any and all claims (whether in contract, tort, including negligence, quasi-contract, statutory or otherwise)
shall not exceed the actual dollar amount paid by you for the software.
This agreement shall be governed by the laws of the State of Ohio (USA) and shall inure to the benefit of
WaverlyStreet and any successors, administrators, heirs and assigns. Any action or proceeding brought by
either party against the other arising out of or related to this agreement shall be brought only in a STATE or
FEDERAL COURT of competent jurisdiction located in Franklin County, Ohio. The parties hereby consent to in
personam jurisdiction of said courts.
Copyright 2009, WaverlyStreet Software. All rights reserved.