1
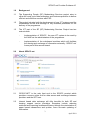
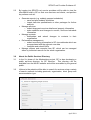
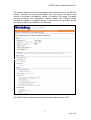
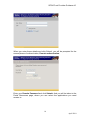
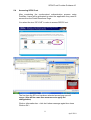
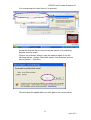
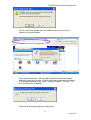
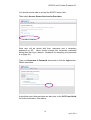
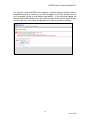
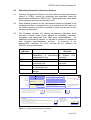
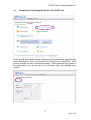
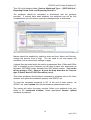
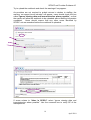
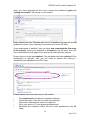
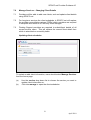
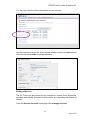
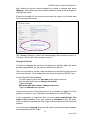
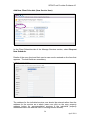
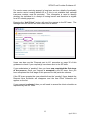
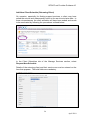
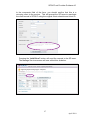
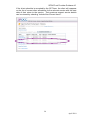
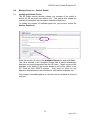
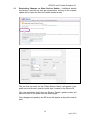
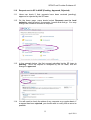
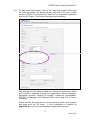
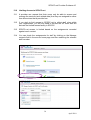
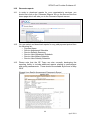
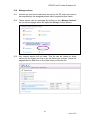
SPOCC.net Briefing
For Providers
User Name
Guidance and Useful information
Version History
Version 1 – Issued on 26th April 2010
SPOCC.net Provider Guidance V1
Contents
Page Number
1.0
Background
3
2.0
About SPOCC.net
3
3.0
About the Public Service Directory
4
4.0
Security & Access to SPOCC.net via PortWise
6
5.0
Logging onto SPOCC.net
8
6.0
Submitting Quarterly Performance Returns
16
7.0
Manage Services – Updating Client Details for
Long term Subsidy Services & Floating Support
21
8.0
Manage Services – Updates to Service Details
29
9.0
Submitting a new QAF
31
10.0
Manage Contract Documents
33
11.0
Requests sent to Supporting People, NIHE
(Pending, Approved & Rejected)
35
12.0
Manage Contacts (Change Staff Details)
36
13.0
Limiting Access to SPOCC.net
38
14.0
Generating Reports
40
15.0
Manage Actions
41
16.0
Change Password
42
17.0
Logging Out
43
18.0
SPOCC.net Guidance & Support
44
2
April 2010
SPOCC.net Provider Guidance V1
1.0
Background
1.1
The Supporting People (SP) Modernising Services project aims to
utilise the most up-to-date technology and business practices to deliver
efficient and effective services within SP.
1.2
The project includes both the development of new ICT systems and the
fundamental review and redesign of key business processes for the
delivery of the programme.
1.3
The ICT part of the SP (SP) Modernising Services Project has two
main strands:
2.0
-
Implementation of ‘SPOCC’, the core ICT system to be used by
the NIHE as the administrators of the programme.
-
Implementation of the web-based modules which will facilitate
the sharing and exchange of information externally. ‘SPOCC.net’
forms part of this second strand.
About SPOCC.net
User Name
2.1
‘SPOCC.NET’ is the web front end to the SPOCC product which
provides a secure online link for data access and exchange between
providers and the SP Team.
2.2
Internet based data exchange will offer benefits for both SP and
housing support service providers. Examples include reducing
workload and improving business efficiency through the minimisation of
paper based transactions and quicker, more accurate updating of
information.
3
April 2010
SPOCC.net Provider Guidance V1
2.3
By logging into SPOCC.net, service providers will be able to view the
information held by SP on their own services and clients, and perform
key actions such as:
•
•
•
•
•
Generate reports (e.g. subsidy payment schedules)
o save and print subsidy schedules
o import data into spreadsheets or other packages for further
analysis
Manage services:
o submit changes to service details and property information
o make additions and changes to service, client and schedule
information
Manage contacts:
o Add/update and submit changes to contacts in their
organisation
Performance management:
o submit monitoring information to SP via workbooks which are
pre-populated with the relevant core data
o complete and submit QAFs
Manage actions and requests from SP, which can be managed
either by individual users or for the whole organisation.
3.0
About the Public Services Directory
3.1
In the 2nd phase of the Modernising project, SP is also developing a
public services directory for SP services. This directory will be
available from the NIHE’s website and will be accessible by the general
public.
3.2
Visitors to the website will be able to search for services using a variety
of search methods including postcode, organisation, client group and
accommodation type.
4
April 2010
SPOCC.net Provider Guidance V1
The service directory will be pre-populated with information from the SPOCC
system, including the service description, the client group for which each
service is provided, the eligibility criteria, its location, the range of support
services provided, any exclusions, contact details and referral routes.
Information related to available places in the service as specified by the
provider can also be published on the directory.
The Public Services Directory will be launched in early summer 2010.
5
April 2010
SPOCC.net Provider Guidance V1
4.0
Security & Access to SPOCC.net
4.1
SPOCC.net is a secure provider area of the SPOCC system and is only
available to authorised users who can only access information relevant
to their own organisation.
4.2
Users will access SPOCC.net through the NIHE’s system using
PortWise, the remote access management software used by the NIHE.
This means that there will be an additional layer of security required
and it will not be possible for users to log directly into SPOCC.net.
4.3
Each time a user wants to use SPOCC.net, they will firstly have to gain
access to the NIHE system through PortWise. This will involve
entering a user name and pin number which will allow you to generate
the ‘one time password’ needed to log on to the PortWise Portal.
When you have accessed the NIHE system, you will then be able to
access SPOCC.net by entering your SPOCC.net password.
4.4
Overview of PortWise Set Up Process
4.4.1 Each user will need to have a PortWise account before they can use
SPOCC.net and the PortWise software will have to be installed on their
PCs.
4.4.2
For PortWise accounts to be issued, provider organisations must
complete and return a Conditions of Connection form. This document
is designed to ensure that all NIHE information held or accessed by a
third party via remote access is protected and remains secure at all
times.
4.4.3 Set up of accounts will be completed by the Housing Executive’s
strategic partner, BT.
Users can install the PortWise software
themselves – a User Manual containing detailed instructions will be
supplied to users by BT along with PortWise account access details.
For providers who may require assistance with the installation process,
a member of staff from the Housing Executive’s I.T. department, on
6
April 2010
SPOCC.net Provider Guidance V1
request, will visit your organisation and install the PortWise software on
each user’s PC.
4.5
Support Arrangements
4.5.1 Following installation, The Housing Executive’s strategic partner, BT
will provide support to providers to assist with any PortWise issues.
This will be done remotely through the Service Desk and no further on
site support will be provided. The contact details for the BT Service
Desk are shown below:
Email address:
Telephone:
[email protected]
028 90 318 666
4.5.2 Once PortWise and SPOCC.net are operational, all technical queries
relating to PortWise/ SPOCC.net should be raised with the BT Service
Desk. For any other queries relating to the general use of SPOCC.net,
users can contact a member of the Modernising Services Project
Team. Contact details are:
Caroline Connor
Julie Alexander
Darren Stockdale
David Mayne
James Taylor
[email protected]
[email protected]
[email protected]
[email protected]
[email protected]
028 90318402
028 90318819
028 90318692
028 90318800
028 90318820
7
April 2010
SPOCC.net Provider Guidance V1
5.0
Logging onto SPOCC.net
5.1
Before entering your username and password into SPOCC.net, users
will have to complete the synchronised authentication process in
PortWise.
5.2
All users should have been provided with the user manual for PortWise
detailing this process. A summary is also provided below.
5.3
Factor Synchronised Authentication
If the software is not already open, go to Start -> All Programs >PortWise -> Mobile ID -> PortWise Mobile ID. Enter the PIN that
has been supplied to you (or the PIN you have changed it to) by
clicking each number in the sequence with your mouse.
If you make a mistake while entering your PIN, click the refresh button
in the bottom right corner, and re-enter your PIN.
Security Note: Each time you click refresh the keypad, the numbers
are shuffled. This ensures that software such as key loggers cannot
learn your PIN, and therefore this method helps ensure only authorised
personnel are accessing the system.
8
April 2010
SPOCC.net Provider Guidance V1
One time
Password
When you have entered your PIN correctly, the Mobile ID Client will generate
you a One Time Password (OTP). As the name suggests, this password can
be used only once to access PortWise. This must be entered during the first
phase of authentication with the portal page.
Note: once the OTP appears it is automatically copied to your Windows
Clipboard, so by opening the Synchronized logon page, you can paste it
(using Ctrl+V) straight into the OTP field.
Type
the
following
https://access.nihe.gov.uk
address
into
your
internet
browser:
Select Synchronized. You will be prompted to supply your User Name and
OTP.
9
April 2010
SPOCC.net Provider Guidance V1
When you enter these details and click Submit, you will be prompted for the
second phase of authentication, Domain authentication.
Enter your Domain Password and click Submit. And you will be taken to the
Portal Resources page, where you can select the applications you need
access to.
10
April 2010
SPOCC.net Provider Guidance V1
5.4
Accessing SPOCC.net
After completing the synchronised authentication process using
PortWise, users will be prompted to select the application they need to
access from the Portal Resources Page.
You select the icon “SP LIVE” in order to access SPOCC.net.
The first time the SP icon has been selected several pop ups will
appear (this will be a one time occurrence to apply the
configuration)
Click on information bar - click don’t show message again then close
Click on OK –
11
April 2010
SPOCC.net Provider Guidance V1
You must accept the client Active X to proceed
Accept the ActiveX client in the security bar above or by adjusting
browser security levels.
Click on top of screen where it says the website wants to run the
following add on : Access Client web loader ‘from Portwise’ and run
activex control - Click Run.
This will install the update after you click yes on the screen below
12
April 2010
SPOCC.net Provider Guidance V1
This is a one time update from the NIHE’s secure server and is
therefore a trusted update.
If pop ups are blocked - click on pop-up blocked and select always
allow pop-ups from this site. (Pop blocker can sometimes be enabled
in IE browser settings under Tools – Internet Options – Privacy – un
tick the check box to disable).
Click yes to allow pop-ups from nihe.gov.uk
13
April 2010
SPOCC.net Provider Guidance V1
You should now be able to access the SPOCC secure site.
Then select Access Secure Services for Providers:
Each user will be issued with their username and a temporary
password by SP. Users should change this temporary password
during their first log in session. (Guidance for changing your password
is on page 42)
Type your Username & Password and select or click the login button.
Please see below.
It should be noted that providers can also refer to the OCC User Guide
for further information. See above:
14
April 2010
SPOCC.net Provider Guidance V1
For security reasons SPOCC.net employs a timeout feature whereby after a
predefined period of inactivity you will be logged out of the system and an
error message similar to that below may appear. If you become logged out
through this timeout feature you will need to return to the secure log-in screen
and re-enter your username and password in order to continue working.
15
April 2010
SPOCC.net Provider Guidance V1
6.0
Submitting Quarterly Performance Returns
6.1
Quarterly Performance Returns (formerly called contract performance
returns or CPRs), should be completed and submitted using the
performance workbooks in SPOCC.net. These workbooks mirror those
used nationally and were developed by CLG.
6.2
More detailed guidance on the performance measures included in the
workbook and how to complete them is provided on the SP section of
the NIHE’s website and will be provided to each user as part of their
training documentation.
6.3
The workbook includes the existing performance indicators which
providers currently make returns against for availability, utilisation,
throughput and departures from short term accommodation. An
additional performance indicator is included in relation to departures
from longterm accommodation services.
A summary of the
performance indicators for which returns will be collected via
SPOCC.net is provided below:
Performance
Definition
Indicator
KPI 1
%
of
Services
Users
Establishing & Maintaining
Independent Living
KPI 2
% of planned moves
SPI 1
Available units as a % of
contracted units
SPI 2
Occupied/utilised units as a %
of contracted units
SPI 4
% of service users moving
through
S e rvice ID n um be r
Se rvice n a m e
P ro vide r I D
1
4
5
3
S upp orting P eop le Hostel
Pro vid er n a m e
S POCC.ne t Test Pr ovider
C o nt ac t n a m e
P o sitio n
Co nt ac t a d d re ss 1
2
3
4
5
P o stc od e
All services
No rth e rn Irela n d H o us ing E xe cu tive
Yr
Ma nag er
20 1 0/ 1 1
Q ua rte r
N o . o f w e e ks
1
Da te su bm it te d to ad m in iste rin g au th o rity
M on 0 5 A p r 10
Fu ll q u art er:
to
M on 0 5 A p r 10
A ct ua l d a te s:
to
2 A del aide S tr eet
B elfast
B T2 8 PB
13
S un 04 J ul 10
S un 04 J ul 10
Ca p ac ity at t he s ta rt o f th e q u arte r:
15
Ch a ng e in c ap a city
f rom :
Ca p ac ity at t he e n d o f t h e qu a rte r:
15
A n y c ha n ge in ca pa cit y in t he q u a rt er will
n o t be re co rde d u n le ss t he d a te o f th e
Ho m e le ss fa m ilies with su pp o rt n e ed s
Dire ct a cce ss : S h ort t erm / t im e lim ite d
Te lep h on e
E m a il
SE RVICE AVAILABILITY
S e lec t da ily o r we e kly m et h od f or re co rd ing s ervic e av aila bilit y
T ot al nu m b e r o f un it da ys (ba se d o n ca p ac ity) in th e qu a rte r
T ot al nu m b e r o f ava ila ble u n it d a ys in th e q ua rte r
A v a ila bl e uni ts as a p er ce nta ge of c a pa ci ty
Applicable
Services
Long term services
& Support Only
Services
Short term Services
Accommodation
services
All services
c ha n ge is a lso re co rde d in th e b o x
la b elle d "fro m ".
SERV ICE UTILISATION
da ily
1 ,3 65
1 ,3 00
9 5 .2 %
S e lec t d a ily o r we ek ly m et ho d f or re co rdin g se rvice u t ilis at ion
To t al nu m b e r o f a va ilab le u n it d a ys in th e qu a rte r
To t al nu m b e r o f o cc up ie d un it d ays in t he q u a rt er
O c cup ie d u nits a s a pe rc e ntag e of a va i la ble u nits
da ily
1, 30 0
1, 20 0
9 2 .3 %
d aily
1, 3 65
THROUGHPUT
a.
b.
c.
d.
e.
f.
LE NG TH O F STAY
H ow m a ny u nit s we re o ccu p ie d o n S un 4 Jly 20 1 0 ?
H ow m a ny se rvice u se rs d ie d du rin g th e q ua rte r ? (p lea se e xc lu d e su icid es - a d d a ny su icid es t o an sw e r c .)
H ow m a ny se rvice u se rs (o th e r th a n th o se w h o d ie d ) ce a se d to u se t h e se rv ice d urin g th e q u arte r ? )
T ot al nu m b e r o f se rv ic e u se rs in th e q u art er.
C ap a city o f t he se rv ic e (at t he e n d o f t h e qu a rte r)
T hro u gh p ut : to ta l n um be r o f se rvice u se rs in t h e pe riod as a % o f th e n u m b er o f u nit s (t he c ap a city )
15
7
22
15
1 4 6. 7%
Le n g th o f tim e w it h th e se rvice
g.
M o re th an two ye a rs
h.
B e twe en o n e a nd t wo ye ars
i.
U p to o n e ye a r
j.
To ta l
Use rs a t
end of
th e q ua rte r
Us ers w ho
d ie d or le f t
d u rin g
th e q ua rte r
2
13
15
Figure 1 – Excerpt from Performance Workbook
16
April 2010
7
7
SPOCC.net Provider Guidance V1
6.4
Completing & Uploading Workbooks Via SPOCC.net
User Name
Users should select performance measurement from the home page and then
select download in order to download the workbook for completion. Each
service requires its own individual workbook. Each workbook only needs to
be downloaded once at the start of the financial year and updated every
quarter.
17
April 2010
SPOCC.net Provider Guidance V1
Then fill in the following fields: Service; Workbook Type – “(SPPI (2004) a”;
Reporting Period From; and Reporting Period To.
The workbook should be completed in accordance with the guidance
provided. If macros have been disabled, the workbook can not be fully
completed and you will receive a prompt message similar to that below:
Macros should be enabled by selecting tools and then Macro and Security,
change the security level to high. You will need to exit and reopen the
workbook for the new security settings to apply.
It should then be saved within the user’s computerised files (if Microsoft Office
2007 is installed on your computer you will need to save your documents as
Microsoft 1997/2003 version instead of the 2007 default version. You can do
this by going to ‘File’, ‘Save as’ & go to the drop down box for ‘Save as
type’ & select Word 97-2003 Document (.doc)).
This saved workbook should then be accessed to complete returns for future
quarters and upload the workbook quarterly into SPOCC.net.
To send the completed workbook to SP, at the end of each quarter, via
SPOCC.net, select upload from the performance measurement menu.
The system will return the page overleaf. Select your workbook from your
folder or PC (workbook location). Select appropriate Quarter. Upload
workbook as required.
18
April 2010
SPOCC.net Provider Guidance V1
Try to upload the workbook and check the warnings if any appear.
As providers are not required to submit returns in relation to staffing, the
warning ‘no support hours included” will appear, users should check the box
called “Ignore missing data and inconsistencies where possible”, so that
the system will allow the workbook to be uploaded without staffing information
completed.
Users should ensure that any other errors identified by
SPOCC.net are amended before the workbook is uploaded.
If errors relates to ‘Value in SPOCC’ select “ignore missing data and
inconsistencies where possible”. Use the comment box to notify SP of the
discrepancies.
19
April 2010
SPOCC.net Provider Guidance V1
Once you have amended all the errors, upload the workbook again and
“Upload successful” will pop up on your screen.
Users should use the “Request sent to LA” procedure on page 35 of this
guidance to check if your request(s) have been sent to the SP team.
If your submission is “pending” then you have now completed the first stage
of the process. Once your workbook is accepted by the SP team, then you
have completed the final stage of this process for this particular scheme.
Ensure that you check (as required) if the workbook has been rejected. If the
workbook(s) is rejected, then you will need to amend the return(s) /
workbook(s) as requested by the SP Team.
If the workbook has been rejected you will need to:
•
•
•
•
•
Click attachment and open the rejected workbook;
Check the name of the service which was rejected;
Note and/or deal with the reason for rejection;
Go to your drive or PC and amend workbook and
Re-submit the workbook within the time scale stipulated by the SP
Team
20
April 2010
SPOCC.net Provider Guidance V1
7.0
Manage Services – Changing Client Details
7.1
Providers will be able to add new clients, end and update client details
using SPOCC.net
7.2
For long-term services the client schedules in SPOCC.net will replace
the provider reconciliation returns (PRRs) which providers are required
to complete and return to SP with any client changes.
7.3
Floating Support providers are required to submit/input details of all
current service users. This will replace the current client detail form
which is submitted on a monthly basis.
Updating client schedules
To update or add client information, users should select Manage Services
from the home page.
(a)
(b)
Use the service drop down list to choose the service you want to
update client information on.
Click into manage to open the client schedules.
21
April 2010
SPOCC.net Provider Guidance V1
You can now view the client information for your service.
Use the mouse to select the client whose details need to be updated and
click into the client name to update schedule.
Ending of Service
The SP Team can be notified of any changes to current client schedules,
including entering an end date for the service, by submitting the details as
follows:
From the Secure Services home page click manage services
22
April 2010
SPOCC.net Provider Guidance V1
Now select the service whose schedule you need to change and press
‘Manage’. Now select the client whose schedule needs to be changed by
clicking their name.
Enter the end date for the service and select the reason for the end date
from the drop down menu.
The ‘Manage Services’ screen will acknowledge the request and set it to
‘Pending’ until the SP team accept or reject it.
Change of Service
If a client is changing service from one scheme to another within the same
provider organisation you will need to end the first service.
Then you will need to create a new schedule from the day the client moves
to the new service. Then submit the new client schedule via SPOCC.net.
In the individual client schedule:
You will need to type in the end date of the client’s service.
Use the drop down list and choose the month.
Type in the year
Select the end date reason ‘change of service’
Type in comments as required.
Users should use the “Request sent to LA” procedure on page 35 of this
guidance to check if your request(s) have been sent to the SP team.
If your submission is “pending” then you have now completed the first
stage of the process. Once your request is accepted by the SP team,
then you have completed the final stage of this process for this particular
scheme.
If your request is rejected, then you will need to amend the client schedule
as requested by the SP Team.
23
April 2010
SPOCC.net Provider Guidance V1
Add New Client Schedule (New Service User)
In the Client Schedules tab of the Manage Services section, select Request
New Schedule.
Details of the new client and their service can now be entered on the form that
appears. The bold fields are mandatory.
The address for the individual service user should be entered rather than the
address for the service as a whole (users can click on the copy property
address button for accommodation services if the individual property
addresses match the address held in housing benefit records).
24
April 2010
SPOCC.net Provider Guidance V1
For service users receiving support in long term services, details of preferably
the service user’s housing benefit ID or if this is not available their national
insurance number must be provided. This information is used to identify
whether the individual is in receipt of hosing benefit and therefore is eligible
for a SP subsidy payment.
Pressing the “Add Client” button will send the request to the SP team. The
Manage Services screen will now reflect this as below:
Users can also use the “Request sent to LA” procedure on page 35 of this
guidance to check if your request(s) have been sent to the SP team.
If your submission is “pending” then you have now completed the first stage
of the process. Once your request is accepted by the SP team, then you
have completed the final stage of this process for this particular scheme.
If the SP team accepts the new schedule then the “pending” figure beside the
Request New Schedule will disappear and the new Client Schedule will
appear on the list.
If your request is rejected, then you will need to amend the client schedule as
requested by the SP Team.
25
April 2010
SPOCC.net Provider Guidance V1
Add New Client Schedule (Returning Client)
On occasion, especially for floating support services, a client may have
exited the service and subsequently return to the service at a later date. In
these circumstances, the client schedule will have been ended and needs
to be reactivated by following the procedures outlined below.
In the Client Schedules tab of the Manage Services section, select
Request New Schedule.
Details of the returning client and their service can now be entered on the
form that appears. The bold fields are mandatory.
26
April 2010
SPOCC.net Provider Guidance V1
In the comments field of the form, you should confirm that this is a
returning client to the service. This will prompt the SP team to reactivate
the client record in SPOCC using the original client schedule and client ID.
Pressing the “Add Client” button will send the request to the SP team.
The Manage Services screen will now reflect this as below:
27
April 2010
SPOCC.net Provider Guidance V1
If the client schedule is accepted by the SP Team, the client will reappear
on the list of current client schedules for the relevant service with the start
date of their return to the service. Their previous support service details
can be viewed by selecting “Include Non-Current Items”.
28
April 2010
SPOCC.net Provider Guidance V1
8.0
Manage Services – Service Details
8.1
Updating Available Places
The SP public service directory allows any member of the public to
search for SP services (see section 3.0). This search also shows the
number of places that services have available at that time.
To update the number of available places for your service, select the
Service Details tab.
Enter the number of units in the Available Places box and click Save.
The value entered in the Available Places field is saved immediately
and does not require approval from the SP team. These values will be
available to the public in the service directory and will be visible to the
SP Team on their SPOCC system. They have no effect on any
payment calculations and are included for information purposes only.
The number of available places in a service can be updated as often as
required.
29
April 2010
SPOCC.net Provider Guidance V1
8.2
Requesting Changes to Other Service Details – Additional details
concerning a service can also be requested by clicking on the request
update link to open the Service Details update screen.
The text that you enter for the “Public Search Name” will appear in the
public service directory search results area, instead of the Service ID.
Only the description field from the Service Details update screen will
also be shown in the public service details page.
Only changes accepted by the SP team will appear in the public search
area.
30
April 2010
SPOCC.net Provider Guidance V1
9.0
Submitting a New QAF
9.1
Providers can submit their self assessments against the QAF
standards via SPOCC.net
9.2
These submissions can be made for individual service or groups of
services, against the current QAF (QAF 2004) or the new QAF2 (QAF
2009).
Under manage services, users should select QAFs, and then click on
Submit a new QAF (if a QAF has already been submitted and/or
validated, the details will appear in this screen). Users should select
QAF 2004 (the current QAF) or QAF 2009 (the new QAF2) depending
on which they have been asked to make a submission against.
The screen below will then open to add the new QAF.
31
April 2010
SPOCC.net Provider Guidance V1
Users should work through the questions under each of the tabs
relating to the core objectives, ensuring that they click the complete
button regularly to save their work.
Once the submission is finished, you should click on the submit button
to send it to the SP team.
Users should use the “Request sent to LA” procedure on page 35 of
this guidance to check if your request(s) have been sent to the SP
team.
If your submission is “pending” then you have now completed the first
stage of the process. Once your request is accepted by the SP team,
then you have completed the final stage of this process for this
particular request.
If your request is rejected, then you will need to amend the QAF
submission as requested by the SP Team.
32
April 2010
SPOCC.net Provider Guidance V1
10.0
Manage Contract Documents
10.1
Copies of your current funding agreements are held within SPOCC.net.
To view them, click on Manage Contracts
Select the Contract you wish to manage from the drop down list.
Only the contracts available for the contact currently logged in are
visible in the list. Please see Section 12.0 – Limiting Access.
Pressing the ok button will open the “Manage Contract” screen for the
selected contract.
33
April 2010
SPOCC.net Provider Guidance V1
From here amendments can be made to contract documents that have
been created in SPOCC. It is possible to:
•
•
•
•
Edit provider comments
Sign the document (if it is unsigned)
View the document
View document history.
The “Progress” of any contract document is always controlled by the
SP Team. Even if the provider signs a contract document the
“Progress” will remain as is until the SP Team manually sets the
progress to “signed”.
34
April 2010
SPOCC.net Provider Guidance V1
11.0
Request sent to SP in NIHE (Pending, Approved, Rejected)
11.1
Users can check if their requests have been received (pending),
approved or rejected by the SP team.
11.2
On the home page, users should select Requests sent to local
authority, select a period, for example 1 month and click go. You may
change the number of months as required.
11.3
In the example below, the first request submitted to the SP team is
pending. Once the request is accepted by the SP team, this will
change to approved.
11.4
You will need to check the status of any requests on a regular basis, if
a request has been rejected, you should seek to rectify this as soon as
possible.
35
April 2010
SPOCC.net Provider Guidance V1
12.0
Manage Contacts (changing staff details)
12.1
Within SPOCC.net, providers can update staff details or can add new
staff.
12.2
From the home page, users should select manage contacts.
12.3
The screen below will then be displayed and the user should select the
staff member whose details need to be updated.
12.4
Users should ensure that accurate information is provided to the SP
team, especially if it involves deactivating a member of staff from the
SPOCC system. A staff member can not be deactivated if they are
assigned a role relating to the funding agreement of a service, for
example as a Service Manager or Emergency Contact. This role will
need to be reassigned to the appropriate member of staff before the
staff member can be deactivated.
36
April 2010
SPOCC.net Provider Guidance V1
12.5
To add a new staff contact, click on the “add new contact” button and
the following screen will appear (please note that if the new contact
requires SPOCC.net access this needs to be requested separately
from the SP Team). The fields in bold type are mandatory.
One change you may want to make is to change the services to which
the Contact is assigned (Contact for organisation, Service Manager,
Emergency Contact, Contact for Contract, Contact for Accreditation,
SPOCC.net Manager, Self Referral Office Hours and Out of Hours
Contacts).
Please use the “Request sent to LA” procedure to check if your request
has been sent the SP team. If your submission is marked as
approved, then you have successfully completed the process.
37
April 2010
SPOCC.net Provider Guidance V1
13.0
Limiting Access to SPOCC.net
13.1
A provider can request that their users only be able to access and
manage the services (and related data) that they are assigned to rather
than all services that a provider has.
13.2
If you wish to limit access to SPOCC.net to reflect staff roles within
your organisation, you will first need to contact the SP team who will
activate the limited access facility in SPOCC.
13.3
SPOCC.net access is limited based on the assignments recorded
against each contact.
13.4
You can check the assignments for staff by clicking on the Manage
contacts field in the secure home page and then selecting the relevant
staff member.
38
April 2010
SPOCC.net Provider Guidance V1
13.5
If you request limited access to SPOCC.net then your staff team’s
SPOCC.net access will be limited as follows:
If a contact is assigned Organisation contact or Accreditation
contact they will be able to access all service data for all their
organisation’s services. N.B. each role can only be assigned to 1
contact for the organisation
o If a contact is assigned Service Manager, Emergency Contact,
Self referral Out of Hours, Self referral Office Hours, or
SPOCC.Net Manager – access will be limited to those Services
covered by the assignments. (E.g. Service Manager for Service
A will only be able to manage the affairs of Service A; Service
Manager for Service B who is also Emergency Contact for
Service A will be able to manage the affairs of both Services A &
B) N.B. each role, with the exception of SPOCC.net Manager
can only be assigned to 1 contact for each service
o If a Contact is assigned Contract Contact– their access will be
limited to those Services covered by the Contract(s) for which
the Contact is assigned as Contract Contact
o
N.B. The role of SPOCC.Net manager is only available, and therefore
can only be assigned, if your organisation has requested limited access
to SPOCC.Net. The role is only available in this case as you may wish
for more than one Contact to be assigned as able to log in and manage
that Service in SPOCC.Net. There is no limit to the number of
SPOCC.Net Managers you can assign to a Service.
13.6
If you wish to alter assigned roles or add new roles for staff members,
after advising the SP team that you wish to activate the limiting
SPOCC.net access facility, these changes should be made by editing
the contact details of the relevant staff and submitting the change as a
request via SPOCC.net.
39
April 2010
SPOCC.net Provider Guidance V1
14.0
Generate reports
14.1
In order to download reports for your organisation’s services, you
should first click on the ‘Generate Reports’ link on the Secure Services
home page which will take you to the Generate Reports screen.
14.2
You can select and download reports for any paid payment period from
the following list:
o Payment Items
o Service Adjustment Schedule
o Service Subsidy Summary
o Service User Adjustment Schedule
o Service User Means Schedule
o Service User Subsidy Schedule
14.3
Please note that the SP Team are also currently developing the
reporting facility to include additional reports relating to performance
and quality assessments. These should be available by the end of May
2010.
Excerpt from Quality Assessment Framework Report
40
April 2010
SPOCC.net Provider Guidance V1
15.0
Manage actions
15.1
Actions are time bound tasks that are set by the SP team and need to
be completed by the assigned person within a specified time frame.
15.2
These actions can be managed by clicking on the ‘Manage Actions’
link on the homepage which will open the Manage Actions screen.
15.3
Any current actions will be listed. This list can be limited to either
actions for the logged on User or for the Service as a whole. Check the
appropriate box and click on the Filter button to limit the list.
41
April 2010
SPOCC.net Provider Guidance V1
16.0
Change Password
16.1
Users will be prompted to change their password every 90 days. In
order to change your password, select change password, from the
secure homepage.
16.2
Users should enter their current password and enter and confirm their
new password. Passwords should contain at least 6 characters which
includes at least 1 capital letter and 1 number.
16.3
If you forget your password, notify the SP team, via the link on the log
in page. It will be reset for you and you will be notified of your new
temporary password.
16.4
If a staff member no longer requires SPOCC.net access or a new
member of staff requires access, you should contact the SP team, so
that the appropriate changes can be made. New SPOCC.net users will
be required to follow the process for PortWise set up and be provided
with a username for SPOCC.net.
42
April 2010
SPOCC.net Provider Guidance V1
17.0
Log out
17.1
To log out, go to the secure homepage and select Log out.
43
April 2010
SPOCC.net Provider Guidance V1
18.0
SPOCC.Net Guidance & Support
18.1
More detailed guidance on both the PortWise authentication process
and the SPOCC.net system is available.
18.2
The PortWise user manual should have been sent to each user by BT
during the installation process and can also be accessed through the
programme itself.
18.3
The SPOCC.net guidance produced by Oxford Computer Consultants
is available from the SPOCC.net secure homepage.
18.4
BT will provide support to providers to help them install PortWise and
set up the connection. This will be done remotely through the Service
Desk and no on site support will be provided. The contact details for
the BT Service Desk are shown below:
Email address:
Telephone:
[email protected]
028 90 318 666
18.5
Once SPOCC.net is operational in your organisation, all technical
queries relating to PortWise/SPOCC.net should be raised with the BT
Service Desk.
18.6
SP has established a dedicated support team to deal with any
functional queries, help users who are experiencing difficulties using
particular areas of SPOCC.net and manage the general administration
associated with the system. The contact details for these team
members and the areas of the system for which they are responsible
are provided below:
Caroline Connor
Responsibilities:
[email protected]
028 90318402
General management of SPOCC.net
028 90318819
Julie Alexander
[email protected]
Responsibilities:
Administrator for SPOCC.net, including issuing
documentation, arranging limiting access facility, issuing usernames,
providing training etc
James Taylor
[email protected]
028 90318820
Responsibilities:
General queries regarding functions of SPOCC.net
including actions, contacts, requests sent to SP, QAF submissions,
resetting passwords etc.
Darren Stockdale [email protected] 028 90318692
Responsibilities:
Administration of client schedules/changes for
longer term schemes and managing contracts facility in SPOCC
David Mayne
[email protected]
028 90318800
Responsibilities:
Administration of client schedules/changes for
floating support services, administration of performance measurement
returns
44
April 2010