1
Instruction for use
& installation instructions
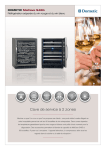
miniBar
HiPro 3000
HiPro 4000
HiPro 6000
HiPro Vision
Dometic absorption refrigerators for hotels & offices
English
MBA 10/2011
Record for future reference:
Type H20 / 60
821 2660-51
Model number
.............................................
Product number
.............................................
Serial number
.............................................
N 1-1
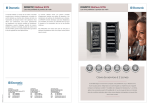
HiPro 3000
HiPro 4000
HiPro 6000
HiPro 4000
OPTION
HiPro Vision
Dometic GmbH
In der Steinwiese 16
D-57074 Siegen
www.dometic.com
© Dometic GmbH - 2011 - Subject to change without notice
2
Table of contents
1.0
General . . . . . . . . . . . . . . . . . . . . . . . . . . . . . . . . . . . . . . . . . . . . . .
4
1.1
1.2
1.3
1.4
1.5
1.6
1.7
1.8
1.9
Introduction . . . . . . . . . . . . . . . . . . . . . . . . . . . . . . . . . . . . . . . . . . . . . . . . . . . . . . . . . . . . . . . .
Guide to these operating instructions . . . . . . . . . . . . . . . . . . . . . . . . . . . . . . . . . . . . . . . . . . . .
Copyright protection . . . . . . . . . . . . . . . . . . . . . . . . . . . . . . . . . . . . . . . . . . . . . . . . . . . . . . . . .
Explanation of symbols used in this manual . . . . . . . . . . . . . . . . . . . . . . . . . . . . . . . . . . . . . . .
Warranty . . . . . . . . . . . . . . . . . . . . . . . . . . . . . . . . . . . . . . . . . . . . . . . . . . . . . . . . . . . . . . . . . . .
Limitation of liability . . . . . . . . . . . . . . . . . . . . . . . . . . . . . . . . . . . . . . . . . . . . . . . . . . . . . . . . . .
Customer services . . . . . . . . . . . . . . . . . . . . . . . . . . . . . . . . . . . . . . . . . . . . . . . . . . . . . . . . . . .
Spare parts . . . . . . . . . . . . . . . . . . . . . . . . . . . . . . . . . . . . . . . . . . . . . . . . . . . . . . . . . . . . . . . . .
Environmental notices . . . . . . . . . . . . . . . . . . . . . . . . . . . . . . . . . . . . . . . . . . . . . . . . . . . . . . . .
4
4
4
4
5
5
5
6
6
1.9.1
1.9.2
Disposal . . . . . . . . . . . . . . . . . . . . . . . . . . . . . . . . . . . . . . . . . . . . . . . . . . . . . . . . . . . . . . . . . . . . . . . . . . .
Energy-saving tips . . . . . . . . . . . . . . . . . . . . . . . . . . . . . . . . . . . . . . . . . . . . . . . . . . . . . . . . . . . . . . . . . . .
6
6
1.10
Declaration of conformity . . . . . . . . . . . . . . . . . . . . . . . . . . . . . . . . . . . . . . . . . . . . . . . . . . . . . .
6
2.0
Safety instructions . . . . . . . . . . . . . . . . . . . . . . . . . . . . . . . . . . . . . .
7
2.1
2.2
2.3
2.4
2.5
Application according to regulations . . . . . . . . . . . . . . . . . . . . . . . . . . . . . . . . . . . . . . . . . . . . .
User's responsibility . . . . . . . . . . . . . . . . . . . . . . . . . . . . . . . . . . . . . . . . . . . . . . . . . . . . . . . . . .
Protection of children when disposing of the equipment . . . . . . . . . . . . . . . . . . . . . . . . . . . . .
Working upon and checking the miniBar . . . . . . . . . . . . . . . . . . . . . . . . . . . . . . . . . . . . . . . . . .
Information on coolant . . . . . . . . . . . . . . . . . . . . . . . . . . . . . . . . . . . . . . . . . . . . . . . . . . . . . . . .
7
7
7
7
7
3.0
Installation . . . . . . . . . . . . . . . . . . . . . . . . . . . . . . . . . . . . . . . . . . . .
8
3.1
3.2
3.3
3.4
Unpacking . . . . . . . . . . . . . . . . . . . . . . . . . . . . . . . . . . . . . . . . . . . . . . . . . . . . . . . . . . . . . . . . .
Installation . . . . . . . . . . . . . . . . . . . . . . . . . . . . . . . . . . . . . . . . . . . . . . . . . . . . . . . . . . . . . . . . .
Securing . . . . . . . . . . . . . . . . . . . . . . . . . . . . . . . . . . . . . . . . . . . . . . . . . . . . . . . . . . . . . . . . . . .
Connecting the device to the electricity supply . . . . . . . . . . . . . . . . . . . . . . . . . . . . . . . . . . . .
8
8
9
10
3.4.1
Plug connection (UK only) . . . . . . . . . . . . . . . . . . . . . . . . . . . . . . . . . . . . . . . . . . . . . . . . . . . . . . . . . . . . .
10
3.5
3.6
3.7
Installing and changing the sliding hinge . . . . . . . . . . . . . . . . . . . . . . . . . . . . . . . . . . . . . . . . . .
Changing the doorhang . . . . . . . . . . . . . . . . . . . . . . . . . . . . . . . . . . . . . . . . . . . . . . . . . . . . . . .
Decor panel . . . . . . . . . . . . . . . . . . . . . . . . . . . . . . . . . . . . . . . . . . . . . . . . . . . . . . . . . . . . . . . .
11
12
13
3.7.1
3.7.2
Measurements of decor panel . . . . . . . . . . . . . . . . . . . . . . . . . . . . . . . . . . . . . . . . . . . . . . . . . . . . . . . . . .
Changing the decor panel . . . . . . . . . . . . . . . . . . . . . . . . . . . . . . . . . . . . . . . . . . . . . . . . . . . . . . . . . . . . .
13
13
3.8
Technical data . . . . . . . . . . . . . . . . . . . . . . . . . . . . . . . . . . . . . . . . . . . . . . . . . . . . . . . . . . . . . .
14
4.0
Operating instructions . . . . . . . . . . . . . . . . . . . . . . . . . . . . . . . . . . . 15
4.1
4.2
4.3
4.4
4.5
4.6
4.7
4.8
4.9
4.10
Cleaning . . . . . . . . . . . . . . . . . . . . . . . . . . . . . . . . . . . . . . . . . . . . . . . . . . . . . . . . . . . . . . . . . . .
Initial operation . . . . . . . . . . . . . . . . . . . . . . . . . . . . . . . . . . . . . . . . . . . . . . . . . . . . . . . . . . . . . .
Temperature control . . . . . . . . . . . . . . . . . . . . . . . . . . . . . . . . . . . . . . . . . . . . . . . . . . . . . . . . . .
Automatic defrost function . . . . . . . . . . . . . . . . . . . . . . . . . . . . . . . . . . . . . . . . . . . . . . . . . . . . .
Leakage detection . . . . . . . . . . . . . . . . . . . . . . . . . . . . . . . . . . . . . . . . . . . . . . . . . . . . . . . . . . .
Positioning of the storage rack and shelf . . . . . . . . . . . . . . . . . . . . . . . . . . . . . . . . . . . . . . . . .
Interior light . . . . . . . . . . . . . . . . . . . . . . . . . . . . . . . . . . . . . . . . . . . . . . . . . . . . . . . . . . . . . . . .
Automatic door control . . . . . . . . . . . . . . . . . . . . . . . . . . . . . . . . . . . . . . . . . . . . . . . . . . . . . . .
Remote control . . . . . . . . . . . . . . . . . . . . . . . . . . . . . . . . . . . . . . . . . . . . . . . . . . . . . . . . . . . . . .
Troubleshooting . . . . . . . . . . . . . . . . . . . . . . . . . . . . . . . . . . . . . . . . . . . . . . . . . . . . . . . . . . . . .
3
15
15
15
15
16
16
17
17
17
18
General
1.0 General
1.1
Introduction
1.4
You have made an excellent choice in selecting
the Dometic Absorption miniBar. We are sure
that you will be satisfied with your new miniBar in
all respects. The miniBar, which works silently,
meets high quality standards and guarantees the
efficient utilisation of resources and energy
throughout its entire life cycle, during manufacture, in use and when being disposed of.
1.2
Explanation of symbols
used in this manual
Warning notices
Warning notices are identified by symbols. A supplementary text gives you an explanation of the
degree of danger.
Observe these warning notices rigorously. You
will thus protect yourself and other people
from injury, and the appliance from damage.
Guide to these operating
instructions
WARNING!
Before you start using the miniBar, please
read the operating instructions carefully.
WARNING indicates a potentially hazardous situation which, if not avoided, could result in death or
serious injury.
These instructions provide you with the necessary guidance for the proper use of your miniBar.
Observe in particular the safety instructions.
Observation of the instructions and handling
recommendations is important for dealing with
the miniBar safely and for protecting you from
injury and the miniBar from damage. You must
understand what you have read before you carry
out a task.
CAUTION!
CAUTION indicates a potentially hazardous situation which, if not avoided, may result in minor or
moderate injury.
Keep these instructions in a safe place close
to the miniBar so they may be referred to at
any time
CAUTION!
1.3
Copyright protection
CAUTION (used without the safety alert symbol)
indicates a potentially hazardous situation which,
if not avoided, may result in damage to the appliance.
The information, texts and illustrations in these
instructions are copyright protected and are subject to industrial property rights.
No part of these instructions may be reproduced,
copied or utilised in any other way without written
authorisation by Dometic GmbH, Siegen.
4
General
Information
1.6
Limitation of liability
All information and guidance in these operating
instructions were prepared after taking into consideration the applicable standards and regulations as well as the current state of the art.
Dometic reserves the right to make changes at
any time which are deemed to be in the interest
of improving the product and safety.
Dometic will assume no liability for damage in
the case of :
INFORMATION gives you supplementary and useful guidance when dealing with your miniBar.
Environmental Tips
non-observation of the operating instructions
application not in accordance with the
regulations or provisions
ENVIRONMENTAL TIPS gives you useful guidance for saving energy and disposal of the appliance.
use of non-original spare parts
modifications and interferences to the
appliance
effect of environmental influences, such as
- temperature fluctuations
- humidity
1.5
Warranty
1.7
Warranty arrangements are in accordance with
EC Directive 44/1999/CE and the normal conditions applicable for the country concerned. For
warranty or other maintenance, please contact
our customer services department. Any damage
due to improper use is not covered by the warranty. The warranty does not cover any modifications to the appliance or the use of non-original
Dometic parts. The warranty does not apply if
the installation and operating instructions are not
adhered to and no liability shall be entertained.
Customer services
Find your authorised customer service centre
from www.dometic.com. When contacting
Dometic Customer Services, please state the
model, product number and serial number together with the MLC code, if applicable. You will find
this information on the rating plate inside the
miniBar. We recommend that you note this data
in the field provided on the front page of this operation manual.
5
General
1.8
Run the miniBar for about 12 hours before filling it.
Arrange the shelves evenly spread in the com
partment to achieve the most efficient use of
energy.
Where possible, always store precooled and
packed products.
Do not overfill the storage grids and compart
ments to prevent obstructing the internal air
circulation.
Maintain a clearance of approx. 5-10 mm bet
ween chilled products and post-evaporator
("cooling fins").
Only open the miniBar door for a short
period of time when removing products.
Set room temperature to approx. 20 °C (higher
room temperatures increase the energy consumption of the miniBar).
Ventilate room regularly. Increased energy consumption in rooms without air exchange.
Select "12°C" temperature setting (point 4.3).
Observe installation instructions (point 3.2).
Spare parts
Parts can be ordered throughout Europe from our
customer services.
Always give the model and product number when
you contact the customer service! You will find
this information on the rating plate inside the
miniBar.
1.9
Environmental notices
Ammonia (a natural compound of hydrogen and
nitrogen) is used in the cooling unit as a coolant.
Non-ozone-hazardous cyclopentane is used as a
propellant for manufacturing PU foam insulation.
1.9.1 Disposal
In order to ensure that the recyclable packaging
materials are re-used, they should be sent to the
customary local collection system. The appliance
should be transferred to a suitable waste disposal company that will ensure re-use of the recyclable components and proper disposal of the
rest. For eco-friendly draining of the coolant from
all absorber refrigeration units, a suitable disposal plant should be used.
1.10 Declaration of conformity
Appliances bearing this symbol must be deposited at the designated local reception
point for the disposal of electrical and
electronic equipment.
It is not permitted that this product be
disposed of by way of the normal
household refuse collection system.
Dometic refrigerators bear this symbol on the data plate to be found in the interior of
the unit.
1.9.2 Energy-saving tips
Do not expose the miniBar to direct sunlight or
any other heat source (e.g. heater).
Ensure that air circulation of the refrigeration
unit is not obstructed.
6
Safety instructions
2.0 Safety instructions
2.1
Application according to
regulations
2.4
This miniBar is intended for free-standing installation (miniBar with unit cover) or installation in
furniture (miniBar without unit cover).
Only use the miniBar for chilling and storing closed drinks and snacks. Do not keep any perishable foodstuffs in the miniBar.
WARNING!
Work on electrical facilities must be carried
out by authorised personnel only.
Substantial damage to property and/or injury to persons can arise through unprofessional procedures.
WARNING!
WARNING!
The miniBar is not suitable for the proper
storage of medication. Please observe in
addition the instructions in the medication
package inserts.
2.2
Never open the absorber cooling unit! It is
under high pressure.
There is a danger of injury!
User's responsibility
2.5
Anyone operating the miniBar must be familiar
with the safe handling and understand the advice
in these operating instructions.
2.3
Working upon and checking
the miniBar
Information on coolant
Ammonia is used as a coolant.
This is a natural compound also used in household cleaning agents (1 litre of Salmiak cleaner
contains up to 200g of ammonia - about twice as
much as is used in the miniBar). Sodium chromate is used for corrosion protection (1.8% by
weight of the solvent).
Protection of children when
disposing of the equipment
In the event of leakage (easily identifiable from
the strong odour), proceed as follows:
- Switch off the appliance.
- Air the room thoroughly.
- Inform authorised customer services.
WARNING!
When disposing of the miniBar, detach the
miniBar door and leave the storage racks in
the miniBar. In this way inadvertent entrappment and suffocation is prevented.
For the safety of hotel guests and personnel it
was ascertained in an expert's report that no
impairment of health exists when the coolant
is discharged
7
Installation
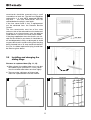
3.0 Installation
3.1
Air passing through the duct must not be
preheated by any source of heat.
Ventilation grills, if used, must have openings of at least 200cm² each.
Unpacking
Check during unpacking that the device is
defect-free.
Report transport damage to the transport
company immediately.
Check that the voltage noted on the model
label corresponds to the
mains voltage.
1
Depending on the model, the following parts can
be found in the miniBar:
2x
sliding hinge
reflector
Special equipment
IR-transmitter
200 cm²
Fig. 1
20 mm
Fig. 2
3.2 Installation
2
CAUTION!
Please follow the installation details below
carefully. Guarantee is valid for products
installed as described only.
200 cm²
The miniBar must be level both
directions.
There should be 20mm clearance to the
wall.
Ventilation must be provided as shown in
alternatives 1, 2, 3 or 4.
Only the entire cooling unit must project
into the duct as shown
20 mm
Fig. 3
8
Installation
3.3
3
Securing
When being built into a cupboard or a recess, the
miniBar must be positioned in such a manner that
both hinges/feet of the unit lie flush.
The miniBar is then (see Figures a, b) screwed, at
its hinges, to the piece of furniture in question.
In the case of units with 8mm feet and with LED
option for the door opening control, the reflector
delivered with the unit must also be installed in
the manner shown in Figure 6.
200 cm²
20 mm
Fig. 4
4
b
a
Fig. 6
200 cm²
a
reflector
20 mm
Stick on supplied reflector.
Fig. 7
b
Fig. 5
CAUTION!
The mains plug/socket must be freely
accessible once the miniBar has been
installed.
Drive in the screws and place the caps on.
9
Fig. 8
Installation
3.4
Connecting the device to
the electricity supply
WARNING!
This appliance must be earthed.
The device must be connected to a properly earthed socket in line with the relevant
valid country regulations.
The mains plug/socket must be freely
accessible.
The wires in the mains lead of this appliance
are coloured in accordance with the following
code:
Check prior to initial operation that the voltage noted on the model label corresponds
to the mains voltage. If this is not the
case, do not connect the device and contact your dealer!
GREEN and YELLOW : EARTH
If the connection cable is damaged it must
be replaced by the Customer Service at
Dometic, or by respectively qualified personnel, in order to prevent any hazards.
BLUE
: NEUTRAL
BROWN
: LIVE
Fig. 10
Fig. 9
As the colours of the wires in the mains lead
may not correspond with the coloured markings
identifying the terminals in your plug, proceed as
follows.
CAUTION!
The mains plug/socket must be freely
accessible once the miniBar has been
installed.
Connect the GREEN and YELLOW coloured wire to the plug terminal marked letter E
or earth symbol or coloured green or green
and yellow.
CAUTION!
If the connection cable is damaged it must
be replaced by the Customer Service at
Dometic, or by respectively qualified personnel, in order to prevent any hazards.
Connect the BROWN coloured wire to the
plug terminal marked letter L
or coloured red.
Connect the BLUE coloured wire to the
plug terminal marked letter N or
coloured black.
FOR UK ONLY!
3.4.1 Plug connection (UK only)
Moulded-On Plug Version :
If a 3-pin plug is used, it should be fitted with a 3
amp fuse,
with other plug types, the circuit
should contain a 5 amp fuse.
Warning - This appliance must be earthed.
The mains lead is fitted with a non-rewirable
moulded-on plug containing a 3 amp fuse. If the
fuse requires replacing at any time, the fuse
10
Installation
cover/carrier should be removed using a small
screwdriver to level out. The old fuse should be
replaced by a 3 amp ASTA approved BS1362
fuse and
the fuse cover/carrier must be
refitted before the plug is used again.
If the fuse cover-carrier is lost, a replaceement
can be obtained from the Dometic Service
Centers.
The fuse cover/carrier must be of the same
colour as that of the coloured insert in the base of
the plug. In no circumstances must the plug be
used without a correct fuse cover/carrier fitted.
If the plug supplied on the mains lead is not suitable for the socket in your home, it should be cut
off and disposed of safely, or destroyed, to avoid
any possible shock hazard resulting from the plug
being inserted into a 13 amp socket elswhere in
the use. A suitable replacement plug should then
be fitted as given above.
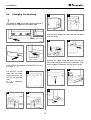
3.5
2
Fig. 12
3
Installing and changing the
sliding hinge
Distance to cupboard door (Fig. 11, 12)
When closed, the cabinet door must not abut
the cabinet frame (clearance 1-2 mm), otherwise the miniBar door does not close tightly.
There must be a distance of 6-8mm between the cupboard door and the miniBar.
Fig. 13
4
1
Fig. 14
Fig. 11
11
Installation
3.6
Changing the doorhang
5
4
The (optional) LED of the door-opening control is
placed always opposite the hanging side.
Fig. 22
Fig. 21
Pull the lower hinges forwards, pull out the door
with the hinge.
7
6
Fig. 15
Fig. 24
Fig. 23
appliance with feet
Remove the upper hinge pin and insert on the
other side, change the lower pin in the door. Then
push the door in together with the lower hinge.
Fig. 17
Fig. 16
If the miniBar is equipped with the LED first carry
out steps 1. - 5. :
8
Pull out LED, lay the
cable into the cable
routing and insert the
LED at the opposite
side.
(4. + 5. = appliance
wiht feet)
9
1
Fig. 25
Fig. 18
10
3
2
Fig. 27
Fig. 19
Fig. 20
12
Fig. 26
Installation
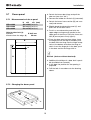
3.7
Detach the lower door hinge and pull the
door out (see also "3.6").
Decor panel
Remove the holder for the lock (A) (mounted).
3.7.1 Measurements of decor panel
Detach the lower frame section (B) (not screwed) and remove.
H xW
x D (mm)
492 x 294,5 x 2 (max)
524 x 311,5 x 2 (max)
533 x 376,5 x 2 (max)
HiPro 3000
HiPro 4000
HiPro 6000
Slightly bend the decorative panel (C) and
pull it out of the door frame.
Push in a new decorative panel with the
upper edge running exactly parallel to the
upper part of the frame. Place the frame section (B) on and press firmly (clip in).
Hole for door lock (a)
diameter
Ø 23,5 mm
distance from the edge (h)
62 mm
Place the door onto the lower hinge, insert
the hinge pin into the top of the door, push
the door with the hinge into the hinge receptacle at the bottom and allow the hinge to
notch. Insert the hinge pin in the door, push
in the door and let the hinge click in.
B
h
a
Remark (devices without doorlock):
H
Additional installation of a door lock is possible (available from Dometic)
In the door the position for the opening is
prepared.
Drill the hole in accordance to the drawing
above.
Fig. 28
3.7.2 Changing the decor panel
A
C
B
Fig. 29
13
installation
3.8
Technical data
HiPro Vision
Casing
Gross contents (litres)
Dimensions (mm)
(H x W x D)
Electrical rating (W)
Power consumption
kWh / 24h*
Net weight (kg)
Assembly
freestanding
HiPro 3000
Casing
Gross contents (litres)
Dimensions (mm)
(H x W x D)
Electrical rating (W)
Power consumption
kWh / 24h*
Net weight (kg)
Assembly
Plastic
27
527 x 388 x 418
65
0,568*
12
x
Plastic
36
559 x 405 x 452
65
0,649*
13,5
x
with cooling unit cover + feet
Dimensions (mm)
(H x W x D)
601 x 405 x 472
Net weight (kg)
14,5
freestanding
x
HiPro 6000
Casing
Gross contents (litres)
Dimensions (mm)
(H x W x D)
Electrical rating (W)
Power consumption
kWh / 24h*
Net weight (kg)
Assembly
559 x 405 x 465
65
0,739*
13,5
x
x
*The energy consumption is measured at 12°C at 25°C environment temperature ( cellar ) .
HiPro 4000
Casing
Gross contents (litres)
Dimensions (mm)
(H x W x D)
Electrical rating (W)
Power consumption
kWh / 24h*
Net weight (kg)
Assembly
Plastic
36
Plastic
50
568 x 490 x 474,5
80
0,695*
17
x
14
Operation
4.0 Operating instructions
4.1
4.3
Cleaning
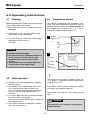
Temperature control
The miniBar is equipped with completely automatic, electronic temperature control. Using an
optional remote control, the default setting can
be changed from 5 °C to 3 °C, 7 °C or 12 °C
(maximum ambient temperature 25 °C).
Before operating the miniBar, we recommend you
clean it both inside and outside.
Use a soft cloth, lukewarm water and a mild
detergent.
Following this, wash out the miniBar using
clean water and dry thoroughly.
1
At annual intervals, remove dust from fridge
aggregate using a brush or
soft cloth.
Yellow
Change over :
3°C
7°C
Blue
Change over :
5°C
12°C
CAUTION!
To prevent material damage :
Do not use soap or detergents which are
harsh, coarse or which contain soda .
Keep the door seal free from oil and
grease.
The cylinder locks have been lubricated
in the factory to be long-lasting.
2
3°C
(3x flashing)
5°C
(5x flashing)
7°C
(7x flashing)
12°C
(12x flashing)
Fig. 30
4.2
Initial operation
The energy-saving effect is highest when the
12°C preset is selected (internal temperature
range 8 °C to 14 °C).
The device must be plugged into a properly
earthed socket.
The miniBar starts automatically with a self
test. If the electronics do not detect any
fault, the LED for the interior lighting illumina
tes for 2 seconds after approximately 10
seconds.
If a fault is detected, the illumination changes
to a continuous flashing light.
If this occurs, please consult your authorised
Customer Service
If you select a lower (colder) temperature setting,
the energy consumption increases.
Observe the instructions in "1.9.2 Energy-saving
tips".
WARNING!
The miniBar achieves its operating temperature after several hours.
The miniBar is not suitable for storing perishable foodstuffs.
15
Operation
4.4
4.6
Automatic defrost function
The first defrosting phase commences 39
hours after the initial operation and lasts for
two hours.
After this, the device operates for 22 hours at
a time, followed by adefrosting period of 2
hours.
Pull out the storage rack until it is blocked.
Press in the lock of both running rails.
Remove storage rack and running rails and
place it at the desired position.
Remove storage rack and running rails and
place it at the desired position. After clicking
in the the storage rack it is secured against
pulling out completely again.
Positioning of the storage
rack and shelf
Fig. 31
CAUTION!
1
2
The ice layer must never be
removed using force, nor
must the defrosting process ever be accelerated using a heater.!
Fig. 33
Fig. 32
4.5
4
3
Leakage detection
The electronics carry out a leakage test after
every defrosting period (every 24 hrs) by measuring the temperature at the evaporator by means
of a second sensor.If the electronics detect a
leak, the miniBar is automatically switched off .
The LED for the interior lighting changes after
approx. 10 secs. to a continuous flashing. (The
LED of the door-opening control flashes synchronously , if available.)
Please contact the authorized Dometic
Service if a failure occurs.
Fig. 35
Fig. 34
5
HiPro miniBars, which are designed for use on
sea vessels, are equipped with a bimetal sensor switch instead ! Malfunction of the cooling
unit is not shown via the LEDs.
6
Fig. 36
Fig. 37
(5 / 6) To fit the storage shelf, the reverse order
applies.
16
Operation
4.7
Interior light
4.9
Remote control
Two LEDs (1)
1 light the cooling compartment
whilst the door is opened.
Two sensors (2)
2 control the LEDs and the (optional) door control as well.
2
1
1
Fig. 38
4.8
Automatic Door Control [ADC]
(optional)
The LED (1)
1 placed at the bottom edge of the
miniBar indicates whether the miniBar door has
been opened.
Fig. 42
Type 1
1 Red = Red Dot Reset (reset door opening)
3
4
2
1
1
1
Fig. 40
Fig. 39
1. Open the miniBar, check its contents and
- if applicable- stock it up again.
2. Reset the door control sensor by means of an
IR-transmitter (RED-DOT-RESET) 2 .
3. Close the miniBar.
Fig. 43
Type 2
1
2
3
4
2
Infrared - transmitter
Infrared - reciever
Fig. 41
17
Red = Red Dot Reset (door opening, press once)
Black = Reset cooling unit (press once)
Yellow = Change over temperature 3°C / 7°C
Blau = Change over temperature 5°C / 12°C
Operation
4.10 Troubleshooting
Failure : No cooling (the aggregate at the back of the device is cold).
Possible Cause
a.) The device plug is not
plugged in.
Self Help
Authorised Service
b.) No voltage in socket.
b.) Check main fuse.
a.) Plug in device plug.
c.) The electronics or the sensor
is faulty.
Does the LED flash ?
c.) Install new
electronics or sensor.
d.) Defective heating element.
d.) Install new heating
element.
e.) The device is in its defrosting
phase.
e.) See operating instruction 4.4.
Failure : No cooling (the aggregate is warm).
Possible Cause
Self Help
Authorised Service
a.) The device is not level.
Leakage test ?
a.) Level the device using a
spirit level.
b.) The device was only
switched on a short while
ago.
b.) Switch on the device and
let it run for 5-6 hours.
c.) Exchange device.
c.) Defective cooling unit.
Failure : Poor cooling performance.
Possible Cause
Self Help
Authorised Service
a.) The cooling aggregate is not
sufficiently ventilated.
a.) Check that the ventilation
grids are not covered.
Check that device has
been installed properly
(installation instruction 3.2).
b.) The device is exposed to
direct sunlight.
b.) Follow installation
instruction 3.2.
c.) The fridge door does not
close tightly
c.) Check installation in line
3.2.
d.) The fridge was stocked a
short while ago.
d.) Check fridge after
5-6 hours for proper
cooling function.
c.) Install new doorseal,
if necessary.
Failure : Frost formation in fridge.
Possible Cause
Self Help
Authorised Service
a.) The fridge door does not
close tightly.
a.) Check installation is in line
with 3.2.
a.) Install new doorseal,
if necessary.
18
Produktdatenblatt
Product Data Sheet
miniBar
www.dometic.com
Fabrik / Factory :
Dometic GmbH
In der Steinwiese 16
D-57074 Siegen (Germany)
Modelle / Models :
HiPro 3000, HiPro 4000, HiPro 6000, HiPro Vision
Typenklasse / Type family :
H 20/60
Produktdaten / Product data :
HiPro 3000
Kategorie / Category
:
2 (Kellerfach)
2 (cellar
2
2
Energieeffizienzklasse
Energy efficiency index
:
C
C
D
D
Energieverbrauch (kWh/annum) :
Energy consumption (kWh/annum)
207
237
254
270
Nutzinhalt / Usable capacity
:
26 Ltr.
34 Ltr.
48 Ltr.
34 Ltr.
Klimaklasse / Climate class
:
SN
SN
SN
SN
Umgebungstemperatur
Ambient temperature
:
min. +10°C
max. +32°C
min. +10°C
max. +32°C
min. +10°C
max. +32°C
min. +10°C
max. +32°C
Schallemissionen
Noise emission
:
0 dB
0 dB
0 dB
0 dB
X
X
X
X
Einbaugerät / built-in appliance :
HiPro 4000
compartment)
miniBar
19
HiPro 6000
HiPro Vision
www.dometic.com