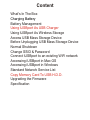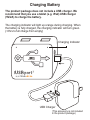
1
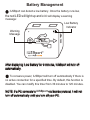
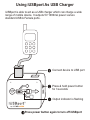
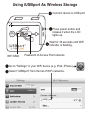
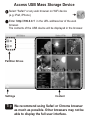
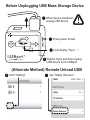
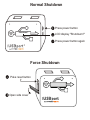
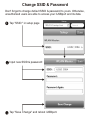
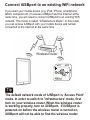
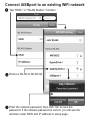
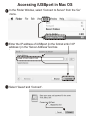
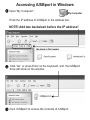
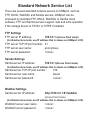
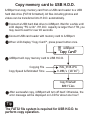
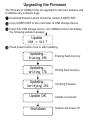
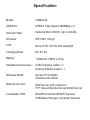
User Manual
iUSBport2
www.hyperdrive.com
FCC STATEMENT
1.This device complies with Part 15 of the FCC Rules. Operation is
subject to the following two conditions:
(1) This device may not cause harmful interference.
(2) This device must accept any interference received, including
interference that may cause undesirable operation.
2.Changes or modifications not expressly approved by the party
responsible for compliance could void the user's authority to operate
the equipment.
NOTE: This equipment has been tested and found to comply with
the limits for a Class B digital device, pursuant to Part 15 of the FCC
Rules. These limits are designed to provide reasonable protection
against harmful interference in a residential installation.
This equipment generates, uses and can radiate radio frequency
energy and, if not installed and used in accordance with these
instructions, may cause harmful interference to radio
communications. However, there is no guarantee that interference
will not occur in a particular installation. If this equipment does
cause harmful interference to radio or television reception, which
can be determined by turning the equipment off and on, the user is
encouraged to try to correct the interference by one or more of the
following measures:
Reorientate or relocate the receiving antenna.
Increase the separation between the equipment and receiver.
Connect the equipment into an outlet on a circuit different
from that to which the receiver is connected.
Consult the dealer or an experienced radio/TV technician for
help.
RF warning statement:
The device has been evaluated to meet general RF exposure
requirement. The device can be used in portable exposure condition
without restriction.
Sanho Manufacturer's Limited Warranty
Sanho warrants to the end user, that this product, excluding content and or
software supplied with or on the product, will be free from material defects in
manufacture, will conform to Sanho's published product specifications and be fit
for normal use during the Warranty Period specified below commencing on the
date of purchase provided that the product is legally placed on the market.
To make a warranty claim please contact Sanho at the telephone number below
or [email protected] within the Warranty Period and provide proof of
purchase (showing date and place of purchase and name of the reseller) and
product name, type and number. You may return the product after first obtaining
a Return Material Authorization number and following any other guidelines
listed. For further information see www.hypershop.com. Sanho may at its option
repair this product or provide you with an equivalent product; and if unable to
repair or replace the product, will refund the purchase price. Sanho will not be
liable for indirect or consequential damage (including loss of data), or for
damage caused by improper use (including use in an incompatible device and
use not in accordance with the instructions), or by improper installation,
unprofessional repair, modification or accident. This constitutes Sanho's entire
liability which will never exceed the price you paid for it, plus the necessary
costs you made for the warranty claim. Sanho products must not be used in
applications where failure could threaten injury or life, such as life support
systems. National, state and local laws may grant you other rights that are not
affected by this warranty.
Warranty Period: 1 Year
Sanho Corporation
47456 Fremont Blvd.
Fremont, CA 94538, U.S.A.
Tel: +1-408-737-7878
Additional terms and conditions can be found at www.hypershop.com
Usage of this product constitute acceptance of these terms and conditions.
Content
What's In The Box
Charging Battery
Battery Management
Using iUSBport As USB Charger
Using iUSBport As Wireless Storage
Access USB Mass Storage Device
Before Unplugging USB Mass Storage Device
Normal Shutdown
Change SSID & Password
Connect iUSBport to an existing WiFi network
Accessing iUSBport in Mac OS
Accessing iUSBport in Windows
Standard Network Service List
Copy Memory Card To USB H.D.D.
Upgrading the Firmware
Specification
What's In The Box
USB Port 1
USB Port 2
WiFi
Indicator
Charging
Indicator
MicroSDXC
Slot
Power Button
LCD
Charging Port
Main Unit
Getting Started Guide
USB Charging Cable
Charging Battery
The product package does not include a USB charger. We
recommend that you use a tablet (e.g. iPad) USB charger
(5V/2A) to charge the battery.
The charging indicator will light up orange during charging. When
the battery is fully charged, the charging indicator will turn green.
(~6hrs to full charge from empty)
Charging Indicator
Battery: 3.68V
USB Charger
(This accessory is not included
in the product package.)
Battery Management
iUSBport can detect a low battery. Once the battery runs low,
the red LED will light up and LCD will display a warning
message:
Low Battery
Indicator
Warning
Message
Low Battery
After displaying 'Low Battery' for 3 minutes, iUSBport will turn off
automatically.
To conserve power, iUSBport will turn off automatically if there is
no active connection for a specified time. By default, this function is
disabled. You can modify this timer from 30 minutes to 120 minutes.
NOTE: If a PC connects to iUSBport via Samba protocol, it will not
turn off automatically until you turn off your PC.
Using iUSBport As USB Charger
iUSBport is able to act as a USB charger which can charge a wide
range of mobile device. It outputs 5V 1000mA power via two
standard USB A Female ports.
Connect device to USB port
Press & hold power button
for 3 seconds
Output indicator is flashing
Press power button again to turn off iUSBport
Using iUSBport As Wireless Storage
Connect device to USB port
Press power button and
release it when the LCD
lights up.
Wait for 30 seconds until WiFi
indicator is flashing.
WiFi SSID
Password of Access Point network
Go to "Settings" in your WiFi device (e.g. iPad, iPhone)
Select "iUSBport" from the list of WiFi networks.
iUSBport
iUSB2_xxxx
Access USB Mass Storage Device
Select "Safari" or any web browser on WiFi device
(e.g. iPad, iPhone)
Enter 'http://199.0.0.1' in the URL address bar of the web
browser.
The contents of the USB device will be displayed in the browser.
Partition Drives
Settings
Tip
Content
We recommend using Safari or Chrome browser
as much as possible. Other browsers may not be
able to display the full user interface.
Before Unplugging USB Mass Storage Device
When device shutdown,
unplug USB device
Press power button
Sync...
LCD display "Sync ..."
Wait for Sync and then unplug
USB device from iUSBport
(Alternate Method) Remote Unload USB
Click "Setting"
Tap "Safely Remove:"
Normal Shutdown
Press power button
Shutdown?
LCD display "Shutdown?"
Press power button again
Force Shutdown
Poke reset button
Open side cover
Change SSID & Password
Don't forget to change default SSID & password to yours. Otherwise,
unauthorized users are able to access your iUSBport and its data.
Tap "SSID:" in setup page
Input new SSID & password:
Tap "Save Change" and reboot iUSBport.
Connect iUSBport to an existing WiFi network
If you want your mobile device (e.g. iPad, iPhone, smartphone,
tablet, computer etc.) to access iUSBport and the Internet at the
same time, you will need to connect iUSBport to an existing WiFi
network. This mode is called "Infrastructure Mode". In this mode,
you can access iUSBport with your mobile device and remain
connected to the Internet at the same time.
Wireless Router
Tip
The default network mode of iUSBport is 'Access Point'
mode. In order to switch to 'Infrastructure' mode, first
turn on your wireless router. When the wireless router
is working properly, turn on iUSBport. If iUSBport is
powered on before the wireless router is turned on,
iUSBport will not be able to find the wireless router.
Connect iUSBport to an existing WiFi network
Tap "SSID:" in "WLAN Station:" function
Choice a WLAN in WLAN list
Enter the network password, then click 'Ok' to save the
password. If the network password is correct, you will see the
wireless router SSID and IP address in setup page.
Accessing iUSBport in Mac OS
In the Finder Window, select 'Connect to Server' from the 'Go'
menu.
Enter the IP address of iUSBport (in the format smb://<IP
address>) in the 'Server Address' text box.
'
smb://192.168.0.120
Select 'Guest' and 'Connect' .
Accessing iUSBport in Windows
Open 'My Computer' ;
My Computer
Enter the IP address of iUSBport in the address bar;
NOTE! Add two backslash before the IP address!
\\192.168.0.120
Click 'Go' or press Enter on the keyboard, and the iUSBport
drive will show on the window.
\\192.168.0.120
iUSBport-C
Click 'iUSBport' to access the contents of iUSBport.
Standard Network Service List
There are several standard network servers in iUSBport, such as
FTP, DLNA, WebDAV and Samba servers. iUSBport can be
accessed by standard FTP, DNLA, WebDAV or Samba client
software. FTP and Samba servers support read and write operation
if the storage device is 'FAT32' or 'NTFS' formatted .
FTP Settings
FTP server IP address:
199.0.0.1 (Access Point mode)
(In infrastructure mode, use IP address that is shown on iUSBport LCD)
FTP server TCP/IP port number:21
FTP server user name:
anonymous
FTP server password:
<none>
Samba Settings
Samba server IP address:
199.0.0.1(Access Point mode)
(In infrastructure mode, use IP address that is shown on iUSBport LCD)
Samba server TCP/IP port number:
Samba server user name:
Samba server password:
WebDav Settings
Samba server IP address:
139
Guest
<none>
http://199.0.0.1:81/webdav
(Access Point mode)
(In infrastructure mode, use IP address that is shown on iUSBport LCD)
WebDAV server user name:
WebDAV server password:
<none>
<none>
Copy memory card to USB H.D.D.
iUSBport can copy memory card from a USB card reader to a USB
hard disk drive (FAT32 formatted). All files including photos and
videos can be transferred into H.D.D. automatically.
Connect a USB hard disk drive to iUSBport. Wait for a while until
LCD display "FS is Ok". If H.D.D. capacity is larger then 1TB, you
may need to wait for over 40 seconds.
Connect USB card reader with memory card to iUSBport.
When LCD display "Copy Card?", press power button once.
iUSBport
Copy Card?
iUSBport will copy memory card to USB H.D.D.
Copying File
Copy Speed & Estimated Time
IMG_0168.JPG
9.1MB/s (18'16")
Copy Finished!
800 Files
After successful copy, iUSBport will turn off itself. Otherwise, the
error message will be displayed on LCD for about one hour!
Tip
The FAT32 file system is required for USB H.D.D. to
perform copy operation.
Upgrading the Firmware
The firmware of iUSBport can be upgraded to add new features and
to address any software bugs.
Download firmware which should be named IUSBP2.SEF
Copy IUSBP2.SEF to the root folder of USB storage device.
Insert this USB storage device into iUSBport and it will display
the following update message:
Update
V10 -> V11 ?
Press power button once to start updating.
Updating...
Erasing 19%
Erasing flash memory
Updating...
Writing 77%
Writing flash memory
Updating...
Verifying 25%
Update OK
Shutdown
Verifying firmware
Update successful
System will power off
Specification
Model:
iUSBport2
USB Port:
USB2.0 High Speed 480MBps x 2
Internal Flash:
Optional Micro SDXC (Up to 64GB)
Wireless:
WiFi 802.11b/g/n
LCD:
Mono STN 132*32 with backlight
Charging Rate:
DC 5V 2A
Battery:
3300mAh 18650 Li-Poly
Standard Accessories : USB Charging Cable x 1
Getting Started Guide x 1
Wireless Mode:
Access Point Mode
Infrastructure Mode
Network Service:
Web Server with extension
FTP Server/Samba Server/DLNA Server
Compatible With:
iPad/iPhone/Android/WiFi Devices
USB Mass Storage Compliant Devices
iUSBport
Designed in Silicon Valley, California by Sanho Corporation
All rights reserved. Copyright 2013.
Apple, iPad, iPhone are registered trademarks of Apple, Inc.
All other trademarks are copyrights are the property of their
respective owners