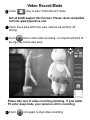
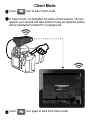
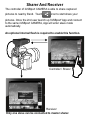
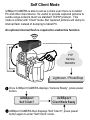
1
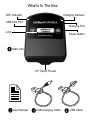
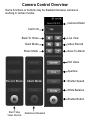
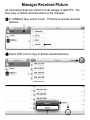
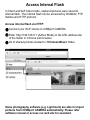
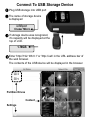
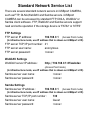
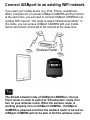
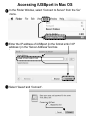
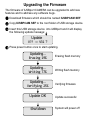
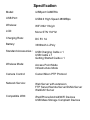
UserManual
FCC STATEMENT
1.This device complies with Part 15 of the FCC Rules. Operation is
subject to the following two conditions:
(1) This device may not cause harmful interference.
(2) This device must accept any interference received, including
interference that may cause undesirable operation.
2.Changes or modifications not expressly approved by the party
responsible for compliance could void the user's authority to operate
the equipment.
NOTE: This equipment has been tested and found to comply with
the limits for a Class B digital device, pursuant to Part 15 of the FCC
Rules. These limits are designed to provide reasonable protection
against harmful interference in a residential installation.
This equipment generates, uses and can radiate radio frequency
energy and, if not installed and used in accordance with these
instructions, may cause harmful interference to radio
communications. However, there is no guarantee that interference
will not occur in a particular installation. If this equipment does
cause harmful interference to radio or television reception, which
can be determined by turning the equipment off and on, the user is
encouraged to try to correct the interference by one or more of the
following measures:
Reorientate or relocate the receiving antenna.
Increase the separation between the equipment and receiver.
Connect the equipment into an outlet on a circuit different
from that to which the receiver is connected.
Consult the dealer or an experienced radio/TV technician for
help.
RF warning statement:
The device has been evaluated to meet general RF exposure
requirement. The device can be used in portable exposure condition
without restriction.
Sanho Manufacturer's Limited Warranty
Sanho warrants to the end user, that this product, excluding content and or
software supplied with or on the product, will be free from material defects in
manufacture, will conform to Sanho's published product specifications and be fit
for normal use during the Warranty Period specified below commencing on the
date of purchase provided that the product is legally placed on the market.
To make a warranty claim please contact Sanho at the telephone number below
or [email protected] within the Warranty Period and provide proof of
purchase (showing date and place of purchase and name of the reseller) and
product name, type and number. You may return the product after first obtaining
a Return Material Authorization number and following any other guidelines
listed. For further information see www.hypershop.com. Sanho may at its option
repair this product or provide you with an equivalent product; and if unable to
repair or replace the product, will refund the purchase price. Sanho will not be
liable for indirect or consequential damage (including loss of data), or for
damage caused by improper use (including use in an incompatible device and
use not in accordance with the instructions), or by improper installation,
unprofessional repair, modification or accident. This constitutes Sanho's entire
liability which will never exceed the price you paid for it, plus the necessary
costs you made for the warranty claim. Sanho products must not be used in
applications where failure could threaten injury or life, such as life support
systems. National, state and local laws may grant you other rights that are not
affected by this warranty.
Warranty Period: 1 Year
Sanho Corporation
47456 Fremont Blvd.
Fremont, CA 94538, U.S.A.
Tel: +1-408-737-7878
Additional terms and conditions can be found at www.hypershop.com
Usage of this product constitute acceptance of these terms and conditions.
Content
What's In The Box
Charging Battery
Connect To DLSR
Connect Tablet PC To iUSBport
Camera Control Overview
Remote Control DLSR
Manager Received Pictures
Live View & Focus Selection
Video Record Mode
Client Mode
Sharer & Receiver
Self Client Mode
Access Internal Flash
Connect To USB Storage Device
Standard Network Service List
Connect iUSBport to an existing WiFi network
Accessing iUSBport in Mac OS
Accessing iUSBport in Windows
Upgrading the Firmware
Specification
This manual content is based on iOS App V1.5 and Firmware V3.1. As
software continue to be improved, the above content subject to change without
notice.
What's In The Box
WiFi Indicator
Charging Indicator
USB Host Port
Charging Port
LCD
Power Button
Main Unit
1/4" Tripod Thread
User Manual
USB Charging Cable
USB Cable
Charging Battery
The product package does not include a USB charger. We
recommend that you use a 5V/1A USB charger to charge the
battery.
When the LCD display 'No Battery', you should charge the iUSBport
CAMERA. After displaying 'No Battery' for 3 minutes, iUSBport will
turn off automatically.
The charging indicator will light up orange during charging. When
the battery is fully charged, the charging indicator will turn green.
(~7hrs to full charge from empty)
iUSBport
!No Battery
Charging Indicator
USB Charger
(This accessory is not included in
the product package.)
Connect to DLSR
Press power button
Connect DLSR to USB port
Wait for iUSBport CAMERA until your DLSR was detected. The
LCD will display following message:
iUSBport
Camera Ready
Connect Tablet PC to iUSBport CAMERA
Go to "Settings" in your WiFi device (e.g. iPad)
Select "iUSBport" from the list of WiFi networks.
iUSBport
iUSBport
Select "iUSBport" from the list of WiFi networks.
Wait for Wi-Fi connecting until 'Wi-Fi' icon being displayed at the
corrner of tablet PC status bar.
Camera Control Overview
Install & run 'iUSBport' App in your tablet PC (e.g. iPad)
Touch
icon to searching iUSBport CAMERA.
Select your iUSBport CAMERA and open 'Camera Control'.
The 'Camera Control' panel will be launched.
Camera Info
Main View
Mode
Camera
Dashboard
EXIF
Thumbnail
Histogram
Camera Control Overview
Some functions or buttons may be disabled because camera is
working in certain modes.
Camera Model
Card Info
Back To Home
Client Mode
Share Mode
Live View
Video Record
Save To Album
ISO Value
Aperture
Shutter Speed
White Balance
Shutter Button
Start / Stop
Video Record
Dashboard Disabled
Remote Control DLSR
Once 'Camera Control' detected the camera, iUSBport CAMERA
LCD displays 'Camera Tethered'
iUSBport
Camera Tethered
Touch
icon to remote release shutter.
According to camera's setting, it may perform AF driving
before releasing shutter. If it fail to finish AF, shutter will not
be released. In this case, please adjust your camera or lens.
The camera always stores picture into memory card. So if
there is no memory card in camera, the shutter will not be
released.
The captured image will be transferred to tablet PC
automatically. During transferring, a progress bar is displaying
and shutter button is disabled.
Transferring progress is also displayed on the iUSBport CAMERA's
LCD.
Picture Size
File Name
6.8MB - 88%
IMG_0168.JPG
Progress
Manager Received Picture
All received pictures are stored in local storage of tablet PC. You
may copy or delete received picture in file manager.
In 'iUSBport' App, select 'Local' - 'Pictures' to access received
pictures.
Touch 'Edit' icon to copy or delete selected pictures.
Live View & Focus Selection
Touch
icon to enter 'Live View' mode.
Not all DLSR support this function. Please check compatible
list from www.hyperdrive.com
Touch the focus area within live view, camera will perform AF
driving. The focus indicator is shown for several seconds.
If you try to release shutter during AF driving, camera will
stop AF driving and capture image immediately. Therefore,
you will get an unfocused picture.
Because of camera's character, metering point may not be
linkage with AF point. Please refer your camera's manual for
detail.
Touch
icon again to exist from 'Live View' mode.
Video Record Mode
Touch
icon to enter 'Video Record' mode.
Not all DLSR support this function. Please check compatible
list from www.hyperdrive.com
Touch focus area within live view, camera will perform AF
driving.
Touch
icon to start video recording. A red point will blink at
the right top of live view area.
Please take care of video recording operating. If your tablet
PC enter sleep mode, your camera is still in recording.
Touch
icon again to stop video recording.
Client Mode
Touch
icon to enter Client mode.
In Client mode, it is forbidden to remote control camera. You can
operate your camera and take pictures freely. All captured picture
will be transferred to tablet PC in background.
Touch
icon again to exist from Client mode.
Sharer And Receiver
The controller of iUSBport CAMERA is able to share captured
pictures to nearby friend. Touch
icon to start share your
pictures. Once the 2nd user launch up 'iUSBport' App and connect
to the same iUSBport CAMERA, App will enter slave mode
automatically.
An optional internal flash is required to enable this function.
Controller / Sharer
Receiver
Only one slave can be connected to master sharer.
Self Client Mode
iUSBport CAMERA is able to act as a client even there is no tablet
PC and other client device. It's useful to provide captured pictures to
a wide range network client via standard TCP/IP protocol. This
mode is similar with 'Client' mode. But captured pictures will dump to
internal flash instead of dumping to tablet PC.
An optional internal flash is required to enable this function.
FTP
Samba
WebDAV
Lightroom / PhotoShop
Once iUSBport CAMERA displays 'Camera Ready', press power
button.
iUSBport
Self Client?
iUSBport
Client Mode Ready
iUSBport CAMERA then displays 'Self Client?', press power
button again to enter 'Self Client' mode.
Access Internal Flash
In Client and Self Client mode, captured pictures were saved to
internal flash. The internal flash can be accessed by WebDAV, FTP,
Samba and HTTP protocol.
Access internal flash via HTTP:
Connect your Wi-Fi device to iUSBport CAMERA.
Enter 'http://192.168.0.1' (Adhoc Mode) in the URL address bar
of the Safari or Chrome web browser.
All of shared pictures located in '/C/CameraShare' folder.
Some photography software (e.g. Lightroom) are able to import
pictures from iUSBport CAMERA automatically. Please refer
software manual or access our web site for assistant.
Connect To USB Storage Device
Plug USB storage into USB port
The name of storage device
is displayed
iUSBport
Cruzer Micro
If storage device was recognized,
it's capacity will be displayed at the
top of LCD.
1.79GB
Enter 'http://192.168.0.1' or 'http://usb' in the URL address bar of
the web browser.
The contents of the USB device will be displayed in the browser.
Partition Drives
Content
Settings
Standard Network Service List
There are several standard network servers in iUSBport CAMERA,
such as FTP, DLNA,WebDAV and Samba servers. iUSBport
CAMERA can be accessed by standard FTP, DNLA, WebDAV or
Samba client software. FTP, WebDAV and Samba servers support
read and write operation if the storage device is 'FAT32' or 'NTFS'
FTP Settings
FTP server IP address:
192.168.0.1 (Access Point mode)
(In infrastructure mode, use IP address that is shown on iUSBport LCD)
FTP server TCP/IP port number:21
FTP server user name:
anonymous
FTP server password:
<none>
WebDAV Settings
WebDAV server IP address:
http://192.168.0.1:81/webdav
(Access Point mode)
(In infrastructure mode, use IP address that is shown on iUSBport LCD)
Samba server user name:
Samba server password:
<none>
<none>
Samba Settings
Samba server IP address:
192.168.0.1 (Access Point mode)
(In infrastructure mode, use IP address that is shown on iUSBport LCD)
Samba server TCP/IP port number:
Samba server user name:
Samba server password:
139
Guest
<none>
Connect iUSBport to an existing WiFi network
If you want your mobile device (e.g. iPad, iPhone, smartphone,
tablet, computer etc.) to access iUSBport CAMERA and the Internet
at the same time, you will need to connect iUSBport CAMERA to an
existing WiFi network. This mode is called "Infrastructure Mode". In
this mode, you can access iUSBport CAMERA with your mobile
device and remain connected to the Internet at the same time.
Wireless Router
Tip
The default network mode of iUSBport CAMERA is 'Access
Point' mode. In order to switch to 'Infrastructure' mode, first
turn on your wireless router. When the wireless router is
working properly, turn on iUSBport CAMERA. If iUSBport
CAMERA is powered on before the wireless router is turned on,
iUSBport CAMERA will not be able to find the wireless router.
Connect iUSBport to an existing WiFi network
Click "Setting"
Turn on 'Join known networks'.
Select the existing wireless network you want to join.
Enter the network password, then click 'Done' to save the
password. There will be no indication if the network password is
correct or not until iUSBport restarts. If the network password is
correct, iUSBport LCD screen will display the wireless router
SSID and IP address that is assigned by the wireless router to
iUSBport.
Home
192.168.0.120
SSID of Wireless Router
IP address of iUSBport
Accessing iUSBport in Mac OS
In the Finder Window, select 'Connect to Server' from the 'Go'
menu.
Enter the IP address of iUSBport (in the format smb://<IP
address>) in the 'Server Address' text box.
'
smb://192.168.0.120
Select 'Guest' and 'Connect' .
Accessing iUSBport in Windows
Open 'My Computer' ;
My Computer
Enter the IP address of iUSBport in the address bar;
NOTE! Add two backslash before the IP address!
\\192.168.0.120
Click 'Go' or press Enter on the keyboard, and the iUSBport
drive will show on the window.
\\192.168.0.120
iUSBport-C
Click 'iUSBport' to access the contents of iUSBport.
Upgrading the Firmware
The firmware of iUSBport CAMERA can be upgraded to add new
features and to address any software bugs.
Download firmware which should be named IUSBPCAM.SEF
Copy IUSBPCAM.SEF to the root folder of USB storage device.
Insert this USB storage device into iUSBport and it will display
the following update message:
Update
V?? -> V31 ?
Press power button once to start updating.
Updating...
Erasing 19%
Erasing flash memory
Updating...
Writing 77%
Writing flash memory
Updating...
Verifying 25%
Update OK
Shutdown
Verifying firmware
Update successful
System will power off
Specification
Model:
iUSBport CAMERA
USB Port:
USB2.0 High Speed 480MBps
Wireless:
WiFi 802.11b/g/n
LCD:
Mono STN 132*32
Charging Rate:
DC 5V 1A
Battery:
3300mAh Li-Poly
Standard Accessories : USB Charging Cable x 1
USB Cable x 1
Getting Started Guide x 1
Wireless Mode:
Access Point Mode
Infrastructure Mode
Camera Control:
Canon/Nikon PTP Protocol
Network Service:
Web Server with extension
FTP Server/Samba Server/DLNA Server
WebDAV Server
Compatible With:
iPad/iPhone/Android/WiFi Devices
USB Mass Storage Compliant Devices
iUSBport
Designed in Silicon Valley, California by Sanho Corporation
All rights reserved. Copyright 2013.
Apple, iPad, iPhone are registered trademarks of Apple, Inc.
All other trademarks are copyrights are the property of their
respective owners