1
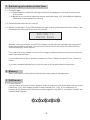
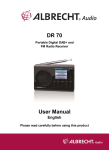
DB-100V
Please read this user manual carefully before using the receiver
LOCATION OF CONTROLS
Front
3
1 2
4 5
6
7
10
12
11
9
8
13
14
1. Autoscan
8.Preset keys (1-5/ 6-10)
2. DAB/ FM
9.Speaker
3. Power
10. Earphone Socket
4. Info/Menu
11. DC Socket
5. Shift
12. Volume Up/ Down
6. Tune/Select
13. Aerial
7. LCD display
14. Battery Door
-1-
1. Switching your radio on first time
1.1 Power Supply
1.1a Main Adaptor (inside the package) connects the adaptor to the radio socket to the
wall socket.
1.1b Batteries (not include) open the battery door and insert “AA” size alkaline batteries.
(Remarks: insert batteries correctly)
1.2 Extend the aerial as far as it can go.
1.3 Switch on the radio. The LCD backlight will light up during the operation of the radio. It will
automatically show and enter auto scan mode:
Welcome to
Digital Radio
Remark: during auto scan, the LCD will display a slide bar that indicates the progress of
scanned the amount of radio. Once the scan has finished, the radio will select the first
alphanumerically found station.
If you can’t hear any sound or volume is too large, please press the volume up or down to
reach your desired level.
If you need switch to other stations, please turn Tune / Select and press Tune / Select to
reach.
If you didn’t pass the select key, and it will back to the original station 4 seconds.
2. Memory
When you switch on the radio and will play the last mode in last operation.
3. DAB mode
3.1 Preset Station
You can store 10 of your favorite stations to the preset keys Just press and hold one of the
preset key (1-5) until display shows Preset X saved (X is 1-10). If you need save in
location 6-10, please press Shift and number together (say Shift + 1=location 6) and it will
show Preset X saved.
-2-
3.2 Recalling a preset station
Simply press 1-5, that you can reach stored station in location 1-5. If it shows Preset X
Emply, that means no preset. If you need recall 6-10, please press Shift and 1-5 together
to reach.
Info/Menu
3.3 DAB Display Mode
Every time press Info/Menu, that you will find:Signal Strength
Programme Type
Station Operator
Bitrate
Signal Error
Frequency
Time
Date
The information is displayed on the LCD display.
Signal Strength: Longer slide bar means in good reception, if drops below fifth box then
you may experience problems with quality of the audio.
Radio 1 IN DAB
minimum signal level
Program Type: Style of broadcasting. Eg: News or Rock
Operator: means service provide by which company
Bitrate / Signal Error / Frequency: Technical information being on broadcasting
Time / Date: Information will provided by radio station. If the station didn’t provide and it
will show “Time / Date”
-3-
Advanced Display modes
To enter advanced display mode, please hold Info/Menu for approximately 3 seconds
then release.
Manual Tune: you can select from 5A to 13F, when new station in your city or unable auto
tune that you can use manual tune
Full Scan: Full scan all station in your city.
DRC: Dynamic range compression (DRC) increases the amplitude of weaker frequency
components of a sound signal. This makes the overall sound seem louder, making
a station 'stand out' on the dial and helping to mask background interference.
Prune: Delete stations which already not available
System:
Time: adjust time, date, time mode or auto adjust
SW version: Show the software number of this radio
Software Upgrade: only for maintenance use
Factory Reset: Back to original mode and delete all setting and presets.
4. FM Mode
4.1 From DAB to FM: If you need switch from DAB to FM, please press DAB/FM. The radio
will automatically tune to nearest station. It will show station name or frequency.
4.2 Auto Scan: to search for a FM station, you need to press Autoscan, it will start scanning
up. Once a station has been found, the scanning will stop automatically. If no station is
found, the tuning will cycled through the entire FM band (87.5-108MHz)
4.3 Preset: Please refer DAB section.
4.4 FM Display Mode
Every time press Info/Menu, that you will find:Information from Station
Programmee Type
Frequency
Stereo / Mono
Time
Date
The information is displayed on the LCD display.
Advanced Display modes
To enter advanced display mode, please hold Info/Menu for approximately 3 seconds
then release.
Scan Setting: All stations / Strong station
Audio Setting: Stereo Allowed / Forced mono
System:
Time: Adjust time, date, time mode or adjust automatically
SW version: Software number of this radio
Software Upgrade: for maintenance only
Factory Reset: Back to original mode and delete all setting and presets.
-4-
CAUTIONS
1. Do not allow this radio to be exposed to water, steam or sand.
2. Do not leave your radio where excessive heat could cause damage such as in parked car
where the heat from the sun can build up even though the outside temperature may not
seems too high.
3. The rating is located on the underside of the unit.
4. No naked flame sources such as lighted candles should be placed on the product.
5. It is strongly recommended that the orginal packaging supplied with your product be
retained for future safe transportation.
TROUBLESHOOTING
Why can I not receive any DAB+ stations?
1. Please check if you are in digital radio coverage area.
2. If you are in a good reception area and still do not receive any signals, try moving the radio
to another position of the house as physical and electromagnetic factors can play a large
part in signal strength and quality.
No Sound
1. Adjust volume
2. For mains powered radio, please check that the mains power lead is connected at the side
of the radio and the main power wall socket is switched
3. Check if the batteries are low when you are using batteries. We recommended using
alkaline batteries to maintain working in good condition.
Support Line
For further assistance, please call our support line on 852-31101856
(Monday – Friday: 09:30-13:00 & 14:00-17:00)
-5-