1
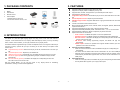
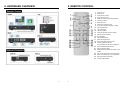
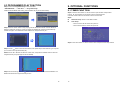
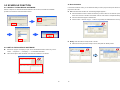
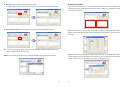
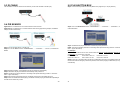
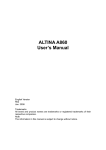
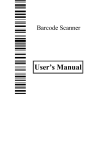
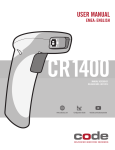
CONTENTS EYEZONE B500C 1. Package Contents……………………..……………………….. 2. Introduction……………………………….……………………... 3. Features………………………………………….……………… 4. Hardware Overview…………………..………………………... 5. Remote Control…………………………..…………………….. 6. Start The B500C…...…..……………………………………….. 7. Setting Up……………………………………………………….. 7.1 Preferences…….…………………..….……………………. 7.2 Photo Setup…………….…………………………………… 7.3 Firmware Setup…………………………………………….. 8. Using the B500C…….……………………..…………………... 8.1 USB Auto-Copy Function………….………………………. 8.2 One File Repeat Function…………………………………. 8.3 Programmed Play Function.…....…………...……………. 9. Optional Function…………………………..…………………... 9.1 Timer Function.....……....…………..…………..…………. 9.2 Schedule Function……....…………..…………..…………. 9.3 IR Cable…………………..…………..…………..…………. 9.4 PIR Sensor………………….………..…………..…………. 9.5 Play-Button Box………....…………..…………..…………. 9.6 Touch-Sensor Buttons…..…………..…………..…………. 9.7 Bar-Code Scanner…………………..…………..…………. 10. Troubleshooting……….……..…………………..……………. User Manual Dec 12, 09 3452000 1 2 2 3 4 5 6 7 7 9 9 10 10 11 12 13 13 14 20 20 21 22 23 41 1. PACKAGE CONTENTS 1. 3. FEATURES B500C 2. User Manual 3. Remote Control 4. Power Adapter - Standard Version: DC5V, 2A - PIR Function Version: DC12V, 1.5A 2. INTRODUCTION The B500C is a palm-size digital signage player that plays picture, music and video without a computer. It uses media files from CF, SD(HC), MMC and MS(Pro) memory card. By connecting Video, S-Video, VGA and Audio, you can play media files on any display device. The B500C features Programmed Play and One File Repeat function, and supports USB host (for Auto-Copy function), optional IR input (for connecting to the PIR Sensor) and optional Laser Scanner input. Programmed Play Function: Sets the files to play on the list, and make them in the order you like. One File Repeat Function: Repeat only the selected file. USB Auto-Copy Function: Automatically copy the media files from Pen Driver to CF card. PIR Sensor (optional): After sensing approaching subjects, the B500C will play the files automatically. Bar-code Scanner (optional): The B500C will display the corresponding file when the bar-code scanner scans the bar-code. With the portable B500C, you can play the shows on any display device for advertising, presentations, training, and other media applications. 2 3 Supports multiple file formats: Picture, Music and Video. Supports CF, SD(HC), MMC and MS(Pro) memory card. Supports Video, S-Video, VGA (resolution up to 640x480) and Audio output. Supports NTSC and PAL format. Programmed Play Function: Set the files to play on the list, and make them in the order you like One File Repeat Function: Repeat only the selected file. USB Auto-Copy Function: Supports USB host for copying the media files from Pen Driver to CF card. Includes a full-function infrared remote control. Multi-Language OSD: English, French, German, Italian, Portuguese, Spanish, Netherlands, Japanese and Chinese. Supports SLIDE SHOW Function: With 14 kinds of transition effects. Supports SLIDE TIME (INTERVAL) Mode: Interval time with 1, 3, 5, 10, 30, 60 seconds. Supports MUSIC SLIDE Show: Music and pictures play at the same time. Optional Functions and Connectors: - Timer Function: The B500C will power on/ off at the specified time. - Schedule Function: The B500C will play the specified files at the specified time. - Bar-Code Scanner: The B500C will display the corresponding file when the bar-code scanner scans the bar-code. - PIR Sensor: After sensing approaching subjects, the B500C will play the files automatically. - S/PDIF Output: Connects to speakers that supports S/PDIF interface (the connected speakers must be with AC3 license). Optional Touch-Sensor Buttons: - Press one of the touch-sensor buttons, the B500C will play the corresponding file automatically. - The number of touch-sensor buttons can be customized to 12, 24 or 36 for OEM project. - Used with various operating environment (glass, plastics and acrylic material, except metal material), the thickness supports 3mm -5mm, and it can be customized to 1cm for OEM project. Optional Button Box: - Press one of the play buttons, the B500C will play the corresponding file automatically. - The Play Button Box supports up to 12 play-button inputs. 4. HARDWARE OVERVIEW 5. REMOTE CONTROL 1 Power on/ off 2 Mute sound 3 Open the setup menu 4 Go to the main menu 5 Open the timer setup window (optional) 6 Volume up/ down 7 Move the cursor 8 Confirm the selection/ entry 9 Go to the previous/ next page or image 10 List all the pictures. 11 List all the music 12 List all the videos 13 Open the file library (list all the files) 14 Pause/ resume playback 15 Stop playback 16 Play the selected file 17 Select the repeat mode 18 Rewind/ forward videos or music 19 View the previous/ next file Play the previous/ next file if in playback 20 Set the slideshow interval time 21 Set the transition effect 22 Rotate photo 90 degrees clockwise on the screen 4 5 23 Play music and pictures at the same time 24 Zoom in the image up to 4x magnification 25 Mirror the image horizontally 26 Output mode selection Power On z Insert the memory card that has videos, pictures or music. and then press the “ENTER” button. You will be presented with the B500C settings screen. z Connect the provided power adapter and turn on the power switch, then the B500C will power You can also press the “SETUP” button on remote control to directly open the settings screen. on automatically. In the main menu, using the “▲、▼、 、 ” button on remote control to select the “Setup” item, ▼ 7. SETTING UP ▲ 6. START THE B500C (If there is file that is being play, please stop first.) Status After Power On z Status 1: If the “Auto Start (ALL, Photo + Music, One File Repeat or Programmed Play)” function is enabled and there are media files on the memory card, the B500C will auto play media files after power on. z Status 2: If the “Auto Start” function is disabled, after power on the main menu will appear as shown in the following figure. There are six items in the main menu. 7.1 PREFERENCES OSD Language: Select the OSD language (English/ Chinese/ French/ German/ Italian/ Portuguese/ Spanish/ Dutch/ Japanese). Power Off: Turn off the power switch or press the “POWER” button on the remote control to power off. 6 7 7.2 PHOTO SETUP Auto Start: Enable/ disable the auto play function after power on. - OFF: Disable the auto start function - ALL: Play all media files on the memory card after power on. - Photo + Music: Play the pictures with music. - One File Repeat: Repeat only the selected file. - Programmed Play: Set the files to play on the list, and make them in the order you like Slideshow Mode: Enable/ disable the slideshow function. Interval Time: Set the time each photo is shown to 1, 3, 5, 10, 30 or 60 seconds. Transition Mode: Set transition effects between photos. Reset: Reset all settings to the original (factory) settings. Timer Message: Turn on/ off the time message displayed on the screen. 7.3 FIRMWARE SETUP 8 9 Firmware Version: Display the current firmware version. Step5: The B500C will copy all files from USB pen driver to the CF card automatically. 8. USING THE B500C NOTE: All files on the CF card will be deleted before copying. 8.1 USB AUTO-COPY FUNCTION Step1: Use the “Notepad” to create a file on your PC. Type “AUTOCOPY” and named the file “AUTOCOPY.ini”. Step6: After copying has finished, the message “COPY DONE” will appear. Remove the USB pen driver, and the B500C will play the files automatically. AUTOCOPY.ini Step2: Put the files that you want to copy and the file “AUTOCOPY.ini” to the USB pen driver. NOTE: 1. If the file “AUTOCOPY.ini” is not on Pen Driver, the B500C will not execute the Auto-Copy function. 2. Please confirm there are no “Folder”, “Hidden File” and “System File” on the USB pen driver and CF card. How to see the hidden file: Browse your USB pen driver or CF card using “My Computer”. From the file menu click on “TOOLS” → “FOLDER 8.2 ONE FILE REPEAT FUNCTION OPTIONS”, then click on the “VIEW” tab. Select the option “SHOW HIDDEN FILES AND FOLDERS” inside the Step1: Confirm the ONE FILE REPEAT function is enabled. “Advanced Settings” box. If there are hidden files on the USB pen driver or CF card, they will now appear in your file <PREFERENCES> → <Auto Start> → <One File Repeat> list. Please restart the B500C after setting, and the B500C will play the file automatically. 3. If the total size of the files on the USB pen driver is bigger than the CF card size, the auto-copy function will stop after the CF card is full 4. The transfer rate is up to 10MB per minute. Step3: Insert the CF card and turn on the B500C. Step4: Insert the USB pen driver while playing media files. Step2: Press the “STOP” button to stop playing, and the file list will be shown. Use the ▲ and ▼ buttons to select file, and press the “ENTER” button to confirm the selected file (the check mark will appear on the left side of the selected file). Step3: Restart the B500C after setting, and the B500C will execute the One File Repeat function. 10 11 8.3 PROGRAMMED PLAY FUNCTION 9. OPTIONAL FUNCTIONS Step1: Confirm the Programmed Play function is enabled. <PREFERENCES> → <Auto Start> → <Programmed Play> 9.1 TIMER FUNCTION Please restart the B500C after setting, and the B500C will play the file automatically. and ▼ Use the ▲ Step1: Press the “EDIT” button on remote control to open the timer setup window. buttons on the remote control to select each item. Use the ▲ and ▼ buttons on the remote control to set the value. Step2: Date/Time Setup: Set the current date and time. Timer Setup - Power On Time: Set the time of auto power on. - Power Off Time: Set the time of auto power off. ▼ Step2: Press the “STOP” button to stop playing, and the file list will be shown. Use the ▲ and ▼ buttons to select file. Use the button to confirm the selected file, and the “Programmed Play” window will appear. The selected file will be added to the Programmed Play list. Step3: Use the ▲ Step3: Press “EDIT” button on remote control to save and quit the timer setup window. button to back to file list screen, and repeat step2 to add other files (you may add up to 10 files to the Programmed Play list). NOTE: Use the ▲ or ▼ button to select the “Clear” item, and press the “ENTER” button to clear the Step4: After finish setting, press the ▲ Programmed Play list (all the play lists will be deleted). button to back to file list screen and restart the B500C. The B500C will execute the Programmed Play function. 12 13 9.2 SCHEDULE FUNCTION A. Basic Schedule 9.2.1 INSTALL THE SCHEDULE SOFTWARE In the “Basic Schedule” mode, you can select files that you want to play and set up the volume and the Execute “setup.exe” to install the Schedule software in the CD driver, and finish the installation play times of each file. procedure in accordance with the illustration below. Add: Click this button to add a file. The following diagram appears: z Click the “Browser” button to search for files that you want to add. You can also set up the “Play Times” and “Volume” of the file in the window. Click the “OK” button to complete the setup. z Click the “Add” button again to add other file. z COPY Function:Click the “Copy to…” button to copy directly the added file to the memory card. Modify: Click this button to modify the file in the list. z 9.2.2 SET UP THE SCHEDULE SOFTWARE Execute the program “FJ Display” to open the “FJ Schedule Generator” window on your PC. <Start> → <Programs> → <FJ Display> → < FJ Schedule Generator > There are two parts: “Basic Schedule” and “Advance Schedule” in the window. 14 15 Select the file that you want to modify in the list, and press the “Modify” button. B. Advance Schedule Remove: Click this button to remove the file from the list. z Select the file that you want to remove from the list, and press the “Remove” button to delete. In the “Advance Schedule” mode, you can select files that you want to play, and can also set up the volume, the play times, and the initial and end time of each file. There are “Time Setup” and “File Setup” in the “Advance Schedule”. Move Up / Move Down: Click these buttons to change the order that the files are played. Step 1: Click the “Add” button in the “Time Setup” section to open the “Advance Schedule Editor” window. Set up the Start and Stop Date, Start and Stop Time and the Week Day, then click “OK” to quit the window. After the setup, press the “SAVE” button, and a pop-up window will appear. Select the path, then click the “SAVE” button to save your setup. Step 2: Click the “Add” button in the “File Setup” section to open the “Schedule File Editor” window. NOTE: Do not rename the file (eyezone.ini), otherwise the B500C will not be able to read the file. Click the “Browser” button to select a file that you want to play. You can also set up the “Play Times” and “Volume” of the file in the window. Click the “OK” button to complete the setup. 16 17 Step 3: Repeat the steps 1~2 to add other files. Date Setup Error! There are some errors in the “Advance Schedule”. Check the date/ time of the schedule for conflict or error. Step 4: After finishing all setup, press the “SAVE” button, and a pop-up window will appear. Select the path, then click the “SAVE” button to save. NOTE: Do not rename the file (eyezone.ini), otherwise the P070-7 will not be able to read the file. No any schedule file in advance schedule!Can’t Save! There is no schedule file in the advance schedule. Please add files that you want to play in the advance schedule. 9.2.3 Explanation of the Warning Message No any schedule!Can’t Save! There is no schedule file in the “Basic Schedule” or “Advance Schedule” can be saved. Please add and edit a new schedule file first. 9.2.4 Apply the Schedule on the B500C Put the “eyezone.ini” file and the associated media files on the memory card, and insert the memory card to the B500C. The B500C will auto play the files at the designated time. 18 19 9.3 IR CABLE 9.5 PLAY-BUTTON BOX The IR cable is an external remote control receiver (connect the IR Cable to the IR input). Step1: Connect the Play-Buttons to the Play-Button Box (supports up to 12 play-buttons). 9.4 PIR SENSOR Application 1: The PIR Sensor is an external remote control receiver. Application 2: The PIR Sensor is a motion detector. After sensing approaching subjects, the B500C will play the files automatically. Step2: Turn on the Button Box function <PREFERENCE> → <Auto Start> → <Button Box>, and restart the B500C. Step3: The B500C will play the default file automatically while powered on. Step1: Connect the PIR Sensor to the IR input. Step2: Turn on the Sensor function <PREFERENCE> → <Auto Start> → <Sensor>, and restart the B500C. NOTE: The files are sorted by filename in ascending order alphanumerically (numbers < lowercase letter < upper case letters). For Example: There are 6 demo files on the CF card. The file names are a01.xxx, 33.xxx, b55.xxx, 1abc.xxx, 07.xxx and A01.xxx. (xxx is extension of the file) Default File: 07.xxx Demo File 1: 1abc.xxx Demo File 2: 33.xxx Demo File 3: A01.xxx Demo File 4: a01.xxx Demo File 5: b55.xxx Step4: Press one of the play-buttons to play the corresponding demo file. If the B500C finishes playing the demo file without having any buttons be pressed, it will resume playing the default file (07.xxx) automatically. Step3: Restart the B500C, and the B500C will play the default file automatically. Step4: The B500C will play the default file automatically while powered on. NOTE: The files are sorted by filename in ascending order alphanumerically (numbers < lowercase letter < upper case letters). Step5: After sensing approaching subjects, the B500C will play the all the media files once. Step6: When the meida files finishes playing, the B500C resumes playing the default file repeatedly till the PIR Sensor detects any motion. 20 21 9.6 TOUCH-SENSOR BUTTONS 9.7 BAR-CODE SCANNER Step1: Create 6 media files (include 1 default file and 5 demo files) on your PC and name the 6 media 9.7.1 Using the Bar-Code Scanner files as 00_xxx.xxx ~ 05_xxx.xxx. Step1: Connect the bar-code scanner to the B500C. Default file: 00_xxx.xxx First file: 01_xxx.xxx Second file: 02_xxx.xxx Third file: 03_xxx.xxx Fourth file: 04_xxx.xxx Fifth file: 05_xxx.xxx Step2: Put the 6 media files on the memory card, and insert to the B500C. Step3: Open the battery cover and set the batteries (AA size) as shown below. Please note that the polarity of the battery. Step4: Turn on the Touch-Sensor Buttons function <PREFERENCE> → <Auto Start> → <Button>, and restart the B500C. Step2: Copy the default file (00_xxx) and barcode video files to the memory card. NOTE: The name of barcode video file is the same as barcode number. For example: The Barcode number is 1234567, and names the corresponding video file “1234567.xxx”. (xxx is the extension) Step3: Turn on the Scanner function <PREFERENCE> → <Auto Start> → <Scanner>, and restart the B500C. Step5: The B500C will play the default file (00_xxx) automatically while powered on. Step6: Press one of the touch-sensor buttons to play the corresponding demo file. If the B500C finishes playing the demo file without having any buttons be pressed, it will resume playing the default file (00_xxx) automatically. Step4: The B500C will play the default file (00_xxx) automatically while powered on. Step5: Scan the bar-code to play the corresponding file. NOTE: 1. Keep 5 to 10 centimeters of distances between bar-code scanner and bar-code. 2. If the B500C can’t find the corresponding file, the message “NO FILE” will be showed on the screen. 22 23 3. If the message “READ AGAIN” will be showed on the screen, please scan again. 4. Show the bar-code number on the screen when scanning <PREFERENCE> → <Barcode Number> → <ON> Enter/Exit Programming Mode All framed barcode names represent 9.7.2 Setting the Bar-Code Scanner as default settings. The bar-code scanner supports the following type UPC / EAN/ JAN Japanese Bookland Interleaved 2 of 5 UPC A & UPC E Code 39 Addendum 2 of 5 EAN 8 & EAN 13 Codabar MSI / Plessy JAN 8 & JAN 13 Code 128 & EAN 128 China Postal Code ISBN / ISSN Code 93 Code 32 Please follow the step below to change the scanner setting. Step1. Scan Enter/ Exit programming mode barcode (2 beeps Low—high). Step2. Scan barcode for the desired feature (1beep). Step3. Scan Enter/ Exit programming mode barcode to save the configuration (2 beeps, long---short). RESET ※ The reading of the “RESET” label turns all the parameters back to default values. 24 25 Code 39 Enable Codabar Enable Code 39 Disable Codabar Disable 26 27 UPC/EAN/JAN Enable ITF 2 of 5 Enable UPC/EAN/JAN Disable ITF 2 OF 5 Disable 28 29 Chinese Post Code Enable Code 128 Disable Chinese Post Code Disable 30 31 Code 93 Enable EAN-128 Enable Code 93 Disable EAN-128 Disable 32 33 Code 32 Enable (Italian Pharmacy Code) MSI enable Code 32 Disable (Italian Pharmacy Code) MSI Disable 34 35 EAN-13 Convert to ISBN/ISSN Enable UPC/EAN ADD ON OFF EAN-13 Convert to ISBN/ISSN Disable ADD ON 5 only 36 37 ADD ON 2 only EAN/UPC +Add on (none mandatory) ADD ON 2 or 5 EAN/UPC + Add on ( mandatory) 38 39 10. TROUBLESHOOTING Force UPC-A to EAN-13 format enable Situation Check Point No Picture 1. Check power cable and power switches. 2. Make sure the file format on the memory card is correct. 1. Ensure that the battery (CR1220 3v lithium battery) in the remote control and it is inserted the correctly. No Response From the Remote Control 2. Check for any barrier between the remote control and the B500C. 1. Check if the mute function is on. 2. Check if the volume is set properly. 1. Confirm the file “AUTOCOPY.ini” is in the USB pen driver (refer No sound Can’t execute auto-copy function Can’t execute to the section 8.1) 1. section 8.3). Programmed Play function Can’t execute 1. The Bar-Code cannot read (optional). 40 41 Scanner bar-codes Confirm the One File Repeat function is enabled (refer to the section 8.4). One File Repeat function Force UPC-A to EAN-13 format disable Confirm the Programmed Play function is enabled (refer to the 1. 2. The scanner window is dirty and must be cleaned. The presented barcode type is not enabled (refer to section 9.7.2 for changing bar-code type). 3. The barcode type presented is not supported.