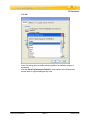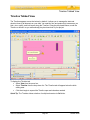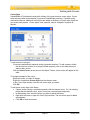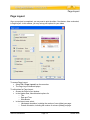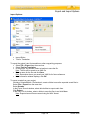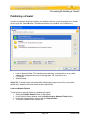
1
User Manual Contents Welcome to ViewletBuilder6 Professional ....................................................................................1 New Features................................................................................................................................2 System Requirements...................................................................................................................3 Download and Installation.............................................................................................................4 License Activation and Deactivation .............................................................................................5 Interface Overview ........................................................................................................................7 Preferences.................................................................................................................................10 Screenshot Project......................................................................................................................18 Image Project..............................................................................................................................25 Blank Project...............................................................................................................................27 Slide View and Thumbnail View..................................................................................................29 Tabbed Views – Brief Introduction ..............................................................................................32 Browser Tabbed View.................................................................................................................34 Thumbnails Tabbed View ...........................................................................................................37 Timeline Tabbed View ................................................................................................................38 Stylesheets Tabbed View ...........................................................................................................44 Slide Notes Tabbed View............................................................................................................47 Working with Cursors..................................................................................................................48 Messages....................................................................................................................................53 Object Timing..............................................................................................................................61 Format Painter ............................................................................................................................66 Dictionary, Spell Check & Search and Replace ..........................................................................67 Working with Slides.....................................................................................................................70 Audio...........................................................................................................................................76 Images ........................................................................................................................................78 Background Frames....................................................................................................................80 Shapes........................................................................................................................................93 Events and Actions Overview .....................................................................................................99 Buttons......................................................................................................................................103 Hyperlinks .................................................................................................................................105 Interactive Zones – Common Features.....................................................................................107 Click Zones ...............................................................................................................................111 Text Zones ................................................................................................................................113 Question Slides.........................................................................................................................115 Keystroke Zones .......................................................................................................................117 Pause Zone...............................................................................................................................119 Page Layout..............................................................................................................................121 Printing Slides ...........................................................................................................................123 Export and Import Options ........................................................................................................125 Project Properties .....................................................................................................................128 Previewing a Viewlet.................................................................................................................146 Publishing a Viewlet..................................................................................................................148 ViewletCentral – General Information .......................................................................................152 ViewletCentral Self-Hosted Server ...........................................................................................153 Support and Self-Help...............................................................................................................154 Training .....................................................................................................................................155 Sales and General Customer Service.......................................................................................156 Welcome to ViewletBuilder6 Professional Welcome to ViewletBuilder6 Professional Qarbon welcomes you to the exciting world of Viewlet technology! People are natural visual learners, so a quick animated Viewlet gets the point across much more effectively than words on a page. And, with over 3 million presentations launched every month, Viewlets are one of the most popular ways of sharing information, providing support, presenting products and training new employees. ViewletBuilder, the authoring tool used to create Viewlets, allows anyone, regardless of technical or creative ability, to make compelling, animated online presentations with ease. Due to its versatility, intuitive user-interface and incredibly quick creation time, ViewletBuilder is now a standard content creation tool in corporations, governmental institutions and academic organizations around the world. ViewletBuilder6 Professional: Contains all of the classic ViewletBuilder features Viewlet authors have come to know and respect with many enhancements not found in prior versions. This ViewletBuilder6 Professional User Manual is designed to introduce you to the world of Viewlet authoring. It will provide you with a general overview of the ViewletBuilder6 Professional’s most important features you will need to know to start creating your own Viewlets. Let’s get started! VB6 Pro User Manual Page 1 October 2008 New Features New Features ViewletBuilder6 Professional comes with many new enhancements, making the program even more versatile, the output more compelling and the creation process smoother. This, combined with more design control functionality for cursors, objects and other Viewlet elements, makes ViewletBuilder6 Professional more powerful then ever. The list is just too long to list in this manual. Please visit our web site (www.qarbon.com) for more information on ViewletBuilder6 Professional’s features. VB6 Pro User Manual Page 2 October 2008 System Requirements System Requirements System requirements for using ViewletBuilder6 Professional will depend upon several factors, including your operating system. If you have any questions about what your system needs to efficiently run ViewletBuilder6 Professional to achieve the best possible results, please visit our web site (www.qarbon.com) and look for the specific ViewletBuilder6 Professional products page. On this page you will find a Technical Specs link with more information. If you still have questions, please send us an email: [email protected]. VB6 Pro User Manual Page 3 October 2008 Download and Installation Download and Installation The download and installation process for ViewletBuilder6 Professional is straightforward, but the location and process for it may vary overtime. For the fastest results, go to our home page (www.qarbon.com) and look for and click the Download(s) link. On the download page, click the link for the product you want to download and follow the instructions on the preceding pages to download the installation file. Remember the name and location of the installation file. After downloading the file, close the browser window. Then, locate and double click the installation file. Follow the onscreen prompts to install ViewletBuilder6 Professional. If you run into any installation issues or have any questions about the current ViewletBuilder6 Professional download and installation process, email: [email protected]. VB6 Pro User Manual Page 4 October 2008 License Activation and Deactivation License Activation and Deactivation In order to activate ViewletBuilder6 Professional, you will need to purchase a license. Purchase a license online by visiting our web site (www.qarbon.com). Look for and click the Store link where you will find various purchase options. Or, you can contact our Sales Team ([email protected]) for current pricing and purchasing information. Once you purchase a license, you will receive a confirmation email with your license and purchase information. Keep this email for your records. You will need to be connected to the Internet to activate ViewletBuilder6 Professional. Once connected, launch the program. Select Help > License Activation from the menu bar. Follow the screen prompts to complete the license activation process. For best results, copy the license number directly from your email and paste it in the required field when registering ViewletBuilder6 Professional. To check license information, select Help > About ViewletBullder6 to display an “About” window that fetches current license type and membership status directly from the server. If the “About” window is unable to connect to the activation server, a link will be provided to display the activation status. VB6 Pro User Manual Page 5 October 2008 License Activation and Deactivation There may be times you will need to move your license to a different machine. To avoid any licensing abuse issues (such as registering the same license too many times, possibly resulting in your license being suspended), you can deactivate your license. To do this, make sure you are connected to the Internet. Launch ViewletBuilder6 Professional and select Help > License Deactivation from the menu bar. Follow the prompts to deactivate your license. Once you’re finished, follow the steps outlined previously to activate your license on another computer. Note: If you don’t have an Internet connection or your firewall is blocking ViewletBuilder6 Professional, go through the activation wizard as normal, the last page will display steps to activate ViewletBuilder via the web. The page will look like this: If you have any problems or questions regarding the license activation or deactivation process, email: [email protected]. VB6 Pro User Manual Page 6 October 2008 Interface Overview Interface Overview When ViewletBuilder6 Professional is launched and no project is open, the window is divided into the following sections: Example of ViewletBuilder6 Professional Interface – No Project Open VB6 Pro User Manual Page 7 October 2008 Interface Overview Example of ViewletBuilder6 Professional Interface – Project Open Start Page: The first screen you see when running ViewletBuilder6 Professional is the Start Page. This page displays quick links to commands you use most frequently. It also has links to your recently opened projects, tutorials, help and a dynamic news page. Menu Bar: This is the bar that sits right below the title bar and contains menu titles that reveal additional options. The menu bar offers access to: File, Edit, View, Insert, Project and Help operations. Main Toolbar: Below the menu bar is the main toolbar containing a series of buttons. These buttons offer quick one-click access to the most common features in the program. In many cases, these buttons provide quicker access to tools found on the menu bar. Context Sensitive Toolbar: Displayed with open projects. It sits below the main toolbar and contains buttons to access the features related to the currently selected object. For example, when editing a slide, the context sensitive toolbar displays buttons for editing the slide. If you select a message, this toolbar will dynamically change accordingly. VB6 Pro User Manual Page 8 October 2008 Interface Overview Tabbed Views: These include options for working with different views. Depending upon the selection, the tabbed view will display to the left of the slide editing area or below it. Tabbed views include: Browser, Thumbnails, Stylesheets, Output, Timeline and Slide Notes. This are explained in more detail later in this manual. Object Toolbar: This toolbar, previously known as the Tools Palette, contains buttons to add new objects into the slide such as: Balloons, Notes, Text Boxes, Cursors, Shapes, Images, Buttons, Movies, Pause Zones, Click Zones, Text Zones, Keystroke Zones and Questions. When a project is opened, the slide view displays. The slide view is where you add elements to your project and edit them. Many of these features are discussed in more detail later in this manual. If you have any questions, please email: [email protected]. VB6 Pro User Manual Page 9 October 2008 Preferences Preferences In ViewletBuilder6 Professional, you can set up preferences for such features as language, spelling options, proxy server, log files, backup files and Java. This chapter provides on overview to setting up preferences for your ViewletBuilder6 Professional projects. Note: You do not need to have a project open to set up preferences. To set preferences in the: General tab: The General tab allows you to specify the language that is used to display the user interface. By default this will pick up your current system’s language, but you may want to switch to a different language in this tab. You can also specify some sound recording preferences in this tab. Select Edit > Preferences from the menu bar. Select the General tab. o In the Language area, click Change Language. o Select a language from the list. VB6 Pro User Manual Page 10 October 2008 Preferences o Click OK. o In the Recording area, set audio recording options as needed to display a countdown. Click the Reset Preferences to Default to reset options in the Preferences window back to original settings at any time. o VB6 Pro User Manual Page 11 October 2008 Preferences Spelling tab: ViewletBuilder6 Professional will spell check any text entered into a message. This is enabled by default and can be turned on and off via the View menu > Spelling Mistakes selection. This Spelling tab allows you to specify the spelling dictionary that should be used. Select the Spelling tab. Select a dictionary for the spell checker from the drop down list. Place a checkmark next to the additional spelling options as desired. VB6 Pro User Manual Page 12 October 2008 Preferences Proxy tab: The Proxy tab is used to set up your proxy server. If you don’t know what a proxy server is, chances are you don’t need to worry about it. Some companies require the programs that access the Internet to log on through a proxy server. In this case your network administrator should have the information to fill out this preference screen. Select the Proxy tab. In the Preferences area, select your proxy options. Enter additional proxy information as required in the fields provided. VB6 Pro User Manual Page 13 October 2008 Preferences Logging tab: While ViewletBuilder6 Professional is running it writes a log that describes in detail what is going on in the background. This is indispensable for tracking down problems and making ViewltBuilder6 Professional as bug free as possible. The logging can be viewed in the Output tab, which can be viewed by selecting View > Output from the menu bar. It is also by default written to a log file. You should leave this option enabled and may be asked to send the log file to Qarbon Support if you are having issues. Select the Logging tab. In the Output Window area, select a Report option from the drop down list. Click Clear Output Window (this is a tabbed view that, if selected as a View option, displays below the slide area), to clear the information in this tabbed view. In the Log File area, select the Enabled check box to activate this feature to create log files. If enabling logging, choose a file size limit and file save location path. Click Clear Log File to clear old log files from your system. VB6 Pro User Manual Page 14 October 2008 Preferences Backup tab: Select the Backup tab. In the Backup Files on Save area, click the check box next to the desired options. If choosing to create backup files for automatic saves, select the radio button next to the store options and enter a path to save these files. In the Automatic Save area, click the check box to enable the automatic save function. If using automatic saves, select how many minutes each automatic save will be performed. VB6 Pro User Manual Page 15 October 2008 Preferences Advanced tab: Select the Advanced tab. View the Java settings or click the Change Java Settings button. VB6 Pro User Manual Page 16 October 2008 Preferences A Java Preferences window displays where you can make selections. In the Memory area, set a value for minimum and maximum amount of memory that ViewletBuilder6 Professional may use. In the VM Options area, enter additional options as needed. Click OK to save options. Once all the preferences are set up, click OK. If you have any questions setting up ViewletBuilder6 Professional preferences, please contact [email protected]. VB6 Pro User Manual Page 17 October 2008 Screenshot Project Screenshot Project ViewletBuilder6 Professional has the ability to create a project from a series of screenshots of a running application. Screenshot projects can be captured in various sizes (custom, standard, full screen, and more), and using various screen resolutions. There are two capture modes available: Smart Capture for automatic captures and Manual Capture for full capture control. 1. To create a screenshot project, open the Create New Project window: Select File > New from the menu options, or Click the New button on the toolbar, or Click the Create Project button. 2. Select the Screenshot Project option. 3. Specify a Slide Size by selecting an option from the drop down list. The list includes slide sizes and a brief description of each. Custom: Choose a custom width and height. VB6 Pro User Manual Page 18 October 2008 Screenshot Project Standards: Select a predefined standard size from the drop down list or create a new one. a. New Standard: Click the green plus symbol, enter the information in the Standard Resolution window and click OK to add it to the list. b. Modify a Standard: Select a size from the drop down list. Click the pencil icon and modify the information in the Standard Resolution window. Click OK to apply. c. Delete a Standard: Select a size from the drop down list and click the red ‘X’ icon. In the Delete Standard window, click Yes. Application: Capture a window of a running application by selecting one from the drop down list. Area: Capture an area of the screen that you will define prior to capturing screenshots. Window: Select a window to capture. Full Screen: Capture the entire screen by selecting a specific screen resolution from the drop down list. 4. Select a Capture Mode from the drop down list. Manual Capture: Capture screenshots using a predefined hotkey. Smart Capture: Capture screenshots automatically. VB6 Pro User Manual Page 19 October 2008 Screenshot Project 5. Set up capture mode Options and click OK to apply. Click the Options button (located below the capture modes drop down list). In the Capture Options window, in the: a. Hotkeys tab: Click a button and when it starts to blink, press the desired hotkey to replace for capturing screenshots, animation frames, to pause or continue, stop capture and cancel screenshot captures. VB6 Pro User Manual Page 20 October 2008 Screenshot Project b. Feedback tab: In the During Capture area, select/deselect options for status window and tray icon behaviors. In the Play Sound area, select options for when to play sound during captures. VB6 Pro User Manual Page 21 October 2008 Screenshot Project c. Generation tab: Make selections for Add to Slide options for On Mouse Click, On Text Entered and On Mouse Wheel activities during screen captures. VB6 Pro User Manual Page 22 October 2008 Screenshot Project d. Options tab: In the Capture Popups area, select the check box to capture popup hints and tooltips during the capture session. To make the capture file size smaller, select the Compress During Caption option. VB6 Pro User Manual Page 23 October 2008 Screenshot Project e. Advanced tab: Set the frame rate for capturing animation frames during drag and drop operations and screenshot delay to wait before taking a screenshot. 6. Once the slide size and capture mode are set, click OK to start the screenshot process. Depending upon the slide size chosen, you may be prompted to define an area of the window or a specific window to capture before starting. Depending upon the capture mode, you capture screenshots manually using your hotkey choice or the system will capture screenshots automatically using the smart capture mode. 7. Click the ViewletBuilder 6 Professional icon in the system tray to choose options for pausing, ending or changing options during a screenshot session. Click Stop to end the screenshot session. 8. Once you stop (not cancel) a screenshot session, ViewletBuilder 6 Professional will render your screenshots as a series of slides ready for editing. If you have any questions or if any issues arise while creating Screenshot Projects, contact Support ([email protected]) for assistance. VB6 Pro User Manual Page 24 October 2008 Image Project Image Project Create a project from a series of images on your system or from an available storage device. Supported image formats include .jpeg, .gif, .tiff, .jpg, .png and .bmp. Images are embedded on slides as background images. 1. To create an image project, open the Create New Project window: Select File > New from the menu options, or Click the New button on the toolbar, or Click the Create Project button. 2. Select the Image Project option. 3. Specify a Slide Size by selecting an option from the drop down list. There are two options available. Custom: Choose a custom width and height. VB6 Pro User Manual Page 25 October 2008 Image Project Standards: Select a predefined standard size from the drop down list or create a new one. a. New Standard: Click the green plus symbol, enter the information in the Standard Resolution window and click OK to add it to the list. b. Modify a Standard: Select a size from the drop down list. Click the pencil icon and modify the information in the Standard Resolution window. Click OK to apply. c. Delete a Standard: Select a size from the drop down list and click the red ‘X’ icon. In the Delete Standard window, click Yes. 4. Add images to the project by clicking the green plus icon. In the Select Images Files window, locate and select one or more image files and click Open. 5. A list of image files will display. To work with the image list before creating the new project: Click the Filename column header to sort the files by name in ascending/descending order. Select the Stretch check box option to have the image stretched to fill the entire slide background. Select a file and click either the up or down arrow (to the right of the list) to move the file up or down in the list. To add more files to the list, click the green plus icon. To remove a file from the list (not from the computer), click the red ‘X’ icon. To preview an image, select it in the list and view the preview panel. To rotate an image, select it and click one of the curved arrows below the preview pane to rotate the image as desired. This rotation orientation will be the position used when the image is embedded as a slide background. To view the size and dimensions of an image, select it in the list and view the information before the preview pane. 6. Click OK and the images will be embedded as slide backgrounds ready for editing. If you have any questions regarding image projects, email: [email protected]. VB6 Pro User Manual Page 26 October 2008 Blank Project Blank Project Create a project containing one or more blank slides. This option is a great starting point for authors who want to create projects using a blank template. 1. To create a blank project, open the Create New Project window: Select File > New from the menu options, or Click the New button on the toolbar, or Click the Create Project button. 2. Select the Blank Project option. 3. Specify a Slide Size by selecting an option from the drop down list. There are two options available. Custom: Choose a custom width and height. Standards: Select a predefined standard size from the drop down list or create a new one. VB6 Pro User Manual Page 27 October 2008 Blank Project a. New Standard: Click the green plus symbol, enter the information in the Standard Resolution window and click OK to add it to the list. b. Modify a Standard: Select a size from the drop down list. Click the pencil icon and modify the information in the Standard Resolution window. Click OK to apply. c. Delete a Standard: Select a size from the drop down list and click the red ‘X’ icon. In the Delete Standard window, click Yes. 4. For Slide Count, enter the number of slides you want to create for the new project. 5. Click OK to create the new blank project ready for editing. If you have any questions regarding blank projects, email: [email protected]. VB6 Pro User Manual Page 28 October 2008 Slide View and Thumbnail View Slide View and Thumbnail View If you have worked with ViewletBuilder in previous versions, there were two main views, Slide View and Thumbnail View. Both views are available in ViewletBuilder 6 Professional, but with some very powerful options. Let’s take a brief look at each. Slide View The slide view is the area where you directly add objects to a slide and edit them. This is normally referred to as the main editing area of a project and where you will probably spend most of your time while working with a slide. The main slide area can be resized by dragging the edges of the slide areas panels or by closing one or more tabbed views. The main slide area can be resized by dragging the edges of the slide areas panels or by closing one or more tabbed views. Or, you can use the various Zoom toolbar buttons to quickly zoom in/out or fit to size. Tasks performed while working in the slide view area vary and are explained in further details throughout this manual. VB6 Pro User Manual Page 29 October 2008 Slide View and Thumbnail View Thumbnail View The thumbnail view allows you to view all the slides in the entire project. These slides are rendered as thumbnails. Various tasks can be performed while viewing thumbnails including moving slides around in the project, deleting slides, adding features to multiple slides, etc. While in thumbnail view, you can use the zoom in and zoom out buttons to increase/decrease the size of the thumbnails. You can rename the slide by clicking on the thumbnail title. The bottom of the thumbnail contains various icons representing the kind of elements on that slide. VB6 Pro User Manual Page 30 October 2008 Slide View and Thumbnail View Quick Tip: Use the Refresh and Refresh All buttons to ensure all thumbnails are in sync with their slide. If you need further information about these features, please email [email protected], or visit the Help section of our web site (www.qarbon.com). VB6 Pro User Manual Page 31 October 2008 Tabbed Views – Brief Introduction Tabbed Views – Brief Introduction ViewletBuilder 6 Professional offers authors control over customizing various workspace views. These options are called Tabbed Views. While in slide view, these tabs display to the left of the slide or below, depending on the selection. Each view can be displayed or hidden as desired and are used for specific operations. If you would like to relocate one of these views, grab the tab with your mouse and move it to the left, right or bottom areas of your screen. To view a list of available tabbed views: Select View from the menu bar. Select a tabbed view to display. If a view selection is already checked in the menu, select it to remove the checkmark to hide it. Each tabbed view has buttons to expand or minimize/maximize the tab(s): Select the Expand button on the tab to see the tab in full view. Select the Minimize button on the tab to minimize all active tabs. button on the tab to maximize all active tabs. Select the Maximize VB6 Pro User Manual Page 32 October 2008 Tabbed Views – Brief Introduction View of minimized tabs: . VB6 Pro User Manual Page 33 October 2008 Browser Tabbed View Browser Tabbed View This tabbed view allows you to easily organize, access and manage the resources that are available to you while you author your Viewlets. You can open projects, drag and drop images and movies, add publishing targets, delete files or folders, and view statistics of your Viewlets published on ViewletCentral. To display the Browser tab: If the browser tab is not in view to the left of the slide area, select View from the menu bar. Select Browser from the drop down list. To add a publishing target: Click the Add (green plus) icon. Select a publishing target from the drop down list. 1. Local or network folder: Select a folder and click Select Folder to add it to the list in the Browser tab while in ViewletBuilder 6 Professional. 2. Add FTP server: Fill in the required information in the FTP Server window and click OK. VB6 Pro User Manual Page 34 October 2008 Browser Tabbed View 3. Add Corporate ViewletCentral: In the window that displays, enter the requested information. If you do not have this available, contact your ViewletCentral Administrator. Click OK. To delete files or folders from the list (not from the system): Select the file or folder. Click the Delete icon (red ‘X’) on the Browser toolbar. A Delete confirmation will appear. Click Yes. To navigate through files and folders: Click the desired file or folder to highlight it. If the folder contains a plus symbol, click it to expand the files/folders beneath it. If the folder contains a minus symbol, click it to hide (collapse the view of) the files/folders in it. Click the yellow folder with the green up arrow on the toolbar to move back to the top of the list. To refresh the list of files and folder: Click the blue circular arrow on the toolbar to refresh the current files and folders being viewed. To change views of how files and folders are displayed: Click the Views button on the toolbar. Select a view option: 1. Icon View: Displays the name of each file in its perspective folder. 2. Details View: Displays the file or folder name, type, dimensions, number of slides, last modification date and file size. You can sort by each of these by clicking the appropriate column header. Sort the columns as needed by clicking a column and dragging it to its new location. 3. Thumbnail View: View each file as a thumbnail. VB6 Pro User Manual Page 35 October 2008 Browser Tabbed View To expand/collapse the Browser view: Click on the slide icon to the right of the tab to expand the view. Click the double slide icon to minimize the tab view. To close/hide the Browser tab: Select View from the menu options and deselect Browser from the drop down list, or Click the small ‘x’ in the right corner of the Browser tab. VB6 Pro User Manual Page 36 October 2008 Thumbnails Tabbed View Thumbnails Tabbed View This tab appears to the left of the slide editing area and displays thumbnails of all the slides in the current project. Thumbnails can be resized in this view and the tab expanded to take advantage of additional operations performed in Thumbnail View such as moving slides, performing the same operation on multiple slides, etc. To display the Thumbnails tab: Select View from the menu bar. Select Thumbnails from the drop down list. The Thumbnails tab will appear to the left of the slide editing area. To expand/minimize the tab: By default, the tab appears in minimized view. To expand it, click the slide icon to the right of the tab. This will close the slide editing view, displaying all the project’s slides in a Thumbnail View. To go back to slide edit view or to minimize this view, double click a thumbnail or click the double slides icon to the right of the view. Note: If you miss the old ViewletBuilder4 thumbnail view and want to see all your thumbnails on one large screen, you can use the Thumbnails tab’s Maximize button get the same effect. Once you find the slide you want to edit, simply double click on it and it will open in Slide View. VB6 Pro User Manual Page 37 October 2008 Timeline Tabbed View Timeline Tabbed View The Timeline appears across the bottom by default. It allows you to manage the start and duration times of all elements on your slide. Let creativity flow and productivity increase as you hide, view, modify, and lock layers along the Timeline. Using the play head feature, scrub the Timeline or follow it as you automatically play back sections of your project. To display the Timeline tab: Select View from the menu bar. Select Timeline from the drop down list. The Timeline tab will appear below the slide editing area. Click the triangle to expand the Timeline open and closed as needed. Quick Tip: The Timeline allows selection of multiple elements via Ctrl clicks. VB6 Pro User Manual Page 38 October 2008 Timeline Tabbed View The Timeline contains the following features: Layers The left side of the Timeline displays all the elements on the slide. Each element exists in a layer. Elements in higher layers will overlap elements in lower layers. The Layers maybe be expanded or collapsed via the arrow to the left of the slide title. To expand/collapse the layers while viewing the Timeline: Select the Timeline tab. On the left side of the Timeline, click the right arrow. This changes the arrow to a down arrow displaying the project layers. Repeat this process, clicking the down arrow to hide all of the project layers. To rearrange layers: Expand the layers so that all are in view. Select a layer by clicking on it. Right click on the same layer to display the shortcut menu. Select Arrange and then select an option for arranging the layer on the slide. To hide/display a layer: Select a layer. Click the “eye” icon to hide the layer. To display a hidden layer, click on the “eye” icon again to display it. To lock/unlock a layer: Select a layer. Click the lock along the layer to lock it. This prevents it from being edited. If a layer is locked, click the lock to unlock it to allow the layer to be edited. To move an object along a layer: Click on the rectangle inside the layer that displays the object’s duration along the Timeline. Drag the rectangle along the Timeline as needed. Quick Tip: Select multiple objects to move them at the same time along the Timeline. VB6 Pro User Manual Page 39 October 2008 Timeline Tabbed View To increase/decrease an object’s duration in a layer along the Timeline: Click on one of the edges of the rectangle that displays the object’s duration along the Timeline when the double arrow displays. Drag the edge of the rectangle as needed to increase/decrease the object’s duration. To delete a layer: Select one or more layers. Press the delete key on the keyboard or right click and select Delete from the shortcut menu or click the Delete button on the Main toolbar. Timing Links Timing links are links that connect two or more elements along the Timeline. The benefit of this feature is that as you edit an element’s timing along the Timeline, the linked elements are also updated accordingly. To add a timing link: Select two objects via a Ctrl + Click. Click the Add Timing Links button When adding a timing link, the order the objects were selected is significant. VB6 Pro User Manual Page 40 October 2008 Timeline Tabbed View To remove a timing link: Select two or more objects. Click the Remove Timing Link button. Timing Links come in four different styles: End to Start : Link the end time of the first selected object to the start time of the second selected object. Start to End: Link the start time of the first selected object to the end time of the second selected object Start to Start: Link the start times of the two selected objects. End to End: Link the end times of the two selected objects. Note: Sometimes you may be asked to change an element to a manual timing rule to allow the timing link to be placed. Also, there are some objects that you can’t add timing links between, such as an object on the main timeline and an object that exists inside of a Question or Zone. Maintaining Timing Links In the Project Properties window in the Timing section, there is a check box labeled “Maintain Timing Links”. By default this check box is enabled. It ensures that as notes, balloons and cursors are added to a slide that timing links are added to them to maintain best practice timing for presentations. VB6 Pro User Manual Page 41 October 2008 Timeline Tabbed View For example, notes will always be displayed first, followed by balloons then cursors. This is exactly as it was in ViewletBuilder4 with the exception that ViewletBuilder 6 Professional allows for multiple notes and balloons per slide. If the timing links are getting in your way you can select all the elements on the slide and click on the Remove Timing Links button or you can turn it off globally for the project via the Maintain Timing Links check box. Slides Features Above the main area of the Timeline, there are a series of numbers and arrows that are used when working with slide options. These include: Slide numbers: Indicates current slide and number of slides in the project. Seconds: Indicates the duration of current slide in relation to overall project duration. Active slide duration: Indicates full playtime for current slide, which can be increased/decreased by clicking the up/down arrow. Additional Timeline Features: In addition to layer and slide options, the Timeline has additional tools to make working along the Timeline more productive. For example: Zoom: Next to the magnifying glass is a viewing percentage signifying the current zoom of the Timeline. Use the up/down arrow next to this to increase/decrease the overall zoom level of the Timeline. Switch views: Select to view All Slides or Current Slide along the Timeline. or Timing Links: When multiple objects are selected, you can click a timing link to add timing links or remove timing links of selected objects. Player buttons: To the right of the Zoom tool are player buttons. These buttons can be used to jump to the beginning of the project, go back one slide, go forward one slide, or jump to the end of the project. VB6 Pro User Manual Page 42 October 2008 Timeline Tabbed View Preview menu: Click the arrow at the top right of the Timeline to view a menu with various options for previewing the project. Slide name boxes: These indicate the position and number (or title) of the slides that make up the project. By dragging the edge of a box, you can increase/decrease the duration of a slide along the Timeline. Play head: Click on the top of a tick mark and a play head will appear. Drag this play head to manually scrub (or move along) the Timeline. If you have any questions about working with the Timeline, email: [email protected]. VB6 Pro User Manual Page 43 October 2008 Stylesheets Tabbed View Stylesheets Tabbed View ViewletBuilder 6 Professional allows you to set properties of multiple objects using a template called a Stylesheet. You can define several Stylesheets and then choose one to apply to all slides in a project or to a selection. The following table lists all objects whose properties can be defined using Stylesheets. Objects with Properties Definable Using Stylesheets Object Properties Slide Background Color Balloon Message Style Note Background Color Correct Message Text Properties (Font, Size, Style, Alignment and Color) Incomplete Message Incorrect Message Question Text Question Choice Text Text Box Text Properties (Font, Size, Style, Alignment and Color) Button Button Style Click Area Modify Click Area VB6 Pro User Manual Page 44 October 2008 Stylesheets Tabbed View To display the Stylesheet tab: Select View from the menu bar. Select Stylesheet from the drop down list. The Stylesheet tab will appear to the left of the slide editing area. To select an object’s default Stylesheet: Select the Stylesheet tab. Select an object from the list to display its default Stylesheet. To create a new Stylesheet: Select the Stylesheet tab. Click the New Stylesheet icon on the toolbar. In the Stylesheet window, enter a name and password (if desired). Click OK. Make sure this is the active Stylesheet and make changes to object’s as desired. VB6 Pro User Manual Page 45 October 2008 Stylesheets Tabbed View To modify a Stylesheet: In the Stylesheet tab, select a Stylesheet from the drop down list. Note: The default Stylesheet cannot be modified. Edit object properties as needed. To change the name or password, right click on an object and select Modify Stylesheet. In the Stylesheet window, edit as needed and click OK. Applying a Stylesheet: In the Stylesheet tab, select a Stylesheet from the drop down list. Right click on an object and select the apply option of your choice. Or, select an apply button option (Apply to Project or Apply to Selection) from the toolbar. To update a Stylesheet: Make the appropriate changes to the object(s) and/or slide as needed. Click the Update Stylesheet with Selection icon on the toolbar. To delete a Stylesheet: Select a Stylesheet from the drop down list. Click the Delete Stylesheet icon from the toolbar. For any questions working with Stylesheets, email [email protected]. VB6 Pro User Manual Page 46 October 2008 Slide Notes Tabbed View Slide Notes Tabbed View Slide Notes allows you to add presentation notations that are not part of the actual slide. Or, you may use Slide Notes as a collaboration tool by adding editing notes when working with a team of authors on the same project. These notes may be viewed or hidden and printed as desired. To display the Slide Notes tab: Select View from the menu bar. Select Slide Notes from the drop down list. The Slide Notes tab will appear below the slide editing area. To add a Slide Note to a slide: Select the desired slide so that it displays in slide edit view. Select the Slide Notes tab to make it the active tab below the slide. Type your notes in the notes area. To print Slide Notes with your slide: Select File > Page Layout from the menu bar. In the Layout window, in the Options area, select the Slide Notes options as desired. Click OK to save these options or click Print. VB6 Pro User Manual Page 47 October 2008 Working with Cursors Working with Cursors Cursor animation is a fundamental component of most Viewlet projects. While capturing screenshots, whether manually or by using ViewletBuilder 6 Professional’s Smart Capture tool, cursors and their paths and click actions are automatically captured as part of the project. Once the project is rendered as a source file (.qvp), cursors are one of the elements that may be easily edited to product dynamic results. This section of the user manual provides an overview of working with cursors in a ViewletBuilder 6 Professional project. Red, Green and Blue Circle Indicators There are three shades of circles that surround cursors, each indicating a different cursor attribute. They are: VB6 Pro User Manual Page 48 October 2008 Working with Cursors Green circle: A green circle around a cursor signifies the starting position of the cursor. o To move the position of the green circle (cursor): a. Click on the green circle to select it. b. Drag the green circle (cursor) to its new location. Red circle: A red circle indicates the ending position of the cursor. o To move the position of the red circle (cursor): a. (Recommended) Go to the next slide where the red circle becomes the green circle and drag it to its new location. Then switch back to the original slide to note where the new location of the red circle resides. b. Click on the red circle to select it. c. Hold down your left mouse button over the red circle. d. Drag it to its new location. (Use caution and remember to check the new position of this cursor on the next slide when using this approach.). Red Point: The cursor will travel on either a straight or curved path between the Start and End cursors. Between the Start and End Cursor there can be one or more points that allow the cursor to travel a more complex path. These points are represented by red dots. Blue circle: A blue circle is a point on the cursor path that also has a separate cursor shape from the previous point on the path.. o To move the position of the blue circle (cursor): a. Click on the blue circle to select it. b. Drag it along the cursor path. c. Let go of it along the path where you want the cursor to change shape. Quick Tip: Cursors are linked from one slide to the next. So, as you move the start cursor on one slide, you are also moving the end cursor on the previous slide and vise versa. Cursor Path The dotted line between the green circle and the red circle is known as the cursor path. This is the path the cursor travels during its animation (or while moving from one slide to the next slide). A basic path starts at the green circle and ends at the red circle. A more complicated path includes points along the cursor path where the cursor may change direction. Elements of the cursor path may be edited. VB6 Pro User Manual Page 49 October 2008 Working with Cursors To change the cursor path from straight to curved or curved to straight: Click on the green circle to select it. Click the Straight Path or Curved Path button from the context sensitive toolbar. To change all cursor paths to straight or curved within the project: Click the green circle to select it. Click the Straight Path – All Slides or Curved Path – All Slides button from the context sensitive toolbar. To add points along a cursor path: Click the green circle to select it. Click the Add Point to Cursor Path button on the context sensitive toolbar. A red point will appear along the cursor path, ready for editing. To edit a point along a cursor path: Click the desired point on the cursor path. Drag it to a new location. To delete a point along a cursor path: Click the desired point on the cursor path. Press Delete on your keyboard or right click and select Delete from the shortcut menu. VB6 Pro User Manual Page 50 October 2008 Working with Cursors Cursor Style ViewletBuilder 6 Professional comes with a library of the most common cursor styles. Cursor styles are also called cursor shapes (in previous ViewletBuilder versions). Captured during screenshot sessions, additional cursor styles are added to the library of cursor style objects as your create new projects. Cursor styles, once captured, may be changed in a project as desired. To add cursors to a project: Cursors are automatically captured during screenshot sessions. To add cursors to slides that do not have cursors (or to Image or Blank projects), click on the slide where you want to add a cursor. Click the Insert Cursor (arrow) icon on the Object Toolbar. A new cursor will appear on the slide. To change the shape of the cursor: Select the cursor you want to change. Right click it and select Cursor Style from the shortcut menu. In the Cursor Style window, click the new cursor style you desire. Click OK. To add a new cursor style to the library: Capture a slide (during a screenshot session) with the desired cursor. Or, if an existing project has the desired cursor, import it into your current project temporarily. In slide editing view, select the cursor you want to add to the library. Right click the cursor to open the Cursor Style window. The new cursor style is added automatically. Click OK to close the window. VB6 Pro User Manual Page 51 October 2008 Working with Cursors To delete a cursor from a slide: Select the cursor you want to delete. Press the Delete key on your keyboard, or click the arrow icon on the Objects Toolbar. If you have any questions on working with cursors such as removing cursors from the library or repairing stray cursor movement, please contact [email protected]. VB6 Pro User Manual Page 52 October 2008 Messages Messages ViewletBuilder 6 Professional allows you to add impact to your project with Messages. These Messages come in the form of Balloons, Notes and Text Boxes. Let’s take a look at each of these. Balloons This type of message is used to point at a specific part of a slide. It may provide text information in it. Balloons are useful when you need to related important information quickly and effectively. New to ViewletBuilder 6 Professional is the ability to add multiple Balloons to the same slide. And, each balloon can be controlled individually with regards to when it appears on a slide, how long it displays and in what order with other objects on the same slide. To insert a Balloon on a slide: Click the Insert Balloon icon on the Objects Toolbar. Move your cursor over the slide and you will see the cursor change to a cross-hair shape. Position this cursor where you want to insert the slide. Click to insert the Balloon on the slide. VB6 Pro User Manual Page 53 October 2008 Messages To remove a Balloon from a slide: Click the Balloon to select it. Press Delete on your keyboard, or right click and select Delete from the shortcut menu. To resize a Balloon: Click the Balloon to select it. Point your cursor over one of the grab handles and drag to resize. To move a Balloon on a slide: Point your cursor at the Balloon until the cursor changes to a hand shape. Hold down your left mouse button and drag it to its new position on the slide. To change the background color of a Balloon: Select the Balloon by right clicking on it. Click Background Color from the shortcut menu. In the Background Color window, select a color. Click OK to apply it. To add text to a Balloon: Double click inside the Balloon to enter text edit mode. Once the cursor starting blinking inside the Balloon, you are ready to input text. Note: Use the options on the context sensitive toolbar (while in text edit mode) to italicize, underline and bold your text. You can also change your font, font color, font size and alignment while in text edit mode. VB6 Pro User Manual Page 54 October 2008 Messages Notes Another type of Message is the Note. Notes may be used to remind the viewer of some important information without calling attention to a particular area of a slide (as you would with a Balloon). Or, it can be used to provide general information or tips and tricks. To insert a Note on a slide: Click the Insert Note icon on the Objects Toolbar. A Note will be inserted on the current slide. To remove a Note from a slide: Click the Note to select it. Press Delete on your keyboard, or right click and select Delete from the shortcut menu. To resize a Note: Click the Note to select it. Point your cursor over one of the grab handles and drag to resize. To move a Note on a slide: Point your cursor at the Note until the cursor changes to a hand shape. Hold down your left mouse button and drag it to its new position on the slide. To change the background color of a Note: Select the Note by right clicking on it. Click Background Color from the shortcut menu. In the Background Color window, select a color. Click OK to apply it. VB6 Pro User Manual Page 55 October 2008 Messages To add text to a Note: Double click inside the Note to enter text edit mode. Once the cursor starting blinking inside the Note, you are ready to input text. Note: Use the options on the context sensitive toolbar (while in text edit mode) to italicize, underline and bold your text. You can also change your font, font color, font size and alignment while in text edit mode. Text Boxes Another type of Message is the Text Box. There may be times when you want to enhance your Viewlet project or portions of a slide by inserting text. The Text Box allows you to add text directly to a slide or over an image seamlessly. To insert a Text Box: Click the Insert Text Box icon on the Object Toolbar. As you move your cursor over the slide, the cursor will change to a cross-hair shape. Click on the slide to insert the Text Box. To delete a Text Box: Click the Text Box to select it. Press the Delete key or right click and select Delete from the shortcut menu. VB6 Pro User Manual Page 56 October 2008 Messages To resize a Text Box: Click the Text Box to select it. Point your cursor over a grab handle. When the cursor changes to an arrow, hold down the left mouse button and drag to resize the Text Box. To add/edit text in a Text Box: Double click on the Text Box. When the cursor starts blinking you are in text edit mode. Input (edit) text. Click outside of the Text Box to exit text edit mode. Message Styles and Types ViewletBuilder 6 Professional allows you to change message object styles and types quickly and easily. So, for instance, if you start with a Balloon, you can change it to a different Balloon type or even to a Note with just a few clicks. To change a message’s style: Right click on a message. Select Message Type from the shortcut menu. In the Message Type window, select a new message style from the drop down list. Click OK. VB6 Pro User Manual Page 57 October 2008 Messages To change a message’s type: Right click on a message. Select Message Type from the shortcut menu. In the Message Type window, make sure that you have selected your desired message style from the drop down list. In the message type area, click on the image of the message type desired. Click OK. Message Text Options While working with Message Objects (Balloons, Notes and Text Boxes), you will apply various attributes to the text contained within each one. Text options include italics, underline, bold, font type, color, size, alignment, etc. The steps for working with text in each of the message objects are basically the same, for ease of use. To enter and exit text edit mode: Double click inside the message object When the cursor starts blinking, you are in text edit mode Click off the message object to deselect it to exit text edit mode Quick Tip: Balloons and notes automatically wrap around text for quick editing. To underline, bold, or italicize text: Highlight the text Click the Underline icon (on the context sensitive toolbar) or press Ctrl + U to underline text Click the Bold icon (on the context sensitive toolbar) or press Ctrl + B to bold text Click the Italics icon (on the context sensitive toolbar) or press Ctrl + I to italicize text To change the text’s font style (using the context sensitive toolbar): Highlight the text Select a font from the Font drop down list To change text color (using the context sensitive toolbar): Highlight the text Click the Text Color icon Select a color from the palette Click OK To align text in a message object: Click anywhere in a line of text Note: You do NOT have to highlight text to change its alignment. Click the Left Align, Center Align, or Right Align button VB6 Pro User Manual Page 58 October 2008 Messages Message Object Options Available on the Right Click Menu Balloons, Notes and Text Boxes are the three Message objects available in ViewletBuilder 6 Professional. While working with them, you will find that many of their features are similar (text input and editing, background color, moving, resizing, etc.). There are additional features while working with Messages available quickly via the right click menu. (Note: These same options may also be available on the object’s context sensitive toolbar.) To enter text edit mode: Right click on a message object. Select Edit Message. As soon as the cursor starts blinking inside the message object, you are ready to edit text. To move a message from one slide to another: Select the message by clicking on it. Right click and select Cut from the shortcut menu. Go to the slide where you want to reinsert the message. Right click and select Paste from the shortcut menu to insert the message. VB6 Pro User Manual Page 59 October 2008 Messages To arrange messages in layers: Make sure the Timeline tab is displayed below the slide (this will make more sense as you arrange the message objects on the slide). Click on the message you want to appear at the top of the stack (or at the top of the stack in the layers in the Timeline). Right click and select Arrange. Select an arrange position as desired. The resulting position will be reflected in the stack (if messages are stacked on the slide) and also in the layers. To align a message on a slide: Select the message or messages to align. Right click and select Align. Select an alignment option as needed. To apply a Stylesheet to a message: Select the message. In the Stylesheet tab, select a Stylesheet from the drop down list. Right click on the message and select Stylesheet. Select Apply Stylesheet to Selection. To view/modify message properties (such as name, location & size and timing): Right click on a message. Select Message Properties from the shortcut menu. In the Message Properties window, modify the properties as desired. Click OK. To attach sound to a message: Right click on a message. Select Attach Sound from the shortcut menu. In the Sound window: o Click to folder icon to browse for and select a sound file. o Click the Record button to record a sound file. Click OK to attach the sound. To delete sound from attached to a message: Right click on a message. Select Attach Sound from the shortcut menu. In the Sound window, click the red ‘X” to remove the sound file. Click OK. If you have any questions working with Messages, please email [email protected]. VB6 Pro User Manual Page 60 October 2008 Object Timing Object Timing Timing Commands Timing commands can be applied to a single or multiple objects on a slide. An object’s timing will determine when it will display on a slide, how long it will remain displayed on a slide and, if multiple objects display on the same slide, what timing command elements they may have in common. Timing may be adjusted in two places: in the properties window and along the Timeline. To adjust a message (balloon, note, text box) object’s timing: Right click on the message object. Select Message Properties from the shortcut menu. In the Message Properties window, in the Timing area, select a timing option from the drop down list: Manual Timing: Select a value for the Start Time (the delay in seconds before the object displays on the slide) and the Duration (time displayed on the slide). Until End of Slide: Select a value for the Start Time. The message will remain displayed from the start time for the duration the slide displays. Reading Speed: Select a value for the Start Time. The message will remain displayed from the start time until the automatically calculated reading speed (based on the amount of text in the message object) is reached. Click OK. VB6 Pro User Manual Page 61 October 2008 Object Timing To adjust a shape object’s timing: Right click on the shape object. Select Shape Properties from the shortcut menu. In the Message Properties window, in the Timing area, select a timing option from the drop down list: o Manual Timing: Select a value for the Start Time (the delay in seconds before the object displays on the slide) and the Duration (time displayed on the slide). o Until End of Slide: Select a value for the Start Time. The message will remain displayed from the start time for the duration the slide displays. Click OK. To adjust an image’s timing: Right click on the image. Select Image Properties from the shortcut menu. In the Message Properties window, in the Timing area, select a timing option from the drop down list: o Manual Timing: Select a value for the Start Time (the delay in seconds before the object displays on the slide) and the Duration (time displayed on the slide). o Until End of Slide: Select a value for the Start Time. The message will remain displayed from the start time for the duration the slide displays. Click OK. Note: To change any object’s timing using the properties window, right click on the object and select the appropriate “properties” option from the shortcut menu. To adjust an object’s timing along the Timeline: Display the Timeline tab below the slide editing area. Click on the down arrow to the left of the Timeline to display all layers. Select the object layer. Point your cursor over an edge of the rectangle (that signifies the duration of that object along the Timeline) until it changes to a double-arrow. Hold down your left mouse button and drag to increase or decrease the object’s duration (time) along the Timeline. VB6 Pro User Manual Page 62 October 2008 Object Timing To synchronize timing for multiple objects on a slide: Select the objects you want synchronize the time of by clicking on one, holding down the Ctrl key and selecting additional objects. Note: Be careful when selecting multiple objects. The FIRST object selected will be used as the key object from which the other times are calculated. Click on one of the following synchronization commands (left to right as highlighted in the image above) from the Context Sensitive toolbar: o Same Start Time: Selected objects use the same Start Time as the key object. o Same End Time: Selected objects use the same End Time as the key object. o Same Start and End Time: Selected objects get the same Start and End Time as the key object. o Sequence Times: Selected objects are displayed sequentially in the order they were selected. o Display Until End Time: The end times of all elements will be set to the end time of the last end time. This is useful if you want all elements to stop being displayed at the same time. VB6 Pro User Manual Page 63 October 2008 Object Timing To adjust timing for a “Display Object” action: Select the object (shape, image, etc.). Click the Events icon on the context sensitive toolbar, or right click and select Events from the shortcut menu. Select the appropriate tab (On Click, On Rollover, On Rollout). Click the Add button (green plus symbol). In the Action window, select Display Object from the first (top) drop down list. In the Duration area, select a timing command from the last (bottom) drop down list: o Manual Timing: Enter a value for the Duration the object will display for the Object Action. o Until End of Slide: Object displays once Object Action is performed and for the duration the slide is displayed. VB6 Pro User Manual Page 64 October 2008 Object Timing Timing Rules Each object has a timing rule associated with it. Timing rules automatically control how the timing for that object is calculated. Timing rules differ from the timing synchronization commands in that synchronization commands make a one-time adjustment. To understand Timing Rules a bit better, let’s look at an example. A simple timing rule is “Reading Speed” which insures that the duration of a message object is calculated from the number of words and reading speed. This rule may be applied to the message so that the message disappears after a specific duration (based on what ViewletBuilder 6 Professional calculates for the reading time for the message based on the amount of text it contains). To help standardize object timing, ViewletBuilder 6 Professional offers a set of Timing Rules: Manual: An object’s timing is calculated manually, meaning that the user has full control over the start time and duration. Reading Speed: This rule only applies to Balloons, Notes and Messages. The duration is calculated based on the reading speed and the number of words in the text. The user can adjust the start time. Until End of Slide: Objects with this rule will from a user specified start time display until the end of the slide. Displayed via Show Object Action: Objects with this rule have no timing themselves, instead, they are displayed when a “Display Object” action tells them to display. A Timing Rule Change window will display when you attempt to change the timing of an object on the timeline in a way that is not allowed by its current Timing Rule. ViewletBuilder 6 Professional will ask if you want to change to manual timing. If you manually edit timing a lot, then you might want to select the Don’t show me this message again check box when this window displays. If you have questions about object timing, timing commands or timing rules, please contact [email protected]. VB6 Pro User Manual Page 65 October 2008 Format Painter Format Painter The Format Painter may be used to quickly change text properties in balloons, notes and text boxes without the need for stylesheets. You can also use the Format Painter to easily apply properties of one shape object to another throughout your project. To use the Format Painter to apply text attributes from one object to another: Make your changes to text in your message object. Click on the text (or click anywhere inside the text) that will be copied from. Click the Format Painter. Click on subsequent text objects to apply this formatting from the first selection. Continue clicking on text on the current or any other slide to apply the formatting. When you are finished, click the Format Painter to deselect it. To use the Format Painter to copy a shape’s attributes and apply them to other shapes: Make your changes to the shape as desired and then make sure it is selected. Click the Format Painter. Click on subsequent shapes to apply the formatting. When you are finished, click the Format Painter to deselect it. Quick Tip: You can even use the Format Painter across multiple slides. If you have any questions about the Format Painter, please contact [email protected]. VB6 Pro User Manual Page 66 October 2008 Dictionary, Spell Check & Search and Replace Dictionary, Spell Check & Search and Replace ViewletBuilder 6 Professional offers spell check and dictionary tools. You can set your dictionary to one of several languages and enable your spell check to highlight typos as you write your project’s content. To set your dictionary and spell check preferences: Select Edit > Preferences from the menu bar. Select the Spelling tab. Select a language for the spell check dictionary from the drop down list. Select additional options for the spell check as needed. To enable or disable the spell check tool: To enable the Spelling Mistakes tool, select View > Spelling Mistakes from the menu. To disable, repeat the above action to deselect the feature from the View menu. VB6 Pro User Manual Page 67 October 2008 Dictionary, Spell Check & Search and Replace To correct a typo using the right click menu: Click anywhere in the text where the typo appears. Right click to reveal the shortcut menu. At the bottom of the shortcut menu, select an option: o Replace: Replaces text with the listed selection. o Replace All: Replaces all similar text through out the project with listed selection. o Ignore All: Disables spell check red line for all instances of text. o Learn: Adds text (underlined in red) to the dictionary. VB6 Pro User Manual Page 68 October 2008 Dictionary, Spell Check & Search and Replace To use the Search and Replace tool: Click the Search and Replace icon on the button toolbar. To use the Search feature only, select the Search tab: o Enter text in the field provided. o Select the Case Sensitive option if desired. o Select a Direction. o Select the Slides to search. o Click Slide Next to continue search. To use the Search AND Replace feature, select the Replace tab: o Enter text in the field provided for the search. o Enter text to replace the searched text with in the field provided. o Select the Case Sensitive option if desired. o Select the Direction and Slides to search. o Click Replace All, Replace, Find Next or Cancel. If you have any questions on working with the Dictionary, Spell Check and Search and Replace tools, please contact [email protected]. VB6 Pro User Manual Page 69 October 2008 Working with Slides Working with Slides ViewletBuilder 6 Professional projects are made up of slides, so it’s important to understand how to work with the most common slide features while building your project. This chapter provides a starting point for you to use while working with slides. While there may be several ways to perform the same tasks, they may not all be covered in this section. Slide Types There are essentially three types of slides that you may insert into existing projects: Blank slides Screenshot slides Image slides These slide types may seem familiar. This is because these slide types are also the same options that are available when creating new projects. To insert blank slides: Select a thumbnail. The inserted slide will be inserted right after this slide. Select Insert > Blank Slide from the menu bar. Note: You can only insert one blank slide at a time using the above or right click insert option. If your project has blank slides, you can copy/paste to add more blank slides. To insert screenshot slides: Select a thumbnail. The new screenshot(s) will be inserted right after this slide. Select Insert > Screenshots from the menu bar. In the windows that appear, follow the prompts to select options for taking screenshots. Take your screenshots as prompted. End your screenshot session to insert the new screenshots into your existing project. To insert image slides: Select a thumbnail. The new image(s) will be embedded onto slides right after this slide. Select Insert > Images from the menu bar. Follow the instructions in the Select Images to Import window that displays for locating and selecting your image files. Once your images are selected, click OK to insert the new image slides into your existing project. VB6 Pro User Manual Page 70 October 2008 Working with Slides To insert duplicate slides quickly: Click on a slide so that it displays in slide edit view. Press Ctrl + D on your keyboard or select Edit > Duplicate Slide from the menu bar. Slide Properties Slide properties can be set for each slide. These properties include the slide name, duration and whether to include the slide in the table of contents (for viewing purposes). To access slide properties: Right click on a slide. Select Slide Properties from the shortcut menu. To edit slide properties: In the Slide Properties window, edit the: o Name: This is the title of the slide displayed at the top of the slide while in Thumbnail View and along the timeline. o Duration: The amount of time the slide displays. o Options: Select this option if you want it included in the Table of Contents when viewed as a Flash file. Slide Color Slide color is applied directly to the slide and can be changed on one or multiple slides. The slide color appears behind slide objects and embedded images. The color chooser remembers recent and custom color selections and has buttons for adding and deleting custom colors to make that functionality easier to use. VB6 Pro User Manual Page 71 October 2008 Working with Slides To change slide color: Select the slide or slides you want to work with. Right click and select Background Color from the shortcut menu. In the Background Color window, select a color. Click OK to apply it to the selected slide or slides. VB6 Pro User Manual Page 72 October 2008 Working with Slides Slide Background Image: You can embed an image directly to a slide background. In fact, you can do this to one or multiple slides using the same image. In addition, images can be aligned in various ways on the slide or stretched as needed. To add a background image to a slide or slides: Select the slide or slides you want to work with. Right click and select Background Frames. In the Background Frames window, click the folder icon. Locate an image file, select it and click Open. Select a Layout option. Click OK. Quick Tip: In the Background Frames window, click Show Preview to view a preview of the select frame image. To delete a background image: Right click a slide and select Background Frames. In the Background Frames window, click the red ‘X’ icon. Click OK. Moving Slides There are various ways to move slides with in a project. The easiest way to do it is while working with thumbnails. VB6 Pro User Manual Page 73 October 2008 Working with Slides To move slides using drop and drag: Make sure the Thumbnails tab is displayed. You can work in this view or while it is expanded in full view so that only thumbnails are displayed. Select the slide (or slides) you want to move by clicking on them. Hold down the left mouse button and drag the slide(s) to the new location and drop into place. To move slides using cut and paste: Make sure the Thumbnails tab is displayed. Select the slide you want to move. Right click on it and select Cut. Click on the slide where you want to insert the “cut” slide next to. Right click and select Paste. Quick Tip: Click the Undo button to immediately undo cut and paste operations. Deleting Slides You can remove slides from a project while in slide edit view or while working with thumbnails. The choice is up to you. However, if you are deleting multiple slides at the same time, you will need to do this while working with thumbnails. To delete a single slide: Select the thumbnail or click on it while in slide edit view (so that it is the current slide). Right click and select Delete from the shortcut menu. To delete multiple slides: Select the slides you want to delete while viewing thumbnails. Select Edit > Delete from the menu bar or press Delete on your keyboard. When the Delete window appears, click Yes. The Hidden Slide ViewletBuilder 6 Professional offers you the option of hiding a slide instead of deleting it. This feature is handy because instead of deleting the slide, it will hide it so that it will not display while previewing or publishing the project, but can later be unhidden when needed. The main features of working with hidden slides include: The thumbnail for a hidden slide has an X in the lower left corner. If you select a hidden slide in thumbnails, it will display in slide edit view at 50% opacity. If you use slide navigation arrows to go from slide to slide, hidden slides are skipped. The duration of hidden slides is ignored in the times in the Timeline. VB6 Pro User Manual Page 74 October 2008 Working with Slides To hide or unhide a slide: Click on the slide (while in slide edit view) or slides in thumbnail view. Click the Hide Slide icon on the context sensitive toolbar (closed eye) to hide the slide. Note: Hidden slides will not display when previewing project, however, they will remain in the slide count. To display a slide, click the Show Slide (open eye) icon on the context sensitive toolbar. Quick Tip: Hidden slide sounds will not play during preview. For questions on working with slides, please contact [email protected]. VB6 Pro User Manual Page 75 October 2008 Audio Audio ViewletBuilder 6 Professional allows you to add sound to your project. You can import sound files or record them directly while working in ViewletBuilder 6 Professional. Audio files may be attached directly to a slide or various slide objects such as balloons, notes, text boxes and shapes. You may also export sound from projects. And, there is a feature that allows you to add a background sound track (independent of sound attached to slides or slide objects) to your project. To attach audio to a slide or a slide object: Click on the slide or slide object to select it. Click the Attach Sound icon on the context sensitive toolbar. Or, right click and select Attach Sound from the menu bar. In the Sound window, choose your desired sound option. Click OK. To import a sound file to attach to a slide or slide object: Click on the slide or slide object to select it. Click the Attach Sound icon on the context sensitive toolbar. In the Sound window, click the Load Sound (folder) icon. In the Load Sound window, select a sound file. Note: Supported sound files include MP3, AIF, WAV and AU Click Open. In the Sound window, click OK. To record sound inside ViewletBuilder 6 Professional: Click on the slide or slide object to select it. Right click and select Attach Sound. In the Sound window, click the Record (red circle) button. Note: In order to record audio, your computer must have a sound card. ViewletBuilder 6 Professional records audio using the MP3 format. This reduces file sizes in projects containing audio. Speak into your system’s microphone to record. VB6 Pro User Manual Page 76 October 2008 Audio Press the Stop (red square) button to end the recording. Click OK to attach the recording to the slide or slide object. To listen to a sound file attached to a slide or slide object: Click on the slide or slide object to select it. Right click and select Attach Sound. In the Sound window, press the Play (green arrow) button to listen to the sound file attached to the slide or slide object. Click OK to close the Sound window. To remove sound attached to a slide or slide object: Click on the slide or slide object to select it. Click the Attach Sound icon on the context sensitive toolbar. In the Sound window, click the Delete Sound (red X) button. Click OK to close the Sound window. To export sounds from your project: Before exporting any sound files from your project, create a folder outside of ViewletBuilder 6 Professional to save your exported sound files in (recommended). Select File > Export from the menu bar. Select Sounds. In the Export Sounds window, select the slides to export: o Current Slide: Only the sound attached to the current slide and any attached to slide objects will be exported. o From: Enter a starting slide number in the first field and an ending slide number in the second field. Sound attached to the slides (and objects on the slides) in this sequence will be exported. o All: All sound attached to slides and slide objects will be exported. In the Save File In window, select a folder to save the exported audio files in. Click Save. Note: Exported sound files are saved in the WAV format. Sound Quality for Published Project Please refer to the Project Properties chapter for information regarding how to set up sound quality options for your published project. Background Soundtrack As discussed previously in this chapter, audio may be attached directly to a slide as well as to other slide objects. You may also attach a background sound track to your published project. This sound track is independent of sound attached to slides and slide objects and plays in the background when the Viewlet is played . Please refer to the Project Properties chapter for more information on adding a background soundtrack to your Viewlet. It should be noted that this track will loop in the background and play even when the Viewlet pauses on zone slides. If the viewer pauses the Viewlet using the player bar or clicks an object with a pause event, all sounds will stop though. Although the design was not intended for project narration across all slides, it is possible to do this assuming you do not have any zones that could cause the background track to get out of sync with the foreground track. VB6 Pro User Manual Page 77 October 2008 Images Images Images may be used in projects in a few different ways. One option is to create an entire project made up of image files. When creating image projects or when inserting image slides, images are embedded as slide backgrounds. When used in this way, images cannot be moved around the slide. And, only one image may be embedded as a slide background. You may also insert images onto slides as slide objects. When inserted on the slide, images may be resized, moved on the slide, converted to a hyperlink object, become a rollover event, have its transparency level modified and more. And, multiple images may be inserted on the same slide. This chapter covers the basics of working with images that are inserted on to slides as slide objects. To insert an image on to a slide: Select the slide you want to insert the image on. Click the Insert Image button on the Object Toolbar. In the Insert an Image window, browse to locate the image file. Note: Support image file formats include JPEG, GIF, TIFF, JPG, TIF, PNG, BMP Select the image file and click Open. The image is inserted in the center of the slide ready for editing. To move an image on a slide: Select the image by clicking on it. Move your cursor over the image and when the cursor changes to a hand shape, hold down the left mouse button. Drag the image (while holding down the left mouse button) to its new location on the slide. To resize an image on a slide: Select an image by clicking on it. Point your cursor over one of the grab handles. When the cursor changes to an arrow, hold down your left mouse button. Drag the grab handle (while holding down the left mouse button) to resize the image. To change an image’s opacity level: Select an image by clicking on it. Enter a value in the Opacity field on the context sensitive toolbar. Press enter to apply the new opacity level. To layer images (or images and shapes): Right click on the image. Select Arrange from the shortcut menu. Select an arrangement option from the fly-out menu. VB6 Pro User Manual Page 78 October 2008 Images To view and/or modify image properties: Right click on the image. Select Image Properties from the shortcut menu. In the Image Properties window, view/edit the Name, Location & Size and Timing as desired. Click OK to close the Image Properties window. To create an image event: Click on the image to select it. Click the Events icon on the context sensitive toolbar. In the Image Events window, select an events tab and choose the desired action. Click OK to apply. To delete an image: Select the image. Press the Delete key on your keyboard or right click and select Delete from the shortcut menu. VB6 Pro User Manual Page 79 October 2008 Background Frames Background Frames In ViewletBuilder 6 Professional, the Background Frames window replaces the Background Images window found in earlier versions of ViewletBuilder. In ViewletBuilder4 and ViewletBuilder5, a slide contained a single background image. Now, in ViewletBuilder 6 Professional, a single slide can have a single background image (called a frame) or a series of images like the frames in a movie. Each of the frames are displayed (during playback) in order for a specified duration. Background Frames – Single Frame To access the Background Frames window: • • • Select the desired slide in slide or thumbnail view. Right click and select Background Frames. The Background Frames window displays. You can also double click on the frame along the Timeline to display the Background Frames window. To add a background frame to a slide with detailed settings: • In the Background Frames window, click the Add Frame (green plus) button. VB6 Pro User Manual Page 80 October 2008 Background Frames • The Background Frame window displays. Click the folder button to search for and select an image for the frame. • • • Set Options, Location & Duration settings as desired. Click OK. Click OK in the Background Frames window to load the selected frame. To directly load a frame from the Background Frames window: • In the Background Frames window, select the Load Image button. • • • Browse for and select an image. Click Open. Click OK. VB6 Pro User Manual Page 81 October 2008 Background Frames To delete a background frame: • In the Background Frames window, click the Remove Background button. • Click OK to remove the background frame. Quick Tip: If you accidentally delete a background frame from a slide (and this was your last action), simply press Ctrl + Z to undo this last action. To expand/collapse the Background Frames window: ▪ In the Background Frames window, click Show Preview to expand the window. • To collapse the window, click Hide Preview. To choose the layout for the frame: • In the Background Frames window, select an orientation for the image from the Layout list. • Click OK. To change zoom selection of frame Preview: • To zoom in, click the Zoom In button. VB6 Pro User Manual Page 82 October 2008 Background Frames • To zoom out, click the Zoom Out button. • To fit the image in the Preview panel, click the Scale to Fit button. VB6 Pro User Manual Page 83 October 2008 Background Frames Background Frames – Multiple Frames As previously mentioned, in ViewletBuilder 6 Professional a single slide may contain multiple background images (usually created when using the Smart Capture feature for screenshots) that make up slide background animation. You will use the same steps to modify multiple background frames as you would with the steps outlined for modifying a slide with a single background frame. There are, of course, a few additional options since you are working with multiple frames. For instance, following is an example of what a typical Background Frames window looks like when working with a slide containing multiple background frames. VB6 Pro User Manual Page 84 October 2008 Background Frames Background Frames window with Preview Hidden VB6 Pro User Manual Page 85 October 2008 Background Frames Background Frames window with Preview Displayed Key Frame Frames added after the first frame may or may not be key frames. If marked as a key frame, the key frame will completely replace the previous image in the sequence. If a frame is not marked as a key frame, the frame is just “painted” on top of the previous key frame, like an additional image layered on top of it. After creating a screenshot project or adding new screenshots using SmartCapture, if you look at a slide that has multiple animation frames on it, you will see that all but the first frame are NOT key frames. To enable/disable a Key Frame: • In the Background Frames window, double click a frame. • In the Background Frame window, select the Key Frame option. VB6 Pro User Manual Page 86 October 2008 Background Frames • Click OK. To move a frame up/down within the list: • Select the frame in the list. • Click the Move Up button (blue “up” arrow) to move the frame up in the list. • Click the Move Down button (blue “down” arrow) to move the frame down in the list. VB6 Pro User Manual Page 87 October 2008 Background Frames To add a frame to the list of frames: • • • Click the Add button . In the Background Frame window, load a frame image and make other selections as desired. Click OK. To edit a frame: • Select a frame in the list. • • • Click the Modify button . In the Background Frame window, make selections as desired. Click OK. To delete a frame: • Select a frame in the list. • Click the Delete button . Navigating the Preview of Multiple Background Frames While working with multiple background frames, there are a few different features for navigating the Preview in addition to the zoom features previously covered. Use the following tools to quickly navigate through animation frames. To navigate through multiple animation frames: • In the Background Frames window, select a frame in the list. • Click Show Preview if applicable. • Click the appropriate button (below the preview pane): o First Frame o Previous Frame o Next Frame o Last Frame VB6 Pro User Manual Page 88 October 2008 Background Frames • To preview the animation frames, click Preview Background Frames. To highlight a selected frame: • In the Background Frames window, select a frame in the list. • Under the preview pane, select the Highlight Selected Frame checkbox. Quick Tip: The highlight will differ for a Key Frame and a non-Key frame. 1. If the selected frame is a Key Frame and the Highlight Selected Frame check box is selected, the entire frame will be highlighted. VB6 Pro User Manual Page 89 October 2008 Background Frames 2. If the selected frame is NOT a Key Frame and the HIghlight Selected Frame check box is selected, only the applicable portion of the frame is selected because this frame is a subset of the entire frame. VB6 Pro User Manual Page 90 October 2008 Background Frames Using the Timeline to Access Background Frames If you prefer to edit your project using the Timeline, you can also easily access the Background Frames window to modify your background frames. Here’s an example of what a slide containing multiple background frames (animation frames) looks like along the Timeline: VB6 Pro User Manual Page 91 October 2008 Background Frames In the illustration above, Slide 27 contains multiple animation background frames. In fact, it contains three frames (as designated in the layer called “Background: 1 of 3). Frame 1 is the selected frame and, in this example, is a Key Frame. Frame 2 and Frame 3 are part of the background frames, but will not display until selected along the Timeline. In this example, they are not selected. Clicking on a background frame will also display that frame in slide view. Quick Tip: To preview the background frame animation, click the playhead at the beginning of the Timeline (for the slide) and drag it while watching it progress along the Background layer and across the different animation frames. Or, click at the beginning of the Timeline for the frame and click the Preview button for the current slide. VB6 Pro User Manual Page 92 October 2008 Shapes Shapes You may insert one or more shapes onto slides. This chapter provides an overview of the four basic tools for creating shapes and how to edit them. The Rectangle Tool The rectangle tool allows you to draw rectangles and squares on a slide. VB6 Pro User Manual Page 93 October 2008 Shapes To insert a rectangle: Click the Insert Shape icon on the Object Toolbar. If not already selected, click the Rectangle Tool icon on the context sensitive toolbar. Move the cursor over the slide until the cursor changes to a cross-hair shape. Click on the slide and hold down the left mouse button. Continue to hold down the left mouse button and drag to draw the rectangular shape. Let go of the left mouse button to complete the shape. The Ellipse Tool The ellipse tool allows you to draw circles or ovals on a slide. To insert an ellipse: Click the Insert Shape icon on the Object Toolbar. Click the Ellipse Tool on the context sensitive toolbar. Move the cursor over the slide until the cursor until the cursor changes to a cross-hair shape. Click on the slide and hold down the left mouse button. Continue to hold down the left mouse button and drag to draw the elliptical shape. Let go of the left mouse button to complete the shape. VB6 Pro User Manual Page 94 October 2008 Shapes The Lasso Tool The lasso tool allows you to create free-form shapes. To create a free-form shape: Click the Insert Shape icon on the Object Toolbar. Click the Lasso Tool on the context sensitive toolbar. Move the cursor over the slide until the cursor changes to a lasso shape. Hold down the left mouse button and draw your shape. Let go of the left mouse button when the free-form shape is complete. VB6 Pro User Manual Page 95 October 2008 Shapes The Poly Lasso Tool The poly lasso tool allows you to create polygonal shapes. To create a polygonal shape: Click the Insert Shape icon on the Object Toolbar. Click the Poly Lasso Tool on the context sensitive toolbar. Move the cursor over the slide until the cursor changes to a lasso shape. Click on the slide to insert the first “anchor” point. Drag the cursor to form the first leg of the polygon. Click again to insert the next anchor point. Drag the cursor again to form the next leg of the polygon. Continue repeating these steps until the polygon shape is formed. VB6 Pro User Manual Page 96 October 2008 Shapes Miscellaneous Shape Tool Features Once shapes are created, you may move, resize, recolor, and arrange them to create custom effects. To move a shape on a slide: Click the shape to select it. Move your cursor over the shape until the cursor becomes a hand shape. Hold down the left mouse button and drag the shape to move it. To resize a shape: Click the shape to select it. Move your cursor over one of the grab handles until the cursor changes to an arrow shape. Hold down the left mouse button and drag to resize the shape. VB6 Pro User Manual Page 97 October 2008 Shapes To arrange the shape in a stack: Click the shape to select it. Right click and select Arrange from the shortcut menu. Select one of the arrange options to move the shape to that position in the stack. To delete a shape from the slide: Click the shape to select it. Right click and select Delete from the shortcut menu. Or, press the Delete key on your keyboard. VB6 Pro User Manual Page 98 October 2008 Events and Actions Overview Events and Actions Overview ViewletBuilder 6 Professional offers a robust set of events and actions that may be associated with slides and slide objects such as shapes and images to produce greater dynamics and a higher user interactive experience than ever before. This chapter provides a brief introduction into ViewletBuilder 6 Professional’s events and actions features. Events Events may be defined as what happens when a certain scenario occurs. For example, a slide event may be the “On Load” event. This means that when the slide “loads” or as it “loads” this “loading” is an event. To create a slide event: Right click on a slide directly and select Events from the shortcut menu. In the Slide Events window, select a tab: o On Load: This is when a slide is loaded. VB6 Pro User Manual Page 99 October 2008 Events and Actions Overview o On Unload: This is when you leave the slide. o On Key Pressed: This is when a key is press while on a slide. Select an action as desired. Click OK. To create a shape event: Right click on a shape. Select Events from the shortcut menu. In the Shape Events window, select a tab: o On Click: This is when the user clicks on the shape. o On Rollover: This is when the user moves the mouse over the shape. o On Rollout: This is when the user has moved the mouse off the shape. Select an action as desired. Click OK. To create image event: Right click on an image. Select Events from the shortcut menu. In the Image Events window, select an events tab. Select an action as desired. Click OK. VB6 Pro User Manual Page 100 October 2008 Events and Actions Overview Actions Actions are associated with Events and are “what will take place” once a particular event occurs. For example, an “On Click” event may have a “Goto slide” action attached to it. So, when a user clicks on a shape, for example, the project will “go to” a predefined slide. To attach an action to an event: Select a slide, shape, image or other object (that supports events). Right click and select Events from the shortcut menu. In the Events window, select an events tab. In the tab, click the Add button. In the Action window, select an action from the drop down list. Click OK to close the Action window to return to the Events window. Click OK to close the Events window. VB6 Pro User Manual Page 101 October 2008 Events and Actions Overview To arrange multiple actions for a given event: In the Events window, select an events tab. If multiple actions are listed in that tab, click an action to highlight it. Click the up or down arrow to move the action up or down within the action list. Click OK. To edit an action : In the Events window, select an events tab. Select the action to edit. Click the Modify (pencil) icon. In the Action window, modify the action as needed. Click OK to close the Action window. Click OK to close the Events window. To delete an action : In the Events window, select an events tab. Select the action to delete. Click the Delete (red X) button. Click OK to close the Events window. Quick Tip: If Multiple Actions can be assigned to an Event, they will be performed sequentially. For more information on working with Events and Actions in ViewletBuilder 6 Professional, please email [email protected]. VB6 Pro User Manual Page 102 October 2008 Buttons Buttons Buttons may be used to increase user interactivity within your Viewlet project. For example, if you want to give your viewer the control to advance through your Viewlet at their own pace, you can create your own series of customized buttons for them to do this. Or, you might provide buttons that, when clicked, will allow the viewer to skips ahead or to different parts of your project instead of just progressing through it in a linear fashion. To insert a button on to a slide: Select the Insert Button icon on the Object Toolbar. A button is inserted on the slide ready for editing. VB6 Pro User Manual Page 103 October 2008 Buttons To view/modify button properties: Right click a button and select Button Properties from the shortcut menu. In the Button Properties window in the: o Name area: Enter a name for the button in the field provided. Enter the Text to be displayed on the button in the field provided. o Location & Size area: Enter values for its Left and Top margin. Enter values for the Width and Height of the button. o Timing: Selection a timing option for the button to display on the slide from the drop down list. Enter values for any Start/Duration times as applicable. Click OK. To move a button on a slide: Click a button to select it. Point your cursor over the button and when the cursor changes to a hand shape, hold down your left mouse button. Continue to hold down the left mouse button and drag the button to its new location. To resize a button: Click a button to select it. Point your cursor over a grab handle until the cursor changes to an arrow shape. Hold down the left mouse button over the grab handle and drag it to resize the button. To select a button style: Right click on the button and select Button Style. In the Button Style window, select a style from the list. Click OK. To add an event and action(s) to the button: Right click on the button. Select Events from the shortcut menu. In the Button Events window, in the On Click tab, click the Add icon. In the Action window, select an action from the drop down list. Click OK to close the Action window. Click OK to close the Button Events window. To delete a button: Select a button to delete. Right click and select Delete from the shortcut menu. For more information on working with Buttons, contact [email protected]. VB6 Pro User Manual Page 104 October 2008 Hyperlinks Hyperlinks A hyperlink allows a user, with a single click action, to perform an action such as jump to another section of the project, open an email, go to a web page and more. In ViewletBuilder 6 Professional, hyperlinks functionality has been expanded to include not only the common hyperlink functions you may have become familiar with in previous versions, but with many more options too. This chapter covers some basics steps for creating hyperlinks in your Viewlet projects. Message Hyperlinks While message objects themselves cannot be set up as a hyperlink, a portion or all of the text inside can. These types of hyperlinks are known as text links. To create a test link within a message object: Highlight the text you want to use for the link. Right click the text and select Hyperlink from the shortcut menu. Or, click the Hyperlink (globe) icon on the context sensitive toolbar. In the Hyperlink window, make sure the On Click tab is selected. VB6 Pro User Manual Page 105 October 2008 Hyperlinks Click the Add (green plus) button. In the Action window, click on action from the first drop down list and select/enter additional options below this after making your selection as required. Click OK to close the Action window. Click OK to close the Hyperlink window. Note: By default, a text hyperlink will be blue underlined text. Once a hyperlink is created, you may change the link’s text attributes as needed. Miscellaneous Hyperlinks Any object that requires the user to click may be considered a link of some sort. Message (text) hyperlinks work the same as when you are creating an Event/Action setup. Links can also be set up to occur when an image loads, etc. Please refer to the chapter on Events and Actions Overview. Or, contact [email protected] for more information. VB6 Pro User Manual Page 106 October 2008 Interactive Zones – Common Features Interactive Zones – Common Features Interactivity is key to acquiring and maintaining your viewer’s interest. And, with the use of interactive zones within your Viewlet, you can gain valuable input from your viewers for training, marketing and even product development purposes. The Interactive Zones are a staple of ViewletBuilder and have been in almost all of the previous versions. They provide dynamic results like Events and Actions, but focus on specific purposes. ViewletBuilder 6 Professional offers five Interactive Zones: Click Zone Text Zone Keystroke Zone Pause Zone Question Slide For purposes of this chapter, we are not including Hyperlinks or Events/Actions. These later features are covered in previous chapters. The Interactive Zones (with the exception of the Pause Zone) have many elements in common. These include: Only one zone per slide. An input field OR a clickable area or button. Audio option. Response to user input in the form of a message or some other object for when the user answers correctly or incorrectly or doesn’t complete a response. Scoring with points, attempts and time for answering. Let’s review each of these elements separately. The One Zone Per Slide Rule Unlike other dynamic elements, Interactive Zones serve a specific purpose and therefore, only one zone may be on the slide at a time. If you try to insert multiple slides, you will see a Warning window the will inform you what type of zone the slide already contains. It will offer you the following Options: VB6 Pro User Manual Page 107 October 2008 Interactive Zones – Common Features Replace it with a [selected zone]. Add the [selected zone] to a new empty slide. Add the [selected zone] to a copy of this slide. Select one of these options and click OK. Zone Interactive Area Each of the zones contain some type of “input area” or “zone” that the user will interact with and these will vary, depending upon the zone: Click Zone: Contains a click area that covers a portion of the slide. This area (transparent in the published project) is where the user must click to correctly respond. Text Zone: Contains a text input field. The user must input the answer correctly into this field. Keystroke Zone: Contains a zone that shows the Viewlet author (not the viewer) the keys that the viewer must press in the published file to answer correctly. This “zone” will not display in the published file. Pause Zone: Though not technically a zone, when this zone is inserted on a slide, it will insert a red triangle (not viewable in the published file) in the bottom right corner of the slide and the slide will pause. Question Slide: The newest of the zones, these slides will vary in look, but they will contain some type of input button (usually radio buttons) that the user will click to answer a given question. These slides also contain a button to “Submit” the input. Audio Attached to a Zone In some instances, you may attach a sound file to a zone. To see which zones have this option, click on the zone’s input field and if the Audio icon on the context sensitive toolbar is active, you can attach audio to the zone. Otherwise, you still have the option to attach audio to a slide as a workaround if desired (and the option is not available for your zone). VB6 Pro User Manual Page 108 October 2008 Interactive Zones – Common Features Response to User Input When creating an Interactive Zone, you should offer some type of response to the user after they’ve completed their input. In its simplest form, this response may simply be a message object that informs the user they’ve answered correctly. Or, it may be as elaborate as a combination of a message that, when the user answers incorrectly, a message appears telling them this and directing them to click a link to launch a quick training movie before continuing or to just continue without this option, etc. The choice as to how simple or complex the response will be is up to you. You even have the option to remove all responses to user input as well, if you desire. Note: Response objects will only displays as setup in the Viewlet itself. To create a response message object: Insert an Interactive Zone and, if applicable, three response text messages will appear. o Green message object: This will display if the user answers correctly. o Lime message object: This will display if the user did not complete the message. o Red message object: This will display if the user answers incorrectly. Select a message object and edit as you would any other message object with regards to text and message type/style itself. Move and stack the messages as desired on the slide. To edit a response object: You may change a response object from a message to an image or shape or none at all. In addition, you may change how this response object responds in reaction to a certain user action and the duration a response displays on a slide. These features are part of ViewletBuilder 6 Professional’s events/actions tools. Click on the “zone” area for the Interactive Zone. Click the Events icon on the context sensitive toolbar. In the Slide Events tab, click the appropriate tab. For example, to change the response that will display when the user answers correctly, select the On Correct tab. In the Slide Events window, select the action to modify and click the Modify (pencil) icon. In the Action window, edit as desired and click OK. In the Slide Events window, select another tab and repeat this process as desired for each of the response objects. When complete, click OK to close the Slide Events window. To quickly delete a response object: Click the response object. Press Delete on your keyboard. Scoring Options Several of the Interactive Zones offer you the option of scoring user input. When available, these scoring options include points, attempts and time to complete an answer. VB6 Pro User Manual Page 109 October 2008 Interactive Zones – Common Features To set up scoring options for an Interactive Zone: Click on the zone’s input or zone field. Click the Scoring icon on the context sensitive toolbar. In the Score window, three scoring options are available. To set: o Points: Enter a number that will be used for the point value if the user answers the question correctly. o Attempts: Enter a number of times the user has to answer the question correctly. After this number is reached and if the question is not answered correctly, it will be marked as incorrect and the Viewlet will continue. Select the option to allow the question to be reanswered if the user navigates backwards in the project, if desired. o Time: To limit the amount of time a user has to answer a question, select the Enable a time limit for the question check box. Then, enter the Hours/Minutes/Seconds as desired. Click OK to apply the scoring options and to close the Score window. For more information on working with Interactive Zone features covered in this chapter, please contact [email protected]. VB6 Pro User Manual Page 110 October 2008 Click Zone Click Zones The Click Zone is one of the most popular interactive zones used in ViewletBuilder 6 Professional. A Click Zone may be used to increase the effectiveness of your Viewlet, forcing the user to interact with it by clicking on a portion of the slide in order to continue. This chapter highlights the Click Zone, providing information on this zone not already covered in a previous chapter, Interactive Zones – Common Features. To create a Click Zone: Click the Insert ClickZone button on the Object Toolbar. By default, a click zone area and three response message objects will be inserted on the slide. To edit the click area properties: Double click on the click area or right click it and select Modify Click Area from the shortcut menu. In the Click Area window, you have three “states” to set up for the fill (bucket) color and for the border (pencil) color. Note: When the number is set to zero (0), the fill/border color will be transparent. The three states are: o Normal: Enter a value for the fill and for the border when the mouse is NOT over the click area in the Viewlet. o Rollover: Enter a value for the fill and border when the cursor moves on to the click area in the Viewlet. o Selected: Enter a value for the fill and border when the click area is “clicked”. VB6 Pro User Manual Page 111 October 2008 Click Zone Select the Double Click to Select check box if you want the user to double click (instead of the default single click) to respond correctly. Click OK. o To move a click area on a slide: Select the click area. Move your cursor over the click area until the cursor changes to a hand shape. Hold down your left mouse button and drag the area to its new location. To resize a click area: Select the click area. Move your cursor over one of the grab handles until the cursor changes to a double arrow. Hold down your left mouse button and resize the area as desired. To delete a Click Zone: Select the click area of the Click Zone. Press Delete on your keyboard. Quick Tip: Click Area styles are applied to new Click Zones. For additional Click Zone features, please review the Interactive Zones – Common Features chapter. Or, email [email protected] with any questions you may have. VB6 Pro User Manual Page 112 October 2008 Text Zone Text Zones Text Zones are another popular interactive features used in Viewlets by Viewlet authors. These zones may be added to slides when you require the user to answer questions by inputting text responses into a field. This chapter highlights the Text Zone, providing information on this zone not already covered in a previous chapter, Interactive Zones – Common Features. To create a Text Zone: Click the Insert TextZone icon on the Object Toolbar. By default, a text input field and three response message objects are inserted on the slide. To modify the text zone input field: Double click the text field or right click it and select Modify Text Field from the shortcut menu. In the Modify Text Field window, enter information as needed: o For Correct Answers – One Per Line: Input the correct answers in the field provided. This is what the user will need to type in the field in order to answer correctly. For multiple answers, press the Enter key between each correct entry. o Case Sensitive: By default, user may enter responses using caps or not and the answers, if input otherwise properly, will be considered to be correct. To force a user to use capital letters (for proper nouns, etc.), select the Case Sensitive check box. o Wrap Text: Select the Wrap Text option to allow text to wrap inside the text field. VB6 Pro User Manual Page 113 October 2008 Text Zone o o Password Field: To encrypt the user input while typing in the text field, select the Password Field check box. Submit Key: Choose a key from the drop down list the user must press in order to submit the response. Quick Tip: To let users hit the Enter key without clicking Submit, set the Submit Key to None. To move the text field on the slide: Select the text field. Mouse your cursor over the text field until the cursor changes to a hand shape. Hold down the left mouse button and move the text field to its new location. To resize the text field: Select the text field. Mouse your cursor over one of the grab handles until the cursor changes to a double arrow shape. Hold down your left mouse button and drag the grab handle to resize the text field. To delete a Text Zone: Select the text field. Press the Delete key on your keyboard. VB6 Pro User Manual Page 114 October 2008 Question Slide Question Slides Turn your Viewlet into a testing or survey tool by using Question Slides. Question Slides are a form of an Interactive Zone and contain (by default): Text box for the question. Choice boxes for users to select an answer Text boxes for answers Submit button the user clicks to submit the response Response message objects This chapter highlights the Question Slide, providing information on this feature not already covered in a previous chapter, Interactive Zones – Common Features. To create a Question Slide: Select the Insert Question icon on the Object Toolbar. The Question elements are inserted on the slide. VB6 Pro User Manual Page 115 October 2008 Question Slide To modify the question text box: Select the question text box located on the top of the slide. Right click and select Edit Message from the shortcut menu. Edit the text as you would in any text box. Click off the question text box to deselect it. To add additional choice fields: Click on one of the Choice field boxes to load its context sensitive toolbar. Click the Add Choice button on the context sensitive toolbar to add another choice to the list. To delete a choice field: Click on the choice field to select it. Press the Delete key on your keyboard. To select a choice field or fields as the correct response: To select the correct choice response, double click the choice field that the user will need to click for the correct response. A checkmark will display in the choice field box. Note: Multiple choice fields may be selected if the user is required to answer with multiple selections. To deselect a choice, if a checkmark is displayed, double click it to deselect it and remove the checkmark. To modify an answer text box: Right click on the answer text box and select Edit Message from the shortcut menu. Edit the text. Click off the answer text box to deselect it. To modify the Submit button properties: Double click the Submit button. In the Button Properties window, edit the information as required. Click OK. To modify additional Submit button options: Please refer to the Buttons chapter for more information on editing the Submit button’s style and Events/Actions. To delete a Question from the slide: Click the Insert Question button on the Object Toolbar. In the Warning window, select the Remove It option. Click OK. VB6 Pro User Manual Page 116 October 2008 Keystroke Zone Keystroke Zones A Keystroke Zone may be inserted on a slide to force the user to press an individual or combination of keys in order to continue with the Viewlet. This chapter highlights the Keystroke Zone features not already covered in a previous chapter Interactive Zones – Common Features. VB6 Pro User Manual Page 117 October 2008 Keystroke Zone To insert a Keystroke Zone: Select Insert KeystrokeZone button on the Object Toolbar. By default, a keystroke “object” (not visible in the Viewlet) that indicates the current key that the user needs to press in order to answer correct will display along with three response message objects. To define the keystroke: Right click on the keystroke object and select Define Keystroke from the shortcut menu. In the Define Keystroke window, follow the instructions for defining a new keystroke or keystroke combination. Click OK to apply. Quick Tip: If you define a keystroke or set of keystrokes that is incompatible with Flash an error will display, warning you of the issue. For more information on applying other Keystroke Zone features, review the Interactive Zones – Common Features chapter. Or, email [email protected]. VB6 Pro User Manual Page 118 October 2008 Pause Zone Pause Zone The Pause Zone is used to pause the Viewlet on a particular slide. These zones are easy to use on slide and are most commonly used on slides that contain hyperlinks or buttons that allow the user to click when they decide to continue to play the Viewlet. VB6 Pro User Manual Page 119 October 2008 Pause Zone To insert a Pause Zone on a slide: Click the Insert PauseZone icon on the Object Toolbar. A red triangle will be inserted in the bottom right corner of the slide. This triangle indicates the slide will pause, but this triangle will not display in the Viewlet. To remove a Pause Zone from a slide: Click the Insert PauseZone icon on the Object Toolbar. In the Warning window, select the Remove It option. Click OK. Note: Pause zones are now editable on the timeline. By default they will always be placed at the end of the slide, but they can be moved to happen at any point in the slide. For more information on working with Pause Zones, please contact [email protected]. VB6 Pro User Manual Page 120 October 2008 Page Layout Page Layout Once your project is completed, you may want to print the slides. One feature, often overlooked, is Page Layout. In this window, you may set up print options for your slides. To access Page Layout: Select File > Page Layout from the menu bar. The Page Layout window displays. To edit options for Page Layout: Access the Page Layout window. In the Header area, select/deselect options for: o Title o Date and Time o Slide Border In the Layout area, select: o Landscape orientation, including the number of rows (slides) per page. o Portrait orientation, including the number of columns (slides) per page. VB6 Pro User Manual Page 121 October 2008 Page Layout In the Options area, select/deselect whether to display: o Hidden slides o Slide Title o Slide Notes o Cursor o Cursor Path In the Footer area, select/deselect if you want Page Numbers to display. As you make selections, view the slide Preview arrow, using the arrows underneath the preview display to navigate throughout your project. In the Slides area, select which slides to print. Click OK to save these as the default options for this project, or click Print to open the Print window. VB6 Pro User Manual Page 122 October 2008 Printing Slides Printing Slides There may be times you want to print your slides for users to view or as reference materials. Before you print your slides, review the Page Layout chapter for setting up layout options for printing your slides. To print open the Print window: Select File > Print from the menu bar, or Press Ctrl + P on your keyboard, or Click the Printer button on the button toolbar. VB6 Pro User Manual Page 123 October 2008 Printing Slides Setting print options and printing your slides: Open the Print window as previously described. In the General tab, select a printer from the drop down list. Note: The Print window options will vary from computer to computer. In the Print Range area, select what slides (pages) to print. If available, in the Copies area, enter a value for the number of copies to print. Click Print. Depending upon the speed of your computer, a progress bar may appear across your screen as the print job is processed. To print an electronic copy of your slides: Use the instructions for printing as described above, but select a PDF option for the printer, or Select File > Export from the menu options. Select PDF. In the Export PDF window, make selections in the Options and in the Slides area. Click Export. In the Export PDF second window, select a location to save the file in and give the file a name. Click Save. Depending upon the size of your file, a progress bar may display. Once complete, you will be returned to your Viewlet project. If you have any questions on printing your project, contact [email protected]. VB6 Pro User Manual Page 124 October 2008 Export and Import Options Export and Import Options ViewletBuilder 6 Professional offers various export and import options. These include: Export Options: Text for Translation Sounds PDF Slides to Images QuestionMark VB6 Pro User Manual Page 125 October 2008 Export and Import Options Import Options: Import Slides Text for Translation To export the project’s text for translation or other copywriting purposes: Select File > Export from the menu bar. Select Text for Translation. In the Export Text window, select a location to save the file. Note: The file will be saved as an XML file. Enter a name for the file and click Save. Note: Remember where you saved your XML file for future reference. If an Information window displays, click OK. To export sounds from your project: Outside of ViewletBuilder 6 Professional, create a folder to save the exported sound files in. Select File > Export from the menu bar. Select Sounds. In the Export Sounds window, select which slides to export audio from. Click Export. In the Save File In window, select a folder to save the files in and click Save. Note: Exported sound files are saved using the WAV format. VB6 Pro User Manual Page 126 October 2008 Export and Import Options To export slides as a PDF file: Select File > Export from the menu bar. Select PDF. In the Export PDF window, make selections for Options and for Slides. Click Export. In the second Export PDF window, select a location to save the file in. Enter a name for the file and click Save. To export slides as image files: Select File > Export from the menu bar. Select Slides to Images. In the Export Slides to Images window in the: o File area: Enter a Prefix (used for beginning of file names); select an Extension from the drop down list (this will determine the type of image file that will be saved when slides are exported); and, if applicable, select the Quality (for JPG files) from the drop down list. o Options area: Select additional options as desired. o Slides area: Select which slides to export as images by select the radio button next to one of the options. Click Export. In the Save File In window, select a folder to save the exported image files in. Click Save. To import slides (from another qvp project): Select a thumbnail as an insertion point for imported slides. Imported slides will be inserted after the selected slide. Select File > Import from the menu bar. Select Import Slides. In the Import Slides window, click Browse. Locate and select a QVP file to load into the preview window. Select the slide or slides to import. Click OK. To import text for translation: Note: In order to use this feature, you will have to create an XML file for THIS EXACT Viewlet using the Export Text for Translation feature. Select File > Import from the menu bar. Select Text for Translation. In the Import Text window, locate the XML file (previously created from this Viewlet when exporting text for translation) and select it. Click Open. If an Information window displays, click OK. For more information on export and import options, contact [email protected]. VB6 Pro User Manual Page 127 October 2008 Project Properties Project Properties ViewletBuilder 6 Professional allows you to set up default properties for all of your Viewlet projects. These project properties may be modified on a project per project basis. The project properties set up in the Project Properties are used when the project is published. Project properties include: Viewlet Profile Sound Quality Image Quality Timing Viewlet Options Scoring Options Packaging Language Flash ViewletSkin HTML Frame To set up project properties: Select Project > Project Properties from the menu bar. In the Project Properties window, set up options for your project as needed. VB6 Pro User Manual Page 128 October 2008 Project Properties To save project properties as default settings: Select Project > Project Properties from the menu bar. In the Project Properties window, edit the properties as desired. Click Save as Default Properties. Click OK to close the Project Properties window. Viewlet Profile – Project Properties Information entered in the Viewlet Profile section of the Project Properties window will be embedded into the Viewlet. VB6 Pro User Manual Page 129 October 2008 Project Properties To set up Viewlet Profile details: Select Project > Project Properties from the menu bar. Select Viewlet Profile from the left navigation menu. In the Viewlet area: Enter a Title. Enter a Description. In the Author area: Enter an author Name. Enter an Email. Enter additional Comments. In the Company area: Enter a Company name. Enter a Department. Enter a company Web Site. VB6 Pro User Manual Page 130 October 2008 Project Properties Sound Quality – Project Properties The sound quality selected in the Sound Quality section of the Project Properties window will be what is used when the Viewlet is published. VB6 Pro User Manual Page 131 October 2008 Project Properties To select Sound Quality options: Select Project > Project Properties from the menu bar. Select Sound Quality from the left navigation menu. There are three quality options and also the option to strip sounds from the published file. Read the descriptions for each and select the radio button next to the sound quality of your choice. Note: This selection will not affect the sound quality of the “pre-published” source qvp file. Image Quality – Project Properties The image quality select in the Image Quality section of the Project Properties window will be the setting used when the Viewlet is published. VB6 Pro User Manual Page 132 October 2008 Project Properties To select Image Quality options: Select Project > Project Properties from the menu bar. Select Image Quality from the left navigation menu. There are three image quality settings. Select the radio button next to the image quality of your choice for your Viewlet. Note: This will not affect the image quality of the project source qvp file. The better the image quality selected, the bigger the published file size. Timing – Project Properties In the Timing section of the Project Properties window, you can set minimum defaults for timing features throughout your project. These settings serve as a baseline for your project and may be modified on a slide-per-slide or object-per-object basis, where applicable, as needed. VB6 Pro User Manual Page 133 October 2008 Project Properties To set up Timing options: Select Project > Project Properties from the menu bar. Select Timing from the left navigation menu. In the Minimum Slide Duration area: Enter a value for the minimum number of seconds a slide will be displayed. In the Reading Speed area: Enter a default reading speed (words per minute) for your project. Quick Tip: Changing the reading speed maintains timing on slides, including manual gaps added at the end of the slide. In the Cursor Speed area: Select a default cursor speed from the drop down list. In the Introductory Delay area: Enter a default delay (in seconds) before a message object is displayed. In the Timing Links area: Select the Maintain Timing Links check box to automatically add and maintain timing between elements along the Timeline while editing a project. VB6 Pro User Manual Page 134 October 2008 Project Properties Viewlet Options – Project Properties In the Viewlet Options section of the Project Properties window, you may set up additional miscellaneous features for your published Viewlet. To set up Viewlet Options: Select Project > Project Properties from the menu bar. Select Viewlet Options from the left navigation menu. In the Login Options area: Select the option to require viewers to login before viewing your Viewlet Select the password option and enter a password (that you will provide to viewers) in the password field VB6 Pro User Manual Page 135 October 2008 Project Properties In the Display Options area: Select the option to display Table of Contents when the Viewlet is viewed Select a Status Bar to be displayed as the Viewlet is playing Select the display score option if desired (recommended for scored Viewlets) Select the options for when the hand shape cursor is displayed for OnClick Events and ClickZones In the Soundtrack area: Click the folder icon to locate and select a sound file that will play in the background when the Viewlet is viewed. If a sound file is displayed in the field and you want to remove it, click the red “X” icon. Quick Tip: The project’s background soundtrack will continue to play asynchronously even if the slide contains a zone. VB6 Pro User Manual Page 136 October 2008 Project Properties Scoring Options – Project Properties The Scoring Options section of the Project Properties window offers scoring selections for your Viewlet project. In the Scoring Options area: Select a Pass / Fail percentage and its value in the field provided Limit the Time the viewer has to answer a question Select Allow Repeat if you will allow the viewer to play the Viewlet again (if it is scored) Quick Tip: If the time limit feature is used on a slide that requires the user interaction, you can set a global OnTimeout event by selecting an action to occur in the Actions to perform when the Viewlet time limit is reached area of the Scoring Options section. This action is fired when the global Viewlet time limit expires. VB6 Pro User Manual Page 137 October 2008 Project Properties Packaging – Project Properties The Packaging section of the Project Properties window offers additional publishing selections for your Viewlet project. To select additional Viewlet file Packaging options: Select Project > Project Properties from the menu bar. Select Packaging from the left navigation menu. In the Standalone Projector area: Select options for creating “standalone Viewlets” that play in their own viewer (according to the operating system selected). Select the Play executable file fullscreen if you want the standalone Viewlet to launch fullscreen (filling the entire viewing area of the user’s monitor) when played. VB6 Pro User Manual Page 138 October 2008 Project Properties In the Miscellaneous area: Select the Create a zip file option to create a copy of the Viewlet files contained in a zip file. Language – Project Properties In the Language section of the Project Properties window, you may set default language preferences for your Viewlet. To set up Language details: Select Project > Project Properties from the menu bar. Select Language from the left navigation menu. VB6 Pro User Manual Page 139 October 2008 Project Properties In the Viewlet language area: By default, the compiling language used by ViewletBuilder 6 Professional is the same as your computer’s operating system. To change it, select a new language from the drop down list. To change default language or text details for various Viewlet panels: Login Panel: If you require viewers to log into the Viewlet, you can change the text displayed in the login panel in the fields provided. Table of Contents Panel: If you choose to display a Table of Contents with the Viewlet, you may edit this panel’s text in the fields provided. Results Panel: If your Viewlet is scored, you may modify the text that displays in the results panel in the fields provided. VB6 Pro User Manual Page 140 October 2008 Project Properties Flash – Project Properties In the Flash section of the Project Properties window, you may set up your default Flash settings for your Viewlet. To set up Flash defaults: Select Project > Project Properties from the menu bar. Select Flash from the left navigation menu. In the Size area: Enter a value for the final Width and Height of your SWF file, or Select the Scale to Fit Web Page option. VB6 Pro User Manual Page 141 October 2008 Project Properties In the Options area: Select additional options for your Flash file including: o Compress Movie: Recommended for smaller file size. o Loop Mode: Recommended for tradeshow Viewlets to play continuously. o Reduce Flash Context Menus: Displays abbreviated right click Flash shortcut menu options. o Rapid Fading Effects on Message: Fades message objects in / out on slides. o Local Access Mode: Allows Viewlet to have access to local files. In the Preloader area: Select Display a waiting animation while the Viewlet is being loaded option is you want a Preloader animation to display while the Viewlet streams in the background. If a Preloader is selected, select how long the Preloader will “Wait” by selecting a radio button next to the desired option. In the Animated Extras area: To display a SWF movie before the Viewlet plays and/or after the Viewlet is played, click the folder icon next to the Beginning and/or Ending field. Locate the SWF movie (Viewlet SWF files CANNOT be used), select it and click Open. To delete a Beginning and/or Ending SWF movie file, click the red “X” button next to the Beginning and/or Ending field. VB6 Pro User Manual Page 142 October 2008 Project Properties ViewletSkin – Project Properties In the ViewletSkin section of the Project Properties window, you may select a wrapper that will display around your Viewlet. To select a ViewletSkin: Select Project > Project Properties from the menu bar. Select ViewletSkin from the left navigation menu. Select a ViewletSkin from the drop down list. Once a skin is selected, you may preview it in the preview area below the drop down list. VB6 Pro User Manual Page 143 October 2008 Project Properties HTML Frame – Project Properties In the HTML Frame section of the Project Properties window, you may choose and modify the HTML Frame that is published with your Viewlet. To select HTML Frame options: Select Project > Project Properties from the menu bar. Select HTML Frame from the left navigation menu. To select the frame that is published with your project: In the HTML Frame section of the Project Properties window, select a default frame from the drop down list. The frame will be added to the Files field area below the list. VB6 Pro User Manual Page 144 October 2008 Project Properties To add a custom frame: In the HTML Frame section of the Project Properties window, click the Add (green plus) icon. In the HTML Frame Properties window, enter a Name for the new frame. Click OK. Double click inside the “coding” field area. In the Resource Properties window that displays, edit as needed. Click OK. To edit or delete an HTML frame: Select an HTML Frame from the drop down list. To modify an HTML Frame: o Click the Modify (pencil) icon. o In the HTML Frame Properties window, edit the Name and click OK. o Double click in the “coding” field. o In the Resource Properties window, edit as needed and click OK. To delete an HTML Frame: o Select a frame from the drop down list. o Click the Delete (red “X”) icon. Quick Tip: A warning displays if the HTML Frame entry point is not set correctly. To Save Project Properties Once all of the options are set up in the Project Properties window, click OK. For more information on Project Properties, contact [email protected]. VB6 Pro User Manual Page 145 October 2008 Previewing/Publishing a Viewlet Previewing a Viewlet There are various ways to preview your Viewlet project. For example, any place you see these buttons: You may use them to advance through your project while inside ViewletBuilder 6 Professional. Quick Tip: You can preview the slide background soundtrack, audio attached to objects, cursor click sounds and key click animation frame sounds within ViewletBuilder 6 Professional without the need to publish to Flash. Additionally, you may access preview options: From the Timeline: Click the Preview button at the top right of the Timeline to preview the project, or Click the down arrow and select a Preview option from the drop down list. VB6 Pro User Manual Page 146 October 2008 Previewing/Publishing a Viewlet From the menu bar: Select Project from the menu bar. Select a preview option: o Preview Current Slide: Plays the current slide inside ViewletBuilder 6 Professional. o Preview From Current Slide: Plays the project inside ViewletBuilder 6 Professional from the selected slide to the end of the project. o Preview All Slides: Plays the entire project while inside ViewletBuilder 6 Professional. o Preview in Browser: Quickly compiles (publishes) the file to SWF (Flash) format and launches it in a browser. Quick Tip: Displaying the About window during Viewlet playback pauses the Viewlet. Closing the About window returns the Viewlet to play mode. After publishing a project: Select Project from the menu bar. Select Publish Viewlet. Complete the information in the windows that display to publish your project. In the last Publish Viewlet window, click the View button to preview the published Viewlet. Outside of ViewletBuilder 6 Professional: Once you’ve published a Viewlet file, a folder containing the published files is created. Locate this folder and open it. Double click the HTML or the SWF file to preview the Viewlet. VB6 Pro User Manual Page 147 October 2008 Previewing/Publishing a Viewlet Publishing a Viewlet In order to create the final Flash Viewlet your audience will see, you must publish your Viewlet source (qvp) file. ViewletBuilder 6 Professional allows you to publish your Viewlets to a: Local or Network folder: This includes your hard drive, a network drive, or any other external file storage device (such as a floppy disk, CD, jump drive, etc.) FTP Server ViewletCentral Quick Tip: To avoid issues with accidentally deleting the project’s source file, you cannot publish your Viewlet to the same folder as the project folder. Local or Network Folders To add a local or network folder as a publishing location: Select the Publish Viewlet button on the toolbar. In the Publish Viewlet window, click the Add a Local or Network Folder button. Locate the desired folder, select it and click Select Folder. The folder is added to the Location list. VB6 Pro User Manual Page 148 October 2008 Previewing/Publishing a Viewlet To modify a local or network location: In the Publish Viewlet window, select the desired folder. Click the Modify (pencil) icon. In the Folder window, edit the folder name and path as needed. Click OK. To delete a local or network location: In the Publish Viewlet window, select the desired folder. Click the Delete (red “X”) icon. If prompted to delete the publishing location, click Yes. To publish a Viewlet to a local or network folder: Select the Publish Viewlet button on the toolbar. In the Location screen, select a local or network folder and click Next. Follow the instructions in the windows that display to complete the process for publishing your Viewlet to the selected local or network folder. When prompted (in the last window) that the Viewlet is published, click Finish to close the window. FTP Servers To add an FTP server as a publishing location: Select Project > Publish Viewlet from the menu bar. In the Location screen, click the Add an FTP Server button. In the FTP Server window, fill in the following information for your FTP server: o Name o Server o Directory (to where you will publish your files) o Login o Password o Port (by default port is 21) o Passive mode option Click OK. Quick Tip: When configuring an FTP publishing target, click the Test Connection button. A message will display information you whether or not the connection passed the test. VB6 Pro User Manual Page 149 October 2008 Previewing/Publishing a Viewlet To modify an FTP server location: In the Publish Viewlet window, select the desired FTP server. Click the Modify (pencil) icon. In the FTP Server window, edit the information as needed. Click OK. To delete an FTP server location: In the Publish Viewlet window, select the desired FTP server. Click the Delete (red “X”) icon. If prompted to delete the publishing location, click Yes. To publish a Viewlet to an FTP server: Select the Publish Viewlet button on the toolbar. In the Location screen, select the desired FTP server and click Next. Follow the instructions in the windows that display to complete the process for publishing your Viewlet to your FTP server. When prompted (in the last window) that the Viewlet is published, click Finish to close the window. VB6 Pro User Manual Page 150 October 2008 Previewing/Publishing a Viewlet ViewletCentral To modify your ViewletCentral information: In the Publish Viewlet window, select Qarbon ViewletCentral. Click the Modify (pencil) icon. In the Qarbon ViewletCentral window, edit the information as needed. Click OK. To publish a Viewlet to Qarbon ViewletCentral: Select the Publish Viewlet button on the toolbar. In the Location screen, select Qarbon ViewletCentral and click Next. Follow the instructions in the windows that display to complete the process for publishing your Viewlet to ViewletCentral. When prompted (in the last window) that the Viewlet is published, click Finish to close the window. Quick Tip: Republishing to ViewletCentral from a different computer but to the same account updates the Viewlet instead of creating a new one. For more information on publishing Viewlets to a local or network folder, an FTP Server or to ViewletCentral, email [email protected]. VB6 Pro User Manual Page 151 October 2008 ViewletCentral – General Information ViewletCentral – General Information Are you looking for a solution for publishing your Viewlets on the Web? Why not check out Qarbon’s ViewletCentral. ViewletCentral is a server-based application that provides centralized reporting, management and deployment of your valuable Viewlets and other Flash-content files. To discover all the features of ViewletCentral, you can immediately open a Free account, which will give you ample disk space to store your Viewlets. For more information about ViewletCentral information, please visit our web site at: http://www.qarbon.com/presentation-software/viewletcentral/ VB6 Pro User Manual Page 152 October 2008 ViewletCentral – Self-Hosted Server ViewletCentral Self-Hosted Server When you purchase a Self-Hosted ViewletCentral server license, you not only get all of the same features that the Qarbon-Hosted version has, but you gain the ability to perform account and project management activities easily and efficiently from one single location. http://www.qarbon.com/presentation-software/viewletcentral/host_server.php If you are interested in learning more about Self-Hosted ViewletCentral, please contact our sales group ([email protected]) or support ([email protected]). VB6 Pro User Manual Page 153 October 2008 Support and Self-Help Support and Self-Help Qarbon offers a support plan to fit your needs. Standard Support is offered to all customers at no charge. You can also purchase Platinum Membership, which is a software maintenance plan with enhanced support benefits. For more information on support plans and options available, visit us online at: http://www.qarbon.com/help/support_plans.php Qarbon also offers users online, self-help resources in the form of Viewlet tutorials, user manuals and FAQs. For access to these self-help aids, please visit our site at: http://www.qarbon.com/help/ You may also contact [email protected] with any support questions you may have. VB6 Pro User Manual Page 154 October 2008 Training Training Take advantage of all the features in ViewletBuilder 6 Professional by signing up for Qarbon’s training classes. Learn how to get the most out of your Viewlet authoring tool to create stunning Flash demonstrations and interactive movies in no time. For information on how to learn from the Viewlet experts, visit us online at: http://www.qarbon.com/services/webinars/index.php VB6 Pro User Manual Page 155 October 2008 Sales and General Customer Service Sales and General Customer Service Customer support is our top priority at Qarbon! Please feel free to contact our Sales or Support staff at any time if you have ANY ViewletBuilder 6 Professional (or other product related) questions or concerns or for options to discuss additional training needs. For current contact information, visit our web site: http://www.qarbon.com/about_us/contact_us/ VB6 Pro User Manual Page 156 October 2008