1
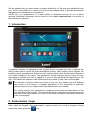
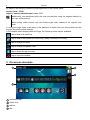
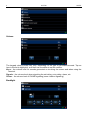
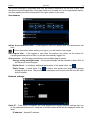
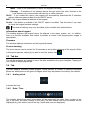
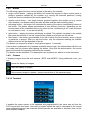
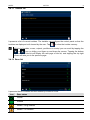
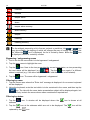
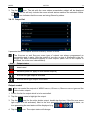
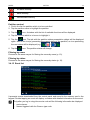
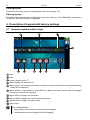
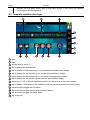
int-tsi_u_en 11/13 Keypad INT-TSI Brief User Manual Firmware version 1.00 SATEL sp. z o.o. • ul. Schuberta 79 • 80-172 Gdańsk • POLAND tel. 58 320 94 00 • [email protected] www.satel.eu WARNINGS Please read this manual carefully before use. Changes, modifications or repairs not authorized by the manufacturer shall void your rights under the warranty. Warning This is a Class A product. In a domestic environment this product may cause radio frequency interference in which case the user may be required to take adequate measures. The installer manual contains information on how to minimize the radio interference. The SATEL's goal is to continually upgrade the quality of its products, which may result in alterations of their technical specifications and firmware. The current information on the introduced modifications is available on our website. Please visit us: http://www.satel.eu The declaration of conformity may be consulted at www.satel.eu/ce The following symbol may be used in this manual: - note. We are pleased that you have chosen a product offered by us. We wish you satisfaction with your choice and would like to assure you that we are always ready to provide professional assistance and information on our products. SATEL Ltd. is a manufacturer of a wide variety of dedicated devices for use in alarm systems. Additional information can be found on our website www.satel.eu or at points of sale offering our products. 1. Introduction A graphical interface is displayed on the keypad screen to enable the user to operate the alarm system and to control the home automation devices. When setting up the keypad, the installer creates templates that define how the interface should look like and what features it is to make available to the users. The appearance of this interface may be varied not only depending on whether the user is logged in or not, but also individualized depending on the user. This allows the interface to be customized to the needs of each user of the keypad. The interface of keypad which has found its way into your hands may look different than shown in this manual. A detailed description of the functioning of particular interface items for your keypad should be obtained from the installer. You should present your expectations regarding functionality and appearance of the user interface to the installer. The interface should be configured for maximum ease of operation of the alarm system or control of the home automation equipment connected to the control panel. 2. Authorization / login When using the keypad, user authorization / login by means of a code is required. Having entered the code, press the key. 2 INT-TSI SATEL By default, the following codes are preprogrammed in the control panel: service code: 12345 object 1 master (administrator) code: 1111 Additionally, the operations which the user can perform using the keypad depend on the user authority level. When acting under duress, use the DURESS type code instead of the regular user code. If, during the login, there is an alarm in the partitions to which the user has access from the keypad, the alarm will be cleared. In the window which displays after the login, the following icons may be available: tap to disarm all partitions tap to disarm the partitions in which entry delay countdown is running tap to change the code tap to change the phone code tap to delete the service note tap to close the window 3. On-screen elements information bar. status icon. tab bar. tab. SATEL INT-TSI 3 3.1 Information bar The information bar will not be displayed if the user interface is so configured by the installer. The following data can be displayed on the information bar: type of alarm control panel; text entered by the installer; date; time; messages about the occurrence of certain events (such as arming/disarming, auto-arming delay countdown, entry/exit delay countdown, alarm, etc.). 3.2 Status icon no logged in user no logged in user – entry/exit delay countdown is running no logged in user – there is a message to read user logged in user logged in – entry/exit delay countdown is running user logged in – there is a message to read Tapping the status icon will open a window in which the following items are displayed: information on the control panel (type, firmware version, build date); name of the logged in user (or information that no user is logged in); messages received from the z control panel or generated by the keypad; icons: tap to log in tap to log out tap to close the window and turn on the screensaver tap to change the code tap to change the phone code tap to display the "Settings" window tap to close the window 3.2.1 "Settings" window The window displays a list of functions which allow you to configure some operating parameters of the keypad or get information on the keypad. Tap the selected item in the list to run the function. 4 INT-TSI SATEL Volume The keypad volume levels may vary, depending on the type of generated sounds. Tap an item in the list to highlight it, and then use the slider to set the volume. Keys – the volume level for sounds generated on touching the screen and when using the terminal. Signals – the volume level when signaling the exit delay, entry delay, alarm, etc. Chime – the volume level of CHIME signaling (zone violation signaling). Backlight SATEL INT-TSI 5 The screen backlight is adjustable and may be different depending on the time of day. Use the slider to set the brightness. If the night mode is to be used, turn on the appropriate option, and then specify the hours during which the night mode is to be used. Screensaver Initiate the screensaver after – if the keypad is idle for a preset time, the screensaver will start. If the screensaver starts before your logout, you will need to login again. Auto logout after – if the logged in user does not perform any action on the screen for a preprogrammed period of time, he will be automatically logged out. Screensavers – the following screensavers are available (tap to select): Energy saving backlight mode – the screen backlight will be reduced to about 20% of the value set for the keypad. Digital Clock – to configure additional parameters of the digital clock, tap . to define how quickly the images will change Photo Frame – a slide show. Tap during the slide show. The photos to be displayed must be put onto the microSD card by the installer. Network settings Static IP – if this option is enabled, you must program the keypad network settings (tap one of the parameters below and, using the onscreen keyboard that will be displayed, enter the data). IP address – keypad IP address. 6 INT-TSI SATEL Mask – mask of the subnetwork in which the keypad is working. Gateway – IP address of the network device through which the other devices in the local network can communicate with devices in other networks. DHCP – if you enable this option, the keypad will automatically download the IP address, subnet mask and gateway data from the DHCP server. MAC – the unique hardware address of the keypad. Details – this button is available if the "DHCP" option is enabled. Tap the button if you want to check the keypad network settings. The network settings may only be edited by the installer and administrators. Information about keypad The window displays the keypad name, its address in the alarm system, etc.. In addition, there is a function available that makes it possible to check if the keypad power supply is appropriate. Firmware The window displays information on the keypad firmware. Screen cleaning The touch screen can be locked for 30 seconds so as to allow cleaning of the keypad. When a dialog box appears, asking if you want to lock the screen, tap . 3.3 Tab bar The tab bar presents, by means of icons, the tabs available in the given template. Tapping an icon results in displaying the tab. 3.4 Tab The tab displays elements called widgets, which perform a number of different functions. Below are descriptions of all types of widgets which may be placed in the tab by the installer. 3.4.1 Analog clock It shows the time. 3.4.2 Date / Time The installer determines which information will be presented (the date, time, number of the day in the year, the week number in the year). He also selects how the information will be displayed (e.g. the order in which the day, month and year are displayed). SATEL 3.4.3 INT-TSI 7 Thermometer It presents the temperature measured by the ATD-100 temperature detector. 3.4.4 System status The status of alarm system is presented by means of icons. alarm or alarm memory none of the partitions operated by the keypad is armed exit delay countdown is running in a partition operated by the keypad all the partitions operated by the keypad are armed some of the partitions operated by the keypad are armed entry delay countdown is running in a partition operated by the keypad information on the partition status is not displayed (the keypad is configured by the installer so that this information is only available after login) trouble or trouble memory (the icon is not displayed, if the partitions operated by the keypad are armed) service mode is active If the installer has enabled the GRADE 2 (INTEGRA) / GRADE 3 (INTEGRA Plus) option: information on the alarms is only displayed after login; the icon indicates that there is a trouble in the system, some zones are bypassed, or that there was an alarm. 3.4.5 Text Any text entered by the installer can be displayed in the tab. 3.4.6 Clipart One of the cliparts available in the gallery prepared by the manufacturer or the installer himself can be placed in the tab by the installer. 3.4.7 Indicator It indicates the status of selected zone (no violation / violation) or output (deactivated / activated) by means of icons. Indicator description can be placed above or below the indicator. 8 3.4.8 INT-TSI SATEL Button The following types of buttons can be placed in the tab by the installer: single control button – tapping the button will cause the keypad or alarm control panel to perform operation defined by the installer (e.g. arming the selected partitions, turning on/off the device controlled by the control panel, etc.); double control button – two single buttons grouped together (the widget can e.g. control roller shutters, one button raising the roller shutters and the other lowering them); indicating button – the button icon indicates the status of the device controlled by means of the button. The button allows performance of two different functions, depending on the current status of the controlled device (e.g. when the air conditioning is off, it can be turned on, and when it is on – it can be turned off). goto button – tapping the button will display a subtab. The installer can place in the subtab the same elements as in the tab, however the subtab is not shown on the tab bar. filter button – the button type available in the tab in which the list of events, zones, outputs or partitions is placed. After you tap the button, only the elements meeting the installer defined criterion will be displayed in the list. The button can respond to a tap or a long press (approx. 3 seconds). If the button is displayed in the template available without login, the authorization with the use of a code may be required after tapping the button. Only after the authorization, the control panel will execute the operation defined by the installer. The button can be described. The description can be placed on, above or under the button. 3.4.9 Camera It displays images from the web camera (JPEG and MJPEG). Using additional icons, you can: pause the display of images start the display of images fit the camera image to window / restore normal size of the camera image 3.4.10 Terminal It enables the alarm system to be operated and programmed in the same way as from the LCD keypad with text menu. How such a keypad should be used is described in the control panel programming and user manuals (these manuals are available in electronic form on the www.satel.eu website). SATEL INT-TSI 9 3.4.11 Trouble list It presents a list of current troubles. The installer can configure the control panel so that the troubles are displayed until cleared by the user. Tap to clear the trouble memory. All lists (of troubles, zones, outputs, partitions or events) you can scroll by tapping the or icon or sliding your finger up and down the screen. Tapping the bottom right corner of the list will display the next page of the list, and tapping the top right corner will take you to the previous page. 3.4.12 Zone list It presents the list of zones and their status by means of icons. Icon Zone status normal violated trouble – long violation trouble – no violation 10 INT-TSI SATEL inhibited isolated tamper alarm alarm tamper alarm memory alarm memory tamper masking masking memory For the widgets presenting a list of zones, outputs or partitions, the or icon may be available, the tapping of which will change the way of sorting the items in the list. When the icon is displayed, the list is sorted by name. When the icon is displayed, the list is sorted by number. Bypassing / unbypassing zones 1. Find in the list the zone which is to be bypassed / unbypassed. 2. Tap the zone name to highlight the zone. 3. Tap the icon. Next to the icon presenting the current zone status, an icon presenting the next status will be displayed (e.g. ). Tap the icon again if a different status is required (e.g. if the zone status is "normal" and the zone is to be isolated). 4. Tap the icon. The zone will be bypassed / unbypassed. Filtering by name 1. Tap the screen area where the "Enter text" message is displayed. An on-screen keyboard will be displayed. 2. Using the keyboard, enter the text which is to be contained in the name, and then tap the key. The tab with the zone status presentation widget will be displayed again, but the list will only include the zones whose name contains the required text. Filtering by status 1. Tap the statuses. 2. Tap the icon. A window will be displayed where the icon is shown at all icon at the statuses which are not to be displayed. The replaced by the icon. icon will be SATEL INT-TSI 11 3. Tap the icon. The tab with the zone status presentation widget will be displayed again, but the list will only include the zones whose status matches the selected criteria. The icon indicates that the zones are being filtered by status. 3.4.13 Output list It presents the list of outputs and their status by means of icons. The SHUTTER UP and SHUTTER DOWN type of outputs are always programmed as consecutive and in pairs. Only the output of SHUTTER UP type is displayed in the list, though the status information applies to both outputs (when one of the outputs is activated, the other one is deactivated). Icon Output status deactivated activated [does not apply to roller shutter outputs] SHUTTER UP type output is activated SHUTTER DOWN type output is activated Output control You can control the outputs of MONO SWITCH, BI SWITCH, REMOTE SWITCH type and the roller shutter outputs. 1. Find in the list the output which is to be controlled. 2. Tap the output name to highlight the output. 3. Tap the icon (for the roller shutter output, double tap the icon, if the SHUTTER DOWN type output is to be activated). Next to the icon presenting the current output status, an icon presenting the next status will be displayed (e.g. 4. Tap the icon. The output status will change. / ). 12 INT-TSI Filtering by name Proceed in the same way as for filtering the zones by name (p. 10). Filtering by status Proceed in the same way as for filtering the zones by status (p. 10). 3.4.14 Partition list It presents the list of partitions and their status by means of icons. Icon Partition status disarmed – there are no violated zones exit delay countdown is running – remaining time longer than 10 seconds exit delay countdown is running – less than 10 seconds remained armed – mode: “full” armed – mode: “full + bypasses” armed – mode: “without interior” armed – mode: “without interior and without entry delay” temporarily blocked blocked for guard round entry delay countdown is running fire alarm alarm warning alarm SATEL SATEL INT-TSI 13 fire alarm memory alarm memory verified alarm memory Partition control 1. Find in the list the partition which is to be controlled. 2. Tap the partition name to highlight the partition. 3. Tap the icon. A window with the list of available functions will be displayed. 4. Tap the function which is to be run to highlight it. 5. Tap the icon. The tab with the partition status presentation widget will be displayed again. Next to the icon(s) presenting the current status of the partition, an icon presenting the next status will be displayed (e.g. 6. Tap the / ). icon. The partition status will change. Filtering by name Proceed in the same way as for filtering the zones by name (p. 10). Filtering by status Proceed in the same way as for filtering the zones by status (p. 10). 3.4.15 Event list It presents events downloaded from the control panel and saved to the memory card in the keypad. Double tapping an event will display a window with detailed information on the event. Only after you log in using the service code will the following information be displayed: panic alarms; alarms triggered with the DURESS type code. 14 INT-TSI SATEL Filtering by text Proceed in the same way as for filtering the zones by name (p. 10). Filtering by type Proceed in the same way as for filtering the zones by status (p. 10). Additionally, events from the specific time interval can be displayed. 4. Description of keypad with factory settings 4.1 Template available without login time. date. system status (see p. 7). tap to display the terminal tab. tap to arm in “full” mode all partitions to which you have access from the keypad (entering a code will be required). tap to disarm / clear alarm in all partitions to which you have access from the keypad (entering a code will be required). tap and hold to trigger the fire alarm. tap and hold to trigger the medical (auxiliary) alarm. tap and hold to trigger the panic alarm. tap to log in. The installer defines: the partitions which can be armed using the keypad; whether alarm can be triggered from the keypad; SATEL INT-TSI 15 whether the loud panic alarm (with a loud alarm signal) or the silent one (without a loud signal) will be triggered). 4.2 Template available after login time. date. system status (see p. 7). tap to display the terminal tab. tap to display the tab containing i.a. the partition list presentation widget. tap to display the tab containing the trouble list presentation widget. tap to display the tab containing i.a. the event list presentation widget. tap to display the tab containing the zone list presentation widget. tap to arm in “full” mode all partitions to which you have access from the keypad. tap to disarm / clear alarm in all partitions to which you have access from the keypad. tap and hold to trigger the fire alarm. tap and hold to trigger the medical (auxiliary) alarm. tap and hold to trigger the panic alarm. tap to log out. 16 INT-TSI 4.2.1 SATEL Tab containing i.a. the partition list presentation widget tap to arm in “full” mode all partitions to which you have access from the keypad. tap to arm in "without interior" mode partition 1. tap to arm in "without interior and without entry delay" mode partition 1. tap to disarm / clear alarm in all partitions to which you have access from the keypad. partition list presentation widget (see p. 12). 4.2.2 Tab containing i.a. the event list presentation widget tap to display the alarms logged to event log. tap to display the events of arming / disarming and alarm clearing type. tap to display the troubles logged to event log. tap to display the events of zone bypassing / unbypassing type. SATEL INT-TSI 17 tap to display all events. event list presentation widget (see p. 13). 5. Sound signaling The installer can disable the sound signaling. 5.1 Beeps generated when using the terminal 1 short beep – touching a number key. 2 short beeps – confirmation of command execution, signaling of entering the user menu, submenu or function. 3 short beeps – signaling of: – starting the arming procedure (if no exit delay has been programmed, this is equivalent to arming): – disarming and/or alarm clearing; – turning output off; – disabling chime signal in the keypad, using the key; – exiting the function and returning to the menu after confirmation of the data entered. 4 short beeps and 1 long beep – signaling of: – turning output on; – enabling chime signal in the keypad, using the key; – ending the function and exiting the user menu after confirmation of the data entered. 1 long beep – signaling of: – violated / bypassed zones when arming; – fault of the vibration detector (10. 24H VIBRATION type zone was not violated during the vibration detector test run upon starting the arming procedure). 2 long beeps – invalid code, function not available or exiting the function without confirmation of the data entered (e.g. by using the 3 long beeps – unavailable function. key). 5.2 Events signaled by sounds Only installer selected events are signaled. Alarms are being signaled throughout the time programmed by the installer. 5 short beeps – zone violation (CHIME). Long beep every 3 seconds, followed by a series of short beeps for 10 seconds and 1 long beep – countdown of exit delay (if the time is shorter than 10 seconds, only the final sequence of short beeps will be generated). A sequence of 7 beeps of diminishing duration, repeated every few seconds – countdown of auto-arming delay. 2 short beeps every seconds – countdown of entry delay. 2 short beeps every 3 seconds – signaling a new trouble. 18 Continuous beep – alarm. Long beep every second – fire alarm. INT-TSI SATEL