1
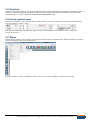
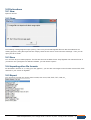
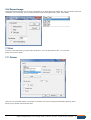
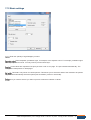
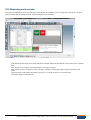
We combine many years of experience with new ideas!
1 Preface
This user manual gives an overview of properties and processes available in SignMax, in the Print & Cut module and in the
professional graphic editing module. This documentation helps new users find their way and highlights special processes that
improve efficiency. SignMax has a wide range of functions. Feel free to experiment with the software. Copyright notes: The
information contained in this manual was collected and authored by the company MAX Systems. It serves for informational
purposes only and may not be changed or expanded by third parties. MAX Systems takes no responsibility for any errors or
inaccuracies this document might contain.
We are thankful for any hints, suggestions and comments. Authored and designed by:
MAX Systems GmbH
Am Bauhof 12
D-27442 Gnarrenburg, Germany
Phone: +49 4763/94595-0
Fax: +49 4763/94595-11
E-Mail: [email protected]
Internet: www.maxsystems.eu
2 Installation
Please observe the installation manual on the software DVD / the USB stick. Not following these instructions may result in the
software's behaving abnormally.
www.maxsystems.eu | Tel: +49 (0) 47 63 / 9 45 95 – 0 | Fax: +49 (0) 47 63 / 9 45 95 – 11
1
Contents:
1 Preface ........................................................................................................................................................................... 1
2 Installation ...................................................................................................................................................................... 1
3 Controls .......................................................................................................................................................................... 5
3.1 Menu bar .................................................................................................................................................................. 5
3.2 Smart bar ................................................................................................................................................................. 5
3.3 Icon bar .................................................................................................................................................................... 5
3.4 Toolbar ..................................................................................................................................................................... 5
3.5 Shop palette ............................................................................................................................................................. 5
3.6 Job palette ............................................................................................................................................................... 6
4 Blank size ....................................................................................................................................................................... 6
5 Creating text ................................................................................................................................................................... 8
5.1 Creating text ............................................................................................................................................................ 8
5.2 Text in preset frame ................................................................................................................................................. 9
5.3 Text frame properties ............................................................................................................................................. 10
5.4 Text on screen kerning .......................................................................................................................................... 11
5.5 Spell check ............................................................................................................................................................ 11
6 Zoom tools .................................................................................................................................................................... 12
7 Weld tools ..................................................................................................................................................................... 12
8 Shape tools .................................................................................................................................................................. 13
8.1 Circle ...................................................................................................................................................................... 13
8.2 Rectangle ............................................................................................................................................................... 13
8.3 Rechteck ................................................................................................................................................................ 13
8.4 Polygon .................................................................................................................................................................. 14
8.5 Star ........................................................................................................................................................................ 14
8.6 Arrow...................................................................................................................................................................... 14
8.7 Fan ......................................................................................................................................................................... 14
8.8 Weed...................................................................................................................................................................... 14
8.9 Power weed ........................................................................................................................................................... 14
8.10 Border .................................................................................................................................................................. 14
8.11 Registration marks ............................................................................................................................................... 15
8.12 Multiple registration marks ................................................................................................................................... 15
8.13 Ruler .................................................................................................................................................................... 15
8.14 Scale .................................................................................................................................................................... 15
9 Graphic edit tools ......................................................................................................................................................... 15
10 Scan tools ................................................................................................................................................................... 15
11 Tools for strokes and fills............................................................................................................................................ 16
12 Ginsu Knife Tools ....................................................................................................................................................... 16
13 Layout ......................................................................................................................................................................... 16
www.maxsystems.eu | Tel: +49 (0) 47 63 / 9 45 95 – 0 | Fax: +49 (0) 47 63 / 9 45 95 – 11
2
13.1 Clipart ...................................................................................................................................................................... 16
13.2 Using your own graphics ..................................................................................................................................... 17
14 Changing shapes and text.......................................................................................................................................... 17
14.1 Center point ......................................................................................................................................................... 17
14.2 Corner point ......................................................................................................................................................... 17
14.3 Boundary point ..................................................................................................................................................... 17
14.4 Rotation point ....................................................................................................................................................... 17
14.5 Making changes from smart bar .......................................................................................................................... 18
14.6 Proportional-scaling ............................................................................................................................................. 18
14.7 Double-click ......................................................................................................................................................... 18
15 Layout functions ......................................................................................................................................................... 18
15.1 Alignment ............................................................................................................................................................. 18
15.2 Arrangement ........................................................................................................................................................ 18
15.3 Guides.................................................................................................................................................................. 19
15.4 Grouping objects .................................................................................................................................................. 19
15.4.1 Grouping objects .................................................................................................................................................. 19
15.4.2 Ungroup ................................................................................................................................................................ 19
15.5 Duplicate .............................................................................................................................................................. 20
15.6 Create pattern/layout ........................................................................................................................................... 20
15.7 Mirror.................................................................................................................................................................... 20
16 File functions .............................................................................................................................................................. 21
16.1 New ...................................................................................................................................................................... 21
16.2 Open .................................................................................................................................................................... 21
16.3 Save ..................................................................................................................................................................... 21
16.4 Importing other file formats .................................................................................................................................. 21
16.5 Export................................................................................................................................................................... 21
16.6 Export image ........................................................................................................................................................ 22
17 Print ............................................................................................................................................................................ 22
17.1 Printer .................................................................................................................................................................. 22
17.2 Basic settings ....................................................................................................................................................... 23
17.3 Setup Settings ..................................................................................................................................................... 24
18 Serialization ................................................................................................................................................................ 25
18.1 Continuous badges .............................................................................................................................................. 25
18.2 Text replacement from file ................................................................................................................................... 27
19 Barcodes .................................................................................................................................................................... 28
20 Plotting........................................................................................................................................................................ 28
20.1 Installing a plotter driver....................................................................................................................................... 29
20.2 Configuring the plotter ......................................................................................................................................... 29
20.3 Cutting with one color .......................................................................................................................................... 30
20.4 Cutting with multiple colors .................................................................................................................................. 31
20.5 Weed und Power Weed ....................................................................................................................................... 32
www.maxsystems.eu | Tel: +49 (0) 47 63 / 9 45 95 – 0 | Fax: +49 (0) 47 63 / 9 45 95 – 11
3
21 Print & Cut .................................................................................................................................................................. 32
21.1 Contour Cut ......................................................................................................................................................... 32
21.2 Contour Cut images ............................................................................................................................................. 33
21.3 Flex-Cut ............................................................................................................................................................... 34
22 The print manager ...................................................................................................................................................... 34
22.1 Print/cut ................................................................................................................................................................ 35
22.2 Reprinting archived jobs ...................................................................................................................................... 36
23 Graphic editing ........................................................................................................................................................... 37
23.1 Outlines and inlines ............................................................................................................................................. 37
23.2 Transformation ..................................................................................................................................................... 37
23.3 Fit text to path ...................................................................................................................................................... 37
23.4 Shadow ................................................................................................................................................................ 38
23.5 Objekt contour ..................................................................................................................................................... 38
23.6 Special effects | Plug-in ....................................................................................................................................... 39
24 Keyboard shortcuts .................................................................................................................................................... 39
25 Installing fonts ............................................................................................................................................................ 40
www.maxsystems.eu | Tel: +49 (0) 47 63 / 9 45 95 – 0 | Fax: +49 (0) 47 63 / 9 45 95 – 11
4
3 Controls
1
2
3
6
4
5
3.1 Menu bar
The menu bar is similar to the one found in other applications.
3.2 Smart bar
The smart bar is a special toolbar in SignMax which contains context-specific controls, depending on the type of process. If you
select a shape, the smart bar shows information such as position and size of the shape. Here you can also easily change the size
of an element (text, image, pictogram, etc.) by entering the corresponding value in the height or width field. Proportional scaling is
activated by default. This means that changing one value also changes the other value proportionally. Clicking the padlock icon
next to the percentage value deactivates this function.
3.3 Icon bar
The icon bar has shortcuts to the software’s primary functions. Buttons can be added to and/or removed from this toolbar.
3.4 Toolbar
The toolbar to the left of the workspace contains the main tools for creating and editing text and shapes. Most of the tool buttons
open other toolbars when clicked.
3.5 Shop palette
The color palette is located at the bottom of the workspace by default. The default color palette contains all colors that are currently
available for the workspace.
If you left-click one of the color icons, the color is selected for filling all currently selected shapes and as the default fill color for all
new shapes. To change the fill color of a shape without changing the default fill color, proceed as follows: Left-click the desired
color icon and drag it away from the default color palette. If you move the cursor, it looks as if it drags a color icon along. Drag the
cursor to the desired shape and release the mouse button. A new color is assigned to the shape. The following images illustrate
the described process:
www.maxsystems.eu | Tel: +49 (0) 47 63 / 9 45 95 – 0 | Fax: +49 (0) 47 63 / 9 45 95 – 11
5
Click a color icon and
drag it away from the
palette.
Drag the icon onto
the object.
Release the mouse
button once
the cursor is over
the object.
3.6 Job palette
The job palette is located at the right side of the window and displays all colors that are currently used in the
workspace. By default, the job palette shows the color preview, which lists all colors currently used in the workspace.
4 Blank size
The blank size is the representation of the area to be printed or cut. The dimensions of the blank size are usually
configured first, so that the positions of images and texts can be shown. The “Blank Size” dialogue is used to adjust
the dimensions and alignment of the blank size. This way you can check the position of the objects in the workspace
before starting a print or cut process.
www.maxsystems.eu | Tel: +49 (0) 47 63 / 9 45 95 – 0 | Fax: +49 (0) 47 63 / 9 45 95 – 11
6
The “blank size” dialogue opens if you select “blank size” in
the “Layout” menu.
If “Other” is displayed under “Current selection”, you can
enter the blank size manually under “Dimensions”.
Under “Origin selection” you can set the origin for the rulers.
www.maxsystems.eu | Tel: +49 (0) 47 63 / 9 45 95 – 0 | Fax: +49 (0) 47 63 / 9 45 95 – 11
7
5 Creating text
To create a text, please find the “text tools” in
the toolbar on the left side.
Text compose
Creating text in a preset frame
Text on Screen kerning
Spell check
Underlined text
5.1 Creating text
To write text, select “Text tools” in the toolbar menu. After selecting the “Text compse” tool you have three
options for configuring the text frame.
Click the workspace:
The input position for the text is specified. When writing text, the text frame adjusts to fit the text.
Drag text frame with pressed mouse button: Sizing a frame using the mouse specifies the text frame fields. When
you write the text, the text frame does not change and the text is limited by the text frame.
Press [Shift] and click the workspace: This fits the text frame to the Blank Size.
www.maxsystems.eu | Tel: +49 (0) 47 63 / 9 45 95 – 0 | Fax: +49 (0) 47 63 / 9 45 95 – 11
8
After starting with text compose, you can change the following parameters:
Font
All your installed
fonts are available
Font height
The font height is
specified in
mililmeters
Font formatting
specified in percent
kerning | writing angle
line mode
5.2 Text in preset frame
As an extension to the “Text tool”, the “Frame text compose” tool automatically adjusts the text frame to the blank
size.
The rectangular dashed line around the text is the text frame. If you enter characters in a text frame, the
properties of the frame determine how the text is compressed, stretched, wrapped, etc. For example, you can
compress each line of text so that it is adjusted to the width of the text frame, or you can expand the width and height
of the text to fill the entire text frame.
Regardless of how the text frame was created, the buttons
“Compress horizontally”, “Compress vertically”, “Line attributes”
and “Frame properties” are used to change how the text is fit
into the frame. You can do all of this in the text toolbox.
www.maxsystems.eu | Tel: +49 (0) 47 63 / 9 45 95 – 0 | Fax: +49 (0) 47 63 / 9 45 95 – 11
9
5.3 Text frame properties
Select the button „frame properties“ in the smart bar to open the dialogue
“Text Frame Properties”
Auto spacing:
Select the button „Settings“ to open the dialogue „Auto Spacing“
Hinweis: To use the control fields „Auto Spacing“ the text must be create with the
option „Frame text compose“-tool.
www.maxsystems.eu | Tel: +49 (0) 47 63 / 9 45 95 – 0 | Fax: +49 (0) 47 63 / 9 45 95 – 11
10
Equal spacing
Equal spacing sets the same space between any two lines of text. If “Top/bottom margin size” is set to less
than 100 % of the line space, the margins are decreased and the space between the text lines increases.
If the value is set to more than 100 %, however, the margins increase and the space between the lines
decreases.
Weighted spacing
Selecting “Weighted spacing” allows you to vary the interline spacing. If you increase “Extra bottom weighting” to more
than 100 %, the lower margin also increases, so that lower text lines in the text box move upwards. If you set “Extra
bottom weighting” to less than 100 %, the bottom margin is decreased and the interline spacing is also decreased,
since the text lines move closer to the lower margin.
5.4 Text on screen kerning
This tool lets you quickly change the kerning (letter spacing) of an existing text. This requires that you select
the text field. Then select the tool.
You can now see various editing icons around the text.
·
·
·
Left square: This square lets you move the text.
Circle under a letter: If you move this control point to the right, all letters to the right of this point are moved
to the right.Any others remain in place.
Right circle: Moving this circle increases or decreases the space between individual letters.
5.5 Spell check
When editing a text, click the Spell Check button to check the spelling of the currently selected text. If no text
is selected, the entire text object is checked.
www.maxsystems.eu | Tel: +49 (0) 47 63 / 9 45 95 – 0 | Fax: +49 (0) 47 63 / 9 45 95 – 11
11
To spell check all text objects in the workspace, select the “Spell Check” option in the “Text Tools” menu.
If spelling errors are found, the “Spell Checker” dialogue opens.
6 Zoom tools
The “Zoom Tools” bar contains functions for zooming in and out.
Tip: You can use the scroll wheel on your mouse to zoom in or out.
·
·
·
·
·
·
·
Zoom in: Drag a box around the area you want to zoom in on.
Zoom out: Zooms out.
Zoom to selected objects: Zooms in on the selected objects
Zoom to Sign blank: Centers the sign plate at the center of the screen
Previous view: Switches to the previous zoom level
Pan state: Move the view in all directions using the mouse
Zoom percentage: Select the percentage for the zoom factor
7 Weld tools
Combining two objects into one curve object with the same outline. A source object welds with a target object to
create a new object that has the filling and outline attributes of the target object.
www.maxsystems.eu | Tel: +49 (0) 47 63 / 9 45 95 – 0 | Fax: +49 (0) 47 63 / 9 45 95 – 11
12
8 Shape tools
The “Shapes” button from the toolbar lets you create different shapes. Left-click a shape. Now move the cursor to the
position in the workspace where you want to create the shape. Hold the left mouse button and drag the shape to the
correct size. Afterwards you can use the smart bar to change the properties of the shape. If you later want to change
the properties of a shape, double-click the shape.
The X and Y fields in the smart bar show the position in the workspace.
This is not relevant for most users.
8.1 Circle
You can use the smart bar to set the radius..
8.2 Rectangle
The smart bar does not allow editing.
8.3 Rechteck
The smart bar lets you set the length, width and rotation angle.
www.maxsystems.eu | Tel: +49 (0) 47 63 / 9 45 95 – 0 | Fax: +49 (0) 47 63 / 9 45 95 – 11
13
8.4 Polygon
The smart bar lets you set the number of points, rotation angle, polygon radius, corner radius and the side convexity.
8.5 Star
The smart bar lets you set the number of points, rotation angle, star radius 1 + 2 and corner radius 1 + 2..
8.6 Arrow
The smart bar lets you set the arrow length, shaft length, arrow width, shaft width, rotation angle, angle between shaft
and tip, forward and backward convexity and rounded tip angle.
8.7 Fan
The smart bar lets you set the number of points, rotation angle, star radius 1 + 2 and corner radius 1 + 2.
8.8 Weed
This tool makes it easier to weed texts and objects.
8.9 Power weed
Optimizes weeding of texts and objects.
8.10 Border
The “Decorative border” tool is used to create a border that encloses either the sign plate or the selected objects. This
tool is available both in the “Shape Tools” menu and in the “Layout” menu. To draw a border around a sign plate,
make sure nothing is selected. Otherwise, the border encloses the selected objects. The smart bar lets you set the
shape of corners, colors, border thickness and distance from the object. Important: If the border should follow the
object, you must click the “Accept” button.
www.maxsystems.eu | Tel: +49 (0) 47 63 / 9 45 95 – 0 | Fax: +49 (0) 47 63 / 9 45 95 – 11
14
8.11 Registration marks
The registration marks are plotted for each color, so that you can use them when applying the foils. You can use the
mouse to move the registration marks.
8.12 Multiple registration marks
If you use “Multiple registration marks”, you have the additional option of automatically positioning the
registration marks.
8.13 Ruler
Help tool for creating rulers.
8.14 Scale
Auxiliary tool for creating scales | potentiometer.
9 Graphic edit tools
A curve object has node points and control points. The shape of the object can be changed. Objects in curves can
have any shape, including straight or curved lines. The node points in an object are the little squares that are shown
along the object outline. The line between two node points is called a segment. Segments can be straight or curved
objects. Every node point has a control point for each curved segment that is connected to the node point. Control
points help you to adjust the bend of a segment.
10 Scan tools
Vector graphics, unlike raster graphics, are not based on a pixel grid where each pixel is assigned a color value, but
on an image description which exactly defines an object on which the image is based. One crucial characteristic,
which is also an advantage compared to raster graphics, is continuous and loss-free scalability.
www.maxsystems.eu | Tel: +49 (0) 47 63 / 9 45 95 – 0 | Fax: +49 (0) 47 63 / 9 45 95 – 11
15
11 Tools for strokes and fills
The stroke tool lets you add an outline to vector objects. There is a difference between the hairline and outline tools.
The hairline is an extremely thin line which is often used for cutting. First select the object to which you want to add an
outline. Then click the tool in the toolbar. In the smart bar you can now choose between hairline and outline. For the
outline you can select the stroke width, color and shape of corners. If you click “Save”, the current changes are saved
as the default settings. Now all new shapes will have this outline. You also have the option to choose multiple color
gradients and pattern fills.
12 Ginsu Knife Tools
The Ginsu Knife lets you separate vector objects and texts quickly and easily.
13 Layout
13.1 Clipart
Your SignMax software contains a symbol library with all common pictograms. The pictograms are divided into
categories. Please consider that pictogram must be installed separately.
To add a pictogram, select the desired category. Select the pictogram and click “OK”. The text cursor appears on the
workspace. Now move the cursor to the correct position and click the left mouse button. The pictogram has its original
size when inserted. If you keep the left mouse button pressed and drag a frame, you can specify the size when
inserting the pictogram. Note: If there are no objects on the sign plate, the sign plate is automatically adapted to the
pictogram.
www.maxsystems.eu | Tel: +49 (0) 47 63 / 9 45 95 – 0 | Fax: +49 (0) 47 63 / 9 45 95 – 11
16
13.2 Using your own graphics
Of course you can also use your own logos and graphics in SignMax. Please observe that the best results can be
achieved with vector graphics. SignMax supports all standard image formats, such as JPEG, BMP, TIF, GIF, PNG,
WMF. You can also import CAD fi les. You may
not save AutoCAD as .DWG, instead use .DXF.
Go to “File” > “Import” to import the files.
14 Changing shapes and text
Left-click a shape to select it. Control points appear on the selected shape. You can change the shape's size by
clicking and dragging a control point. The following control points are available:
14.1 Center point
The center point allows you to change the position of your object. Move the arrow over the center point, until it
because a double arrow. Now drag the mouse move the object in the right position. Release the mouse button once
the object has the correct position.
14.2 Corner point
The corner point lets you make the shape smaller or larger while keeping the original shape. Move the arrow over the
corner point until it becomes a double arrow. As soon as the arrow takes this shape, you can drag the mouse to make
it larger or smaller. Release the mouse button once the object has the correct size.
14.3 Boundary point
The boundary point helps you to stretch or to compress your object.
14.4 Rotation point
The rotation point is used to adjust the shape's angles. Move the arrow over the rotation point. Click and drag the
rotation point. The object is rotated in the direction you move your mouse. Release the mouse button when the correct
orientation has been achieved.
www.maxsystems.eu | Tel: +49 (0) 47 63 / 9 45 95 – 0 | Fax: +49 (0) 47 63 / 9 45 95 – 11
17
14.5 Making changes from smart bar
You can also change objects in the workspace from the smart bar. For this, you have to select the object with your
mouse. In the smart bar you can enter the height and width in millimeters. If you change one value, the other value
changes in proportion to it.
14.6 Proportional-scaling
This function is displayed by the padlock icon in the smart bar. If proportional scaling is activated (padlock is closed),
the side proportions remain the same, because the second one is changed in proportion if you change a value in the
smart bar.
14.7 Double-click
You can double-click a shape to see a special editing function. You can change the object's outlines by clicking and
dragging the control points. In some cases, the editing points behave like the points on the object. Still, the specific
use of these editing points depends on the type of object. For example, compare double-clicking a rectangle to
double-clicking a circle.
15 Layout functions
15.1 Alignment
In the Layout > Arrangement and distribute> Align menu, there are various alignment options. The most commonly
used setting is shown in the figure above. Here the objects are also aligned vertically and horizontally along the center
of the sign plate. Press CTRL + K to repeat the last alignment setting.
15.2 Arrangement
Elements are initially arranged depending on the chronological order of their creation. I.e., if you create a rectangle
first and a circle second, the circle is in a higher layer than the rectangle.
The circle is in the layer above the rectangle.
The circle is in the layer below the rectangle.
If you want the circle to be below the rectangle, the arrangement of objects must be changed. The arrangement of
individual objects can be changed using the following commands:
To Front
To Back
Forward
Backward
Reverse
[Strg + F]
[Strg + B]
[Strg + U]
[Strg + L]
[Strg + M]
Object is moved to the foreground.
Object is moved to the background.
Moves the object up one layer.
Moves the object down one layer
Reverses the order of layers.
www.maxsystems.eu | Tel: +49 (0) 47 63 / 9 45 95 – 0 | Fax: +49 (0) 47 63 / 9 45 95 – 11
18
15.3 Guides
A guide is a horizontal or vertical reference line for positioning objects. To create a guide, right-click a position on the
ruler where the guide should be placed. If you move an object towards the guide, the guide becomes magnetic and
the object is aligned along this line.
You can edit guides by right-clicking a guide or by using the Options > Guides menu. Right-clicking the workspace
opens the “Edit Guides” dialogue.
The following steps create a vertical guide:
Right-click the workspace to open the “Edit Guides” dialogue. Set the alignment of the guide to vertical. Specify the
coordinates for Point 1.
Click “Add”. The created guide runs through the displayed points. The guides function as described below:
·
·
·
·
·
·
·
·
Right-click a ruler to create a guide.
Click and hold [Shift] a selected object and right-click the object's handles to create guides (not when editing vector shapes).
To add guides when editing nodes, press [Shift] and right-click the node.
Open the “Edit Guides” dialogue by right-clicking the workspace (when no objects are selected).
Open the “Edit Guides” dialogue via Options > Guides > Edit Guides.
When dragging the position of a guide, press [Shift] to limit the guide to the next larger step size of the ruler.
To remove a guide, press [Shift] and right-click the guide (when no objects are selected).
Use the guides to align your objects along the center point or the boundary points of the sign plate along the guides.
15.4 Grouping objects
The “
function” is used to combine multiple objects into one object. This ensures that no parts of the object are
left behind when the object is moved. All pictograms are also grouped. Of course you can also ungroup objects.
15.4.1 Grouping objects
Select all objects you want to group by dragging a frame around the objects. Then go to
15.4.2 Ungroup
Select the grouped object. Then go to Menu > Layout > Ungroup. You can also press [ALT + G].
www.maxsystems.eu | Tel: +49 (0) 47 63 / 9 45 95 – 0 | Fax: +49 (0) 47 63 / 9 45 95 – 11
19
15.5 Duplicate
Instead of copying and pasting, you can also duplicate objects. Duplicated objects are inserted immediately. Select all
objects you want to duplicate by dragging a frame around all objects with the left mouse button. You can find this
function via Menu > Layout > Duplicate. You can also press [CTRL + D].
15.6 Create pattern/layout
The “Array” command is used to sort multiple copies into lines, columns or sheets. First you must select the object.
Then go to Menu > Layout > Array.
First you can set the space between the copies (10 mm in this example). Then set the number of copies via
“total X” and “total Y”.
15.7 Mirror
Sometimes it is useful to mirror objects. For example, when printing on transparent foil. Select all objects you want to
mirror by dragging a frame around all objects.
Then go to Menu > Layout > Size/Move > Mirror. Here you can choose between vertical and horizontal.
www.maxsystems.eu | Tel: +49 (0) 47 63 / 9 45 95 – 0 | Fax: +49 (0) 47 63 / 9 45 95 – 11
20
16 File functions
16.1 New
Opens a new file.
16.2 Open
The following message appears upon opening. This is only a note that SignMax files can also be loaded into an
existing project by using the import function. Simply check the box next to “Don't show this message”. Then you can
open your file as usual.
16.3 Save
You can save all your created projects. The files are saved in the MAX format. Only SignMax can read this format. If
you want to use a pictogram in a different software, you will need to export it.
16.4 Importing other file formats
As described in Section 13.2, “Using your own graphics”, you can also use images in other formats such as PDF, EPS
and DXF in your version of SignMax.
16.5 Export
You can export your file into various other formats, such as AI, PDF, EPS, TXT, CAD, etc
www.maxsystems.eu | Tel: +49 (0) 47 63 / 9 45 95 – 0 | Fax: +49 (0) 47 63 / 9 45 95 – 11
21
16.6 Export image
The Export Image function lets you save a pictogram or an entire sign as a graphic file. You can set the color and
resolution. In the next step, you can specify the file name and image format (TIFF, JPG, BMP)
17 Print
The File > Print menu lets you get to the print function. You can also press CTRL + P or use the
printer icon in the icon bar.
17.1 Printer
Here you can select the printer. If “Preview” is checked, you will see a print preview before printing, which
allows you to position and scale the draft.
www.maxsystems.eu | Tel: +49 (0) 47 63 / 9 45 95 – 0 | Fax: +49 (0) 47 63 / 9 45 95 – 11
22
17.2 Basic settings
Enter the quantity of signs/badges you want.
Some templates, prohibition signs, for example, have separate colors. For example, prohibition signs
have a pre-printed red circle. You only need to print the black layer.
These values are important if the print job does not fit on one page. The job is divided automatically. The
configured overlap will be on both pages.
This field is only shown for certain printers. This allows you to select the width of the material to be printed.
SignMax will automatically select the optimal print orientation (vertical or horizontal).
Here you need to select if you want to process continuous material or Labels.
www.maxsystems.eu | Tel: +49 (0) 47 63 / 9 45 95 – 0 | Fax: +49 (0) 47 63 / 9 45 95 – 11
23
17.3 Setup Settings
Here you need to select if you want to process continuous or die-cut labels.
E.g., mandatory sign with “white” color band on blue foil band
www.maxsystems.eu | Tel: +49 (0) 47 63 / 9 45 95 – 0 | Fax: +49 (0) 47 63 / 9 45 95 – 11
24
18 Serialization
E.g., mandatory sign with “white” color band on blue foil band
18.1 Continuous badges
To create a continuous series (e.g., Barrel 001 to Barrel 150), proceed as follows:
· Complete the layout for the badge.
· Select the text to be replaced.
· Click Layout > Badges.
· Set the quantity under “Number of copies”. In this example, use 150 for 150 badges.
· Be sure to check the “Use plate” box.
· Select the text to be changed in the window on the right.
· Click “OK”.
www.maxsystems.eu | Tel: +49 (0) 47 63 / 9 45 95 – 0 | Fax: +49 (0) 47 63 / 9 45 95 – 11
25
In the next window, click the area circled in red. All cells should now be highlighted in blue.
You can replace the text in the upper row.
Click “Serialization”.
In the new dialogue, select the part of the text to increase.
Click “Set as Base” once.
Under “Increment”, set by how many times each badge should be incremented.
Click “OK”.
Now you will also see a data preview.
Click “OK” to run the serialization.
You can now browse through the badges in the lower right of the screen. During printout, you will be asked if you want
to print all badges or only specifi c ones.
www.maxsystems.eu | Tel: +49 (0) 47 63 / 9 45 95 – 0 | Fax: +49 (0) 47 63 / 9 45 95 – 11
26
18.2 Text replacement from file
If you want to create badges using files from a data source, proceed as follows:
·
·
·
·
·
Create data source. This MUST be a TXT file. You can either use a text editor to create the file, or you export
an Excel file. (In Excel, go to
File > Save As. Then select “Text [separated by tab][*.txt]” as the file format.)
Complete the layout for the badge.
Select the text to be replaced.
Click Layout > Badges.
·
·
·
·
·
·
·
·
You do not need to enter anything for the number of copies. This will result from the file.
Be sure to check the “Use plate” box.
Select the text to be changed in the window on the right.
Check the box for text file.
Click “Browse” to select the source file.
Click “OK”.
Now you will also see a data preview.
Click “OK” to run the serialization.
You can now browse through the badges in the lower right of the screen. During printout, you will be asked if you want
to print all badges or only specificones.
www.maxsystems.eu | Tel: +49 (0) 47 63 / 9 45 95 – 0 | Fax: +49 (0) 47 63 / 9 45 95 – 11
27
Additional Functions
This chapter describes additional functions of the SignMax v9.1 software that are available as upgrades.
You can add extensive editing functions for your fi les by purchasing add-on modules such as “Barcodes” or “Pro”.
19 Barcodes
In the Shape Tools bar, select the option, “Barcode”.
Then you can set the properties of the barcode in the smart bar. First you should specify the barcode type, e.g.,
“Code 128”. Enter the barcode value into the “Value” fi eld. The current QR code is also available now.
Click the three-point button
caption options.
next to the “Value” fi eld to see another menu where you can set the barcode
Click “OK” to confirm.
Then click “Apply”.
The arrow cursor now changes to a text cursor. Move the cursor to the position where you want to place the barcode
and confirm once by clicking the left mouse button.
Double-click a barcode to change an already created barcode. You can simply change the value and click “Assign”.
20 Plotting
SignMax supports a number of plotters. Please observe that only vector objects can be cut. All objects you create with
SignMax (even cliparts) are vector objects.
www.maxsystems.eu | Tel: +49 (0) 47 63 / 9 45 95 – 0 | Fax: +49 (0) 47 63 / 9 45 95 – 11
28
20.1 Installing a plotter driver
To install a plotter driver, go to File > Install > Plotter Driver in the menu bar.
Then select the plotter model and click “Next”.
20.2 Configuring the plotter
After having installed the plotter, you still need to set up SignMax to work with your device. To do so, go to Cut >
Plotting defaults in the menu bar. Here you can make some output settings. “Axis swap”, for example, makes sure that
objects are always rotated. Check “Weed border” to give all objects a weed border. Make sure that you click “Save
settings” for all changes. Click “Setup” next to the driver selection to set the driver.
www.maxsystems.eu | Tel: +49 (0) 47 63 / 9 45 95 – 0 | Fax: +49 (0) 47 63 / 9 45 95 – 11
29
Pay attention to the “Connection” tab. Under “Connect to”, select the correct connection for your plotter, e.g., LPT1 for
parallel or COM2 for serial. For a USB connection, select “External DLL”.
20.3 Cutting with one color
Open the SignMax software and create your sign. Click the scissors
The cut preview opens.
in the toolbar.
1
2
Now first click the “poll the Plotter for Height and Width” button. You will then see the exact roll width (green line).
www.maxsystems.eu | Tel: +49 (0) 47 63 / 9 45 95 – 0 | Fax: +49 (0) 47 63 / 9 45 95 – 11
30
20.4 Cutting with multiple colors
Create your sign with all the colors you want to plot. In this example, we want to plot a prohibition sign.
Click
in the toolbar. The cut preview opens.
Now first click the “Check Plotter for Height and Width” button. You will see the exact roll width (green line).
For easier applying, click “Registration Marks”.
The “Registration Marks” window opens.
Here, click “Default”.
The registration marks are plotted for each color, so that you can use them when applying the foils. Use the mouse to
move the registration marks. Click the
by Color” window opens.
“Sort Cut Order by Color” button in the Cut Toolbox. The “Sort Cut Order
www.maxsystems.eu | Tel: +49 (0) 47 63 / 9 45 95 – 0 | Fax: +49 (0) 47 63 / 9 45 95 – 11
31
20.5 Weed und Power Weed
The “Weed” and “Power Weed” functions from the Shape Tools bar create additional weeding lines which
make it easier for you to weed
complex texts or shapes. Click “Assign” after creating the lines.
21 Print & Cut
SignMax uses the “Print & Cut” command for processing “Print only” and “Print & Cut” jobs. A “Print & Cut” job
contains at least one contour cut line, so that the printed material can be cut along the contour lines with a foil plotter.
Therefore, adhesive labels are often created with the “Print & Cut” command. If the “Print & Cut” job is sent to a hybrid
printer (which supports the cut functions), the printer will automatically trim the contour lines after printing.
21.1 Contour Cut
Before you start a print & cut job, you first need to add the cut lines. The Contour Cut option allows you to cut all signs,
pictograms, texts and other shapes precisely along their contours. The substrate remains intact.
·
·
First select the objects to be cut.
Select Cut > Contour Cut in the menu.
www.maxsystems.eu | Tel: +49 (0) 47 63 / 9 45 95 – 0 | Fax: +49 (0) 47 63 / 9 45 95 – 11
32
21.2 Contour Cut images
You can also use Contour Cut to cut
out ported images. For this, simply follow the below instructions..
Here you can see three examples for cut lines added to an image. In the first image you can see the cut lines for the
image's rectangular borders. In the second image, the cut lines follow the image's contours. In the third image, the
contour lines include the shade added to the image.
·
Import an image. Images where the object is shown against a very bright background are best suited for this
function. This makes it easier for the software to decide how to cut the image.
Select an image.
In the “Cut” menu, select “Contour Cut”.
Make sure that the “Cut within bitmap on/off” button is activated.
·
·
·
·
Before you start a print & cut job, you first need to add the cut lines. The Contour Cut option allows you to cut all
signs, pictograms, texts and other shapes precisely along their contours. The substrate remains intact.
·
·
·
First select the objects to be cut.
Select Cut > Contour Cut in the menu.
· As soon as you click “Assign”, a pop-up window appears.
In this window, you need to set the monochrome filter. This monochrome filter determines which parts of the
image (white background) are ignored by the cut line. You can already assess the result during setup, since the
created contour cut line is shown. The contour cut line should be an exact copy of the object.
·
If you are not satisfied with the result, repeat the process with a different value for the monochrome filter.
www.maxsystems.eu | Tel: +49 (0) 47 63 / 9 45 95 – 0 | Fax: +49 (0) 47 63 / 9 45 95 – 11
33
21.3 Flex-Cut
Unlike the Contour Cut option, the Flex Cut option does not just cut the foil, but also cuts the substrate with a
perforation cut. Create a flex cut in the following manner:
·
·
·
Select the objects to be cut out
Go to Cut > Half Cut.
Set the spacing. This specifies how far the cut is removed from the edges of the object or the objects. The cut
now has the same shape as your object.
If you want a cut that does not have the shape of the object, but its own shape, proceed as follows:
·
·
·
Create the shape to be cut out (e.g., a rectangle).
Go to the Cut > Contour Half Cut Object on/off.
A flex cut line is now created from your shape.
22 The print manager
The Print & Cut Manager was developed to facilitate archiving and control of your print jobs. Here you can see at a
glance which signs have already been produced and which are still missing. A small preview helps you to immediately
recognize the sign. All settings made in the SignMax file remain the same and you can reproduce the sign in the same
quality over and over again. Simply click File > Print & Cut.
·
·
·
Select printing que.
Click “Ok”.
Your print job now goes to the Print & Cut Manager.
www.maxsystems.eu | Tel: +49 (0) 47 63 / 9 45 95 – 0 | Fax: +49 (0) 47 63 / 9 45 95 – 11
34
22.1 Print/cut
After you have given the command for printing and cutting in the Print & Cut preview of the SignMax software, the
Print & Cut Manager opens automatically. Your print job goes into the print list, using the current file name.
Wait until the entire print job has come in and the message “Holding job ripped” appears behind the file name. Click
the right mouse button and in the “Print” context menu, select “Print” or “Print & Cut”.
The printer begins to process the file.
www.maxsystems.eu | Tel: +49 (0) 47 63 / 9 45 95 – 0 | Fax: +49 (0) 47 63 / 9 45 95 – 11
35
22.2 Reprinting archived jobs
The Print & Cut Manager saves your print jobs automatically and enables you to manage them efficiently. The print
jobs are saved with all settings and can be printed again when necessary.
·
·
·
·
·
Find already printed signs in the lower half of the window. Select the desired file. The preview can be helpful
here.
Click the job once to select it and drag it back to the upper window.
Wait until the entire print job has come in and the message “Holding job ripped” appears behind the file
name.
Press the right mouse button and select “Print job” or “Print & cut job” in the context menu.
The printer begins printing the file.
www.maxsystems.eu | Tel: +49 (0) 47 63 / 9 45 95 – 0 | Fax: +49 (0) 47 63 / 9 45 95 – 11
36
23 Graphic editing
23.1 Outlines and inlines
Outline and inline can be created simultaneously. The outline checkboxes are on the left side of the smart bar, the
inline checkboxes are on the right side. The color can be set separately. The smart bar offers various options for
configuring corners and stroke widths.
23.2 Transformation
The “Transformation” menu offers various options for warping a shape. First select the object. First click
“transformation” in the “transform” menu.
·
·
·
·
·
·
·
Bownding Box
Perspektive
Fit to:
globe
cylinder
flag
circle
You can now see various options in the smart bar. Simply select a method. Afterwards you will see control points
along the object which you can drag using your mouse. In the example below, the perspective is changed. For this,
move the control point circled in red.
23.3 Fit text to path
The “Fit text to path” command (“transform” menu) is used to align a text shape along a vector graphics shape. Each
vector graphics shape is treated as a “Path” and each vector graphic is either a “closed” or an “open” path. A closed
path has a continuous, uninterrupted contour, such as a circle or square shape. An open path is non-continuous, such
as a straight line or a drawn curve. The checkboxes of the smart bar are only slightly different, depending on whether
the text is aligned along a closed or an open path. For a closed path, there are buttons for the starting position that
show if the text should begin on the left or the right, the top or the bottom of the closed shape. The first two buttons let
you change the running direction. The four on top determine the starting position. The four lower ones are for
alignment along the object.
www.maxsystems.eu | Tel: +49 (0) 47 63 / 9 45 95 – 0 | Fax: +49 (0) 47 63 / 9 45 95 – 11
37
23.4 Shadow
The “Shadow” option (“transform” menu) allows you to create quick shadow effects for one or multiple shapes. After
selecting the shadow type, handles appear around the shape and you can edit the shadow properties from the smart
bar.
By default, the shadow is aligned to the object along the coordinates (0.0). Instead of adjusting these coordinates, you
can set the angle and depth properties in the smart bar.
In the “Style” area on the smart bar, you can select four different types of shadows:
Block shadows
The block shadow adds an illusion of depth to the object.
Perspective shadow
The perspective shadow creates an illusion of distance. The furthest point of the shadow is a percentage of the shape
size and is specified by the “Cast” value. If the cast value is 50, for example, the furthest point of the shadow is 50 %
smaller than the shape size. Set the cast value to 100 (i.e., 100 % smaller than the shape size) to let the shadow run
to infinity.
Drop shadow
The drop shadow is similar to the block shadow, the “space” between the original shape and its shadow is not filled,
however.
Cast shadow
The cast shadow creates the illusion of a light source, so that objects throw a shadow on an imaginary surface.
23.5 Objekt contour
The “Object Contour” command (in the “transform” menu) is used to create a shape which matches the contours of the
selected shapes. You can set the “Object” contour so that the inner contours keep their original shapes, or you can set
a fixed shape without inner contours.
·
·
·
·
·
Fill inner contours
Permit inner contours
Extent of offset
Extent of miter
Contour colors
·
Saved settings
www.maxsystems.eu | Tel: +49 (0) 47 63 / 9 45 95 – 0 | Fax: +49 (0) 47 63 / 9 45 95 – 11
38
23.6 Special effects | Plug-in
Many useful additional tools (plug-ins) are available in the PRO version! All the special effects a graphic designer
needs today. We have integrated some of the most popular plug-ins into SignMax. You no longer need to use multiple
applications for such effects. SignMax has all the graphic tools you need to add a wow-effect to your graphics.
24 Keyboard shortcuts
Using keyboard shortcuts can make work much easier for experienced PC users. We have listed the most important
keyboard shortcuts here. If there is a keyboard shortcut for a command, you can see this in the menu. The
keyboard shortcut is shown next to the command.
F3 Select all
F6 Shrink view
F7 Zoom object selection
F8 Sign plate view
CTRL + K Align
CTRL + G Group
CTRL + P Print
CTRL + Z Undo
CTRL + C Copy
CTRL + A Select all
CTRL + X Cut
CTRL + V Insert
CTRL + D Duplicate
ALT + G Ungroup
ALT + S Show color fill on/off
ALT + I Instant replay
www.maxsystems.eu | Tel: +49 (0) 47 63 / 9 45 95 – 0 | Fax: +49 (0) 47 63 / 9 45 95 – 11
39
25 Installing fonts
For using new fonts with SignMax, or after installing new fonts in Windows. Copy the font files into the Windows font
directory (“C:\Windows\Fonts” by default). In the SignMax menu, select the “Install Fonts” option to open the “Install
Fonts” dialogue. This dialogue is used to search and save the new fonts that have been copied to the hard drive.
Note: Take care when saving fonts on a CD or another removable medium, since this would require that the CD is
inserted
before you work with SignMax.
www.maxsystems.eu | Tel: +49 (0) 47 63 / 9 45 95 – 0 | Fax: +49 (0) 47 63 / 9 45 95 – 11
40