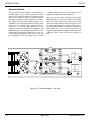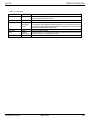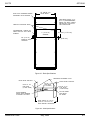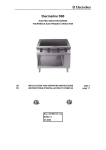
1
PRECISION INSTRUMENTS & SYSTEMS
USER'S MANUAL
PN 0014736001 C
EPR TEST SET
Pt2: 50 inHga Pt7: 100 inHga
ENGINE
VANE
CONTROL
TEST SET
MENSOR ® CORPORATION
CODE
201 BARNES DRIVE
SAN MARCOS, TEXAS 78666
SN
512-396-4200, FAX 512-396-1820
VERSION
WEB SITE http://www.mensor.com
PREFACE
EVCTS
WARRANTY
All products manufactured by Mensor® Corporation are warranted to be free of defects
in workmanship and materials for a period of one year from the date of shipment. No
other express warranty is given, and no affirmation of Seller, by words or actions,
shall constitute a warranty. SELLER DISCLAIMS ANY IMPLIED WARRANTIES OF
MERCHANTABILITY OR FITNESS FOR ANY PARTICULAR PURPOSES WHATSOEVER. If any defect in workmanship or material should develop under conditions of
normal use and service within the warranty period, repairs will be made at no charge
to the original purchaser, upon delivery of the product(s) to the factory, shipping
charges prepaid. If inspection by Mensor Corporation or its authorized representative
reveals that the product was damaged by accident, alteration, misuse, abuse, faulty
installation or other causes beyond the control of Mensor Corporation, this warranty
does not apply. The judgment of Mensor Corporation will be final as to all matters
concerning condition of the product, the cause and nature of a defect, and the necessity
or manner of repair. Service, repairs or disassembly of the product in any manner,
performed without specific factory permission, voids this warranty.
MENSOR CORPORATION MAKES NO WARRANTY OF ANY KIND WITH REGARD TO
THIS MANUAL, INCLUDING, BUT NOT LIMITED TO, THE IMPLIED WARRANTIES
OF MERCHANTABILITY AND FITNESS FOR A PARTICULAR PURPOSE. Mensor
Corporation shall not be liable for errors contained herein or for incidental or
consequential damages in connection with the furnishing, performance, or use of this
material.
ii
May, 2000
MENSOR® CORP.
EVCTS
PREFACE
WARNINGS AND CAUTION NOTES
WARNING: NOT EXPLOSION PROOF!
Installation of this instrument in an area requiring devices rated as intrinsically safe is not
recommended.
WARNING: POSSIBLE INJURY!
The tubing, valves and other apparatus attached to the gauge must be adequate for the
maximum pressure which will be applied, otherwise physical injury to the operator or
bystanders is possible.
CAUTION: USE THE PROPER PRESSURE MEDIUM. USE ONLY CLEAN, DRY NONCORROSIVE GASES. THIS INSTRUMENT IS NOT DESIGNED FOR OXYGEN USE.
ATTENTION
STATIC SENSITIVE DEVICES
HANDLING PRECAUTIONS REQUIRED
CAUTION: The proper use of grounded work surfaces and personnel are
required when coming into contact with printed circuit boards in order
to prevent static discharge damage to sensitive electronic components.
PLEASE NOTICE...
The product specifications and other information contained in this manual are subject to change
without notice.
Mensor Corporation has made a concerted effort to provide complete and current information
for the proper use of the equipment. If there are questions regarding this manual or the proper
use of the equipment, contact Mensor Corporation at:
TEL
TEL
FAX
WEB SITE
E-MAIL
MENSOR® CORP.
1-512-396-4200
1-800-984-4200 (USA only)
1-512-396-1820
http://www.mensor.com
[email protected]
[email protected]
May, 2000
iii
PREFACE
EVCTS
PACKAGING FOR SHIPMENT
If the product must be shipped to a different location or returned to Mensor for any reason
through a common carrier it must be packaged properly to minimize the risk of damage.
The recommended method of packing is to place the instrument in a container, surrounded on
all sides with at least four inches of shock attenuation material such as styrofoam peanuts.
TRADEMARKS
Mensor is a registered trademark of Mensor Corporation. All other brand and product names
are trademarks or registered trademarks of their respective companies. The EVCTS instrument
contains software licensed from Microsoft Corporation.
©1996-2000, Mensor Corp. All rights reserved.
SOFTWARE LICENSE AGREEMENT
This product contains intellectual property, i.e., software programs, that are licensed for use by
the end user/customer (hereinafter “End User”).
This is not a sale of such intellectual property.
The End User shall not copy, disassemble or reverse compile the software program.
THE SOFTWARE PROGRAMS ARE PROVIDED TO THE END USER “AS IS” WITHOUT
WARRANTY OF ANY KIND, EITHER EXPRESS OR IMPLIED, INCLUDING, BUT NOT LIMITED
TO, WARRANTIES OF MERCHANTABILITY AND FITNESS FOR A PARTICULAR PURPOSE.
THE ENTIRE RISK OF THE QUALITY AND PERFORMANCE OF THE SOFTWARE PROGRAM
IS WITH THE END USER.
MENSOR AND ITS SUPPLIERS SHALL NOT BE HELD TO ANY LIABILITY FOR ANY DAMAGES
SUFFERED OR INCURRED BY THE END USER (INCLUDING, BUT NOT LIMITED TO,
GENERAL, SPECIAL, CONSEQUENTIAL OR INCIDENTAL DAMAGES INCLUDING DAMAGES
FOR LOSS OF BUSINESS PROFITS, BUSINESS INTERRUPTION, LOSS OF BUSINESS INFORMATION AND THE LIKE), ARISING FROM OR IN CONNECTION WITH THE DELIVERY, USE
OR PERFORMANCE OF THE SOFTWARE PROGRAM.
FCC RADIO FREQUENCY EMISSION NOTICE
This equipment has been tested and found to comply with the limits for a Class A digital device,
pursuant to Part 15 of the FCC Rules. These limits are designed to provide reasonable protection
against harmful interference when the equipment is operated in a commercial environment. This
equipment generates, uses, and can radiate radio frequency energy and, if not installed and used
in accordance with the instruction manual, may cause harmful interference to radio communications. Operation of this equipment in a residential area is likely to cause harmful interference
in which case the user will be required to correct the interference at his or her own expense.
USE SHIELDED CABLES TO CONNECT EXTERNAL DEVICES TO THIS INSTRUMENT TO
MINIMIZE RF RADIATION.
iv
May, 2000
MENSOR® CORP.
EVCTS
PREFACE
MENSOR BACKGROUND
HISTORY: Mensor was established in 1969 in Houston, Texas as an independent spin-off from
the Texas Instruments (TI) Pressure Instrument Group. As a private corporation, Mensor’s
objective was to design and produce high accuracy, high quality, easy to use pressure instruments. In 1978 Mensor moved to its present location in San Marcos, on Interstate 35 (the
Austin-San Antonio corridor). Two and a half years after the move, the plant was destroyed by
fire on Friday, February 13, 1981. Mensor resolved to come back, and almost before the ashes
had cooled, construction of a new building began on the same site. Six months after the disaster
Mensor moved into its present facility and began shipping products to customers who had waited
patiently for the recovery.
PEOPLE: The key to Mensor’s strength in the marketplace is the concentration of experienced
people in the field of precision pressure measurement and control. The company’s founders
previously worked in various capacities in the Pressure Instrument Group of Texas Instruments,
including engineering, production and marketing. These founders were involved in the design
of the original quartz bourdon pressure gauge at TI. Mensor’s CEO, Jerry Fruit, is co-holder of
the patent on using a fused quartz bourdon tube to accurately measure pressure. The 50 current
full time Mensor employees have an average longevity of fourteen years. That’s a lot of pressure
experience!
PRODUCTS: Mensor’s portfolio of products consists of an extensive line of precision pressure
instruments, including digital gauges, pressure controllers, transducers and pressure calibrations systems. All of these products feature computer interface capability. These products are
used in metrology labs, calibration labs, research facilities, engineering offices, production test
stands, and in other environments were high accuracy pressure measurement and/or control is
required. Many of these products include customized features to meet a customer’s specific
requirement. Mensor products range from about $900 to $30,000.
CUSTOMERS: Typical Mensor customers are pressure sensor manufacturers, aerospace firms,
jet engine manufacturers, electric utilities, nuclear power plants, pharmaceutical firms, calibration laboratories, government agencies and research organizations.
APPLICATIONS: In many facilities the highest accuracy pressure measuring or pressure
controlling instrument is a Mensor product. A typical application for these Mensor instruments
is the calibration of other pressure devices, such as sensors, transducers, transmitters, gauges
and pressure switches. The Mensor product is used as the pressure standard to verify pressure
calibrations or outputs of the device being produced, checked, tested or certified.
MENSOR® CORP.
May, 2000
v
PREFACE
EVCTS
User's Notes:
vi
May, 2000
MENSOR® CORP.
EVCTS
TABLE OF CONTENTS
TABLE OF CONTENTS
Warranty . . . . . . . . . .
Warnings and Caution Notes
Please Notice . . . . . . . .
Packaging for Shipment . .
Trademarks . . . . . . . .
Software License Agreement
Mensor Background . . . .
.
.
.
.
.
.
.
.
.
.
.
.
.
.
.
.
.
.
.
.
.
.
.
.
.
.
.
.
.
.
.
.
.
.
.
.
.
.
.
.
.
.
.
.
.
.
.
.
.
.
.
.
.
.
.
.
.
.
.
.
.
.
.
.
.
.
.
.
.
.
.
.
.
.
.
.
.
.
.
.
.
.
.
.
.
.
.
.
.
.
.
.
.
.
.
.
.
.
.
.
.
.
.
.
.
.
.
.
.
.
.
.
.
.
.
.
.
.
.
.
.
.
.
.
.
.
.
.
.
.
.
.
.
.
.
.
.
.
.
.
.
.
.
.
.
.
.
.
.
.
.
.
.
.
.
.
.
.
.
.
.
.
.
.
.
.
.
.
.
.
.
.
.
.
.
.
.
.
.
.
.
.
.
.
.
.
.
.
.
.
.
.
.
.
.
.
.
.
.
.
.
.
.
.
.
.
.
.
.
.
.
.
.
.
.
.
.
.
.
.
.
.
.
.
.
.
.
.
.
.
.
ii
iii
iii
iv
iv
iv
v
.
.
.
.
.
.
.
.
.
.
.
.
.
.
.
.
.
.
.
.
.
.
.
.
.
.
.
.
.
.
.
.
.
.
.
.
.
.
.
.
.
.
.
.
.
.
.
.
.
.
.
.
.
.
.
.
.
.
.
.
.
.
.
.
.
.
.
.
.
.
.
.
.
.
.
.
.
.
.
.
.
.
.
.
.
.
.
.
.
.
.
.
.
.
.
.
.
.
.
.
.
.
.
.
.
.
.
.
.
.
.
.
.
.
.
.
.
.
.
.
.
.
.
.
.
.
.
.
.
.
.
.
.
.
.
.
.
.
.
.
.
.
.
.
.
.
.
.
.
.
.
.
.
.
.
.
.
.
.
.
.
.
.
.
.
.
.
.
.
.
.
.
.
.
.
.
.
.
.
.
.
.
.
.
.
.
.
.
.
.
.
.
.
.
.
.
.
.
.
.
.
.
.
.
.
.
.
.
.
.
.
.
.
.
.
.
.
.
.
.
.
.
.
.
.
.
.
.
.
.
.
.
.
.
.
.
.
.
.
.
.
.
.
.
.
.
.
.
.
.
.
.
.
.
.
.
.
.
.
.
.
.
.
.
.
.
.
.
.
.
.
.
.
.
.
.
.
.
.
.
.
.
.
.
.
.
.
.
.
.
.
.
.
.
.
.
.
.
.
.
.
.
.
.
.
.
.
.
.
.
.
.
.
.
.
.
.
.
.
.
.
.
.
.
.
.
.
.
.
.
.
.
.
.
.
.
.
.
.
.
.
.
.
.
.
.
.
.
.
.
.
.
.
.
.
.
.
.
.
.
.
.
.
.
.
.
.
.
.
.
.
.
.
.
.
.
.
.
.
.
.
.
.
.
1-1
1-1
1-1
1-2
1-2
1-2
1-3
1-4
1-6
1-7
1-7
1-7
Mounting . . . . . . . . . . . . . . . . . .
Pressure Connections . . . . . . . . . . .
SUPPLY Pressure Port . . . . . . . .
EXHAUST Pressure Ports . . . . . .
MEASURE/CONTROL Pressure Ports
Power On . . . . . . . . . . . . . . . . .
.
.
.
.
.
.
.
.
.
.
.
.
.
.
.
.
.
.
.
.
.
.
.
.
.
.
.
.
.
.
.
.
.
.
.
.
.
.
.
.
.
.
.
.
.
.
.
.
.
.
.
.
.
.
.
.
.
.
.
.
.
.
.
.
.
.
.
.
.
.
.
.
.
.
.
.
.
.
.
.
.
.
.
.
.
.
.
.
.
.
.
.
.
.
.
.
.
.
.
.
.
.
.
.
.
.
.
.
.
.
.
.
.
.
.
.
.
.
.
.
.
.
.
.
.
.
.
.
.
.
.
.
.
.
.
.
.
.
.
.
.
.
.
.
2-1
2-1
2-1
2-1
2-1
2-1
1. INTRODUCTION
Did you get Everything
Initial Inspection . . .
Meet your EVCTS . .
Instrument Case . . .
Front Panel . . . . .
Rear Panel . . . . . .
Electrical Module . .
Pneumatic Module . .
Chassis Assembly . .
Power Up! . . . . . .
If you have Problems .
Calibration Services .
.
.
.
.
.
.
.
.
.
.
.
.
.
.
.
.
.
.
.
.
.
.
.
.
.
.
.
.
.
.
.
.
.
.
.
.
2. INSTALLATION
3. LOCAL OPERATION
System Overview . . . . . .
Keypad . . . . . . . . . . .
Functions . . . . . . .
Dual Passwords . . .
Keypad Functions List
Menu Descriptions . .
Menu Tree . . . . . .
.
.
.
.
.
.
.
.
.
.
.
.
.
.
.
.
.
.
.
.
.
.
.
.
.
.
.
.
.
.
.
.
.
.
.
.
.
.
.
.
.
.
.
.
.
.
.
.
.
.
.
.
.
.
.
.
.
.
.
.
.
.
.
.
.
.
.
.
.
.
.
.
.
.
.
.
.
.
.
.
.
.
.
.
.
.
.
.
.
.
.
.
.
.
.
.
.
.
.
.
.
.
.
.
.
.
.
.
.
.
.
.
.
.
.
.
.
.
.
.
.
.
.
.
.
.
.
.
.
.
.
.
.
.
.
.
.
.
.
.
.
.
.
.
.
.
.
.
.
.
.
.
.
.
.
.
.
.
.
.
.
.
.
.
.
.
.
.
.
.
.
.
.
.
.
.
.
.
.
.
.
.
.
.
.
.
.
.
.
.
.
.
.
.
.
.
.
.
.
.
.
.
.
.
.
.
.
.
.
.
.
.
.
.
.
.
.
.
.
.
.
.
.
.
3-1
3-1
3-1
3-4
3-4
3-5
3-6
IEEE-488 . . . . . . . . . . . . . .
Command and Query Format .
Command Format . . . . .
Query Format . . . . . . .
Subsystem Field . . . . .
Command/Query Field . .
Command/Query Field . .
Data Field . . . . . . . . .
Command/Query Reference
.
.
.
.
.
.
.
.
.
.
.
.
.
.
.
.
.
.
.
.
.
.
.
.
.
.
.
.
.
.
.
.
.
.
.
.
.
.
.
.
.
.
.
.
.
.
.
.
.
.
.
.
.
.
.
.
.
.
.
.
.
.
.
.
.
.
.
.
.
.
.
.
.
.
.
.
.
.
.
.
.
.
.
.
.
.
.
.
.
.
.
.
.
.
.
.
.
.
.
.
.
.
.
.
.
.
.
.
.
.
.
.
.
.
.
.
.
.
.
.
.
.
.
.
.
.
.
.
.
.
.
.
.
.
.
.
.
.
.
.
.
.
.
.
.
.
.
.
.
.
.
.
.
.
.
.
.
.
.
.
.
.
.
.
.
.
.
.
.
.
.
.
.
.
.
.
.
.
.
.
.
.
.
.
.
.
.
.
.
.
.
.
.
.
.
.
.
.
.
.
.
.
.
.
.
.
.
.
.
.
.
.
.
.
.
.
.
.
.
.
.
.
.
.
.
.
.
.
.
.
.
.
.
.
.
.
.
.
.
.
.
.
.
4-1
4-1
4-1
4-1
4-2
4-2
4-2
4-2
4-3
4. REMOTE OPERATION
MENSOR® CORP.
May, 2000
vii
TABLE OF CONTENTS
EVCTS
5. MAINTENANCE
Beyond the Warranty . . . . . . . . . . . . .
Program Disk Replacement . . . . . . . . . .
Module Replacement . . . . . . . . . . . . . .
Electrical Module . . . . . . . . . . . . .
CMOS Memory Battery Replacement
Spare Parts List . . . . . . . . . . . . . . . .
.
.
.
.
.
.
.
.
.
.
.
.
.
.
.
.
.
.
.
.
.
.
.
.
.
.
.
.
.
.
.
.
.
.
.
.
.
.
.
.
.
.
.
.
.
.
.
.
.
.
.
.
.
.
.
.
.
.
.
.
.
.
.
.
.
.
.
.
.
.
.
.
.
.
.
.
.
.
.
.
.
.
.
.
.
.
.
.
.
.
.
.
.
.
.
.
.
.
.
.
.
.
.
.
.
.
.
.
.
.
.
.
.
.
.
.
.
.
.
.
.
.
.
.
.
.
.
.
.
.
.
.
5-1
5-1
5-1
5-2
5-2
5-3
.
.
.
.
.
.
.
.
.
.
.
.
.
.
.
.
.
.
.
.
.
.
.
.
.
.
.
.
.
.
.
.
.
.
.
.
.
.
.
.
.
.
.
.
.
.
.
.
.
.
.
.
.
.
.
.
.
.
.
.
.
.
.
.
.
.
.
.
.
.
.
.
.
.
.
.
.
.
.
.
.
.
.
.
.
.
.
.
.
.
.
.
.
.
.
.
.
.
.
.
.
.
.
.
.
.
.
.
.
.
.
.
.
.
.
.
.
.
.
.
.
.
.
.
.
.
.
.
.
.
.
.
6-1
6-1
6-1
6-1
6-2
6-2
6. CALIBRATION
Calibration Environment . . .
Calibration Pressure Standard
Calibration Medium . . . . . .
Calibration Procedures . . . .
Setting Sensor Zero . . .
Setting Sensor Span . . .
.
.
.
.
.
.
.
.
.
.
.
.
.
.
.
.
.
.
.
.
.
.
.
.
.
.
.
.
.
.
.
.
.
.
.
.
.
.
.
.
.
.
.
.
.
.
.
.
7. SPECIFICATIONS
General Specifications . . . . . . . . . . . . . . . . . . . . . . . . . . . . . . . . . . . 7-1
Measurement Specifications . . . . . . . . . . . . . . . . . . . . . . . . . . . . . . . . 7-2
Control Specifications . . . . . . . . . . . . . . . . . . . . . . . . . . . . . . . . . . . 7-3
8. OPTIONS
Relief Valves . . . . . . . . . . . . . . . . . . . . . . . . . . . . . . . . . . . . . . . . 8-1
Transport Case . . . . . . . . . . . . . . . . . . . . . . . . . . . . . . . . . . . . . . 8-1
Rack Mount Kit . . . . . . . . . . . . . . . . . . . . . . . . . . . . . . . . . . . . . . 8-1
9. APPENDIX
Conversion Factors, Pressure . . . . . . .
Conversion Factors, psi . . . . . . .
Conversion Factors, Millitorr . . . . .
Temperature Conversion Table . . . . . .
Measurement Units . . . . . . . . . . . .
Materials in Contact with Pressure Medium
Head Pressure Correction . . . . . . . . .
Gas Density . . . . . . . . . . . . . .
Head Pressure Calculation . . . . . .
IEEE Connector and Pin Functions . . . .
CMOS Setup . . . . . . . . . . . . . . . .
Commands, Queries and Default Values . .
10. GLOSSARY
11. INDEX
viii
.
.
.
.
.
.
.
.
.
.
.
.
.
.
.
.
.
.
.
.
.
.
.
.
.
.
.
.
.
.
.
.
.
.
.
.
.
.
.
.
.
.
.
.
.
.
.
.
.
.
.
.
.
.
.
.
.
.
.
.
.
.
.
.
.
.
.
.
.
.
.
.
.
.
.
.
.
.
.
.
.
.
.
.
.
.
.
.
.
.
.
.
.
.
.
.
.
.
.
.
.
.
.
.
.
.
.
.
.
.
.
.
.
.
.
.
.
.
.
.
.
.
.
.
.
.
.
.
.
.
.
.
.
.
.
.
.
.
.
.
.
.
.
.
.
.
.
.
.
.
.
.
.
.
.
.
.
.
.
.
.
.
.
.
.
.
.
.
.
.
.
.
.
.
.
.
.
.
.
.
.
.
.
.
.
.
.
.
.
.
.
.
.
.
.
.
.
.
.
.
.
.
.
.
.
.
.
.
.
.
.
.
.
.
.
.
.
.
.
.
.
.
.
.
.
.
.
.
.
.
.
.
.
.
.
.
.
.
.
.
.
.
.
.
.
.
.
.
.
.
.
.
.
.
.
.
.
.
.
.
.
.
.
.
.
.
.
.
.
.
.
.
.
.
.
.
.
.
.
.
.
.
.
.
.
.
.
9-2
9-2
9-2
9-3
9-4
9-4
9-5
9-5
9-6
9-6
9-7
9-10
. . . . . . . . . . . . . . . . . . . . . . . . . . . . . . . . . . . . .
10-1
. . . . . . . . . . . . . . . . . . . . . . . . . . . . . . . . . . . . . . . . .
11-1
May, 2000
MENSOR® CORP.
EVCTS
TABLE OF CONTENTS
REFERENCE LIST OF FIGURES AND TABLES
Figures
1.1 - System Block Diagram . . . . . . .
1.2 - Front Panel . . . . . . . . . . . . .
1.3 - Rear Panel . . . . . . . . . . . . .
1.4 - Internal Electrical Module-Top View
1.5 - Electrical Block Diagram . . . . . .
1.6 - Pneumatic Module-Top View . . . .
1.7 - Pneumatic Schematic . . . . . . .
1.8 - Chassis Assembly-Top View . . . .
3.1 - Keypad . . . . . . . . . . . . . . .
3.2 - EVCTS Menu Tree . . . . . . . . .
5.1 - Chassis Assembly-Top View . . . .
6.1 - Calibration Setup . . . . . . . . . .
7.1 - Dimensional Outline . . . . . . . .
8.1 - Transport Case . . . . . . . . . . .
8.2 - Rack Mount Dimensions . . . . . .
8.3 - Rack Specifications . . . . . . . . .
8.4 - Slide Specifications . . . . . . . . .
9.1 - Head Pressure Calculation . . . . .
9.2 - IEEE Connector And Pin Functions
9.3 - Electrical Module Front View . . . .
9.4 - BIOS Setup Operating Screen . . .
9.5 - Standard Cmos Setup Screen . . .
9.6 - Advanced CMOS Setup Screen . . .
10.1 - Pressure Relationships . . . . . .
.
.
.
.
.
.
.
.
.
.
.
.
.
.
.
.
.
.
.
.
.
.
.
.
.
.
.
.
.
.
.
.
.
.
.
.
.
.
.
.
.
.
.
.
.
.
.
.
.
.
.
.
.
.
.
.
.
.
.
.
.
.
.
.
.
.
.
.
.
.
.
.
.
.
.
.
.
.
.
.
.
.
.
.
.
.
.
.
.
.
.
.
.
.
.
.
.
.
.
.
.
.
.
.
.
.
.
.
.
.
.
.
.
.
.
.
.
.
.
.
.
.
.
.
.
.
.
.
.
.
.
.
.
.
.
.
.
.
.
.
.
.
.
.
.
.
.
.
.
.
.
.
.
.
.
.
.
.
.
.
.
.
.
.
.
.
.
.
.
.
.
.
.
.
.
.
.
.
.
.
.
.
.
.
.
.
.
.
.
.
.
.
.
.
.
.
.
.
.
.
.
.
.
.
.
.
.
.
.
.
.
.
.
.
.
.
.
.
.
.
.
.
.
.
.
.
.
.
.
.
.
.
.
.
.
.
.
.
.
.
.
.
.
.
.
.
.
.
.
.
.
.
.
.
.
.
.
.
.
.
.
.
.
.
.
.
.
.
.
.
.
.
.
.
.
.
.
.
.
.
.
.
.
.
.
.
.
.
.
.
.
.
.
.
.
.
.
.
.
.
.
.
.
.
.
.
.
.
.
.
.
.
.
.
.
.
.
.
.
.
.
.
.
.
.
.
.
.
.
.
.
.
.
.
.
.
.
.
.
.
.
.
.
.
.
.
.
.
.
.
.
.
.
.
.
.
.
.
.
.
.
.
.
.
.
.
.
.
.
.
.
.
.
.
.
.
.
.
.
.
.
.
.
.
.
.
.
.
.
.
.
.
.
.
.
.
.
.
.
.
.
.
.
.
.
.
.
.
.
.
.
.
.
.
.
.
.
.
.
.
.
.
.
.
.
.
.
.
.
.
.
.
.
.
.
.
.
.
.
.
.
.
.
.
.
.
.
.
.
.
.
.
.
.
.
.
.
.
.
.
.
.
.
.
.
.
.
.
.
.
.
.
.
.
.
.
.
.
.
.
.
.
.
.
.
.
.
.
.
.
.
.
.
.
.
.
.
.
.
.
.
.
.
.
.
.
.
.
.
.
.
.
.
.
.
.
.
.
.
.
.
.
.
.
.
.
.
.
.
.
.
.
.
.
.
.
.
.
.
.
.
.
.
.
.
.
.
.
.
.
.
.
.
.
.
.
.
.
.
.
.
.
.
.
.
.
.
.
.
.
.
.
.
.
.
.
.
.
.
.
.
.
.
.
.
.
.
.
.
.
.
.
.
.
.
.
.
.
.
1-1
1-2
1-2
1-3
1-3
1-4
1-5
1-6
3-1
3-6
5-4
6-1
7-1
8-1
8-2
8-3
8-3
9-5
9-6
9-7
9-8
9-9
9-9
10-3
Keypad Functions List . . . . . . . . . . .
Description of Menu Key Functions . . . .
Valid Sub-Systems . . . . . . . . . . . . .
Spare Parts List . . . . . . . . . . . . . .
Recommended Pressure at the Supply Port
Min/Max Slew Speed . . . . . . . . . . . .
Conversion Factors, psi . . . . . . . . . .
Conversion Factors, Millitorr . . . . . . . .
Temperature Conversion . . . . . . . . . .
Measurement Units . . . . . . . . . . . . .
Materials in Contact with Pressure Medium
Gas Density . . . . . . . . . . . . . . . . .
Commands, Queries and Default Values . .
.
.
.
.
.
.
.
.
.
.
.
.
.
.
.
.
.
.
.
.
.
.
.
.
.
.
.
.
.
.
.
.
.
.
.
.
.
.
.
.
.
.
.
.
.
.
.
.
.
.
.
.
.
.
.
.
.
.
.
.
.
.
.
.
.
.
.
.
.
.
.
.
.
.
.
.
.
.
.
.
.
.
.
.
.
.
.
.
.
.
.
.
.
.
.
.
.
.
.
.
.
.
.
.
.
.
.
.
.
.
.
.
.
.
.
.
.
.
.
.
.
.
.
.
.
.
.
.
.
.
.
.
.
.
.
.
.
.
.
.
.
.
.
.
.
.
.
.
.
.
.
.
.
.
.
.
.
.
.
.
.
.
.
.
.
.
.
.
.
.
.
.
.
.
.
.
.
.
.
.
.
.
.
.
.
.
.
.
.
.
.
.
.
.
.
.
.
.
.
.
.
.
.
.
.
.
.
.
.
.
.
.
.
.
.
.
.
.
.
.
.
.
.
.
.
.
.
.
.
.
.
.
.
.
.
.
.
.
.
.
.
.
.
.
.
.
.
.
.
.
.
.
.
.
.
.
.
.
.
.
.
.
.
.
.
.
.
.
.
.
.
.
3-4
3-5
4-2
5-3
7-4
7-4
9-2
9-2
9-3
9-4
9-4
9-5
9-10
Tables
3.1
3.2
4.1
5.1
7.1
7.2
9.1
9.2
9.3
9.4
9.5
9.6
9.7
-
MENSOR® CORP.
May, 2000
ix
TABLE OF CONTENTS
EVCTS
User's Notes:
x
May, 2000
MENSOR® CORP.
EVCTS
INTRODUCTION
INTRODUCTION
DID YOU GET EVERYTHING?
MEET YOUR EVCTS
In addition to this manual you should have:
The Engine Vane Control Test Set (EVCTS) is a
special purpose PCS 400 designed to calibrate jet
engine pressure transducers. It consists of a selfcontained, computerized, high accuracy two channel pressure management system integrated into a
single, compact unit. The system is comprised of a
front panel assembly, a rear panel, an electrical
module, a pneumatic module, and a chassis to tie
it all together. The system functions either as a
bench-top or a rack mounted instrument. It can
operate in local mode to accept front panel input,
or in remote mode to communicate with external
devices. The installed software is specifically designed to test Engine Vane Control parameters
where numbers for the Pt3 and ∆P3 values are
input, and the Ps3 and Pt3 pressures are output to
the rear panel. Notice that Pt3 - Ps3 = ∆P3. A brief
description of the major elements of the system
follows.
·
Engine Vane Control Test Set
·
Power cord
·
1/8 inch NPT fitting adapters
·
Any accessories ordered
·
Envelope containing a Calibration Certificate
and a Warranty Certificate
INITIAL INSPECTION
Your new Mensor instrument was thoroughly
tested and inspected at the factory, and it was free
of dings, dents and scratches when it was packaged
for shipment. Please examine it now for signs of
shipping damage. Report any apparent damage to
the carrier immediately.
Pneumatics Module
Electrical
Module
Pt3
Pneumatics
Ps3
Pneumatics
Front Panel (Display / Keypad)
Figure 1.1 - System Block Diagram
MENSOR® CORP.
May, 2000
1-1
INTRODUCTION
EVCTS
Instrument Case
The instrument case is all aluminum construction
with extruded aluminum frame members and vinyl
clad cover and side panels. Front and rear panel
assemblies attach to the case. These are described
separately below.
Front Panel
The front panel (figure 1.2) includes a forty character per line, two line display, a four by four
membrane keypad, and a transparent window for
the pressure range label. The keypad includes fifteen dual-function keys, plus a sixteenth key, la-
beled 2nd, which toggles the function of the other
fifteen. All sixteen keys include both tactile and
audible feedback.
Rear Panel
The rear panel (figure 1.3) includes access to the
voltage select switch, the line-fuse holder, the
power cord socket, the system power switch, a
ventilator fan opening, and several communication
connectors. All of these items are grouped on the
electrical module side of the rear panel. The pneumatic side exposes the six fitting ports of the pressure manifold.
Display
Keypad
STBY
7
>Pt3:
VENT
29.921
29.481 INHGA
∆ P3:
VENT
0.000
0.000 INHG
METRIC
CONT
8
9
VENT
CE
COMM
ENG
GPIB
4
5
6
CAL
TEST
LIMITS
1
2nd
PRESSURE CALIBRATION SYSTEM
MEAS
UNITS
SERIAL
_
HELP
2
3
+
F1
F2
F3
0
.
=
EVC TEST SET
Pt3: 100 inHga ∆P3: 100 inHg
Pressure
Range
Figure 1.2 - Front Panel
110/220 V
Power Select
Power
Switch
Power
Connector
This equipment complies with the requirements in Part
15 of FCC Rules for a Class A computing device.
Operation of this equipment in a residential area may
cause unacceptable interference to radio and TV
reception requiring the operator to take whatever steps
are necessary to correct the interference.
Ps3
Pt3
Ps3
MEASURE/
CONTROL
Pt3
MEASURE/
CONTROL
Line Fuses
FUSE: 250V/1.5A
Ps3
SUPPLY
Pt3
SUPPLY
(INTERNAL CONNECTION)
Ps3
EXHAUST
Pt3
EXHAUST
Pressure Ports
IEEE STD 488 PORT
SH1, AH1, T6, L4,
SR1, RL1, PP0,
DC1, DT1, E2, C0
PARALLEL PORT
SERIAL PORT
Communication Ports
Figure 1.3 - Rear Panel
1-2
May, 2000
MENSOR® CORP.
EVCTS
INTRODUCTION
Electrical Module
The internal electrical module (figure 1.4) consists
of the input power module, a fan, a power supply,
an AT compatible computer assembly, and a 3.5
inch disk drive. Inside the drive is the disk which
contains the program information to run the sys-
tem. The disk can be removed or replaced by
removing the rear panel which is attached by nine
screws. Note that the plug-in printed circuit cards
are not necessarily in the order illustrated.
Motherboard
Speaker
Input Power
Module
Power
Supply/Fan
I/O
GPIB
SOLENOID DRIVER
PL A
SOLENOID DRIVER
Disk Drive
PL A
Figure 1.4 - Internal Electrical Module - Top View
Display /
Keyboard
Power
Supply
80X86
CPU
PLA
(Pt3)
Solenoid
Driver
Pt3
PLA
(Ps3)
Solenoid
Driver
Ps3
IEEE-488.2
GPIB
Serial
(Disabled)
Figure 1.5 - Electrical Block Diagram
MENSOR® CORP.
May, 2000
1-3
INTRODUCTION
EVCTS
Pneumatic Module
The pneumatic module (figure 1.6) includes two
internal high accuracy, low-drift pressure sensors
which are traceable to NIST as secondary standards. These sensors are used in conjunction with
two high resolution pressure regulators to produce
two precise pressure outputs with a range of 0.1 to
100 inHga. The pneumatics module is set up at the
factory to use a single supply pressure source,
connected to either the Pt3 SUPPLY port (unplugged), or the Ps3 SUPPLY port (plugged). The
EXHAUST ports are plumbed separately to accommodate two independent vacuum sources. The system is flexible enough that either set of ports can
be reconfigured to use two supply sources, and/or
a single vacuum source for both exhausts if the
application will tolerate such conditions.
While the two pneumatic channels can function
independently, the processor connects them digitally. The result is that pressure values for Pt3 and
∆P3 can be entered either from the keypad, or over
the communications bus, and the system will respond by generating the Pt3 and Ps3 output pressures where Pt3 − Ps3 = ∆P3. The operator can
toggle the right half of the display to show either the
simulated value of ∆P3 or the actual pressure of
Ps3.
*
Figure 1.6 - Pneumatic Module - Top View
1-4
May, 2000
MENSOR® CORP.
EVCTS
INTRODUCTION
FILTER
Pt3
SUPPLY
SEE NOTE 1
L2
L1
~
FILTER
Pt3
EXHAUST
FILTER
Pt3
OUTPUT
FILTER
Ps3
OUTPUT
FILTER
Ps3
EXHAUST
FILTER
Ps3
SUPPLY
110 inHg A
VENT
FILTER
L3
L5
Pt3
CONTROLLER
L4
Pt3
XDCR
100 inHg A
Ps3
XDCR
100 inHg A
SEE NOTE 1
L11
Ps3
CONTROLLER
L10
L9
L7
~
FILTER
VENT
110 inHg A
L8
SEE NOTE 1
NOTES: 1. For single source pressure plug one of the two external SUPPLY
ports, or for independent sources disconnect the internal tube marked
" " which joins the two controllers.
2. Solenoid valves L1 through L11 are 5 vdc, 1.5 w, normally closed.
3. Solenoid valve L6 is unused, or not installed in some configurations.
Figure 1.7 - Pneumatic Schematic
MENSOR® CORP.
May, 2000
1-5
INTRODUCTION
EVCTS
Chassis Assembly
The chassis assembly acts as the housing for the
system. The electrical and pneumatic modules are
each self-contained and can be replaced individually using basic hand tools. System accuracy is
maintained when either module is replaced because the transducers and their calibration data
reside in the pneumatic module.
The only moving parts in the EVCTS are the fan,
the disk drive mechanism, the pneumatic flow
controller diaphragms and valves, and the solenoid
valve plungers. There are no internal user adjustments or setup switches. The layout of the internal
system is illustrated in figure 1.8.
Pt3
SENSOR
Ps3
SENSOR
PL A
SOLENOID DRIVER
PL A
SOLENOID DRIVER
GPIB
I/O
Rear
Front
Note: The electrical module is shown with its cover removed.
Figure 1.8 - Chassis Assembly - Top View
1-6
May, 2000
MENSOR® CORP.
EVCTS
INTRODUCTION
POWER UP!
You can confirm that your EVCTS is operational
right now. Simply apply power to the power connector on the rear of the instrument, remove any
plastic plugs from the rear panel pressure ports
and turn the power switch ON. The system will go
through a brief initialization process and then the
display should appear similar to the following illustration:
>Pt3: 29.921
VENT 29.481 INHGA
∆P3: 0.000
VENT 0.005 INHG
On the left half of the display the “>“symbol on the
top line indicates that Pt3 is the active channel, and
this is followed by standard atmospheric pressure.
Displayed directly under these are the current operating mode (default at power-up is VENT) and the
local atmospheric pressure as measured by the Pt3
transducer. The right half of the display shows the
value currently entered for ∆P3 (default at powerup is zero), and the bottom line again shows the
current mode, and the calculated value of ∆P3
where ∆P3 is the difference between the Pt3 the Ps3
transducers.
Press the keys [2nd] then [0] (for the F1 function)
and observe that the “>“ symbol moves to ∆P3 on
the top line to indicate that this channel is now
active. Press several number keys and notice that
the ∆P3 top line numbers echo each number
pressed. Do not press [=].
Press F1 again ([2nd] [0]) and the active symbol “>“
will toggle back to the Pt3 channel. Again, press
several number keys and see the Pt3 top line numbers change. Changing the numbers on either channel takes effect only when followed by pressing [=].
The [=] key acts as the “Enter this command” key.
Rather than [=], press the clear entry key [CE]
several times to clear out the entered numbers.
When the last digit is erased it is replaced with the
previous setpoint which remains active.
MENSOR® CORP.
Press [2nd], [+] (labeled HELP). This changes the
display to show the instrument name on the top
line and a prompt to press [CE] to return to the
previous display. The bottom line shows the instrument serial number and software version number.
This display is the only feature available from the
HELP function at this time. Press [CE] to restore
the display.
If all has gone well the EVCTS can be put into
service by proceeding to the Installation section of
the manual, which is next. Instructions for operating the instrument manually follow that in the Local
Operation section.
IF YOU HAVE PROBLEMS ...
If you have problems using your EVCTS and you
don’t find the answer in your manual, contact
Mensor at 1-800-984-4200 (USA only), or 1-512396-4200 for personal assistance, or at any of the
on-line addresses listed in the front of the manual.
We are ready to help.
Mensor’s concern with the welfare of this instrument is not limited to the warranty period. We
provide complete repair services for the life of the
instrument as explained in Section 5, Maintenance.
CALIBRATION SERVICES
In addition to servicing our own products Mensor
can perform a complete pressure calibration service, up to 20,000 psi, for all of your pressure
instruments. This service includes a Certificate of
Compliance and Calibration and the record of
traceability to the pressure standards of the National Institute of Standards and Technology
(NIST).
May, 2000
1-7
INTRODUCTION
EVCTS
User's Notes:
1-8
May, 2000
MENSOR® CORP.
EVCTS
INSTALLATION
INSTALLATION
MOUNTING
The instrument can be set up on a table-top or it
can be rack-mounted. For rack-mount installation,
see the mounting instructions in Section 8, Options.
The special sensors used in the EVCTS are relatively insensitive to tilt and vibration. However to
further assure stability and accuracy, excessive
motor or machinery vibration of the mounting surface should be avoided.
PRESSURE CONNECTIONS
MEASURE/CONTROL Pressure Ports
Devices to be tested are normally connected to the
two MEASURE/CONTROL ports (Ps3 and Pt3). In
CONTROL mode these ports can output a precise,
stable (static) pressure, or a pressure which climbs
or falls in an orderly manner (pressure rate). The
EVCTS is tuned for most efficient operation working into a one third to one half liter volume at the
end of three feet of tubing connected to these ports.
In MEASURE mode the EVCTS will precisely measure the pressure present on a MEASURE/CONTROL port up to the full scale range of the sensor.
Internal relief valves are provided to protect the
system from overpressure, but this does not reduce
the need for good safety practices.
NOTE: When making up the connection
to an o-ring adapter use a back-up
wrench to prevent over-stressing the
threads in the manifold block.
All of the pressure ports on the rear are female 7/16
- 20 SAE/MS straight threads per MS16142 and
SAE J514 table 14. They require a tube fitting boss
seal with an o-ring per MS33656. Mensor provides
female 1/8 NPT adapter fittings with the instrument. The pressure connections can be made to
these adapters with the proper mating hardware.
We recommend the use of either Loctite Hydraulic
Sealant or fresh teflon tape on the threads of the
male pipe fitting. Do not use sealants on fittings
sealed with an o-ring. The integrity of the seal is
particularly important since even microscopic
leaks can cause errors in pressure measurements.
Figure 1.7 is a pneumatic schematic of the internal
plumbing. Requirements for connecting to the various ports on the EVCTS manifold are given below.
SUPPLY Pressure Port
Each channel of the EVCTS has its own SUPPLY
port. However, one of these is plugged on the rear
panel since they are connected together inside the
pneumatics module. Connect a source pressure of
55 to 60 psi (110 - 120 inHg) to the open SUPPLY
port.
EXHAUST Pressure Ports
Connect a separate vacuum pump to each of the
two EXHAUST ports. These ports must be evacuated in order to control at sub-atmospheric pressures. Although both channels can be connected to
MENSOR® CORP.
a single vacuum pump, doing so can create cross
channel interference under some conditions, and
is not recommended.
POWER ON
After the pressure connections are secure, apply
power to the power connector on the rear of the
instrument. Turn the power switch to ON. The
instrument will go through a quick initialization
process and system check. As soon as the system
check is completed the system will default to the
VENT mode for both channels. The display will
appear similar to the illustration that follows:
>Pt3:
VENT
29.9215
29.4814 INHGA
∆P3: 0.000
VENT 0.000 INHG
On the top line the “>” symbol indicates that Pt3 is
the active channel. Local atmospheric pressure is
shown on the bottom line of channel Pt3.
Press [2nd][+] which is labeled “HELP”. The screen
now shows the instrument name on the top line and
a prompt to press [CE] to return to the previous
display. The serial number and software version
are displayed on the bottom line.
A warm-up period of at least 45 minutes is advised
for greatest accuracy. The EVCTS is now ready for
service.
May, 2000
2-1
INSTALLATION
EVCTS
User's Notes:
2-2
May, 2000
MENSOR® CORP.
EVCTS
LOCAL OPERATION
LOCAL OPERATION
This section describes the proper procedures for
operating the EVCTS from the front panel. Instructions for operating the EVCTS from an external
computer are covered in the next section. Following
the procedures provided in these two sections and
Section 6, Calibration will ensure maximum accuracy and dependability of your instrument.
SYSTEM OVERVIEW
The Engine Vane Control Test Set consists of two
independent pressure measuring/pressure controlling sub-systems, or channels, on the pneumatics module. These two pressure channels are
identified as Pt3 and Ps3. A third channel, identified as ∆P3, is a variable quantity that can be
defined by the operator. With the system in CONTROL mode, the relationship of these three channels is Pt3 - ∆P3 = Ps3. In effect, a controlled
pressure setpoint can be assigned to Pt3, another
positive quantity can be assigned to ∆P3, and the
EVCTS will respond with an output pressure on
the Ps3 MEASURE/CONTROL port which is the
difference between the Pt3 pressure and the ∆P3
value. Notice that P3 will accept only positive values
within the range of Pt3.
KEYPAD
Local operation is accomplished through the keypad and by observing the display. The fifteen dual
purpose function keys enter either the numeric
value or operation printed on the key face or, if the
[2nd] key is pressed first, then the key enters the
menu function printed directly above the key.
STBY
MEAS
CONT
VENT
7
8
9
CE
METRIC
ENG
GPIB
4
5
6
CAL
TEST
LIMITS
HELP
1
2
3
+
F1
F2
F3
0
.
=
UNITS
2nd
Pressing [2nd] causes the next key press to shift
into the menu function mode.
Notice that throughout this manual characters enclosed in square brackets indicates a single key
stroke. For example, [0] indicates pressing the zero
key (unshifted), whereas [2nd], [F1] indicates
pressing “2nd” then “0” to execute the F1 function.
Where the text might say “Go to VENT mode” the
meaning is press the two key sequence, [2nd] then
[CE] to execute the VENT mode.
Functions
A description of each available function is presented below, followed by a table summary. A
graphic menu tree is placed at the end of this
section, and a larger, foldout of the same menu tree
will be found in the rear cover pocket. It might
prove helpful to have a photocopy of one of the
menu trees near the instrument until operators are
familiar with the various keystrokes and functions.
The following descriptions are of functions, and by
inference, require pressing the [2nd] key prior to
pressing the associated function key. Instructions
for pressing the [2nd] key are omitted from this text
in favor of brevity over redundancy. To back out of
any menu or sub-menu press [CE] one or more
times.
F1
COMM
SERIAL
_
The F1 function toggles between selecting
the left (Pt3) or right (∆P3 or Ps3) channels. The leading “>” symbol designates
which channel is active. A channel must
be “active” to change the output pressure
setpoint (top line value). Changing the
primary mode (STANDBY, MEASURE,
CONTROL or VENT) on either channel
forces the change to both channels. In
addition, when in the calibration mode
the active channel is the channel having
its zero offset or span value changed. To
change the output pressure setpoint simply make the appropriate channel active,
then press the number keys for the desired value. The new value appears on the
top line as the numbers are entered.
When the displayed value is correct press
[=]. Next, press [CONT] and the controller for that channel will immediately slew
the output pressure to the newly commanded value.
Figure 3.1 - Keypad
MENSOR® CORP.
May, 2000
3-1
LOCAL OPERATION
F2
EVCTS
The F2 function toggles the display to
show either Pt3 and ∆P3 (normal), or to
show Pt3 and Ps3 (alternate). In the normal Pt3/∆P3 display state selecting either
STANDBY, MEASURE, CONTROL or
VENT, will apply the selected mode to
both channels. In the alternate, Pt3/Ps3
display state, both channels automatically lock into the MEASURE mode.
STANDBY, CONTROL and VENT are
locked out until the display is returned
to the Pt3/∆P3 state.
F3
Not used.
CAL
CAL provides entry to the zero and span
calibration functions, and to the change
passwords function. After pressing [CAL]
press [+] or [-] several times to step
through the ZERO, SPAN and PASSWORD sub-menus. To enable any of
these press [=] while the desired function
is on the display.
TEST
EXHAUST: Tests for a vacuum on the
Exhaust port of the current channel. A
vacuum is required to control sub-atmospheric output pressure. The display
will show a fail message for the test if it
measures a vacuum pressure greater
than 1 (one) inHgA.
SUPPLY: Tests for source pressure great
enough to provide a controlled output
pressure near the span of the selected
channel. A Pass or Fail message is sent
to the display.
SENSOR: Tests the communication link
between the electrical module and the
pressure sensors in the pneumatics
module. The test returns a Pass or Fail
message.
ZERO: A zero password is required in
order to change either channel’s zero offset. When the system is ready to accept a
change to the current zero offset a “?”
prompt to enter the new value will appear
in the display. See the Calibration section
of the manual for instructions on determining the correct zero offset. Note: At
the user’s discretion the zero password
can be disabled so that line operators can
reset zero at will.
SPAN: A separate, master password is
needed to change either channel’s span
value. When the system is ready to accept
a change to the current span value a “?”
prompt to enter the new value will appear
in the display. See the Calibration section
of the manual for instructions on calibrating the sensor’s span. Note: The master password can be changed, but it
cannot be disabled.
CONTROL VALVES: Tests for media flow
through the pressure controller valves. A
Pass or Fail message is sent to the display
PNEUMATICS: Tests the actuating coils
of the solenoid valves. The test sends a
Pass or Fail message to the display.
LIMITS The LIMITS menu provides access to
three sub-menus. Press [+] or [-] repeatedly to step through the sub-menus.
Press [=] to access a sub-menu appearing in the display.
PASSWORDS: Enter this mode to change
the current zero or master password, or
to disable the zero password requirement. More information is given on passwords later in this section.
3-2
Enter the TEST menu area to enable the
various sub-menu tests available. Press
[+] or [-] repeatedly to step through the
various sub-menus listed below (exhaust, supply, etc.). To enable a specific
test press [=] while the test is showing in
the display.
May, 2000
CONTROL RATE MODE: This sub-menu
will display the current RATE status as
either slow, medium or fast by a closed
circle indicator. The fast rate causes the
controller output to slew at maximum
speed from its current setting to a newly
commanded setpoint. Press [+] or [-] to
step through the choices, and [=] to enable the highlighted choice.
MENSOR® CORP.
EVCTS
LOCAL OPERATION
MEASURE FILTER: Allows the amount
of filtering applied to the output reading
to be selected for optimum performance.
The available choices presented are Low,
Normal or High which represent 50%,
90% and 99% filter rates respectively.
The low filter rate is closest to real time
pressure readings, but this can be noisy
in the display. A more stable display of
the numbers is obtained with Normal, or
High. The display indicates the current
choice with a filled circle. Step through
to the desired value with the [+] or [-] key,
then press [=] to enable the highlighted
choice.
SYSTEM DEFAULTS: With SYSTEM
DEFAULTS showing in the display press
[=] to restore all default values to their
factory settings. Which values are the
factory default settings are identified in
‘Menu Descriptions’ listed in this section.
HELP
The only display available from the HELP
menu shows the instrument name, its
serial number, and the software version
number currently loaded into the system.
METRIC Entering the METRIC menu brings up
three available metric units of measure,
mBar, mmHg and kPa. Use the [=] or [-]
key to step through to the desired units,
then press [=]. The selected units will
immediately be assigned to both channels.
ENG
This menu function offers the two ENGLISH measurement units, inHg or psi.
Again, use the [+] or [-] key to select the
desired units. Press [=] to simultaneously assign the selected units to both
channels.
GPIB
Enter this menu to set the GPIB address
of the EVCTS. Addresses of 0 to 30 are
allowed.
MEAS
Places the EVCTS in MEASURE mode to
accurately measure the pressure appearing on the MEASURE/CONTROL ports.
CONT
Puts the EVCTS in CONTROL mode. The
pressure value appearing on the top line
of the display will be presented to that
channel’s MEASURE/CONTROL port.
Not available while Ps3 is displayed.
VENT
This function relieves the pressure from
the EVCTS by venting the pneumatics to
atmosphere within the EVCTS case. Not
available while Ps3 is displayed.
Other Functions: The four operation keys [CE],
[+], [-] and [=] are active while in the
menu modes. They perform as follows:
[CE]
[CE] acts as a backspace during numeric
entry, or returns to the previous screen
in menu mode. If a sub-menu is displayed then it will require pressing [CE]
at least twice to get completely out of the
menus and back to the primary display.
[+]
The [+] key is a numeric sign (acceptable,
but not required) if a positive number
entry is appropriate at the time, or else a
step forward into the sub-menus for each
press when in a menu function. In CONTROL mode each press of the [+] key will
increment the control setpoint by the
pre-defined step value.
[-]
The [-] key is a numeric sign (required) if
a negative number entry is appropriate at
the time, or else a step backward through
the sub-menus for each press when in a
menu function. In CONTROL mode each
press of the [-] key will decrement the
control setpoint by the pre-defined step
value.
[=]
The [=] key is the “Enter” or “Execute”
key for either the value or function that
is currently displayed.
SERIAL Not active for this unit.
STBY
Enables STANDBY for both channels.
Not available while Ps3 is displayed.
MENSOR® CORP.
May, 2000
3-3
LOCAL OPERATION
EVCTS
Dual Passwords
There are two levels of passwords in the system. A
line level or zero password allows access to Zero
adjustments, and a master password that will access all protected functions, including changes to
passwords. In order to change either password the
current master password must be entered. Since
passwords are seldom used they are easily forgotten. Please keep a written record of newly entered
passwords.
The master password will work for any protected
function until it is changed through the CAL/PASSWORD function. Either password can be from one
to six digits long. To allow line technicians to easily
make zero adjustments the zero password could
be changed to the single character “0", for example.
To change either password scroll down the menus
to the appropriate password to be changed. Then, at
the ENTER PASSWORD prompt simply enter the
current master password. Then at the CHOOSE A
NEW PASSWORD prompt enter the digit or digits
desired, then press [=].
The requirement for a zero password can be turned
off so that zero adjustments can be made more easily.
To disable the zero password requirement merely
exit the CHANGE PASSWORD function by pressing
[=] without entering a zero password.
Both the zero and master passwords were set at the
factory to 123456. Again, since passwords are seldom used, they are easily forgotten. Please keep a
written record of the latest changes as they are entered. Contact Mensor Corporation if the master
password is lost.
Keypad Functions List
Table 3.1 - Keypad Functions List
Function
Key Sequence
Description
Select channel to edit
[2nd] [F1]
Toggles between Pt3 and ∆P3.
∆P3 (normal) or Ps3 (alternate)
display mode
[2nd] [F2]
Toggles between Normal (∆P3)
mode and Ps3 in the right hand
display.
Enter pressure output setpoints
Use number keys to enter a setpoint, C h a n g e s t h e s e t p o i n t o f t h e
use [CE] to back-space, use [=] to CONTROL mode output.
execute change.
Change mode to STANDBY
[2nd] [STBY]
Changes the mode to STANDBY. *
Change mode to MEASURE
[2nd] [MEAS]
Changes the mode to MEASURE.
Change mode to CONTROL
[2nd] [CONT]
Changes the mode to CONTROL.*
Change mode to VENT
[2nd] [VENT]
Changes the mode to VENT.*
Select METRIC units
[2nd] [METRIC] then [+] or [-] to Changes the pressure units of both
select the desired units.
channels simultaneously.
Select ENGLISH units
[2nd] [ENG] then [+] or [-] to select Changes the pressure units of both
the desired units.
channels simultaneously.
Change GPIB address
[2nd] [GPIB] and number keys to Changes the GPIB address of the
enter address, then press [=].
instrument to the number entered.
Set transducer ZERO
[2nd] [CAL] Password may be Sets the zero of the channel
required, then number keys to enter selected by [2nd] [F1].
desired zero reading, then [=].
Set transducer SPAN
[2nd] [CAL] [+] Password is required, Sets the span of the channel
then number keys to enter desired selected by [2nd] [F1].
span reading, then [=].
* Available only in NORMAL (∆P3) mode.
3-4
May, 2000
MENSOR® CORP.
EVCTS
LOCAL OPERATION
Menu Descriptions
The following table gives a brief description of the
functions provided under each of the menu keys.
Items shown in bold face type are default values.
Table 3.2 - Description of Menu Key Functions
Menu
Sub-Menu
Function
F1
Select channel to edit (Pt3 or Ps3/∆P3 according to “>”
symbol)
F2
Pt3/∆P3 (normal) or Pt3/Ps3 (alternate) display
F3
Not Used
CAL
TEST
LIMITS
ZERO
Set zero on selected channel
SPAN
Set span on selected channel
PASSWORDS
Change Zero or Master Password
EXHAUST
Test exhaust
SUPPLY
Test supply
SENSOR
Test sensor
CONTROL VALVES
Test regulator valves
PNEUMATICS
Test pneumatic valves
CONTROL RATE MODE
Set RATE to Slow, Medium or FAST
MEASURE FILTER
Set filter to Low, NORMAL or High
SYSTEM DEFAULTS
Sets system parameters to default values
HELP
Shows instrument name, serial number and software
version
METRIC
Change pressure units to MBAR, MMHG or KPA
ENGLISH
Change pressure units to INHG or PSI
GPIB
Change address
SERIAL
Disabled
STBY
Set system to STANDBY mode
MEAS
Set system to MEASURE mode
CONT
Set system to CONTROL mode
VENT
Set system to VENT mode
MENSOR® CORP.
May, 2000
3-5
3-6
2nd
MC408 C 1/14/98
May, 2000
LIMITS
TEST
CAL
2nd
=
F2
.
F1
0
F3
3
2
+
HELP
6
5
4
1
_
SERIAL
COMM
CE
VENT
PNEUMATIC
CONTROL
VALVES
DEFAULT
PASSWORD SENSOR
RATE MODE
LIMITS
3
FILTER
EXHAUST
TEST
2
SET SPAN** SUPPLY
GPIB
9
CONT
CAL
1
SET ZERO*
ENG
8
F3
=
METRIC
MEAS
7
UNITS
DISPLAY
Pt3 / ∆P3
OR
Pt3 / Ps3
F2
.
STBY
SELECT
LEFT
OR
RIGHT
CHANNEL
F1
0
HELP
+
KPA
MMHG
MBAR
METRIC
4
PSI
INHG
@ 0C
ENG
5
ADDRESS
GPIB
6
CONT
PRIMARY MODES
MEAS
9
NONE
EXECUTE ENTRY
=
** MASTER PASSWORD REQUIRED
* ZERO PASSWORD (OPTIONAL)
SCROLL AHEAD ONE STEP
+
SCROLL BACK ONE STEP
CLEAR ENTRY
VERSION 1.X
CE
MENU
ODD
EVEN
VENT
CE
ENGINE VANE CONTROL
TEST SET
STBY
8
PARITY
2
1
STOP BITS
8
7
DATA BITS
19200
9600
2400
1200
BAUD
SERIAL
7
LOCAL OPERATION
EVCTS
Menu Tree
Figure 3.2 - EVCTS Menu Tree
MENSOR® CORP.
EVCTS
REMOTE OPERATION
REMOTE OPERATION
The Engine Vane Control Test System (EVCTS)
may be operated from a remote computer using the
IEEE-488 (GPIB) communication protocol. The
host computer must contain an IEEE-488 Communications Board.
GTL Go To Local
When this message is received, the EVCTS
will return to local operation and unlock the
keyboard.
DCL
Device Clear
When this message is received, the EVCTS
will clear all errors and buffers and remain
in the REMOTE mode.
SDC
Selected Device Clear
Responds as DCL.
EOI
End or Identify
May be used to terminate a command or
query in the place of or concurrent with the
transmission of the terminating linefeed.
IEEE-488
The manufacturer of the host IEEE-488 interface
board provides software to allow communication
between the board and various programming languages. An interactive program for debugging is
usually provided as well. Refer to the board manufacturer’s documentation for more information.
EVCTS IEEE-488 Capability Codes:
SH1
AH1
T6 .
L4 .
SR1
RL1
PP0 .
DC1
DT1
C0 .
E2 .
.
.
.
.
.
.
.
.
.
.
.
. . . . . . Full source handshake capability
. . . . . Full acceptor handshake capability
Talker with serial poll and unaddress if MLA
. . . . . . Listener with unaddress if MTA
. . . . . . . Full service request capability
. Full remote/local capability including LLO
. . . . . . . . . . No parallel poll capability
. . . . . . . . . Full device clear capability
. . . . . . . . Full device trigger capability
. . . . . . . . . . . No controller capability
. . . . . . . . . . . . . . Tri-state outputs
The EVCTS also contains many features of IEEE488.2, the latest version of this protocol.
The EVCTS responds to the following IEEE-488
interface functions:
SRQ
LLO
GET
Service Request
The EVCTS asserts service request whenever an error is encountered. When the bus
controller issues a serial poll the error will
be cleared. If automatic serial polling is
available with your IEEE-488 board, turn
this feature off if you do not want to ignore
errors. (see ERROR? command).
Local Lockout
The front panel keyboard of the EVCTS may
be locked by sending LLO or the command
LOCK ON.
Group Execute Trigger
When this message is received, the EVCTS
will save the current readings until the next
time it is addressed as a talker.
MENSOR® CORP.
Command and Query Format
All commands (messages sent to the EVCTS) and
queries (requests for messages from the EVCTS)
follow a common format. The EVCTS accepts commands and queries in the form of ASCII strings.
The strings are divided into two or three fields. All
strings must terminate with a linefeed (<lf>, 0a
hex, 10 dec). All fields must be separated with at
least one whitespace character (20 hex or less
except 0a hex). Normally an ASCII space (20 hex,
32 dec) is used for the field separator. Lower case
letters are converted to uppercase by the EVCTS
and may be used to improve readability.
Command/Query Field: Unless otherwise specified, commands are converted to queries by appending a question mark to the command. Detailed
command and query functions are listed in table
4.1.
Data Field: The data field is either an ASCII string
or numeric value. The data field is only used with
commands, not with queries. If the data field is
omitted in a command, the default value is used.
In the case of multiple data fields, commas are used
to separate the fields. String or numeric data are
acceptable in any of the following formats:
Example ASCII string data:
ON
OFF
mBar
inHg
May, 2000
4-1
REMOTE OPERATION
EVCTS
Example ASCII numeric data:
1
1.0
-5.678
25.68324e-5
Command Set Definitions
[White Space]:
any character code ≤ hex 0x20 (space) except
hex 0x0a (<lf>)
[Command]:
any valid command (listed below)
[Data]:
ASCII representations of numeric or string
data
[Termination]:
hex 0x0a (<lf>)
Commands are always sent in one of the following formats:
[Command][Termination]
[Command][White Space][Data][Termination]
Queries are special commands that contain the
character ‘?’.
Queries always return an ASCII data string terminated with <cr><lf>.
Floating point data is always returned in the current engineering units in exponential format.
Outform Formats
The “Outform” command sets the output format that will be returned by a subsequent outform query. The formats are:
Outform
Command
1
2 (Default)
3
4-2
Outform Query Returns
Pt3 Pressure, Ps3 Pressure
Pt3 Pressure, ∆P3
Pt3 Pressure, Ps3 Pressure, Pt3 Rate, Ps3 Rate
May, 2000
MENSOR® CORP.
EVCTS
REMOTE OPERATION
Command/Query Set
Table 4.1 - Command/Query Set
COMMAND
Pt3
Pt3?
Ps3
Ps3?
dP3
dP3?
Address
Address?
Chan?
Control
DATA
None
None
None
None
None
None
0-30
None
None
None
Control?
Date
Date?
Default
DOM?
Error?
F1
F2
F3
Filter
Filter?
Id?
Keylock
Keylock?
Linked
Linked?
List?
LowerLimit
None
mm/dd/yy
None
None
None
None
None
None
None
0-99.99
None
None
Yes or No
None
Yes or No
None
None
within sensor
range and
less than
upperlimit
None
None
LowerLimit?
Measure
Measure?
Outform
Outform?
Range?
Rate?
RUnits
None
1, 2, or 3
None
None
None
Sec, Min or
Hour
RUnits?
None
Sbaud
300,1200,
2400,4800,
9600,1920
Sbaud?
None
Continued on next page...
MENSOR® CORP.
RESPONSE / FUNCTION
Makes the left channel active.
Returns the left channel reading.
Makes the right channel active in Ps3 pressure mode.
Returns the right channel pressure reading.
Makes the right channel active in ∆P3 mode.
Returns the right channel ∆P3 reading.
Sets the GPIB address.
Returns the GPIB address.
Returns the active channel name.
If modes are linked, all channels are placed in the Control mode, otherwise
the active channel is placed in control.
Returns YES if active channel is in the Control mode; NO otherwise.
Sets the instrument date.
Returns the instrument date.
Sets the default values (see table 3.2, Local Operation).
Returns the date of manufacture.
Returns the next error in the error queue.
Same as pressing F1 on keyboard.
Same as pressing F2 on keyboard.
Same as pressing F3 on keyboard.
Sets the measured reading exponential filter percent for all channels.
Returns the filter percent.
Returns (s=sn, v=version) MENSOR,EVCTS,ssssss,v.vv.
Locks or unlocks keyboard.
Returns YES or NO.
Links modes if YES; independent if NO.
Returns YES or NO.
Returns a list of valid channel names.
Sets the lower control limit for the active channel.
Returns the lower control limit for the active channel.
If modes are linked, all channels are placed in the Measure mode, otherwise
the active channel is placed in Measure.
Returns YES if active channel is in the Measure mode; NO otherwise.
Sets the output format.
Returns the output format (see “Outform Formats” text).
Returns the range of the active channel.
Returns the rate reading of the active channel.
Sets the rate units.
Returns the rate units.
Sets the serial baud.
Returns the serial baud.
May, 2000
4-3
REMOTE OPERATION
EVCTS
Table 4.1 continued...
COMMAND
Sdata
SData?
Sparity
Sparity?
Sstop
Sstop?
Setpt
Setpt?
Span
Span?
Stable?
StableTime
StableTime?
StableWin
StableWin?
Standby
Standby?
Step
Standby
Standby?
Step
Step?
Time
Time?
Units
Units?
UpperLimit
UpperLimit?
DATA
7 or 8
None
EVEN,ODD,
or NONE
None
1 or 2
None
within lower
and upper
limits
None
desired
pressure or ?
None
None
0-65535
None
within lower
and upper
limits
None
None
None
within lower
and upper
limits
None
RESPONSE / FUNCTION
Sets the serial data bits.
Returns the serial data bits.
Sets the serial parity.
Returns the serial parity.
Sets the serial stop bits.
Returns the serial stop bits.
Sets the control setpoint for the active channel.
Returns the control setpoint for the active channel.
Alters the span value so that the instrument reads the value sent when at the
current pressure. ? clears previous value.
Returns span scale factor.
Returns YES if current channel is stable.
Sets the stable time to the number of seconds specified.
Returns the stable time.
Sets the stable window.
Returns the stable window.
If modes are linked, all channels are placed in the Standby mode, otherwise
the active channel is placed in Standby.
Returns YES if active channel is in the Standby mode; NO otherwise.
Sets the control step for the active channel.
If modes are linked, all channels are placed in the Standby mode, otherwise
the active channel is placed in Standby.
None
Returns YES if active channel is in the Standby mode; NO otherwise.
within lower Sets the control step for the active channel in the current pressure units. Must
and upper
be less than or equal to the sensor range.
limits
None
Returns the control step for the active channel.
hh:mm:ss
Sets the instrument time.
None
Returns the instrument time.
psi,inHg,
Sets the instrument engineering units.
inH2O,mbar
kpa,mmhg,
or PCS 400
unit code
None
Returns the instrument engineering units.
within sensor Sets the upper control limit for the active channel.
range and
more than
lower limit
None
Returns upper control limit for active channel
Continued on next page...
4-4
May, 2000
MENSOR® CORP.
EVCTS
REMOTE OPERATION
Table 4.1 continued...
COMMAND
Vent
DATA
None
Vent?
Window
None
within lower
and upper
limits
Window?
Zero
None
desired
pressure or ?
None
Zero?
MENSOR® CORP.
RESPONSE / FUNCTION
If modes are linked, all channels are placed in the vent mode, otherwise the
active channel is placed in Vent.
Returns YES if active channel is in the Vent mode, NO otherwise.
Sets the measured reading exponential filter window for all channels. This
is a pressure value that the measured pressure must be within for the filter
to be applied. No filtering is applied to pressure readings when the measured
pressure is outside of the set window.
Returns the filter window.
Alters the zero value so that the instrument reads the value sent when at the
current pressure, ? clears previous value.
Returns zero offset.
May, 2000
4-5
REMOTE OPERATION
EVCTS
RS-232 SERIAL COMMUNICATION
This section of the manual applies to the serial
communication capability. Refer to the GPIB portion at the beginning of this section of the manual
for additional information relating to commands
and responses.
selected from the SERIAL setup menu. Refer to the
menu tree provided with this manual. The parameters selected must match the host computer. Commands must be sent in ASCII format and
terminated with either a line feed (<lf>) or a carriage return (<cr>) termination character. Commands are not case sensitive, and both upper and
lower case characters are accepted.
The serial communication port allows the EVCTS to
communicate with computers, terminals and modems (referred to as the host) in RS-232 interface
format. Communicating over the serial port does
NOT disable the front panel keypad. The “Keylock”
command should be issued to avoid conflicts while
operating over the bus.
Parameters
Cable Requirements
Data Bits: Select either 7 or 8 bits
RS-232 communications are transmitted over a
three conductor, shielded cable terminated in a
standard DB 25S connector on the instrument end,
and usually the same DB25 connector on the host
end. Figure 4.1 illustrates the proper pin connections to hook-up a host to an EVCTS.
Baud rate: Select the baud rate which matches
that of the host. Available EVCTS baud rates are
1200, 2400, 9600, and 19200.
Stop Bits: Select either 1 or 2 bits
Parity: Select either Odd, Even or None
Command Format
The command format for RS-232 commands is the
same as those given for IEEE-488 operation.
Setup
Before putting the RS-232 interface into operation
the various communication parameters must be
1 SHLD
2 TX
7
SIG. GND
7
EVCTS
COMPUTER
3 RX
3
2
CONNECTOR DB25
CONNECTOR DB25S
Figure 4.1 - RS-232 Cable
4-6
May, 2000
MENSOR® CORP.
EVCTS
MAINTENANCE
MAINTENANCE
The EVCTS was designed for maintenance-free
operation. User maintenance is not recommended
beyond replacement of parts listed in the ‘Spare
Parts List’. If you have questions not covered by this
manual the Mensor team is ready to help. Call
1-800-984-4200 (USA only) or 1-512-396-4200 for
assistance, or E-MAIL [email protected].
BEYOND THE WARRANTY
Take advantage of Mensor’s expert product care.
Mensor Corporation provides complete maintenance and calibration services, available for the life
of the instrument for a nominal fee. Our service
staff is knowledgeable in the innermost details of
all of our instruments. We maintain units that are
in operation in many different industries and in a
variety of applications, and by users with a wide
range of requirements. Many of these instruments
have been in service for over twenty years, and
continue to produce excellent results. Returning
your instrument to Mensor for service benefits you
in several ways:
a.
Our intimate knowledge of the instrument
assures you that it will receive expert care.
b.
In many cases we can recommend for your
consideration, upgrading to the latest enhancements.
c.
Servicing our own instruments which are
used in “real world” applications keeps us
informed as to the most frequent services
required. We use this knowledge in our continuing effort to design better and more robust instruments.
MODULE REPLACEMENT
To replace an electrical or a pneumatic module
follow these steps:
1.
Remove power cord.
2.
Remove the top cover by removing the three
screws on the top rear.
3.
Remove the pressure fittings from the rear
ports.
4.
To remove the pneumatics module, remove
the four screws on the rear panel that screw
into the pressure manifold, and the two
screws under the bottom plate that hold
down the module. Disconnect all the pneumatic module cables from the electrical module. Then slide the pneumatic module
forward slightly to disengage it from the keyhole slots in its base, and lift it out the top of
the instrument.
5.
To remove the electrical module, remove the
cables to the pneumatic module and the front
panel, and remove the two screws under the
bottom plate that hold down the module.
Slide the module forward slightly to disengage the key-hole slots in its base, and lift the
module out the top.
6.
Reverse the order to replace the module.
PROGRAM DISK REPLACEMENT
In order to replace the system program disk, first
remove the power cord from the instrument. Then
remove the rear panel by removing the five screws
holding it to the frame and the four screws near the
pressure ports. The disk drive is located in the
upper center at the rear of the instrument. The disk
is ejected by pressing the eject button.
Push the new disk into the disk slot until it locks
in place. Replace the rear panel and restore the
instrument power. Turning on the instrument will
reboot the EVCTS and load the new program.
MENSOR® CORP.
May, 2000
5-1
MAINTENANCE
EVCTS
Electrical Module
To gain access to the circuit boards inside the
electrical module without removing the module,
remove the instrument top cover (3 screws), and
the left side panel (2 screws). This allows access to
the ten screws that secure the module cover to the
module chassis; four screws at the top, and 2
screws each at the front, left and right sides. Remove these ten screws, then lift the module cover
straight up to remove it.
CAUTION: ESD PROTECTION
REQUIRED. The proper use of
grounded work surfaces and personal wrist straps are required
when coming into contact with
exposed circuits (printed circuit
boards) to prevent static discharge damage to sensitive electronic components.
All of the circuit boards in the module are compatible with IBM AT format Personal Computers
(PC’s). Most are purchased from various manufacturers; they may differ in appearance and position
from one unit to the next but their functionality
remains the same. The exceptions are that the
Solenoid Driver and PLA boards are proprietary,
designed and assembled by Mensor.
1a.
If the battery is already discharged it is not
necessary to apply power to the unit before
replacement; begin at step 2, below.
1b.
If the battery is still functioning first apply
power to the electrical module. This will hold
the CMOS data in RAM while the battery is
out of the circuit.
CAUTION: HIGH VOLTAGE IS PRES E N T I N T H E V IC INITY O F TH E
POWER INPUT CONNECTOR.
2.
Before disconnecting the battery note the
location and orientation of its connector by
making a sketch of the pin numbers and wire
colors in relation to the battery + and –
terminals.
3.
Disconnect the battery connector and remove the battery/connector assembly from
the module.
4.
Confirm that the replacement battery is the
same voltage as the removed battery.
5.
Pay attention to the + and – sides of the two
batteries, and install the connector and wiring on the new battery to match the old
battery.
6.
Connect the battery connector to the motherboard in the same orientation as when it was
removed.
7.
Cycle the power off, then back on. The system
should initialize the same as it normally
does.
CMOS Memory Battery Replacement
Replacement of the CMOS memory backup battery
(see figure 5.1) every two years is recommended in
order to preclude its complete discharge. If the
battery is allowed to discharge before it is replaced
the Basic Input/Output System (BIOS) data stored
in the CMOS Random Access Memory (RAM) will
be lost. When this occurs the internal computer can
not initialize until the BIOS data is restored. To
restore BIOS data, first replace the battery with a
fresh one, then run the CMOS setup routine to
restore lost data as described in the Appendix,
Section 9.
To replace the CMOS battery first gain access to the
interior of the electrical module as stated above.
If the system hangs up with a cursor in the upper
left corner of the display, first check that the system
disk is seated in the disk drive. If the system disk
is in place then refer to the ‘CMOS Setup’ instructions in the Appendix, Section 9.
NOTE: The battery will be either a 3.6V
or a 6V lithium battery. The replacement
battery must be the same voltage level
lithium battery as the one being replaced.
5-2
May, 2000
MENSOR® CORP.
EVCTS
MAINTENANCE
SPARE PARTS LIST
Below is a table showing EVCTS spare parts that
can be ordered from Mensor.
Table 5.1 – Spare Parts
Part Description
Miscellaneous
Manual
Fuses
Power Cord
Rubber Feet
Part Number
Front Panel Assembly
Display Module
0014181001
5000400012
Electrical Module
Multi I/O Board
GPIB Board
Solenoid Driver Board Modified
PLA Board (Specify for Pt3 or
Ps3)
Floppy Drive
Power Supply (modified)
CMOS Backup Battery - 6 V
0014812001
4904000029
4904000015
0014813001
Pneumatics
LP Regulator Top Cap Assembly (Std)
Fitting Adapter - 7/16-20 to
1/8 NPT Female
Fitting Adapter - 7/16-20 to
1/4 NPT Female
O-ring seals for 7/16-20 Fitting
MENSOR® CORP.
0014736001
4100111150
4000400002
3201300001
0014293001
4907000002
0014168001
4100400015
0014266002
6000602015
6000604001
4250010020
May, 2000
5-3
MAINTENANCE
EVCTS
Pt3
SENSOR
Ps3
SENSOR
PL A
SOLENOID DRIVER
PL A
SOLENOID DRIVER
GPIB
I/O
Rear
Front
Note: The electrical module is shown with its cover removed.
Figure 5.1 - Chassis Assembly -Top View
5-4
May, 2000
MENSOR® CORP.
EVCTS
CALIBRATION
CALIBRATION
The EVCTS automatically adjusts the pressure
reading for the effects of temperature and nonlinearity within the calibrated temperature range of
15-45°C. The process is referred to as dynamic
compensation because each reading is so adjusted
before it is output to the display or to a communication bus. Thus, a calibrated EVCTS operated
within its temperature band, and with proper zero
and span adjustments, will provide accurate pressure measurements.
CALIBRATION PRESSURE STANDARD
The EVCTS should have the span verified periodically on each of its transducers (channels) to
insure their stability. Initially, the recommended
period between calibrations is three months. This
period may be extended as confidence is gained in
the span stability.
The recommended calibration medium is dry nitrogen or clean dry instrument air. For low pressure ranges (< 20 psi) head pressure differences
between the standard and the EVCTS can cause
errors. See ‘Head Pressure Correction’ in the Appendix.
CALIBRATION ENVIRONMENT
CALIBRATION PROCEDURES
For maximum accuracy, allow both channels of the
EVCTS to warm up in the MEASURE mode for a
minimum of 45 minutes in an ambient temperature which is in the specified calibration range, and
stable. In addition the instrument should be at rest
on a stable platform which is free of excessive
vibration and shock.
Figure 6.1 (Calibration Setup) illustrates a typical
setup for either local or remote calibration. In the
figure the additional equipment required for remote calibration is shown as optional.
SHUT-OFF
VALVES
The recommended calibration standard is a piston
gauge type (deadweight gauge) with an uncertainty
of 0.01% of reading or better. For measuring vacuum a diaphragm type vacuum gauge with an
accuracy of 0.05% of reading at 250 to 300 millitorr
is recommended.
CALIBRATION MEDIUM
In the calibration setup illustration the “Pressure
Standard” is normally a deadweight test instru-
VENT
COMPUTER
(optional)
PRESSURE
SUPPLY
LINE
REGULATOR
SHUT-OFF
VALVES
METERING
VALVE
VENT
GPIB
VACUUM
PUMP
VOLUME
CONTROLLER
EVCTS
SHUT-OFF
VALVE
PRESSURE
PRESS
PRESSURE
STANDARD
(DWT)
This equipment complies with the requirements in Part
15 of FCC Rules for a Class A computing device.
Operation of this equipment in a residential area may
cause unacceptable interference to radio and TV
reception requiring the operator to take whatever steps
are necessary to correct the interference.
Ps3
Pt3
Ps3
MEASURE/
CONTROL
Pt3
MEASURE/
CONTROL
Ps3
SUPPLY
Pt3
SUPPLY
FUSE: 250V/1.5A
(INTERNAL CONNECTION)
DIAPHRAGM TYPE
VACUUM GAUGE
VAC
NOTE: DISCONNECT WHEN VACUUM
GAUGE RANGE IS EXCEEDED
Ps3
EXHAUST
Pt3
EXHAUST
IEEE STD 488 PORT
SH1, AH1, T6, L4
SR1, RL1, PPO,
DC1, DT1, E2, CO
PARALLEL PORT
SERIAL PORT
Figure 6.1 - Calibration Setup
MENSOR® CORP.
May, 2000
6-1
CALIBRATION
EVCTS
ment, and the “volume controller” refers to a hand
operated variable-volume pressure vernier device.
A diaphragm type vacuum gauge is recommended
over the gauge tube type of vacuum sensor for
calibrating sub-atmospheric pressures. A vacuum
source with a minimum capacity of 21 liters per
minute is recommended.
NOTE: The recommended units for making zero or
span adjustments are psi. Other engineering units
might add a small roundoff error.
An alternate to entering a new zero value is to just
press [=] at the “?” prompt. This will remove the
current zero value and re-establish the factory entered zero offset for the active channel.
To set zero over the GPIB, send the command
‘Channel ZERO value‘, where Channel is Pt3 or
Ps3, and value is the true pressure, (XXX).
CAUTION: DO NOT APPLY MORE THAN
TH E MANUFACTURERS RECOMMENDED MAXIMUM PRESSURE TO
THE VACUUM GAUGE TUBE OR IT MAY
EXPLODE. The maximum pressure for
the Hastings gauge tubes provided by
Mensor is 50 psia. But, energizing the
gauge tube at pressures above atmosphere (15-50 psia) will decrease the life
and accuracy of the tube.
To re-establish the factory entered zero over the
bus send ‘CHANNEL(space)ZERO(space)?‘. (Notice that the only difference between this and the
Zero query command is the space added between
zero and the question mark.)
Setting Sensor Span
With the EVCTS connected to the Calibration
Setup, close both vent shut-off valves and set both
channels to MEASURE mode.
Evacuate the transducers to a low pressure that will
still maintain a viscous flow, typically 250 to 300
millitorr. (At pressures lower than this the actual
pressure at any particular point in the system is
questionable.) Allow from two to five minutes for
the target pressure to stabilize, then convert the
millitorr reading to an equivalent instrument reading for the active measurement units. Millitorr
conversion factors are provided in table 9.2 in the
Appendix.
The current calibration of the active sensor can
now be checked at a number of pressure points
from zero to full scale. If recalibration is needed,
proceed with the following.
Setting Sensor Zero
With both channels in the MEASURE mode and the
output ports at about 300 millitorr, convert the
millitorr reading into the current displayed engineering units. From the keypad push: [2nd], [CAL],
[=], enter password, [=], [=]. At the “?” prompt,
type in the true absolute pressure, [XXX], and [=]
to enter the reading into memory. The display
should now indicate the current “zero” pressure
reading for the active channel. Press [2nd], [F1] to
toggle the alternate channel and again, enter the
true pressure at the “?” prompt, and then [=]. Each
channel has a maximum zero offset of 10% of full
6-2
scale. Zero values higher than 10% of FS will not
be accepted. When finished with setting zeros press
[CE] then [+] or [-] to set span or press [CE] again
to exit calibration mode.
With both channels warmed up and in MEASURE
mode, apply a known absolute pressure equal to
or near the span of the sensor. The value must be
equal to or greater than 50% of the transducer
range or the system will not accept the entry.
The range of span adjustment available is ±10% of
the transducer full scale value. From the keypad,
push [2nd], [CAL], [+], [=] enter password [=] [=].
At the SENSOR SPAN prompt, type in the true
pressure and then [=] to enter the reading. The
display should now indicate the new true pressure
for each channel. Press [2nd] [F1] to toggle to the
alternate channel and check that the shut-off valve
is in the proper state as described above. Set the
applied known pressure equal to or near the full
scale value for this sensor. Type in the true pressure and [=]. Both channels are now spanned to
the new values. Press [CE] two times to back out of
the calibration functions.
To set span over the GPIB, send the command
‘Channel SPAN value‘, where channel is Pt3 or Ps3
and value is the true pressure applied to the sensor. The recalibration is now complete.
An alternate to entering a new span value while in
LOCAL mode is to just press [=] at the “?” prompt.
This will remove the current span value and re-establish the factory entered span value for the active
channel. The same thing can be accomplished in
REMOTE
m o de
by
se nding
‘CH ANNEL(space)ZERO(space)?’ over the bus for each
channel.
May, 2000
MENSOR® CORP.
EVCTS
SPECIFICATIONS
SPECIFICATIONS
Accuracy specifications presented herein are obtained by comparison with primary standards
traceable to the National Institute of Standards and
Technology (NIST, formerly NBS). The uncertainties of these standards are 0.006% of reading or
0.0001 psi, whichever is greater.
Mensor does not use RMS or RSS techniques to
make specifications appear any better than they
actually are. Primary standard uncertainties
should be used in the evaluation of equipment
performance. The specifications shown by Mensor
are worst case conditions and allow the user to
make an honest evaluation of the instrument. Mensor reserves the right to change specifications without notice.
GENERAL SPECIFICATIONS
Size
Width:
. . . .
Height:
Depth:
.
.
.
.
. . . . . . . . . 17.05 inches (43.31 cm)
. 19.00 inches (48.26) with rack adapter
. . . . . . . . . . 6.97 inches (17.70 cm)
. 20.00 inches (51.0 cm) without fittings
Weight
50.00 lbs (22.68 kg) . . . . . . . . . . . standard
54.00 lbs (24.49 kg) . . . . . . with rack adapter
70.70 lbs. (32.07 kg) . . . . . . shipping w/rack kit
Front View
STBY
MEAS
7
CONT
9
ENG
GPIB
4
5
6
CAL
TEST
LIMITS
HELP
1
2
3
+
F1
F2
F3
0
.
=
UNITS
5.25"
(13.34 cm)
2nd
PRESSURE CALIBRATION SYSTEM
.86"
(2.18 cm)
VENT
8
METRIC
CE
COMM
SERIAL
_
EVC TEST SET
Pt3: 100 inHgA ∆P3: 100 inHg
17.05" (43.31 cm)
19.00" (48.26 cm)
Overall width with Rack Mount Flanges attached.
Side View
6.97"
(17.70 cm)
20.0" (50.80 cm)
Add 0.45 inches (1.14 cm) to height with feet attached.
Figure 7.1 - Dimensional Outline
MENSOR® CORP.
May, 2000
7-1
SPECIFICATIONS
EVCTS
Display
Mounting
Vacuum fluorescent, 2 lines of 40 characters
Keypad
15 dual-function keys and one shift (2nd) key.
Standard: Table model.
Optional: Rack Mount Kit with slides is available for mounting in 19 inch rack.
Pressure (maximum)
200 inHga (atmosphere to any port)
Power
Standard: 115 vac, 60 Hz, 125 VA typical. 90−
132 or 180−264 vac, 47−463 Hz, 175 VA
max.
Operating Environment
Temperature: 0°C to 50°C. (Note: This is not the
compensated temperature range.)
Humidity: 5% to 95% RH non-condensing humidity.
Shipping, Storage And Handling Environment
–20 to 70°C.
Minimal vibration.
5 gravities acceleration maximum.
Non-condensing humidity.
MEASUREMENT SPECIFICATIONS
Accuracy
Pt3: 0.01 inHga
Ps3: 0.01 inHga
Resolution
Pt3: 0.001 inHga
Ps3: 0.001 inHga
Response Time
33 milliseconds.
Warm-up
Approximately 45 minutes to achieve full accuracy.
Gravity/Orientation Effect
Negligible effect on span, linearity and zero in
any attitude.
Mechanical Shock
5 gravities maximum.
Clean, dry non-corrosive gases. See the table
‘Materials in Contact with Pressure Medium’ in
the Appendix.
Filters
Internal replaceable 20 micron filters are in line
with all rear panel ports.
80386 or higher.
Communications
Time: (after warm-up)
0.01% FS maximum 30 days.
Zero may be reset without affecting span or
linearity.
Span Drift
Pressure Medium
CPU
Zero Drift
Time: 0.01% FS max. 90 days.
Span may be reset without affecting zero or
linearity.
Internal Pneumatic Volume (Measure/
Control Ports)
Measure Mode: 30 cc
Control Mode: 238 cc
External Pneumatic Volume
Maximum: 1 liter
Minimum: 0.1 liter (100 cc)
IEEE-488.1 and IEEE-488.2
Fittings
7/16" - 20 SAE/MS (female)
(1/8" Female NPT adapters provided)
7-2
May, 2000
MENSOR® CORP.
EVCTS
SPECIFICATIONS
CONTROL SPECIFICATIONS
Pressure Rate Limit Mode
A pressure rate of slow or fast may be selected
to set the maximum slew speed between selected
control points. The default value is ‘Fast’. Maximum and minimum slew speed is dependent
upon pressure range per the following table:
Standard Pressure Ranges
Pt3: 0 −100 inHga
Ps3: 0 −100 inHga
Source Pressure
Instrument air or dry nitrogen. Recommended
pressure at the Supply port:
Table 7.1
Recommended Pressure at the Supply Port
Channel
Supply Port Pressure
Pt3
0 − 110 inHga
Ps3
0 − 110 inHga
Accurate external regulation not required. Note:
Pt3 and Ps3 Supply ports are internally connected.
Exhaust Pressure
Vacuum pump required for absolute pressure
control. A minimum pump capacity of 21 liters
per minute recommended. One pump per channel recommended.
Reference Pressure
Permanent vacuum
Stability of Controlled Pressure
Pt3: 0.004 inHga
Ps3: 0.004 inHga
Table 7.2
Minimum/Maximum Slew Speed
Full Scale
(FS)
Slow
Medium
Fast
Pt3
0.1
inHg/sec
0.5
inHg/sec
1.0
inHg/sec
Ps3
0.1
inHg/sec
0.5
inHg/sec
1.0
inHg/sec
Dynamic Response (slew time for Fast Response mode)
160 seconds maximum between any two pressure points from 0.5% FS above the EXHAUST
pressure to FS, to within 0.1% FS of the set point
into a 1/2 liter volume. A larger volume will
lengthen the stated time.
Settling Time
15 seconds after the slew time as indicated above
(for pressure to remain within ± 0.01% FS of the
set control point). External volume will lengthen
the stated time.
Overshoot
Pt3: 0.01 inHga
Ps3: 0.01 inHga
Minimum Controlled Pressure
0.1 inHga
MENSOR® CORP.
May, 2000
7-3
SPECIFICATIONS
EVCTS
User's Notes:
7-4
May, 2000
MENSOR® CORP.
EVCTS
OPTIONS
OPTIONS
This section lists options available for the EVCTS.
Users might consider letting the factory install a
special feature not listed here. Mensor welcomes
the opportunity to quote on such requests. The cost
of adding an enhancement frequently will amortize
itself in a very short time because of improved
process efficiency.
RELIEF VALVES
There are several types of relief valves available:
·
One-way differential
·
Two-way differential
·
One-way absolute
·
One-way absolute with vacuum gauge tube
opening with a 90 degree stop, various nickelchrome and stainless steel fixtures, a vinyl satchel
style handle and a fold-out metal “push” handle
with a vinyl grip. The interior is filled with high
density polyurethane foam with a die-cut cavity to
cradle the instrument with fitting adapters in place,
and an additional cavity to store related accessories. Rugged and weather resistant, the case makes
an attractive, practical shipping and moving container. The case weighs approximately 29 pounds
(13.15 kg) unloaded, and can support a load of up
to 150 pounds (68.04 kg). Nominal dimensions are
15 inches by 24 inches by 26 inches (38.10 cm x
60.96 cm x 66.04).
RACK MOUNT KIT
Relief valves are available for pressure ranges from
0.5 psi to 1020 psi. Over time, contaminants in the
system may enter the valves and prevent proper
operations. Servicing the valves by the user is not
recommended.
TRANSPORT CASE (PN 0011159001)
A wheeled Transport Case is available suitable for
moving the EVCTS between sites, or as an airfreight (or other) shipping container. The case is
constructed of a high impact plastic with a silvergrey exterior. It includes two keys, locks, a piano
hinge, an anodized interlocking tongue and groove
The EVCTS is easily mounted into a 7 inch opening
of a 19 inch wide rack. The rack used should satisfy
the dimensional requirements shown below. It
should be free of vibration and excessive heat, as
noted below.
Install the chassis slide, being sure to allow the
proper spacing above and below the EVCTS. An
EVCTS with the rack mount option is then installed
from the front of the rack. Before installing the
EVCTS, remove the four feet from the bottom of the
instrument. Slide the EVCTS all the way into position and secure the instrument to the rack before
connecting power and pneumatic lines to the rear
panel.
V
V
Fold-out Handle
Wheels
Figure 8.1 - Transport Case
MENSOR® CORP.
May, 2000
8-1
OPTIONS
EVCTS
After all equipment is installed, check to see that
the temperature inside the rack does not exceed
38°C. If it does, additional rack spacing and/or
ventilation must be considered.
CAUTION: MOTORS OR VIBRATING DEVICES
SHOULD BE MOUNTED SO AS TO MINIMIZE
THE VIBRATIONS AT THE EVCTS.
Front View
STBY
MEAS
7
6.97"
(17.70 cm)
9
GPIB
5.25"
(13.34 cm)
CE
4
5
6
TEST
LIMITS
2nd
PRESSURE CALIBRATION SYSTEM
VENT
COMM
CAL
1
.86"
(2.18 cm)
CONT
8
ENG
UNITS
METRIC
SERIAL
_
HELP
2
3
+
F1
F2
F3
0
.
=
EVC TEST SET
Pt3: 100 inHgA ∆P3: 100 inHg
17.05" (43.31 cm)
19.00" (48.26 cm)
Side View
Slide
Member
2.30"
(5.84 cm)
20.00" (50.80 cm)
Figure 8.2 - Rack Mount Dimensions
8-2
May, 2000
MENSOR® CORP.
EVCTS
OPTIONS
19" (48.26 cm)
RACK WITH STANDARD RETMA
MOUNTING HOLE PATTERN
RACK WIDTH
ONE RETMA SPACE (1.75"
(4.45 cm) RECOMMENDED,
INSIDE THE RACK, ABOVE
AND BELOW THE EVCTS
FOR VENTILATION.
VERTICAL MOUNTING RAILS
COUNTERSINK 4 HOLES ON
FRONT FOR #10 FLAT HEAD
SCREWS
6-31/32" (17.70 cm)
7" (17.78 cm)
OPENING
5/8" (1.59 cm)
VERTICAL SLIDE
LOCATION
2" (5.08 cm)
Figure 8.3 - Rack Specifications
THREADED RETAINING PLATE
RACK REAR VERTICAL
RACK FRONT VERTICAL
#10-32 X 1/2"
PAN HEAD
(2 PER SLIDE)
#10-32 x 1/2"
PAN HEAD
(2 PLACES)
#10-32 X 1/2"
FLAT HEAD
(2 PER SLIDE)
PIN ON INNER
SIDE MUST
BE DOWN
SLIDE MEMBER.
MATES WITH MEMBER
ATTACHED TO EPRTS
SLIDE DEPTH 22" TO 25"
(55.88 cm TO 63.50 cm)
WITH BRACKET PROVIDED
Figure 8.4 - Slide Specifications
MENSOR® CORP.
May, 2000
8-3
OPTIONS
EVCTS
User's Notes:
8-4
May, 2000
MENSOR® CORP.
EVCTS
APPENDIX
APPENDIX
TABLE OF CONTENTS
Conversion Factors, Pressure . . . . . . . . . . . . . .
Conversion Factors, Psi (Table 9.1) . . . . .
Conversion Factors, Millitorr (Table 9.2) . . .
Temperature Conversion (Table 9.3) . . . . . . . . . .
Measurement Units (Table 9.4) . . . . . . . . . . . . .
Materials in Contact with Pressure Medium (Table 9.5)
Head Pressure Correction
Gas Density (Table 9.6) . . . . . . . . . . . .
Head Pressure Calculation (Figure 9.1) . . . .
IEEE Connector and Pin Functions (Figure 9.2) . . . .
CMOS Setup
. . . . . . . . . . . . . . . . . . . .
Electrical Module Front View (Figure 9.3) . .
BIOS Setup Opening Screen (Figure 9.4) . . .
Standard CMOS Setup Screen (Figure 9.5) . .
Advanced CMOS Setup Screen (Figure 9.6) .
Commands, Queries And Default Values (Table 9.7) . .
MENSOR® CORP.
May, 2000
.
.
.
.
.
.
.
.
.
.
.
.
.
.
.
.
.
.
.
.
.
.
.
.
.
.
.
.
.
.
.
.
.
.
.
.
.
.
.
.
.
.
.
.
.
.
.
.
.
.
.
.
.
.
.
.
.
.
.
.
.
.
.
.
.
.
.
.
.
.
.
.
.
.
.
.
.
.
.
.
.
.
.
.
.
.
.
.
.
.
.
.
.
.
.
.
.
.
.
.
.
.
.
.
.
.
.
.
.
.
.
.
.
.
9-2
9-2
9-2
9-3
9-4
9-4
.
.
.
.
.
.
.
.
.
.
.
.
.
.
.
.
.
.
.
.
.
.
.
.
.
.
.
.
.
.
.
.
.
.
.
.
.
.
.
.
.
.
.
.
.
.
.
.
.
.
.
.
.
.
.
.
.
.
.
.
.
.
.
.
.
.
.
.
.
.
.
.
.
.
.
.
.
.
.
.
.
.
.
.
.
.
.
.
.
.
.
.
.
.
.
.
.
.
.
.
.
.
.
.
.
.
.
.
.
.
.
.
.
.
.
.
.
.
.
.
.
.
.
.
.
.
.
.
.
.
.
.
.
.
.
.
.
.
.
.
.
.
.
.
.
.
.
.
.
.
.
.
.
.
.
.
.
.
.
.
.
.
. 9-5
. 9-5
. 9-6
. 9-7
. 9-7
. 9-8
. 9-9
. 9-9
9-10
9-1
APPENDIX
EVCTS
CONVERSION FACTORS, PRESSURE
Table 9.1 – Conversion Factors, psi
Units
Pressure Unit
To convert from Psi
To convert to Psi
1
PSI
1
1
2
INHG @ 0C
2.036020
0.4911544
15
MBAR
68.94757
0.01450377
19
MMHG @ 0C
51.71508
0.01933672
22
KPA
6.894757
0.1450377
Table 9.2 – Conversion Factors, millitorr
Units
9-2
Pressure Unit
To Convert From Millitorr
To Convert To Millitorr
1
PSI
0.0000193367
51715.1
2
INHG @ 0C
0.0000393701
25400.0
15
MBAR
0.00133322
19
MMHG @ 0C
0.001
1000.00
22
KPA
0.000133322
7500.64
May, 2000
750.064
MENSOR® CORP.
EVCTS
APPENDIX
TEMPERATURE CONVERSION
Table 9.3 – Temperature Conversion
Find the known value in a center (shaded) column. If the known value is in °C, then
the equivalent value is found in the °F column, or if the known value is in °F then the
conversion is found in the °C column.
°C
-17.78
-17.22
-16.67
-16.11
-15.56
-15.00
-14.44
-13.89
-13.33
-12.78
-12.22
-11.67
-11.11
-10.56
-10.00
-9.44
-8.89
-8.33
-7.78
-7.22
-6.67
-6.11
-5.56
-5.00
-4.44
-3.89
-3.33
-2.78
-2.22
-1.67
-1.11
-0.56
0.00
0.56
1.11
1.67
2.22
2.78
3.33
3.89
4.44
5.00
5.56
6.11
6.67
7.22
7.78
8.33
8.89
9.44
0
1
2
3
4
5
6
7
8
9
10
11
12
13
14
15
16
17
18
19
20
21
22
23
24
25
26
27
28
29
30
31
32
33
34
35
36
37
38
39
40
41
42
43
44
45
46
47
48
49
MENSOR® CORP.
°F
32.00
33.80
35.60
37.40
39.20
41.00
42.80
44.60
46.40
48.20
50.00
51.80
53.60
55.40
57.20
59.00
60.80
62.60
64.40
66.20
68.00
69.80
71.60
73.40
75.20
77.00
78.80
80.60
82.40
84.20
86.00
87.80
89.60
91.40
93.20
95.00
96.80
98.60
100.40
102.20
104.00
105.80
107.60
109.40
111.20
113.00
114.80
116.60
118.40
120.20
°C
10.00
10.56
11.11
11.67
12.22
12.78
13.33
13.89
14.44
15.00
15.56
16.11
16.67
17.22
17.78
18.33
18.89
19.44
20.00
20.56
21.11
21.67
22.22
22.78
23.33
23.89
24.44
25.00
25.56
26.11
26.67
27.22
27.78
28.33
28.89
29.44
30.00
30.56
31.11
31.67
32.22
32.78
33.33
33.89
34.44
35.00
35.56
36.11
36.67
37.22
50
51
52
53
54
55
56
57
58
59
60
61
62
63
64
65
66
67
68
69
70
71
72
73
74
75
76
77
78
79
80
81
82
83
84
85
86
87
88
89
90
91
92
93
94
95
96
97
98
99
°F
122.00
123.80
125.60
127.40
129.20
131.00
132.80
134.60
136.40
138.20
140.00
141.80
143.60
145.40
147.20
149.00
150.80
152.60
154.40
156.20
158.00
159.80
161.60
163.40
165.20
167.00
168.80
170.60
172.40
174.20
176.00
177.80
179.60
181.40
183.20
185.00
186.80
188.60
190.40
192.20
194.00
295.80
197.60
199.40
201.20
203.00
204.80
206.60
208.40
210.20
°C
37.78
38.33
38.89
39.44
40.00
40.56
41.11
41.67
42.22
42.78
43.33
43.89
44.44
45.00
45.56
46.11
46.67
47.22
47.78
48.33
48.89
49.44
50.00
50.56
51.11
51.67
52.22
52.78
53.33
53.89
54.44
55.00
55.56
56.11
56.67
57.22
57.78
58.33
58.89
59.44
60.00
60.56
61.11
61.67
62.22
62.78
63.33
63.89
64.44
65.00
May, 2000
100
101
102
103
104
105
106
107
108
109
110
111
112
113
114
115
116
117
118
119
120
121
122
123
124
125
126
127
128
129
130
131
132
133
134
135
136
137
138
139
140
141
142
143
144
145
146
147
148
149
°F
212.00
213.80
215.60
217.40
219.20
221.00
222.80
224.60
226.40
228.20
230.00
231.80
233.60
235.40
237.20
239.00
240.80
242.60
244.40
246.20
248.00
249.80
251.60
253.40
255.20
257.00
258.80
260.60
262.40
264.20
266.00
267.80
269.60
271.40
273.20
275.00
276.80
278.60
280.40
282.20
284.00
285.80
287.60
289.40
291.20
293.00
294.80
296.60
298.40
300.20
°C
65.56
66.11
66.67
67.22
67.78
68.33
68.89
69.44
70.00
70.56
71.11
71.67
72.22
72.78
73.33
73.89
74.44
75.00
75.56
76.11
76.67
77.22
77.78
78.33
78.99
79.44
80.00
80.56
81.11
81.67
82.22
82.78
83.33
83.89
84.44
85.00
85.56
86.11
86.67
87.22
87.78
88.33
88.89
89.44
90.00
90.56
91.11
91.67
92.22
92.78
°F
150
151
152
153
154
155
156
157
158
159
160
161
162
163
164
165
166
167
168
169
170
171
172
173
174
175
176
177
178
179
180
181
182
183
184
185
186
187
188
189
190
191
192
193
194
195
196
197
198
199
302.00
303.80
305.60
307.40
309.20
311.00
312.80
314.60
316.40
318.20
320.00
321.80
323.60
325.40
327.20
329.00
330.80
332.60
334.40
336.20
338.00
339.80
341.60
343.40
345.20
347.00
348.80
350.60
352.40
354.20
356.00
357.80
359.60
361.40
363.20
365.00
366.80
368.60
370.40
372.20
374.00
375.80
377.60
379.40
381.20
383.00
384.80
386.60
388.40
390.20
9-3
APPENDIX
EVCTS
MEASUREMENT UNITS (Number)
The unitno command selects the measurement units to be output on the bus and the display.
The syntax for the unitno command is UNITS N where N is a number from the ‘Units’ column
in the following table.
Table 9.4 – Measurement Units
Number
Units
Output Format
1
pounds per square inch
PSI
2
inches of mercury @ 0°C
INHG @ 0C
15
millibar
MBAR
19
millimeters of mercury @ 0°C
MMHG @ 0C
22
kilopascals
KPA
MATERIALS IN CONTACT WITH PRESSURE MEDIUM
The recommended pressure medium is clean, dry, non-corrosive gases. Consult Mensor
Corporation for applications requiring liquid-filled pressure sensors.
Table 9.5 – Materials in Contact with Pressure Medium
Chamber
Gauge Unit
Pressure
Reference
Absolute Units
Pressure
N/A
Aluminum
X
X
Brass
X
X
Metallics
Copper
X
Gold
X
Solder (60/40)
X
Stainless Steel
(300 Series)
X
X
X
X
Non-Metallics
Buna-N Rubber
Silicon
X
Loctite Sealant
X
PVC
X
Silicone Grease
X
X
Silicone Rubber
X
Teflon
X
Fluorocarbon
9-4
X
X
May, 2000
X
MENSOR® CORP.
EVCTS
APPENDIX
HEAD PRESSURE CORRECTION
The accuracy of pressure measurement depends on several factors, one of which is the
consideration of the head pressure in the system. The pressure medium, whether a gas or liquid,
can cause an error in the measurement if not considered. In some cases the offset may be
insignificant, and it may be ignored. The following information provides instructions for
determining the density of the pressure medium and how to calculate the head pressure effect.
Gas Density
Liquids and gases have mass and are affected by gravity. The extent of the effect is dependent
upon the density of the pressure medium. Liquids normally have a constant density that does
not change with pressure. Gases, however, increase in density as the pressure increases. To
determine the density of a gas at a specific pressure multiply the absolute pressure by the density
from the following table. For gas the head pressure difference due to temperature changes within
the compensated temperature range will be insignificant.
Table 9.6 – Gas Density
Density per psi in pounds/in3 (Dpsi)
Gas @ 23°C
2.9315 X 10⁻⁶
Air, Dry
(A)
4.0443 X 10⁻⁶
(CO2)
4.4824 X 10⁻⁶
Helium
(He)
4.0466 X 10⁻⁷
Hydrogen
(H2)
2.0379 X 10⁻⁷
Nitrogen
(N2)
2.8355 X 10⁻⁶
Argon
Carbon Dioxide
Head Pressure Calculation
The pressure at the input port (P2 of figure 9.1) of the Device Under Test (DUT) will be a positive
number if the standard is positioned higher than the DUT. If the standard is lower than the DUT
the head pressure correction will be a negative value. The equation used to calculate the head
pressure is:
P2 = P1 (1 + h x Dpsi)
h = Difference in vertical height between the
center lines of the two pressure ports.
Dpsi = Gas density (refer to the "Gas Density" table).
Pressure
Standard
P1
(psi)
h in inches
Device
Under
Test
P2
(psi)
Figure 9.1 - Head Pressure Calculation
MENSOR® CORP.
May, 2000
9-5
APPENDIX
EVCTS
IEEE CONNECTOR AND PIN FUNCTIONS
PIN DESCRIPTION
Pin 12
Pin 24
Pin 1
Pin 13
24-pin Female Connector
viewed from rear of instrument
1
2
3
4
5
6
7
8
9
10
11
12
13
14
15
16
17
18
19
20
21
22
23
24
D101
D102
D103
D104
EOI
DAV
NRFD
NDAC
IFC
SRQ
ATN
SHIELD - Connect to Earth GND
D105
D106
D107
D108
REN
PAIRED WITH 6
PAIRED WITH 7*
PAIRED WITH 8
PAIRED WITH 9*
PAIRED WITH 10
PAIRED WITH 11*
GND
* PINS 19, 21, AND 23 ARE PART OF TWISTED PAIRS WITH
OPPOSING PINS. TO BE GROUNDED NEAR TERMINATION
OF OTHER WIRE.
Figure 9.2 - IEEE Connector and Pin Functions
9-6
May, 2000
MENSOR® CORP.
EVCTS
APPENDIX
CMOS SETUP
Before proceeding with the CMOS Setup routine, determine the condition of the CMOS backup
battery on the CPU Board. If it is not fresh and viable, or if it is suspect, replace it. In order
to proceed with this routine the following additional equipment is required:
1.
An AT compatible Computer Keyboard
2.
Most electrical modules come with a combination video driver/printer driver card capable
of running a Hercules type monochrome graphics monitor. If this is the case there will be
an unoccupied 9 pin D-sub female connector available on the front of the electrical module
(see figure 9.2). Otherwise, it is necessary for the user to provide a video driver and
compatible monitor.
CAUTION: DO NOT CONNECT A MONITOR TO THE 9 PIN D-SUB CONNECTOR ON
THE SOLENOID DRIVER BOARD THAT HAS THE SOLENOID DRIVER LINES
PLUGGED INTO IT. DOING SO COULD SEVERELY DAMAGE THE MONITOR.
3.
A graphics monitor compatible with the above video driver card. A Hercules compatible
monochrome monitor is adequate.
User supplied
Monitor Connector
(optional)
Factory supplied
Monitor Connector
(some units)
Solenoid
Driver Board
Keyboard
Connector
Figure 9.3 - Electrical Module Front View
To restore the BIOS data (CMOS Setup):
1.
Turn off power to the electrical module.
CAUTION: ESD PROTECTION REQUIRED.
The proper use of grounded work surfaces and
personal wrist straps are required when coming
into contact with exposed circuits (printed circuit
boards) to prevent static discharge damage to
sensitive electronic components.
MENSOR® CORP.
May, 2000
9-7
APPENDIX
EVCTS
2.
If necessary, install the video driver into an available slot on the motherboard. (To gain
access to the interior of the electrical module refer to the text under the headings ‘Module
Replacement’ and ‘Electrical Module’ in Section 5, Maintenance.)
3.
Connect the monitor to the video driver board.
4.
Connect the keyboard to the keyboard connector on the front of the electrical module (see
figure 9.3).
5.
Apply power to the electrical module and monitor, and watch the screen.
After a few seconds the monitor will display instructions on how to continue, or it will display
an error message such as:
693“Press the <F1> key to continue...”
or
“Hit <Del> if you want to run SETUP”
Follow the instructions on the screen to get to the BIOS setup menu. Figures 9.4, 9.5, and 9.6.
are examples of the screens displayed for CMOS setup routine with a 1992 version of American
Megatrends Inc (AMI) BIOS and one specific motherboard. These are typical but may vary for
different software and hardware configurations. Enter the data into both the standard and the
advanced CMOS setup screens as shown in the examples, or as appropriate for the specific
installation. After all of the data is entered and checked, press F10 from screen 9.4 to save these
settings and exit to DOS. Cycle the EVCTS power off and back on. Contact Mensor if there are
still problems initializing the system.
BIOS SETUP PROGRAM - AMIBIOS SETUP UTILITIES
(C) 1992 American Megatrends Inc., All Rights Reserved
STANDARD CMOS SETUP
ADVANCED CMOS SETUP
AUTO CONFIGURATION WITH BIOS DEFAULTS
AUTO CONFIGURATION WITH POWER-ON DEFAULTS
CHANGE PASSWORD
HARD DISK UTILITY
WRITE TO CMOS AND EXIT
DO NOT WRITE TO CMOS AND EXIT
Standard CMOS Setup for Changing Time, Date, Hard Disk type, etc.
ESC: Exit
: Select
F2/F3: Color
F10: Save & Exit
Figure 9.4 - BIOS Setup Opening Screen
9-8
May, 2000
MENSOR® CORP.
EVCTS
APPENDIX
BIOS SETUP PROGRAM - STANDARD CMOS SETUP
(C) 1992 American Megatrends Inc., All Rights Reserved
Date (mm/date/year): Mon, Nov 30, 1992
Base memory : 640 KB
Time (hour/min/sec): 12 : 47 : 22
Ext. memory : 0 KB
Cyln
Hard disk C: type
: Not Installed
Hard disk D: type
: Not Installed
Floppy Drive A:
: 1.4 MB, 3 1/2"
Floppy Drive B:
: Not Installed
Primary Display
: Not Installed
Keyboard
: Not Installed
Head
Month : Jan, Feb,...Dec
Date : 01, 02, 03,...31
Wpcom
LZone
Sect
Size
Sun Mon Tue Wed Thu Fri Sat
1
2
3
4
5
6
7
8
9
10
11
12
13
14
15
16
17
18
19
20
21
22
23
24
25
26
27
28
29
30
1
2
3
4
5
6
7
8
9
10
11
12
Year : 1901, 1902,...2099
ESC:Exit
:Select F2/F3:Color Pu/Pd:Modify
Figure 9.5 - Standard CMOS Setup Screen
BIOS SETUP PROGRAM - ADVANCED CMOS SETUP
(C) 1992 American Megatrends Inc., All Rights Reserved
Above 1 MB Memory
: Disabled
Hard Disk Type 47 RAM Area : 0:300
: Enabled
Numeric Processor Test
Floppy Drive Seek At Boot : Enabled
System Boot Up Sequence
: A:, C:
Fast Gate A20 Option
: Enabled
Password Checking Option
: Setup
Video ROM Shadow C000,32K : Enabled
System ROM Shadow F000,64K : Enabled
Fast reset
: Enabled
Cyrix cache
: Disabled
ATBUS Stepping
: Enabled
Write wait state
: 0W 2CLK2
ESC:Exit
F5:Old Values
:Sel (Ctrl)Pu/Pd:Modify F1:Help F2/F3:Color
F6:BIOS Setup Defaults
F7:Power-On Defaults
Figure 9.6 - Advanced CMOS Setup Screen
MENSOR® CORP.
May, 2000
9-9
APPENDIX
EVCTS
COMMANDS, QUERIES AND DEFAULT VALUES
Table 9.7 lists all the instrument specific commands and queries, and lists factory-set default
values in the center column.
Table 9.7 – Commands, Queries And Default Values
Command
ADDRESS
X
CONTROL
DEFAULT
X
ENGLISH
X
F1
F2
FILTER
X
LOCK
LOWERLIMIT
X
MEASURE
METRIC
X
OUTFORM
PASSWORD
SETPT
SPAN
X
STABLETIME
STABLEWIN
STANDBY
STEP
UNITS
UPPERLIMIT
VENT
WINDOW
ZERO
9-10
Default
1
none
ON
none
X
none
90
none
NORMAL
none
none
none
2
0.004 inHg
none
none
0.025 inHgA
none
May, 2000
Query
ADDRESS?
CHAN?
CONTROL?
X
DOM?
X
ERROR?
F1?
F2?
FILTER?
ID?
LOCK?
LOWERLIMIT?
MAXRANGE?
MEASURE?
X
MINRANGE?
OUTFORM?
X
SETPT?
SPAN?
STABLE?
STABLETIME?
STABLEWIN?
STANDBY?
STEP?
UNITS?
UPPERLIMIT?
VENT?
WINDOW?
ZERO?
MENSOR® CORP.
EVCTS
GLOSSARY
GLOSSARY
Absolute Pressure
Calibration Curve
A pressure that is referenced to the absence of all
other pressure, that is, referenced to true zero
pressure. See Pressure Relationships.
A graphical representation of the calibration
points.
Calibration Cycle
Accuracy
The difference between the average of multiple
measurements of a value and the true value. See
Uncertainty.
The application of known values of pressure, and
recording of corresponding output readings, over
a full (or specified portion) of the range of an
instrument in an ascending and descending direction.
Air Speed
The distance a body moves through the air per unit
of time. Air speed is related to the free-stream total
pressure (ram air pressure) and the static (or
barometric) pressure.
Calibration Record
Altitude
Calibration Traceability
The vertical distance above mean sea level expressed in units of length (meters or feet). Mensor
uses the ICAO Standard Atmosphere 1964 to relate
absolute pressure (14.696145 psia) to altitude.
The relationship of an instrument calibration,
through a specified step-by-step process, to national standards or nationally accepted measurement systems through an unbroken chain of
comparisons.
A record of the measured relationship of the instrument output to the applied pressure over the instrument range.
Altitude Rate
The change in altitude per unit time expressed as
meters or feet per minute or per second.
Calibration Uncertainty
Ambient Conditions
The maximum calculated error in the output values, shown in a calibration record, due to causes
not attributable to the instrument being calibrated.
The conditions (pressure, temperature, etc.) surrounding the case of the instrument.
Command Message
See Interface Message.
Attitude
The orientation of the instrument represented by
its angles of inclination to three orthogonal axes.
Compensation
An addition of specific materials, processes or
devices to counteract a known cause of error.
Attitude Error
The error due to the orientation of the sensor
relative to the direction in which gravity acts upon
the sensor.
Data Message
Same as Device Dependent Message.
DCL (Device Clear)
Barometric Pressure
Atmospheric pressure at the point of measurement, frequently stated in terms of the height of a
column of mercury. See Pressure Relationships.
Calibration
A test during which known values of pressure are
applied to the instrument and corresponding output readings are recorded under specified conditions.
MENSOR® CORP.
A GPIB interface message used to reset the internal
functions of all devices on the bus.
Dead Band
The change through which the input to an instrument can vary without causing a change to the
instrument output.
Device Dependent Message
A message sent from one device to another that is
specific to that device, i.e., to set up parameters
unique to that device or to transfer data.
May, 2000
10-1
GLOSSARY
EVCTS
Differential Pressure
The difference between the measured pressure and
a fixed reference pressure. See Pressure Relationships.
Drift
Any change in output over a period of time, which
change is not a function of the pressure being
measured. See Stability.
Elevation
The vertical height from mean sea level, especially
of a point on the earth’s surface, used in making
local corrections to barometric readings.
Environmental Conditions
Specified external conditions (shock, vibration,
temperature, etc.) to which an instrument may be
exposed during shipping, storage, handling, and
operation.
the GPIB is defined in the IEC 625-1 standard, and
is identical to the GPIB except for the connector.
GPIB Address
The address of a device on the GPIB, composed of
a primary and possibly a secondary address. The
EPRTS does not support secondary addressing.
Gravity Correction
The correction factor applied to measurement
processes involving mass to account for the gravity
constant exerted at the site of the measurement.
GTL (Go To Local)
A GPIB interface message that causes the addressed listener(s) to go to the LOCAL (front panel)
mode.
HP-IB (Hewlett-Packard Interface Bus)
Another name for the GPIB referring to the originator of the bus.
EOI
A GPIB line that is used to signal the end of a device
dependent message.
Error
The algebraic difference between the indicated
value and the true value of the pressure, usually
expressed in percent of full scale.
Hysteresis
The maximum difference in output, at any pressure
value within the specified range, when the value is
approached first with increasing and then decreasing pressure.
IEC 625-1
International version of the GPIB.
FS
See Full Scale.
IEEE 488.1-1987
The standard defining the GPIB.
Full Scale
The upper limit of the device range, frequently
noted as “FS”. See also Range and Span
Gauge Pressure
The difference between atmospheric pressure and
a variable pressure. See Pressure Relationships.
Interface Message
A message from the GPIB controller to all devices
used to manage the bus and provide some control
over the devices on the bus. See Device Dependent
Message.
Linearity
GET (Group Execute Trigger)
A GPIB interface message that causes all devices
with the GET capability and are currently addressed to listen to initiate a programmed action,
for example to store the current reading, take a
sweep on an oscilloscope, etc. The GET command
provides a means of triggering multiple devices
simultaneously.
10-2
The closeness of a calibration curve to a specified
straight line expressed as a percentage of full scale
deviation.
Line Pressure
The highest pressure within a system which can be
present at the pressure sensor. See Reference
Pressure.
GPIB (General Purpose Interface Bus)
Listener
A common name for the communication system
defined in IEEE 488.1-1987. It is also known by
the following names; IEEE 488.1, IEEE bus, HP-IB,
ASCII bus, PLUS bus. The international version of
A GPIB device that receives device dependent messages from a talker.
May, 2000
MENSOR® CORP.
EVCTS
GLOSSARY
LLO (Local Lockout)
Parallel Poll
A GPIB interface message that causes all devices
that respond to the Local Lockout command to
ignore local control.
The process of polling all configured devices at once
and returning a composite poll response. The
EVCTS does not support Parallel Polling. See Serial Poll.
MLA (My Listen Address)
Peak Pressure
A GPIB interface message used to command a
device to be addressed as a listener.
The greatest (or if desired, the least) pressure
sensed during a measurement session.
MTA (My Talker Address)
Precision
A GPIB interface message used to command a
device to be addressed as a talker.
The ability of an instrument to repeat an output
when measuring a given quantity under identical
conditions.
Operating Conditions
See Environmental Conditions.
Pressure Medium
The fluid (gas or liquid) which comes in contact
with the sensing element in the pressure chamber.
Output
The electrical or digital quantity, produced by an
instrument, which is a function of the applied
pressure.
Pressure Rate
An orderly change in pressure over a specified time.
Overpressure Rating
The pressure which may be applied to the sensing
element or the case (as specified) of a sensor without damage to either the sensing element or sensor
case as specified.
Pressure Relationships
The relationship of various pressure terms are
illustrated below in figure 10.1.
PRESSURE
PSISG
• 29.9213 in.HgA @ 0°C
Sealed
Gauge Pressure
• 14.6961 psiA
PSIG
Absolute Pressure
• Zero ft altitude
PSIA
Standard Atmospheric
Pressure:*
Gauge Pressure
Differential
Pressure
PSID
• 1013.250 millibars
Vacuum
Pressure
• 760 mmHgA
• 33.9602 ft.H 2 O @ 20°C
* Values are approximate. Refer
to pressure conversion tables
in the Appendix.
PSIA
Barometric
Pressure
• 101.325 kilopascals
Absolute
Pressure
• 760 torr
Barometric
Pressure
Absolute Reference
(Perfect Vacuum)
0
Figure 10.1 - Pressure Relationships
MENSOR® CORP.
May, 2000
10-3
GLOSSARY
EVCTS
Range
Status Byte
The measurand values over which the measuring
device is intended to measure, specified by the
lower and upper limits. See also Full Scale and
Span.
The data byte sent by a device when it is serially
polled.
Talker
A GPIB device that sends device dependent messages to listeners.
Rate
See Altitude Rate or Pressure Rate.
Temperature Error
Reference Pressure
The pressure relative to which a differential pressure instrument measures pressure.
Repeatability
The ability of an instrument to reproduce output
readings when the same pressure value is applied
repeatedly, under the same conditions, and in the
same direction.
The maximum change in output, at any pressure
value within the specified range, when the
transducer temperature is changed from the nominal compensated temperature (mid-range of the
stated compensated temperature range) to the
compensated temperature extremes.
Temperature Range, Compensated
The temperature range over which the instrument
specifications are specified.
Resolution, Output
The maximum number of distinguishable values of
output over the range of the instrument. Stated
another way, the least detectable magnitude of
change in the pressure.
Temperature Range, Operating
Response Time
Uncertainty
The length of time required for the output of the
instrument to rise to a specified percentage of its
final value as a result of a step change of pressure.
The maximum credible limits for the difference
between the true value and the measured value of
the pressure under consideration.
SDC (Selected Device Clear)
Vacuum Pressure
A command used to reset the internal functions of
an addressed listener.
A pressure less than ambient barometric pressure.
See Pressure Relationships.
Serial Poll
Warm-up
The process of polling and reading the status of one
specified device on the bus.
The period of time from the application of power
until the instrument has reached its operating temperature, required to assure that the instrument
will perform within all specified tolerances.
Span
The algebraic difference between the lower and
upper limits of the range. See also Full Scale and
Span.
The range of ambient temperatures within which
the instrument will function and not suffer any
damage or permanent change in characteristics.
Zero Drift
A change in the zero-pressure output over a specified period of time.
SRQ (Service Request)
A GPIB line that a device asserts to notify the
controller that the device needs service.
Stability
The ability of an instrument to retain its performance characteristics for an extended period of time.
10-4
May, 2000
MENSOR® CORP.
EVCTS
INDEX
INDEX
A
Accuracy . . . . . . . . . . . . . . . . . . 1-6, 2-1, 7-2, 9-5
Adapters, Fitting . . . . . . . . . . . . . . . . . 1-1, 2-1, 7-2
Appendix . . . . . . . . . . . . . . . . . . . . . . 9-1 - 9-10
B
Basic Input/Output System (BIOS) . . . . . . . . . . . .
Battery . . . . . . . . . . . . . . . . . . . . . . . . . .
Bi-Directional Pressure Control . . . . . . . . . . . . . .
5-2
5-2
8-1
C
.
.
.
.
.
.
.
.
.
.
.
.
.
.
.
.
.
.
.
.
.
.
.
.
.
.
.
.
.
.
.
.
.
.
.
.
.
.
.
.
.
.
.
.
.
.
.
.
.
.
.
.
.
.
.
.
.
.
.
.
.
.
.
.
.
.
.
.
.
.
.
.
.
.
.
.
.
.
.
.
.
.
.
.
. . . . . . . . 9-6
. . . . . . . . 9-5
. . . 1-7, 6-1 - 6-2
. . . . . . . . 1-1
. . . . . . . . 1-6
. . . . . . . . 6-1
. . . . . . . . 6-1
. . . . . . . . 6-1
. . . . . . . . 6-1
. . . . . . . . 1-7
. . . . . . . . 6-2
. . . . . . . . 6-2
. . . . . . 1-2, 8-1
iii, 5-2, 6-2, 8-2, 9-7
. . . . . . 1-1, 1-7
. . . . . . . . 1-6
. . . . . . 1-6, 5-4
. . . . . . . . 2-1
. . . . . . . . 5-2
. . . . . . . . 5-2
. . . . . . . . 9-7
. . . . . . . . 4-1
. . . . . . . . 4-2
. . . . . . . . 7-2
. . . . . . . . 6-1
. . . . . . . . 2-1
. . . . . . . . 1-7
. . . . . . . . 9-6
.
.
.
.
.
.
.
.
.
.
.
.
.
.
.
.
.
.
.
.
.
.
.
.
.
.
.
.
.
.
.
.
.
.
.
.
.
.
.
.
.
.
.
.
.
.
.
.
.
.
.
.
.
.
.
.
.
.
.
.
.
.
.
.
.
.
.
.
.
.
.
.
.
.
.
.
.
.
.
.
.
.
.
.
.
.
.
.
.
.
.
.
.
.
.
.
.
.
.
.
.
.
.
.
.
.
.
.
.
.
.
.
.
.
.
.
.
.
.
.
.
.
.
.
.
.
.
.
.
.
.
.
.
.
.
.
.
.
.
.
.
. . 1-1
. . 4-2
. . 9-5
. . 7-1
1-3, 1-6
. . 1-3
. . 5-1
1-2, 7-2
. . 7-2
.
.
.
.
.
.
8-1
7-3
7-3
9-2
1-1
7-2
D
MENSOR® CORP.
.
.
.
.
.
.
.
.
.
.
.
.
.
.
.
.
.
.
.
.
.
.
.
.
.
.
.
.
.
.
.
.
.
.
.
.
.
.
.
.
.
.
.
.
.
.
.
.
.
.
.
.
.
.
.
.
.
.
.
.
.
.
.
.
.
.
.
.
.
.
.
.
7-2
7-2
6-1
7-3
Electrical Block Diagram
Electrical Module . . . .
Replacement . . . . .
Exhaust . . . . . . . . .
Exhaust Pressure . . . .
.
.
.
.
.
.
.
.
.
.
.
.
.
.
.
.
.
.
.
.
.
.
.
.
.
.
.
.
.
.
.
.
.
.
.
.
.
.
.
.
.
.
.
.
.
.
.
.
.
.
.
.
.
.
.
.
.
.
.
.
. . .
1-3,
. . .
. . .
. . .
. . 1-3
1-6, 9-7
. . 5-1
. . 2-1
. . 7-3
Fan . . . . . . . . . . . . . . . . . .
FCC Radio Frequency Emission Notice
Filters . . . . . . . . . . . . . . . . .
Fittings . . . . . . . . . . . . . . . . .
Adaptors . . . . . . . . . . . . . .
Flow Controller . . . . . . . . . . . .
Front Panel . . . . . . . . . . . . . .
Assembly . . . . . . . . . . . . . .
Display . . . . . . . . . . . . . . .
Keypad . . . . . . . . . . . . . . .
Fuses . . . . . . . . . . . . . . . . .
.
.
.
.
.
.
.
.
.
.
.
.
.
.
.
.
.
.
.
.
.
.
.
.
.
.
.
.
.
.
.
.
.
.
.
.
.
.
.
.
.
.
.
.
.
.
.
.
.
.
.
.
.
.
.
.
.
.
.
.
.
.
.
.
.
.
1-3, 1-6
. . . iv
. . 7-2
. . 7-2
1-1, 2-1
. . 1-6
1-2, 7-1
. . 1-1
1-2, 7-2
1-2, 7-2
. . 5-3
E
F
Cable, GPIB . . . . . . . . . . . . .
Calculation, Head Pressure . . . . .
Calibration . . . . . . . . . . . . .
Chart . . . . . . . . . . . . . . .
Data . . . . . . . . . . . . . . .
Environment . . . . . . . . . . .
Medium . . . . . . . . . . . . .
Pressure Standard . . . . . . . .
Procedures . . . . . . . . . . . .
Services . . . . . . . . . . . . .
Setting Sensor Span . . . . . . .
Setting Sensor Zero . . . . . . .
Case . . . . . . . . . . . . . . . . .
Cautions . . . . . . . . . . . . . . .
Certificate of Compliance . . . . . .
Chassis Assembly . . . . . . . . . .
Chassis Assembly Illustration . . . .
Check, System . . . . . . . . . . .
CMOS Memory Battery Replacement
CMOS Read Only Memory . . . . . .
CMOS Setup . . . . . . . . . . . .
Command and Query Format . . . .
Command/Query Field . . . . . . .
Communications . . . . . . . . . .
Compensation, dynamic . . . . . . .
Connections, Pressure . . . . . . .
Connector . . . . . . . . . . . . . .
IEEE . . . . . . . . . . . . . . .
Control
Bi-Directional Pressure . . . . .
Minimum Pressure . . . . . . .
Stability . . . . . . . . . . . . .
Conversion Factors, Pressure . . . .
Cord, Power . . . . . . . . . . . . .
CPU . . . . . . . . . . . . . . . . .
Damage, Shipping . . . . .
Data Field . . . . . . . . .
Density, Gas . . . . . . . .
Dimensional Outline . . .
Disk Drive . . . . . . . . .
Disk, Program Information
Replacement . . . . . .
Display . . . . . . . . . .
Drift . . . . . . . . . . . .
Span . . . . . . . .
Zero . . . . . . . .
Dynamic Compensation
Dynamic Response . . .
.
.
.
.
.
.
.
.
.
.
.
.
.
.
.
.
.
.
.
.
.
.
.
.
.
.
.
.
.
.
.
.
.
.
.
.
.
.
.
.
.
.
.
.
.
.
.
.
.
.
.
.
.
.
.
.
.
.
.
.
.
.
.
.
.
.
.
G
Gases . . . . . . . . . . . . . . . . . . . . . . . . . . . 7-2
Glossary . . . . . . . . . . . . . . . . . . . . . . 10-1 - 10-4
Gravity/Orientation Effect . . . . . . . . . . . . . . . . . 7-2
H
Head Pressure
Calculation . . . . . . . . . . . . . . . . . . . . . . . 9-5
Gas Density . . . . . . . . . . . . . . . . . . . . . . . 9-5
Health and Safety Warnings . . . . . . . . . . . . . . . . . iii
I
IEEE-488 . . . . . . . . . . . . .
Capability Codes . . . . . . . .
Connector and Pin Functions . .
Initial Inspection . . . . . . . . . .
Installation . . . . . . . . . . . . .
Mounting . . . . . . . . . . . .
Power On . . . . . . . . . . . .
Pressure Connections . . . . .
Internal Pneumatic Volume . . . .
Internal System Layout Illustration
Introduction . . . . . . . . . . . .
.
.
.
.
.
.
.
.
.
.
.
.
.
.
.
.
.
.
.
.
.
.
.
.
.
.
.
.
.
.
.
.
.
.
.
.
.
.
.
.
.
.
.
.
.
.
.
.
.
.
.
.
.
.
.
.
.
.
.
.
.
.
.
.
.
.
.
.
.
.
.
.
.
.
.
.
.
. . . . . 4-1
. . . . . 4-1
. . . . . 9-6
. . . . . 1-1
2-1, 5-1 - 5-4
. . . . . 2-1
. . . . . 2-1
. . . . . 2-1
. . . . . 7-2
. . . . . 1-6
. . 1-1 - 1-7
K
Keypad . . . . . . . . . . . . . . . . . . . . . . 1-2, 3-1, 7-2
Functions and Functions List . . . . . . . . . . 3-2 - 3-4
Menu Descriptions . . . . . . . . . . . . . . . . . . . 3-4
May, 2000
11-1
INDEX
EVCTS
L
Local Operation . . . . . . . . . . . . . . . . . . . . 3-1 - 3-6
M
Maintenance . . . . . . . . . . . . . . .
CMOS Memory Battery Replacement
Electrical Module . . . . . . . . . .
Module Replacement . . . . . . . . .
Program Disk Replacement . . . . .
Spare Parts List . . . . . . . . . . .
Manifold . . . . . . . . . . . . . . . . .
Measure/Control Ports . . . . . . . . .
Measurement Units Table . . . . . . . .
Mechanical Shock . . . . . . . . . . . .
Menu Key Functions . . . . . . . . . . .
Menu Tree . . . . . . . . . . . . . . . .
Mode
Local . . . . . . . . . . . . . . . . .
Pressure Rate Limit . . . . . . . . .
Remote . . . . . . . . . . . . . . . .
Module
Electrical . . . . . . . . . . . . . . .
Input Power . . . . . . . . . . . . .
Pneumatic . . . . . . . . . . . . . .
Replacement . . . . . . . . . . . . .
Mounting . . . . . . . . . . . . . . . .
.
.
.
.
.
.
.
.
.
.
.
.
.
.
.
.
.
.
.
.
.
.
.
.
.
.
.
.
.
.
.
.
.
.
.
.
.
.
.
.
.
.
.
.
.
.
.
.
.
.
.
.
.
.
.
.
.
.
.
.
.
.
.
.
.
.
.
.
.
.
.
.
.
.
.
.
.
.
.
.
.
.
.
.
5-1 - 5-4
. . 5-2
. . 5-2
. . 5-1
. . 5-1
. . 5-3
1-2, 2-1
. . 2-1
. . 9-4
. . 7-2
. . 3-5
. . 3-6
. . . . . . . . .
. . . . . . . . .
. . . . . . . . .
.
.
.
.
.
.
.
.
.
.
.
.
.
.
.
.
.
.
.
.
.
.
.
.
.
.
.
.
.
.
.
.
.
.
.
1-1
7-3
1-1
. . 1-1
. . 1-3
. . 1-1
. . 5-1
2-1, 7-2
N
National Institute of Stds and Tech (NIST) . . . . . . . . 1-7
NPT . . . . . . . . . . . . . . . . . . . . . . . . 1-1, 2-1, 7-2
O
.
.
.
.
.
.
.
.
.
.
.
.
.
.
.
.
.
.
.
.
.
.
.
.
.
.
.
.
.
.
. . . . . 7-2
1-1, 3-1 - 3-6
1-1, 4-1 - 4-11
. . . 8-1 - 8-3
. . . . . 9-4
. . . . . 7-3
P
11-2
. . . . . . . . . . . . . . . . 1-3
. . . . . . . . . . . . . . . . 1-7
. . . . . . . . .
. . . . . . . . .
. . . . . . . . .
. . . . . . . . .
. . . . . . . . .
. . . . . . . . .
. . . . . . . . .
. . . . . . . . .
. . . . . . . . .
. . . . . . . . .
. . . . . . . . .
. . . . . . . . .
. . . . . . . . .
in Contact with
. . . . . . . . .
.
.
.
.
.
.
.
.
.
.
.
.
.
.
.
.
.
.
.
.
.
.
.
.
.
.
.
.
.
.
.
.
.
.
.
.
.
.
.
.
.
.
.
.
.
. . . . 2-1
. . . . 2-1
. . . . 7-3
. . . . 9-2
. . . . 7-3
iii, 7-2, 9-4
. . . . 7-3
. . 1-2, 2-1
. . . . 7-3
. . . . 7-3
. . . . 7-3
. . . . 7-3
. . . . 9-2
. . . . 9-4
. . . . 7-3
R
Rack Mount Kit . . . . . . . .
RAM . . . . . . . . . . . . . .
Rear Panel . . . . . . . . . . .
Communication Connectors
Fan . . . . . . . . . . . . .
Line-fuse Holder . . . . . .
System Power Switch . . . .
Voltage Select Switch . . . .
Reference Pressure . . . . . .
Relief Valves . . . . . . . . . .
Remote Operation . . . . . . .
Resolution . . . . . . . . . . .
Resolution, Output . . . . . . .
Response, Dynamic . . . . . .
Response, Time . . . . . . . .
.
.
.
.
.
.
.
.
.
.
.
.
.
.
.
.
.
.
.
.
.
.
.
.
.
.
.
.
.
.
.
.
.
.
.
.
.
.
.
.
.
.
.
.
.
.
.
.
.
.
.
.
.
.
.
.
.
.
.
.
.
.
.
.
.
.
.
.
.
.
.
.
.
.
.
.
.
.
.
.
.
.
.
.
.
.
.
.
.
.
.
.
.
.
.
.
.
.
.
.
.
.
.
.
.
.
.
.
.
.
.
.
.
.
.
.
.
.
.
.
.
.
.
.
.
.
.
.
.
.
.
.
.
.
.
.
.
.
.
.
.
.
.
.
.
.
.
.
.
.
.
.
.
.
.
.
.
.
.
.
.
.
.
.
.
8-1 - 8-3
. . . 5-2
. . . 1-1
. . . 1-2
. . . 1-2
. . . 1-2
. . . 1-2
. . . 1-2
. . . 7-3
. . . 8-1
4-1 - 4-11
. . . 7-2
. . . 7-2
. . . 7-3
. . . 7-2
SAE . . . . . . . . . . . . . . .
Safety . . . . . . . . . . . . . .
Schematic, Pneumatic . . . . . .
Sensor . . . . . . . . . . . . . .
Services, Calibration . . . . . . .
Settling Time . . . . . . . . . . .
Shipping Damage . . . . . . . .
Shock, Mechanical . . . . . . . .
Size . . . . . . . . . . . . . . .
Slew Speed . . . . . . . . . . .
Software License Agreement . . .
Solenoid Valve . . . . . . . . . .
Source Pressure . . . . . . . . .
Span . . . . . . . . . . . . . . .
Span Drift . . . . . . . . . . . .
Span, Setting the Sensor-Absolute
Specifications . . . . . . . . . .
Stability, Controlled Pressure . .
Standards . . . . . . . . . . . .
Supply Pressure
see also Source Pressure . . .
Supply Pressure Port . . . . . .
Switch
Power . . . . . . . . . . . . .
Setup . . . . . . . . . . . . .
Voltage Select . . . . . . . . .
System Overview . . . . . . . . .
.
.
.
.
.
.
.
.
.
.
.
.
.
.
.
.
.
.
.
.
.
.
.
.
.
.
.
.
.
.
.
.
.
.
.
.
.
.
.
.
.
.
.
.
.
.
.
.
.
.
.
.
.
.
.
.
.
.
.
.
.
.
.
.
.
.
.
.
.
.
.
.
.
.
.
.
.
.
.
.
.
.
.
.
.
.
.
.
.
.
.
.
.
.
.
.
.
.
.
.
.
.
.
.
.
.
.
.
.
.
.
.
.
.
.
.
.
.
.
.
.
.
.
.
.
.
.
.
.
.
.
.
.
.
.
.
.
.
.
.
.
.
.
.
.
.
.
.
.
.
.
.
.
.
.
.
.
.
.
.
.
.
.
.
.
.
.
.
.
.
.
.
.
.
.
.
.
.
.
.
.
.
.
.
.
.
.
.
.
.
.
.
.
.
.
.
.
.
.
.
.
.
.
S
Operating Environment . . . . . . . .
Operation, Local . . . . . . . . . . .
Operation, Remote . . . . . . . . . .
Options . . . . . . . . . . . . . . . .
Output Format for Measurement Units
Overshoot . . . . . . . . . . . . . . .
Packaging for Shipment
Panel
Front . . . . . . . .
Rear . . . . . . . .
Passwords . . . . . . .
Plumbing . . . . . . .
Pneumatic Module . .
Replacement . . . .
Pneumatic Schematic .
Pneumatic Volume . .
Ports
Communication . .
Exhaust . . . . . .
Measure/Control . .
Pressure . . . . . .
Supply . . . . . . .
Power . . . . . . . . .
Cord . . . . . . . .
Switch . . . . . . .
Power Supply . . . . . . .
Power Up! . . . . . . . . .
Pressure
Connections . . . . . .
Control Pressure Check
Controlled Stability . . .
Conversion . . . . . . .
Exhaust . . . . . . . . .
Medium . . . . . . . . .
Minimum Controlled . .
Ports . . . . . . . . . .
Ranges . . . . . . . . .
Rate . . . . . . . . . .
Reference . . . . . . . .
Source . . . . . . . . .
Units . . . . . . . . . .
Pressure Medium, Materials
Pressure Rate Limit Mode .
. . . . . . . . . . . . . . . . . . .
iv
.
.
.
.
.
.
.
.
.
.
.
.
.
.
.
.
.
.
.
.
.
.
.
.
.
.
.
.
.
.
.
.
.
.
.
.
.
.
.
.
.
.
.
.
.
.
.
.
.
.
.
.
.
.
.
.
.
.
.
.
.
.
.
.
.
.
.
.
.
.
.
.
.
.
.
.
.
.
.
.
.
.
.
.
.
.
.
.
.
.
.
.
.
.
.
.
.
.
.
.
.
.
.
.
.
.
.
.
.
.
.
.
. . . . 1-2
. . . . 1-2
. . . . 3-4
. . . . 2-1
1-1, 1-4, 1-6
. . . . 5-1
. . 1-5, 2-1
. . . . 7-2
.
.
.
.
.
.
.
.
.
.
.
.
.
.
.
.
.
.
.
.
.
.
.
.
.
.
.
.
.
.
.
.
.
.
.
.
.
.
.
.
.
.
.
.
.
.
.
.
.
.
.
.
.
.
.
.
.
.
.
.
.
.
.
.
.
.
.
.
.
.
.
.
.
.
.
.
.
.
.
.
.
.
.
.
.
.
.
.
.
.
.
.
.
.
.
.
.
.
.
.
.
.
.
.
.
.
.
.
.
.
.
.
. . . . 1-2
. . . . 2-1
. . . . 2-1
1-2, 2-1, 1-7
. . . . 2-1
1-7, 2-1, 7-2
. . . . 1-1
. . . . 2-1
May, 2000
2-1, 7-2
. . . iii
1-4, 1-7
2-1, 6-2
. . 1-7
. . 7-3
. . 1-1
. . 7-2
. . 7-1
. . 7-3
. . . iv
. . 1-6
. . 7-3
6-1 - 6-2
. . . 7-2
. . . 6-2
7-1 - 7-3
. . . 7-3
. . . 7-1
. . . . . . . . . . . . . 7-3
. . . . . . . . . . . . . 2-1
.
.
.
.
.
.
.
.
.
.
.
.
.
.
.
.
.
.
.
.
.
.
.
.
.
.
.
.
.
.
.
.
.
.
.
.
.
.
.
.
.
.
.
.
1-7, 2-1
. . 1-6
. . 1-2
. . 3-1
MENSOR® CORP.
EVCTS
INDEX
T
Temperature Effects . . . . . . .
Temperature Conversion Table . .
Time
Response . . . . . . . . . . . .
Settling . . . . . . . . . . . . .
Warm-up . . . . . . . . . . . .
Traceability, Calibration . . . . .
Trademarks . . . . . . . . . . . .
Tree, Menu . . . . . . . . . . . .
Troubleshooting Guide . . . . . .
Error Symptoms and Solutions
V
. . . . . . . . . . . .
. . . . . . . . . . . .
.
.
.
.
.
.
.
.
.
.
.
.
.
.
.
.
.
.
.
.
.
.
.
.
.
.
.
.
.
.
.
.
.
.
.
.
.
.
.
.
.
.
.
.
.
.
.
.
.
.
.
.
.
.
.
.
.
.
.
.
.
.
.
.
.
.
.
.
.
.
.
.
7-2
9-3
.
.
.
.
.
. . 7-2
. . 7-3
2-1, 7-2
. . 7-1
. . . iv
3-6, 9-10
. . . 5-2
. . . 5-3
U
Uncertainty . . . . . . . . . . . . . . . . . . . . . . 6-1, 7-1
Valves
Relief . . . . . . . . . . . . . . . . . . . . . . . . . . 8-1
Solenoid . . . . . . . . . . . . . . . . . . . . . . . . 1-6
Volume, Internal Pneumatic . . . . . . . . . . . . . . . . 7-2
W
Warm-up . . . . . . . . . .
Warnings and Caution Notes
Warranty . . . . . . . . . .
Certificate . . . . . . .
Weight . . . . . . . . . . .
.
.
.
.
.
.
.
.
.
.
.
.
.
.
.
.
.
.
.
.
.
.
.
.
.
.
.
.
.
.
.
.
.
.
.
.
.
.
.
.
.
.
.
.
.
.
.
.
.
.
. . . . 2-1, 7-2
iii, 5-2, 6-2, 8-2
. . ii, 1-7, 5-1
. . . . . . 1-1
. . . . . . 7-1
Z
Zero . . . . . . . . . . . . . . . . . . . . . . . . . . . . 6-2
Zero Drift . . . . . . . . . . . . . . . . . . . . . . . . . 7-2
MENSOR® CORP.
May, 2000
11-3
INDEX
EVCTS
User's Notes:
11-4
May, 2000
MENSOR® CORP.