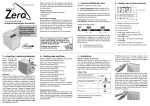
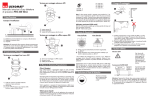
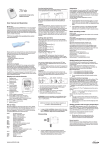
1
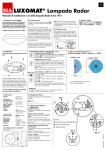
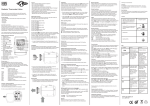
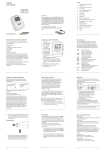
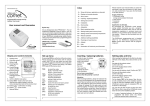
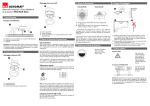
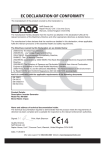
GB B.E.G. LUXOMAT ® TRV2-ZW Installation and operating instructions for B.E.G. – programmable energy-saving radiator thermostat LUXOMAT® TRV2-ZW 1. Part / Part No. / Accessories LUXOMAT® Thermostat TRV2-ZW: 4. Inserting / replacing batteries Remove the battery cover where indicated using a screwdriver and pulling the cover off. 92046 Then insert the batteries as shown in the illustration. For accessories, refer to www.luxomat.com/en-92046 TRV2-ZW USB-TRV2 (Accessory optional) 1. T urn the manual thermostat head up completely, loosen the fastening and pull the thermostat off of the valve. 2. U se an appropriate adapter, if required, and push it onto the valve. i ff Do not use rechargeable batteries! Ensure that the polarity is correct! Scope of delivery (included in the box) 1 TRV2-ZW energy saving radiator thermostat 1 User manual 1 Connector 3 Adapters Attention: Application as directed • Do not disassemble batteries! 2. Display and control elements 1 Heating times 2Child lock active 3Battery low 4.aTravel function active 4.bWireless connection active 4.cComfort temperature 1 2 3 4 5 6 7 7Selector wheel 3. Set up menu By pressing MENU you will arrive at the set up menu. Please choose one of the items with the selector wheel. With OK you can select one menu item and with the selection wheel they can be adjusted. The button OK confirms the setting. The button MENU leads to the previous level. adaptation of temperature to the room situation 8. Dismounting • Take low batteries out of the device immediately. • Keep batteries away from extreme warming – danger of leakage! • Do not apply used and new batteries together. If needed, clean the battery and the contacts before using them. • Keep the batteries away from children. • When getting in touch with battery acid instantly irrigate the affected parts with clear water and call a doctor. 5. Setting date and time active 4.d E conomy temperature active 4.e Window/freeze protection function active 5 AUTO or MANU mode active 6.aButton MENU – leads to the main menu (starting from regular display); within the menu one keypress leads to the previous level 6.bButton OK – confirmation of setting – timer function 6.cButton to select the mode AUTO = automatic mode MANU = manual mode PRAE = PRESENCE mode APRA = Automatic mode + additional presence detection setting of time programme setting of comfort and economy temperature setting of date and time window function reset of the device to factory preset starting of a new adaptation to adjust the valve travel function installation function i • Do not short-circuit batteries! The TRV2-ZW programming port is intended ONLY for our USBTRV2 (Accessory: 92054). Never connect other devices with the programming port! 4. N ow, you put TRV2-ZW on the connector until it noticeably clicks into place. ff In case of a later installation please switch in the menu to before you install the device. Herewith the installation is facilitated. • Never recharge batteries, danger of explosion! With the TRV2-ZW energy-saving control, you have acquired a wirelessly connected radiator control designed to control temperatures in enclosed rooms and thus reduce heating energy consumption. Please use the thermostat only for this purpose. 3. S crew the connector on the valve or the adapter. After inserting the batteries for the first time the date will flash on the display. Now, date and time can be set. Set day with the selector wheel. Confirm with . OK Set hour with the selector wheel. Confirm with Set minute with the selector wheel. Confirm with That´s it. OK . OK 9. Adaptation – On the display will be shown. Now, the motor will completely move to the installation position in order to make the installation easier. As soon as TRV2-ZW is ready for installation will be shown on the display. You can also set date and time via the menu item later on. But in case of that, TRV2-ZW does not move to the installation position. ff In case of replacing batteries, the stored time programme will remain active. You should check the specified time to ensure that. i 6. Creating the wireless connection 1. Initialise the device before it logs in for the first time. The menus may be navigated by using the adjusting wheel and function keys. You can navigate to the menu item with MENU OK and confirming with OK 2. T he login procedure may now commence. To commence the login procedure, switch the MyControl to learning mode: i ff In order to dismount TRV2-ZW press the releasing device to loosen the locking device. Now, pull the TRV2ZW off of the valve. Set date with the selector wheel. Confirm with OK . Set month with the selector wheel. Confirm with OK . The learning procedure for the TRV2-ZW is also started in the next step. MENU OK OK A symbol representing the radiator control will be shown in the MyControl display when the learning procedure has been concluded. 3. O nly the time for the repeater‘s cyclical query now needs to be set. This time also automatically determines the maximum period before the heating is switched on after movement has been detected. The options are: 3, 4 or 5 minutes. You may navigate to these settings via MENU OK Example ..... OK 7. Installation TRV2-ZW can be quickly and easily mounted on all common valves (see adapter table). It can be installed without grime and water spots because the heating circuit is not interrupted. Initial installation: Press the button OK until appears on the display so that TRV2-ZW will be able to start its adaptation. The device will adapt itself to the stroke of your valve body. To do this the valve will now be opened and closed several times to store the end points. In some cases this process can take a few minutes. After successful adaptation it returns to normal mode. i ff Should adaptation become necessary again, e.g. if your radiator does not cool down in the position, please press in the menu the button until adaptation starts again. ff If the mistake is shown on the display place TRV2-ZW onto the radiator valve and then take the batteries out for a short time in order to execute a reset. 10. Basic operating modes MANU-mode In the MANU-mode TRV2-ZW adjusts to the manually specified temperature. AUTO-mode In AUTO mode, he TRV2-ZW operates as a standalone unit (without motion detection) and switches between two temperatures depending on the settings made in the timer program: comfort temperature (factory preset 21°C) economy temperature (factory preset 16°C) Presence mode In presence mode, the TRV2-ZW will switch the heater to the set comfort temperature when it detects motion. Otherwise the temperature will remain at the previously set economy temperature. Auto-presence mode Auto-presence mode combines automatic mode with presence mode, i.e. fixed heating times may set during which the economy control switches the heating to the specified comfort temperature. When economy temperature is active, the unit will adjust the heating depending on its presence-detection, i.e. it will activate the heating if it senses any movement. The heating and economy times can be specified via the adjustable time programme. It is possible to set 8 switch points (4 heating and 4 economy times) per day at the most. TRV2-ZW has the following factory preset: Economy time: lowering to economy temperature (factory preset: 1st economy time at 22:00) 11. Setting heating and economy times With TRV2-ZW it is possible to set 4 heating and 4 economy times per day – one for each day or one for a block of several days. TAG1 to TAG7 represent the weekdays from Monday to Sunday. Additionally, the corresponding days are shown as abbreviation below the menu bar on the display. Block construction: T 1–5 = same programme from Monday to Friday T 1–6 = same programme from Monday to Saturday T 1–7 = same programme from Monday to Sunday i ff For non-programmed days the factory preset remains active. Setting of an individual programme: Press MENU . Select the menu item with the selector wheel. Press OK . for Monday is shown on the display. Select day/block with the selector wheel. Confirm with Set the beginning of the 1st heating time (symbol selector wheel. Confirm with OK . . OK ) with the Set the beginning of the 1st economy time (symbol ) with the selector wheel. Confirm with OK . Now, if desired, a 2nd, 3rd or 4th heating/economy time can be entered. ff If you do not want to set a further heating/economy “ with OK . time confirm “ i The next day for programming is shown on the display. i ff If you do not want to enter a further day, leave the menu with MENU . If the temperature is shown on the display the programming is finished. ff Within the blocks you can also overwrite single days with differing times. 12. Setting comfort and economy temperature Press MENU . Select the menu item with the selector wheel. Confirm with OK . Set comfort temperature with the selector wheel. Confirm with OK . Set the economy temperature with the selector wheel. Confirm with OK . Area Area : 8°C, freeze protection function is active : valve is completely open Travel function For the time you are absent you can select an individual temperature. After this period the originally defined programme becomes active again. . Confirm with OK Press MENU . Select the menu item appears on the display). Select with the selector (suitcase wheel the end of the travel function (= date of the recommencement of the regular heating times). Confirm with OK . Set the appears time and confirm with the button OK . The signal on the display. Now set the temperature and confirm with OK . appears on the display. With MENU the function can be deactivated. Child lock You can lock TRV2-ZW to protect the device from unauthorized activation. at the same time for about 2 Press the buttons OK + seconds until the signal appears on the display in order to lock the device. By using this button combination again the symbol disappears and you release the lock. Heating pause – Closing the TRV2-ZW Press MENU . Select the menu item with the selector wheel. and confirm with OK . Set the Confirm with OK . Select temperature on the display to . The valve is now closed and will work without a time programme. The calcification protection function remains active once a week. After the heating pause you switch in the menu to the AUTO-mode and the personally set programme will be executed again. Going back to factory preset / All reset with the selector wheel. Press MENU . Select the menu item flashes, confirm with OK . TRV2-ZW Confirm with OK . is reset again. Now, proceed as described for the initial operation. Freeze protection and calcification protection function are active automatically: ff By the way: Maximum energy saving can be obtained with an economy temperature which is about 5˚C below the comfort temperature. With the selector wheel an adaptation of the room temperature is possible at any time. In the AUTO - mode it remains active until the next switch point is reached. Now, the usual programme becomes active again. 14. Further functions Timer function The timer function is selected with the timer-button . With this function a user-defined temperature for a programmable period can be entered. This can be very useful in case of a . First, the time for which the party, for example. Press time programme has been deactivated is shown. Confirm with OK . Now, the desired temperature can be set. Confirm with OK . Offset If the perceived temperature significantly differs from the set thermostat temperature a temperature set up can be executed. with the selector Press MENU . Select the menu item will wheel. Confirm with OK . The degree setting flash on the display. Now, set up the desired adaptation for the temperature (from -5 up to +5°C) with the selector wheel. Confirm your entry with OK . The temperature display does not change! Window function If you open a window and consequently the temperature drops significantly, TRV2-ZW will automatically close the heating valve in order to save energy. The display will show . Afterwards, TRV2-ZW will resume normal operation. For the set up select in the menu. Confirm with OK . First, the sensibility is selected with the selector wheel ( = high sensibility, = medium sensibility (factory preset), = low sensibility). Confirm with OK . Now, you enter the time (10 min. (factory preset) - 60 min.) for which the valve should remain closed. Confirm with OK . Cause Solution Batteries do not have enough power. Replace batteries. Wireless connection not working Please check whether all wireless subscribers have been correctly connected. Heating element does not warm up. Is the boiler water temperature O.K.? Adjust the temperature of the boiler water. Valve does not open, is it calcified after the summer pause / heating pause? Remove the TRV2-ZW, move the valve system back and forth per hand or with a tool. Heating element does not cool down. Valve does not close completely. It may be that the closing point of your valve seat has shifted. Adapt again (see “Adapting”) Move the valve stem several times by hand, it may be that adaptation is impossible because your valve is calcified or the seat no longer performs its function. Pressure piece drops out. The pressure piece which is located on the bottom, can drop out due to a continuous thread. Insert pressure piece. Press MENU . Choose in the menu items with the help of the adjusting wheel. Confirm with OK . Now the continuous thread rotates and fastens the pressure piece again. No adaptation possible. Is the installation OK? TRV2-ZW is not installed to the heater. Install TRV2-ZW to the heater. Valve stroke is too short. Open and close the valve several times manually or replace the batteries. Motor movement is not possible. Does the valve stem move freely? flashing. Calcification protection function To prevent radiator valves from calcifying TRV2-ZW is submitted to a calcification protection programme once a week on Friday mornings. LCD-Display Standby Press MENU . Choose menue point “STBY” with the selector wheel. Confirm with OK and choose “ON/OFF“ with the selector wheel. After a period of 30 seconds the LCD display switches into standby mode. By pressing any button the display will be reactivated (reset of standby mode by removing the battery). This will prolong battery life. MENU OK Power supply: Battery 2 x AA 1,5 V Nominal voltage: 2,1 - 3,6 V Transmission and reception frequency: 868,42 MHz Transmission and reception range (open area): Start MyControl unlearning mode 19. Technical data Transmission power: <10 mW 15. Logging the unit out of the system Sensibility: Variable adjustable: OK Alternatively, the unit may also be unlearned using the MyControl‘s submenu. max. 100 m Number of subscribers: up to 80 (recommended) X in 16. Cleaning and used devices 13. Manual operation Problem Freeze protection function If the temperature drops below 6°C, TRV2-ZW opens the valve until the temperature again rises above 8°C. This prevents the radiators from freezing. The TRV2-ZW‘s unlearning mode will be activated. i 18. Help Cleaning To clean the TRV2-ZW use only a dry or lightly wet cloth. Avoid chemical solvent – it will probably damage the device. 0,5°C, 1,0°C, 1,5°C and 2,0°C Child lock included Dimensions Housing: L 82 x W 55 x D 65 mm Display: W 29 x H 21mm Ambient temperature: +5°C – +45°C Used devices Do not throw old devices and packaging into the household waste. They can be recycled. You receive further information at your local government or at WEEE directive coverage. 17. Adapters Heimeier, Junkers Landys+Gyr, MNG, Honeywell, Braukmann thread-measure dimension of M 30x1,5 Danfoss RAV (accompanying pin must be plugged on the valve tapped) no adapter required + accompanying pin, only for RAV! Danfoss RA Danfoss RAVL MAN 7408 – 280612–1 Heating time: Heating with comfort temperature (factory preset: 1st heating time at 07:00)