1
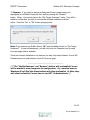
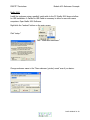
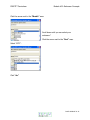
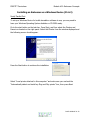
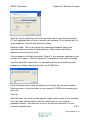
Braille Module 31 Embosser Basics Embosser Hardware and Software Concepts PROFITT Curriculum Module #31–Embosser Concepts Braille Module 31 Embosser Basics Embosser Hardware and Software Concepts Summary Goal(s): The goal of this module is for the students to explore hardware and software features in embossers, examine embosser settings, and learn to install an embosser. SMART Objectives: Specific, Measurable, Achievable, Realistic, and Time-sensitive By the end of this module, students should be able to: Instructor: Instructor Delivery Method(s): Lecture Hands on BS31.1: Describe the hardware of a computer/embosser. Length: 5 hours BS31.2: Install embosser driver. Two topics BS31.3: Set up embosser settings. Any Applicable Business and/or Soft Skills: Identify the parts of a computer. Set up a embosser Corresponding LOC Manual: Take Away Message(s): We can never stress what a blessing an embosser is to the braille reader and to the transcriber. Understanding the basic hardware and software components of an embosser will allow you to correctly set-up and maintain your own braille workstation. Correct margins are essential to ensure proper binding is possible. Since crisp, clean, and raised dots are a part of good transcribing be sure to understand the importance of setting up the embosser properly. Remember that agency specifications may state different margins for the embossed copy. You will always want to ask the agency you are working for to provide a copy of their specs prior to a braille transcription. Braille Module 31-1 PROFITT Curriculum Module #31–Embosser Concepts Instructor Preparation Title of Module: Embosser Hardware and Software Concepts The purpose of this module is to provide the students with a basic understanding of the hardware connections and software components pertaining to an embosser. This module is purely to enable the student to set up one or more embossers on their system. However please note that different manufactures have different procedures on how to set up their embossers. This is a general procedure as most embossers share similar settings but are different in the way they are set. Agenda Topic: Hardware Time Allotted: 5 hours A. Computer/Embosser Connections and Driver (2.5 hours) B. Setting Embosser Settings (2.5 hours) Materials & Supplies – items needed in order to carry out the agenda and classroom activities 1. Desktop PC 2. Braille embosser with CD/DVD driver 3. Handouts for activities: Installing an Embosser Using Duxbury and Braille 2000 (1.A.1), Installing an Embosser as a Windows Device (1.A.2), Common Embosser Functions (1.B.1) Classroom Preparation – steps to follow when setting up the learning environment 1. Have lab set with one embosser at each station. Braille Module 31-2 PROFITT Curriculum Module #31–Embosser Concepts Curriculum Content A. Computer/Embosser Connections (2.5 hours) Objective BS31.1: Describe the hardware of a computer/embosser. PREINSTRUCTIONAL ACTIVITIES The instructor will be familiar with the computer/embosser connections You will need copies of: Installing an Embosser Using Duxbury and Braille 2000(31.A.1) and Installing an Embosser as a Windows Device (31.A.2). Discuss the objectives for this module. Explain that this lesson will explore hardware features in computers and embossers. Review Computer Module 1 for relevant terminology and explanations on embosser/ printer hardware. Examine the various components of the computer and explain their function (i.e. serial/parallel port, USB port). Lead a discussion on computer hardware to help assess prior knowledge of hardware concepts. CONTENT PRESENTATION AND LEARNER PARTICIPATION The Installing an Embosser Using Duxbury and Braille 2000 (31.A.1) walks you through the different braille translation software and shows you the different windows dialog boxes used in installing an embosser. The Installing an Embosser as a Windows Device (31.A.2) walks you through the steps it takes to install the embosser using the windows interface. Review Basic Computer Skills module 1 handouts “Introduction to printer PowerPoint 1.B.5” and “Installing a Printer PowerPoint 1.B.6”. These PowerPoint’s have great foundational information that is needed when you install an embosser. ASSESSMENT Most PCs and laptops these days do not have Parallel or Serial Ports. Many embossers only have Parallel and/or Serial ports. A serial port was first created to allow users to add devices to their computers without having to open the computer case. A serial port does only one thing: it takes a stream of serial data (which runs on only one wire) and converts it into a format that that the CPU can easily understand. Most newer printers use USB connections. USB printers plug into any USB port on your computer. USB printers come with a USB Cable, usually with the standard USB type A Braille Module 31-3 PROFITT Curriculum Module #31–Embosser Concepts connector on one end and the smaller USB type B connector on the other end. Whichever configuration your USB printer has, just plug in the USB cable it is that easy. So how can you connect your Parallel/Serial embosser to your computer? If you have a desktop PC, one of the simplest ways is to add a suitable expansion card which provides additional Parallel and/or Serial ports. If you have a laptop PC, which has an available PCMCIA slot, there are cards available which will provide an appropriate port. A search at http://www.google.com (or your favorite internet search engine) for "Parallel PC Cards" or "Serial PC Cards" should provide a list of suppliers in your country. The alternative is to purchase a "USB to Parallel Cable". Once again, an Internet search should result in a wide choice of local suppliers. Review Basic Computer Skills module 1 handouts “Introduction to printer PowerPoint 1.B.5” and “Installing a Printer PowerPoint 1.B.6”. These PowerPoint presentations provide a general overview of installing a printer. An embosser is essentially just that printer. A braille embosser can be installed through the braille translation software suites such as Braille 2000 and Duxbury. It can also be installed through Windows. A common request is, "Can you tell us where to obtain Windows drivers for our xx braille printer (embosser).” The simple answer is quite often, "You don't need any!" Printer drivers are special-purpose programs which Windows programs use to send output to your printer(s). The term Windows Device, refers to a printer driver that is installed for the purpose of sending output to a braille embosser rather than an ink printer. There are three advantages to setting up a Windows Device, rather than having braille translation programs send data to your port. The first advantage is that, when using a Windows Device, it will usually allow you to return to work, or even exit the braille translation software, before your whole document has been sent to the embosser. This can be very advantageous if you often have long documents to emboss. The second advantage is that Windows devices need not be connected directly to your machine. In other words, by configuring a Windows Device, you enable your braille translation software to work with an embosser elsewhere on your network. Braille Module 31-4 PROFITT Curriculum Module #31–Embosser Concepts The third advantage is that using a Windows Device often provides a useful way around compatibility problems that may occur when braille translation software is attempting to write to the port directly. These errors are called WriteComm failed errors. See handouts Installing an Embosser Using Duxbury and Braille 2000 (31.A.1) and Installing an Embosser as a Windows Device (31.A.2). B. Setting Embosser Settings (2.5 hours) Objective BS31.2: Install embosser driver. Objective BS31.3: Set up embosser settings. PREINSTRUCTIONAL ACTIVITIES Lead a discussion on the different margin and dot impact settings that can be adjusted on the embosser. Most embossers can be easily adjusted through impact knob or through embosser software. CONTENT PRESENTATION AND LEARNER PARTICIPATION Review the list of settings in the Common Embosser Functions (31.B.1). Remember that all embossers are different. What works for one will not necessary work for another? Each manufacture has user’s manuals available on line to help make embosser setup easier. ASSESSMENT Some embossers play a tune to indicate good connection. Other embossers speak to you to indicate what settings are in effect. Some make no noise at all and require you to print test pages to ensure that all settings are set correctly. Whichever embosser you have please note that the following information is greatly generalized. Most agencies provide their preferred margin settings for embossed pages. The margins are not to exceed this preferred space as book bindings must have room for the braille reader to “read” the pages unhindered. Setting page margins on an embosser differs from embosser to embosser. Please see your particular embosser for detailed instructions. For example, setting top-of-form tells the embosser where the paper starts and where to begin the braille. You need to tell the embosser to reset top-of-form whenever you change paper or adjust the top margin, which is called top-of-form offset. The distance from the top edge of the paper to where the braille begins is adjustable in 0.1 inch Braille Module 31-5 PROFITT Curriculum Module #31–Embosser Concepts increments. For 25 lines embossed on 11 inch paper it is generally recommend a top-ofform offset of 3 or 0.3 inches. How you enter this setting with an Enabling Technologies embosser is not that different then entering this setting in a Versa Point Embosser. If you have a Tiger Embosser this setting will have to be inputted through Tiger software. Installing Paper Your embosser will produce good quality braille on paper weights from standard 20pound computer paper (suitable for rough drafts) to 100-pound traditional braille paper (recommended for more permanent documents). If necessary, the height of the braille can be adjusted up or down for different weights of paper using the impact control knob (or embosser software). Not all embossers have keypads. If you do have a knob turning it clockwise makes the height of the braille higher. Again remember that most embossers do have a dot impact adjustment setting, however, it could be software orientated instead of hardware. Please use this adjustment very cautiously, as running the embosser with the dots set too high can cause premature wear on critical parts. Remove the paper from the box by turning the box upside down and stack the paper neatly on the floor in front of the table. Open the embossers’ paper tractors by lifting on the inside edge of each tractor door. They will stay open until closed by hand. Insert the paper into the embosser so it extends through the embosser and out the back. Position the tractors so that the tractor pins line up with the holes on the edges of the paper (making sure the paper is straight). To move the tractors from side to side, push the small release handles, located near the outside edge of each tractor, toward you. (They may be a little stiff at first.) Although all tractors are able to move, generally it is the right tractors that need to be moved more often because that is how you adjust for differences in paper width. Close the tractors to grip the paper and tighten the release handles back down to lock the tractors themselves in position. Check to be sure there is enough room behind the embosser to collect the paper. Turn the power switch on. The embosser will execute a self-test (usually) or you may have to enter in a sequence of number settings to adjust the paper in the top of form position. Braille Module 31-6 PROFITT Curriculum Module #31–Embosser Concepts Braille Module 31 Embosser Basics Embosser Hardware and Software Concepts Handouts Braille Module 31-7 PROFITT Curriculum Module #31–Embosser Concepts Installing an Embosser Using Duxbury and Braille 2000 (31.A.1) Duxbury The Global: Embosser Setup dialog is used to tell DBT about your braille embosser. You must normally have at least one embosser (Brailler Device) set up on your system, but you may now have as many devices as you like. Brailler Device: (Selection/List box) During the DBT installation process, you may have chosen to install one or more embossers. If so, they will appear in this list. If the list only contains "(No Target Embosser)", and you wish to set one up, tab to the "New" button, and press Enter. New: This button will take you to the Embosser Setup: General Tab, which is one of three tabs where you may begin the setup process. (If you are setting up a new embosser, may we suggest you click on the above link now.) ** Modify Embosser: Before you click this button, please ensure that you have highlighted the embosser you wish to edit in the Braille Device selection list. This button will also take you to the Embosser Setup: General Tab. 31.A.1 Braille Module 31-8 PROFITT Curriculum Module #31–Embosser Concepts ** Remove: If you wish to remove an Embosser Device, please ensure it is highlighted in the Brailler Device list first, before pressing the "Remove" button. [Note: You cannot remove the "(No Target Embosser)" entry.] You will be asked to confirm that you wish to remove the selected embosser as shown below. Press the "Yes" or "No" button as appropriate. Note: If you remove any Brailler Device, DBT sets the Brailler Device to "(No Target Embosser)". In such circumstances, you will only have the Characters per line and Lines per page options available. There are however limitations in so much as you may only select between 10 and 160 Characters per line, and between 4 and 40 Lines per page. (** The "Modify Embosser" and "Remove" buttons will be disabled if a user will be unable to save changes to the configuration. So, restricted users in Windows XP will find that these buttons will often be disabled. In Vista, they will often be disabled if a user has not run DBT "As Administrator".) 31.A.1 Braille Module 31-9 PROFITT Curriculum Module #31–Embosser Concepts Braille 2000 Install the embosser using a parallel/ serial cable to the PC. Braille 2000 does not allow for USB installation. A Parallel to USB Cable is necessary to allow for use with newer computers. Open Braille 2000 Software. Right click the "emboss" button on the main screen. Click "setup." Click "Install New Embosser." Change embosser name in the "New embosser (printer) name" area if you desire. Braille Module 31-10 PROFITT Curriculum Module #31–Embosser Concepts Click the arrow next to the "Model:" area. Scroll down until you can select your embosser." Click the arrow next to the "Port" area. Select "LPT1". Click "ok." Braille Module 31-11 PROFITT Curriculum Module #31–Embosser Concepts Installing an Embosser as a Windows Device (31.A.2) Serial/ Parallel Port To set up a Windows Device for braille translation software to use, you may need to have your Windows Operating System diskettes or CD-ROM ready. Go to the start button on the task bar. Press Start, and then select the Printers and Faxes icon located on the right panel. Select Add Printer from the window displayed and the following screen should appear. Press the Next button to continue the installation. Select “Local printer attached to this computer” and make sure you uncheck the “Automatically detect and install my Plug and Play printer” box, then press Next. Braille Module 31-12 PROFITT Curriculum Module #31–Embosser Concepts Check the “Use the following port” button and make sure the drop down box has the LPT port highlighted that you wish to use with your embosser. This is typically Lpt1 for most installations. Press the Next button to continue. Embosser Model: This is a drop-down list containing an alphabetic listing of all supported makes and models of braille embosser. Note however that Generic embossers are at the top of the list. If your embosser is not listed, then select "Generic" if your embosser embosses on just one side of the page, or "Generic Interpoint" if it embosses on both sides of the page. Press the “Have Disk” radio button. You will need the driver disc provided with your embosser to continue. Insert the disc into your CD-ROM drive. Using the Browse button, locate the directory on the driver disc previously installed. Please note that x: is the drive letter of your computer’s CD-ROM drive containing the driver disc. Press OK. When the Name Your Printer window appears, assign a unique name to your embosser. This is the name that will appear in the Print dialog boxes in your computer’s application software. Also select the Yes box if you wish this embosser to be your computer’s default printer. 31.A.2 Braille Module 31-13 PROFITT Curriculum Module #31–Embosser Concepts If you do not plan to share your embosser with any other users on your network, select the “Do not share this printer” button and press Next. When prompted to print a test page, select the No button and press Next. The standard Windows test page is not compatible with your braille embosser. Click Finish to complete your ET Emboss driver installation. 31.A.2 Braille Module 31-14 PROFITT Curriculum Module #31–Embosser Concepts If a box appears indicating that the driver has not been signed, press the Continue Anyway button and allow the driver to complete installation. If you see the Files needed box appear, you may need to browse for the embosser driver disc. Highlight the needed file when it appears and press Open. USB Port Connect the embosser to an available USB port on your computer. Once the embosser is connected and the power is turned on, Windows should recognize the device and after a brief delay indicate that the device is installed correctly and ready to use. For additional information on setting up your embosser for use on the USB port, please consult the User’s Manual that came with your embosser. The following images are of the Add a Printer wizard when installing a USB embosser. You now need to "Add a Printer", which is done in the normal way in Windows XP. However, you should select "Local Printer", and specifically NOT ask Windows to automatically detect the printer. You will then be asked to select a printer port. From the drop down list of ports, look for "USB### (Virtual Printer Port for USB)", where ### will be a USB port number. Press Start, then select the Printers and Faxes icon located on the right panel. Select Add Printer from the window displayed, and the following screen should appear. 31.A.2 Braille Module 31-15 PROFITT Curriculum Module #31–Embosser Concepts Press Next to continue. Select “Local printer attached to this computer” and make sure you uncheck the “Automatically detect and install my Plug and Play printer” box, then press Next. Highlight the “Use the following port” button and make sure the drop down box has the “Virtual printer port for USB” highlighted. Press the Next button to continue. At the next dialog, you will be asked to select a printer. In this case, from the Manufacturer list select "Generic", and from Printers list select "Generic /Text Only" as shown below. Embosser Model: This is a drop-down list containing an alphabetic listing of all supported makes and models of braille embosser. Note however that Generic embossers are at the top of the list. If your embosser is not listed, then select "Generic" if your embosser embosses on just one side of the page, or "Generic Interpoint" if it embosses on both sides of the page. 31.A.2 Braille Module 31-16 PROFITT Curriculum Module #31–Embosser Concepts You will be asked to name your printer, and at this point, we suggest you enter something meaningful as we have shown below, by adding "(Brailler on USB Port)" to the name suggested by Windows. Complete the printer wizard as stated above. 31.A.2 Braille Module 31-17 PROFITT Curriculum Module #31–Embosser Concepts Common Embosser Functions (31.B.1) General Overview Using the Keypad The real power of this certain embosser is in the configurations available through the key pad. Your primary access to these configurations is through the keypad. The embosser must be off-line. If necessary, press OL to toggle off-line. # is the Enter key. When you press #, listen for the tone, some embossers do not produce a tone. If the valid-sequence tone is heard, the entry was accepted. If the invalid sequence tone is heard, the sequence that you pressed was not correct and the parameter value is left unchanged. You may have to press # several times before the exit tone is heard. On-line/Off-line (OL) Each time the On-line/off-line button is pressed, the embosser switches between on-line and off-line status. When you turn on the embosser, it defaults to on-line. On-line Receive and emboss data. Off-line Modify a configuration. Halt reception of data into the buffer and stops embossing at the end of the current line. Any data left in the buffer will not be disturbed and embossing will continue as soon as the embosser is placed back on-line. Line Feed Button (LF) The Line Feed button advances the paper to the next line. Each time LF is pressed, the page advances one line. Using LF to advance the page does not disturb the top-of-form setting. To set the top of form Once set, the embosser will remember the top-of-form setting. Moving the paper by pressing the LF (line-feed) button or the FF (form-feed) button will not disturb the topof-form setting. Top-of-form will not be correctly set if there is more than one formlength of paper extending from the embosser when the command is issued. After the top of form has been set, you can press the TF button to reset top-of-form after installing a new batch of paper. To remove the finished document: 1. Ensure that the embosser is off-line by pressing the OL (on/off-line) button. 2. Move the current page out of the embosser by pressing the FF (form-feed) button. 3. After removing the document, press OL (on/off line) again to ensure the embosser is on line. Braille Module 31-18


![Rii Mini-[2.4GHz] User`s Manual Ver:2.0](http://vs1.manualzilla.com/store/data/005760596_1-38a2c6f0785d9724a30239cfe3cd13aa-150x150.png)