1
E
Elixir Desktop
and Converters
for AFP™
User Guide
June 1999
Version 4.00
Elixir Technologies Corporation
P.O. Box 1559
Ojai, CA 93024
Copyright ©1999 by Elixir Technologies Corporation.
All rights reserved.
June 1999
Version 4.00
Printed in the United States of America
Trademarks and Service Marks/Company:
Bitstream/Bitstream, Inc.
Elixir/Elixir Technologies Corporation
HP, PCL, LaserJet/Hewlett Packard Company
IBM, Personal Computer, AT, PS/2, AFP, and all other
IBM products mentioned in this publication are trademarks of International Business Machines
IRMA/Digital Communications Associations, Inc.
Logitech/Logitech, Inc.
MS-DOS, Microsoft Mouse/Microsoft Corporation
Norton Utilities/Symantec Corporation
PaintBrush/Z-Soft Corporation
All other product names and trade names used herein
are trademarks of their respective owners.
Copyright protection claimed includes all forms and
matters of copyrightable material and information now
allowed by statutory or judicial law or hereinafter
granted, including without limitation, material generated from the software programs which are displayed
on the screen such as icons, screen display looks,
etc.
Changes are periodically made to this document.
Changes, technical inaccuracies, and typographic errors will be corrected in subsequent editions.
Notes and cautions
The following notes and cautions apply to the Elixir
Desktop and Converters for AFP.
Drivers
Elixir software supports printing using Windows
3.11 printer drivers under Windows 3.11. Windows 95 users must use a printer driver that supports API calls rather than Escape calls. If you
have problems printing with a non-Elixir supplied
driver, check with the vendor to ensure that the
driver is appropriate for the operating system you
use.
Help files include graphics created using screen
drivers with large fonts. If you use a screen driver
with small fonts, Help file graphics may not display clearly. For optimum graphics display, use a
screen driver with large fonts.
Video drivers must be fully compatible with the
Microsoft Windows VGA/SVGA standard to ensure graphical integrity. If you encounter problems
when printing shading or graphics, the cause may
be an incompatibility between a third-party video
driver and the Microsoft standard. To determine
if the problem is the third-party driver, switch to
the Microsoft VGA/SVGA driver (for the screen
resolution currently in use). If this resolves the
problem, contact the video card distributor to see
if there is an updated version of their driver. If
this still does not resolve the problem, contact
Elixir Customer Support.
Current versions of Elixir software for an AFP environment are applications which use Device Dependent Bitmaps (DDB). This allows fast graphic
manipulation, but the size of graphic that can be
manipulated and displayed is dependent on the
Windows screen driver installed.
If you have problems with graphics not displaying
correctly, or experience unpredictable video effects (graphic or drawing elements not appearing
as they should), Elixir recommends that you install and use the Windows screen driver supplied
with Windows with either 256-colors or 16-colors.
BWCC.DLL file version
Installing a BWCC.DLL file in a directory other than
drive:\WINDOWS\SYSTEM may cause errors when
you perform operations such as copying files from the
User Files icon to Elixir folders. Elixir installs a
BWCC.DLL file dated 1995 or later in your
drive:\WINDOWS\SYSTEM directory during installation. Other programs may also install BWCC.DLL
files in different directories. Remove these other versions of the BWCC.DLL file from your system to prevent errors.
Using the Desktop under Windows NT
All current versions of Elixir software run in a Windows NT (version 3.51 and 4.0) environment.
Printing to HP printers
Windows NT uses a different HP soft font handling architecture than other operating systems. To ensure
true WYSIWYG printing capabilities, new printing
functions using raster fonts are implemented.
Due to the new printing functions, you must regenerate all HP soft fonts (from Elixir generic fonts or production printer fonts) before printing under Windows
NT.
Elixir has successfully tested a number of HP and HPcompatible printers and printer drivers. However, due
to the number of printer drivers and environmental
configurations, Elixir cannot guarantee that all drivers
and printers labeled "HP-compatible" will produce correct results.
Table of contents
Notes and cautions
1. Introduction
1-1
Customer support
1-2
Elixir training
1-2
Who should use this guide
1-2
Conventions
1-3
Display conventions
1-3
Typographical conventions
1-3
Mouse operations
1-4
On-line Help
1-6
Organization of this guide
1-7
Installation
1-9
Starting the Elixir Desktop
1-9
Exiting the Elixir Desktop
1-10
2. Desktop basics
2-1
Common Windows operating system
2-1
Desktop layout
2-1
Icons
2-2
Elixir folder icons
2-3
Forms folder
2-3
Fonts folder
2-3
Images folder
2-3
Documents folder
2-3
Jobs folder
2-4
ELIXIR DESKTOP FOR AFP USER GUIDE
vii
TABLE OF CONTENTS
Clipboard icon
2-4
User Files icon
2-4
ElixirForm/AppBuilder for AFP application icon
2-4
Other Elixir application icons
2-4
User Tools icon
2-5
Diskette icon
2-5
Printers icon
2-5
Scanners icon
2-5
Dispatcher icon
2-6
Converter icon
2-6
Trashbin icon
2-6
Viewer icon
2-6
Transformer icon
2-6
Sub-window menus
2-7
Backup button
2-7
Filter menu
2-7
Selection menu
2-9
View menu
2-10
Accessing DOS
2-12
3. Elixir folders
3-1
Folders and DOS directories
3-1
Elixir folder structure
3-2
Changing folder display
Forms folder
3-6
Elixir Forms folder
3-6
Input Forms folder
3-7
Output Forms folder
3-8
Fonts folder
3-9
Elixir Fonts folder
3-9
Input Fonts folder
3-10
Output Fonts folder
3-11
Images folder
viii
3-4
3-13
ELIXIR TECHNOLOGIES CORPORATION
TABLE OF CONTENTS
Elixir Images folder
3-13
Input Images folder
3-13
Output Images folder
3-14
Documents folder
3-15
Elixir Documents folder
3-16
Input Documents folder
3-16
Output Documents folder
3-17
Jobs folder
3-18
Elixir Docs Jobs
3-18
Elixir Data Jobs
3-19
Input Jobs
3-19
Output Jobs
3-19
User Files folder
3-21
4. Desktop configuration
4-1
System configuration
4-2
Desktop usage switches
4-4
User privileges
4-7
Diagnostics
4-9
Creating a directory
4-10
Converter properties
4-11
Transformer properties
4-14
Resetting System menu options
4-15
Refreshing the screen
4-15
Selecting toolsets
4-16
5. Additional Desktop features
Opening icons
5-1
5-1
Opening a folder icon
5-2
Opening Elixir files
5-2
Opening the ElixirForm icon
5-3
Opening device icons
5-3
Diskette icon
5-3
Printers icon
5-3
Scanners icon
5-3
ELIXIR DESKTOP FOR AFP USER GUIDE
ix
TABLE OF CONTENTS
Opening other icons
5-4
User Tools icon
5-4
User Files icon
5-4
Dispatcher icon
5-4
Converter icon
5-4
Viewer icon
5-4
Displaying Icon properties
5-5
Files
5-5
Displaying Elixir file formats
5-6
Printing Desktop folder contents
5-7
Displaying a logo
5-9
Copying files
5-11
Copying files to Elixir folders
5-11
Copying files to a DOS directory
5-11
Copying files from a DOS directory
5-13
Copying files to a DOS-format
diskette
5-13
Copying files from a DOS-format
diskette
5-14
Copying files to a DOS-Elixir format
diskette
5-15
Copying files from a DOS Elixirformat diskette
5-16
Copying files from Output to Input
folders
5-17
Copying Elixir form files
5-17
Creating a .PUB file
5-17
Copying a .PUB file to a diskette
5-19
Restoring a .PUB file from a diskette
5-20
Using the Elixir Scheduler Desktop
x
5-21
Scheduler setup
5-22
Scheduler Desktop examples
5-26
Scheduler example 1
5-26
Scheduler example 2
5-27
ELIXIR TECHNOLOGIES CORPORATION
TABLE OF CONTENTS
Viewing files
5-29
Viewing Elixir image files
Setting the default ElixirForm font
6. Peripheral devices
5-29
5-31
6-1
Diskette drive
6-1
Scanner device
6-3
Configuration
6-3
Using scanners
6-5
Proof printing
6-6
Printing Elixir forms
6-6
Printing Elixir forms with highlight color
6-8
Printing non-Elixir forms
6-10
Using the Elixir HP print driver
6-12
Printing PostScript
6-15
Printing PostScript using the Elixir
converter
6-15
Printing PostScript using a Windows
driver
6-15
7. File conversions
7-1
General procedures
7-1
Elixir folders
7-2
Forms folder
7-2
Fonts folder
7-3
Images folder
7-3
Documents folder
7-4
Initial converter setup
7-4
File conversion procedures
7-8
Converting forms
7-9
Converting forms to and from AFP
format
7-9
AFP Page Converter Options dialog box
7-11
Generating source .OGL and .LOG
files
ELIXIR DESKTOP FOR AFP USER GUIDE
7-22
xi
TABLE OF CONTENTS
Changing the target environment
from MVS to VM
7-23
Converting Elixir forms to HP PCL
7-25
Converting using the Elixir
HP print driver
7-25
Converting forms to PostScript
format
7-28
Converting using Elixir's
PostScript driver
7-28
Converting using the Windows printer driver
7-30
Converting Elixir forms to PDF
format
7-32
Converting forms to Elixir images
7-36
Using FGIDs in a form
7-36
Converting fonts
7-37
Font requirements for an HP or
compatible printer
7-38
AFP Font Converter Options dialog
box
7-38
Converting AFP fonts to Elixir format
7-42
xii
Converting double-byte AFP fonts to
Elixir format
7-44
Converting double-byte Elixir fonts to
AFP format
7-45
Converting fonts to HP PCL format
7-46
Converting Elixir fonts to HP
PCL soft fonts
7-47
Adding HP PCL fonts to
Windows applications
7-47
Converting AFP and Elixir-AFP fonts
to HP PCL format
7-48
Converting Elixir and contour fonts
to HP PCL format
7-49
Converting TrueType fonts
7-50
Converting HP PCL fonts to Elixir
and AFP formats
7-53
ELIXIR TECHNOLOGIES CORPORATION
TABLE OF CONTENTS
Converting Elixir fonts to AFP format
7-53
Creating a full AFP font
from an Elixir coded font
7-53
Creating full AFP fonts from
Elixir character sets
7-55
Creating individual font
components
7-56
Changing the code page
7-59
Editing the Elixir Code Page
7-60
Reconverting fonts created with
Elixir Desktop version 1.00
7-60
Generating fonts from outlines
7-61
Font naming conventions
7-65
Generating Elixir fonts
7-68
Generating non-Elixir fonts
7-68
Generating screen fonts
7-69
Adding HP PCL fonts to Windows
applications
7-69
Windows character mapping
7-69
Converting images
7-71
Converting Elixir image files to Tiles
in a Font format
7-72
Converting to and from AFP page
segments
7-72
Converting .TIF and .PCX files to
Elixir
7-75
Adding color to images during
conversion
7-76
Converting documents
7-77
Converting Elixir .DAT files to HP
PCL documents
7-78
Converting Elixir .DAT files to PostScript documents
7-78
Converting Elixir .DAT files to AFP
documents
7-79
ELIXIR DESKTOP FOR AFP USER GUIDE
xiii
TABLE OF CONTENTS
AFP Page Converter Options dialog box
Converting AFPDS to multiple Elixir
forms
7-90
Converting Pagedef/Formdef resources
7-92
Converting files using DOSVSE
7-93
Running DOSVSE as a DOS command line utility
7-93
Running DOSVSE from the Elixir
Dispatcher icon
7-93
Converting files using ELX2VSE
Using ELX2VSE
7-94
7-94
Running ELX2VSE as a
DOS command line utility
7-95
Running ELX2VSE from the
Elixir Dispatcher icon
7-95
Deleting converted input files
7-95
Confirming file conversion
7-95
ElixirDoc
7-96
8. Accessing DOS files and applications
Desktop tools
xiv
7-80
8-1
8-1
User Tools icon
8-1
User Files icon
8-1
Dispatcher icon
8-2
Creating an application icon
8-2
Creating an icon
8-2
Starting the application
8-5
Displaying icon properties
8-6
User Tools example
8-6
Creating an icon for Ventura
Publisher
8-6
Checking the properties of
the Ventura Publisher icon
8-8
Starting and exiting Ventura
Publisher
8-8
ELIXIR TECHNOLOGIES CORPORATION
TABLE OF CONTENTS
Creating and icon for Elixir's
Web site
Accessing DOS directories
Changing directories
8-8
8-9
8-11
Copying files between subdirectories
8-12
Linking files to applications
8-12
Linking files to an existing User Tool
8-13
Linking files to a new application
8-13
Checking tool properties
8-14
Opening linked files
8-14
Starting DOS executables
8-14
Starting batch files
8-14
Using the Dispatcher icon
8-15
Setting up Dispatcher commands
8-16
Executing Dispatcher commands
8-20
Copying files to the
Dispatcher
8-20
Executing commands from
the Dispatcher icon
8-20
Dispatcher example
8-21
Using the Dispatcher to run Elixir
utilities
8-23
DOS menu
8-24
9. File transfer
9-1
PC-to-MVS host file transfer
9-1
Installation
9-2
Pre-transfer considerations
9-2
Downloading files
9-2
Downloading with IBM 3270
or IRMA FT/3270
9-2
Downloading with IRMA
FT/TSO
9-3
Converting OVE and
AFPDS files
9-3
Converting Fonts
9-3
ELIXIR DESKTOP FOR AFP USER GUIDE
xv
TABLE OF CONTENTS
Input directory information
Uploading files
9-4
9-5
Uploading with IBM 3270 or
IRMA FT/3270
9-5
Uploading with IRMA
FT/TSO
9-5
Fonts
9-5
Output directory information
9-5
Using IBM 3270 or IRMA FT/3270
9-6
Downloading object-format AFP files
9-7
Uploading object-format AFP files
9-7
Downloading text files
9-7
Uploading text files
9-8
Using IRMA FT/TSO
9-9
Downloading object-format AFP files
9-9
Converting the file to VB
format
9-9
Parameters for downloading
object-format AFP files
9-9
Parameters for
downloading/uploading text
files
9-10
Downloading files
9-10
Uploading files with FT/TSO
Parameters for uploading
object-format AFP files
9-12
Uploading the file with
FT/TSO
9-12
Converting the host file to
VBM format
9-13
Converting FB to VBM format
9-14
PC-to-IBM AS/400 file transfer
9-14
Creating a temporary holding library
and file on the AS/400
xvi
9-11
9-15
ELIXIR TECHNOLOGIES CORPORATION
TABLE OF CONTENTS
Copying to the Shared Folder
9-16
Installing the resources in the AFP
libraries
9-16
Overlays - CRTOVL (Create
Overlay)
9-17
Fonts - CRTFNTRSC (Create Font Resource)
9-17
Page Segments CRTPAGSEG (Create Page
Segment)
9-17
Printing fully composed AFPDS
documents
9-18
Extracting object files from the AS/400 to a PC
9-18
Using the Loader
9-20
10. Transformations
10-1
Transformer setup
10-1
Transforming Elixir forms
10-3
Form Transformer options
10-4
Remap
10-4
Rotate
10-5
Shift
10-6
FontChange
10-6
Transforming Elixir images
A. Keyboard shortcuts
10-7
A-1
Desktop
A-1
Windows
A-2
By option name
A-3
B. Additional files anddirectories
Elixir mapping table directories
B-1
B-1
PostScript mapping table directory
B-1
Contour fonts mapping table
directory
B-2
Bitstream Facelift fonts mapping
directory
B-2
C. Desktop menu bar
File menu
ELIXIR DESKTOP FOR AFP USER GUIDE
C-1
C-1
xvii
TABLE OF CONTENTS
Open (<F2>)
C-2
Copy (<Ctrl> + <C>)
C-2
New
C-3
Duplicate
C-3
Delete (<Del>)
C-4
Properties (<F2>)
C-4
Print (<Ctrl>+<P>)
C-4
Print Directory Listing
C-5
View
C-5
Formats
C-5
Convert (<Ctrl> + <V>)
C-5
Transform
C-5
Dispatch (<Ctrl> + <I>)
C-6
Close (<F3>)
C-6
Exit Elixir (<Alt> + <F4>)
C-6
System menu
C-6
System Config (<Alt> + <F6>)
C-7
Usage Switches
C-7
User Privileges
C-7
Diagnostics (<Alt> + <F5>)
C-7
Make Directory (<Ctrl> + <M>)
C-7
Converter Props
C-7
Transformer Props
C-8
Reset to Defaults
C-8
Refresh
C-8
Toolset
C-8
Special menu
xviii
C-8
Close All (<F4>)
C-8
Efont Factory
C-9
Install Fonts
C-9
Scheduler Setup (<Alt> + <F2>)
C-9
Scheduler Actions (<Alt> + <F3>)
C-9
Global View (<Ctrl> + <G>)
C-9
ELIXIR TECHNOLOGIES CORPORATION
TABLE OF CONTENTS
DOS menu
C-10
DOS Command (<Ctrl> + <D>)
C-10
Window menu
C-10
Cascade
C-11
Tile
C-11
Arrange Icons
C-11
Message
C-11
Help menu
C-11
D. AFP font conversion considerations
D-1
Bounded box and unbounded box fonts
D-1
Additional filter options
D-1
AFP font components
D-3
Character Set
D-3
Code Page
D-3
Coded Font
D-4
Country Keyboard Map and PC mapped font
files
D-5
Usage notes
D-7
Files generated for AFP font
to Elixir conversions
Default Code Pages
D-7
D-9
Editing an Elixir Code Page
D-10
Font conversion strategies
D-12
AFP bounded box font customers
D-14
AFP unbounded box font customers
D-14
Hybrid customers
D-14
Glossary
Index
ELIXIR DESKTOP FOR AFP USER GUIDE
GLOSSARY-1
INDEX-1
xix
1.
Introduction
This guide describes the Elixir Desktop for AFP, the
Windows-based operating environment for launching
and using Elixir applications such as ElixirForm for
AFP, ElixirImage for AFP and ElixirFont for AFP.
Additionally, the Desktop has numerous productivityenhancing features, including those which enable you
to:
convert files using icons
link files to applications, thereby allowing you to
start an application and load a file in one step
define icons for DOS or Windows-based applications you want to launch from the Desktop, such
as word processors, desktop publishers and
spreadsheets.
Because this guide describes all functions and features of the Desktop, certain options described herein
may not apply to your specific configuration. In such
cases, unavailable options display in gray (not black)
on menus and dialog boxes, and some screens and
icons may not display at all.
See the Elixir for AFP Getting Started Guide for detailed installation information.
ELIXIR DESKTOP FOR AFP USER GUIDE
1-1
INTRODUCTION
Customer support
Elixir customer support centers provide telephone
technical assistance for Elixir users during business
hours.
If you have purchased your Elixir product directly from
Elixir Technologies then contact one of the support
center hotlines.
See the Elixir for AFP Getting Started Guide for information about contacting your support center.
Elixir training
Elixir Technologies Corporation offers training for the
full range of our Windows-based family of products.
For more information, contact:
Elixir Learning
(805) 641-5900 ext. 6
Who should use this guide
This guide serves users needing first-time or ongoing
reference information about the Elixir Desktop for
AFP.
Users should already be familiar with Microsoft Windows operations, printer and font management operations and PC peripherals, and have access to reference manuals for related PC software and hardware.
1-2
ELIXIR TECHNOLOGIES CORPORATION
INTRODUCTION
Conventions
Most of the following conventions are the same or
similar to Windows conventions.
display conventions
typographical conventions
mouse operations
Display conventions
The Elixir Desktop, ElixirForm, ElixirFont and ElixirImage all adhere to Microsoft Windows conventions
for using menus, menu commands, dialog boxes,
command buttons, icons and mouse. See your Windows manual for more information.
Typographical conventions
The following typographical conventions are used
throughout this guide and other Elixir product guides.
Keystrokes are shown enclosed in < > (angle
brackets). For example:
<Enter>
Key combinations are denoted by a plus sign between keys. For example:
<Shift> + <F1> indicates to simultaneously press
the <Shift> and the <F1> keys.
Menu titles are shown in bold. Menu options are
enclosed in [ ] (square brackets). For example:
Select [New] from the File menu.
ELIXIR DESKTOP FOR AFP USER GUIDE
1-3
INTRODUCTION
Commands, options, actions, and parameters
that require description are shown in bold followed on the next line by the description. For example:
Delete
Deletes the selected files.
Steps in a procedure are shown in numbered bold
paragraphs. For example:
1.
At the prompt, enter the file name and
extension.
Comments relating to a step (such as this paragraph) are shown in regular text following the bold
paragraph.
Commands you enter at the DOS prompt are
shown in larger text. Within DOS commands,
variable names and keys you press are shown in
italics. For example:
CD \ELIXIR <Enter>
Mouse operations
You can perform most operations in Elixir applications
by using the mouse. The terminology is similar to
other Windows based applications.
Mouse operations are performed using the left or right
mouse buttons, depending on the specific task.
The following mouse related terms are used in this
guide:
click
to momentarily press and release the left mouse button once. A right mouse button click is specified
where necessary. For example,
Click on the right mouse button to finish entering text.
double-click
to click the left mouse button twice in rapid
succession.
1-4
ELIXIR TECHNOLOGIES CORPORATION
INTRODUCTION
drag
to click and hold the mouse on an item and move the
item with the mouse.
drag and drop
to drag an item as above, then release the mouse button, once the item is positioned over a the area. If the
selected object is a file and the destination is a directory, the file copies to the directory.
object
a selectable item on the screen.
open
to point and double-click on an icon -- the effect of this
operation depends on the icon.
point
to move the mouse to position the screen pointer on
an area of the screen.
select
to point to an object and click the mouse -- this usually
highlights the object.
<Alt>click
to hold down the <Alt> key while pressing the left
mouse button -- this allows you to select a range of
files in a window.
<Ctrl>click
to hold down the <Ctrl> key while pressing the left
mouse button -- this allows you to select individual
files from a group in a window.
<Shift>click
to hold down the <Shift> key while clicking the mouse
-- this allows you to select more than one object at a
time.
ELIXIR DESKTOP FOR AFP USER GUIDE
1-5
INTRODUCTION
On-line Help
Elixir software uses the Microsoft Windows Help program to provide on-line Help for all functions.
For more information about Windows Help, select the
[How to Use Help] option in the Help menu, or see
your Microsoft Windows documentation.
The Help files included with your Elixir software include graphics created using screen drivers with large
fonts. If you use a screen driver with small fonts, the
Help file graphics may not display clearly. For optimum graphics display, use a screen driver with large
fonts.
You can display on-line Help in the following ways:
Bubble Help
Click on an icon with the right mouse button to view its
properties (if applicable) or to display "bubble help."
Bubble help is a short description of the icon function
that displays in a bubble extending from the icon.
Quick Help
Enable the quick function by selecting the quick help
option in the Usage Switches (or Preferences -- for
ElixirImage) dialog box. When you move the screen
pointer over an icon on the screen, a short description
of the icon function displays in the message area of
the screen. During certain operations a message
about the function you are performing also displays in
the message area. To see these operational messages, disable quick help.
Context sensitive Help
To use this function, click on an icon and press <F1>.
If available, the appropriate Help topic displays. If no
specific topic is available, the Help table of contents
displays.
Help menu
Select [Help] from the top pull-down menu and choose
one of the displayed topics.
1-6
ELIXIR TECHNOLOGIES CORPORATION
INTRODUCTION
Dialog box Help
Click on the [Help] button in a dialog box to view an
associated Help topic. Under Windows 95 and Windows NT, right-click on a dialog box option to display
an associated Help topic.
Help pop-ups and jumps
Within Help topic text, words or phrases underlined in
green are pop-ups or jumps. When you click on a
pop-up topic, a box displays within the current Help
topic with additional information. When you click on a
jump, a different, associated Help topic displays.
Help hypergraphics
Hypergraphics are special graphics within Help files
that contain "hot spots". Hot spots are either pop-up
topics or jumps. Hypergraphics in Elixir Help are most
commonly dialog boxes with option hot spots (pop-up
definitions), toolboxes with tool hot spots (topic
jumps), and menus with option hot spots (topic jumps
or pop-up definitions).
Move the cursor over a hypergraphic until a hand displays, then click on this hot spot to display a pop-up
topic, or a "jump". To close a pop-up topic, click the
mouse button. To return to the original Help topic
from a jump, click on <Back> in the Help file menu.
Organization of this guide
This guide contains the following chapters and
appendices:
Chapter 1, “Introduction,” presents an overview of
Desktop functions, features and documentation.
Chapter 2, “Desktop basics,” describes the layout and
basic operation of the Desktop.
Chapter 3, “Elixir folders,” describes the Elixir directory structure and how to use the Desktop to organize
and manage forms, fonts, images, documents and
jobs.
ELIXIR DESKTOP FOR AFP USER GUIDE
1-7
INTRODUCTION
Chapter 4, “Desktop configuration,” describes how to
customize the Desktop.
Chapter 5, “Additional Desktop features,” describes
further capabilities built into the Desktop.
Chapter 6, “Peripheral devices,” describes how to
configure and use PC diskette drives, scanners and
printers.
Chapter 7, “File conversions,” describes how to perform various file conversions.
Chapter 8, “Accessing DOS files and applications,”
describes tools that allow you to access DOS and link
DOS files to applications.
Chapter 9, “File Transfer,” describes how to transfer
files between your PC and host computer, and how to
download and upload files for subsequent processing.
Chapter 10, “Transformations,” describes how to apply Elixir utilities to modify Elixir-format form and image files.
Appendix A, “Keyboard shortcuts,” describes all Desktop keyboard shortcuts (fast keys).
Appendix B, “Additional files and directories,” explains
the functions and use of related files not described
elsewhere in this guide.
Appendix C, “Desktop menu bar,” describes operations accessed from Desktop pull-down menus.
Appendix D, "AFP font conversion considerations,"
describes issues and strategies relating to AFP font
conversions.
Glossary.
Index.
1-8
ELIXIR TECHNOLOGIES CORPORATION
INTRODUCTION
Installation
See the Elixir for AFP Getting Started Guide for installation information.
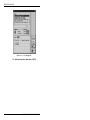
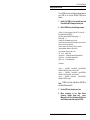
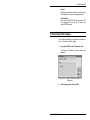
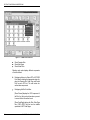
Starting the Elixir Desktop
To start the Desktop, double-click on the Elixir Suite
for AFP icon in the Program Manager Elixir Applications window.
The Elixir Desktop displays.
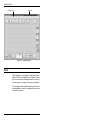
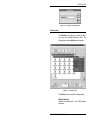
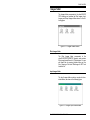
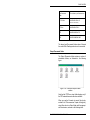
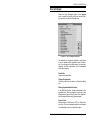
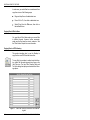
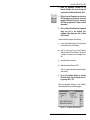
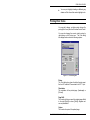
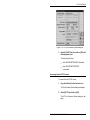
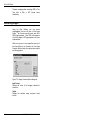
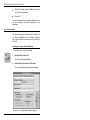
Exit button
Figure 1-1. Elixir Desktop
If you are using a monochrome monitor and have difficulty reading Title bar text, select [Usage Switches]
from the System menu. Then, in the Usage Switches
dialog box, select [Monochrome Monitor].
ELIXIR DESKTOP FOR AFP USER GUIDE
1-9
INTRODUCTION
An Elixir logo may also display at the center of your
screen. The logo disappears when you press a key on
the keyboard or a mouse button.
Note that you cannot move icons on the Desktop.
Exiting the Elixir Desktop
To exit the Elixir Desktop or any of its associated
applications:
Double-click on the Close button at the top left of
any Elixir application.
Press <Alt> + <F4>.
Press <Alt> + <X>.
From the File menu and select [Exit]
Click on the [X] at the top right corner of the application window.
1-10
ELIXIR TECHNOLOGIES CORPORATION
2.
Desktop basics
This chapter describes the Elixir Desktop layout and
basic operation. Later chapters describe more advanced Desktop operations.
Common Windows operating system
The Elixir Desktop uses the standard Windows interface for display and use of operational elements such
as icons, command buttons, tools, menus, dialog
boxes and mouse.
See your Windows manual for complete information.
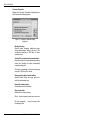
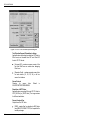
Desktop layout
The Elixir Desktop comprises two main display areas:
The top of the Desktop displays the menu bar and
message area.
The remaining Desktop area displays icons.
Both menu bar and icons provide access to pull-down
menus. See the "Sub-window menus" section in this
chapter, and the "Desktop configuration" and "Additional Desktop features" chapters for more information.
The message area displays information about the operation in process, including relevant warning and error messages.
ELIXIR DESKTOP FOR AFP USER GUIDE
2-1
DESKTOP BASICS
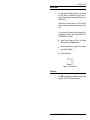
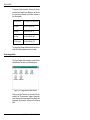
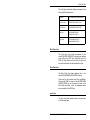
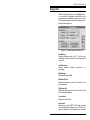
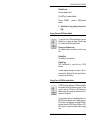
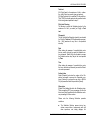
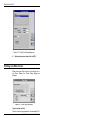
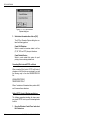
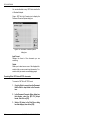
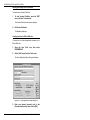
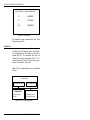
Message area
Menu bar
Figure 2-1. Desktop layout
Icons
Each Desktop icon represents an application, folder,
utility or PC device configured for your system. Generally, the name, shape and appearance of an icon indicate its purpose or the type of action you can perform.
The following sections briefly describe each icon and,
where applicable, refer you to chapters where you can
find more information.
2-2
ELIXIR TECHNOLOGIES CORPORATION
DESKTOP BASICS
Elixir folder icons
The five icons displayed at the top left of the Desktop
represent specific DOS directories. You can access
directory files and convert them from one format to
another using these icons.
See the "Additional Desktop features", “Elixir folders”
and "File conversions" chapters for more information.
Forms folder
Represents the drive:\ELIXIR\FORMS directory containing Elixir, Input and Output form files.
Fonts folder
Represents the drive:\ELIXIR\FONTS directory containing Elixir, Input and Output font files.
Images folder
Represents the drive:\ELIXIR\PICS directory containing Elixir, Input and Output image files.
Documents folder
Represents the drive:\ELIXIR\DOCS directory containing form list files referencing the Elixir-format files for
multi-page documents.
Note that Documents folder functionality for .PDF files
requires PDF option products.
ELIXIR DESKTOP FOR AFP USER GUIDE
2-3
DESKTOP BASICS
Jobs folder
Represents the DOS \ELIXIR\JOBS directory and is
used with Elixir AppBuilder to create multiple Elixir
form print files called Jobs. A job includes formatting
information for the print run and individual pages and
comprises a print ticket and form files.
Clipboard icon
Temporarily stores Elixir-format (.ELX) form files during job creation. You can copy an Elixir-format form to
the Clipboard using standard copying procedures,
then copy the form to a specific job when you need it.
User Files icon
Provides access to all DOS directories and files, and
links applications to files. See the "Additional Desktop
features" and “Accessing DOS files and applications”
chapters and "Additional files and directories" appendix for more information.
ElixirForm/AppBuilder for AFP application icon
Represents ElixirForm. If you have Elixir AppBuilder
for AFP installed, you can toggle the icon between the
two applications by <Ctrl>-clicking on it.
Opening this icon clears the Desktop and starts the
ElixirForm or AppBuilder for AFP application.
Other Elixir application icons
If other Elixir applications such as ElixirFont or ElixirImage are installed, icons representing these applications also display at the right of the Desktop. Opening these icons starts the corresponding application.
2-4
ELIXIR TECHNOLOGIES CORPORATION
DESKTOP BASICS
User Tools icon
Allows you to create and define icons for DOS applications and batch files so that opening the icon starts
the application.
See the "Additional Desktop features" and “Accessing
DOS files and applications” chapters for more information.
Diskette icon
Allows you to access and format a diskette in your PC
disk drive.
See the “Additional Desktop features” and “Peripheral
devices” chapters for more information.
Printers icon
Allows you to access a local proof printer connected to
your PC.
See the "Additional Desktop features" chapter and
"Local Printers" appendix for more information.
Scanners icon
Allows you to start a scanner connected to your PC directly from the Desktop.
See the "Additional Desktop features" and "Peripheral
devices" chapters for more information.
Dispatcher icon
Allows you to invoke DOS commands or batch files in
which you can embed replaceable parameters.
See the "Additional Desktop features" and “Accessing
DOS files and applications” chapters for more information.
ELIXIR DESKTOP FOR AFP USER GUIDE
2-5
DESKTOP BASICS
Converter icon
Allows you to convert form, font and graphics files and
multi-page documents to different formats by using
simple “drag-and-drop” mouse operations.
See the "Additional Desktop features" and “File conversions“ chapters for more information.
Trashbin icon
Allows you to delete folders and files associated with a
specific directory or application.
See the “Deleting files and folders” section for more
information.
Viewer icon
Allows you to view Elixir-format files associated with
an application without having to first launch the application.
See the "Additional Desktop features" chapter for
more information.
Sub-window menus
The Elixir Desktop offers additional functionality to
normal Windows operations by providing pull-down
menus in sub-windows (or "child" windows) that you
can access from any Elixir folder icon. The following
sections describe these functions.
2-6
ELIXIR TECHNOLOGIES CORPORATION
DESKTOP BASICS
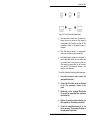
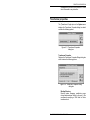
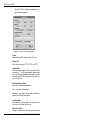
Backup button
You can access the backup button by first opening
any Elixir folder on the Desktop (Forms, Fonts, Images or Documents), then opening any Elixir, Input or
Output folder.
Each click on the backup button (or <Ctrl>+<B>) displays the contents of a directory one level closer to the
root.
You can also use the backup button to change the default directory of an Elixir, Input or Output folder in the
SYSTEM.INI file, as follows:
Select [Save Settings on Exit] in the Usage
Switches dialog box (System menu).
Use the backup button to change to the directory
you want as the default.
Exit/close the folder.
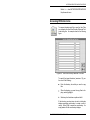
Figure 2-2. Backup button
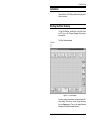
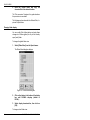
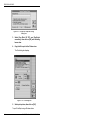
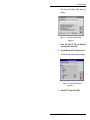
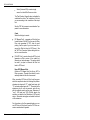
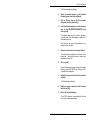
Filter menu
The Filter menu allows you to display files you select
using the * and ? DOS wildcard characters.
ELIXIR DESKTOP FOR AFP USER GUIDE
2-7
DESKTOP BASICS
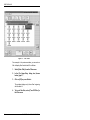
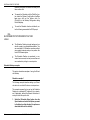
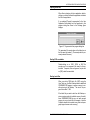
Figure 2-3. Filter menu
For example, in the previous window, you can enter a
filter to display files that start with X as follows:
1.
Select [Enter Filter] from the Filter menu.
2.
In the File Name Entry dialog box (shown
below), type X*.*
3.
Click on [OK] or press <Enter>.
The window displays only those files beginning
with the letter X.
4.
2-8
To turn off the filter, select [Turn Off Filter] in
the Filter menu.
ELIXIR TECHNOLOGIES CORPORATION
DESKTOP BASICS
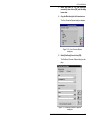
Figure 2-4. File Name Entry dialog box
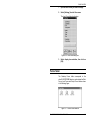
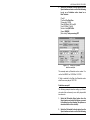
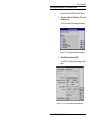
Selection menu
The Selection menu allows you to select and deselect one or more specified files within a folder. The
following figure shows a Selection menu example.
Figure 2-5. Selection menu
The Selection menu contains the following options:
Wildcard Selection
Highlight files specified with * and ? DOS wildcard
characters.
ELIXIR DESKTOP FOR AFP USER GUIDE
2-9
DESKTOP BASICS
Write Selection <Ctrl>+<W>
"Remember” a number of selected files (see the Reselect option, below).
Reselect <Ctrl>+<R>
Highlight files “remembered” using [Write Selection].
When you use [Write Selection] for files accessed
from a Desktop folder (Jobs, Forms, Fonts, Graphics
or Documents) icon, use [Reselect] to highlight files
with the same stem name (and the same or different
extensions) in another folder.
Select All <Ctrl>+<A>
Highlight all files in a window.
Unselect All <Ctrl>+<A>
Deselect all highlighted files in a window.
Make Pubfile
Copy highlighted drive:\ELIXIR\FORMS\ELIXIR and
subordinate directory form files to a diskette. See the
"Additional Desktop features" chapter for more
information.
Archive Pubfile
See [Make Pubfile], above.
View menu
The following figure shows the View menu and an example of viewing files using the [Show Actual] option.
2-10
ELIXIR TECHNOLOGIES CORPORATION
DESKTOP BASICS
Figure 2-6. Show Actual example
The View menu allows you to display files in a window
in different ways. The available options are:
Short Name
Display files by name only.
Long Name
Display files by name, creation/revision date and size
(in bytes).
Icon
Display files as icons, with names underneath.
Show Actual
Display reduced, bit-mapped screen versions of Elixir
form, font and image files. Allows you to preview files
without invoking the application and loading the file.
Name
Display files alphabetically by file name.
ELIXIR DESKTOP FOR AFP USER GUIDE
2-11
DESKTOP BASICS
Type
Display files alphabetically by file type (extension).
Date
Display files by creation/revision date.
Size
Display files by size (in bytes).
Ascending
Display files in ascending order, either by name or
type (alphabetically, with "A" first), by date (chronologically, with oldest date first) or by size (smallest file
first).
Descending
Display files in descending order, either by name or
type (alphabetically, with "A" last), by date (chronologically, with latest date first) or by size (largest file first).
Settings
Displays the Local View dialog box which summarizes
the file view settings for the open folder. View
changes in this dialog box override global view
settings.
You can apply view settings to all Desktop folders using the Global View dialog box. See the "Elixir folders"
chapter for more information.
Accessing DOS
The DOS menu allows you to run DOS commands
from the Desktop.
Selecting the [DOS Command] option or pressing
<Ctrl>+<D> displays a dialog box to allow you to enter
any standard DOS command.
2-12
ELIXIR TECHNOLOGIES CORPORATION
DESKTOP BASICS
Enter a DOS command and select [OK] to display the
Elixir Exec window and execute the DOS command
from either of the following directories:
the \ELIXIR directory, if no windows are open on
the Desktop
the directory corresponding to the window, if a
window is open on the Desktop.
After the DOS command executes, the system
prompts you to enter any key to redisplay the
Desktop.
See the “Accessing DOS files and applications” chapter for additional ways to access DOS.
Exiting the Desktop
You can exit the Desktop in any of the following ways:
Click on the Exit Box at top left of Desktop
Press <Alt>+<F4>
Press <Alt>+<X>
Select [Exit] from the File menu.
ELIXIR DESKTOP FOR AFP USER GUIDE
2-13
3.
Elixir folders
This chapter describes the Elixir Desktop folder organization. To better understand this chapter, you
should already be familiar with DOS directory
structures.
Folders and DOS directories
Directories and subdirectories are structures DOS
uses to store and organize files. Folder icons on the
Desktop represent DOS directories or subdirectories.
Just as a DOS directory contains files and subdirectories, Desktop folders contain files and other folders.
Using folder icons is easier than using DOS directories because you can display folder contents as icons
in a window, and copy files from one folder to another
(see the "Desktop basics" chapter in this guide).
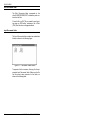
The Elixir folder icons shown in the following figure
display at the top left of the Desktop.
Figure 3-1. Elixir folder icons
Elixir folder icons allow you to use simple mouse operations to:
access and display Elixir-format files
copy Elixir-format files into different folders
convert form, font, image, document and job files
to and from Elixir format.
ELIXIR DESKTOP FOR AFP USER GUIDE
3-1
ELIXIR FOLDERS
To the right of the Elixir folder icons, the User Files
icon shown in the following figure displays.
Figure 3-2. User Files icon
The User Files icon allows you to access any file or
directory on your hard disk or diskette drive. See the
“Accessing DOS files and applications” chapter in this
guide for a description of the User Files icon.
Elixir folder structure
This section describes the structure and use of the
five Elixir folder icons.
Most Elixir folder icons contain three subordinate folders labeled Elixir, Input and Output.
For example, when you open the Elixir Forms folder
icon, the following window displays.
Figure 3-3. Forms Folders window
Similarly, opening the Elixir Fonts, Elixir Images and
Elixir Documents folder icons display a window showing subordinate folders called Elixir, Input and Output.
This folder structure allows you to edit or view form,
font, image, document and job files having different
formats, as shown in the following figure.
3-2
ELIXIR TECHNOLOGIES CORPORATION
ELIXIR FOLDERS
Figure 3-4. Input, Elixir and Output folders
Each Input folder is similar to an “in basket" containing files you can convert to Elixir format by
copying them to the Converter icon. See the “File
conversions” chapter in this guide for more information.
Each Elixir folder is similar to a “working area”
where you can edit and view converted files.
Each Output folder is similar to an “out basket”, to
which edited Elixir-format files are written after
you convert them to their original or other nonElixir format by copying them to the Converter
icon. See the “File conversions” chapter in this
guide for more information.
To use Elixir folders for file editing, follow these steps:
1.
Copy a file you want to edit or view to the
appropriate Input folder.
2.
Convert the file to Elixir format as described
in the “File conversions” chapter of this
guide.
3.
Double-click on the converted Elixir-format
file to start the appropriate Elixir application
and load the file.
4.
Edit the file using the tools provided by the
Elixir application. After editing, save the file.
5.
Convert the edited Elixir-format file to the
format you want. The converted file writes to
the appropriate Output folder.
ELIXIR DESKTOP FOR AFP USER GUIDE
3-3
ELIXIR FOLDERS
6.
Open the Output folder and copy
converted file to the desired location.
the
The “File conversions” chapter in this guide describes
this procedure in more detail.
The following sections describe the different Elixir, Input and Output folders.
Changing folder display
You can modify Elixir folder display and apply these
changes to all folders (global) or only to the currently
open (local) folder.
To change the global folder view:
1.
Select [Global View] from the Special menu.
The Global View dialog box displays.
Figure 3-5. Global View dialog box
2.
Click on the button in the bottom of the dialog
box until GLOBAL displays (default is
LOCAL).
3.
Select display characteristics, then click on
[OK].
To change a local folder view:
3-4
ELIXIR TECHNOLOGIES CORPORATION
ELIXIR FOLDERS
1.
Open the Elixir folder you want to change.
2.
Select [Settings] from the View menu.
The Local View dialog box displays.
Figure 3-6. Local View dialog box
3.
Select display characteristics, then click on
[OK].
Forms folder
The Desktop Forms folder corresponds to the
drive:\ELIXIR\FORMS directory and contains the Elixir
Forms, Input Forms and Output Forms folders shown
in the following figure.
Figure 3-7. Forms Folders window
ELIXIR DESKTOP FOR AFP USER GUIDE
3-5
ELIXIR FOLDERS
Elixir Forms folder
The Elixir Forms folder corresponds to the DOS
drive:\ELIXIR\FORMS\ELIXIR directory and any userdefined subdirectories within the drive:\ELIXIR\
FORMS\ELIXIR directory (such as drive:\ELIXIR\
FORMS\ELIXIR\ DEMO).
The Elixir Forms folder displays Elixir form files (files
with .ELX name extensions). You can edit any file using ElixirForm for AFP by opening the file.
The Elixir Forms folder also displays files with .BAK,
.PUB and .INV name extensions, as follows:
.BAK extension files are backup form files that
ElixirForm creates. You can edit .BAK files if you
rename their extensions to .ELX.
.PUB extension files are publication files used for
archiving and copying Elixir form files and all related components (such as fonts and graphics
used on the form) to a diskette. See the “Elixir
Fonts folder” section in this chapter for more
information.
When you use the ELXINV utility to convert .ELX
files to a different orientation (from portrait to inverse portrait, for example), you create .INV extension files. To edit these files using ElixirForm,
rename the extensions to .ELX. See the “Standalone utilities” chapter for more information about
the ELXINV utility.
Input Forms folder
The Input Forms folder contains the folders shown in
the following figure:
3-6
ELIXIR TECHNOLOGIES CORPORATION
ELIXIR FOLDERS
Figure 3-8. Input Forms folder
The Input Forms folder correspond to the following
subdirectories:
Input Forms folder
DOS subdirectory and file extensions
FOB Forms
\ELIXIR\FORMS\FOBIN\*.*
AFP OVE Forms
\ELIXIR\FORMS\OVEIN\*.OVE
OGL Forms
\ELIXIR\FORMS\OGLIN\*.OGL
LOG Forms
\ELIXIR\FORMS\LOGIN\*.LOG
Output Forms folder
The Output Forms folder contains a number of subordinate folders, as shown in the following figure.
ELIXIR DESKTOP FOR AFP USER GUIDE
3-7
ELIXIR FOLDERS
Figure 3-9. Forms Output Folders window
When you use the Converter icon to convert files (as
described in the “File conversions” chapter of this
guide), output files write to the Output folders with appropriate file extensions, as shown in the table on the
following page.
Output Forms
folder
DOS subdirectory and file extensions
HP PCL Forms
\ELIXIR\PRINTS\HPPRINT\*.PRN
PostScript Forms
\ELIXIR\FORMS\PSOUT\*.PS
PDF Forms
\ELIXIR\FORMS\PDFOUT\*.*
FOB Forms
\ELIXIR\FORMS\FOBOUT\*.FOB
AFP OVE Forms
\ELIXIR\FORMS\OVEOUT\*.OVE
OGL Forms
\ELIXIR\FORMS\OGLOUT\*.OGL
LOG Forms
\ELIXIR\FORMS\LOGOUT\*.LOG
The above Output Forms folders show all formats to
which Elixir Desktop products can be converted.
3-8
ELIXIR TECHNOLOGIES CORPORATION
ELIXIR FOLDERS
Fonts folder
The Fonts folder corresponds to the drive:\ELIXIR\
FONTS directory and contains the Elixir Fonts, Input
Fonts and Output Fonts folders as shown in the following figure.
Figure 3-10. Fonts Folders window
Elixir Fonts folder
The Elixir Fonts folder corresponds to the DOS
drive:\ELIXIR\FONTS\ELIXIR subdirectory and displays Elixir-format font file names with .HDR extensions. You can edit these files using ElixirFont by
opening (double-clicking on) the files. See the ElixirFont User Guide for more information.
Although only .HDR extension files display, each
Elixir-format font consists of three files having the
same stem name but different extension, as follows:
.HDR - the font header file
.GLH - the glyph (character) header file
.GLY - the glyph (character) bitmap file
The .GLH and .GLY files are also in the drive: \ELIXIR\FONTS\ELIXIR subdirectory, but do not display in
the window. You can display all three components if
you open the subdirectory using the User Files icon
described in the “Accessing DOS files and applications” chapter of this guide.
When you copy a font from the Elixir Fonts folder using the Desktop copy operation (copying to a diskette,
for example), all three file components copy.
ELIXIR DESKTOP FOR AFP USER GUIDE
3-9
ELIXIR FOLDERS
If you want to copy an Elixir font using either the User
Files icon or DOS COPY command, remember to
copy all three components for each file.
In addition, the Elixir Fonts folder may contain .COD
(Elixir code page file) and .CDF (Elixir coded font) font
components. These components describe mapping
information for converting the font to an AFP format
font. See the "File conversions" chapter or the ElixirFont for AFP User Guide for more information.
The .COD and .CDF components display when you
select [Show Code Page] and [Show Coded Fonts]
from the Filter menu in the Elixir Fonts window
header.
Elixir versions of fonts converted from AFP fonts are
composed of additional files. See the “AFP font conversion considerations” appendix for more information.
Input Fonts folder
The Input Fonts folder contains subordinate folders,
as shown in the following figure.
Figure 3-11. Fonts Input Folders window
To prepare a font file for conversion, first copy it to the
appropriate Input Fonts folder. Make sure the file has
the correct name extension for the folder, as shown in
the following table.
3-10
ELIXIR TECHNOLOGIES CORPORATION
ELIXIR FOLDERS
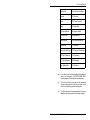
Input Fonts folder
DOS subdirectory and file extensions
HP PCL Fonts
\ELIXIR\FONTS\HPIN\*.FNT
ATM Fonts
\ELIXIR\FONTS\HPIN\*.ATM
True-Type Fonts
\ELIXIR\FONTS\HPIN\*.TT
Outline Fonts
\ELIXIR\FONTS\CONTOURS\*.TDF
\ELIXIR\FONTS\CONTOURS\*.SPD
(default - also user-definable)
3800 AFP Fonts
\ELIXIR\FONTS\I38IN\*.*
AFP Fonts
\ELIXIR\FONTS\AFPIN\*.*
In the AFP and 3800 AFP Fonts folders, C*, T1*, or X*
font components display depending on whether you
select [Show Charset], [Show Code Page] or [Show
Coded Fonts], respectively, in the Filter menu accessed from the folder header.
The Outline Fonts folder displays internal names of
the font, as specified by the "menulabel" line in the
.TDF file.
Output Fonts folder
The Output Fonts folder contains a number of subordinate folders
Figure 3-12. Fonts Output Folders window
ELIXIR DESKTOP FOR AFP USER GUIDE
3-11
ELIXIR FOLDERS
When you use the Converter icon to convert files (as
described in the “File conversions” chapter), output
files write to the Output folders with appropriate name
extensions, as shown in the following table.
Output Fonts folder
DOS subdirectory and file extensions
HP PCL Fonts
\ELIXIR\FONTS\PRINTER\*.FLJ
(regular fonts)
\ELIXIR\FONTS\PRINTER\*.RLJ
(rotated fonts for proof-printing)
ATM Type 3 Fonts
\ELIXIR\FONTS\ATM3OUT\*.PS
Screen Fonts
\ELIXIR\FONTS\SCREEN\DEMO\*.VGA
(user-defined subdirectory)
(for
VGA monitors)
\ELIXIR\FONTS\SCREEN\DEMO\*.FNT
(for all other supported monitors)
\ELIXIR\FONTS\SCREEN\DEMO\
*.WDT
(width tables)
Windows Fonts
\ELIXIR\FONTS\SCREEN\WINDOWS
(Windows screen fonts)
3800 AFP Fonts
\ELIXIR\FONTS\I38OUT\*.*
AFP Fonts
\ELIXIR\FONTS\AFPOUT\*.*
AFP Fonts
\ELIXIR\FONTS\AFPIN\*.*
HP PCL Fonts
\ELIXIR\FONTS\HPIN\*.FNT
The above Output Fonts folders show all formats to
which Elixir Desktop products can be converted.
Note that Elixir fonts converted from AFP fonts display
different file extensions. Character sets have .240 or
.300 extensions; code pages and coded fonts do not
have file extensions.
3-12
ELIXIR TECHNOLOGIES CORPORATION
ELIXIR FOLDERS
Images folder
The Images folder corresponds to the drive:\ELIXIR\
PICS directory and contains the Elixir Images, Input
Images and Output Images folders shown in the following figure.
Figure 3-13. Images Folders window
Elixir Images folder
The Elixir Images folder corresponds to the
drive:\ELIXIR\PICS\PRINTER directory and contains
Elixir image-format files with .LP3 extensions. You can
edit these files by opening (double-clicking on) the
files. Opening a file starts ElixirImage for AFP and
loads the file.
Input Images folder
The Input Images folder contains a number of subordinate folders, as shown in the following figure.
Figure 3-14. Images Input Folders window
ELIXIR DESKTOP FOR AFP USER GUIDE
3-13
ELIXIR FOLDERS
To prepare a file for conversion, first copy it to the appropriate Input Images folder. Make sure the file has
the correct name extension for the folder, as shown in
the following table.
Input Images folder
DOS subdirectory and file extensions
PCX Images
\ELIXIR\PICS\PCXIN\*.PCX
TIFF Images
\ELIXIR\PICS\TIFFIN\*.TIF
BMP Images
\ELIXIR\PICS\BMPIN\*.BMP
AFP PSEG Images
\ELIXIR\PICS\SEGIN\*.SEG
The above Input Images folders show all formats from
which Elixir Desktop products can be converted.
Output Images folder
The Output Images folder contains a number of subordinate folders, as shown in the following figure.
Figure 3-15. Images Output Folders window
When you use the Converter icon to convert files (described in the “File conversions” chapter of this guide),
output files write to the appropriate Output folders with
appropriate file extensions, as shown in the following
table.
3-14
ELIXIR TECHNOLOGIES CORPORATION
ELIXIR FOLDERS
Output Images folder
DOS subdirectory and file extensions
HP PCL Images
\ELIXIR\PRINTS\HPPRINT\*.*
PCX Images
\ELIXIR\PICS\PCXOUT\*.PCX
TIFF Images
\ELIXIR\PICS\TIFFOUT\*.TIF
BMP Images
\ELIXIR\PICS\BMPOUT\*.BMP
Screen Images
\ELIXIR\PICS\SCREEN\*.LW8
AFP PSEG Images
\ELIXIR\PICS\SEGOUT\*.SEG
The above Output Images folders show all formats to
which Elixir Desktop products can be converted.
Documents folder
The Documents folder corresponds to the DOS
drive:\ELIXIR\DOCS directory.
It also contains subordinate Elixir Document, Input
Document and Output Document folders, as illustrated in the following figure.
Figure 3-16. Documents Folders window
ELIXIR DESKTOP FOR AFP USER GUIDE
3-15
ELIXIR FOLDERS
Elixir Documents folder
The Elixir Documents folder corresponds to the
drive:\ELIXIR\DOCS\DOCLIST subdirectory and contains form list files.
A form list file is a .DAT file you create for proof printing using an ASCII editor, containing a list of Elixir
(.ELX) form files for a multi-page document.
Input Documents folder
The Input Documents folder contains two subordinate
folders, as shown in the following figure.
Figure 3-17. Documents Folders window
To prepare a file for conversion, first copy it to the appropriate Input Documents folder. Make sure the file
has the correct name extension for the folder, as
shown in the following table.
3-16
ELIXIR TECHNOLOGIES CORPORATION
ELIXIR FOLDERS
Input Documents
folder
DOS subdirectory and file extensions
HP PCL Docs
\ELIXIR\DOCS\HPIN\*.HP
(default - also user-definable)
AFP Docs
\ELIXIR\DOCS\AFPIN\*.*
TIFF
\ELIXIR\PICS\AFPIN\*.TIF
BMP
\ELIXIR\PICS\BMPIN\*.BMP
The above Input Documents folders show all formats
from which Elixir Desktop products can be converted.
Output Documents folder
The Output Documents folder contains a number of
subordinate folders, as illustrated in the following
figure.
Figure 3-18. Documents Output Folders
window
Note that the PDF Docs output folder displays only if
the PDF extended converter has been installed.
When you use the Converter to convert files (as described in the “File conversions” chapter of this guide),
output files write to an Output folder with the appropriate file extension, as shown in the following table.
ELIXIR DESKTOP FOR AFP USER GUIDE
3-17
ELIXIR FOLDERS
Output Documents folder
DOS subdirectory
AFP Docs
\ELIXIR\DOCS\AFPOUT\*.*
NorAFP Docs
\ELIXIR\DOCS\NRAFPOUT\*.*
HP PCL Docs
\ELIXIR\DOCS\HPOUT\*.*
PostScript Docs
\ELIXIR\DOCS\PSOUT\*.*
PDF Docs
\ELIXIR\DOCS\PDFOUT\*.*
XGF Docs
\ELIXIR\DOCS\XGFOUT\*.*
The above Output Documents folders show all formats to which Elixir Desktop products can be
converted.
Jobs folder
The Jobs folder corresponds to the DOS ELIXIR\
JOBS directory and contains a number of subordinate
folders, as illustrated in the following figure.
Figure 3-19. Jobs folder
3-18
ELIXIR TECHNOLOGIES CORPORATION
ELIXIR FOLDERS
The Jobs folder subordinate folders correspond to the
following DOS subdirectories:
Job folder
DOS subdirectory and file extension
Elixir Docs Jobs
\ELIXIR\DOCS\DOCLIST\*.DAT
Elixir Data Jobs
\ELIXIR\JOBS\ELIXIR\SYSTEM
Input Jobs
\ELIXIR\JOBS\PPFAIN\*.*
\ELIXIR\DOCS\AFPIN\*.*
Output Jobs
\ELIXIR\JOBS\PPFAOUT\*.*
\ELIXIR\JOBSS\AFPOUT\*.*
Elixir Docs Jobs
The Elixir Docs Jobs folder corresponds to the
drive:\ELIXIR\DOCS\DOCLIST directory and displays
a list of Elixir jobs (.DAT files). Each Elixir job is an
ASCII file that contains a list of Elixir form files and
print ticket information for the individual form files.
Elixir Data Jobs
The Elixir Data Jobs folder displays files in the
drive:\ELIXIR\JOBS\ELIXIR\SYSTEM directory.
These are job files created using Elixir AppBuilder.
Note that the DOS file names in drive:\ELIXIR\JOBS\
ELIXIR\SYSTEM are not the same as those in the
Elixir Data Jobs folder; rather, the displayed names
are extracted from the DOS files.
Input Jobs
The Input Jobs folder contains folder icons as shown
in the following figure.
ELIXIR DESKTOP FOR AFP USER GUIDE
3-19
ELIXIR FOLDERS
Figure 3-20. Input Jobs folder
The PDef/FDef folder corresponds to the drive: \ELIXIR\JOBS\AFPIN directory. Compiled object-format
FORMDEF and/or PAGEDEF files must be copied to
this directory for importing into AppBuilder. All file extensions are valid.
See the Elixir AppBuilder for AFP User Guide for more
information.
Output Jobs
The Output Jobs folder contains folder icons as
shown in the following figure.
Figure 3-21. Output Jobs folder
The PDef/FDef folder corresponds to the drive:\ELIXIR\JOBS\AFPOUT directory. Compiled object-format
FORMDEF and/or PAGEDEF files generated by AppBuilder write to this directory. Output files have .OBJ
extensions.
The PPFA Source folder corresponds to the drive:\
ELIXIR\JOBS\PPFAOUT directory. Source FORMDEF and/or PAGEDEF files generated by AppBuilder
3-20
ELIXIR TECHNOLOGIES CORPORATION
ELIXIR FOLDERS
write to this directory. Output files have .SRC extensions.
See the Elixir AppBuilder for AFP User Guide for more
information.
User Files folder
In addition to the Elixir folders described in the previous sections, the Elixir Desktop installation procedure
creates a number of directories that contain mapping
or correspondence tables. You can access these directories using the User Files icon described in the
"Additional Desktop features" and "Accessing DOS
files and applications" chapters. See the "Additional
files and directories" appendix for detailed information
on mapping table directories.
ELIXIR DESKTOP FOR AFP USER GUIDE
3-21
4.
Desktop configuration
To customize your Elixir Desktop for AFP, you can
use the System menu options shown in the following
figure. You can also access some options using the
shortcut keys displayed to the right of menu options.
System menu
Special menu
Figure 4-1. Desktop menu bar
The System menu contains the options shown in the
following figure.
Figure 4-2. System menu
ELIXIR DESKTOP FOR AFP USER GUIDE
4-1
DESKTOP CONFIGURATION
Each option in the System menu allows you to perform certain configuration actions:
System Config<Alt> + <F6>
Configures basic system parameters.
Usage Switches
Enables/disables selected Desktop functions.
User Privileges
Specifies user access controls.
Diagnostics <Alt> + <F5>
Accesses the diagnostics application.
Make Directory <Ctrl> + <M>
Creates a DOS directory
Converter Props
Specifies control parameters for the Converter icon.
Transformer Props
Specifies parameters for the Transformer icon.
Reset to Defaults
Resets all configuration parameters to default values.
Refresh
Refreshes the screen display.
Toolset
Provides several Desktop toolsets.
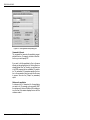
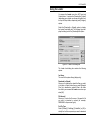
System configuration
Select the [System Config] option in the System menu
to set system configuration parameters. The Desktop
Basic Setup dialog box displays and contains the following options:
4-2
ELIXIR TECHNOLOGIES CORPORATION
DESKTOP CONFIGURATION
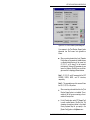
Figure 4-3. Desktop Basic Setup dialog box
Warn on low disk space
Displays a warning when disk space falls below the
[Threshold] value (default is 500 KB; maximum is 25
MB).
Show banner logo file
Display the banner logo .BMP file each time you start
the Desktop, if there are no open window. The default
logo is DESKLOGO.BMP, but you can enter any .BMP
file residing in drive:\ ELIXIR\PICS\BMPIN.
Show conversion parameters
Displays conversion parameters when converting
files.
Clock Attributes
Clock Running
Displays the current date and time in the menu bar.
Clock Attributes
Set Time and Date
Displays the Date & Time dialog box for setting the
current date and time.
Double Click Speed
Speed at which successive mouse clicks interpret as
a double-click: [Slowest], [Slow], [Medium] (the default) or [Fast].
ELIXIR DESKTOP FOR AFP USER GUIDE
4-3
DESKTOP CONFIGURATION
Country Keyboard Map
Displays the Browse Country Keyboard Map dialog
box for selecting a .KMP file to convert to/from AFP
font format. The selected file name displays on the
button's face when you click on [OK]. See the "AFP
font conversion considerations” appendix for more
information.
Default CodePage
Displays the Browse Code Page dialog box for selecting a default code page for font conversion. The selected file name displays on the button's face when
you click on [OK].
GCID File
Displays the Browse GCID File dialog box for selecting aGCID mapping file for converting non-AFP Elixir
fonts to AFP fonts. The selected file name displays
on the button's face when you click on [OK]. Default
is C0ADOBE.
Tag Display
Specifies the data tags print option:
[None] - prints no data tags
[Replace Char]- prints form with the selected field
length and replacement characters
[Tag Name] - prints tags on the form using the field
name
Desktop usage switches
Select the [Usage Switches] option in the System
menu to customize your Desktop. The Desktop Usage Switches dialog box displays and contains the following options:
4-4
ELIXIR TECHNOLOGIES CORPORATION
DESKTOP CONFIGURATION
Figure 4-4. Usage Switches dialog box
Confirm file deletions
Displays the Confirmation for Command dialog box
when deleting file(s).
Confirm file overwrites
Displays the Confirmation for Command dialog box for
requesting confirmation of file overwrite. This option
is only applicable for files copied through the Desktop.
Show diskette property sheet
Displays the Diskette Properties dialog box each time
you copy a file to or open the Diskette icon. See the
“Additional Desktop features” and “Peripheral devices”
chapters for more information.
Show printer property sheet
Displays the Printer Properties dialog box each time
you print a file. See the “Peripheral devices” chapter
for more information.
Show scanner property sheet
Displays the Scanner Properties dialog box each time
you use the Scanners icon. See the “Peripheral devices” chapter for more information.
Save Settings on Exit
Retains the Usage Switches change made in the current Desktop session and displays them in future
sessions.
Monochrome Monitor
Executes the DOS MODE MONO command required
for SIGMA monitors on PS/2 systems and for newer
(after 1990) SIGMA monitors running in monochrome
(non-grayscale) mode.
ELIXIR DESKTOP FOR AFP USER GUIDE
4-5
DESKTOP CONFIGURATION
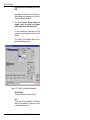
Converter
Displays the Converter Properties Dialog which contains the following options:
Figure 4-5. Converter Properties Dialog dialog box
Working Directory
Directory where temporary read/writes occurs
during transformations. Default is the root (\). We
recommend specifying a RAM disk for faster
transformations.
Confirm file overwrites during transformation
Requests confirmation before overwriting existing
output files. Deselect this option automatically
overwrite existing files.
This option is applicable only when transforming
form and .LGO files to Elixir format.
Show properties before transformation
Specifies default dialog box setup options for
each file transformation type.
Pause after transformation
Pauses after each transformation.
Stop process after:
Select when to stop processing:
[Error] - stops a conversion when an error occurs
[All files processed] processing all files
4-6
stops conversion after
ELIXIR TECHNOLOGIES CORPORATION
DESKTOP CONFIGURATION
User privileges
Select the [User Privileges] option in the System
menu to select the level of control over certain Desktop operations for the Elixir Desktop user.
Figure 4-6. User Privileges dialog box
For example, you can choose whether or not to allow
a user to access an Elixir application from the Desktop. If you choose not to allow access, the icons representing the Elixir application and its associated
folder do not display.
Delete Files
Users cannot delete files.
Change file properties
Users can enter the file name in a Properties dialog
box.
Backup beyond default directories
In the Elixir file structure, backs up directories to the
specified drive. When not selected, backs up to the
default directory for the Elixir (Forms, Fonts, Graphics,
and Documents) folders only (recommended).
Access Forms
Allows access to ElixirForm for AFP or Elixir-format
form files. The icons representing both do not display
on the Desktop if you do not select this option.
ELIXIR DESKTOP FOR AFP USER GUIDE
4-7
DESKTOP CONFIGURATION
Access Fonts
Allows access to ElixiFont or Elixir-format font files.
The icons representing both do not display on the
Desktop if you do not select this option.
Access Images
Allows access to ElixirImage or Elixir-format image
files. The icons representing both do not display on
the Desktop if you do not select this option.
Access Documents
Allows access to non-Elixir files. The User Files icon
does not display on the Desktop if you do not select
this option.
Access Userfiles
Allows access to non-Elixir applications. The User
Tools icon does not display on the Desktop if you do
not select this option.
Access Usertools
Allows access to the User Tools icon. The icon does
not display if you do not select this option.
Access Scan
Allows access to the ElixirScan icon. The icon does
not display if you do not select this option.
Access Dispatcher
Allows access to the Dispatcher icon. The Dispatcher
icon does not display on the Desktop if you do not select this option.
Access Transformer
Allows access to the Transformer icon. The icon does
not display if you do not select this option.
Access Converters
Allows access to the Converter icon. The icon does
not display if you do not select this option.
Perform Reset to Default
Enables resetting system defaults from the System
menu.
Access DOS
Allows DOS access from the Desktop.
4-8
ELIXIR TECHNOLOGIES CORPORATION
DESKTOP CONFIGURATION
Diagnostics
Select the [Diagnostics] option in the System menu
to run a number of diagnostic utilities and/or enter a
command to run a diagnostic program of your choice.
The Desktop Diagnostics dialog box displays and contains the following options:
Figure 4-7. Desktop Diagnostics dialog box
Free Memory
Displays available memory in KB. The figure displayed also includes the size of the Windows swap file
on your PC.
Free Resources
Displays available
percentage.
Windows
resources
as
a
Base Memory
Displays total system RAM.
Maximum file list
Displays the maximum number of files that can display in a window.
Disk Space Left
Displays the disk space left on the hard disk on which
the Elixir Desktop displays.
Current drive:
Displays the current drive.
View Install
Displays the log file INSTALL.LOG that generates
when installing Elixir software on your PC. When you
report any problems to the Support Center, the center
ELIXIR DESKTOP FOR AFP USER GUIDE
4-9
DESKTOP CONFIGURATION
may ask for the contents of this log file to help determine the source of your problem.
View Autoexec.BAT
Displays the contents of the AUTOEXEC.BAT file.
Show Installed ElixiKeys
Displays installed ElixiKeys on your PC.
View Config.SYS
Displays the contents of the CONFIG.SYS.
Creating a directory
Select the Directory] option in the System menu to
create a directory in the entered path. The Enter Path
of Directory to Create dialog box displays and contains the following options:
Figure 4-8. Enter Path of Directory to Create
dialog box
Enter the name and path of any directory you want to
create, then click on [OK] to create the directory.
If you do not enter a full path for a directory name:
If a window is open, the directory you enter becomes subordinate to the directory corresponding
to the window.
If the Desktop does not display any open windows, the directory becomes subordinate to the
root directory, on the drive on which you loaded
Elixir software.
4-10
ELIXIR TECHNOLOGIES CORPORATION
DESKTOP CONFIGURATION
Converter properties
Select the [Converter Props] option in the System
menu to select/enter initial setup options for converting files.
The Converters Properties dialog box displays and
contains the following options:
Figure 4-9. Converters Properties dialog box
Converter Property Sheets
Form Converters
AFP
Displays the AFP Page Converter Options dialog box
for setting AFP page conversion parameters.
Converter Property Sheets
Form Converters
PostScript
Displays the PostScript Converter Options dialog box
for setting PostScript conversion parameters.
Converter Property Sheets
Font Converters
AFP
Displays the AFP Font Converter Options dialog box
for setting AFP font conversion parameters.
Converter Property Sheets
Font Converters
Outline
Displays the Outline-to-raster font generator dialog
box for setting outline font conversion parameters.
ELIXIR DESKTOP FOR AFP USER GUIDE
4-11
DESKTOP CONFIGURATION
Converter Property Sheets
Image Converters
AFP
Displays the AFP Image Converter Options dialog box
for setting AFP image conversion parameters.
Converter Properties
Displays the Converter Properties Dialog dialog box
described in the "Usage Switches" section.
Message Reporting
Displays the Message Options dialog box which contains the following options:
Figure 4-10. Message Options Dialog
dialog box
Message Reporting
Show messages after process
Displays any error messages on-screen after
processing.
Message Reporting
Write Messages to LOG file
Writes any error messages to the file (.LOG) entered in the text box.
New Messages
Overwrite LOG file
Overwrites the previously-created .LOG file after
processing.
New Messages
Append to LOG file
New error messages add tot he end of the
previously-created .LOG file.
A maximum of 64 KB of text displays in the message log window. If message text exceeds this,
the message window displays empty and
4-12
ELIXIR TECHNOLOGIES CORPORATION
DESKTOP CONFIGURATION
messages write to drive:\ELIXIR\MESSOUT.MSG
which is viewable in any text editor.
Transformer properties
The [Transformer Props] option in the System menu
displays the Transformer Properties dialog box which
contains the following options:
Figure 4-11. Transformer Properties
dialog box
Transformer Properties
Displays the Transformer Properties Dialog dialog box
which contains the following options:
Figure 4-12. Transformer Properties Dialog
dialog box
Working Directory
Directory where temporary read/writes occurs
during transformations. Default is the root (\). We
recommend specifying a RAM disk for faster
transformations.
ELIXIR DESKTOP FOR AFP USER GUIDE
4-13
DESKTOP CONFIGURATION
Confirm file overwrites during transformation
Requests confirmation before overwriting existing
output files. Deselect this option automatically
overwrite existing files.
This option is applicable only when transforming
form and .LGO files to Elixir format.
Show properties before transformation
Specifies default dialog box setup options for
each file transformation type.
Pause after transformation
Pauses after each transformation.
Stop process after:
Select when to stop processing:
[Error] - stops a conversion when an error occurs
[All files processed] processing all files
stops conversion after
Message Reporting
Displays the Message Options Dialog dialog box. See
the "Converter properties" section for more
information.
Resetting System menu options
The [Reset to Defaults] option resets the specifications selected in the [System Config], [User Privileges], and [Diagnostics] options in the System menu
to initial default values.
Refreshing the screen
If closing a window does not completely remove it or
leaves “snow” on the screen, use the [Refresh] option
in the System menu to refresh the screen.
4-14
ELIXIR TECHNOLOGIES CORPORATION
DESKTOP CONFIGURATION
Selecting toolsets
When you install more than one version of the Desktop on a PC drive, select the [ToolSet] option in the
System menu to switch between versions.
The Desktop Toolsets dialog box displays and contains the following options:
Figure 4-13. Desktop Toolsets dialog box
Full HYBRID Desktop
Allows conversion of all installed Desktop versions.
AFP Desktop
Displays the AFP Desktop.
AS/400 Desktop
Displays the AS/400 Desktop.
Distributed Desktop
Displays the Elixir Forms Editor Desktop.
Xerox B & W
Allows all black-and-white Xerox conversions.
Xerox H/L Color and B & W
Displays the Desktop for the Elixir HighLight Option
and Plus products. Allows color and black-and-white
Xerox conversions, if you installed both versions (for
users running both B&W and color monitors and
Xerox 4850 and other printers).
Xerox Distributed Printers
Displays the 4235 XES Desktop.
Desktops differ in icon appearances and allowed file
conversions which display in the Converter icon dialog
boxes. See the “File conversions” chapter for more information about file conversions, and the tabbed
ELIXIR DESKTOP FOR AFP USER GUIDE
4-15
DESKTOP CONFIGURATION
printer sections for more information about different
Desktop versions.
4-16
ELIXIR TECHNOLOGIES CORPORATION
5.
Additional Desktop
features
This chapter describes additional operations you can
perform using the Desktop icons and menu bar File,
System and Special menus. You can perform most
of these operations using keyboard shortcuts, as described in the "Keyboard shortcuts" appendix.
The following figure shows the Desktop menu bar.
Figure 5-1. Desktop menu bar
Operations described in this chapter include:
opening icons
setting icon properties
displaying/deleting different formats of a file
displaying a logo at start-up
copying files
using the Scheduler Desktop
viewing files.
If you are just starting to use the Desktop, you may
want to read the “Desktop basics” chapter first to become more familiar with general Desktop operations.
ELIXIR DESKTOP FOR AFP USER GUIDE
5-1
ADDITIONAL DESKTOP FEATURES
Opening icons
Opening an icon typically starts a corresponding application or causes a window or dialog box to display
showing properties related to the icon. In most cases
you can modify the properties displayed to affect the
performance of the object represented by the icon.
You can open an icon in any of the following ways:
Double-click on it
Click on it and press <Enter>
Click on it and select [Open] from the File menu.
The following sections describe the results of opening
various icons.
Opening a folder icon
When you open a (Forms, Fonts, Images or Documents) folder icon, a window showing the contents of
the folder displays. Each folder typically comprises
one or more sub-folders containing files. Note that
each folder corresponds to a DOS directory.
Opening Elixir files
Elixir files are generic Elixir-format files that you access from the Desktop Elixir folders, and include:
Elixir-format form files in the Elixir Forms folder
(drive:\ELIXIR\FORMS)
Elixir-format font files in the Elixir Fonts folder
(drive:\ELIXIR\FONTS)
Elixir-format graphics files in the Elixir Graphics
folder (drive:\ELIXIR\IMAGES)
Elixir-format document files in the Elixir Documents folder (drive:\ELIXIR\DOCS).
5-2
ELIXIR TECHNOLOGIES CORPORATION
ADDITIONAL DESKTOP FEATURES
When you open an Elixir file, the corresponding Elixir
application starts and the file loads in the application.
For example, when you open an Elixir form file, the
Elixir Forms Editor application starts, and the form file
loads (displays on the screen), ready for editing.
Note that your PC must have the corresponding application installed and enabled. Elixir applications can be
enabled/disabled using the System menu, as described in the “Desktop configuration” chapter.
Note also that you cannot open an Elixir document
icon in the Elixir Docs folder (drive:\ELIXIR\DOCS).
Opening the ElixirForm icon
Opening the ElixirForm icon at the right of the Desktop
starts the ElixirForm application. When you exit the
application, the Desktop redisplays.
Note that pressing <CTRL> and clicking the right
mouse button on the icon instead displays icons representing other installed applications.
Opening device icons
Opening a device icon displays a dialog box for viewing or modifying the current properties of the device
represented, as follows:
Diskette icon
Configures your PC's internal or external diskette
drive. See the "Icon properties" section and “Peripheral devices” chapter for more in- formation.
Printers icon
Configures alocal proof printer connected to your PC.
See the "Icon properties" section and "Local Printers"
appendix for more information.
ELIXIR DESKTOP FOR AFP USER GUIDE
5-3
ADDITIONAL DESKTOP FEATURES
Scanners icon
Configures scanners connected to your PC. See the
"Icon properties" section and “Peripheral devices”
chapter for more information.
Opening other icons
Opening the User Tools, User Files, Dispatcher, Converter and Viewer icons results in different displays:
User Tools icon
Displays the User Tools window for creating an icon
for DOS applications or batch files. See the "Accessing DOS files and applications" chapter for more
information.
User Files icon
Displays the User Files: Directory Paths and Tool
Links dialog box for linking fileswith DOS applications. See the "Accessing DOS files and applications"
chapter for more information.
Dispatcher icon
Displays the Dispatcher Commands dialog box for entering DOS batch commands. See the "Icon properties" section and “Accessing DOS files and
applications” chapter for more information.
Converter icon
Displays the Converter Properties dialog box for converting form, font and graphics files to and from different formats. See the "Icon properties" section and
"Desktop configuration" and "File conversions" chapters for more information.
Viewer icon
Displays the Windows Notepad for displaying the contents of an Elixir-format file for editing. See the "Viewing files" section for more information.
5-4
ELIXIR TECHNOLOGIES CORPORATION
ADDITIONAL DESKTOP FEATURES
Displaying Icon properties
Using the Desktop, you can view and modify property
specifications for the following:
Converter icon
Dispatcher icon
Viewer icon
device (Diskette, Scanners and Printers) icons
file icons.
To display and modify properties for any of the above,
select the appropriate icon, then perform one of the
following:
Press <F2>.
Press the right mouse button.
Select [Properties] from the File menu.
Files
Selecting [Properties] for a file icon displays the File
Object Properties dialog box which contains the following options:
Figure 5-2. File Object Properties dialog box
File name and extension
The name and extension of the selected file. Enter a
new file name and extension to rename the file.
File type
Selected file type. For example, Elixir, HP PCL, or
PostScript.
File size
Size of the selected file in bytes.
ELIXIR DESKTOP FOR AFP USER GUIDE
5-5
ADDITIONAL DESKTOP FEATURES
Date of last access
Date file created or last changed.
Time of last access
Time file last accessed.
If you select more than one file, a dialog box for each
subsequent file displays when you click on [OK] or
[Cancel].
Displaying Elixir file formats
When you convert Elixir and Input folders files, files
with the same stem names but different extensions
write to the appropriate Output folders (see the “Elixir
folders' and “File conversions” chapters for more information).
The Desktop file formats feature allows you to select a
file in any Elixir folder, and to display all files with the
same stem name but different extensions on the drive
to which Elixir installs. This feature also allows you to
delete either all or selected file formats from the
directory.
To display different versions of a file, select the desired file from an Elixir folder, then select [Formats]
from the File menu. The File Formats dialog box displays and contains the following options:
Figure 5-3. File Formats dialog box
No Operation
Performs no operations on displayed files.
5-6
ELIXIR TECHNOLOGIES CORPORATION
ADDITIONAL DESKTOP FEATURES
Delete * Formats
Deletes all displayed formats of a selected file.
Delete * except Elixir
Deletes all formats of a selected file, except the Elixir
format.
Printing Desktop folder contents
You can display and print a listing of all files in a
folder.
To display all files in a folder:
1.
Open the desired folder.
2.
Select [Enter Filter] from the Filter menu.
The File Name Entry dialog box displays.
Figure 5-4. File Name Entry dialog box
3.
Enter *.* in the [Selecting File(s)] option, then
click on [OK].
To print the listing of a folder:
1.
Open the desired folder.
2.
Select [Print Directory Listings] from the File
menu.
The Print dialog box displays.
ELIXIR DESKTOP FOR AFP USER GUIDE
5-7
ADDITIONAL DESKTOP FEATURES
Figure 5-5. Print dialog box
3.
Select/enter print information, then click on
[OK].
Displaying a logo
You can configure the Desktop to display a logo upon
start up. The logo displays only if you closed all windows when last exiting the Desktop.
The displayed logo may be any .BMP graphics file in
drive:\ELIXIR\PICS\BMPIN. The default logo is
DESKLOGO.BMP.
5-8
ELIXIR TECHNOLOGIES CORPORATION
ADDITIONAL DESKTOP FEATURES
To specify the logo to display:
1.
Select [System Config] from the System
menu.
The Desktop Basic Setup dialog box displays.
Figure 5-6. Desktop Basic Setup dialog box
2.
Select [Show banner logo file], enter the stem
name
of
the
.BMP
file
in
the
drive:\ELIXIR\PICS\BMPIN to display, then
click on [OK].
Depending on your monitor's screen resolution,
the size of the displayed logo changes.
Copying files
Copying files involves different procedures, depending
on whether you are copying files to or from:
Elixir folders
DOS directories on the hard disk
DOS-format diskettes
DOS Elixir-format diskettes
Viewer icon
ELIXIR DESKTOP FOR AFP USER GUIDE
5-9
ADDITIONAL DESKTOP FEATURES
In each case, you select files from a window and then
copy them in one of the following ways:
Drag and drop files on the destination icon.
Press <Ctrl>+<C>, then click on destination icon.
Select [Copy] from the File menu, then click on
the destination icon.
Copying files to Elixir folders
You copy files to Elixir folders when you convert files
to different formats. However, before conversion,
make sure the files have the correct extension. See
the “Elixir folders” chapter for more information.
Copying files to a DOS directory
This section describes how to use the Desktop to
copy files from one DOS hard disk to another.
To copy file(s) in a window to another hard disk directory, select the files and drag and drop them on the
User Files icon. The User Files: Directory Paths and
Tool Links dialog box displays and contains the following options:
Figure 5-7. User Files: Directory Paths and Tool Links dialog box
5-10
ELIXIR TECHNOLOGIES CORPORATION
ADDITIONAL DESKTOP FEATURES
To specify the target directories (maximum 12), perform one of the following:
Enter the directory into which you want to copy
files
When the directory you want to copy files to displays, select (highlight) it
Select any line that shows a path and edit it
If the directory you enter does not exist, a dialog box
displays requesting confirmation to create a new directory. Select [Yes] to create the new directory. An
empty window for the new directory displays.
You can also use wildcard characters to display a filtered list of files in a directory.
Click on [OK] to copy the files. See the “Accessing
DOS files and applications” chapter for more information.
Copying files from a DOS directory
To copy one or more files from a DOS directory, open
the User Files icon to display the User Files: Directory
Paths and Tool Links dialog box.
Enter the name of the directory from which you want
to copy files or, if the path to the directory displays, select it and click on [OK].
A window similar to the following figure displays,
showing the contents of the directory. In the window,
select the files you want to copy, then drag and drop
the files on the Desktop target icon. The target icon
can be any of the Elixir folders, the Diskette icon or
the User Files icon.
ELIXIR DESKTOP FOR AFP USER GUIDE
5-11
ADDITIONAL DESKTOP FEATURES
Figure 5-8. Directory window example
Copying files to a DOS-format diskette
To copy selected files from a displayed window to a
DOS-format diskette:
1.
Copy the selected file from your diskette(s) to
the Diskette icon on the Desktop.
The System Diskette dialog box displays and contains
the following options:
Figure 5-9. System Diskette dialog box
Directory on Diskette to open
Destination for writing files.
Diskette Drive
Disk drive identifier for your disk drive.
Diskette Type
Select the diskette type: [DOS User-Defined] or [DOS
Elixir].
5-12
ELIXIR TECHNOLOGIES CORPORATION
ADDITIONAL DESKTOP FEATURES
Diskette Access
Select the diskette format:
[For WRITing] - formatted diskettes
[Perform FORMAT] - creates a DOS-formatted
diskette
2.
Select/enter file copy options, then click on
[OK].
Copying files from a DOS-format diskette
To copy files from a DOS-format diskette, open the
Diskette icon to display the System Diskette dialog
box. Select/enter the following information:
Directory on Diskette to open
The diskette directory from which you want to copy
files.
Diskette Drive
The identifier for your disk drive.
Diskette Type
[DOS User-Defined] to copy files from a DOS
directory.
A window displays showing the contents of the entered directory. Select the files, then copy the files to
a target icon on the Desktop.
Copying files to a DOS-Elixir format diskette
A DOS Elixir-format diskette is a DOS-format diskette
that contains the Elixir file directory structure. You can
copy files such as .PUB files to a DOS Elixir-format
diskette without first creating the destination Elixir directories on the diskette.
To copy selected files from a displayed window to a
DOS Elixir-format diskette, insert a diskette into your
PC disk drive. If the diskette is not already DOS Elixir
formatted, select the [DOS Elixir] and [Perform FORMAT] options to format the diskette before copying
files.
ELIXIR DESKTOP FOR AFP USER GUIDE
5-13
ADDITIONAL DESKTOP FEATURES
Copy the selected files to the Diskette icon on the
Desktop.
The System Diskette dialog box displays.
Figure 5-10. System Diskette dialog box
Select/enter the following information, then click on
[OK]:
Directory on Diskette to open
Select [DOS Elixir] to display the drive:\ELIXIR directory.
Diskette Drive
The identifier for your disk drive (normally A or B).
Diskette Type
[DOS Elixir] diskette.
copies files to a DOS Elixir-format
Diskette Access
As appropriate, select either [For WRITing] for a formatted diskette or [Perform FORMAT] to create a
DOS-formatted diskette with an Elixir directory
structure.
Copying files from a DOS Elixir-format diskette
To copy files from a DOS Elixir-format diskette, open
the Diskette icon on the Desktop to display a System
Diskette dialog box.
5-14
ELIXIR TECHNOLOGIES CORPORATION
ADDITIONAL DESKTOP FEATURES
Select/enter the following information, then click on
[OK]:
Directory on Diskette to open
Drive to copy files from.
Diskette Drive
The identifier for your disk drive.
Diskette Type
[DOS Elixir] - copies files from an Elixir diskette.
Diskette Access
[For READing]
A window displays showing the contents of the entered directory. Select the file, then copy the files to a
target icon on the Desktop.
Copying files from Output to Input folders
To copy one or more files from an Elixir Output folder
to a corresponding Input folder:
1.
Select the output file(s) from the Output
folder.
2.
Copy the file(s) to the destination Elixir icon
on the Desktop.
The selected file(s) copy into the appropriate Input folder.
You cannot copy files directly from the Output Documents folder to the Input Documents folder. Instead,
you must copy them to the User Files icon, and then
enter the path for the appropriate Document Input
folder in the User Files: Directory Paths and Tool
Links dialog box that displays.
Note also that you cannot copy files from an Input
folder to an Output folder.
Copying Elixir form files
To copy a form file and all associated elements, use
the Desktop archival feature.
ELIXIR DESKTOP FOR AFP USER GUIDE
5-15
ADDITIONAL DESKTOP FEATURES
The archival feature creates a publication (.PUB) file
containing references to all font, graphics and form information for an Elixir-format (.ELX) form file in the
Elixir Forms folder (drive:\ELIXIR\FORMS\ELIXIR).
You cannot use standard DOS or Elixir copy procedures to copy Elixir form files because these files contain elements such as text, fonts and graphics that
reside in different Elixir directories.
Creating a .PUB file
To create a .PUB file for an Elixir form file, follow
these steps:
1.
Select the .ELX file to archive.
2.
Select [Make Pubfile] from the Selection
menu.
The Elixir Publication File dialog box displays.
3.
Select/enter information, then click on [OK].
Figure 5-11. Elixir Publication File
dialog box
The Elixir Publication File dialog box contains the following information:
PubFile name
The name of the .PUB file you want to create, based
on the .ELX file stem name.
5-16
ELIXIR TECHNOLOGIES CORPORATION
ADDITIONAL DESKTOP FEATURES
Include Screen Fonts
Includes screen fonts in the .PUB file.
Include Screen Graphics
Includes screen images in the .PUB file.
Include Printer Fonts
Includes proof printer and rotated fonts (for the proof
printer you specify in the [Proof Printer Fonts for] option) in the .PUB file.
Include Printer Graphics
Includes printer images in the .PUB file.
Include Elixir Fonts
Includes Elixir versions of the fonts in the .PUB file.
Pubfile Version 1.0 Compatible
Disables the [Include Elixir Fonts] option so that .PUB
files you create are usable in previous versions of the
Desktop.
Proof Printer Fonts For
Specifies your proof printer as [HP LJ].
The Elixir Desktop creates a .PUB file in the Elixir
Forms folder with the same stem name as the file you
selected. If a .PUB file with the same name exists in
the Elixir Forms folder, the program prompts you to
confirm overwriting it.
You can view the contents of a .PUB file by doubleclicking on its icon as shown in the following figure.
Figure 5-12. Publication file components example
ELIXIR DESKTOP FOR AFP USER GUIDE
5-17
ADDITIONAL DESKTOP FEATURES
Copying a .PUB file to a diskette
To copy a .PUB file to a diskette:
1.
Insert a formatted diskette into your diskette
drive. Open the Diskette icon and make sure
[Diskette Drive] indicates the correct drive.
2.
Select the .PUB file from the Elixir Forms
window.
3.
From the Selection menu, select [Archive
Pubfile].
Alternatively, copy the .PUB file to the Diskette icon.
All directories and related files required for each element of the .PUB file copy to the diskette. If a .PUB
file with the same name exists on the diskette, the
program prompts you to confirm overwriting it. Your
confirmation also overwrites any component files with
the same stem name.
Restoring a .PUB file from a diskette
To copy a .PUB file and all associated graphics, font
and form files from a diskette to your hard disk, follow
these steps:
1.
Insert the diskette into your diskette drive.
2.
Open the Diskette icon, and select
[DOS-Elixir] to display a window with the
diskette contents.
3.
Displays the drive:\ELIXIR\FORMS\ELIXIR (or
subordinate directory) window that contains
the .PUB file.
4.
Copy the .PUB file icon to the Desktop Forms
icon.
5.
Click on the Elixir Forms folder in the
displayed window.
The .PUB file and all associated files copy to the appropriate Elixir folders. If a .PUB file with the same
5-18
ELIXIR TECHNOLOGIES CORPORATION
ADDITIONAL DESKTOP FEATURES
name exists in the Elixir Forms folder, the program
prompts you to confirm overwriting it. Your confirmation also overwrites any existing component files with
the same stem name.
If you restore a .PUB file to a PC with a different monitor than the PC from which you copied the form file,
your screen fonts and screen graphics may not display correctly. For correct font and graphics display,
use the Converter icon (described in the “File conversions” chapter of this guide) to regenerate the screen
fonts and graphics.
Using the Elixir Scheduler Desktop
The Elixir SchedulerDesktop allows you to specify
automated file conversions, batch file execution and
other actions, and the conditions for their
performance.
The actions you can specify are:
file conversions
running transcripts
executing an application defined as a User Tool
executing an application defined in the Dispatcher
icon
executing any .BAT, .EXE or .COM command.
The conditions for which you can specify the above
actions are:
the date and/or time for performing an action
checking for the existence of a file before performing an action
performing an action at specified intervals.
ELIXIR DESKTOP FOR AFP USER GUIDE
5-19
ADDITIONAL DESKTOP FEATURES
Examples of automated actions you can specify with
the Scheduler Desktop are:
If files in an Input Folder are present, convert
them to one or more formats.
At a certain time, perform a certain action (such
as back up files).
(Later, this section provides detailed examples.)
In addition, if you install the Elixir Desktop on a dedicated PC attached to a network, the Scheduler enables uploading files to another destination, for
example, to a high-speed printer.
As an example of a Scheduler setup:
You can print an application document to a file on
a Network Scheduler.
The Scheduler Desktop detects the file and converts it from its native format to a high speed
printer format.
The Scheduler then automatically sends the file to
the printer for processing.
Scheduler setup
To execute operations from the Scheduler Desktop,
follow these steps:
First, install the Scheduler Desktop on a dedicated PC
attached to the network.
If you want to specify automated file conversions, follow steps 1 through 4. If you want to specify actions
other than file conversions (such as executing batch
files), go to step 5.
1.
5-20
Open the User Files icon and specify the
Network Scheduler directory to which the files
print to disk (see the "Accessing DOS files
and
applications"
chapter
for
more
information).
ELIXIR TECHNOLOGIES CORPORATION
ADDITIONAL DESKTOP FEATURES
2.
Install the appropriate converter on the
Network Scheduler drive or set its input and
output paths to the Network Scheduler drive.
3.
Right-click on the Dispatcher icon and set up
the Dispatcher to run the files for conversion
through a DOS batch file (see the "Accessing
DOS files and applications" chapter for more
information).
4.
Click on [Setup] in the Dispatcher Commands
dialog box and in the displayed User
Application Setup dialog box, click on [Send
only Filename].
Create the batch file to perform the following:
convert input Dispatcher files to the output format
you previously set up in the Desktop
write an error log; you can set the Scheduler
desktop to check for the existence of the log and
to pause or to transmit an error message if it exists
send files directly to the printer
delete any unwanted files on the PC.
(Later, this chapter describes more details about
these actions).
5.
Set up the Scheduler Desktop by selecting
[Scheduler Setup] from the Special menu, or
by pressing <Alt> + <F2>
Make the appropriate selections in the Scheduler
Setup dialog box shown in the following figure.
Figure 5-13. Scheduler Setup dialog box
ELIXIR DESKTOP FOR AFP USER GUIDE
5-21
ADDITIONAL DESKTOP FEATURES
All Scheduler Activity
Sets processing to [Processing] (on) or [OFF] for up to
eight Scheduler actions. [Processing] polls each
Scheduler action to test it for a TRUE, condition. If a
Scheduler action tests TRUE a consequent action
results.
Task Scheduling by
The processing mode. [ID Priority] processes Scheduler actions using number 1 as the highest priority,
and number 8 as the lowest priority. [Circular processing] processes Scheduler actions sequentially
without priority.
Number of allowable scheduler tasks
The number of Scheduler actions tested for when you
select [Processing]. The maximum is eight actions.
Timing delay between scheduler tasks
The frequency at which the Scheduler tests for TRUE
Scheduler actions, in seconds.
6.
Set up the Scheduler action by selecting
[Scheduler Actions] from the Special menu, or
pressing <Alt> + <F3>.
Figure 5-14. Scheduler Tasks dialog box
Task
Allows definition of up to eight Scheduler actions
(tasks), and to set [Task processing ON] (select) or off
(leave deselected). Click on [Next] or [Prev] to display
and to modify tasks 1 through 8.
5-22
ELIXIR TECHNOLOGIES CORPORATION
ADDITIONAL DESKTOP FEATURES
Task test
[On File(s)] tests for the existence of a file in a directory, both of which you specify (see next options),
[On DateTime] tests for a specified PC date and time,
[Test TRUE] continually executes the specified action
at the timing interval specified in step 5.
File(s) test Directory
The directory in which the Scheduler checks for the
existence of a file if you select [on File(s)] in Task
test.
Filename(s)
The file for which the Scheduler checks if you selected
[on File(s)] in Task test. DOS wildcards are permissible. [Any] searches for any files in the specified
directory.
Date
When testing for passage of a specified date, enter
the day, month, and year you want the Scheduler action processed. Select [Any] after the date to process
the Scheduler action every day at the time specified
by Time.
Time
When testing for passage of a specified time, enter
the hours, minutes, and seconds you want the Scheduler action processed.
Action to take
Select [Dispatch] and enter the number of the Dispatcher command to process the Dispatcher command, [Usertool] to process the user tool, or [BATch
File] to process the batch file specified in [Name].
After action
[Delete Files] deletes files after the Scheduler action,
[Task processing OFF] turns processing off after the
action, and [None] specifies that the Scheduler continues processing for further actions.
Please note
conditions:
the
following
Scheduler
operation
The Scheduler Desktop pauses during keystrokes, mouse clicks or movements, menu pull
down operations, and dialog displays, but
ELIXIR DESKTOP FOR AFP USER GUIDE
5-23
ADDITIONAL DESKTOP FEATURES
resumes polling after an allotted time delay once
these actions end.
To operate the Scheduler with the [DateTime] option, select the [System Config] option in the System menu and set the system clock on
([Clock]:On) in the Desktop Configuration dialog
box that displays.
To reset the Scheduler functions to defaults, enter the following command at the DOS prompt:
DEL
\ELIXIR\DESKTOP\SYSTEM\DISPATCH\*.SRV
<Enter>
The Scheduler Desktop is single tasking and you
should operate it on a dedicated workstation. You
can accomplish Full Scheduler operations without
using network interrupts and you can perform this
from a DOS-based system.
The Scheduler Desktop is operational in nonnetwork environments, and can process files sent
over modems for printing to a remote printer.
Scheduler Desktop examples
This section describes examples of using the Scheduler Desktop.
Scheduler example 1
The following example describes setting up a Scheduler action to run a batch file at one minute past noon.
The example assumes that you set up the Scheduler
Desktop on a dedicated PC, attached it to a network,
and if applicable, defined the Network Scheduler directory to which files print to disk.
1.
5-24
Select the [Scheduler Setup] option from the
Special menu and select the options you want
in the dialog box that displays (the options as
described earlier in this section).
ELIXIR TECHNOLOGIES CORPORATION
ADDITIONAL DESKTOP FEATURES
2.
Select the [Scheduler Actions] option from the
Special menu and enter or select the following
to set up a Scheduler action based on a
DateTime test:
[Task] 1
[Task test] On DateTime
[Filename(s)] *.SYS
[Date] 02 [Month] 12 [Year] 92
[Hour] 12 [Min] 1 [Sec] 0
[Action to take] BATchFile
[Name] JOBXXX
[After action] Task processing OFF
Figure 5-15. Testing for a passed
date/time example
This example sets up Scheduler action number 2 to
run the file JOBXXX on 12/02/92 at 12:01 PM.
If [Any] is selected for the Date, the Scheduler action
would occur every day at 12:01 PM.
Scheduler example 2
The following example describes setting up a Scheduler action that continuously runs a utility at specified
time intervals.
1.
Select the [Scheduler Setup] option from the
Special menu and select the options you want
in the dialog box that displays (the options as
described earlier in this section).
2.
Select the [Scheduler Actions] option from the
Special menu and enter or select the following
ELIXIR DESKTOP FOR AFP USER GUIDE
5-25
ADDITIONAL DESKTOP FEATURES
to set up a Scheduler action based on a Test
TRUE test:
Task] 2
[Task test]Test TRUE
[Action to take] Usertool
[Name] NETCOMX
[After action] None
Figure 5-16. Testing for a TRUE
condition example
This example sets up Scheduler task number 2 to run
the usertool NETCOMX continuously at intervals
specified in step 5 in the Scheduler setup section.
You can use this Scheduler action to periodically send
messages over the network to inform nodes that the
Scheduler is active and waiting.
Viewing files
The Viewer icon links applications to file extensions so
that copying a file with a certain extension to the icon
starts the application and loads the file.
For example, you can link all .PCX file to the Windows
PaintBrush program so that copying a .PCX file to the
Viewer icon starts PaintBrush and displays the .PCX
file.
5-26
ELIXIR TECHNOLOGIES CORPORATION
ADDITIONAL DESKTOP FEATURES
To link applications to file extensions, use any ASCII
editor to edit the ELX.INI file in the drive:\WINDOWS
directory.
You can also click the right mouse button on the
Viewer icon to start Windows Notepad with ELX.INI
loaded. In the file, under the [Viewer_Filemap] section
add lines in the following format:
extension=application
extension
is the file extension
application
is the executable linked to extension.
For example:
PCX=PBRUSH.EXE
This line links .PCX files to the PaintBrush application.
Viewing Elixir image files
The Viewer icon also display Elixir format images
(.LP3) and screen graphics (.LW8) by copying the files
to the icon. You can copy the above files from any
folder to the Viewer icon.
ELIXIR DESKTOP FOR AFP USER GUIDE
5-27
ADDITIONAL DESKTOP FEATURES
Figure 5-17. Elixir image (.LP3) display example
The Elixir Image Viewer application displays Elixir images or the screen versions of Elixir images in an image window, as shown in the above example.
From the File menu select [Attributes] to display information about the image, [Print] to print the image and
[Exit] to exit the Viewer.
Clicking on the arrows in the image window header allows you to zoom in to 2X, 4X, 8X, 16X, and 32X
magnifications and to zoom out to -2X, -4X, and -8X
magnifications. The printed image size also displays
(PRN displays in the window header).
When displaying magnifications greater than 1X, the
left of the window displays the magnified view and the
right of the window shown a portion of the image at 1X
magnification.
Clicking on the button to the right of the arrow toggles
a grid at magnifications of 8X or greater.
Moving the screen pointer in the window displays the
coordinates of the pointer in dots with respect to the
top left corner of the image
5-28
ELIXIR TECHNOLOGIES CORPORATION
ADDITIONAL DESKTOP FEATURES
Setting the default ElixirForm font
ElixirForm uses screen fonts by default when creating
forms. You can change the default to Elixir-generic
format fonts by editing a parameter in the ELX.INI file.
To set the default ElixirForm font to Elixir-generic
format:
1.
Close all open Elixir products.
2.
Open
the
ELX.INI
file
(typically
in
C:\WINDOWS, C:\WIN95, or C:\WINNT) in
Windows Notepad or Wordpad.
3.
In the [AdvancedOptions] section, change the
value of the PreferScreenFonts parameter
from 1 to 0.
where "1" represents screen fonts, and "0" represents Elixir-generic fonts
4.
Restart Elixir for the change to take effect.
ELIXIR DESKTOP FOR AFP USER GUIDE
5-29
6.
Peripheral devices
This chapter describes how to access and use peripheral devices connected to your PC. Devices covered
in this chapter include:
diskette drives (internal or external)
scanners
printers.
Diskette drive
You access diskette drives through the Desktop Diskette icon.
The Diskette icon allows you to:
specify the drive letter of the diskette drive you
want to access
copy files from the hard disk to a diskette
copy files from a diskette to the hard disk
format a high or low density diskette in DOS or
DOS-Elixir formats (DOS format with the standard
Elixir directory structure on the diskette)
format a low density diskette with the Xerox
printer format.
The “Additional Desktop features” chapter provides
procedures for copying DOS and Xerox printer format
files to and from diskettes.
ELIXIR DESKTOP FOR AFP USER GUIDE
6-1
PERIPHERAL DEVICES
To assign a drive letter or to format diskettes, open
the Diskette icon to display the System Diskette dialog
box shown in the following figure. This dialog box also
displays when you copy one or more files to a diskette
(by copying file icons to the Diskette icon).
Figure 6-1. System Diskette dialog box
Diskette Setup
To specify a drive letter, enter the letter for the [Diskette Drive] option. Any actions you subsequently perform using the Diskette icon apply to the diskette drive
you specify.
Diskette Access
To format a diskette, select [Perform FORMAT] for
the [Diskette Access] option, then select the format
type for the [Diskette Type] option.
When you format a diskette the following options
apply:
DOS User- Defined
Formats the diskette using the DOS FORMAT
command.
DOS Elixir
Formats the diskette using the DOS FORMAT command and creates an \ELIXIR subdirectory on the
diskette.
6-2
ELIXIR TECHNOLOGIES CORPORATION
PERIPHERAL DEVICES
When you copy files to and from a diskette, the following options also apply:
Directory on Diskette to open
The diskette directory you want to access. The default
is A:\*.*
Diskette Access
[Perform FORMAT] - formats a diskette (see above);
[For READing] - displays a window showing a list of
files and directories on the diskette. [For WRITing] applicable only when you copy files from the hard
disk; copies the hard disk files to the diskette.
Scanner device
You can access any scanning device connected to
your PC through the Desktop Scanners icon when you
have the appropriate scanner software installed that
can create a .TIF or .PCX file.
Before using your scanner, configure the Desktop as
described in the following section.
You can run only one scanner from the Desktop.
Configuration
To use your scanner from the Desktop, first select the
scanner specifications as follows:
Select the Scanners icon and press <F2> or select
[Properties] from the File menu. The User Application
Setup dialog box displays and contains the following
options:
ELIXIR DESKTOP FOR AFP USER GUIDE
6-3
PERIPHERAL DEVICES
Figure 6-2. User Application Setup dialog box
Command to Execute
The command that executes the application associated with the icon. For example, to create a WordPerfect icon, you would specify WP.
If you want to link the application to files in the same
directory as the application (see the “Linking files to an
already defined User Tool” section), you can also type
in the DOS command with an embedded %1 parameter. The embedded %1 parameter specifies the location in the command at which you want the file name
to appear. See also the [Prompt for parameters]
option.
Nickname for application
A nickname (up to 8 characters) for the application
you want to run. For example, you may specify VENT
as a nickname for Ventura Publisher. After creating an
icon, the User Tools window displays the icon with the
nickname under it.
6-4
ELIXIR TECHNOLOGIES CORPORATION
PERIPHERAL DEVICES
Optional Long Name
A descriptive name for the application (up to 29 characters). For example, for Ventura Publisher, you can
enter Ventura Publisher. The long name is informational only; it identifies the application in the dialog
box.
Working Directory
The DOS path for the executable. Use this field if the
application you are running is not present in the
drive:\ELIXIR directory and if you have not specified a
DOS PATH= statement for the directory in which the
application executable resides.
Command Options
Select command options:
[DOS Application]- for running a DOS applications
[Send Only Filename] - uses only the file's stem name
for command execution
[Prompt for parameters] - program prompts for an argument to appends to the command in the [Command to execute] option
[Run Minimized]- executes the command in a minimized window
Command Attributes
Select command attributes:
[Command is .BAT file] - for DOS batch file commands; redisplays the Desktop when you exit the application. If the application is a batch file that calls
another batch file, the Desktop does not redisplay
when you exit the application. See the “Starting batch
files” section for more information.
Deselect to return to the directory specified in the
batch file.
[Pause after execution]- pauses after exiting the
application
Display Options
Select a command display option:
[Window] - displays command execution in a window
ELIXIR DESKTOP FOR AFP USER GUIDE
6-5
PERIPHERAL DEVICES
[Full Screen] - displays command execution in a full
screen environment
Browse
Displays the contents of a DOS directory from which
you can select a file.
Using scanners
To use your scanner, double-click on the Scanners
icon. After confirming that the information in the User
Application Setup dialog box is correct, click on [OK]
to start the scanner application.
See your scanner user manual for information on configuring your system for your scanner.
Proof printing
This section describes information required for printing form files on local proof printers attached to your
PC.
The local printer option uses the installed Windows
print drivers. To print a file, copy it to the Printers icon
on the Desktop, select [Print] from the File menu, or
press <Ctrl> + <P>.
The Elixir Desktop supports local printing as follows:
You can print Elixir forms on a HP PCL printer
connected to your PC and configured in
Windows.
When printing non-Elixir, non-ASCII files, you can
either specify a binary copy operation to the
printer port or specify a user-defined print driver.
You can print ASCII text files or formatted data
streams if the proof printer connected to your PC
can correctly interpret the files or data streams.
You can print PostScript using either the Elixir
PostScript converter or a Windows PostScript
driver.
6-6
ELIXIR TECHNOLOGIES CORPORATION
PERIPHERAL DEVICES
You can print highlight shading as different gray
shades on Elixir forms that contain highlight color.
Printing Elixir forms
You can add, change, or delete printer drivers (for
printing Elixir forms) from the Windows Control Panel.
You can also change the current printer's setup by
right-clicking on the Printers icon. The Print dialog
box displays and contains the following options:
Figure 6-3. Print dialog box
Printer
The Print dialog box shows the default printer specified is a HP LaserJet IIP connected to the LPT1: port.
Orientation
The orientation of the printed page: [Landscape] or
[Portrait].
Page Shift
The number of dots you want the printed page shifted
to the right ([Xshift]) or down ([Yshift]). Negative values are permissible.
Copies
The number of copies of the printed page.
ELIXIR DESKTOP FOR AFP USER GUIDE
6-7
PERIPHERAL DEVICES
Print to File
When selected, creates an HP PCL print file instead
of printing.
Print Fonts as Graphics
Rasterizes fonts as graphics. This requires less printer
memory, speeding up printing time.
Message
Displays the Message Options dialog box.
Setup
Displays a Windows-provided, print driver-specific
Document Properties dialog box that allows you to select paper and graphic options.
Printing Elixir forms with highlight color
Elixir forms that contain highlight color shades print as
solid black with the Elixir HP Driver. Printing these
forms via the Converter icon produces print output
with the highlight shading displaying as gray shades.
To print Elixir forms with highlight color:
1.
Select [Converter props] from the System
menu.
The Converter Properties dialog box displays.
Figure 6-4. Converter Properties dialog box
2.
6-8
Click on the [Converter props] button.
ELIXIR TECHNOLOGIES CORPORATION
PERIPHERAL DEVICES
The Converter Properties Dialog dialog box displays.
Figure 6-5. Converter Properties Dialog dialog box
3.
Select [Use Elixir HP PCL and PostScript
converters], then click on [OK] until all dialog
boxes close.
4.
Open the Elixir forms folder, select the forms
to print, then press <Ctrl> + <V>.
The Forms
displays.
Converter
Options
dialog
box
Figure 6-6. Form Converter Options dialog box
5.
Select [HP PCL], then click on [OK].
The Print Driver Dialog dialog box displays.
ELIXIR DESKTOP FOR AFP USER GUIDE
6-9
PERIPHERAL DEVICES
Figure 6-7. Print Driver Dialog dialog box
6.
Select print options, then click on [OK].
Printing non-Elixir forms
When printing non-Elixir forms from the Output or Input Forms folders, the Printer Setup dialog box
displays.
Figure 6-8. Printer Setup dialog box
Copy to printer on Port
Perform a binary copy operation to the selected [Port].
6-10
ELIXIR TECHNOLOGIES CORPORATION
PERIPHERAL DEVICES
User-Defined Print Driver
Specify a user-defined print driver. Click on [Setup] to
select the driver.
Port
Specify the port as [LPT1], [LPT2] or [LPT3].
Copies to Print
The number of copies you want printed.
Setup
Not applicable.
Using the Elixir HP print driver
The Elixir HP print driver produces files that require
substantially less disk space and take less time to
print. To use the Elixir HP print driver:
1.
Select and drag the file to the Printers icon.
The Print dialog box displays.
Figure 6-9. Print dialog box
2.
Select [Elixir HP Driver] and click on [Setup].
ELIXIR DESKTOP FOR AFP USER GUIDE
6-11
PERIPHERAL DEVICES
The Elixir HP Driver dialog box displays and contains the following options:
Figure 6-10. Elixir HP Driver dialog box
Printer
Select the type of HP LaserJet printer : II, III, or 4.
Printer Port
Select the printer's port: [LPT1], [LPT2], or [LPT3].
Output Mode
Select an output mode [Use PCL commands] or [Use
rasterization]. The [Use rasterization] option allows
you to print some embedded objects (such as circles
and paths) that HP PCL may ignore or print other objects in their place.
Font Substitution Tables
Select a font substitution table option:
[No] - uses printer-resident fonts
[Selected] - uses fonts from the table selected/ entered in the [Selected Table] option
Create As Macro
Select and enter a value in [Macro ID number] to store
your form on the printer for future use.
Select Font Table
Displays the Select Font Table dialog box from which
6-12
ELIXIR TECHNOLOGIES CORPORATION
PERIPHERAL DEVICES
you can select the font table that displays in the [select Table] option.
3.
Select/enter print driver options, then click on
[OK] until all dialog boxes close.
Printing PostScript
You can print PostScript using either the Elixir Converter or a Windows PostScript driver.
To print PostScript using the Elixir converter:
1.
Select [Converter Props] from the System
menu.
The Converter Properties dialog box displays.
Figure 6-11. Converter Properties dialog box
2.
Click on the [Converter Properties] button.
The Converter Properties Dialog dialog box
displays.
ELIXIR DESKTOP FOR AFP USER GUIDE
6-13
PERIPHERAL DEVICES
Figure 6-12. Converter Properties Dialog
dialog box
3.
Select [Use Elixir HP PCL and PostScript
converters], then click on [OK] until all dialog
boxes close.
4.
Copy the file to print to the Printers icon.
The Print dialog box displays.
Figure 6-13. Print dialog box
5.
Select print options, then click on [OK].
To print PostScript using a Windows driver:
6-14
ELIXIR TECHNOLOGIES CORPORATION
PERIPHERAL DEVICES
6.
Select [Converter Props] from the System
menu.
The Converter Properties dialog box displays.
Figure 6-14. Converter Properties dialog box.
7.
Click on the [Converter Properties] button.
The Converter Properties Dialog dialog box displays.
Figure 6-15. Converter Properties Dialog
dialog box
8.
Deselect [Use Elixir HP PCL and PostScript
converters], then click on [OK] until all dialog
boxes close.
9.
Copy the file to print to the Printers icon.
The Print dialog box displays.
ELIXIR DESKTOP FOR AFP USER GUIDE
6-15
PERIPHERAL DEVICES
Figure 6-16. Print dialog box
10. Select print options, then click on [OK].
6-16
ELIXIR TECHNOLOGIES CORPORATION
7.
File conversions
The primary function of the Elixir Desktop is to convert
form, font, image and document (multi-page form)
files to and from different formats.
Note that conversion of Elixir Jobs (AppBuilder resources) is not currently supported by the Desktop.
General procedures
The simplest way to convert files is to use the desktop
Converter icon. To convert a file or files:
1.
Select the file(s) to convert
appropriate Elixir or Input folder.
from
the
2.
Copy the file(s) to the Converter icon.
3.
Specify the output file format(s) in one or
more dialog boxes that display.
Based on the type of file (as determined by file location and extension), one or more output files with the
correct file extensions write to the appropriate Output
folders.
Note that converting a form, font or page segment file
whose name is one of the restricted OGL keywords
can result in printing problems. See the IBM Overlay
Generation Language/370 User's Guide and Reference manual for a list of restricted OGL keywords.
ELIXIR DESKTOP FOR AFP USER GUIDE
7-1
FILE CONVERSIONS
The Converter icon also allows you to run a number of
Elixir utilities, as described in this chapter.
Elixir folders
This section describes how to convert files to different
formats. You may want to review the information in
the “Elixir folders” chapter before reading this section.
Each Font, Form, Image and Document folder displayed on the desktop contains subordinate Input,
Elixir and Output folders.
Figure 7-1. Subordinate folders example
Forms folder
The Input Forms folder comprises folders containing
non-Elixir, single-page form files you can convert to
other formats. To convert a non-Elixir single-page file
to another format, you must copy it to the appropriate
folder in the Input Forms folder.
The Elixir Forms folder contains Elixir-format form
(.ELX) files and/or other subordinate folders containing Elixir forms. When you create Elixir Forms or convert form files to Elixir-format, files write to this folder.
When you convert form files from the Input Forms
folder to any non-Elixir format, or when you convert
Elixir forms from the Elixir Forms folder, the resulting
output form files write to folders in the Output Forms
folder.
7-2
ELIXIR TECHNOLOGIES CORPORATION
FILE CONVERSIONS
Fonts folder
The Input Fonts folder comprises folders containing
non-Elixir font files you can convert to other formats.
To convert a non-Elixir font, you must copy it to the
appropriate folder in the Input Fonts folder.
The Elixir Fonts folder contains Elixir-format font
(.HDR) files. When you create Elixir Fonts or convert
font files to Elixir-format, files write to this folder.
When you convert font files from the Input Fonts
folder to any non-Elixir format, or when you convert
Elixir fonts from the Elixir Fonts folder, the resulting
output font files write to folders in the Output Fonts
folder.
Images folder
The Input Images folder comprises folders containing
non-Elixir image files you can convert to other formats. To convert a non-Elixir image, you must copy it
to the appropriate folder in the Input Images folder.
The Elixir Images folder contains Elixir-format image
(.LP3) files. When you create Elixir images or convert
image files to Elixir-format, files write to this folder.
When you convert image files from the Input Images
folder to any non-Elixir format, or when you convert
Elixir images from the Elixir Images folder, the resulting output files write to folders in the Output Images
folder.
ELIXIR DESKTOP FOR AFP USER GUIDE
7-3
FILE CONVERSIONS
Documents folder
The Input Documents folder comprises folders containing non-Elixir multi-page documents you can convert to other formats. To convert a non-Elixir
document, you must copy it to the appropriate folder in
the Input Documents folder.
The Elixir Documents folder contains .DAT files, ASCII files that reference the Elixir-format form (.ELX)
files comprising a multi-page document. When you
convert documents to Elixir-format, .DAT files write to
this folder and .ELX files write to the Elixir Forms
folder.
When you convert documents from the Input Documents folder to any non-Elixir format, or when you
convert .DAT files from the Elixir Documents folder,
the resulting output files write to folders in the Output
Documents folder.
Initial converter setup
Before you start file conversions, you may find it helpful to select several setup parameters that are common to most conversions and which display in dialog
boxes when you convert files. Select these options in
the Converters Properties dialog box.
To display the Converters Properties dialog box, select the Converter icon then perform one of the
following:
select [Properties] from the File menu
press <F2>
right-click on the icon
select [Converter Props] from the System menu
7-4
ELIXIR TECHNOLOGIES CORPORATION
FILE CONVERSIONS
Figure 7-2. Converter Properties dialog box
Converter Property Sheets
Form Converters
AFP
Displays the AFP Page Converter Options dialog box
for setting AFP page conversion parameters.
Converter Property Sheets
Form Converters
PostScript
Displays the PostScript Converter Options dialog box
for setting PostScript conversion parameters.
Converter Property Sheets
Font Converters
AFP
Displays the AFP Font Converter Options dialog box
for setting AFP font conversion parameters.
Converter Property Sheets
Font Converters
Outline
Displays the Outline-to-raster font generator dialog
box for setting outline font conversion parameters.
Converter Property Sheets
Image Converters
AFP
Displays the AFP Image Converter Options dialog box
for setting AFP image conversion parameters.
ELIXIR DESKTOP FOR AFP USER GUIDE
7-5
FILE CONVERSIONS
Converter Properties
Displays the Converter Properties Dialog dialog box
which contains the following options:
Figure 7-3. Converter Properties Dialog
dialog box
Working Directory
Directory where temporary read/writes occurs
during transformations. Default is the root (\). We
recommend specifying a RAM disk for faster
transformations.
Confirm file overwrites during transformation
Requests confirmation before overwriting existing
output files. Deselect this option automatically
overwrite existing files.
This option is applicable only when transforming
form and .LGO files to Elixir format.
Show properties before transformation
Specifies default dialog box setup options for
each file transformation type.
Pause after transformation
Pauses after each transformation.
Stop process after:
Select when to stop processing:
[Error] - stops a conversion when an error occurs
[All files processed] processing all files
7-6
stops conversion after
ELIXIR TECHNOLOGIES CORPORATION
FILE CONVERSIONS
Message Reporting
Displays the Message Options dialog box which contains the following options:
Figure 7-4. Message Options Dialog dialog box
Message Reporting
Show messages after process
Displays any error messages on-screen after
processing.
Message Reporting
Write Messages to LOG file
Writes any error messages to the file (.LOG) entered in the text box.
New Messages
Overwrite LOG file
Overwrites the previously-created .LOG file after
processing.
New Messages
Append to LOG file
New error messages add tot he end of the
previously-created .LOG file.
A maximum of 64 KB of text displays in the message log window. If message text exceeds this,
the message window displays empty and messages write to drive:\ELIXIR\MESSOUT.MSG
which is viewable in any text editor.
File conversion procedures
This section briefly describes file conversion steps.
Later sections provide more detailed descriptions.
ELIXIR DESKTOP FOR AFP USER GUIDE
7-7
FILE CONVERSIONS
To convert a form, font, image or document file to a
different format:
1.
To convert a non-Elixir file, copy the file to the
Input folder appropriate for the file format.
(If to convert an Elixir-format file, the file may
already reside in an Elixir folder.)
2.
Open the appropriate Input or Elixir folder and
select the file(s) to convert.
3.
Copy the selected file(s) to the Converter
icon.
The Converter Properties dialog box displays.
Figure 7-5. Converter Properties dialog box
4.
Select the output file format(s), then click on
[OK].
The file(s) you specify convert and the generated output file(s) write to the appropriate Output folder. If you
specify more than one output format in step 4, each
input file converts to the formats you specify and write
to the appropriate Output folders.
If any errors occur during conversion, a message displays in a separate window.
If errors do not occur, a dialog box displays showing a
status for the conversion. Following conversion, click
on [OK] in the dialog box.
7-8
ELIXIR TECHNOLOGIES CORPORATION
FILE CONVERSIONS
Converting forms
To convert forms, copy one or more Input or Elixir
form files of the same format to the Converter icon.
The Form Converter Options dialog box displays and
contains the following options:
Figure 7-6. Form Converter Options dialog box
Input Format
The selected format conversion type.
Output
The output form conversion format(s).
Converting forms to and from AFP format
When converting an AFP form file to Elixir format or
when converting an Elixir form file to AFP format, the
AFP Page Converter Options dialog box displays.
Options in this dialog box may or may not display, depending on the selected form file type.
ELIXIR DESKTOP FOR AFP USER GUIDE
7-9
FILE CONVERSIONS
Figure 7-7. AFP Page Converter Options dialog box
The following notes apply to conversions for the formats specified:
When converting Elixir form files to OGL, OVE or
LOG formats, output file names alter as follows:
OGL output file names truncate after six characters; OVE and LOG output file names truncate after six characters and get a 01 prefix.
When converting to OGL, the following messages
display if you do not specify a default code page
in the Desktop Basic Setup dialog box:
Error: Cannot load ELIXIR Code Page xxxxxxx
Error: Unable to build default ASCII to EBCDIC table
To access the Desktop Basic Setup dialog box,
pull down the System menu and click on [System
Config].
When converting an OVE form to Elixir format,
dashed and dotted lines (box borders and individual lines) convert to genned images and write to
drive:\ELIXIR\PICS\GENIMAGE directory. Also,
box borders thicker than 32 pels convert as lines,
not boxes. This is due to the IBM overlay format,
where outlines larger than 32 pels convert to multiple lines instead of single thick lines.
7-10
ELIXIR TECHNOLOGIES CORPORATION
FILE CONVERSIONS
Rasterized images such as paths, rounded corner
boxes, and embedded segments are handled as
bitmapped images and stored in drive:\
ELIXR\PICS\GENIMAGE as .LP3 files. The .LP3
file names contain the form name without the 01
prefix, and a sequence number in positions seven
and eight. For example, a file named 01TESTAA
becomes TESTAA01. When you load the form in
ElixirForm, the image is treated as a PIC and you
can move or delete it as such. When you proof
print the form, the print utility looks in the GENIMAGE directory and downloads the genned image to the printer.
If you convert the form back to OVE format, the
genned image is automatically re-embedded in
the form. If you delete the form, the genned image file also deletes.
If you convert the form to OGL format, the genned images convert to patterns in the OGL file
(see your OGL/370 manual for more information).
If you reconvert this OGL file to Elixir format, the
pattern translates back into a genned image. The
[Embed Page Segments] option in the AFP Page
Converter Options dialog box has no effect on
this type of image.
AFP Page Converter Options dialog box
Options in this dialog box may or may not display, depending on your selections in the Form Converter Options dialog box.
Elixir Pages in
Source directory for Elixir forms (default is drive:\
ELIXIR\FORMS\ELIXIR\).
Text Justification
Applicable for conversions to OVE and OGL. The default [Inter-Word] justifies text by adding or deleting
spaces between words. This option reduces the complexity of your form so the form prints faster. [InterCharacter] justifies text by adding or deleting spaces
between characters. This option makes the form more
readable but extends printing time.
ELIXIR DESKTOP FOR AFP USER GUIDE
7-11
FILE CONVERSIONS
Rotate Pages
Rotates the screen version of a form clockwise by the
number of degrees selected.
If you converted Elixir forms to another format and
now want to convert them back to Elixir format, you
must adjust the page rotation as follows:
Output rotation
[0]
[90]
[180]
[270]
Input rotation
[0]
[270]
[180]
[90]
Output rotation is the rotation option selected when
the original Elixir form was converted to another format. Input rotation is the rotation option you should select when you convert the form back to Elixir format so
the form displays correctly.
Resolution of AFP Printer
Select your printer's resolution: [240 Pels] or [300 RUnits]. When converting forms to Elixir format, the
program marks the file with the value you select.
When reconverting from Elixir to another format, you
must specify the printer resolution for resizing as
follows:
If the Elixir file contains the resolution value to
which you want to convert the file, it does not
resize.
If the Elixir file contains a resolution value different from the value to which you want to convert, it
resizes accordingly.
If the Elixir file contains no mark, it resizes if the
[Resolution of AFP Printer] value is other than
[300 R-Units].
When converting an Elixir form originally converted
from AFP format, specify [240 Pels] to retain the size.
Format of output files
Select the output format for AFP file(s):
7-12
ELIXIR TECHNOLOGIES CORPORATION
FILE CONVERSIONS
[VBM] - creates AFP-format files for uploading to MVS
hosts using IBM 3270, IRMA FT/3270 or compatible
file transfer packages
[AS400] - creates AFP-format files for uploading to
AS400 hosts
[IRMA] - creates AFP-format files for uploading to
MVS hosts using the IRMA FTTSO and compatible
file transfer packages
[OS/2] - creates AFP-format files for use with PSF/2
[DOS/VSE] - creates AFP-format files for uploading to
DOS/VSE hosts
Font Type
When converting to Elixir format:
[Universal X0] - creates call-outs to X0 universal
(bounded box) fonts in the Elixir form file
[Separate X1-X4] - creates callouts that emulate unbounded box font types in the Elixir form file, based on
the following:
text direction = Across, X1 is called out
text direction = Down, X2 is called out
text direction = Back, X3 is called out
text direction = Up, X4 is called out
When converting AFP and OVE format forms to Elixir
format, if the form contains call-outs for X0 fonts, the
[Separate X1-X4] option is not effective. Font call-outs
in the Elixir form remain X0 call-outs regardless of the
font type option selected.
When outputting fonts to AFP or OVE and back to
Elixir format, if fonts in your form are all one direction
and/or you do not want the two-digit AFP prefix added, select [No AFP Prefix].
Deselect [No AFP Prefix] if you have mixed-directional
fonts in your form and plan on proof-printing. See the
"Font requirements for an HP-compatible printer" section for an example.
ELIXIR DESKTOP FOR AFP USER GUIDE
7-13
FILE CONVERSIONS
Units
Units for horizontal or vertical offset in pels, inches or
millimeters.
Remove Image Whitespace
Not applicable to form conversions.
Embed Page Segments
Includes converted Page Segments within the data
stream when converting to OVE. Deselecting this option includes only a reference to the Page Segment.
Note that the Page Segment must exist in your host
Page Segment library.
Floating Offsets
[Horizontal] is applicable for converting to AFP format.
Shifts output right for portrait orientation, and shifts
output down for a landscape orientation by the number of dots specified. The offset value displays in the
unit of measurement selected in the Units option. The
default unit is pels, so offset values converted to
inches or millimeters may be slightly off due to rounding errors. You can edit the value displayed if
necessary.
[Vertical] is applicable for converting to AFP format.
Shifts output down for portrait orientation, and shifts
output right for a landscape orientation by the number
of dots specified. The offset value displays in the unit
of measurement selected in the Units option. The default unit is pels, so offset values converted to inches
or millimeters may be slightly off due to rounding errors. You can edit the value displayed if necessary.
Fonts
Displays the MCF Fonts dialog box which contains the
following options:
7-14
ELIXIR TECHNOLOGIES CORPORATION
FILE CONVERSIONS
Figure 7-8. MCF Fonts dialog box
MCF(1)
Uses Map Coded Font Format 1 (MCF(1)) structured fields in the resulting output file. MCF(1) is
IBM's original AFP font specification and AFP architecture supports it as a coexistence object.
MCF(1) has been superseded by MCF(2) but is
still valid.
MCF(2)
Uses Map Coded Font Format 2 structured fields
in the resulting output file. MCK(2) is recommended for MO:DCA compliance.
Default
Converter looks in the file entered in the Character Mapping File Name option for individual font
handling instructions. If an entry is found for a
font used in the original Elixir form or document,
the RTYPE keyword format is used; else the font
using the coded font name in a MCF(1) structures
field record is used (default).
Coded Font Name
Converter writes all font references using the
coded font name.
Charset + Code Page Name
Converter writes all font references using a character set/code page pair. The original font's character set and code page are referenced for fonts
originating in the AFP environment.
ELIXIR DESKTOP FOR AFP USER GUIDE
7-15
FILE CONVERSIONS
The six character assigned Elixir name generates
the character set name and the code page comes
from the Default Code Page option in the Desktop
Basic Setup dialog box for non-AFP fonts.
Outline
Converter writes all font references using PSF
outline font parameters (only valid for Adobe Type
1 or True Type fonts). You must set-up font family name references in your AFP font mapping file
before selecting this option. If no font matches
are found, the character set and code page
names are used.
To set up font family name references, open your
font
mapping
file
(default
is
drive:\ELIXIR\FONTS\MAPS\DEFAULT.FAM),
then follow the instructions in the "Font Family
Descriptors" section.
FGID
Converter writes all font references using the
previously-specified Global Resource Identifier
(GRID). The GRID includes the Font Typeface
Global Identifier (FGID), Graphic Character Set
Global Identifier (GCSGID) and the Code Page
Global Identifier (CPGID) mappings.
Character Mapping File Name
Path and name of your AFP font mapping file
which provides the Converter with output overlay
and document font mapping information. Default
is drive:\ELIXIR\FONTS\MAPS\DEFAULT.FAM.
7-16
ELIXIR TECHNOLOGIES CORPORATION
FILE CONVERSIONS
AFP
Displays the AFP Settings dialog box which contains the following options:
Figure 7-9. AFP Settings dialog box
This dialog box allows you to select your target
environment and specify record format, block and
record lengths, DocuTag for AFP converter options and form page bottom marker settings.
OGL
Displays the Page Source Converter Options dialog
box which contains the following options:
Figure 7-10. Page Source Converter Options dialog box
ELIXIR DESKTOP FOR AFP USER GUIDE
7-17
FILE CONVERSIONS
Include Author Banner
Includes the form's Page Author information in
the file conversion. The author banner includes
the author's name at the top of the form file. See
the Page Databasing Information defaults submenu in your ElixirForm for AFP User's Guide for
more information.
Keep Texts Boxed (OGL only)
Writes boxed text on a form into OGL as a
DRAWBOX WITHTEXT command during conversion. Boxed text with no visible border is written
as DRAWBOX WITHTEXT xxPELS xxPELS 0,
and justified text is always written as JUSTIFY
LASTNO (last line remains LEFT justified). All
justification in this mode is done INTERWORD
(only option the OGL compiler supports). The
BALANCE option is not supported.
Code Page Translation (OGL only)
Writes OGL out to EBCDIC rather than ASCII
format.
Include Description Text
Converter generates a specialized comment for
inclusion after the Author Banner in OGL or LOG
source files. The format for this comment is:
'1
[InternalName].[LocalID]
Description]
[MadeFor]
[Short
Page
where "1" is used as a search string for host programs which produce listings of overlay source
libraries, and [InternalName] is the six-character
name of the OGL or LOG source.
See the Page Databasing dialog box in your ElixirForm for AFP User's Guide for information on
the other options included in this comment. Note
that the Date/Time Stamp and Long Page Comments for a form are also included in the
conversion.
Generate BPSD Tags
Automatically generates and displays BPSD tags
in the OGL formats.
7-18
ELIXIR TECHNOLOGIES CORPORATION
FILE CONVERSIONS
Font Assignment
For OGL, select [Auto] to map fonts from their
coded font names to six-character internal names
without the 'Xn' prefix. For LOG, the full eightcharacter 'X' coded font name is retained.
Select [Mapped] to load and use the DEFAULT.
FAM table in drive:\ELIXIR\FONTS\MAPS for
mapping font names.
For LOG, use this table to assign local fourcharacter identifier names for fonts residing on
the printer's disk.
For OGL, use this table to assign individual
DDNAMES to fonts.
For OVE or AFPDS, use this table to assign Font
Global Identifiers (FGIDs) to font names. See the
"Using FGIDs in a form" section for an example of
mapping FGIDs to fonts.
You can also change your target environment
from MVS to VM by editing the drive:\ELIXIR\
DESK TOP\ SYSTEM\AFP.INI file included with
the Desktop. See the "Changing your target environment from MVS to VM" section for more
information.
In the [Map table] field, enter the file name of the
mapping table in drive:\FONTS\MAPS to use
when you select [Mapped] in the [Font Assignment] option. DEFAULT.FAM is the default.
Pseg Assignment
Select [Auto] to map page segment image names
from their external file names to six-character internal names without the 'S1' prefix. For LOG, the
full eight-character S1 name is retained. Select
[Mapped] to load and use the DEFAULT.SAM table in drive:\ ELIXIR\PICS\MAPS to map page
segment names. Once compiled, the page segments store inside the overlay.
For LOG, you can use DEFAULT.SAM to assign
local four-character identifier names for fonts residing on the printer's disk. For OGL, you can
use this table to assign DDNAMES to page
segments.
ELIXIR DESKTOP FOR AFP USER GUIDE
7-19
FILE CONVERSIONS
You can change your target environment from
MVS
to
VM
by
editing
the
drive:\ELIXIR\DESKTOP\ SYSTEM\AFP.INI file
included with the Desktop. See the "Changing
your target environment from MVS to VM" section
for more information.
In the [Map table] field, enter the file name of the
mapping table in drive:\ELIXIR\PICS\MAPS to
use when you select [Mapped] in the [Pseg Assignment] option. DEFAULT.SAM is the default.
CONTROL
Builds the CONTROL statement used in OGL and
LOG source files:
[noSTORE] - specifies that the form is not stored
in a library
[STORE] - stores the form in a library
[REPLACE] - stores the form in a library and replaces any existing forms with the same name
[ALL] - displays every message the system generated during processing
[WARN] - displays only the warning messages
generated during processing
[ERROR] - displays only the error messages generated as a result of OGL/370 processing
[noSUMMARY] - specifies that a summary does
not display as part of the source listing
[SUMMARY] - displays a statistical summary as
part of the source listing
Formwidth
Enter the FORMWIDTH command arguments directly. For example, 3600 PELS.
Formlength
Enter the FORMLENGTH command arguments
directly. For example, 3200 PELS.
7-20
ELIXIR TECHNOLOGIES CORPORATION
FILE CONVERSIONS
Copies
This option is valid in certain circumstances. See
your Comparex documentation for information.
Margin
Enter the offset from the edge of the paper to the
beginning of the printing area. If you specify a
margin value in the Form Control Block, use the
same value. The default margin is 0.
Sequence Numbers
Appends 8-digit sequence numbers to output in
columns 73-80.
Delete
Deletes the overlay from the printer's disk after
use. Deselect to save the overlay on the printer's
disk.
Generating source .OGL and .LOG files
OGL output does not include Formwidth, Formlength, Delete, Margin or Copies option data, and
has DDNAME parameters instead of Font and Pseg
mapping information.
Information from the Page Databasing dialog box (below) and the Page Source Converter Options dialog
box was used as input to generate the sample
SOURCE.LOG file that follows.
Figure 7-11. Page Databasing dialog box
ELIXIR DESKTOP FOR AFP USER GUIDE
7-21
FILE CONVERSIONS
_'**************************************'
_'**************P E T E R ***************'
_'**************P E T E R ***************'
_'**************P E T E R ***************' AUTHOR BANNER)
_'**************P E T E R ***************'
_'**************P E T E R ***************' _'**************************************'
_'1 FEDBANK.CEF CE SERVICES Federal Bank Line of Credit Application'
(DESCRIPTION TEXT)
_'Created 8/23/93 9:15:34 AM'
(DATE/TIME STAMP)
CONTROL NOSTORE WARN SUMMARY;
(CONTROL STATEMENT)
ORIENT 0 FORMWIDTH 3600 PELS FORMLENGTH 3200 PELS MARGIN 4;
(ORIENTATION / FORM WIDTH / FORM LENGTH / MARGIN)
SEGMENT PSEG00 S1FBLOGO
(AUTO PSEG MAPPING)
FONT FONT00 X1HE07NP ;
FONT FONT01 X1HE08BP ;
FONT FONT02 X1HE08NP ;
(AUTO FONT MAPPING)
FONT FONT03 X1HE24BP ;
FONT FONT04 X1HE14BP ;
DELETE CEFRM2;
(DELETE Y/N using Local ID name)
OVERLAY CEFRM2 SIZE 2040 PELS 2640 PELS OFFSET 24 PELS 8 PELS;
(OVERLAY NAME, SIZE, and OFFSETS / COPIES [1] NOT SHOWN)
_'This form is designed for the 1993 FedBank Line of Credit'
_'Application approved in 1992 by measure 23A in the bylaws.'
_'Updates to this form must be approved by the finance'
_'committee.'
(LONG PAGE COMMENTS)
_'LINES SECTION: 21 lines--------------------' (LINES/BOXES/TEXT/IMAGES SECTIONS)
POSITION ABSOLUTE 0528 PELS ABSOLUTE 0398 PELS;
DRAWRULE ACROSS 0960 PELS MEDIUM SOLID;
_'BOXES SECTION: 22 boxes--------------------'
POSITION ABSOLUTE 0095 PELS ABSOLUTE 0079 PELS;
DRAWBOX 1848 PELS 0480 PELS LIGHT SOLID;
POSITION ABSOLUTE 0094 PELS ABSOLUTE 0598 PELS;
DRAWBOX 1848 PELS 0080 PELS MEDIUM SOLID SHADE MEDIUM;
_'TEXT SECTION: 50 texts--------------------'
POSITION ABSOLUTE 0516 PELS ABSOLUTE 0500 PELS;
SETTEXT 0 MODERN
LINE FONT04 'Preferred Customer Line of Credit Application';
_'PSEGS SECTION: 1 psegs--------------------'
POSITION ABSOLUTE 0720 PELS ABSOLUTE 0160 PELS;
PLACE SEGID PSEG00;
7-22
ELIXIR TECHNOLOGIES CORPORATION
FILE CONVERSIONS
Information in the SOURCE.LOG file associated with
options in the dialog boxes shows as the bold text in
parentheses.
Changing the target environment from MVS to VM
When you generate OGL source code, the FONT and
SEGMENT keywords write with either a DDNAME
(MVS) or a FILETYPE (VM) parameter.
The JCL or VM EXEC use these statements to identify
the system libraries where these resources exist. As a
default, Elixir writes out OGL with MVS DDNAME
parameters.
On a VM site, you can change the default by editing
the Target_environment=MVS statement in the
drive:\ELIXIR\DESKTOP\SYSTEM\AFP.INI file to
Target_environment=VM
When you change MVS to VM, the Converter changes
the parameter to FILETYPE.
There are two other files in which you can modify the
default DDNAME or FILETYPE statements. The name
and structure of each is as follows:
drive:\ELIXIR\FONTS\MAPS\DEFAULT.FAM file
%%Elixir_Font_Name_Assignment_Table: AFP 2.10
August 1993
MVS_default_ddname=FONTDD;
VM_default_filetype=FONT38PP;
%Usage: font_id=X0aaaaaa[, dd=aaaaa][, ft=aaaaa][,
id=hxhx];
%Example:
font_id=X0MYFONT,
ft=FONT3820,
id=2B4F, dd=FONTLIB;
drive:\ELIXIR\PICS\MAPS\DEFAULT.SAM file
%%Elixir_Pseg_Name_Assignment_Table: AFP 2.10
August 1993
MVS_default_ddname=SEGDD;
VM_default_filetype=PSEG38PP;
%Usage: Pseg_id=S1aaaaaa, dd=aaaaa;
%Example: Pseg_id=S1MYSEG, dd=SEGLIB;
ELIXIR DESKTOP FOR AFP USER GUIDE
7-23
FILE CONVERSIONS
Converting Elixir forms to HP PCL
You can convert Elixir forms to HP PCL using Windows printer drivers (default) or by selecting the Elixir
HP print driver.
Using the Elixir HP print driver produces optimized
output files that are significantly smaller than those
produced by Windows drivers, yet produce identical
printer output. For information on selecting the Elixir
HP print driver as the default, see the "Peripheral devices" chapter.
Leave the Elixir HP print driver deselected to use the
Windows HP PCL print driver.
Converting using the Elixir HP print driver
To select the Elixir HP print driver as default:
1.
Right-click on the Converter icon.
The Converter Properties dialog box displays.
Figure 7-12. Converter Properties dialog box
2.
7-24
Click on the [Converter Properties] button.
ELIXIR TECHNOLOGIES CORPORATION
FILE CONVERSIONS
The Converter Properties Dialog dialog box
displays.
Figure 7-13. Converter Properties Dialog
dialog box
3.
Select [Use Elixir HP PCL and PostScript
converters], then click on [OK].
4.
Copy the Elixir form(s) to the Converter icon.
The Form Converter Options dialog box displays.
Figure 7-14. Form Converter Options
dialog box
5.
Select [HP PCL], then click on [OK].
ELIXIR DESKTOP FOR AFP USER GUIDE
7-25
FILE CONVERSIONS
The Form Print Properties (FORMPRN) dialog
box displays.
Figure 7-15. Form Print Properties dialog box
6.
Select/enter print options, then click on [OK].
The Form Print Properties dialog box contains the following options:
File Name
The name of the selected file.
Output
The output destination: [Printer] or [Disk].
Printer Port
Your printer's port: [LPT1], [LPT2] or [LPT3].
Tray
The desired printer tray for paper selection.
Copies
The desired number of copies.
7-26
ELIXIR TECHNOLOGIES CORPORATION
FILE CONVERSIONS
Spacing
Select [InterWord] to justify text by adding or deleting spaces between words. This option reduces the complexity of your forms so they print
faster. Select [InterChar] to justify text by adding
or deleting space between characters. This option may make the form more readable, but
causes it to print slower.
Printer Options
Select [Print] to send your form to the printer. Select [Store] to store your file on the printer hard
disk for future use. Select [StorePrint] to print your
form and store it on the printer. Select [Constant]
to store your form (one page only) in the printer's
memory until the printer is turned off or reset.
Macro
The macro number you assigned to your form.
This also stores your form in the printer's memory
until the printer is either turned off or reset.
Format
Select [ASCII] to produce ASCII output for writing
to disk. Select [EBCDIC] to produce EBCDIC output for Xerox printers connected to your PC via
coaxial cable and a protocol converter. Select
[SmartBox] if your PC is connected to the printer
through a SmartBox or Agile protocol converter.
Printer Font Loading
Select when to load the fonts onto the printer ([Always], [Once] or [Never]). Select [Always] to
download fonts each time you print. Select [Once]
to download fonts to the printer only once, as they
are encountered (fonts stay resident until printer
is reset). Select [Never] to use only those fonts
resident on the printer (no fonts are downloaded).
Page Shift
The number of dots you want the printed page
shifted to the right ([Xshift]) or down ([Yshift]).
Negative values are permissible.
The converted files write to the Output HP PCL
forms folder (drive:\ELIXIR\PRINTS\HPPRINT).
Note that converted HP PCL files have .PRN
extensions.
ELIXIR DESKTOP FOR AFP USER GUIDE
7-27
FILE CONVERSIONS
Converting forms to PostScript format
You can convert Elixir forms to PostScript using Windows printer drivers (default) or by selecting Elixir's
PostScript driver.
Elixir's PostScript driver produces optimized output
files significantly smaller than those produced by Windows drivers with identical printer output. Leave
Elixir's PostScript driver deselected to use the Windows printer driver.
Converting using Elixir's PostScript driver
To convert files with Elixir's PostScript driver:
1.
Right-click on the Converters icon.
The Converter Properties dialog box displays.
Figure 7-16. Converter Properties dialog box
2.
Click on the [Converter Properties] button.
The Converter Properties Dialog box displays.
Figure 7-17. Converter Properties Dialog box
7-28
ELIXIR TECHNOLOGIES CORPORATION
FILE CONVERSIONS
3.
Select [Use Elixir HP PCL and PostScript
converters], then click on [OK] until all dialog
boxes close.
4.
Copy the Elixir form(s) to the Converter icon.
The Form Converter Options dialog box displays.
Figure 7-18. Form Converter Options
dialog box
5.
Select [PostScript], then click on [OK].
The PostScript Converter Options dialog box displays.
Figure 7-19. PostScript Converter Properties
dialog box
ELIXIR DESKTOP FOR AFP USER GUIDE
7-29
FILE CONVERSIONS
6.
Select/enter conversion options, then click on
[OK].
The PostScript Converter Options dialog box contains
the following options:
PostScript Level
Select the printer's PostScript level: [PS Level 1] or
[PS Level 2].
KMP
Enter the path for your KMP file or click on the [...] button and select one from the Browse KMP File dialog
box.
Font Mapping File
Enter the path for your font mapping file or click on the
[...] button and select one from the Browse Font Mapping File dialog box.
Source Directories
Fonts
Enter the path for your input font file or click on the
[DIR] button and select one from the Browse Input
Fonts Directory dialog box.
Source Directories
Images
Enter the path for your input image file or click on the
[DIR] button and select one from the Browse Input Images Directory dialog box.
Source Directories
Forms
Enter the path for your input form file or click on the
[DIR] button and select on from the Browse Input
Forms Directory dialog box.
Place each character separately
Approximates the position of non-standard Adobe
Type 1 fonts in the converted PostScript file.
Converting using the Windows printer driver
To convert files with the Windows printer driver:
1.
7-30
Copy the Elixir form(s) to the Converter icon.
ELIXIR TECHNOLOGIES CORPORATION
FILE CONVERSIONS
The Form Converter Options dialog box displays.
Figure 7-20. Form Converter Options
dialog box
2.
Select [PostScript], then click on [OK].
The Print Driver Dialog dialog box displays.
Figure 7-21. Print Driver Dialog dialog box
3.
Select your print options, then click on [OK].
The Print Driver Dialog dialog box contains the following options:
ELIXIR DESKTOP FOR AFP USER GUIDE
7-31
FILE CONVERSIONS
Orientation
The orientation of the printed page: [Landscape] or
[Portrait].
Page Shift
The number of dots you want the printed page shifted
to the right (Xshift) or down (Yshift). Negative values
are permissible.
Copies
The number of copies of the printed page.
Print Fonts as Graphic
When selected, rasterizes fonts as graphics. This option also requires less printer memory and may speed
up printing time.
Load Fonts
[Always] includes (in the output data stream) every
font used on every form you convert. [Once] includes
every font the first time that the Desktop session encountered it. [Never] does not include fonts in the output data stream (this option assumes that all required
PostScript fonts reside on the printer).
Setup
Allows you to specify Windows setup parameters for
your printer.
You must use the Efont Factory to generate the
screen fonts used on forms that to convert to PostScript format. See the “Generating fonts from outlines” section for more information.
After conversion, one-page PostScript-format files
write to the Output PostScript Forms folder
(drive:\ELIXIR\FORMS\PSOUT). Converted PostScript files have .PS extensions.
Message
Displays the Message Options dialog box.
7-32
ELIXIR TECHNOLOGIES CORPORATION
FILE CONVERSIONS
Converting Elixir forms to PDF format
The Desktop allows you to convert a single-page Elixir
form to Adobe's Portable Document Format (PDF).
However, converting multiple-page form and document files require installation of the Elixir PDF option
key.
To convert Elixir forms to PDF format:
1.
Copy the Elixir form(s) to the Converter icon.
The Form Converter Options dialog box displays.
Figure 7-22. Form Converter Options
dialog box
2.
Select [PDF], then click on [OK].
The PDF Settings dialog box displays.
ELIXIR DESKTOP FOR AFP USER GUIDE
7-33
FILE CONVERSIONS
Figure 7-23. PDF Settings dialog box
3.
Select/enter conversion options, then click on
[OK].
The PDF Settings dialog box contains the following
options:
Input ELX File
The name of the input file (form) to be converted.
Output PDF Directory
The output directory for the .PDF file. The default is
drive:\ELIXIR\DOCS\PDFOUT.
DIR
Allows you to browse and select a file from the Output
PDF Directory.
Output PDF File
The name of the output file. When processing multiple
files, leave this option blank.
Substitute All Fonts (MM Fonts)
Creates Multiple Master versions of all fonts in your
job. Requires that Elixir versions of the fonts are in
drive:\ELIXIR\FONTS\ELIXIR.
Use this option when your document text consists
mostly of alphanumeric information with common
typefaces.
7-34
ELIXIR TECHNOLOGIES CORPORATION
FILE CONVERSIONS
The Converter scans each Elixir font in the form and
in the .PDF file, embeds hints for generating Adobe
Multiple Master instances. Because these are vector
fonts, .PDF file size is minimized.
To view the file you must have Adobe Type Manager
3.0 or newer installed. Note that custom characters
(such as logos or special symbols fonts) display as alphanumeric characters. For documents containing
fonts of this type, see the [Rasterize All Fonts] or [Use
Font Mapping] options described below.
Rasterize All Fonts (Type 3 Fonts)
Embeds all form fonts in the .PDF file as Adobe Type
3 raster fonts. Requires that Elixir versions of the fonts
are in drive:\ELIXIR\FONTS\ ELIXIR.
Used when most fonts in your form are special characters or images (such as logos) to ensure that the
special characters are viewable when the file is distributed. Because the actual raster graphics of the characters are embedded in the file, .PDF files are fairly
large.
Use Font Mapping
Uses a mapping table to control, on a font-by-font basis, the .PDF file's font format. Allows the Converter to
use a combination of Multiple Master, Adobe Type 3
raster fonts and Adobe Type 1 (PostScript) name
mappings for the fonts. The name entry box allows
you to specify the mapping file. The default file is
drive:\ELIXIR\PSSTASH\PSFONTS.MAP.
Use this option when form character mappings do not
match standard Windows character mappings.
When you select this option, the Converter scans the
specified file and compares the Elixir font names in
the form with the names found in the file (see example
below). If a match for a font is not found, a Multiple
Master instance is generated. If a match is found, the
Converter looks at the right half of the entry to determine whether to rasterize as a Type 3 font or call the
font out by a Type 1 name.
ELIXIR DESKTOP FOR AFP USER GUIDE
7-35
FILE CONVERSIONS
The mapping file is an editable text file with a simple
equivalence table. The syntax for entries is:
font name= [RASTERIZE] [TYPE1fontname-weight
point-size]
For Example:
TR11NP=Times-Roman 11
TR12NP=Times-Roman 12
HE07BP=Helvetica-Bold 7
CH14SP=ZapfChancery-MediumItalic14
SIGFNT=RASTERIZE
If you specify a Type 1 font, you must enter it exactly
as it appears in the Adobe Type Manager "Installed
ATM Fonts" window. If you want to view the resulting
.PDF file on another PC, the chosen font must also be
available through ATM on the target machine.
MAP
Press this button to browse and select other files residing on the Font Mapping Table.
KMP Map Table
Uses a customized mapping table to control translation of .PDF file keystrokes. The name entry box displays the specific mapping file to be used for the
conversion. The default file is drive:\ELIXIR\FONTS\
MAPS\X1000437.KMP (U.S.) See the ElixirForm for
AFP User Guide and ElixirFont for AFP User Guide
for more information.
KMP
Press this button to browse and select other files residing on the Keyboard Country Mapping Table. See
the ElixirForm User for AFP Guide and ElixirFont for
AFP User Guide for more information.
Converting forms to Elixir images
To convert (or rasterize) a form to an Elixir image
(.LP3 file in drive:\ELIXIR\PICS\PRINTER), select the
[Images] option in the Form Converter Options dialog
box. The Image Converter Options dialog box displays. You can specify the image resolution as 240 or
300 dpi (the default).
7-36
ELIXIR TECHNOLOGIES CORPORATION
FILE CONVERSIONS
Using FGIDs in a form
To use FGIDs in a form, select the fonts and create a
new .FAM file or edit the DEFAULT.FAM file as
follows:
1.
Identify the FGIDs for the selected fonts and
find a similar AFP bitmapped (raster) font.
2.
Edit a .FAM file as in the following example.
%%Elixir_Font_Name_Assignment_Table: AFP 3.11 June 1995
MVS_default_ddname=FONTDD;
VM_default_filetype=FONT38PP;Default_gcsgid = -1;
Default_cpgid = -1;
%Usage: font_id=X0aaaaaa[, option][, option]...
%where following nonpositional case insensitive options are available (only first two chars significant):
%name =aaaaaa - internal name for OGL out conversion
%ddname=aaaaaa - ddname for OGL on MVS
%ftype =aaaaaa - filetype for OGL on VM
%id =hhhh - HexId for LOG
%gcsgid=nnnn - A Graphic Character Set Global Identifier
%cpgid =nnnn - A Code Page Global Identifier
%fgid =nnnn - A Font Global Identifier
%Examples:
%font_id = X0A075B0, name=HE12B, ftype=FONT3820,
DDName=FONTLIB, gc=1234, cp=5678, fg=1000;
%font_id = X0G0550U, name=Charly, ftype=FONT3820,
DDName=FONTLYN, gc=4095, cp=256, fg=4096
%font_id = X0G0558U, name=Patsy,
ftype=FONT38PP,
DDName=FONTTIM, fg=4097;
Note: CPGID is the Code Page ID and GCSGID is
the Global Character Set ID.
3.
Use the AFP raster fonts in your form.
4.
When converting, in the Page Source
Converter Options dialog box,
select
[Mapped] in the [Font Assignment] field, then
enter the table name that maps the FGIDs.
ELIXIR DESKTOP FOR AFP USER GUIDE
7-37
FILE CONVERSIONS
Converting fonts
This section describes font conversion and generation
procedures.
The Desktop allows you to perform the following font
operations:
convert AFP and double-byte AFP fonts to Elixir
format
convert Elixir fonts to HP PCL, Windows and
Screen formats
convert Contour (outline) fonts to Elixir, HP PCL,
Windows and Screen formats
convert ATM and TrueType fonts to Elixir, HP
PCL and Screen formats
generate Elixir, non-Elixir and Screen fonts
To convert all other fonts, select and copy either the
.HDR font components from the Elixir Fonts folder or
fonts from the Input Fonts folder to the Converter icon.
The Font Converter Options dialog box dis- plays.
Figure 7-24. Font Converter Options
dialog box
The Font Converter Options dialog box contains the
following options:
Input Format
The format of the font selected for conversion.
7-38
ELIXIR TECHNOLOGIES CORPORATION
FILE CONVERSIONS
Output
The font's output format(s).
Font requirements for an HP or compatible printer
If you plan on proof-printing your form using an HP or
compatible printer, you must have every font orientation (X1 through X4) present on conversion.
The following explains how to create X1 through X4
fonts after converting a contour font (from the Outline
Fonts folder) to Elixir, screen or HP PCL font format.
To create every font orientation, you must first convert
the font to AFP, then reconvert from AFP to either
Elixir, screen or HP PCL format and select [Universal
X0] from the AFP Font Converter dialog box. Every
font orientation (X1 through X4) generates in the
drive:\ELIXIR\FONTS\PRINTER directory.
AFP Font Converter Options dialog box
This section describes all the options in the AFP Font
Converter Options dialog box.
When converting AFP bounded or unbounded box
fonts to Elixir screen format, you should also convert
the AFP code page to Elixir format.
The AFP Font Converter Options dialog box contains
the following options:
ELIXIR DESKTOP FOR AFP USER GUIDE
7-39
FILE CONVERSIONS
Figure 7-25. AFP Font Converter Options dialog box
Text Direction Support/Orientation to Assign
Applicable when converting bounded box AFP fonts to
Elixir format, and bounded box AFP and Elixir-AFP
fonts to HP PCL format:
[Universal X0] - creates one screen version of the
font that ElixirForm can rotate when designing
Elixir forms
[Separate Fonts] - creates separate screen fonts
for each rotation (X1, X2, X3, X4) or all four
screen font rotations
Screen Fonts in
Directory
for
screen
fonts.
\ELIXIR\FONTS\SCREEN\DEMO\.
Default
is
Resolution of AFP Printer
Applicable when converting Elixir and HP PCL fonts to
AFP: [240 Pels] or [300 R-Units]. The image resizes
for different resolutions.
Format of output files
Output format for AFP fonts:
[VBM] - creates files for uploading to MVS hosts
using IBM 3270, IRMA FT/3270, or compatible file
transfer packages
7-40
ELIXIR TECHNOLOGIES CORPORATION
FILE CONVERSIONS
[AS400] - creates files for uploading to AS/400
hosts
[IRMA] - creates files for uploading to MVS hosts
using the IRMA FTTSO and compatible file transfer packages, and OS/2 creates files for use with
PSF/2
[DOS/VSE] - creates AFP format files for uploading to DOS/VSE hosts
Font Type (3800)
Applicable when converting fonts to AFP 3800 (unbounded box) font format: [X1], [X2], [X4], or [All] create AFP unbounded box fonts in the output 3800 AFP
Fonts folder. These selections correspond to output
font rotations of 0°, 90°, and 270°, in a clockwise
direction.
Unbounded box font characters have a smaller maximum cell size than bounded box font characters. Due
to this size difference, during conversion from Elixir
bounded box fonts to AFP unbounded box fonts, a
message may display indicating that there is an error
generating the AFP 3800 character set, and the conversion may abort. If you receive this message during
a conversion, you should edit the font in ElixirFont to
shrink the character cells.
Create
When converting an AFP font to Elixir or HP PCL
formats:
[Full AFP Font] - converts the entire AFP font to
Elixir or HP PCL format. Use this option if you
plan to edit and reconvert the font back to AFP
format). See the previous sections and the "AFP
font conversion considerations" appendix for
more information.
[PC Mapped Font] - creates a PC mapped or subset version of an AFP font. Use this option if the
font will be converted to a format that uses ASCIIbased fonts (e.g., Xerox Centralized), or you will
be converting forms using this font to full-page
images or using one of Elixir's PreProcessor
products to convert a datastream to PDF.
ELIXIR DESKTOP FOR AFP USER GUIDE
7-41
FILE CONVERSIONS
Keep ASCII Mapped Font
An ASCII Mapped font (or PC Mapped font) is an intermediate font file used for generating screen (for
use in ElixirForm) and HP proof printer fonts. It contains only those characters from the AFP character
set that match those in the selected Country Keyboard
map (.KMP) file.
Keeps the PC mapped font file after a conversion.
Deselected to automatically delete the file after a conversion (does not affect the generation of screen
fonts).
Set MCIR Flag
Sets a flag in your font file which says that this font
can be used with magnetic ink character recognition
(MCIR) printers.
Country Keyboard Map
Displays the Browse Country Keyboard Map dialog
box. The selected KMP file name displays on the button when you click on [OK].
Notify on mismatch
Provides a notice when an original font code page
does not match one in the Keyboard Map file.
You can select a keyboard mapping file from the list of
files that reside in the drive:\ELIXIR\FONTS\MAPS directory. See the "AFP font conversion considerations"
appendix for more detailed information about .KMP
files.
Converting AFP fonts to Elixir format
To convert AFP fonts to Elixir format:
1.
Download the three components for each AFP
font (Coded Font, Character Set and Code
Page) to drive:\ELIXIR\FONTS\AFPIN (for
bounded box fonts) or to drive:\ELIXIR\
FONTS\I38IN (for unbounded box fonts)
See the “File
information.
2.
7-42
transfer”
chapter
for
more
Verify that the Country Keyboard Map (.KMP
file) is correct.
ELIXIR TECHNOLOGIES CORPORATION
FILE CONVERSIONS
See the “AFP font conversion considerations” appendix for more information.
3.
Open the Input Fonts folder (AFP Fonts for
bounded box fonts or 3800 AFP Fonts for
unbounded box fonts), then select [Show
Coded Fonts] from the Filter menu.
The X* components of the AFP fonts display.
4.
Copy the font(s) to the Converter icon.
5.
In the displayed Font Converter Options
dialog box, select [Elixir].
The AFP Font Converter Options dialog box displays.
Figure 7-26. AFP Font Converter Optionsdialog box
6.
Select/enter information in
options, then click on [OK]:
the
following
Text Direction Support
Depending on your printer and on the type of AFP
font to convert:
Select [Separate Fonts] and either [All], [X1],
[X2], [X3], or [X4] to create different screen
font rotations.
ELIXIR DESKTOP FOR AFP USER GUIDE
7-43
FILE CONVERSIONS
Select [Universal X0] to create a single
screen font which ElixirForm can rotate.
The [Text Direction Support] option is disabled for
unbounded box fonts. The orientation of the font
you are converting is the orientation of the output
font.
See the "AFP font conversion considerations" appendix for more information.
Create
Select the font type to create:
[PC Mapped Font] - generates an Elixir font from
a partial subset of the AFP font for use with ElixirForm; also generates HP PCL fonts for proof
printing. Use this option if you do not want to reconvert the Elixir font back to AFP format. See
the "AFP Font Converter Options dialog box" section for more information.
[Full AFP Font] - converts the entire AFP font and
generates an Elixir version of the coded font,
character set, and code page. This option should
be used if you plan to reconvert the Elixir font
back to AFP format.
Keep ASCII Mapped Font
Creates a PC mapped font file after an AFP to
Elixir conversion. Deselect (the default) to automatically delete the file after a conversion.
When converting AFP fonts to Elixir fonts the generated font components have the following file prefixes:
character sets begin with "C", coded fonts begin with
"X", and code pages begin with "T". Character set file
extensions may or may not generate, and will vary
with the software version you are using. Extensions of
".num", .240 (pels) and .300 (R-Units) denote the
resolution you select in the [Resolution of AFP printer]
option. Generated code pages and coded fonts have
no file extensions.
For information on the files generated when you convert AFP fonts to Elixir format, see the "AFP font conversion considerations" appendix.
7-44
ELIXIR TECHNOLOGIES CORPORATION
FILE CONVERSIONS
Converting double-byte AFP fonts to Elixir format
To convert double-byte AFP fonts to Elixir format:
1.
Copy the coded font (X0xxxxxx) file to the
Converter icon.
The Font Converter Options dialog box displays.
Figure 7-27. Font Converter Options dialog box
2.
Select [Elixir], then click on [OK].
The AFP Font Converter Options dialog box displays.
Figure 7-28. AFP Font Converter Options dialog box
ELIXIR DESKTOP FOR AFP USER GUIDE
7-45
FILE CONVERSIONS
3.
Select [Full AFP Font], deselect [Keep ASCII
Mapped Font], then click on [OK] until all
dialog boxes close.
Character set sections display as C0xxxxxx.HDR
files and code page sections display as
T1xxxxxx.COD files in the Elixir fonts folder.
Conversion to SCREEN, Windows or HP PCL fonts is
for future implementation.
Converting double-byte Elixir fonts to AFP format
To convert double-byte Elixir fonts to AFP format:
1.
Copy the font (X0xxxxxx.CDF) file to convert
to the Converter icon.
The Font Converter Options dialog box displays.
Figure 7-29. Font Converter Options dialog box
2.
Select either [AFP Bounded] or
Unbounded 3800], then click on [OK].
[AFP
The AFP Font Converter Options dialog box displays.
7-46
ELIXIR TECHNOLOGIES CORPORATION
FILE CONVERSIONS
Figure 7-30. AFP Font Converter Options dialog box
3.
Select [Full AFP Font], then click on [OK] until
all dialog boxes close.
The font outputs to either:
drive:\ELIXIR\FONTSS\I38OUT (bounded)
drive:\ELIXIR\FONTSS\AFPOUT
(unbounded)
Converting fonts to HP PCL format
To convert fonts to HP PCL format:
1.
Copy the font file(s) to the Converter icon.
The Font Converter Options dialog box displays.
2.
Select [HP PCL] and click on [OK].
The HP Font Converter Options dialog box displays.
ELIXIR DESKTOP FOR AFP USER GUIDE
7-47
FILE CONVERSIONS
Figure 7-31. HP Font Converter
Options dialog box
3.
Select/enter information then click on [OK].
The HP Font Converter Options dialog box contains the following options:
Create All 4 Rotations
Select to create font versions rotated in all four
(0o, 90o, 180o and 270o) inline print directions.
Create Rotated Version
Select to create rotated font version for proof
printing a form containing rotated fonts.
Converting Elixir fonts to HP PCL soft fonts
When converting Elixir fonts to HP PCL soft fonts, all
characters in the Elixir font are maintained if you add
the following entry to the drive:\WINDOWS\ELX.INI
file:
[ADVANCEDOPTIONS]
GENSPACEGLYPHS=1
Where 1 maintains all characters below position x064,
and 0 removes these characters.
Adding HP PCL fonts to Windows applications
The following procedure describes the steps necessary to add HP PCL fonts to your Windows application
fonts list.
1.
7-48
Open the Windows Control Panel and select
the Printers icon.
ELIXIR TECHNOLOGIES CORPORATION
FILE CONVERSIONS
The Printers dialog box displays.
2.
Select the desired printer in the [Installed
Printers] option, then click on [Setup].
3.
Click on [Fonts], then in the Font Installer
dialog box, click on [Add Fonts].
4.
In the Add Fonts dialog box, set the directory
path to drive:\ELIXIR\FONTS\PRINTER, then
click on [Add].
The installer reads all soft font files in the directory and builds a list that displays a default font
name and point size.
Note that you can simplify this process by converting one font at a time.
5.
Select the desired font from the right list box.
The actual file name displays at the bottom of the
dialog box. Check the file name to ensure you
selected the correct file.
6.
Click on [Add].
Unless otherwise necessary, accept the default
directory (drive:\PCLFONTS) by clicking on [OK]
in the Add fonts dialog box.
7.
Select the font from the left list box and click
on [Edit].
The Edit dialog box displays.
8.
Modify the name to match the font file name
and click on [OK].
9.
Exit to the Program Manager.
The HP PCL fonts are now available in the fonts
list of your Windows applications.
ELIXIR DESKTOP FOR AFP USER GUIDE
7-49
FILE CONVERSIONS
Converting AFP and Elixir-AFP fonts to HP PCL format
When you convert an AFP or Elixir-AFP font (an Elixir
font created from an AFP font) to HP PCL format, you
should select the coded font file (X*) for conversion.
To display the coded font file component of a font, pull
down the Filter menu in the Input Fonts folder and select [Show Coded Fonts]. We do not recommend
converting character sets (C* files) because fonts do
not map to the keyboard and results are
unpredictable.
If you convert an unbounded box font (X1- X4* files)
or choose to output only one text direction of a
bounded box font (X0* files) when converting to HP
PCL, both portrait and landscape versions of the selected font rotation are created.
When you convert an Elixir-AFP unbounded box font
to HP PCL format the conversion is automatic and no
further dialog boxes display.
For other conversions, depending on the type of font
(bounded box or unbounded box) you are converting
from and to, the AFP Font Converter Options dialog
box displays. The available (non-grayed) options depend on the type of conversion. See the "AFP Font
Converter Options dialog box" section in this chapter
for a description of the options that apply to your conversion type.
Converting Elixir and contour fonts to HP PCL format
When you convert fonts to non-AFP Elixir or outline
fonts to HP PCL format, the HP Font Converter Options dialog box also displays and contains the following options:
Figure 7-32. HP Font Converter
Options dialog box
7-50
ELIXIR TECHNOLOGIES CORPORATION
FILE CONVERSIONS
Create All 4 Rotations
Select to create a version of the font having all four
rotations.
Create Rotated Versions
Select to create rotated versions of each FLJ font file,
thereby allowing proof-printing of HP PCL forms containing mixed orientations.
Adding
the
following
entry
to
drive:\WINDOWS\ELX.INI maintains all characters in
the Elixir font when converted to HP PCL soft fonts:
[ADVANCEDOPTIONS]
GENSPACEGLYPHS=1;
Note:
GENSPACEGLYPHS=0 - removes all characters
below x0'64'
GENSPACEGLYPHS=1 - maintains all characters
below x0'64'
Converting TrueType fonts
You can use TrueType fonts on your Elixir forms, but
you must first convert the fonts to bitmap format.
You can display the TrueType Fonts window by either
opening the Input Fonts, TrueType Fonts icon; selecting [TrueType Fonts] from the Special menu; or
pressing <Alt>+<T>.
Note: TrueType underline and overstrike styles are
not supported during Desktop conversion. You must
first convert to Elixir format, then use ElixirFont to add
these styles.
You can then convert the
underline/overstrike Elixir font to other formats.
To convert TrueType fonts to supported formats:
1.
Copy a file from the TrueType Fonts folder to
the Converter icon.
The Font Converter Options dialog box displays.
ELIXIR DESKTOP FOR AFP USER GUIDE
7-51
FILE CONVERSIONS
2.
Select the desired output format, then click on
[OK].
Depending on the output format, a Font Converter
Options dialog box may display prior to the TrueType Fonts Attributes dialog box.
3.
If a Font Converter Options dialog box
displays, select the desired font rotation
and/or output options, then click on [OK].
For more information on these options, see the
procedures for converting fonts to Xerox and HP
formats.
The TrueType Fonts Attributes dialog box displays with the following options:
Figure 7-33. TrueType Fonts Attributes dialog box
Selected Fonts
The name of the font you want to convert.
Size
The point size for the converted file. The Desktop
does not output scaleable TrueType fonts, so you
must create all desired sizes.
7-52
ELIXIR TECHNOLOGIES CORPORATION
FILE CONVERSIONS
Output Font/Custom Name
The font prefix as specified in the Custom Name
text block. If a font with the specified prefix exists,
the system prompts for a different prefix.
Output Font/Auto Name
The system-generated name based upon the font
name and point size. The naming convention for
half-point sizes uses alpha characters in the third
position of the name to represent the point size.
For example, A=1 point, B=2 points, C=3 points,
through Z=26 points. The auto-name for an Arial
10.5 normal font is ARJ5NP. AR for Arial, J for
10 points, 5 for .5 of a point, N for normal, and P
for portrait.
Output Fonts
The list of fonts to convert and output. Click on
the [ADD] button to add the selected font to the
list or [DEL] to delete it.
Sample text
Displays a sample of the selected font and point
size.
Character set mapping
The lowest and highest character positions in the
font's range in either decimal ([DEC]), hexadecimal ([HEX]), or ASCII ([ASC]) representation.
Map font
Allows selection of non-standard keyboard maps
for the TrueType fonts you are converting, and for
your output fonts.
Target
Displays a dialog box for selecting the keyboard
mapping file (.KMP) to use for the non-default
character layout you want to map to.
Windows
Displays a dialog box for selecting the keyboard
mapping file (.KMP) when the TrueType font you
are converting uses a non-standard keyboard
map.
ELIXIR DESKTOP FOR AFP USER GUIDE
7-53
FILE CONVERSIONS
Orientation
The orientation of the output font: portrait, inverted portrait, landscape, or inverted landscape.
You can click on [ADD] after selecting each orientation to simultaneously create all four font rotations for use in ElixiForm.
Style
The character style of the output font: italic, bold,
underlined, or overstrike.
DPI
The dots per inch resolution of the output font:
[240], [300], or [Custom], including the custom
horizontal and vertical measures.
Prepare for PostScript use
Adds an entry in the PSFONT.MAP file for each
font generated, and for each font's corresponding
PostScript font (for printing).
Converting HP PCL fonts to Elixir and AFP formats
When you convert a HP PCL font to Elixir format the
conversion is automatic and no further dialog boxes
display.
When you convert a HP PCL font to AFP or 3800 AFP
format the AFP Font Converter Options dialog box
displays. The available (non-grayed) options depend
on the type of conversion. See the "AFP Font Converter Options dialog box" section in this chapter for a
description of the options that apply to your conversion type.
Converting Elixir fonts to AFP format
To convert Elixir fonts to AFP, use one of the following
procedures:
Creating a full AFP font from an Elixir coded font
To generate a full AFP font (code page, coded font,
and character set) from an Elixir font:
7-54
ELIXIR TECHNOLOGIES CORPORATION
FILE CONVERSIONS
1.
From the Filter menu in the Elixir Fonts folder,
select [Show Coded Fonts].
2.
Copy the Elixir font from the Elixir Fonts
folder to the Converter icon and select [AFP
Bounded] or [AFP Unbounded 3800] as the
output format for bounded box and
unbounded box fonts, respectively.
Note that you can convert Elixir bounded box
fonts to either AFP bounded or unbounded box
fonts.
3.
In the displayed AFP Font Converter Options
dialog box, select the following:
the printer resolution (normally 240 Pels for
AFP printers)
the output format (depending on your AFP
host)
if converting to unbounded box fonts, select
the rotation ([X1], [X2], or [X4]). Note that
3800 printers do not support [X3], the BACK
rotation
[Full AFP Font] - the AFP Font-Related Converter Options dialog box displays
Figure 7-34. AFP Font-Related Converter
Options dialog box
This dialog box shows the coded font name and
the code page and character set the coded font
points to.
The generated AFP fonts are:
ELIXIR DESKTOP FOR AFP USER GUIDE
7-55
FILE CONVERSIONS
When converting to a bounded box font: C0*.num
(character set) where .num denotes the printer
resolution, X0* (coded font), and T1* (code page)
in drive:\ELIXIR\FONTS\AFPOUT.
When converting to an unbounded box font:
C1*.num - C4*.num, X1* - X4*, and T1* in
drive:\ELIXIR\FONTS\I38OUT.
Creating full AFP fonts from Elixir character sets
To create an entirely new AFP font from either an AFP
originated or non-AFP originated Elixir character set:
1.
Select [Show Charset] from the Filter menu in
the Elixir Fonts folder .
2.
Copy the selected file from the Elixir Fonts
folder to the Converter icon and select [AFP
Bounded] or [AFP Unbounded] (3800) as the
output format for bounded box and
unbounded box fonts, respectively.
CAUTION: Convert only full character set Elixir
fonts. These fonts start with C0 (for fonts converted from bounded box) or C1 - C4 (for fonts
converted from unbounded box). PC mapped
Elixir fonts are named X*.HDR and must not be
used for conversions to AFP format.
You can convert Elixir bounded box fonts to AFP
bounded or unbounded box fonts.
3.
In the displayed AFP Font Converter Options
dialog box select the following:
the printer resolution (normally 240 pels for
AFP printers)
the output format (depending on your AFP
host)
if converting to unbounded box fonts, select
the rotation ([X1], [X2], or [X4])(Note that
3800 printers do not support [X3], the BACK
rotation)
7-56
ELIXIR TECHNOLOGIES CORPORATION
FILE CONVERSIONS
[Full AFP Font] - the AFP Font-Related Converter Options dialog box displays
Figure 7-35. AFP Font-Related Converter
Options dialog box
This dialog box shows the character set name to
convert, the coded font name (based on the character set name) and the default code page you
specified in the Desktop System Configuration
dialog box. You can change the code page and
coded font names if desired.
Initially, the default code page specified in the
Desktop Basic Setup dialog box (accessed by
pulling down the System menu and selecting
[System Config]) displays. If you change the
code page in the Font Components dialog box,
the code page you enter generates for the current
conversion and the default generates for subsequent conversions.
The generated AFP fonts are:
When converting to a bounded box font: C0*.num
(character set) where .num denotes the printer
resolution, X0* (coded font), and T1* (code page)
in drive:\ELIXIR\FONTS\AFPOUT.
When converting to an unbounded box font:
C1*.num - C4*.num, X1* - X4*, and T1* in drive:\
ELIXIR\FONTS\I38OUT.
Creating individual font components
You can create an individual character set, code page,
or coded font using one of the following procedures:
ELIXIR DESKTOP FOR AFP USER GUIDE
7-57
FILE CONVERSIONS
Creating a coded font file
You can create a new coded font file for use in the following procedures by setting the Filter menu in the
Elixir Fonts folder to [Show Coded Fonts], and then
pressing <Alt> + <N> or selecting [New] from the File
menu. An AFP Font-Related Converter Options dialog
box displays and allows you to enter the character set,
coded font, and code page names. Only X0 or X1-X4
prefixes are permissible for the coded font name.
Converting a coded font
If you modified an Elixir coded font by changing the
code page or character set, or have created a new
coded font and want to upload it to your host:
1.
From the Filter menu in the Elixir Fonts folder,
select [Show Coded Fonts].
2.
Copy the Elixir font from the Elixir Fonts
folder to the Converter icon and select [AFP
Bounded] or [AFP Unbounded] (3800) as the
output format for bounded box and
unbounded box fonts, respectively.
Note that you can convert Elixir bounded box
fonts to either AFP bounded or unbounded box
fonts.
3.
In the displayed AFP Font Converter Options
dialog box select the output format and
[Coded Font Only].
The generated AFP fonts are:
When converting to a bounded box font: X0*
(coded font) in drive:\ELIXIR\FONTS\AFPOUT.
When converting to an unbounded box font: X1* X4* in drive:\ELIXIR\FONTS\I38OUT .
Creating a character set
If you modified the font character set only (no code
page or coded font changes), you need only convert
the character set to AFP using the following steps:
7-58
ELIXIR TECHNOLOGIES CORPORATION
FILE CONVERSIONS
1.
From the Filter menu in the Elixir Fonts folder,
select [Show Charset].
2.
Copy the Elixir font from the Elixir Fonts
folder to the Converter icon and select [AFP
Bounded] or [AFP Unbounded] (3800) as the
output format for bounded box and
unbounded box fonts, respectively.
CAUTION: Convert only full character set Elixir
fonts. These fonts start with C0 (for fonts converted from bounded box) or C1 - C4 (for fonts
converted from unbounded box). PC mapped
Elixir fonts are named X*.HDR and must not be
used for conversions to AFP format.
Note that you can convert Elixir bounded box
fonts to either AFP bounded or unbounded box
fonts.
3.
In the displayed AFP Font Converter Options
dialog box select the output format and
[CharSet Only]:
The generated AFP fonts are:
When converting to a bounded box font: C0*.n
(character set) where .n denotes the printer resolution in pels, in drive:\ELIXIR\FONTS\AFPOUT .
When converting to an unbounded box font:
C1*.n - C4*.n where .n denotes the printer resolution in pels in drive:\ELIXIR\FONTS\I38OUT.
If you want to create a screen version of the new or
modified Elixir character set, select its Coded Font
(.CDF file) component, copy it to the Converter icon,
and select the [Screen] option. The PC mapped file
regenerates with the modifications you made. If you
convert only the character set (.HDR file) to screen
format, the screen font that generates does not properly map for the keyboard.
Creating a code page
If you created a new code page or modified an existing code page follow these steps:
ELIXIR DESKTOP FOR AFP USER GUIDE
7-59
FILE CONVERSIONS
1.
From Filter menu in the Elixir Fonts folder,
select [Show CodePage].
2.
Copy the Elixir code page from the Elixir
Fonts folder to the Converter icon and select
[AFP Bounded] or [AFP Unbounded] (3800) as
the output format for bounded box and
unbounded box fonts, respectively.
3.
In the displayed AFP Font Converter Options
dialog box select the output format.
The generated AFP fonts are:
When converting to a bounded box font: T1*
(code page) in drive:\ELIXIR\FONTS\AFPOUT.
When converting to an unbounded box font: T1*
in drive:\ELIXIR\FONTS\I38OUT.
Changing the code page
To change just the code page for an AFP font (for example, when using a character set for European
languages):
1.
Download the AFP coded font from your host
drive:\ELIXIR\FONTS\AFPIN
to
the
or
drive:\ELIXIR\FONTS\I38IN directory.
2.
Convert the AFP font to Elixir by specifying
[Full AFP Font] to generate an Elixir version of
the font.
3.
Select [Show Coded Fonts] from the Filter
menu in the Elixir Fonts folder.
4.
Right-click on the coded font to change the
code page.
The Font-Related Converter Options dialog box
displays.
7-60
ELIXIR TECHNOLOGIES CORPORATION
FILE CONVERSIONS
Figure 7-36. Font-Related Converter
Options dialog box
5.
After conversion, upload the generated files to
your AFP host using the procedures
described in the "File transfer" chapter.
Editing the Elixir Code Page
To edit an Elixir Code Page, select [Show Code
Pages] from the Filter menu in the Elixir Fonts folder.
In the displayed window double-click on any Code
Page to edit. The ElixirFont program starts. See the
ElixirFont for AFP User Guide for information about
editing Code Pages.
Alternatively, you can use the DOS EDIT editor to edit
the Elixir Code Page. See the "AFP font conversion
considerations" appendix for an example of editing an
Elixir Code Page.
Reconverting fonts created with Elixir Desktop version 1.00
If you created a non-AFP font or modified an existing
AFP font and exported the font using the T1ELIXIR
code page in version 1.00 of the Desktop, and then
converted the font back to Elixir format, the font does
not map properly for (screen and HP PCL) keyboard
use.
To properly map the font for keyboard use:
1.
Make a note of the current Country Keyboard
Map displayed in the Desktop System
Configuration dialog box.
ELIXIR DESKTOP FOR AFP USER GUIDE
7-61
FILE CONVERSIONS
2.
Change the Country Keyboard Map file name
to T1ELIXIR. This .KMP file comes with the
current software version.
3.
Convert the version 1.00 font to Elixir format.
4.
Reset the Country Keyboard Map to the map
noted in step 1.
To remap fonts using the T1ELIXIR code page GCIDs
to fonts using standard IBM GCIDs, convert the original non-AFP font in Elixir format to AFP format using
the C0ADOBE GCID mapping file. See the "Desktop
configuration" chapter for more GCID file information.
Generating fonts from outlines
The Elixir desktop includes the Elixir Font Factory
(Efont Factory), a utility that uses contour (outline)
fonts compatible with Bitstream Facelift to generate
Elixir (printer and screen versions), and AFP bounded
box and unbounded box bit-mapped (or raster) fonts.
Note: Efont Factory cannot generate fonts from Bitstream Fontware and Fontware-compatible fonts.
The Elixir desktop installation procedure installs 35
contour fonts compatible with Bitstream Facelift in
(drive:\ELIXIR\FONTS\CONTOURS\) the Outline
Contour Fonts folder.
If not already installed, you can install Bitstream
Facelift fonts on your PC:
1.
Select [Install Fonts] from the Desktop Special
menu.
2.
Insert the first Bitstream Facelift diskette into
your diskette drive and follow the on-screen
instructions.
Once installed, you can generate up to 6 point sizes of
a font each time you use the Efont Factory.
7-62
ELIXIR TECHNOLOGIES CORPORATION
FILE CONVERSIONS
The Efont factory also allows you to:
generate whole or partial character sets
generate different font resolutions
automatically generate font names
perform additional transformations such as font
rotation and darkening when generating Xerox
fonts
map to standard Windows character sets
You can display the Contours fonts window by doubleclicking the Outline Fonts icon, by selecting [Efont
Factory] from the Special menu, or by typing <Alt> +
<E>.
The following figure shows the Input Contour Fonts
folder window.
Figure 7-37. Input Contour Fonts folder window
To generate an Elixir font from a contour font, copy
one or more outline fonts from the Input Contour
Fonts folder to the Converter icon. In the Font Converter Options dialog box that displays, select one or
more output font formats, then click on [OK]. The
Outline-to-raster font generator dialog box displays.
ELIXIR DESKTOP FOR AFP USER GUIDE
7-63
FILE CONVERSIONS
Figure 7-38. Outline-to-raster font generator
dialog box
The Outline-to-raster font generator dialog box contains the following options:
Font Name
The name of the converted raster font(s). If converting
to more than one point size (see the description for
the next option), enter a file name stem ending with
01. Names for converted files increment by 1 for each
point size selected, in order of ascending point size. If
you convert more than one contour font file to multiple
point sizes, the converted files become similarly
named. The maximum number of files you can create
is 99.
Autoname
Names the font files using the naming conventions
described in the “Font naming conventions” section
which follows. We recommend using [Autoname]
rather than [Font Name] for naming fonts. To identify
newly created fonts using this option, view the fonts
using the [By Date] option in the Elixir Fonts folder
View menu.
Point Size(s)
The point size(s) for the converted font file(s). Enter
any size from 2 to 99. See the [Font Name] option description for information about converting to more than
one point size.
7-64
ELIXIR TECHNOLOGIES CORPORATION
FILE CONVERSIONS
Res
The resolution (in dots per inch, dpi) of the target
printer. The default is 240 dpi, normally used on AFP
printers.
Char Set
The character set of the raster font being generated:
[US], [ISO-XB] (international ISO), [Custom] (creates
full character sets), [0-Z] (upper case and numerals
only), [a-z] (lower case only). Each corresponds to a
.GMP ASCII file in drive:\ELIXIR\FONTS\MAPS. Each
line in a .GMP file is of the form mm=nn, where mm is
the hex number of the input font and nn is the hex
number of the corresponding output font.
Range
The number for the first and last characters to convert, in decimal, hexadecimal, or ASCII representation. The default range is 0-255 (decimal).
Prepare for PostScript use
Select this option when printing on a PostScript printer
to place the screen font reference in the fonts mapping table, PSFONT.MAP, a file containing a mapping
between the PostScript name and DOS file name for
each font. When this option is not selected, the fonts
mapping table does not include the PostScript font
name.
Keep Left Kern
Select this option (the default) to keep left kerning information for left-kerned characters. When this option
is deselected, you delete left kerning and create a
width table in the drive:\ELIXIR\FONTS\TABLES directory containing width, height, offset, left, and right
kerning, and ASCII index values for each font character. The width table has the same name as the font
file and has a .TFB file extension.
Information in .TFB files allows you to build a left kerning table for using the font in non-Elixir environments.
Check for size limit
Ensures that the generated font size is within your
printer's size limit. [64k] and [128k] truncate the font at
the specified limit and issue an error message. [None]
generates the font regardless of size.
ELIXIR DESKTOP FOR AFP USER GUIDE
7-65
FILE CONVERSIONS
Creating a screen font larger than 128 KB may result
in errors. See your printer manual for printer font size
limits.
Darken characters
Due to the limitation of some printers, small fonts may
print lightly. To compensate for the problem, use
[Darken RT] to darken horizontally when printing in
portrait orientation and [Darken DN] to darken vertically when printing in landscape orientation. The default is [None].
Font Orientation
Specifies [Portrait], [Landscape], [Inverse Portrait], or
[Inverse Landscape] orientation for output fonts.
Place Screen Fonts in
The directory to which screen fonts write (creates a
new directory if one does not exist).
Font naming conventions
When you select [Autoname] in the Outline-to-raster
font generator dialog box, Efont Factory generates
raster fonts and names them using the following
conventions:
A six-character stem name generates.
The first two characters of the generated font
name describe the font family from the following
table:
7-66
ELIXIR TECHNOLOGIES CORPORATION
FILE CONVERSIONS
Font family
First two file characters
Courier
CO (Courier)
Dutch
TR (Times Roman)
Swiss
HE (Helvetica)
ITC-Avant-Garde
AG (Avant Garde)
ITC-Bookman
BM (Bookman)
Swiss Narrow
HN (Helvetica Narrow)
Symbol-Set
SY (Symbol)
Century-Schoolbook
CS (Century Schoolbook)
ITC-Zapf-Chancery
CH (Chancery)
ITC-Zapf-Dingbats
DB (Dingbats)
Zapf-Calligraphic
PA (Palatino)
If you add a new font family without first adding a
name and descriptor to BTFONT.NAM, Efont
Factory assigns XX as the first two characters.
The third and fourth characters of the generated
font name describe the point size you enter in the
Outline-to-raster font generator dialog box.
The fifth character of the generated font file name
describes the type style from the following table:
ELIXIR DESKTOP FOR AFP USER GUIDE
7-67
FILE CONVERSIONS
Type style
Fifth file character used
Normal
N
Demi
D
Bold
B
Italic
I
Bold Oblique
V
Oblique
O
Light Italic
Q
Demi Italic
R
Medium Italic
S
Bold Italic
T
Demi Oblique
U
The sixth character of the generated font name
describes the orientation from the following table:
Orientation
Sixth file character used
Portrait
P
Landscape
L
Inverse portrait
I
Inverse landscape
J
For example, a converted ITC-Zapf-Chancery, 12
point, bold, portrait font becomes named CH12BP.
7-68
ELIXIR TECHNOLOGIES CORPORATION
FILE CONVERSIONS
You can assign two-character descriptors for additional fonts not included in the above tables as
follows:
First, determine the .TDF file name in the Input
Outline Fonts folder by selecting a font and dragging it within the folder. (The cursor changes and
identifies the font name.) Press <Esc> to return to
a standard cursor.
Next, use the DOS TYPE command to display the
contents of the .TDF file for the font . The .TDF
file displays the HPCODE, a two-character font
family identifier.
Now, edit BTFONT.NAM in drive:\ELIXIR\FONTS
\MAPS (using an ASCII editor) and add a line that
includes the following to the end of the file:
The full DOS name of the .TDF file, a space, the
two-character designator, a space, the typestyle.
Generating Elixir fonts
When using Efont Factory to create fonts for use in
ElixirForm, select the [Keep Left Kern] option in the
Outline-to-raster font generator dialog box. ElixirForm
supports left kerning, and selecting this option spaces
and kerns all form characters correctly on the screen
and on the printer output.
Generating non-Elixir fonts
If you want to use the Efont Factory to create fonts for
non-Elixir applications, do not select the [Keep Left
Kern] option. See the description for the [Keep Left
Kern] option in the “Generating fonts from outlines”
section for more information.
ELIXIR DESKTOP FOR AFP USER GUIDE
7-69
FILE CONVERSIONS
Generating screen fonts
Screen version fonts differ for different monitors, and
therefore require regenerating when you:
copy Elixir fonts from a PC on which Elixir for another monitor is installed, or
reinstall Elixir on your PC and specify a different
monitor.
You need screen fonts when creating or editing forms
with ElixirForm. Creating screen versions of forms
also allows you to preview Elixir fonts in the Elixir
Fonts folder.
You may also want to regenerate the screen version
of a new or revised Elixir character set. To do so, select its Coded Font (.CDF file) component, copy it to
the Converter icon, and select the [Screen] option.
The PC mapped file regenerates with the modifications you made. If you convert only the character set
(.HDR file) to screen format, the screen font that generates does not properly map for the keyboard.
Adding HP PCL fonts to Windows applications
See your Microsoft Windows documentation for information on adding HP PCL fonts to your Windows application fonts list.
Windows character mapping
To map fonts converted with the Efont factory to the
standard Windows character set (Latin 1 - ANSI
1252):
1.
7-70
Copy the outline font to the Converter icon.
ELIXIR TECHNOLOGIES CORPORATION
FILE CONVERSIONS
The Font Converter Options dialog box displays.
Figure 7-39. Font Converter Options dialog box
2.
Select either [Elixir], [Screen], [Windows], or
[ATM Type 3], then click on [OK].
The Outline-to-raster font generator dialog box
displays.
Figure 7-40. Outline-to-raster font generator dialog box
3.
Select the [Char set map - Custom] option,
then click on the [Full] button.
The Browse Code Page dialog box displays.
4.
Select ANSI.GMP, then click on [OK] until all
dialog boxes close.
ELIXIR DESKTOP FOR AFP USER GUIDE
7-71
FILE CONVERSIONS
Character remapping when converting ATM or TrueType fonts to Elixir or APF formats occurs
immediately.
Converting images
Using the Elixir Desktop, you can convert
image/graphics files from the Input or Elixir Image
folders. The Converter can also create color IM or
GOCA page segments. Color IOCA and conversion
of full color images to AFP page segment is for future
implementation.
When you copy one or more image files from any of
the above folders to the Converter icon, the Image
Converter Options dialog box displays and contains
the following options:
Figure 7-41. Image Converter Options dialog box
Input Format
Displays the format of the image(s) selected for
conversion.
Output
Displays the available image conversion output
formats.
7-72
ELIXIR TECHNOLOGIES CORPORATION
FILE CONVERSIONS
Converting Elixir graphics files to Tiles in a Font format
This option places a grid on an image and converts
each cell of the grid to a character in an Elixir font,
starting at position Decimal 65 (A). See the ElixirImage User Guide for more information.
When converting Elixir-format files, select [Tiles in a
Font] and click on [OK] to display the Extra Converter
Options dialog box.
Figure 7-42. Extra Converter Options dialog box
The Extra Converter Options dialog box contains the
following options:
Retile
Retiles the .TXT file associated with the Elixir-format
(.LP3) file.
Orientation
Select [Port] for portrait, [Land] for landscape,
[InvPort] for inverse portrait, or [InvLand] for inverse
landscape format fonts.
Converting to and from AFP page segments
If you are converting an AFP page segment file or converting
an image to AFP page segment format, the AFP Image Converter Options dialog box also displays and contains the following options:
ELIXIR DESKTOP FOR AFP USER GUIDE
7-73
FILE CONVERSIONS
Figure 7-43. AFP Image Converter Options dialog box
Image Type
Select your image's type: [IM Image], [IOCA CCITT4],
or [GOCA].
Remove Image Whitespace
If an AFP Page Segment image contains unwanted
white space, select [Yes] to trim the white space to
create a smaller converted file. Select [No] to retain
the white space. [IOCA CCITT 4] minimizes white
space according to CCITT Group 4 facsimile format.
Resolution of AFP Printer
Allows you to select [240 Pels] or [300 R-Units]. When
converting images to Elixir format, the file is marked
with the value you select. When reconverting from
Elixir to another image format, you must again specify
the printer resolution. During conversion from Elixir
format, the image resizes as follows:
If the Elixir file contains the resolution value to
which you want to convert the file, it does not
resize.
If the Elixir file contains a resolution value different from the value to which you want to convert, it
resizes accordingly.
If the Elixir file contains no mark, it resizes if the
[Resolution of AFP Printer] value is other than
[300 R-Units].
7-74
ELIXIR TECHNOLOGIES CORPORATION
FILE CONVERSIONS
When converting an AFP page segment to Elixir format, specify 240 pels.
When converting Elixir image files originally converted
from AFP format, specify 240 pels to retain the size.
When converting Elixir images not converted from
AFP format, specify 300 R-Units to resize the image;
however, for producing higher quality images, use
ElixirImage for resizing.
Format of output files
Output format for AFP fonts:
[VBM] - creates files for uploading to MVS hosts using
IBM 3270, IRMA FT/3270, or compatible file transfer
packages
[AS400] - creates files for uploading to AS/400 hosts
[IRMA] - creates files for uploading to MVS hosts using the IRMA FTTSO and compatible file transfer
packages, and OS/2 creates files for use with PSF/2
[DOS/VSE] - creates AFP format files for uploading to
DOS/VSE hosts
Rotate Images
The degree the output image rotates: [0], [90], [180],
or [270]. For PSEG-to-Elixir conversions, if a page
segment is rotated beyond 0 degrees, you must rotate
it on input to Elixir format for it to display correctly.
For example, a page segment with a 90-degree rotation should be further rotated 270 degrees during the
conversion to display correctly ("upright") in a portrait
form.
Preferred Color
Color to apply to black and white image or to change a
highlight color images to during conversion.
Floating offsets
Horizontal
Shifts output right for portrait orientation, and shifts
output down for a landscape orientation by the number of dots specified.
ELIXIR DESKTOP FOR AFP USER GUIDE
7-75
FILE CONVERSIONS
Floating offsets
Vertical
Shifts output down for portrait orientation, and shifts
output right for a landscape orientation by the number
of dots specified.
Converting .TIF and .PCX files to Elixir
When converting TIFF or PCX images to Elixir, the
Image Converter Options dialog box displays.
Figure 7-44. Image Converter Options dialog box
Select the resolution of the image as [240] or [300]
dpi. Note that the image is resized if you do not specify its original resolution (the higher the resolution, the
smaller the image).
Adding color to images during conversion
You can apply color to black and white images or
change a highlight color image's color during
conversion.
To add or change image color during conversion:
1.
7-76
Copy the Elixir image (.LP3) to the Converter
icon.
ELIXIR TECHNOLOGIES CORPORATION
FILE CONVERSIONS
The Image Converter Options dialog box displays.
Figure 7-45. Image Converter Options dialog box
2.
Select [AFP PSeg], then click on [OK].
3.
Select a color from the [Preferred Color]
option, then click on [OK].
For converted black and white files, color applies to all
of the black pixels. For converted highlight color files,
color applies to the background color plane.
Converting documents
You can convert multi-page document (.DAT) files
from the Input Document or Elixir Document folders.
.DAT files reside in the drive:\ELIXIR\DOCS\DOCLIST directory (Elixir Documents folder) and contain
existing Elixir-format (.ELX) form files which together
comprise a single multi-page document.
Each form file (without the .ELX extension) in the form
list file is preceded with %% and delimited by a carriage return/line feed combination. For example, a file
called TEST.DAT could contain the following lines:
%%TAX
%%FEDBANK
...
ELIXIR DESKTOP FOR AFP USER GUIDE
7-77
FILE CONVERSIONS
You can double-click on any .DAT file to view the file
in Windows Notepad.
Copy a .DAT file to the Converter icon to display the
Document Converter Options dialog box.
Figure 7-46. Document Converter Options
dialog box
Input Format
Displays the format of the documents you are
converting.
Output
Allows you to select one or more of the displayed formats to which you can convert input documents. Formats to which you cannot convert display grayed.
Converting Elixir .DAT files to HP PCL documents
To convert a .DAT file to HP PCL format:
7-78
1.
Copy the file(s) to convert from the Document
folder's Elixir or Input folder to the Converter
icon.
2.
In the Document Converter Option dialog box
that displays, select the [HP PCL] output
format , then click on [OK].
3.
Select a HP printer in the Print Driver dialog
box that displays, then click on [OK].
ELIXIR TECHNOLOGIES CORPORATION
FILE CONVERSIONS
The Desktop creates a .PRN file in the Output Documents, HP PCL Docs folder (drive:\ELIXIR\DOCS\
HPOUT\ ).
Converting Elixir .DAT files to PostScript documents
To convert a .DAT file to PostScript format:
1.
Copy the file(s) to convert from the Document
folder's Elixir or Input folder to the Converter
icon.
2.
In the Document Converter Option dialog box
that displays, select PostScript], then click on
[OK].
3.
Select a PostScript printer in the Print Driver
dialog box that displays, then click on [OK].
The program creates a .PS file in the Output Documents,
PostScript
Docs
folder
(drive:\ELIXIR\DOCS\PSOUT\).
Converting Elixir .DAT files to AFP documents
To convert a .DAT file to AFPDS format:
1.
Select the file(s) to convert from the Elixir or
Input folder of the Documents folder.
2.
Copy the file(s) to the Converter icon.
3.
In the Document Converter Option dialog box,
select the [AFPDS] output format and click on
[OK] or press <Enter>.
ELIXIR DESKTOP FOR AFP USER GUIDE
7-79
FILE CONVERSIONS
The AFP Page Converter Options dialog box displays.
Figure 7-47. AFP Page Converter Options dialog box
4.
Select converter options, then click on [OK].
The program creates an .AFP file in the AFP Docs
folder (drive:\ELIXIR\DOCS\AFPOUT\ directory).
AFP Page Converter Options dialog box
Options in this dialog box may or may not display, depending on your selections in the Form Converter Options dialog box.
Elixir Pages in
Source directory for Elixir forms (default is drive:\
ELIXIR\FORMS\ELIXIR\).
Text Justification
Applicable for conversions to OVE and OGL. The default [Inter-Word] justifies text by adding or deleting
spaces between words. This option reduces the complexity of your form so the form prints faster. [InterCharacter] justifies text by adding or deleting spaces
between characters. This option makes the form more
readable but extends printing time.
7-80
ELIXIR TECHNOLOGIES CORPORATION
FILE CONVERSIONS
Rotate Pages
Rotates the screen version of a form clockwise by the
number of degrees selected.
If you converted Elixir forms to another format and
now want to convert them back to Elixir format, you
must adjust the page rotation as follows:
Output rotation
[0]
[90]
[180]
[270]
Input rotation
[0]
[270]
[180]
[90]
Output rotation is the rotation option selected when
the original Elixir form was converted to another format. Input rotation is the rotation option you should select when you convert the form back to Elixir format so
the form displays correctly.
Resolution of AFP Printer
Select your printer's resolution: [240 Pels] or [300 RUnits]. When converting forms to Elixir format, the
program marks the file with the value you select.
When reconverting from Elixir to another format, you
must specify the printer resolution for resizing as
follows:
If the Elixir file contains the resolution value to
which you want to convert the file, it does not
resize.
If the Elixir file contains a resolution value different from the value to which you want to convert, it
resizes accordingly.
If the Elixir file contains no mark, it resizes if the
[Resolution of AFP Printer] value is other than
[300 R-Units].
When converting an Elixir form originally converted
from AFP format, specify [240 Pels] to retain the size.
Format of output files
Select the output format for AFP file(s):
ELIXIR DESKTOP FOR AFP USER GUIDE
7-81
FILE CONVERSIONS
[VBM] - creates AFP-format files for uploading to MVS
hosts using IBM 3270, IRMA FT/3270 or compatible
file transfer packages
[AS400] - creates AFP-format files for uploading to
AS400 hosts
[IRMA] - creates AFP-format files for uploading to
MVS hosts using the IRMA FTTSO and compatible
file transfer packages
[OS/2] - creates AFP-format files for use with PSF/2
[DOS/VSE] - creates AFP-format files for uploading to
DOS/VSE hosts
Font Type
When converting to Elixir format:
[Universal X0] - creates call-outs to X0 universal
(bounded box) fonts in the Elixir form file
[Separate X1-X4] - creates callouts that emulate unbounded box font types in the Elixir form file, based on
the following:
text direction = Across, X1 is called out
text direction = Down, X2 is called out
text direction = Back, X3 is called out
text direction = Up, X4 is called out
When converting AFP and OVE format forms to Elixir
format, if the form contains call-outs for X0 fonts, the
[Separate X1-X4] option is not effective. Font call-outs
in the Elixir form remain X0 call-outs regardless of the
font type option selected.
When outputting fonts to AFP or OVE and back to
Elixir format, if fonts in your form are all one direction
and/or you do not want the two-digit AFP prefix added, select [No AFP Prefix].
Deselect [No AFP Prefix] if you have mixed-directional
fonts in your form and plan on proof-printing. See the
"Font requirements for an HP-compatible printer" section for an example.
7-82
ELIXIR TECHNOLOGIES CORPORATION
FILE CONVERSIONS
Units
Units for horizontal or vertical offset in pels, inches or
millimeters.
Remove Image Whitespace
Not applicable to form conversions.
Embed Page Segments
Includes converted Page Segments within the data
stream when converting to OVE. Deselecting this option includes only a reference to the Page Segment.
Note that the Page Segment must exist in your host
Page Segment library.
Floating Offsets
[Horizontal] is applicable for converting to AFP format.
Shifts output right for portrait orientation, and shifts
output down for a landscape orientation by the number of dots specified. The offset value displays in the
unit of measurement selected in the Units option. The
default unit is pels, so offset values converted to
inches or millimeters may be slightly off due to rounding errors. You can edit the value displayed if
necessary.
[Vertical] is applicable for converting to AFP format.
Shifts output down for portrait orientation, and shifts
output right for a landscape orientation by the number
of dots specified. The offset value displays in the unit
of measurement selected in the Units option. The default unit is pels, so offset values converted to inches
or millimeters may be slightly off due to rounding errors. You can edit the value displayed if necessary.
Fonts
Displays the MCF Fonts dialog box which contains the
following options:
ELIXIR DESKTOP FOR AFP USER GUIDE
7-83
FILE CONVERSIONS
Figure 7-48. MCF Fonts dialog box
MCF(1)
Uses Map Coded Font Format 1 (MCF(1)) structured fields in the resulting output file. MCF(1) is
IBM's original AFP font specification and AFP architecture supports it as a coexistence object.
MCF(1) has been superseded by MCF(2) but is
still valid.
MCF(2)
Uses Map Coded Font Format 2 structured fields
in the resulting output file. MCK(2) is recommended for MO:DCA compliance.
Default
Converter looks in the file entered in the Character Mapping File Name option for individual font
handling instructions. If an entry is found for a
font used in the original Elixir form or document,
the RTYPE keyword format is used; else the font
using the coded font name in a MCF(1) structures
field record is used (default).
Coded Font Name
Converter writes all font references using the
coded font name.
Charset + Code Page Name
Converter writes all font references using a character set/code page pair. The original font's character set and code page are referenced for fonts
originating in the AFP environment.
7-84
ELIXIR TECHNOLOGIES CORPORATION
FILE CONVERSIONS
The six character assigned Elixir name generates
the character set name and the code page comes
from the Default Code Page option in the Desktop
Basic Setup dialog box for non-AFP fonts.
Outline
Converter writes all font references using PSF
outline font parameters (only valid for Adobe Type
1 or True Type fonts). You must set-up font family name references in your AFP font mapping file
before selecting this option. If no font matches
are found, the character set and code page
names are used.
To set up font family name references, open your
font
mapping
file
(default
is
drive:\ELIXIR\FONTS\MAPS\DEFAULT.FAM),
then follow the instructions in the "Font Family
Descriptors" section.
FGID
Converter writes all font references using the
previously-specified Global Resource Identifier
(GRID). The GRID includes the Font Typeface
Global Identifier (FGID), Graphic Character Set
Global Identifier (GCSGID) and the Code Page
Global Identifier (CPGID) mappings.
Character Mapping File Name
Path and name of your AFP font mapping file
which provides the Converter with output overlay
and document font mapping information. Default
is drive:\ELIXIR\FONTS\MAPS\DEFAULT.FAM.
AFP
Displays the AFP Settings dialog box which contains the following options:
ELIXIR DESKTOP FOR AFP USER GUIDE
7-85
FILE CONVERSIONS
Figure 7-49. AFP Settings dialog box
OGL
Displays the Page Source Converter Options dialog box which
contains the following options:
Figure 7-50. Page Source Converter Options dialog box
Include Author Banner
Includes the form's Page Author information in
the file conversion. The author banner includes
the author's name at the top of the form file. See
the Page Databasing Information defaults submenu in your ElixirForm for AFP User's Guide for
more information.
7-86
ELIXIR TECHNOLOGIES CORPORATION
FILE CONVERSIONS
Keep Texts Boxed (OGL only)
Writes boxed text on a form into OGL as a
DRAWBOX WITHTEXT command during conversion. Boxed text with no visible border is written
as DRAWBOX WITHTEXT xxPELS xxPELS 0,
and justified text is always written as JUSTIFY
LASTNO (last line remains LEFT justified). All
justification in this mode is done INTERWORD
(only option the OGL compiler supports). The
BALANCE option is not supported.
Code Page Translation (OGL only)
Writes OGL out to EBCDIC rather than ASCII
format.
Include Description Text
Converter generates a specialized comment for
inclusion after the Author Banner in OGL or LOG
source files. The format for this comment is:
'1
[InternalName].[LocalID]
Description]
[MadeFor]
[Short
Page
where "1" is used as a search string for host programs which produce listings of overlay source
libraries, and [InternalName] is the six-character
name of the OGL or LOG source.
See the Page Databasing dialog box in your ElixirForm for AFP User's Guide for information on
the other options included in this comment. Note
that the Date/Time Stamp and Long Page Comments for a form are also included in the
conversion.
Generate BPSD Tags
Automatically generates and displays BPSD tags
in the OGL formats.
Font Assignment
For OGL, select [Auto] to map fonts from their
coded font names to six-character internal names
without the 'Xn' prefix. For LOG, the full eightcharacter 'X' coded font name is retained.
Select [Mapped] to load and use the DEFAULT.
FAM table in drive:\ELIXIR\FONTS\MAPS for
mapping font names.
ELIXIR DESKTOP FOR AFP USER GUIDE
7-87
FILE CONVERSIONS
For LOG, use this table to assign local fourcharacter identifier names for fonts residing on
the printer's disk.
For OGL, use this table to assign individual
DDNAMES to fonts.
For OVE or AFPDS, use this table to assign Font
Global Identifiers (FGIDs) to font names. See the
"Using FGIDs in a form" section for an example of
mapping FGIDs to fonts.
You can also change your target environment
from MVS to VM by editing the drive:\ELIXIR\
DESK TOP\ SYSTEM\AFP.INI file included with
the Desktop. See the "Changing your target environment from MVS to VM" section for more
information.
In the [Map table] field, enter the file name of the
mapping table in drive:\FONTS\MAPS to use
when you select [Mapped] in the [Font Assignment] option. DEFAULT.FAM is the default.
Pseg Assignment
Select [Auto] to map page segment image names
from their external file names to six-character internal names without the 'S1' prefix. For LOG, the
full eight-character S1 name is retained. Select
[Mapped] to load and use the DEFAULT.SAM table in drive:\ ELIXIR\PICS\MAPS to map page
segment names. Once compiled, the page segments store inside the overlay.
For LOG, you can use DEFAULT.SAM to assign
local four-character identifier names for fonts residing on the printer's disk. For OGL, you can
use this table to assign DDNAMES to page
segments.
You can change your target environment from
MVS
to
VM
by
editing
the
drive:\ELIXIR\DESKTOP\ SYSTEM\AFP.INI file
included with the Desktop. See the "Changing
your target environment from MVS to VM" section
for more information.
7-88
ELIXIR TECHNOLOGIES CORPORATION
FILE CONVERSIONS
In the [Map table] field, enter the file name of the
mapping table in drive:\ELIXIR\PICS\MAPS to
use when you select [Mapped] in the [Pseg Assignment] option. DEFAULT.SAM is the default.
CONTROL
Builds the CONTROL statement used in OGL and
LOG source files:
[noSTORE] - specifies that the form is not stored
in a library
[STORE] - stores the form in a library
[REPLACE] - stores the form in a library and replaces any existing forms with the same name
[ALL] - displays every message the system generated during processing
[WARN] - displays only the warning messages
generated during processing
[ERROR] - displays only the error messages generated as a result of OGL/370 processing
[noSUMMARY] - specifies that a summary does
not display as part of the source listing
[SUMMARY] - displays a statistical summary as
part of the source listing
Formwidth
Enter the FORMWIDTH command arguments directly. For example, 3600 PELS.
Formlength
Enter the FORMLENGTH command arguments
directly. For example, 3200 PELS.
Copies
This option is valid in certain circumstances. See
your Comparex documentation for information.
Margin
Enter the offset from the edge of the paper to the
beginning of the printing area. If you specify a
margin value in the Form Control Block, use the
same value. The default margin is 0.
ELIXIR DESKTOP FOR AFP USER GUIDE
7-89
FILE CONVERSIONS
Sequence Numbers
Appends 8-digit sequence numbers to output in
columns 73-80.
Delete
Deletes the overlay from the printer's disk after
use. Deselect to save the overlay on the printer's
disk.
Converting AFPDS to multiple Elixir forms
To convert AFPDS files to Elixir:
1.
Copy the AFPDS data stream file to the Input
AFP Docs folder and assign the extension
.AFP to the file.
2.
Copy the file to the Converter icon and select
[Elixir].
3.
Select the following options from the AFP
Page Converter Options dialog box :
Figure 7-51. AFP Page Converter Options dialog box
4.
7-90
Select the following options:
ELIXIR TECHNOLOGIES CORPORATION
FILE CONVERSIONS
Rotate Pages
Allows you to rotate the output forms with respect to
the print direction of the input forms by the number of
degrees you specify.
Resolution of AFP Printer
Allows you to select [240 Pels] or [300 R-Units]. When
converting images to Elixir format, the file is marked
with the value you select. When reconverting from
Elixir to another image format, you must again specify
the printer resolution. During conversion from Elixir
format, the image is resized as follows:
If the Elixir file contains the resolution value to
which you want to convert the file, it does not
resize.
If the Elixir file contains a resolution value different from the value to which you want to convert, it
resizes accordingly.
If the Elixir file contains no mark, it resizes if the
[Resolution of AFP Printer] value is other than
[300 R-Units].
When converting an AFP page segment to Elixir format, specify 240 pels.
When converting Elixir image files originally converted
from AFP format, specify 240 dpi to retain the size.
The conversion process creates one-page Elixir forms
in the Elixir Forms folder, a .DAT file in the Elixir
Documents folder, appropriate fonts in the Elixir Fonts
folder (see the "Converting fonts" section and the
"AFP font conversion considerations" appendix for information), and any images in the Elixir Image folder.
Font Type
When converting to Elixir format, [Universal X0] creates call-outs to X0 universal (bounded box) fonts in
the Elixir form file. [Separate X1 - X4] creates call-outs
that emulate unbounded box font types in the Elixir
form file based on the following: if the text direction in
the form is Across, X1 is called out; if the text direction
is Down, X2 is called out; if the text direction is Back,
X3 is called out; and if the text direction is Up, X4 is
called out.
ELIXIR DESKTOP FOR AFP USER GUIDE
7-91
FILE CONVERSIONS
When converting AFP and OVE format forms to Elixir
format, if the form contains call-outs for X0 fonts, the
[Separate X1-X4] option is not effective. Font call-outs
in the Elixir form remain X0 call-outs regardless of the
font type option selected.
When outputting fonts to AFP or OVE and back to
Elixir format, if fonts in your form are all one direction
and/or you do not want the two-digit AFP prefix added,
select [No AFP Prefix].
Note: Do not select [No AFP Prefix] if you have
mixed-directional fonts in your form and plan on proofprinting. See the "Font requirements for a HP series II
printer" section for an example.
Remove Image Whitespace
Select [Yes] to trim the white space surrounding images to create a smaller converted file. Select [No] to
retain the white space.
Converting Pagedef/Formdef resources
The Jobs folder manages Pagedef and Formdef resources. Opening the Elixir Data Jobs folder provides
access to the Elixir AppBuilder jobs database which
is stored by default in drive:\ELIXIR\JOBS\ELIXIR.
To convert existing Elixir-format Pagedef and Formdef
resources:
1.
Copy the resource to convert to the Converter
icon.
The Application Converter Options dialog box
displays.
2.
Select either [PPFA Source Application] or
[AFP Compiled Pagedefs/Formdefs], then
click on [OK].
The Export Options dialog box displays. See your
Elixir AppBuilder for AFP User Guide for a descriptions of the available options.
7-92
ELIXIR TECHNOLOGIES CORPORATION
FILE CONVERSIONS
3.
Select/enter options, then click on [OK].
The converted resources display in the Output
Jobs folder in either the PPFA Source or
PDEF/FDEF folder.
To convert PPFA source or object (compiled)
Pagedefs and formdefs into Elixir format:
1.
Copy the resource to convert to the Converter
icon.
The Application Converter Options dialog box
displays.
2.
Select [Elixir Application], then click on [OK].
The Import Options dialog box displays. See your
Elixir AppBuilder for AFP User Guide for a descriptions of the available options.
3.
Select/enter options, then click on [OK].
The converted resources save in AppBuilder's database and are accessible by double-clicking on
the icon in the Elixir Data Jobs folder or by loading it within AppBuilder.
Converting files using DOSVSE
The DOSVSE program extracts AFP structured field
information from a downloaded phase file in preparation for conversion to Elixir generic format.
This utility converts the file into an Elixir readable file
(structured field records only). The conversion overwrites the existing file so make a backup before running it if necessary.
You can run DOSVSE:
as a DOS command line utility
as a utility executed from the Elixir Dispatcher
icon.
ELIXIR DESKTOP FOR AFP USER GUIDE
7-93
FILE CONVERSIONS
Running DOSVSE as a DOS command line utility
To execute, type the following from the drive:\ELIXIR
command prompt:
DOSVSE
<Enter>
[full
path
name\]filename.ext
Running DOSVSE from the Elixir Dispatcher icon
To set up a Dispatcher utility, see the "Accessing DOS
files and applications" chapter.
To execute, select the resource(s) to convert, drag
them down to the Dispatcher icon, and select the
DOSVSE utility.
Converting files using ELX2VSE
ELX2VSE converts AFP data stream files (.SEG,
.OVE and font files) to VSE linkage editor statements.
The utility uses the CL4.DEF file to obtain the job control information included in the object deck. You can
edit the CL4.DEF file using any standard text editor.
You should examine this file and modify it to your installation standards. Parameters that may require
modification include CATALOG (the destination for the
phase file), DISP, and CLASS.
ELX2VSE creates a file with the name filename.DCK
in the directory where the original file resides.
Uploading to the host
To upload the .DCK file to the host:
Use ELX2VSE to convert, then upload the .DCK
file.
Use the DOSLOAD.BAT file to automate conversion and upload.
See the "File transfer" chapter for AFPDS to VSE uploading procedures
7-94
ELIXIR TECHNOLOGIES CORPORATION
FILE CONVERSIONS
Prerequisite software levels
- VSE/ESA APAR PL77851 in PTF UN06427
- VSE/SP V4 APAR PL76660 in PTF UL92181
- VSE/SP V3 APAR PL77268 in PTF UL89813
Using ELX2VSE
You can run ELX2VSE:
as a DOS command line utility
as a utility executed from the Elixir Dispatcher
icon.
Running ELX2VSE as a DOS command line utility
To execute, type the following from the drive:\ELIXIR
command prompt:
ELX2VSE
<Enter>
[full
path
name\]filename.ext
Running ELX2VSE from the Elixir Dispatcher icon
To set up a Dispatcher utility, see the "Accessing DOS
files and applications" chapter.
To execute, select the resource(s) to convert, drag
them down to the Dispatcher icon, and select the
ELX2VSE utility.
Deleting converted input files
After converting files, the input files you copied to the
Converter icon remain highlighted in the window.
To save disk space, you may want to delete the highlighted file(s).
ELIXIR DESKTOP FOR AFP USER GUIDE
7-95
FILE CONVERSIONS
Confirming file conversion
To confirm file conversion, close the input folder in
which you selected files to convert. Open each Output
folder in which the converted file(s) generate and
check the contents of the folder. You may find it easier
to find the files you want if you display the contents of
the window by date. The most recently created files
display at the beginning of the file list.
ElixirDoc
You can run all Elixir conversion applications by copying files to the Converter icon as described in this
chapter. You can also run the conversion applications
as stand-alone programs.
To run any Elixir conversion program, open the ElixirDoc icon to display a window showing a list of Elixir
conversion applications.
You can specify the setup options for the conversion
application to use by clicking on its icon, then selecting [Properties] from the File menu. The appropriate
property sheet for the selected conversion displays.
Specify the options and select [OK] to save the options to disk.
To run a stand-alone converter, do one of the following:
Double-click on the icon.
Select [Open] from the File menu.
Press <F2>.
The Desktop clears and the selected converter application runs. You can now perform file conversions as
described in this guide for each converter application.
After conversion, select [Quit] or [Exit] to return to the
desktop.
7-96
ELIXIR TECHNOLOGIES CORPORATION
8.
Accessing DOS files
and applications
This chapter describes how the Elixir Desktop allows
access to DOS files and applications.
Desktop tools
The Elixir Desktop includes a number of tools that enable you to access DOS files and applications as
follows:
User Tools icon
The User Tools icon allows you to establish an icon
for any Windows application, DOS application or
batch file, so that double-clicking on the icon executes
(or starts) the application.
User Files icon
The User Files icon provides access to all DOS directories and files.
The User Files icon also includes a Tool Link utility
that allows you to link a file with an application. Once
linked, double-clicking on the file starts the application
and loads the file.
ELIXIR DESKTOP FOR AFP USER GUIDE
8-1
ACCESSING DOS FILES AND APPLICATIONS
Dispatcher icon
The Dispatcher icon allows you to store up to 12 DOS
commands with optional replaceable parameters.
When you copy a file to the Dispatcher icon and select
a command, the name of the file substitutes for the
first replaceable parameter.
Creating an application icon
The User Tools icon allows you create icons for applications and batch files on your PC.
During software installation, the ELXWDATA User
Tools install.
The ELXWDATA User Tool starts a batch file that
generates a text file called ELXWDATA.TXT on the A:
drive diskette. The file contains the contents of your
AUTOEXEC.BAT, CONFIG.SYS and INSTALL.LOG
files and other information such as existing .APP and
.EXE files and system memory.
Creating an icon
To create an application icon, open the User Tools
icon to display the User Tools window.
The User Tools window is similar to other Elixir windows and includes an additional Tools menu title in
the window header.
Select the [New Tool] option in the Tools menu to
display the User Application Setup dialog box which
contains the following options:
8-2
ELIXIR TECHNOLOGIES CORPORATION
ACCESSING DOS FILES AND APPLICATIONS
Figure 8-1. User Application Setup dialog box
Command to Execute
The command that executes the application associated with the icon. For example, to create a WordPerfect icon, you would specify WP.
If you want to link the application to files in the same
directory as the application (see the “Linking files to an
already defined User Tool” section), you can also type
in the DOS command with an embedded %1 parameter. The embedded %1 parameter specifies the location in the command at which you want the file name
to appear. See also the [Prompt for parameters]
option.
Nickname for application
A nickname (up to 8 characters) for the application
you want to run. For example, you may specify VENT
as a nickname for Ventura Publisher. After creating an
icon, the User Tools window displays the icon with the
nickname under it.
ELIXIR DESKTOP FOR AFP USER GUIDE
8-3
ACCESSING DOS FILES AND APPLICATIONS
Optional Long Name
A descriptive name for the application (up to 29 characters). For example, for Ventura Publisher, you can
enter Ventura Publisher. The long name is informational only; it identifies the application in the dialog
box.
Working Directory
The DOS path for the executable. Use this field if the
application you are running is not present in the
drive:\ELIXIR directory and if you have not specified a
DOS PATH= statement for the directory in which the
application executable resides.
Command Options
Select command options:
[DOS Application]- for running a DOS applications
[Send Only Filename] - uses only the file's stem name
for command execution
[Prompt for parameters] - program prompts for an argument to appends to the command in the [Command to execute] option
[Run Minimized]- executes the command in a minimized window
Command Attributes
Select command attributes:
[Command is .BAT file] - for DOS batch file commands; redisplays the Desktop when you exit the application. If the application is a batch file that calls
another batch file, the Desktop does not redisplay
when you exit the application. See the “Starting batch
files” section for more information.
Deselect to return to the directory specified in the
batch file.
[Pause after execution] - pauses after exiting the
application
8-4
ELIXIR TECHNOLOGIES CORPORATION
ACCESSING DOS FILES AND APPLICATIONS
Display Options
Select a command display option:
[Window] - displays command execution in a window
[Full Screen] - displays command execution in a full
screen environment
Browse
Displays the contents of a DOS directory from which
you can select a file.
After you specify the required fields in the User Application Setup dialog box and click on [OK], the User
Tools window displays an icon labeled with the nickname you specified and an .XAP extension to identify
it as a User Tool icon. The .XAP file writes to
drive:\ELIXIR\DESKTOP\SYSTEM\USERTOOL.
Double-clicking on the icon now runs the specified application described in the following section.
Starting the application
To start an application for which you have defined an
icon, open the User Tools window and double-click on
the icon.
If you did not select the [Prompt for parameters] option, the Desktop clears and the application starts. If
you selected the above option, a dialog box displays
requesting that you enter an argument. Enter the required argument and click on [OK] to run the
application.
If you selected the [Pause after execution] option, the
program prompts you to" press any key to continue"
after exiting the application. Press any key to return to
the Desktop.
Displaying icon properties
To check or edit the properties of a previouslyspecified application in the User Tools folder, select
the application icon and do one of the following:
Select [Properties] from the File menu.
ELIXIR DESKTOP FOR AFP USER GUIDE
8-5
ACCESSING DOS FILES AND APPLICATIONS
Select [Tool Props] from the Tools menu on the
User Tools window header.
Press <F2>.
The User Application Setup dialog box displays, showing the information previously specified for the
application.
User Tools example
The following example illustrates how to specify and
run Ventura Publisher from the Desktop using the
User Tools utility and how to create an icon for Elixir's
Web site.
Creating an icon for Ventura Publisher
To create an icon for Ventura Publisher:
1.
Open the User Tools icon.
The User Tools window displays.
2.
Select [New Tool] from the Tools menu.
The User Application Setup dialog box displays.
Figure 8-2. User Application Setup dialog box
8-6
ELIXIR TECHNOLOGIES CORPORATION
ACCESSING DOS FILES AND APPLICATIONS
3.
Type VP in the [Command to Execute] option.
4.
Type VENT in the [Nickname for application:]
option.
5.
Type Ventura Publisher in the [Optional Long
Name:] option.
6.
Select the [Command is .BAT file] option
(Ventura Publisher runs from VP.BAT, a batch
file).
7.
Do not select [Prompt for parameters].
This starts Ventura Publisher without requiring
you to enter a parameter.
8.
Do not select [Pause after execution].
9.
Enter the directory path that specifies the
location of your Ventura Publisher executable
files.
For example, if the Ventura Publisher batch
(.BAT) file is on the C: (root) drive; enter C:\.
10. Click on [OK].
The User Tools window shows a User Tools icon
with a VENT.XAP label.
Checking the properties of the Ventura Publisher
icon
To check (or
specifications:
modify)
Ventura
Publisher
1.
Select the VP icon by clicking on it.
2.
Select [Tool Props] from the Tools menu.
icon
The User Application dialog box for Ventura Publisher displays. Check the information you entered and make changes if necessary.
3.
Click on [OK].
ELIXIR DESKTOP FOR AFP USER GUIDE
8-7
ACCESSING DOS FILES AND APPLICATIONS
Starting and exiting Ventura Publisher
To start and exit Ventura Publisher:
1.
To start Ventura Publisher, open the VENT
icon in the User Tools window.
The Ventura Publisher main screen displays.
2.
Exit Ventura Publisher.
The Desktop redisplays.
Creating and icon for Elixir's Web site
To create an icon that automatically connects you to
Elixir's Web site:
1.
Open the User Tools icon, then select
ELXWWW.XAP.
2.
Select [Tool Props] from the Tools menu.
The User Application Setup dialog box displays.
Figure 8-3. User Application Setup dialog box
3.
8-8
Enter your Internet browser's path in the
[Command to Execute], then click on [OK].
ELIXIR TECHNOLOGIES CORPORATION
ACCESSING DOS FILES AND APPLICATIONS
Default is drive:\NETSCAPE\NETSCAPE.EXE
http://www.elixir.com.
Accessing DOS directories
To access directories and files, open the User Files
icon to display the User Files Directory Paths and Tool
Links dialog box. An example shows in the following
figure.
Figure 8-4. User Files Directory Paths and Tool Links
To specify the target directories (maximum 12), perform one of the following:
Enter the directory into which you want to copy
files
When the directory you want to copy files to displays, select (highlight) it
Select any line that shows a path and edit it
If the directory you enter does not exist, a dialog box
displays requesting confirmation to create a new directory. Select [Yes] to create the new directory. An
empty window for the new directory displays.
ELIXIR DESKTOP FOR AFP USER GUIDE
8-9
ACCESSING DOS FILES AND APPLICATIONS
You can also use wildcard characters to display a filtered list of files in a directory.
Figure 8-5. Window example
If you enter a directory that does not exist, a dialog
box displays to confirm creating a new directory.
Changing directories
The window header contains a backup button similar
to the button described in the “Elixir folders” chapter.
Click on the backup button to display the contents of
the directory one level closer to the root directory. Repeatedly clicking on the backup button eventually displays a window showing the active drives on your PC.
For example, if you have the C:\TYPESET\LETTERS
window displayed and you repeatedly click on the
backup button, the following windows display after
each click:
C:\TYPESET
C:\ (the root directory)
Active drive letters (C:, A:, etc.)
To change directories further from the root, click on
any folder icon (<Dir>) to display the contents of the
folder (directory).
8-10
ELIXIR TECHNOLOGIES CORPORATION
ACCESSING DOS FILES AND APPLICATIONS
Copying files between subdirectories
To copy one or more files to another subdirectory:
1.
Select and drag the file(s) to the User Files
icon.
The User Files Directory Paths and Tool Links
dialog box displays with the path for your specified file(s) selected.
2.
Enter the full path of the directory to copy the
file(s) or select a displaying path, then click
on [OK].
The file(s) you selected copy to the directory you
specified.
Linking files to applications
When you establish a link between an application and
a file, double-clicking on the file icon starts the application and loads the file as a parameter to the application command (you can link only one application to
one or more files in a directory).
The Tools menu (accessed from the header of any
open window displayed through the User Files icon)
allows you to establish links between files in a window
and an application (executable or batch file).
For example, if you link files created by a word processing program to the word processing application,
double-clicking on any of the file icons starts the word
processing program and loads the selected file in the
program.
You can link files to an application for which a User
Tool exists, or create a User Tool for an application
and link files to it.
ELIXIR DESKTOP FOR AFP USER GUIDE
8-11
ACCESSING DOS FILES AND APPLICATIONS
Linking files to an existing User Tool
If you created a User Tool icon for an application, you
link files in a directory to the application as follows:
Select [Tool Link] from the Tools menu to display the
Tool Link Definition dialog box which contains the following options:
Figure 8-6. Tool Link Definition dialogbox
UserTool Nickname
Enter the nickname specified when creating the user
tool. Using the User Tools example in the previous
section, you would enter VENT for Ventura Publisher.
Open only files with extension
Only links files with the extension you specify. Leave
deselected to not use an extension filter. Files with all
extensions link to the application.
Linking files to a new application
If you have not established an application as a User
Tool icon, you can do so by selecting [New Tool] in
the Tool Link Definition dialog box header to display
the User Application Setup dialog box.
See the “Creating an application icon” section in this
chapter for more information about fields in this dialog
box.
Checking tool properties
After you establish tool links, you can check or modify
entries for the Tool Properties from the Tools menu.
Selecting this option displays the User Application
Setup dialog box for editing.
8-12
ELIXIR TECHNOLOGIES CORPORATION
ACCESSING DOS FILES AND APPLICATIONS
Opening linked files
When files in a directory link to an application, doubleclicking on a linked file starts the application and loads
the file in the application.
If you selected [Prompt for parameters] in the User
Application Setup dialog box, the Arguments to this
program dialog box shown in the following figure
displays.
Figure 8-7. Arguments to this program dialog box
The parameter (file name) shown in the dialog box is
the file name last entered. (The example has no previously entered file name.)
Starting DOS executables
Double-clicking on a .EXE, .COM, or .BAT file
prompts you for an argument (file name) for the executable. If required, enter an argument, or just click
on [OK] to start the executable.
Starting batch files
When you start a DOS batch file (.BAT) using the
User Tools icon, the Elixir Desktop loads an additional
COMMAND.COM program in system memory to enable returning to the Desktop. The size of the program file is about 11 KB.
If the batch file you want to start from the Desktop requires a major portion of available memory, the additional COMMAND.COM file may not leave enough
memory to run your batch file (for example, a Ventura
Publisher chapter that contains many fonts and paragraph tags consumes much memory).
ELIXIR DESKTOP FOR AFP USER GUIDE
8-13
ACCESSING DOS FILES AND APPLICATIONS
To utilize the maximum amount of system memory,
start batch files as follows:
If possible, start the application directly without
using a batch file.
Do not select the [Command is .BAT File] option
in the User Application Setup dialog box and use
an ASCII editor to add the following lines to the
end of the batch file:
drive:
CD \ELIXIR
ELIXIR
drive: is the drive on which the Desktop installs.
Use a commercially-available memory management program to remove unwanted memoryresident programs from memory. Add the command(s) required to remove the additional
COMMAND.COM program to the first line of your
application batch file. Select the [Command is
.BAT File] option in the User Application Setup
dialog box.
Using the Dispatcher icon
The Dispatcher icon allows you to specify up to 12
DOS commands with optional embedded replaceable
parameters. Copying a file to the Dispatcher icon
substitutes the name of the file for the replaceable parameter and invokes the command.
The Dispatcher icon provides a convenient way to
store commonly-used DOS commands, that you start
using simple mouse operations.
Some examples of functions you can store and run
using the Dispatcher icon are:
DOS batch files
Elixir utilities or batch files
8-14
ELIXIR TECHNOLOGIES CORPORATION
ACCESSING DOS FILES AND APPLICATIONS
Quick DOS
optimizer).
operations
(such
as
the
disk
You can use the Dispatcher icon as follows:
Copy one or more files to the Dispatcher icon and
in the displayed dialog box select the batch command you want to run with the selected file(s) as
replaceable parameter(s).
Open the Dispatcher icon, enter a batch command, and enter the name of the file you want to
run as a parameter to the batch command.
Setting up Dispatcher commands
To set up Dispatcher commands, open the Dispatcher
icon to display the Dispatcher Commands dialog box
shown in the following figure.
Figure 8-8. Dispatcher Commands dialog
box example
The dialog box allows you to enter and display up to
12 DOS commands.
To enter a command, select a line and type the
command.
You can use a %1 replaceable parameter in the command line. When you copy a file to the Dispatcher
ELIXIR DESKTOP FOR AFP USER GUIDE
8-15
ACCESSING DOS FILES AND APPLICATIONS
icon and select the command line, the file name substitutes for the replaceable parameter.
If you want a prompt to enter a parameter each time
you run the Dispatcher command, select the [Prompt
for parameters] option in the User Application Setup
dialog box. The parameter you specify adds after the
Dispatcher command.
Use the <Backspace>, <Del>, and horizontal arrow
keys to edit a selected line.
If you frequently run more than 12 Dispatcher executables, you may want to store eleven of your most
frequently-used commands and leave one line open to
enter other commands as required.
After entering a command, select [Setup] in the dialog
box header to display the User Application Setup dialog box shown in the following figure.
Figure 8-9. User Application Setup dialog box
The User Application Setup dialog box shows the
command you entered in the [Command to Execute]
option (you can edit the command, if required).
8-16
ELIXIR TECHNOLOGIES CORPORATION
ACCESSING DOS FILES AND APPLICATIONS
The User Application Setup dialog box displays the
following options:
Command to Execute
The command you want to execute through the
Dispatcher.
Nickname/Optional Long Name
Not applicable when setting
executables.
up
Dispatcher
Working Directory
Optional - allows you to enter the path of the directory
containing the executable (useful if the executable you
are running is does not reside on drive:\ELIXIR and
you did not specify a DOS PATH= statement).
DOS application
Select if you want to specify a DOS application (enables the [Command Attributes] options).
Send Only Filename
Execution of this command uses only the stem name
of the file.
Prompt for parameters
Select to prompt for an argument when executing the
command (see the description for the Dispatcher
Commands dialog box). This allows you to run commands directly from the Dispatcher icon without requiring you to copy files to the Dispatcher icon.
Run Minimized
Executes the command in a minimized window.
Command is .BAT file
For a batch (.BAT) file, select to return you to the
Desktop after executing the command. Leave deselected (the default) to return you to DOS after executing the command. If the executable is a batch file that
calls another batch file, you return to the second batch
file.
Pause after execution
Select to pause after command execution and to
prompt for any keystroke to continue (redisplays the
Desktop). Otherwise redisplays the Desktop immediately after command execution.
ELIXIR DESKTOP FOR AFP USER GUIDE
8-17
ACCESSING DOS FILES AND APPLICATIONS
Display Options
[Window] displays command execution in a window.
[Full Screen] displays command execution in a full
screen environment.
After specifying options, click on [OK] to redisplay the
Dispatcher Commands dialog box. Click on:
[Start] to execute the highlighted command
[OK] to update information in the dialog box without executing any commands
[Cancel] to cancel any changes to the Dispatcher
Command dialog box.
Executing Dispatcher commands
You can run DOS command files using the Dispatcher
in two ways:
by copying selected files to the Dispatcher icon
by opening the Dispatcher icon and executing
commands.
Copying files to the Dispatcher
To execute Dispatcher commands by copying one or
more files to the Dispatcher icon:
1.
Select one or more files.
2.
Copy the selected files to the Dispatcher icon
using any copy procedure, or press <Ctrl> +
<I>, or select [Dispatch] from the File menu.
The Dispatcher Commands dialog box displays.
8-18
3.
Select the command line for the command
you want to execute, or enter or modify a
command on any line.
4.
Click on [Start].
ELIXIR TECHNOLOGIES CORPORATION
ACCESSING DOS FILES AND APPLICATIONS
The Desktop clears, and the command executes multiple times, each time with one file as an argument to
the command.
Executing commands from the Dispatcher icon
To execute a command and specify a parameter to
the command directly from the Dispatcher icon:
1.
Open the Dispatcher icon (double-click on it,
select it and press <Enter>, or just press
<Ctrl> + <I>).
The Dispatcher Commands dialog box displays.
2.
Select the command you want to execute.
3.
Click on [Setup].
The User Application Setup dialog box displays.
4.
Select [Prompt for parameters].
5.
Click on [OK].
The Dispatcher dialog box redisplays.
6.
Click on [Start].
The Arguments to this program dialog box
displays.
7.
Enter any parameter(s) required to execute
the command.
8.
Click on [OK].
The command executes with the parameter you
specified.
Dispatcher example
The following example shows how you can use the
Dispatcher icon to issue a DOS TYPE command to
view the contents of an ASCII file. This example assumes that your AUTOEXEC.BAT file is on your C:
drive.
ELIXIR DESKTOP FOR AFP USER GUIDE
8-19
ACCESSING DOS FILES AND APPLICATIONS
1.
Open the Dispatcher icon.
The Dispatcher Commands dialog box displays.
2.
On a blank line, enter TYPE %1 | MORE and
click on [Setup].
This DOS command lists the contents of an ASCII file one screen at a time and then pauses and
prompts you to enter any key to continue.
3.
In the displayed User Application Setup dialog
box select the following options:
[DOS application]
[Pause after execution]
[Full Screen].
Click on [OK] twice to exit the Setup and Dispatcher Commands dialog boxes.
4.
Open the User Files icon.
5.
On the displayed User Files Directory Paths
and Tool Links dialog box, enter C:\*.* on a
blank line and click on [OK].
A window displays the contents of the C: drive on
your PC.
6.
In the window header, select [By Name] from
the View menu.
The contents of your C: drive displays in alphabetical order.
7.
Select the AUTOEXEC.BAT file and copy it to
the Dispatcher icon.
8.
In the displayed Dispatcher Commands dialog
box, select the TYPE %1 | MORE line and click
on [START].
The screen clears and the contents of your
AUTOEXEC.BAT file displays followed by a
“Press any key to continue” message. Press any
key to redisplay the Desktop.
After specifying the DOS TYPE command in the
Dispatcher Commands menu, you can use the
8-20
ELIXIR TECHNOLOGIES CORPORATION
ACCESSING DOS FILES AND APPLICATIONS
procedure above to list the contents of any ASCII
file from the Desktop.
Using the Dispatcher to run Elixir utilities
You can run DOS-based Elixir utilities from the Desktop in several ways (for example, by using the DOS
menu). However, the Dispatcher allows you to conveniently run the utilities by copying files to the Dispatcher icon and specifying the commands required to
run the utilities in the Dispatcher Commands dialog
box. The following figure shows an example of a dialog box with commands for some Elixir utilities.
Figure 8-10. Dispatcher Commands dialog
box example
You must install Elixir utilities in the drive:\ELIXIR directory. Unless you have included drive:\ELIXIR in a
DOS PATH= statement, either precede each command shown in the example with drive:\ELIXIR or
specify drive:\ELIXIR for [Full path to executable for
optional lookup] in the User Application Setup dialog
box.
Some Elixir utilities require that you specify the stem
name (file name without the extension) of the file as a
parameter. To use the Dispatcher for such utilities,
select the [Usage Switches] option from the System
menu and from the displayed dialog box and select
the [Send Only Filename on Dispatches] option.
ELIXIR DESKTOP FOR AFP USER GUIDE
8-21
ACCESSING DOS FILES AND APPLICATIONS
DOS menu
The DOS menu allows you to enter any DOS command from the Desktop.
Pull down the DOS menu and select [DOS Command], the only option.
Alternatively, enter <Ctrl> + <D> at the keyboard.
The DOS Commands dialog box shown in the following figure displays.
Enter any DOS command and click on [OK] to execute the command.
The DOS command you enter executes from the directory corresponding to the top window on the Desktop. If no windows are open, the command executes
from the root directory (for example, C:\).
Figure 8-11. DOS Commands dialog box
8-22
ELIXIR TECHNOLOGIES CORPORATION
9.
File transfer
This chapter describes procedures for transferring
files between your PC and a MVS host computer and
between your PC and an AS/400 computer using a
PC-to-host file transfer package. It also includes information on using the Loader menu options to configure
host connections, specify font libraries, and download
and upload files between an AFP host and a PC.
PC-to-MVS host file transfer
You can use any host-to-PC file transfer package that
allows binary file transmission to transfer AFP font,
page segment image, one-page overlay, and multipage AFPDS files between an MVS host and your PC.
Elixir has tested and verified the performance of the
following file transfer packages:
IBM 3270 (recommended)
IRMA FT/3270 (recommended)
IRMA FT/TSO
Binary file transfer ensures that ASCII to EBCDIC
translation does not occur. This requirement is necessary because all files (except OGL files) generated on
your PC by the Elixir Desktop are in EBCDIC format.
The above packages also allow you to transfer source
OGL files produced by Elixir Desktop to an MVS host.
Since source files created by Elixir Desktop are in ASCII format, source file uploading requires conversion
to EBCDIC.
Procedures for transferring files with the IBM 3270
and IRMA FT/3270 packages are similar and described in a single section.
ELIXIR DESKTOP FOR AFP USER GUIDE
9-1
FILE TRANSFER
Procedures for transferring files with IRMA FT/TSO
are in a separate section.
Installation
To use any of the above file transfer packages, first
install the appropriate PC card, the PC file transfer
software, and the host-resident software.
Contact your technical support staff if you are not sure
whether you installed all components correctly.
Pre-transfer considerations
The following sections describe setup procedures on
the MVS host and on your PC before you start downloading or uploading files.
Downloading files
Note the following before downloading files to your
PC.
Downloading with IBM 3270 or IRMA FT/3270
To download object format AFP files (all except OGL
files) using the 3270 packages, first copy the files to a
dataset with the following DCB attributes:
RECFM
LRECL
BLKSIZE
=
=
=
VBM
8205
8209
Downloading with IRMA FT/TSO
To download object-format AFP files (all except OGL
files) using FT/TSO, first copy the files to a dataset
with a variable-blocked (VB) record format.
9-2
ELIXIR TECHNOLOGIES CORPORATION
FILE TRANSFER
Converting OVE and AFPDS files
If you want to download and convert one-page overlay
(OVE) or multi-page AFPDS files to Elixir format, first
download all fonts and images referenced by the OVE
or AFPDS files and convert them to Elixir font, image,
and screen format files.
Converting Fonts
The Elixir Desktop can convert bounded box and
standard unbounded box AFP fonts. You must download unbounded box AFP fonts to your \ELIXIR\
FONTS\ I38IN directory, and download bounded box
AFP fonts to your \ELIXIR\ FONTS\AFPIN directory.
Each AFP bounded box and unbounded box font consists of the following three files, all of which you must
download:
Coded font file
Code page file
Character set file
The coded font file contains the code page file name
and the character set file name. The first two characters of a coded font file name are as follows:
If the AFP font is a bounded box font, the first two
characters are X0.
If the AFP font is an unbounded box font, the first
two characters range from X1 — XG.
The code page file is a table file that assigns hexadecimal positions to each character in the character
set file. The code page file name starts with T1. You
can use one code page file for multiple character set
files.
The character set file contains the bit-map font characters. The first two characters of a character set file
name are as follows:
For a bounded box font, the first two characters
are C0.
For an unbounded box font, the first two characters range from C1 — CG.
ELIXIR DESKTOP FOR AFP USER GUIDE
9-3
FILE TRANSFER
Input directory information
The following table shows the directories to which you
must download AFP files for conversion to Elixir format by Elixir Desktop.
File type
Extension
Input directory
Font
any
\ELIXIR\FONTS\I38IN
(unbounded box fonts)
Font
any
\ELIXIR\FONTS\AFPIN
(bounded box fonts)
AFPDS
.AFP
\ELIXIR\DOCS\AFPIN
Overlay
.OVE
\ELIXIR\FORMS\OVEIN
Page
segment
.SEG
\ELIXIR\PICS\SEGIN
Uploading files
Note the following before uploading files from your PC
to an MVS host.
Uploading with IBM 3270 or IRMA FT/3270
If your version of IBM 3270 and IRMA FT/3270 does
not create host datasets as part of the file transfer
procedure, allocate a host dataset with the following
DCB parameters:
RECFM
LRECL
BLKSIZE
=
=
=
VBM
8205
8209
Uploading with IRMA FT/TSO
IRMA FT/TSO requires that your object-format AFP
files (all except OGL files) be fixed-length record files.
To generate the correct fixed-length record files, select [IRMA] as the output format in the appropriate
AFP Converter Options dialog box. Once on the host,
9-4
ELIXIR TECHNOLOGIES CORPORATION
FILE TRANSFER
the files break up into VBM format using IEBGENER
(see the “Using IRMA FT/TSO” section in this
chapter).
Fonts
If you have modified the bit-maps of characters in a
font and have not modified code page files or coded
font files, it is only necessary to upload the character
set file to your host computer.
Output directory information
The following table shows the directory to which each
AFP file writes after conversion by the Elixir Desktop.
File type
Extension
Output directory
Font
any
\ELIXIR\FONTS\I38OUT
(unbounded box fonts)
Font
any
\ELIXIR\FONTS\AFPOUT
(bounded box fonts)
AFPDS
.AFP
\ELIXIR\DOCS\AFPOUT
Overlay
.OVE
\ELIXIR\FORMS\OVEOUT
Page
segment
.SEG
\ELIXIR\PICS\SEGOUT
ELIXIR DESKTOP FOR AFP USER GUIDE
9-5
FILE TRANSFER
Using IBM 3270 or IRMA FT/3270
The file transfer procedure is determined by the type
of file you want to upload or download:
Source text files such as .OGL files
Object-format AFP files such as multi-page
AFPDS, one-page overlays (OVE), AFP fonts, or
page segment images
Object-format AFP files are not readable, and are
stored in datasets with the following DCB
specifications:
RECFM
LRECL
BLKSIZE
=
=
=
VBM
8205
8209
Downloading object-format AFP files
To download an object-format AFP file from a host
computer, enter the following command at the DOS
prompt:
RECEIVE [path]pcfilename 'hostfilename' BINARY <Enter>
This downloads the object-format file hostfilename to
the PC file pcfilename. A DOS directory path before
pcfilename is optional. For convenience, you may
want to specify the input directory path for the type of
file you are downloading.
Uploading object-format AFP files
To upload an AFP object-format file to your host using
one of the 3270 file transfer packages, follow these
steps:
1.
Allocate a dataset on the host with the
following DCB specifications:
DCB=(LRECL=8205,BLKSIZE=8209,
RECFM=VBM)
9-6
ELIXIR TECHNOLOGIES CORPORATION
FILE TRANSFER
2.
Enter the following command at the DOS
prompt:
SEND [path]pcfilename
CRLF BINARY <Enter>
'hostfilename'
This uploads the object-format file pcfilename to
the host dataset hostfilename. A DOS directory
path before pcfilename is optional.
Downloading text files
To download a text file (such as a source OGL file)
from your host, enter the following command at the
DOS prompt:
RECEIVE [path]pcfilename
ASCII CRLF <Enter>
'hostfilename'
This downloads the text file hostfilename to the PC file
pcfilename. A DOS directory path before pcfilename is
optional.
The ASCII parameter specifies that the file be converted from EBCDIC to ASCII.
The CRLF parameter specifies that records in the PC
file are to be separated by carriage return/line feed
combinations.
Uploading text files
To upload a text file (such as a source OGL file), follow these steps:
1.
Allocate a dataset on your host with the
following DCB parameters:
DCB=(LRECL=255,
BLKSIZE=3000,RECFM=VB)
2.
Enter the following command at the DOS
prompt:
SEND [path] pcfilename 'hostfilename' ASCII
CRLF <Enter>
ELIXIR DESKTOP FOR AFP USER GUIDE
9-7
FILE TRANSFER
This uploads the text file pcfilename to the host dataset hostfilename. A DOS directory path before pcfilename is optional.
The ASCII parameter specifies that the file be converted from ASCII to EBCDIC.
The CRLF parameter specifies that records in the PC
file are delimited by carriage return/line feed
combinations.
Using IRMA FT/TSO
This section describes how to use IRMA FT/TSO to
move text files (such as OGL source) and AFP objectformat files between a PC and a host computer.
Downloading object-format AFP files
As FT/TSO cannot download VBM format files, downloading AFP object format files requires you first convert the files to variable blocked (VB) format before
downloading.
Converting the file to VB format
Use IEBGENER to convert AFP object format files
from VBM to VB format.
Parameters for downloading object-format AFP
files
To download an object-format AFP file (in VB format),
select the FT/TSO parameters using the following
values:
9-8
ELIXIR TECHNOLOGIES CORPORATION
FILE TRANSFER
Block size:
Record size:
Record format:
Line numbers:
Code table:
Transfer mode:
Expand tabs:
Truncate spaces:
U/L case:
Space units:
Primary QTY:
Secondary QTY:
8209
8205
VB
Position: 0 Length: 0
STD
BINARY
NO
NO
ASIS
TRKS
1
2
Parameters for downloading/uploading text files
For downloading and uploading text files (such as
OGL), use the following sample FT/TSO parameters
values. Note that since host text files may be stored in
datasets with different DCB parameters, you may be
required to change the parameters to match the exact
text file DCB parameters.
Block size:
Record size:
Record format:
Line numbers:
Code table:
Transfer mode:
Expand tabs:
Truncate spaces:
U/L case:
Space units:
Primary QTY:
Secondary QTY:
3000
255
VB
Position: 0 Length: 0
STD
EXT
NO
NO
ASIS
TRKS
1
2
Downloading files
To download files with FT/TSO, follow these steps:
1.
Change the current directory to the directory
which contains the FT/TSO file transfer
software.
2.
At the DOS prompt, type
FT/TSO <Enter>
ELIXIR DESKTOP FOR AFP USER GUIDE
9-9
FILE TRANSFER
3.
At the PC file name prompt, enter the name of
a PC file to which you want to download the
host file and press <Tab>.
Optionally, precede the name of the file with the
DOS directory path for the appropriate Elixir input
directory for the type of AFP file you are
downloading.
4.
At the dataset name prompt, enter the name of
the host dataset you want to download and
press <Tab>.
5.
Enter the appropriate transfer type.
The transfer type you specify depends on whether
you are transferring AFP object-format files, like
page segment images or .OVE format forms, or
text files like OGL forms.
Note: A transfer type is a collection of file transfer
parameters that you can store and name. For details, see your FT/TSO documentation.
6.
Press <F3> to download a file from the host to
the PC.
Uploading files with FT/TSO
FT/TSO cannot transfer variable-length record files in
binary mode. To upload a variable-length file, follow
these steps:
1.
Create the file as a fixed-blocked (FB) format
file by selecting [IRMA] as the output format
in the AFP Converter Options dialog box.
2.
Upload the file.
3.
Convert the uploaded file to VBM format
using IEBGENER.
The Desktop Converter uses a default block size of
8209 for files formatted for a host dataset. Some files
such as IBM Core fonts may require a larger block
size. If a block length error message displays during
conversion, you may need to increase the default
block size for Elixir.
9-10
ELIXIR TECHNOLOGIES CORPORATION
FILE TRANSFER
To change the block size, use an ASCII editor to modify the \ELIXIR\DESKTOP\SYSTEM\AFP.INI file Irma_block_length parameter value for all conversions
(OVE, font, and Pseg.) IBM recommends a block size
of 12288 for font resources under new PSF versions.
The AFP.INI file is similar to the following:
%%Elixir_AFP_Configuration:23.00 Feb 1994
%%Target_Environment=MVS
Irma_block_length = 8209
Parameters for uploading object-format AFP files
To upload an object-format AFP file (in FB format),
select the FT/TSO parameters according to the following table:
Block size:
Irma_block_length value (AFP.INI)
Record size:
same as above block size
Record format:
FB
Line numbers:
Position: 0 Length: 0
Code table:
STD
Transfer mode:
BINARY
Expand tabs:
NO
Truncate spaces:
NO
U/L case:
ASIS
Space units:
TRKS
Primary QTY:
1
Secondary QTY:
2
Uploading the file with FT/TSO
To send files with FT/TSO, follow these steps:
1.
Change the current directory to the directory
which contains the FT/TSO file transfer
software.
2.
At the DOS prompt, type
FT/TSO <Enter>
3.
At the PC file name prompt, enter the name of
the PC file you want to upload and press
<Tab>.
ELIXIR DESKTOP FOR AFP USER GUIDE
9-11
FILE TRANSFER
Optionally, precede the name of the file with the
DOS directory path containing the AFP file you
want to upload.
4.
At the dataset name prompt, enter the name of
the host dataset to which you want to upload
the PC file and press <Tab>.
5.
Enter the appropriate transfer type.
The transfer type you specify depends on whether
you are transferring AFP object files, like page
segment images or .OVE format forms, or text
files like OGL format forms.
Note: A transfer type is a collection of file transfer
parameters that you can store and name. For details, see your FT/TSO documentation.
6.
Press <F1> to upload the file from the PC to
the host.
Converting the host file to VBM format
After uploading an FB file, use IEBGENER to convert
the file to VBM format.
In the IEBGENER JCL job, specify the SYSUT1 and
SYSUT2 (input and output) DCB parameters as follows if you created the file by selecting the [IRMA]
Output Format option:
DCB=(LRECL=8205,BLKSIZE=8209,RECFM=VBM)
When you configure the DCB parameters as above,
the MVS system catalog views the AFP dataset as a
VBM file (instead of a FB file, the RECFM initially assigned to the file).
The target host library (SYS1.FONTLIB or userdefined) to which the resources copy after the
IEBGENER copy must have a block size that matches
that of the Irma_block_length value in the AFP.INI file,
and a record length equal to the block size minus 4.
Most font libraries installed for PSF version 2 have a
block size of 12288 and a record size of 12284.
9-12
ELIXIR TECHNOLOGIES CORPORATION
FILE TRANSFER
The following section provides a sample JCL to perform this procedure.
Converting FB to VBM format
Use the following JCL to convert a fixed-block file to
VBM format. This is a required conversion if you want
to upload a file using IRMA FT/TSO.
The JCL specifies a VBM record format on both the
SYSUT1 and SYSUT2 steps of the IEBGENER.
//LOADSEG JOB(8200,Z200-Z20001),'KASHANI7-1994',CLASS=A,
//
MSGCLASS=J,NOTIFY=00D42D,USER=00D42D,PRTY=4
//*
//* JCL TO CONVERT VBM FILE TO VB FORMAT
//*
//STEP1
EXEC PGM=IEBGENER
//SYSPRINT DD SYSOUT=*
//SYSUT1
DD DSN=DISK,DISP=OLD,
//
DCB=(RECFM=VBM,LRECL=8205,BLKSIZE=8209)
//SYSUT2
DD DSN=SYS1.PSEGLIB (S1TEST),DISP=SHR,
//
DCB=(RECFM=VBM,LRECL=8205,BLKSIZE=8209)
//SYSIN
DD DUMMY
ELIXIR DESKTOP FOR AFP USER GUIDE
9-13
FILE TRANSFER
PC-to-IBM AS/400 file transfer
This section describes how to upload your files to an
AS/400 computer. The requirements for file transfer
are:
You must install PC Support on your PC.
You must attach your PC to an AS/400.
You must activate the Shared Folders function of
your PC Support session.
The steps involved are as follows:
1.
Convert form, image, font, or document files
to AFP format (described in the "File
Conversions" chapter) and specify [AS400] as
the output format in the appropriate dialog
boxes.
2.
Create an AS/400 library and file to use as a
temporary storage area for the uploaded
resources.
3.
Copy the AFP resource(s) to a Shared Folder
directory.
4.
Move the resource(s) from the Shared Folder
to the temporary file using the CPYFRMPCD
command (Copy From PC Document).
5.
Install the resource(s) into the appropriate
AFP library using one of the OS/400 AFP
resource creation commands (CRTFNTRSC,
CRTPAGSEG, or CRTOVL) . You must identify
the libraries your installation uses for storing
print-ready AFP resources.
The following sections describe these steps in more
detail.
9-14
ELIXIR TECHNOLOGIES CORPORATION
FILE TRANSFER
Creating a temporary holding library and file on the AS/400
To create a library and file on the AS/400, enter the
following commands on the command line in your
AS/400 session (in the following examples, the library
and file that generate are ELXLIB and TEMP,
respectively).
CRTLIB LIB(ELXLIB) <Enter>
This command creates the ELXLIB library.
CRTPF FILE(ELXLIB/TEMP)
RCDLEN(1024) LVLCHK (*NO) <Enter>
This command creates a physical file with the following attributes:
Record length=1024
Record Format Level Check = NO
Copying to the Shared Folder
The Elixir Desktop sees the Shared Folder as a standard PC hard drive and typically assigns the drive letter I:. You may want to create a directory on the
Shared Folder drive for holding the resources you
copy (in the following example, we use the \ELXFOLD
directory).
To create the directory, pull down the System menu
and select [Make Directory] (or press <CTRL> +
<M>). In the dialog that displays, type:
I:\ELXFOLD
Click on [OK] to create the new directory.
To copy resources to the new Shared Folder directory,
open the output folder for the resource you want to upload (for example, for overlays, open the AFP OVE
folder).
Select the resources and copy them to the User Files
icon. In the dialog box that displays, enter
I:\ELXFOLD on a blank line and click on [OK]. The
resource(s) copy to the Shared Folder.
ELIXIR DESKTOP FOR AFP USER GUIDE
9-15
FILE TRANSFER
Installing the resources in the AFP libraries
You must now move the resource file(s) from the
Shared Folder into the temporary file and then reformat them to AS/400 database format. First move the
resource from the Shared Folder to the temporary file
by issuing the Copy From PC Document command at
the AS/400 console session. The syntax for the command is as follows:
CPYFRMPCD FROMFLR(ELXFOLD)
TOFILE(ELXLIB/TEMP)
FROMDOC(resource.nam)
TRNTBL(*NONE)
where resource.nam is the name of the resource file
you are uploading.
Next, reformat the resource into an AS/400 database
object by issuing one of the following commands.
Note that the resource name is used without the 3
character extension:
Overlays - CRTOVL (Create Overlay)
CRTOVL OVL(OVE300/resource)
FILE(ELXLIB/TEMP)
where OVE300 is the installation name for the AFP
Overlay library.
Fonts - CRTFNTRSC (Create Font Resource)
CRTFNTRSC FNTRSC(FONT300/resource)
FILE(ELXLIB/TEMP)
where FONT300 is the installation name for the AFP
Font library.
Page Segments - CRTPAGSEG (Create Page
Segment)
CRTPAGSEG PAGSEG(SEG300/resource)
FILE(ELXLIB/TEMP)
where SEG300 is the installation name for the AFP
Page Segment library.
9-16
ELIXIR TECHNOLOGIES CORPORATION
FILE TRANSFER
The resource(s) are now ready for use with your AFP
printer.
Printing fully composed AFPDS documents
You can also upload and print fully composed AFPDS
documents. To upload AFPDS files, follow the steps
above for moving the file from the PC to the Shared
Folder. Issue the CPYFRMPCD command as above
(you may want to move the document into a file other
than TEMP if you want to save the document).
To print, issue the following command:
PRTAFPDTA FILE(DOC300/TEST)
[FIDELITY(*CONTENT)]
where DOC300 is the installation AFP Document
Library and TEST is the file to print.
FIDELITY(*CONTENT) is optional.
Extracting object files from the AS/400 to a PC
Extracting files from the AS/400 involves creating a
special type of AS/400 file called a save file, then saving the AS/400 AFP resource object (a font, overlay
etc.) to the save file . To convert the file into AS/400
database file format, you must:
send the file to your own userid
receive the file into an AS/400 database file that
you created
Note: Both files (AFP resource object file and save
file) must have the same record length.
Use the following commands and procedures on the
AS/400 to extract AS/400 objects to a standard
AS/400 database file:
ELIXIR DESKTOP FOR AFP USER GUIDE
9-17
FILE TRANSFER
1.
CRTSAVF Objname <Enter>.
Make a note of where (which library) you created
this file (displays in the return message).
2.
SAVOBJ objname LIB(libname)
DEV(*SAVF) OBJTYPE(*objtype)
SAVF(libname/objname) <Enter>.
3.
SNDNETF objname
TOUSRID((YourUserID SameSystem))
<Enter>.
4.
WRKNETF YourUserID <Enter>.
5.
Press PF11 (Display Type/Records).
Make a note of the record length (recl) of the file
you just sent yourself.
6.
CRTPF afpfile RCDLEN(recl)
FILETYPE(*DATA) LVLCHK(*NO)
<Enter>.
(This step might be redundant if completed
earlier.)
7.
Select option 1 (receive network file) from the
WRKNETF screen.
8.
Receive the file into the AFPFile you created
earlier.
Once the objects migrate to a database file, you can
download them to the PC using:
AS/400 PC Support (specify transfer type 6 - no
ASCII to EBCDIC conversion)
CPYTOPCD (Copy to PC Document) command
on the AS/400 to copy the member to the shared
folder using a translation table of (*NONE).
9-18
ELIXIR TECHNOLOGIES CORPORATION
FILE TRANSFER
Using the Loader
You access the Loader menu from AFP Input and
Output folders. It contains the [Download] or [Upload]
(depending upon whether you access the option from
an Input or Output folder, respectively) and [Configure]
options.
Select the [Download] or [Upload] options to display
the Loader Load dialog box. The following figure displays the dialog box for the [Download] fonts option.
Figure 9-1. Loader Load dialog box
The Loader Load dialog box contains the following
options:
for Library
The name of the system library (display only).
Download (or Upload)
Allows you to download or upload the files you select
in the Input or Output folder when you select [Selected
Files]; or to download or upload all files in the folder
from which you accessed the Loader menu when you
select [All].
File Name(s)
Allows you to enter the file name of the specific file
you want to download or upload (for example,
NEWNAME in the previous figure).
For File Type
Select [Charset], [CodePage], [CodedFont] or [All] to
identify the font file components you want to download
ELIXIR DESKTOP FOR AFP USER GUIDE
9-19
FILE TRANSFER
or upload. See the "AFP font conversion considerations" appendix for information on each of the
components.
Process
For future implementation.
Process related resources
For future implementation.
Pause After
Select to pause after you download or upload files, or
leave unselected to return to the Desktop after the
operation.
Enter New Host Name\Library
Select to display the Host Name dialog box displayed
in the following figure when you click on [OK], or leave
deselected to accept the default host name and host
library.
Figure 9-2. Host Name dialog box
The Host Name dialog box contains the following
options:
DOS Name
The file name as entered in the Loader Load dialog
box File Name(s) option displays.
New Host Name
The new (alternate) host name.
New Host Library
The new (alternate) host library name.
Select [Configure] from any AFP Folder window
header to display the Loader Remote Library Connection dialog box shown in the following figure.
9-20
ELIXIR TECHNOLOGIES CORPORATION
FILE TRANSFER
Figure 9-3. Loader Remote Library Connection
dialog box
The Loader Remote Library Connection dialog box
contains the following options:
Remote Library Connection Options
Select [User] to access any loading system, including
AS/400 and NFS libraries; [VM] to connect to a Virtual
Storage library, or [MVS Lib] to connect to a Multiple
Virtual Storage library.
MVS Sub-Options
When you select [MVS Lib] as the Remote Library
Connection option, you can select [PComm], [NFS],
[REXXec] or [APPC] as the MVS sub-option.
Input Library
Enter the input library name when downloading files
from a remote library. The default input library name
for the form, font, or image format you are downloading displays.
Output Library
Enter the output library name when uploading files to
a remote library. The default output library name for
the form, font, or image format you are uploading displays.
ELIXIR DESKTOP FOR AFP USER GUIDE
9-21
FILE TRANSFER
Receiver & Sender
Enter the receive or send command for downloading
files from or uploading files to a remote library. The
defaults for the form, font, or image format you are receiving or sending display for the [VM] and [MVS Lib]
connection options.
The syntax for [User] library connections is::
RECEIVE
(options)
pcfile
hostname
filetype
filemode
SEND pcfile hostname filetype filemode (options)
where pcfile is the PC file name; hostname is the
name of the resource; filetype is one of the following: OGL source (OVERLAY), OVE (OVLY38PP),
Fonts (FONT3820) or Psegs (PSEG38PP);
filemode is the VM/CMS file mode (the default is
A1); and options are the file transfer options: for
text (OGL) (ASCII CRLF RECFM F LRECL 80),
for object (CRLF RECFM
V LRECL 8205).
For example, a text command could read:
SEND TEST.OGL TEST OVERLAY A1
(ASCII CRLF RECFM F LRECL 80
RECEIVE TEST.OGL TEST OVERLAY
A1 (ASCII CRLF
You can embed %1 to substitute a DOS filename, and
%2 to substitute a file stem name
Lister
This option is not supported for the [PComm] option.
9-22
ELIXIR TECHNOLOGIES CORPORATION
10.
Transformations
This chapter describes transformation operations you
can perform using the Transformer, which applies
Elixir utilities to modify Elixir-format form and image
files.
These modifications change the file header information to make the files compatible with operations such
as uploading files to a host or sending files through a
network.
To transform an Elixir-format file, you copy it to the
Transformer icon and select the appropriate option as
described in the following sections.
Transformer setup
To set up the Transformer properties, follow these
steps:
1.
Right-click on the Transformer icon.
The Transformer Properties dialog box displays.
Figure 10-1. Transformer Properties dialog box
2.
Click on the [Transformer Properties] button.
ELIXIR DESKTOP FOR AFP USER GUIDE
10-1
TRANSFORMATIONS
The Transformer Properties Dialog dialog box
displays and contains the following options:
Figure 10-2. Transformer Properties Dialog dialog
box
Working Directory
The directory in which temporary read/writes take
place during file transformations. The default is
the root (\) directory. You can specify a RAM disk
for faster transformations.
Confirm file overwrites during transformation
Allows you to specify whether you overwrite existing output files with files you create using the
same names. Select this option to display a dialog box requesting confirmation before overwriting
an existing file. Not selecting this option automatically overwrites existing files.
Show properties before transformation
Allows you to specify default setup options for dialog boxes for each file transformation type.
Pause after transformation
Select this option to pause
transformation.
after
each
Stop process after
Select [Error] to stop a conversion when an error
is reported, or select [All files processed] to stop a
conversion after processing all files.
3.
10-2
Click on the [Message Reporting] button.
ELIXIR TECHNOLOGIES CORPORATION
TRANSFORMATIONS
The Message Options Dialog dialog box displays
and contains the following options:
Figure 10-3. Message Options Dialog dialog box
Message Reporting
Select [Show messages after process] to display
transformation messages in the Message window
after processing, or [Write Messages to LOGfile]
to specify the .LOG file to which transformation
messages are written.
New Messages
Select [Overwrite LOGfile] to overwrite an existing
.LOG file, or [Append to LOGfile] to append new
messages to an existing .LOG file.
Transforming Elixir forms
This section describes Elixir form transformations. To
transform an Elixir form:
1.
Copy the .ELX file to the Transformer icon.
ELIXIR DESKTOP FOR AFP
10-3
TRANSFORMATIONS
The Form Transformer Options dialog box
displays.
Figure 10-4. Form Transformer Options dialog box
2.
Select your option(s), then click on [OK].
Form Transformer options
The Form Transformer Options dialog box contains
the following options:
Remap
Displays the Page Remap dialog box which contains
the following options:
Figure 10-5. Page Remap dialog box
Input
Displays the directory and file name of the form(s) you
are remapping.
Output
Displays the destination directory and file name of the
form(s) you are remapping.
10-4
ELIXIR TECHNOLOGIES CORPORATION
TRANSFORMATIONS
Original KMP File
The original keyboard mapping assigned to the file
you are remapping.
Target KMP
You can select a keyboard mapping file from the list of
files in the drive:\ELIXIR\FONTS\MAPS directory.
See the "AFP font conversion considerations" appendix for more detailed information about .KMP files.
Rotate
Displays the Page Rotate dialog box which contains
the following options:
Figure 10-6. Page Rotate dialog box
Input
Displays the directory and file name of the form(s) you
are rotating.
Output
Displays the destination directory and file name of the
form(s) you are rotating.
Rotate
Allows you to rotate the output forms with respect to
the print direction of the input forms by the number of
degrees you specify ([0], [90], [180], or [270]).
ELIXIR DESKTOP FOR AFP
10-5
TRANSFORMATIONS
Shift
Displays the Page Shift dialog box which contains the
following options:
Figure 10-7. Page Shift dialog box
Input
Displays the directory and file name of the form(s) you
are shifting.
Output
Displays the destination directory and file name of the
form(s) you are shifting.
Shift
The number of dots you want the printed page shifted
to the right ([Xshift]) or down ([Yshift]).
FontChange
Displays the Page Font Change dialog box which contains the following options:
Figure 10-8. Page Font Change dialog box
Input
Displays the directory and file name of the form(s)
to which you are changing the font.
10-6
ELIXIR TECHNOLOGIES CORPORATION
TRANSFORMATIONS
Output
Displays the destination directory and file name of
the form(s) to which you are changing the font.
Font Map File
Click on the [FONTLIST] button to select a .LST
font mapping file from the list of files in the
drive:\ELIXIR directory.
Transforming Elixir images
This section describes Elixir graphics file transformations. To transform an Elixir image:
1.
Copy the .LP3 file to the Transformer icon.
The Graphic Transformer Options dialog box
displays.
Figure 10-9. Graphic Transformer Options
dialog box
2.
Select [Image], then click on [OK].
ELIXIR DESKTOP FOR AFP
10-7
TRANSFORMATIONS
The Image Process Transformation dialog box
displays and contains the following options:
Figure 10-10. Image Process Transformation
dialog box
Source File
Displays the directory and file name of the image(s)
you are transforming.
Destination File
Displays the destination directory of the image(s) you
are transforming. You must enter a file name. Note
that using the same file name as the original may
automatically overwrite the original file with the transformed file (according to how you set the confirmation
option in the Transformer Properties Dialog dialog
box.)
Mirror
This option allows you to flip an image in horizontal or
vertical directions. To mirror an image:
10-8
1.
Select [Mirror], enter a file name in the
[Destination File] option, then click on [OK].
2.
In the Mirror dialog box, select [Horizontal] or
[Vertical] and click on [OK].
ELIXIR TECHNOLOGIES CORPORATION
TRANSFORMATIONS
Resize
This option allows you to resize an image up or down
in independent horizontal and vertical percentages.
To resize an image:
1.
Select [Resize], enter a file name in the
[Destination File] option, and click on [OK].
2.
In the Resize dialog box, enter
the
[Horizontal] or [Vertical] percentages and
click on [OK].
Note that if you are upsizing an image, you must
have enough space to the right and below the image so that the image stays in the image area.
Reverse
This option changes all black dots in an image area to
white and all white dots in the image area to black.
This option does not require you to set options in any
other dialog box. Select [Reverse], enter a file name
in the [Destination File] option, and click on [OK].
Shift
This option allows you to move an image area, or the
whole image with respect to its borders with precision.
To shift an image:
1.
Select [Shift], enter a file name in the
[Destination File] option, and click on [OK].
2.
In the Shift dialog box, select a direction to
shift ([Up], [Down], [Left], or [Right]).
3.
Set the number of Pels (pixels) you want the
image to shift.
4.
Specify whether you want circular shift and
click on [OK].
The [Shift Circular] option replaces the area that
is moved with a new version of the image.
ELIXIR DESKTOP FOR AFP
10-9
TRANSFORMATIONS
Rotate
This option allows you to rotate an image on the page
by degrees. To rotate an image:
1.
Select [Rotate], enter a file name in the
[Destination File] option, and click on [OK].
2.
In the Rotate dialog box, enter the degree of
rotation and click on [OK].
.
10-10
ELIXIR TECHNOLOGIES CORPORATION
A.
Keyboard shortcuts
This appendix lists all keyboard shortcuts for Desktop
operations and for child window menus.
Desktop
Close dialog box/menu
<Esc>
Organization of the following Desktop keyboard shortcuts is by pull-down menu.
File menu
<Alt> + <F>
Close (top window)
<F3>
Convert
<Ctrl> + <V>
Copy to
<Ctrl> + <C>
Copy quit
<Esc>
Delete
<Del>
Dispatch
<Ctrl> + <I>
Exit
<Alt> + <F4>
Formats
<Ctrl> + <F>
Help
<F1>
Open
<Enter>
Print
<Ctrl> + <P>
Properties
<F2>
ELIXIR DESKTOP FOR AFP USER GUIDE
A-1
KEYBOARD SHORTCUTS
System menu
<Alt> + <S>
System Configuration
<Alt> + <F6>
Diagnostics
<Alt> + <F5>
Make Directory
<Ctrl> + <M>
Special menu
<Alt> + <P>
Close All
<F4>
Efont Factory
<Alt> + <E>
Scheduler Action
<Alt> + <F3>
Scheduler Setup
<Alt> + <F2>
DOS menu
<Alt> + <D>
DOS command
<Ctrl> + <D>
Window menu
<Alt> + <W>
Help menu
<Alt> + <H>
Contents
<F1>
Back up one directory level
<Ctrl> + <B>
Display start of file list
<Home>
Display end of file list
<End>
Windows
A-2
ELIXIR TECHNOLOGIES CORPORATION
KEYBOARD SHORTCUTS
Display next page
<Page Down>
Display previous page
<Page Up>
Filter menu
<Alt> + <I>
Jump to files beginning with
letter...
press <letter>
Reselect
<Ctrl> + <R>
Select adjascent file
Left/Right/Up/Down
arrow keys
Select/Unselect All
<Ctrl> + <A>
Write Selections
<Ctrl> + <W>
By option name
Back up one directory level
<Ctrl> + <B>
Close top window
<F3>
Close All
<F4>
Close dialog box/menu
<Esc>
Convert
<Ctrl> + <V>
Copy to
<Ctrl> + <C>
Delete
<Del>
Diagnostics
<Alt> + <F5>
Dispatch
<Ctrl> + <I>
Display start of file list
<Home>
Display end of file list
<End>
Display next page
<Page Down>
ELIXIR DESKTOP FOR AFP USER GUIDE
A-3
KEYBOARD SHORTCUTS
A-4
Display previous page
<Page Up>
DOS
<Ctrl> + <D>
Exit Elixir
<Alt> + <F4>
Filter menu
<Alt> + <I>
Formats
<Ctrl> + <F>
Help
<F1>
Jump to files beginning with
letter...
press <letter>
Make PubFile
<Ctrl> + <U>
Open
<Enter>
Print
<Ctrl> + <P>
Properties
<F2>
Reselect
<Ctrl> + <R>
Select adjacent file
Left/Right/Up/Down
arrow keys
Select All
<Alt> + <A>
Scheduler Action
<Alt> + <F3>
Scheduler Setup
<Alt> + <F2>
System Config
<Ctrl> + <F6>
Unselect All
<Ctrl> + <A>
Write Selections
<Ctrl> + <W>
ELIXIR TECHNOLOGIES CORPORATION
B.
Additional files and
directories
This appendix describes additional files and directories the Elixir Desktop for AFP uses.
Elixir mapping table directories
This section describes directories that contain mapping or correspondence tables. You can access these
directories using the User Files icon described in the
“Accessing DOS files and applications” chapter.
PostScript mapping table directory
The
PostScript
mapping
table
directory
(drive:\ELIXIR\PSSTASH) contains the following mapping tables:
PSFONT.MAP
An ASCII file in which each line consists of the sixcharacter Xerox production printer font file name, an
equal sign (=), and the PostScript equivalent ElixiScript uses.
PSTOP.PSC
This ASCII file contains macros and job setup commands and is added as a header to each PostScript
job. This file also allows access to international
characters.
PSEND.PSC
The PostScript page terminator code (such as footers,
line draw, page markers, and page eject) in ASCII
format.
ELIXIR DESKTOP FOR AFP USER GUIDE
B-1
ADDITIONAL FILES AND DIRECTORIES
PSTRAIL.PSC
This file is appended to the end of multi-page PostScript jobs (status sheet).
See the “File conversions” chapter for more information about PostScript processing.
Contour fonts mapping table directory
The contour fonts mapping table directory, drive:\
ELIXIR\FONTS\TABLES, contains the .TFB file created when you do not select [Keep Left Kern] in the
Outline-to-raster font generator dialog box (see the
“Accessing DOS files and applications” chapter for
more information).
Bitstream Facelift fonts mapping directory
The Bitstream Facelift fonts mapping directory, drive:\
ELIXIR\FONTS\MAPS, contains the BTFONTS.NAM
and BTFONTS.MAP files.
BTFONTS.NAM
Contains an ASCII list with the following information
for each font: the .TDF font file name, the twocharacter font family designator, and the typestyle.
BTFONTS.MAP
Contains a table that maps the name of a new Bitstream Facelift font to the name of a PostScript font
on a printer.
B-2
ELIXIR TECHNOLOGIES CORPORATION
C.
Desktop menu bar
This appendix describes or refers you to the options
and corresponding keyboard shortcuts (fast keys)
available from the Desktop pull-down menus.
Figure C-1. Desktop menu bar
File menu
The File menu options perform operations on files,
applications, or attached devices (printers, scanners
and diskette). The following figure shows the File
menu.
Figure C-2. File Menu
The File menu contains the following options:
ELIXIR DESKTOP FOR AFP USER GUIDE
C-1
DESKTOP MENU BAR
Open (<F2>)
Opens a selected icon as does double-clicking on an
icon. Opening an icon has different meanings, depending on whether the icon is a folder, Elixir file,
Elixir application, User Tool, peripheral device or icon,
as follows:
When you open a folder, a window displays showing
the contents of the folder. A folder may contain files
and additional folders. Each folder corresponds to a
DOS directory.
When you open an Elixir-format file, the Elixir
Desktop runs the Elixir application associated
with the file. For example, if you open an Elixir
form file, Elixir Forms Editor runs and loads the
form file you selected.
When you exit the Elixir application, the Elixir
Desktop redisplays.
Opening an application icon clears the Desktop
and runs the application. When you exit the application, the Elixir Desktop redisplays.
When you open the Diskette, Dispatcher, or
Scanners icon, a Properties dialog box displays,
allowing you to set specifications and properties
for these items.
Copy (<Ctrl> + <C>)
Copies a selected file or files to another folder or icon.
When you select this option, the screen pointer
changes to a small document icon attached to an uparrow. To copy the file, click on the folder icon into
which you want to copy the file, as follows:
If copying to an Elixir folder (the Forms, Fonts,
Images or Documents folder icons on the top left
of the Desktop), click on the appropriate Elixir
folder, on an Elixir, Input or Output folder, and finally on the destination folder.
C-2
ELIXIR TECHNOLOGIES CORPORATION
DESKTOP MENU BAR
If copying to a non-Elixir folder, click on the User
Files icon to display the User Files Directory
Paths dialog box. In the dialog box, specify the
directory into which you want to copy the file and
click on [OK].
For information on copying files to and from diskettes
and tapes, see the "Desktop basics" and “Peripheral
devices” chapters.
New
Creates a new file in a window folder. A dialog box
displays in which you enter the name and extension of
the new file.
If you create an Elixir-format file in an Elixir folder, you
do not need to specify an extension because the Elixir
Desktop creates files with the appropriate extensions.
When you create a new Elixir font, you generate all
three component files.
When you create a new file in the Elixir Documents
folder, you generate a .DAT file with a sample (blank)
form.
Duplicate
Creates a duplicate of a selected file in the same
folder. A dialog box displays and prompts you to enter
a name for the duplicate file.
If you duplicate a file in any Elixir folder and do not
specify an extension for the [into] option, the extension
appropriate for that folder generates.
ELIXIR DESKTOP FOR AFP USER GUIDE
C-3
DESKTOP MENU BAR
Delete (<Del>)
Deletes selected files and empty folders (you cannot
delete a folder that contains files or other folders).
If [Confirm File Deletions] is selected (in the Desktop
Usage Switch Settings dialog box accessed from the
System menu), a confirmation prompt displays, showing the name of the file.
Properties (<F2>)
Allows you to view or set specifications in dialog
boxes for files, the System Diskette, the converter,
dispatcher, and attached scanners and printers.
Selecting properties for the Diskette icon displays
the System Diskette dialog box described in the
“Desktop basics” and “Peripheral devices”
chapters.
Selecting properties for the Converter icon displays the Converter Properties dialog box described in the “File conversions” chapter.
Selecting properties for the Dispatcher icon displays the Dispatch Commands dialog box described in the “Accessing DOS files and
applications” chapter.
Selecting properties for the Scanners icon displays the User Application Setup dialog box, described in the “Peripheral devices” chapter.
Selecting properties for the Printers icon displays
the Print dialog box described in the "Local printers" appendix.
Print (<Ctrl>+<P>)
Sends one or more selected files to the default Windows printer and port. See the “Local printers” appendix for more information.
Print Directory Listing
Prints the directory listing for the open Desktop folder.
C-4
ELIXIR TECHNOLOGIES CORPORATION
DESKTOP MENU BAR
View
This option is similar to copying a file to the Viewer
icon and displays the selected file, if its extension links
with a display application. For example, you can associate the .PCX extension with the PaintBrush
application.
To make a file extension link to an application, use an
ASCII editor to edit the drive:\ELIXIR\ELX.INI file and
add the line extension=application to the file. For the
above example, you would add PCX= PBRUSH.EXE.
Formats
Displays the File Formats dialog box that shows a list
of folders that contain different formats of a selected
file (files with the same stem name but different extensions). This feature is useful for checking or deleting
different formats of a file that may exist on your hard
disk.
Convert (<Ctrl> + <V>)
For one or more files selected in any Elixir folder
(Forms, Fonts or Images), choosing this option displays a Converter dialog box that allows you to specify
the format to which you want to convert the selected
file(s).
Alternatively, copy one or more selected files to the
Converter icon (see the “File conversions” chapter for
more information).
Transform
This option functions the same as using the Transformer icon.
Copying an Elixir format file to the Transformer icon
allows applying utilities to the files which generally
modify the file headers without converting the file to
another format. Refer to the "Transformations" chapter for more information.
ELIXIR DESKTOP FOR AFP USER GUIDE
C-5
DESKTOP MENU BAR
Dispatch (<Ctrl> + <I>)
With one or more files selected, opens the Dispatcher
Commands dialog box. See the “Accessing DOS files
and applications” chapter for more information.
Close (<F3>)
Closes an open window. Alternatively, click on the
close box on the window header.
Exit Elixir (<Alt> + <F4>)
Closes the Elixir Desktop and returns to Windows.
System menu
The System menu allows you to configure the Elixir
Desktop. The “Desktop configuration” chapter describes all options in the System menu.
Figure C-3. System menu
System Config (<Alt> + <F6>)
Allows you to configure basic system parameters such
as warnings, logo displays, conversion parameters
and double-click speed.
C-6
ELIXIR TECHNOLOGIES CORPORATION
DESKTOP MENU BAR
Usage Switches
Allows you to customize the Desktop by enabling and
disabling certain options, including confirmation dialog
boxes, property sheets, saving settings on exit, converter selections and processes stop.
User Privileges
Allows you to set the level of control over certain
Desktop user operations.
For example, you can choose whether or not to allow
a user to access an Elixir application from the Desktop. If you choose not to allow access, the icons representing the Elixir application and its associated
folder do not display.
Diagnostics (<Alt> + <F5>)
Allows you to run a number of diagnostic utilities and
to enter a command to run a diagnostic program of
your choice.
Make Directory (<Ctrl> + <M>)
Allows you to create a DOS directory.
Converter Props
Allows you to specify certain initial setup options for
converting files and lets you modify control parameters for the Converter icon.
Transformer Props
Allows you to specify certain initial setup options for
transforming files and lets you modify control parameters for the Transformer icon.
Reset to Defaults
Resets all configuration parameters to the default
values.
ELIXIR DESKTOP FOR AFP USER GUIDE
C-7
DESKTOP MENU BAR
Refresh
Refreshes the screen display. You can use this option
if closing a window does not completely remove it or
leaves “snow” on the screen.
Toolset
Allows you to switch between Desktop toolsets.
Special menu
The Special menu contains the options shown in the
following figure.
Figure C-4. Special Menu
Close All (<F4>)
Closes all open windows on the Desktop.
Efont Factory
Displays the Contour Fonts folder window (drive:\
ELIXIR\FONTS\CONTOURS directory which, if installed, initially contains 35 Bitstream Facelift contour
font files.
The Elixir Efont Factory utility makes high-quality
screen and printer fonts for PostScript-compatible
printers from these contour fonts, and any other Bitstream Facelift-compatible contour fonts you install in
this directory. See the “File conversions” chapter for
more information about contour-to-raster font conversion.
C-8
ELIXIR TECHNOLOGIES CORPORATION
DESKTOP MENU BAR
Install Fonts
Runs the Bitstream Loadtype program that installs Bitstream Facelift fonts on your PC.
Scheduler Setup (<Alt> + <F2>)
A network-independent enhancement to the Desktop
that automates file conversion and enables standalone “hands off” operation of Elixir tools.
Scheduler Actions (<Alt> + <F3>)
Allows you to define up to eight Scheduler actions
such as testing for a file in a given directory or checking a date and time.
Global View (<Ctrl> + <G>)
Allows you to define how files in Desktop folder windows are to display, such as by Long Name or as
icons.
DOS menu
The DOS menu allows you run to DOS commands
from the Desktop.
DOS Command (<Ctrl> + <D>)
Displays a dialog box allowing you to enter any standard DOS command.
Enter a DOS command and click on [OK] to clear the
Desktop and execute the command from the following
directories:
from the drive:\ELIXIR directory, if there are no
windows open on the Desktop
from the directory corresponding to the window, if
a window is open on the Desktop.
ELIXIR DESKTOP FOR AFP USER GUIDE
C-9
DESKTOP MENU BAR
After execution, the program prompts you to press
any key to redisplay the Desktop.
Window menu
The Window menu contains options for arranging the
display of open windows (and dialog boxes) on the
Elixir Desktop. It also contains an options for opening
a message dialog box that displays current activities.
The bottom portion of the Window menu shows numbered entries allowing you to activate previously
opened windows and dialog boxes.
Figure C-5. Window menu
The Window menu contains the following options:
Cascade
You can arrange open windows so each header
shows and the active window displays in full on top of
the other windows.
Tile
You can resize and arrange windows side-by-side so
each window displays fully. The active window header displays as highlighted.
Arrange Icons
This option arranges icons in an orderly manner within
a window or on the Desktop.
C-10
ELIXIR TECHNOLOGIES CORPORATION
DESKTOP MENU BAR
Message
This option displays a message dialog box containing
information on current Desktop activity.
Help menu
The Help menu contains Windows on-line help for the
Elixir Desktop. See the "Introduction" chapter for
more information.
ELIXIR DESKTOP FOR AFP USER GUIDE
C-11
D.
AFP font conversion
considerations
This appendix describes issues relating to AFP font
conversions and how to use the desktop Converter to
convert between AFP and Elixir-format fonts. The appendix also describes site-specific strategies for font
conversion.
For more detailed information, see the ElixirFont for
AFP User Guide.
Bounded box and unbounded box fonts
AFP fonts for IBM 3800 printers are unbounded box
fonts. A characteristic of unbounded box fonts is that
for printing rotated fonts, you need a separate font for
each of the three available rotations of the font (0°,
90°, and 270° from the inline print direction).
AFP fonts for IBM 3812, 3820, 3825, 3827, and 3835
printers are bounded box fonts. For printing rotated
fonts on these printers, you need only one version of
the font that you rotate "on the fly".
Additional filter options
The Filter menu in the Elixir Fonts, Input AFP Fonts,
3800 AFP Fonts, Output AFP Fonts, and 3800 AFP
Fonts window headers display additional options as
shown in the following figure:
ELIXIR DESKTOP FOR AFP USER GUIDE
D-1
AFP FONT CONVERSION CONSIDERATIONS
Figure D-1. Filter menu selections
Show Character Sets
Show Code Pages
Show Coded Fonts
Selecting each option displays different components
of fonts as follows:
If displaying the Input or Output AFP or AFP 3800
Font folders, selecting the appropriate option displays the Character Set, Code Page, and Coded
Font for each AFP font. The next section describes these components.
If displaying the Elixir Font folder:
[Show Charset] displays the .HDR component of
the Elixir font, that you should use when you want
to convert the font to another format.
[Show CodePage] displays the Elixir Code Page
files (.COD) ASCII files that are the editable
equivalents of AFP Code Pages.
D-2
ELIXIR TECHNOLOGIES CORPORATION
AFP FONT CONVERSION CONSIDERATIONS
Show Coded Fonts] displays the Elixir Code Font
(.CDF) ASCII files, which list the character set,
code page, and keyboard mapping file for the
font.
The following section describes these files.
AFP font components
Each AFP font has three components:
Character Set
Code Page
Coded Font
Character Set
The Character Set contains the actual font bitmaps for
characters. For bounded box fonts, character set file
names are C0*. For unbounded box fonts, Character
Set file names are C1* - C4*, where C1 denotes an
inline print direction of 0°, C2 denotes 90°, and so
forth.
Code Page
The Code Page is a file that maps keyboard entries to
characters in a character set. Each key on a keyboard
corresponds to a hexadecimal code point. When printing, the code point matches to a graphic character ID
(GCID) in the code page (each character has its own
unique ID). Thus different code pages allow printing
subsets of characters in a character set (for example,
for different European languages).
ELIXIR DESKTOP FOR AFP USER GUIDE
D-3
AFP FONT CONVERSION CONSIDERATIONS
Hex Code Point
C1
...
97
...
D8
...
...
Graphic Character ID
LA0200000
LP0100000
LQ0200000
Figure D-2. Code Page
For bounded box and unbounded box fonts, Code
Page file names are T1*.
Coded Font
A Coded Font links Character Sets to Code Pages.
For bounded box fonts, the Coded Font file name is
prefixed with X0*. For unbounded box fonts, the
Coded Font file names are prefixed with X1* - X4*,
where X1 denotes 0° rotation from the inline print direction, X2 denotes 90°, and so forth.
Note: X3 is an invalid designation for an unbounded
box font.
Coded Font
Character Set names
Character Set
Character bitmaps
and IDs
Code Page names
Code Page
Character IDs and
keyboard mapping
Figure D-3. AFP font components
D-4
ELIXIR TECHNOLOGIES CORPORATION
AFP FONT CONVERSION CONSIDERATIONS
Country Keyboard Map and PC mapped font
files
When converting AFP Bounded-box or Unboundedbox fonts to Elixir format, you can convert the full
character set or a PC mapped subset.
A PC mapped subset is an intermediate font file used
for generating screen fonts (for use in ElixirForm) and
HP proof-printer fonts.
The PC mapped subset that gets converted to Elixir
format is determined by a Country Keyboard Map file
(.KMP), which maps AFP graphic character IDs
(GCIDs) for each character to the corresponding ASCII keyboard position.
.KMP files are in the drive:\ELIXIR\FONTS\MAPS directory. Each .KMP file is an ASCII file with the following structure:
%%Elixir_Keyboard_Mapping: 1.0 June 1992
pc_keyboard-"LATIN2 MULTILINGUAL PC"
ss000000=01;
SS010000=02;
SS020000=03;
...
...
SP3000000=FF
Figure D-4. .KMP file structure
The first line is a required comment identifier. The
second line is a label identifying the keyboard mapping. Other lines are graphic character IDs (GCIDs)
and corresponding ASCII keyboard positions in hexadecimal notation.
ELIXIR DESKTOP FOR AFP USER GUIDE
D-5
AFP FONT CONVERSION CONSIDERATIONS
The following .KMP files write to the drive:\ELIXIR\
FONTS\MAPS directory during installation:
D-6
.KMP file
Description
T1000437.KMP
Personal Computer for
US English, UK English,
and European languages
using the IBM character
set
T1000850.KMP
Pc Multiligual 1 for IBM
PC multinational
keyboards
T1000852.KMP
Latin2 Multilingual 2
(Slavic) for Croatian,
Czech, East German,
Hungarian, Polish, Romanian, Slovak, and
Slovenian
T1000855.KMP
Cyrillic
T1000857.KMP
Latin 5 (Turkish)
T1000860.KMP
Portugal
T1000861.KMP
Iceland
T1000862.KMP
Hebrew
T1000863.KMP
Canadian French
T1000864.KMP
Arabic
T1000865.KMP
Nordic
T1000869.KMP
Greek
ELIXIR TECHNOLOGIES CORPORATION
AFP FONT CONVERSION CONSIDERATIONS
To select a .KMP file when converting AFP fonts to
PC mapped Elixir font formats, pull down the System
menu, select [System Config], and in the displayed
dialog box, click on the entry for Country Keyboard
Map. This displays a window corresponding to
drive:\ELIXIR\FONTS\MAPS\*.KMP. The window allows you to select one of the displayed .KMP files.
Note: US1.KMP and INTL.KMP are older .KMP files
you can still use; however, we recommend you use
the new .KMP files.
To generate a new .KMP file, we recommend you duplicate an existing, defined one for your current PC
keyboard.
Usage notes
1.
If a GCID exists in the AFP character set but
not in the .KMP file, the Elixir character does
not generate in the PC mapped font.
2.
If a GCID exists in the .KMP file but not in the
AFP character set or code page, an empty
space is inserted with a width of zero.
Files generated for AFP font to Elixir conversions
The Converter generates the following files when converting AFP fonts to Elixir format:
In the [Text Direction Support] option of the AFP Font
Converter Options dialog box, if you selected [Separate Fonts], one screen font for each rotation you
specified generates; if you selected [Universal X0],
one screen font generates which Elixir can rotate for
all directions.
In the [Create] option, if you selected [PC Mapped
Font]:
A "PC mapped" (a partial subset) Elixir font generates (with the required .HDR, .GLH, and .GLY
components) in drive:\ELIXIR\FONTS\ELIXIR.
The Elixir font file name is the same as the Coded
Font file and starts with X.
ELIXIR DESKTOP FOR AFP USER GUIDE
D-7
AFP FONT CONVERSION CONSIDERATIONS
An Elixir Coded Font file (.CDF) generates in
drive:\ELIXIR\FONTS\ELIXIR. This ASCII file
contains a table of correspondence between
.KMP, character set, and code page for the font.
The program uses this file for ASCII to EBCDIC
translation when converting Elixir forms (.ELX) to
OVE and OGL formats.
or if you selected [Full AFP Font]:
The full AFP character set converts to Elixir format (with the required .HDR, .GLH, and .GLY
components) in drive:\ELIXIR\FONTS\ELIXIR.
The Elixir file name is the same as the Coded
Font and starts with C. You can edit this file with
ElixirFont and reconvert it back to AFP format.
The following files also generate:
An ASCII font metrics (.HDA) file in
drive:\ELIXIR\FONTS\ELIXIR. This file contains
additional AFP font header information required
when reconverting the Elixir font file back to AFP
format.
Elixir rotation files (.GL0 - .GL4) in drive:\ELIXIR\
FONTS\ELIXIR. These ASCII files contain metrics (including A-space, B-space, C-space,
GCIDs, and orientation) information for each
character rotation of the font. When converting
unbounded box fonts, .GL0 generates. When
converting bounded box fonts, .GL1 - .GL4 generate, depending on the orientations selected in the
AFP Font Converter Options dialog box.
The Elixir Code Page file (.COD) in drive:\ELIXIR\FONTS\ELIXIR. This ASCII file contains
GCIDs and corresponding code points for each
character in the character set. You can edit this
file and use it to generate new code pages for
AFP member libraries.
The Elixir Coded Font file (.CDF) in drive:\ELIXIR\FONTS\ELIXIR. This ASCII file contains a table of correspondence between .KMP, character
set and code page for the font.
D-8
ELIXIR TECHNOLOGIES CORPORATION
AFP FONT CONVERSION CONSIDERATIONS
The PC Mapped font file (X...HDR) if you selected
the [Keep PC Mapped Font] option of the AFP
Font Converter Options dialog box. This file contains only those characters from the AFP character set that match those in the selected Country
Keyboard map (.KMP) file.
Default Code Pages
The Default Code Page (or Elixir Code Page) is an
ASCII .COD file in drive:\ELIXIR\FONTS\ELIXIR and
contains GCIDs and corresponding code points for
each character in the character set. An Elixir Code
Page is the Elixir version of an AFP Code Page, and
includes GCIDs and EBCDIC code points that convert
to Elixir format from an AFP font.
You use the Elixir Code Page when converting an
Elixir font to AFP format for the first time (i.e., if you
did not originally convert the Elixir font from an AFP
font). After converting, an AFP Code Page, a required
component of the AFP font, generates.
The Default Code Page you select at installation will
be the default when you run the Elixir Desktop. You
can change the default to another one as described in
the "Desktop configuration" chapter. The program
uses the Default Code Page in conjunction with the
Country Keyboard Map to translate PC ASCII characters to EBCDIC characters when you convert overlays
to or from Elixir-format.
You can also download an existing AFP Code Page
from your host computer to the appropriate directory,
convert it to Elixir format, and use it as a default (see
the "File transfer" chapter for information about downloading AFP resources, and the "File conversions"
chapter for information about converting AFP Code
Pages to Elixir Code Pages).
ELIXIR DESKTOP FOR AFP USER GUIDE
D-9
AFP FONT CONVERSION CONSIDERATIONS
Editing an Elixir Code Page
You can edit an Elixir Code Page using ElixirFont for
AFP. Display the Code Pages in the Elixir Fonts
folder (pull down the Filter menu in the window
header and select [Show Code Pages]) and open it to
load the Code Page in ElixirFont. See the ElixirFont
for AFP User Guide for more information.
You can also use any ASCII editor (like DOS EDIT) to
edit the Elixir Code Page file as follows:
D-10
1.
Open the Dispatcher icon and specify
EDIT %1 as a command on a Dispatcher line.
2.
In the Dispatcher Commands dialog box, click
on [Setup] and specify the working directory
for the DOS EDIT command (normally
drive:\DOS).
3.
Select [DOS application] for the Command
Options parameter and click on [OK].
4.
Click [OK] in the Dispatcher Commands
dialog box to close it.
5.
Display the Code Pages in the Elixir Fonts
folder (pull down the Filter menu and select
[Show Code Page]).
6.
Drag and drop .COD file you want to the
Dispatcher icon, select the line with the EDIT
%1 command, and click on [Start]. This loads
DOS EDIT and loads the selected .COD file:
ELIXIR TECHNOLOGIES CORPORATION
AFP FONT CONVERSION CONSIDERATIONS
Figure D-5. Elixir Code Page example
Brief descriptions of lines in the sample .COD file
above follow (see the AFP Host Font Data Stream
Reference manual for more information):
Line 1:
the Elixir header
Line 2:
a text description of the code page
Line 3:
the number of code points referenced
by the code page
Line 4:
the graphic character ID used when a
character is not assigned to a code
point
Line 5:
print flags that reference the default
character
Line 6:
the code point of the variable spacing
character
Line 7:
enables or disables the variable
spacing flag that allows the set
variable text instructions to be used
in the AFP data stream
ELIXIR DESKTOP FOR AFP USER GUIDE
D-11
AFP FONT CONVERSION CONSIDERATIONS
Lines 8 - end
displays the flags set for each
code point
When VALID, the character
referenced by the GCID is
printed. When INVALID, the
default character is substituted for the
character.
7.
After editing the Elixir Code Page, exit DOS
Editor as follows:
Press <Alt> + <F> to view the DOS Editor File
menu.
Press <X> to exit the program (the program
prompts you to save or discard any changes).
Font conversion strategies
This section describes how best to respond to dialog
boxes presented by the Elixir Desktop when converting fonts from AFP to Elixir format.
The section assumes that you are converting AFP
fonts to Elixir format to generate Elixir forms, which
you can then convert to other formats.
The selections you make in dialog boxes are dependend upon the kind(s) of fonts you require and the
type of printer(s) you are using at your site:
AFP bounded box fonts only
AFP unbounded box fonts only
Hybrid (AFP and Xerox fonts)
When converting AFP fonts to Elixir, the AFP Font
Converter Options dialog box displays.
D-12
ELIXIR TECHNOLOGIES CORPORATION
AFP FONT CONVERSION CONSIDERATIONS
Figure D-6. AFP Font Converter Options dialog box
Your response to the [Text Direction Support] option
determines how Elixir screen fonts generate as
follows:
When converting bounded box fonts, [Separate
Fonts] allows you to generate all rotated versions
or selected rotated versions of the screen font
(X1, X2, X3, or X4, where X1 is the horizontal
print direction). [Universal X0] generates only one
screen font; however, ElixirForm can use the single screen font for displaying different rotations.
Note 1: X1, X2, X3, and X4 correspond to the AFP
ACROSS, DOWN, BACK, and UP directions,
respectively.
Note 2: The generated screen font names will have
the X0, X1, X2, X3, or X4 prefixes.
When converting unbounded box fonts the [Text
Direction Support] option is not available. The orientation of the font you are converting is the orientation of the output font.
For the [Create] option, select [PC Mapped Font]
to create a partial subset of the Elixir font. The
characters converted are defined in the default
Country Keyboard Map file you specify in the
[System Config] option on the System menu.
ELIXIR DESKTOP FOR AFP USER GUIDE
D-13
AFP FONT CONVERSION CONSIDERATIONS
Select [Full AFP Font] to convert the entire character set to Elixir format.
AFP bounded box font customers
If your printer uses bounded box fonts only, consider
the following:
1.
If you require proof-printing of Elixir forms on
a HP printer and want to proof-print using font
directions other than ACROSS, select
[Separate Fonts] and the font directions you
want to proof-print. HP printers require that a
separate font exist for each font direction.
2.
If you do not require proof-printing or you
want to proof-print on a HP printer using only
the converted font in the ACROSS direction,
select [Universal X0].
3.
If you want to generate separate fonts for
different rotations, select [Separate Fonts]
and select the required rotation.
AFP unbounded box font customers
When converting an Unbounded-box font to Elixir,
only the orientation of the font converts to Elixir.
Screen fonts for the rotation also generate. You can
use each converted rotation for proof-printing.
Hybrid customers
If you are converting fonts from an AFP source into
Elixir format for use in Elixir forms that you will convert
and print on non-AFP (for example, Xerox) printers:
D-14
1.
Generate PC-mapped Elixir fonts (non-AFP
fonts generally do not contain as many
characters as AFP fonts).
2.
For bounded box fonts, generate one font for
each rotation of the AFP font that you are
converting by selecting [Separate Fonts] and
the rotation you require.
ELIXIR TECHNOLOGIES CORPORATION
Glossary
This glossary provides a list of the basic terms used in
this guide.
Application: Any program you run on your PC. Elixir
applications are represented by icons on the ElixirForm/Elixir Desktop. If an Elixir application is not installed on your PC, its icon does not display.
Arrow: An arrow-shaped screen pointer used for selecting objects.
Boxed text: Text on a form that is bound by a column
with a set height and width.
Button (on the screen): An area on the screen that
causes a response when you click on it. For example,
an [OK] button that accepts your entries when you
click on it in a dialog box.
Click, on an item: To momentarily press and release
the left mouse button with the screen pointer on an
item.
Close: To exit from a window, dialog box, application,
or the Desktop.
Close box: A small white box at the left of a window
header and at the left of the menu bar. Clicking a
close box on a window header closes the window.
Clicking a close box on the menu bar exits the
Desktop.
Command button: A button in a dialog box that confirms or cancels an action when you click on it. The
[Cancel] button cancels the command. The [OK] button confirms and executes the command and saves
the information you specified in a dialog box.
ELIXIR DESKTOP FOR AFP USER GUIDE
GLOSSARY-1
GLOSSARY
Converter icon: The icon that converts font, form, image and document files to and from different formats.
Cursor: A screen pointer used when entering text in
the work area or in a dialog box.
Desktop: The Elixir Desktop working environment,
consisting of the menu bar, the screen area and icons
on the screen.
Dialog box: A rectangular box that displays and requests information. You enter information in fields in
the dialog box, and normally confirm your entries by
clicking on an [OK] button or by pressing <Enter>.
Directory: A list of hard disk or diskette contents.
Desktop directories are represented by folder icons.
Folder contents can be viewed pictorially, alphabetically, by icon, by size, or by date.
Dispatcher icon: The icon in the Elixir Desktop that
stores and invokes a number of DOS commands.
DOS: Disk Operating System, the collection of programs that gives control of a PC's resources to the
user.
Double-click: To press the left mouse button twice in
rapid succession, normally to open an icon.
Drag: To click on an item and move the item with the
mouse while holding down the left mouse button.
Drag and drop: A method used to copy an object as
follows: click on an item on the screen, hold down the
left mouse button, move the mouse to move the
screen pointer to an icon, then release the mouse
button.
Drop: To release the mouse button after dragging an
item to an icon.
Elixir folders: The folders represented by the four
top left icons on the Desktop: the Forms, Fonts, Images and Documents folders. Each of these folders
contains a subordinate Elixir, Input and Output folder.
GLOSSARY-2
ELIXIR TECHNOLOGIES CORPORATION
GLOSSARY
Extension: The period and three characters following
a file name. An extension identifies the type of information in a file. For example, .ELX indicates an Elixir
format form file.
Fast Keys: See Keyboard shortcuts.
File filter: The use of DOS wildcard characters to display only those files with selected name characteristics in a window or dialog box. For example, to display
only files that begin with ABC in a directory of many
files you could enter ABC*.*. See also, Wildcard
character.
File name: The name of a file. The ElixirForm/Elixir
Desktop uses DOS file naming conventions. DOS file
names consist of a base (stem) name containing up to
eight characters and an extension of up to three
characters.
Folder icon: The Desktop icon representing a DOS
directory. Folders allow you to quickly organize information on the Desktop.
Format: To prepare a diskette so it can hold information. Formatting a diskette erases the information on
the diskette.
Form elements: The individual lines, shapes, images,
and text that compose a form. You can create,
change, move, copy, delete, import, or load a form
element.
Form template: A form loaded as an overlay or visual
guide only for the purpose of designing new form elements around it. A form template does not become
part of the form when the form is saved, only the new
elements added are saved with the form.
Free text: Text on a form that is not bound by a column with a set height and width. The width of the form
is the only restriction.
Grayed options: Grayed options are menu options
you cannot choose because they do not apply to your
current selection. Also called dimmed options.
ELIXIR DESKTOP FOR AFP USER GUIDE
GLOSSARY-3
GLOSSARY
Head to head: In duplex printing, when the page top
is printed in the same position on both sides of the
page.
Head to toe: In duplex printing, when the top of one
side of the page is printed in the same position as the
bottom of the other side of the page.
Highlighted: A highlighted option appears darkened
on the screen, and indicates that it is selected.
Icon: A small, roughly rectangular-shaped symbol on
the Desktop that represents an application, a file, a
folder, or a peripheral device.
Importing files: The process of copying non-Elixir
format files from different storage media (such as a
hard disk, a diskette, or tape) to the appropriate Desktop input folder or to the Work area.
Information box: A white square at the right of the
menu bar identified with an "i". Clicking on the information box displays information about the open Elixir
Desktop application.
Inverse Landscape: The orientation of fonts, logos,
or images on a page. See the definition for portrait for
a figure describing the orientation of fonts on pages.
Inverse Portrait: The orientation of fonts, logos, or
images on a page. See the definition for portrait for a
figure describing the orientation of fonts on pages.
Kerning: Adjusting the spacing between characters to
make certain letters appear better fitted together and
more attractive on the page.
Keyboard shortcut: Also called Fast keys. A special
one- or two-key combination that allows you to execute an option without using the mouse. Keyboard
shortcuts are shown on each menu beside the name
of the option and are listed in the “Keyboard shortcuts”
appendix.
Landscape: The orientation of a page or the fonts, logos, or images on a page. A landscape page is narrower on the sides than on the top. See the definition
of portrait for a figure describing the orientation of
fonts on pages.
GLOSSARY-4
ELIXIR TECHNOLOGIES CORPORATION
GLOSSARY
Menu: A list of options from which you make a selection to perform an action. A menu displays when you
select a menu title from the menu bar or from a window header, or when you click on an option.
Menu bar: The horizontal bar displayed at the top of
the Desktop from which you access pull-down menus.
Menu titles: Text that identifies a menu, displayed in
a window header or on the menu bar.
Message area: A bar just below the menu bar that
displays error messages or information about the activity you are performing.
Mouse button: A button on the top of the mouse.
ElixirForm uses the left and right buttons of a mouse.
Multi-select: Selecting more than one file or icon by
shift-clicking on them.
Open a folder, Elixir file, application, or peripheral
device: 1.) Opening a folder icon displays a window
showing the contents of the folder. 2.) Opening an
Elixir file icon starts the application that created the file
and loads the file . 3.) Opening an application icon
starts the application. 4.) Opening a peripheral device
displays a dialog box allowing you to set the device
parameters.
Option: A word or phrase in a menu that you can
select.
Peripheral (device): A printer, scanner, or tape drive
connected to your PC.
Point: To move the mouse so the screen pointer (in
most cases an arrow) rests on the desired item.
Portrait: The orientation of a page, or the fonts, logos, or images on a page. A portrait page is narrower
on top than on the side (like pages in this book). See
the following figure for the orientation of fonts on
pages.
ELIXIR DESKTOP FOR AFP USER GUIDE
GLOSSARY-5
GLOSSARY
Orientation of fonts on Portrait (left) and
Landscape pages
Printer icon: An icon representing a proof printer connected to your PC.
Pull-down menu: See menu.
Raster graphics: Pictures composed of bit maps,
where each element of the picture is a dot defined as
black or white.
Replaceable parameter: A parameter (usually %1)
used in commands to represent a selected file name.
The selected file name replaces the parameter during
certain operations.
Run: To execute or start an application.
Scanner icon: The icon representing a scanner connected to your PC.
Screen pointer: A pointer shaped like an arrow that
displays on the screen, and which you can move by
rolling the mouse on a flat surface.
Screen version: The version of a color or font composed such that its appearance on a screen display is
as close as possible to its appearance when printed.
Scroll: To move a directory list in a window so you
can view different parts of the list.
GLOSSARY-6
ELIXIR TECHNOLOGIES CORPORATION
GLOSSARY
Scroll bar: A bar displayed on the right side of some
windows used for scrolling. The scroll bar contains a
scroll arrow, [+] and [-] buttons, and a slider bar that
moves within the scroll box.
Select: To click on an object, menu option, or form
element. A selected item appears highlighted.
Shift-click: To click on an object while holding down
the <Shift> key. Usually used to select multiple
elements.
Slider bar: A bar in the scroll box at the side of some
windows that scrolls items in the window when you
drag it up and down.
Snap to: A function that causes form elements to
automatically align with the nearest grid point when a
grid is displayed in the Work area.
Tape icon: The icon representing a tape drive connected to your PC.
Trashbin icon: The Trashbin icon is in the lower right
corner of the Desktop and represents a receptacle for
items you want to delete. You delete a file by dragging
it to the Trashbin icon.
UDK: (User Defined Key) a substitute escape character defined by a user for specific print jobs
Unselect: To cause one or more selected (highlighted) icons or elements to not be selected any
more. The quickest way to do this is to click on another area of the Desktop or Work area.
UserTools icon: The icon that links applications to
files.
Utilities: Special-purpose applications with which you
can perform functions from the DOS prompt.
Wildcard character: A character in a file name, usually an asterisk (*), that specifies a matching set. For
example, *.EXE represents all files that end with the
.EXE extension.
Window: A rectangular area on your screen in which
you view information, such the contents of a folder. All
ELIXIR DESKTOP FOR AFP USER GUIDE
GLOSSARY-7
GLOSSARY
windows contain a window header. Some windows
have scroll bars along the right side.
Window header: The top of a window that displays
the DOS directory corresponding to the window contents. Some window headers also show a close box
and a number of menu titles with pull-down menus.
GLOSSARY-8
ELIXIR TECHNOLOGIES CORPORATION
Index
A
B
access alternatives, 4-8
AFP Font-Related Converter Options dialog
box, 7-54, 7-56
AFP font components,
D-3, D-4
AFP Font Converter Options, 7-43, D-7
AFP Font Converter Options dialog box, 4-12,
7-39, 7-43, D-13
AFP Image Converter
Options dialog box,
4-12, 7-73
AFP Page Converter
Options, 7-9, 7-79
AFP Page Converter
Options dialog box,
4-12, 7-10
AFP Settings dialog box,
7-17
Appbuilder
jobs database, 7-92
application icons
creating, 8-2
ElixirForm, 2-4
opening, 5-3
Arguments to this Program, 8-14
Arguments to this program dialog box, 8-14
AS/400 file transfer,
9-14, 9-18
AUTOEXEC.BAT, 4-10,
8-2, 8-21
backup button, 2-7, 8-11
batch files, 8-14
Bitstream Facelift fonts,
7-61, B-2
Bitstream Fontware,
7-61
Browse Code Page dialog box, 4-4
Browse Country Keyboard Map dialog box,
4-4
Browse GCID File dialog
box, 4-4
BTFONTS.MAP, B-2
BTFONTS.NAM, B-2
Bubble Help, 1-6
ELIXIR DESKTOP FOR AFP USER GUIDE
C
character set, D-3
Clipboard, 2-4
code page
changing, 7-59
code point, D-3
default, D-9
editing, D-10
example, D-11
Code Page ID, 7-37
coded font, 7-53, D-4
COMMAND.COM, 8-14,
8-15
CONFIG.SYS, 4-10, 8-2
configuration options,
4-2
confirm/warn settings,
4-5, 10-2
INDEX-1
INDEX
Confirmation for Command dialog box, 4-5
Context sensitive Help,
1-6
contour fonts, 7-61, B-2
conventions, 1-3
display, 1-3
font naming, 7-65
mouse, 1-4
typographical, 1-3
Converter
icon, 2-6, 7-1
overview, 2-6
properties, 4-6,
4-11, 7-4
setup, 7-4
Converter Properties
dialog box, 4-12, 5-4,
6-8, 6-15, 7-5, 7-8
Converter Properties
Dialog dialog box, 4-6,
4-13, 6-8, 6-15, 7-6
converting
.PCX files, 7-75
.TIF files, 7-75
adding color to images, 7-76
AFP fonts to Elixir,
7-42, D-7
AFP to HP PCL,
7-48
AFPDS, 7-90
changing the target
environment, 7-24
coded fonts, 7-57
confirmation, 7-95
contour fonts to HP
PCL, 7-49
documents, 7-77
double-byte Elixir
fonts to AFP, 7-45
Elixir fonts to AFP,
7-53
FB to VBM, 9-14
files, 7-1
fixed block files,
9-14
fonts, 7-3, 7-37
INDEX-2
for Hybrid, D-14
form list files to AFP,
7-77, 7-79
form to graphics,
7-36
Formdef reources,
7-92
forms, 7-2, 7-9, 7-32
general, 7-1
graphics to a font,
7-72
HP PCL files, 7-28
HP PCL fonts, 7-46
HP PCL to AFP,
7-53
images, 7-71
images to/from AFP,
7-72
outline fonts, 7-61
page segments,
7-72
Pagedef resources,
7-92
PDF, 7-32
PostScript, 7-28
procedures, 7-8
setup parameters,
7-4
to/from AFP, 7-9
to VB, 9-9
to VBM, 9-13
using DOSVSE,
7-93
using ELX2VSE,
7-94
copying files, 5-11, 8-12
Country Keyboard Map,
4-4, 7-61, D-5
country keyboard map,
7-41
CPGID, 7-37
creating
a .PUB file, 5-17
character set, 7-58
coded font, 7-57
customer support, 1-2
ELIXIR TECHNOLOGIES CORPORATION
INDEX
customizing the Desktop, 4-1, 4-4
D
Data Jobs
Elixir folders, 3-19
Date & Time dialog b,
4-3
DDNAMES, 7-19, 7-87
DEFAULT.FAM, 7-36
default code page, D-9
deleting files, 7-95
Desktop
archival feature,
5-17
basics, 2-1
Clipboard, 2-4
confirm file deletions, 4-5
customizing, 4-1,
4-4
DOS menu, 2-12,
8-24, C-10
exiting, 1-10
features, additional,
5-1
File menu, 5-1, C-1
folders, 2-3, 3-1
Help menu, C-11
icons, 2-2
keyboard shortcuts,
A-1
layout, 2-1
menu bar, 2-1, 4-1,
C-1
message area, 2-1
resetting, 4-15
Scheduler Desktop,
5-21
Special menu, 4-1,
5-1, C-8
starting, 1-9
system configuration, 4-2
System menu, 4-1,
5-1, C-6
ELIXIR DESKTOP FOR AFP USER GUIDE
toolsets, 4-16
user privileges, 4-7
Window menu, C-10
Desktop Basic Setup
dialog box, 4-3, 5-10
Desktop Diagnostics
dialog box, 4-9
Desktop folder
printing contents,
5-7
Desktop Toolsets dialog
box, 4-16
Desktop Usage
Switches dialog box, 4-4
diagnostics, 4-9
dialog box,
AFP Font-Related
Converter Options,
7-54, 7-56
AFP Font Converter
Options, 4-12, 7-39,
7-43
AFP Image Converter Options, 4-12,
7-73
AFP Page Converter
Options, 4-12, 7-10
AFP Settings, 7-17
Arguments to this
program, 8-14
Browse Code Page,
4-4
Browse Country
Keyboard Map, 4-4
Browse GCID File,
4-4
Confirmation for
Command, 4-5
Converter Properties, 4-12, 5-4, 6-8,
6-15, 7-5, 7-8
Converter Properties
Dialog, 4-6, 4-13,
6-8, 6-15, 7-6
Date & Time, 4-3
Desktop Basic
Setup, 4-3, 5-10
INDEX-3
INDEX
Desktop Diagnostics, 4-9
Desktop Toolsets,
4-16
Desktop Usage
Switches, 4-4
Diskette Properties,
4-5
Dispatcher Command, 5-4
Document Converter Options, 7-77
Elixir HP Driver,
6-13
Elixir Publication
File, 5-18
Enter Path of Directory to Create, 4-11
Extra Converter Options, 7-72
File Formats, 5-7
File Name Entry, 5-7
File Object Properties, 5-5
Font Converter Options, 7-38
Font Related Converter Options, 7-60
Form Converter Options, 6-9, 7-9
Form Print Properties, 7-26
Forms Converter
Options, 6-9
Forn Transformer
Options, 10-4
Global View, 3-4
Graphic Transformer Options, 10-7
Host Name, 9-21
HP Font Converter
Options, 7-46
Image Converter
Options, 7-71, 7-75
Image Process
Transformation,
10-8
INDEX-4
Loader Load, 9-20
Loader Remote Library Connection,
9-22
Local View, 3-5
MCF Fonts, 7-15,
7-83
Message Options,
10-3
Message Options
Dialog, 4-13, 4-15,
7-7
Mirror, 10-8
Outline-to-raster font
generator, 4-12,
7-63
Page Databasing,
7-22
Page Font Change,
10-6
Page remap, 10-4
Page Rotate, 10-5
Page Shift, 10-6
Page Source Converter Options, 7-18,
7-86
PostScript Converter
Options, 4-12
PostScript Converter
Properties, 7-29
Print, 5-8, 6-7, 6-12,
6-15, 6-16
Print Driver Dialog,
6-9
Printer Properties,
4-5
Printer Setup, 6-10
Resize, 10-9
Rotate, 10-10
Scanner Properties,
4-5
Shift, 10-9
System Diskette,
5-14, 5-15
Tool Link Definition,
8-13
ELIXIR TECHNOLOGIES CORPORATION
INDEX
Transformer Properties, 4-14, 10-1
Transformer Properties Dialog, 4-14,
10-2
TrueType Fonts Attributes, 7-51
User Application
Setup, 8-3
User Files: Directory
Paths and Tool
Links, 5-4, 5-12,
5-13, 8-10
User Privileges, 4-7
Dialog box Help, 1-7
directories
accessing, 8-9
Bitstream Facelift
mapping, B-2
changing, 8-11
contour fonts mapping, B-2
creating, 4-10
KMP files, 7-42, D-5
mapping, 3-21
PostScript mapping,
B-1
structure, 3-1
User Files, 8-9
diskette
accessing, 6-1
DOS format, 5-16,
6-1, 6-2
Elixir-format, 5-15
properties, 4-5
system, 5-15, 6-2
Xerox format, 6-1
Diskette icon, 2-5, 5-3,
5-14, 6-1
Diskette Properties dialog box, 4-5
Dispatcher, example,
8-21
Dispatcher Commands
dialog box, 5-4
Dispatcher icon, 2-6,
5-4, 8-2, 8-15
ELIXIR DESKTOP FOR AFP USER GUIDE
display options, files,
2-11
Docs Jobs
Elixir folders, 3-18
Document Converter
Options, 7-77
Document Converter
Options dialog box, 7-77
documents
converting, 7-4, 7-77
Elixir Documents
folder, 3-16
folders, 3-15
Input Documents
folder, 3-16
Output Documents
folder, 3-17
Documents folder, 2-3,
3-15, 7-4
DOS
access, 2-12, 4-9,
8-1, 8-9, C-10
batch files, 8-14
commands, 8-17,
8-24, C-10
copying files, 5-13
directories, 3-1, 8-9
diskette, 5-13, 5-14,
6-1
executables, 8-14
folders and directories, 3-1
linking files, 5-4
menu, 2-12, 8-24,
C-10
storing commands,
8-16
DOS menu, 8-24, C-10
DOSVSE utility, 7-93
double-byte font
AFP, 7-44
converting, 7-44,
7-45
Elixir, 7-45
double-click speed, 4-4
downloading files
converting fonts, 9-3
from AS/400, 9-18
INDEX-5
INDEX
FT/TSO parameters, 9-9
object files, 9-3, 9-7
overview, 9-2
text files, 9-7
using 3270, 9-6
using FT/TSO, 9-9
E
Efont Factory, 7-61
ElixiKey, 4-10
Elixir applications
conventions, 1-3
Help, 1-6
Elixir code page, D-9
Elixir folders
changing display,
3-4
Data Jobs, 3-19
Docs Jobs, 3-18
Documents, 3-16
Fonts, 3-9
Forms, 3-6
Graphics, 3-13
structure, 3-2
Elixir highlight color
forms
printing, 6-8
Elixir HP Driver dialog
box, 6-13
Elixir Image Viewer,
5-30
Elixir Publication File
dialog box, 5-18
Elixir Web site
creating icon for, 8-8
ElixirDoc icon, 7-96
ElixirFont
installation, 1-9
ElixirForm font default,
5-31
ElixirForm icon, 2-4
ELX2VSE utility, 7-94
Enter Path of Directory
to Create dialog box,
4-11
INDEX-6
exiting the Desktop,
1-10
Extra Converter Options
dialog box, 7-72
extracting files from
AS/400, 9-18
F
fast keys, A-1, A-4
FGIDs, 7-20, 7-36, 7-88
File Formats dialog box,
5-7
File menu, 5-1, C-1
File Name Entry dialog
box, 5-7
File Object Properties
dialog box, 5-5
file transfer
AS/400, 9-14
configuration, 9-2
converting fonts, 9-3
downloading AFP
files, 9-7
downloading text
files, 9-7
from the host, 9-2
initial setup, 9-2
input directories, 9-4
object files, 9-7
output directories,
9-5
OVE/AFPDS files,
9-3
overview, 9-1
to the host, 9-5
uploading AFP files,
9-7
uploading text files,
9-8
using IBM 3270, 9-6
using IRMA
FT/3270, 9-6
using IRMA
FT/TSO, 9-9
using the Loader,
9-20
files
ELIXIR TECHNOLOGIES CORPORATION
INDEX
.BAK, 3-6
.BAT, 8-14
.COM, 8-14, 8-15
.DAT, 7-4
.DCK, 7-94
.ELX, 7-2, 7-4
.FAM, 7-20, 7-36,
7-88
.HDR, 7-3
.INV, 3-6
.KMP, D-5
.LOG, 7-22
.LP3, 7-3, 7-36, 7-72
.OGL, 7-22
.PCX, 5-29, 7-75
.PUB, 3-6, 5-17
.SYS, 8-2
.TDF, B-2
.TFB, 7-64, B-2
.TIF, 7-75
.TXT, 7-72
access alternatives,
4-8
AFPDS, 7-90
AUTOEXEC.BAT,
4-10, 8-2, 8-21
batch (.BAT), 8-14
BTFONTS.MAP,
B-2
BTFONTS.NAM,
B-2
CL4.DEF, 7-94
code page, D-3
COMMAND.COM,
8-14
CONFIG.SYS, 4-10,
8-2
confirm/warn settings, 4-5
confirm conversion,
7-95
conversion process,
7-8
converting, 7-1
copying, 5-11, 8-12
DEFAULT.FAM,
7-20, 7-36, 7-88
ELIXIR DESKTOP FOR AFP USER GUIDE
deleting, 4-5, 7-95
display options, 2-11
downloading, 9-2
editing, 3-3
graphics, 5-29
HP PCL, 7-25, 7-28
INSTALL.LOG,
4-10, 8-2
linked, 8-14
linking, 5-4, 8-12
management, 5-6
PostScript, 7-28
properties, 5-5
PSEND.PSC, B-1
PSFONT.MAP, B-1
PSTOP.PSC, B-1
PSTRAIL.PSC, B-2
transfer packages,
9-1
transfering, 9-1
transforming, 10-1
uploading, 9-5
versions, 5-6
Filter menu, 2-7, D-2
folder display
changing, 3-4
folders
changing display,
3-4
copying files, 5-17
Desktop, 3-1
Documents, 3-15,
7-4
Elixir, 3-2, 3-3, 5-2,
7-2
Elixir Data Jobs
folder, 3-19
Elixir Docs Jobs
folder, 3-18
Elixir Documents
folder, 3-16
Elixir Fonts folder,
3-9
Elixir Forms folder,
3-6
Elixir Graphics
folder, 3-13
INDEX-7
INDEX
Fonts, 2-3, 3-9,
3-18, 7-3
Forms, 2-3, 3-6, 7-2
Graphics, 2-3, 3-13
Images, 7-3
Input, 3-3
Input Documents
folder, 3-16
Input Fonts folder,
3-10
Input Forms folder,
3-7
Input Graphics
folder, 3-13
Output, 3-3
Output Documents
folder, 3-17
Output Fonts folder,
3-11
Output Forms folder,
3-8
Output Graphics
folder, 3-14
structure, 3-2
User Files, 2-4
Font-Related Converter
Options dialog box, 7-60
Font Converter Options
dialog box, 7-38
Font Global Identifiers,
7-20, 7-88
font requirements
HP or compatible
printers, 7-38
fonts
adding HP PCL
fonts to a Windows
application, 7-69
AFP components,
D-3
AFP conversion, D-1
Bitstream Facelift,
7-61, B-2
Bitstream Fontware,
7-61
bounded box, D-1,
D-14
INDEX-8
BTFONTS.MAP,
B-2
BTFONTS.NAM,
B-2
character set, D-3
coded font, D-4
contour, 7-61, B-2
conversion strategies, D-12
converter options,
7-37
converting, 7-3, 7-37
CPGID, 7-37
DDNAMES, 7-19,
7-87
Elixir fonts folder,
3-9
FGIDs, 7-36
GCID, D-3
GCSGID, 7-37
generating Elixir
fonts, 7-68
generating non-Elixir
fonts, 7-68
HP PCL, 7-46
HP PCL in Windows
applications, 7-47
HP PCL soft fonts,
7-47
Input Fonts folder,
3-10
kerning, 7-64
loading, 7-27, 7-32
mapping, 7-20,
7-61, 7-65, 7-88
name, 7-63
naming conventions,
7-65
orientation, 7-65
outline, 7-61
outline-to-raster font
generator, 7-63
Output Fonts folder,
3-11
PSFONT.MAP,
7-64, B-1
PSSEND.PSC, B-1
ELIXIR TECHNOLOGIES CORPORATION
INDEX
PSTOP.PSC, B-1
PSTRAIL.PSC, B-2
screen, 7-69
TrueType, 7-50
unbounded box,
D-1, D-14
Fonts folder, 2-3, 3-9,
3-18, 7-3
Form Converter Options
dialog box, 6-9, 7-9
Form Print Properties
dialog box, 7-26
Form Transformer Options dialog box, 10-4
Formdefs
converting, 7-92
forms
converting, 7-2, 7-9
converting to graphics, 7-36
Elixir Forms folder,
3-6
Input Forms folder,
3-7
orientation, 7-31
Output Forms folder,
3-8
PDF, 7-32
PostScript, 7-28
transformer options,
10-3
Forms Converter Options dialog box, 6-9
Forms folder, 2-3, 3-6,
7-2
FT/3270, 9-1
FT/TSO, 9-1
G
GCSGID, 7-37
Global Character Set ID,
7-37
Global View dialog box,
3-4
Graphic Transformer
Options dialog box, 10-7
graphics
ELIXIR DESKTOP FOR AFP USER GUIDE
converting to a font,
7-72
Elixir Graphics
folder, 3-13
Elixir Image Viewer,
5-30
Input Graphics
folder, 3-13
Output Graphics
folder, 3-14
tiles, 7-72
Graphics folder, 2-3,
3-13
H
Help, on-line, 1-6
Help hypergraphics, 1-7
Help menu, 1-6, C-11
Help pop-ups and
jumps, 1-7
Host Name dialog box,
9-21
HP Font Converter Options dialog box, 7-46
HP or compatible
printers
font requirements,
7-38
HP PCL
fonts, 7-47
Hybrid conversions,
D-14
I
IBM/IRMA 3270, 9-6
icons
applications, 8-2
checking properties,
8-8
Clipboard, 2-4
Converter, 2-6, 7-1
create (example),
8-6
Desktop, 2-2
Diskette, 2-5, 5-3,
6-1
INDEX-9
INDEX
Dispatcher, 2-6, 8-2,
8-15
Documents, 2-3, 7-4
Elixir Web site, 8-8
ElixirDoc, 7-96
ElixirForm, 2-4
folders, 2-3
Fonts, 2-3, 7-3
Forms, 2-3, 7-2
Graphics, 2-3
Images, 7-3
Jobs, 2-4
modifying, 5-5
opening, 5-1, 5-3
Other Elixir applications, 2-4
Printers, 2-5, 5-3
properties, 5-5
Scanners, 2-5, 5-3,
6-3
Transformer, 4-14
Trashbin, 2-6
User Files, 2-4, 3-2,
5-11, 8-1, 8-9
User Tools, 2-5, 8-1,
8-2
Ventura Publisher,
8-6
Viewer, 2-6, 5-29
IEBGENER utility, 9-9,
9-13
Image Converter Options, 7-71
Image Converter Options dialog box, 7-71,
7-75
Image Process Transformation dialog box,
10-8
Image Viewer, 5-30
images
.PCX and .TIF conversions, 7-75
adding color during
conversion, 7-76
converter options,
7-71
converting, 7-3, 7-71
INDEX-10
transformer options,
10-7
Images folder, 7-3
Input folders
Documents, 3-16,
3-17
Fonts, 3-10
Forms, 3-7
Graphics, 3-13
structure, 3-3
INSTALL.LOG, 4-10, 8-2
installation, 1-9
IRMA FT/TSO, 9-9
J
Jobs folder, 2-4
K
kerning, 7-64, 7-68
keyboard mapping, 7-35
keyboard shortcuts, A-1,
A-4
KMP file, 7-42, D-5
L
linked files, 8-14
linking files, 8-12
Loader Load dialog box,
9-20
Loader menu, 9-20
Loader Remote Library
Connection dialog box,
9-22
Local view, 2-11
Local View dialog box,
3-5
logo, display, 5-9
M
mapping, 7-65, B-1
Windows character
set, 7-69
mapping table
ELIXIR TECHNOLOGIES CORPORATION
INDEX
Bitstream Facelift
fonts, B-2
code page, D-3
contour fonts, B-2
directories, 3-21,
B-1
PostScript, B-1
MCF Fonts dialog box,
7-15, 7-83
memory, 4-9
menus
Desktop, 2-1, 5-1,
C-1
Desktop menu bar,
2-1
DOS, 2-12, 8-24,
C-10
File, 5-1, C-1
Filter, 2-7, D-2
Help, C-11
Loader, 9-20
options, C-1
Selection, 2-9
Special, 4-1, 5-1,
C-8
System, 4-1, 5-1,
8-23, C-6
Tools, 8-2, 8-12
View, 2-10
Window, C-10
message area, 2-1
Message Options Dialog
dialog box, 4-13, 4-15,
7-7, 10-3
Mirror dialog box, 10-8
monochrome monitor
setup, 4-6
mouse, 1-4
MVS host, 7-28, 9-1
O
other Elixir application
icons, 2-4
Outline-to-raster font
generator dialog box,
4-12, 7-63
Output folders
ELIXIR DESKTOP FOR AFP USER GUIDE
Fonts, 3-11
Forms, 3-8
Graphics, 3-14
structure, 3-3
P
Page Converter Options,
7-11, 7-80
Page Databasing dialog
box, 7-22
Page Font Change dialog box, 10-6
Page Remap dialog box,
10-4
Page Rotate dialog box,
10-5
Page Shift dialog box,
10-6
Page Source Converter,
7-85
Page Source Converter
Options dialog box,
7-18, 7-86
Pagedefs
converting, 7-92
PaintBrush, 5-29
peripheral devices, 6-1
PostScript
printing, 6-15
PostScript Converter,
7-29
PostScript Converter
Options dialog box, 4-12
PostScript Converter
Properties dialog box,
7-29
PostScript mapping table, B-1
Print dialog box, 5-8,
6-7, 6-12, 6-15, 6-16
Print Driver Dialog dialog
box, 6-9
printer-specific
AFP printer resolution, 7-12, 7-80
print drivers, 7-25,
7-28
INDEX-11
INDEX
Printers icon, 2-5,
5-3
printing Elixir forms,
6-6
printing non-Elixir
forms, 6-10
proof printing, 6-6
properties, 4-5
Printer Properties dialog
box, 4-5
Printer Setup dialog box,
6-10
Printers icon, 2-5, 5-3
printing
Desktop folder contents, 5-7
Elixir forms, 6-6
Elixir forms with
highlight color, 6-8
non-Elixir forms,
6-10
PostScript, 6-15
proof printing, 6-6
properties
Converter, 4-6, 4-11,
7-4
diskette, 4-5
displaying icon, 8-6
ElixiScript Converter, 7-28
file, 5-5
icons, 5-5, 8-6
printer, 4-5
scanner, 4-5, 6-3
tool, 8-14
Transformer, 4-14,
10-1
user application, 6-3
PSEND.PSC, B-1
PSFONT.MAP, B-1
PSSTASH, B-1
PSTOP.PSC, B-1
PSTRAIL.PSC, B-2
PUB files, 5-18
copying, 5-19
creating, 5-17
restoring from diskette, 5-20
INDEX-12
Q
Quick Help, 1-6
R
refreshing screen, 4-15
Resize dialog box, 10-9
Rotate dialog box, 10-10
S
Scanner Properties dialog box, 4-5
scanners
icon, 6-3
properties, 4-5, 6-3
Scanners icon, 2-5, 5-3,
6-3
Scheduler Desktop
actions/tasks, 5-23
setup, 5-22
testing examples,
5-26
use, 5-21
screen, refreshing, 4-15
screen fonts, 7-69
Selection menu, 2-9
Shift dialog bo, 10-9
shortcuts, keyboard, A-1
Special menu, 4-1, 5-1,
C-8
starting the Desktop, 1-9
sub-window, 2-7
support, customer, 1-2
SYSTEM.INI file, 2-7
system configuration,
4-2
system diskette, 5-15,
6-2
System Diskette dialog
box, 5-14, 5-15
System menu, 4-1, 5-1,
8-23, C-6
T
ELIXIR TECHNOLOGIES CORPORATION
INDEX
TDF file, 7-68
Tool Link Definition dialog, 8-13
tool properties, 8-14
Tools menu, 8-12, 8-14
toolsets, 4-16
Transformer
icon, 10-1
properties, 4-14,
10-1
setup, 10-1
Transformer icon, 2-6
Transformer Properties
dialog box, 4-14, 10-1
Transformer Properties
Dialog dialog box, 4-14,
10-2
transforming
forms, 10-3
images, 10-7
Trashbin icon, 2-6
TrueType fonts, 7-50
TrueType Fonts Attributes dialog box, 7-51
dialog box, 5-12, 5-13,
8-10
User Files icon, 2-4, 3-2,
5-11, 8-1, 8-9
user privileges, 4-7
User Privileges dialog
box, 4-7
User Tools
creating application
icons, 8-2
displaying icon properties, 8-6
example, 8-6
starting an application, 8-5
User Tools icon, 2-5,
8-1, 8-2
utilities
running, 8-23
using the Dispatcher, 8-23
U
Ventura Publisher
creating an icon, 8-6
from the Desktop,
8-6
View menu, 2-10
Viewer icon, 2-6, 5-29
VM host, 7-28
Uploading files, 9-5
uploading files
FT/TSO parameters, 9-10, 9-12
object files, 9-7
overview, 9-5
text files, 9-8
to AS/400, 9-14
using 3270, 9-6
using FT/TSO, 9-9
usage switches, 4-4
User Application Setup,
8-18
User Application Setup
dialog box, 8-3
User Files
directories, 8-9
tool links, 8-9
User Files: Directory
Paths and Tool Links
ELIXIR DESKTOP FOR AFP USER GUIDE
V
W
Window menu, C-10
Windows
adding HP PCL
fonts, 7-69
and the Desktop,
2-1
character set, 7-69
keyboard shortcuts,
A-2
operating system,
2-1
PaintBrush, 5-29
INDEX-13
INDEX
print driver, 7-25,
7-28, 7-30
print drivers, 6-6
Windows applications
adding HP PCL
fonts, 7-47
Windows character
mapping, 7-69
INDEX-14
ELIXIR TECHNOLOGIES CORPORATION