1
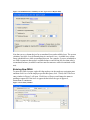
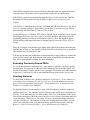
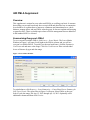
iHR FMLA Supplement
Overview
This supplement is written for users who track FMLA on a rolling year basis. It assumes
that rolling-year accrual has already been set up in iHR and describes how to summarize
leave balances. It explains how to enter new continuous and intermittent leave, check
balances, manage alerts, and run FMLA-related reports. It does not explain mail merging
or paperless files. Those excluded topics relate to FMLA management but are addressed
in the standard iHR User Manual.
Summarizing Everyone's FMLA
To see everyone's available FMLA, click Leave > Leave Matrix. The Leave Matrix
Window in Figure 1 will open. Scroll right to the FMLA column, and you will see
everyone’s available FMLA. To quickly see the total used hours, click the Summarize
Used Leave tab and enter a date range. Click List Used Leave to filter out individual
leaves of absence by type and date range.
Figure 1. Leave Matrix Window
To print balances, click Reports > Leave Summaries > Consolidated Leave Summary for
One Type of Leave. The report filter in Figure 2 will open. Select FMLA as the type.
Select a year date range, like Apr 15, 2012 through Apr 14, 2013. Optionally select
additional columns and then click Preview.
Figure 2. Consolidated Leave Summary for One Type of Leave Report Filter
Note that you see column choices for accumulated leave and available leave. The system
calculates Available Leave differently than Accumulated Leave. Available leave counts
future scheduled leave while accumulated does not. For example, if you are scheduled to
use FMLA tomorrow then today's available balance would be one day less than today's
accumulated balance (Available would account for tomorrow while accumulated would
not).
Entering New FMLA
To enter new FMLA request, right-click the employee in the employee navigation pane
and then click Leave. In the employee profile that opens, click +Family/Med. The leave
entry window in Figure 3 will open. Click Status of Request and change the status to
pending or approved. If the leave is approved then select the type of approval,
intermittent or continuous.
Figure 3. Leave Entry Window
If the FMLA request has been approved but not taken then enter the expected departure
and return dates. These dates serve as place holders until leave is actually taken.
If the FMLA request is intermittent then click the Hours Used Each Day tab. Enter the
days taken. Be sure to mark each day as FMLA in the Concurrent Types of Leave
column.
If the FMLA is continuous then click the Add button and add a block of leave. The Block
Out Leave window will open. That window records leave as at least two types: FMLA
and something else like Unpaid, Vacation, PTO, or Sick.
Set the primary type to Vacation, PTO, Sick or Unpaid. Set the secondary type to Unpaid.
Checking the Do not use more leave than is available checkbox will protect you from
accidentally running Vacation or Sick balances negative. Check the checkbox next to
FMLA (and any other applicable state or company specific leave like CFRA, STD, or
Comp).
Enter the From date. Note that the types frame in the right of the window shows the last
available day of FMLA. Either double-click the FMLA Last Available Day (to block out
all available leave) or enter the To date.
You can also find the last available day in that parent leave entry window by clicking the
Totals and Procedures tab. In the bottom-right corner, select FMLA and enter the start
date. The system will then calculate the last available day.
Extending Previously Entered FMLA
To extend intermittent or continuous leave, open the leave tab in the employee's profile.
Find the leave. (If you do not see the leave then change the filter to include FMLA and
the date in question). Double-click the leave, opening it. Then either enter additional days
in the Hours Used Each Day tab or enter additional blocks in the Blocks of Leave tab.
Checking Balances
To check FMLA balances for a group of employees, click Reports > Leave Summaries >
Consolidated Leave Summary for One Type of Leave. To see the balances for several
types of leave on one report, click Reports > Leave Summaries > Accumulated Leave
Summary or Available Leave Summary.
To check the balance for one employee, right-click that employee in the list to the left
and then click Leave. The summary section at the top of the profile shows the balance as
of today. To see the balance as of a different date, click Print at the bottom. In the report
filter window that opens, check the Itemize detail in leave of absence checkbox and select
a year date range. Click Preview. The report will open, showing the rolling balance for
each day of used leave. The summary section at the bottom shows the balance as of the
end of your reporting period. You can alternatively open the same report by clicking
Reports > Leave Lists and Calendars > Leave Itemization for One Employee.
Managing Alerts
To see the alerts, click Tasks > List. The system support three categories of alerts: (1)
reminders that the system automatically generates based on dates entered in the
employees’ leave windows, (2) one-off ad hoc tasks, and (3) standard tasks like "Obtain
RTW Slip" that are created when the leave is created.
Automatic reminders are controlled by clicking Company > Settings ... Reminders. You
can turn on reminders for medical certification expirations, pending requests that have
never been approved, and employees returning from leave.
To create a one-off ad hoc tasks, click Tasks > Add. Or click the Incomplete Tasks tab at
the bottom of any employee's profile and then click Add.
To create a standard list of tasks that are generated whenever FMLA is entered, click
Tasks > Standard Tasks. You can then add and remove standard tasks as needed, tying
the due date of the task to the beginning or end of the leave. After you create the list of
standard tasks, when you enter leave, you can click the Create New Leave tab and check
the checkboxes next to the tasks that apply. Note a service can be installed that e-mails
these alerts. See http://ihrsoftware.com/ftp/installTaskEmailerService.html for installation
instructions.
Common Problems When Entering FMLA
Table 1 lists common problems and how to resolve them.
Table 1. Common Problems
Issue
Employee's FMLA balance is always 0 or
negative.
Resolution
Assign a leave accrual plan. Go to the leave
tab on the employee’s profile and click
Change Accrual. Select a plan and save.
When blocking out leave, the system
Check the employee's shift Go to the
includes weekends, skips weekdays, or
general tab on the employee’s profile.
shows the wrong number of hours each
Verify the shift setting. Click the “…”
day.
button next to the shift and open the list of
shifts. Open the employee’s shift and
confirm the shift’s settings. Standard
weekday shifts should show 8 hours\day,
starting on a Monday with 5 days on and 2
days off.
FMLA balance shows 480 hours, but the
Assign a full time equivalency less than 1.
employee does not work full 40 hour weeks Go to the leave tab on the employee’s
and should receive less.
profile and click Change Accrual. Click the
Advanced button. Change the FTE to a
fraction. The system will multiply the 480
by whatever FTE you enter.
Running Reports
Table 2 lists the FMLA related reports, explains how to open them, and describes their
contents.
Table 2. FMLA Related Reports
Information\Contents
Individual FMLA history
and balance
How to Open Report
Reports > Leave Lists and Calendars > Leave Itemization
and Summary for One Employee
Two Sections: Detail section with columns showing date of leave, type, hours or days
used, hours or days earned, hours or days accumulated, and note from leave entry
window. Summary section showing earned, used, and accumulated totals
Balances for group of
Reports > Leave Summaries > Consolidated Summary for
employees
One Type of Leave
Columns can be added or removed. Typically shows leave balance, dates most recently
used, and total used hours or days (calendar year or rolling)
Balances for several leave
Reports > Leave Summaries > Accumulated Leave
types
Summary (or Available Leave Summary)
Employee Name and a column for each type of leave. Note that the Available Leave
Summary considers future scheduled leave while the accumulated summary does not
List of FMLA leaves taken Reports > Leave Lists and Calendars > Leave Requests
across the company or a
department
Columns can be added or removed. Typically shows employee, department, hours taken,
date range of leave, and status of request.
FMLA case load
Reports > Leave Summaries > Incidents per Month
Total requests, approvals, and denials per month for a year
FMLA hours taken per
Reports > Timecards > Timecard Summary
month
Use filter to select only FMLA. Shows hours taken per month for each employee
Used leave taken for group Reports > Leave Summaries > Used Leave Summary
of employees
Shows employee and one column for each type of leave