1
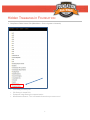
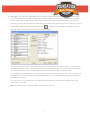
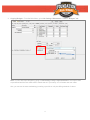
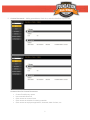
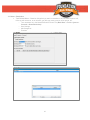
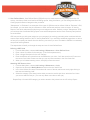
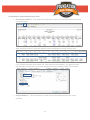
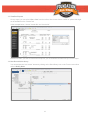
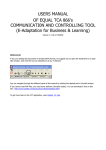
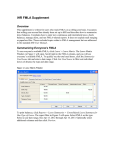
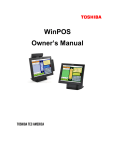
Hidden Treasures in FOUNDATION
Melissa Wood
Consultant
What We’ll Cover
1. Dropdown Control File
2. Tab Order
3. Edit Windows Layout
4. Copying Budgets
5. Custom Documents
6. Green Button
7. J/C Activity Reports
8. SQL Button
9. User Defined Fields
10. Notes & Reminders
11. User Defined Sorts
12. Exporting Report Data
13. Viewing and Sorting Reports
14. Next Record/Quick Query
Hidden Treasures in FOUNDATION
1. Drop Down Fields Control File (Main Menu > Tools > System > Controls)
•
•
•
•
Job filtering for closed jobs
PO filtering for closed POs
Equipment usage filtering for unposted entries
Name/Number Search – This is a fantastic feature that you must turn on!
1
2. Tab Order - The Tab Order Editor allows you to define a custom tab order (the order of the fields to which
you will be taken when you hit the <Tab> key) on certain windows in FOUNDATION. For users who regularly
use the same fields, setting a custom tab order will make the process of entering a record more efficient.
Currently, you can edit tab orders for the AIA Entry, A/P Invoice Entry, A/R Invoice Entry, Employee, Job, and
PO/Sub Entry windows. The Tab Order Editor icon
is available on the FOUNDATION toolbar on each of
these windows. Click on the icon to open the Tab Order Editor.
The list pane on the left side of the window displays a list of all fields on the current window. You can dragand-drop these fields into the Tab Order pane to create a custom tab order. The user can also use the [Add>], [<-Remove], and [<<-Remove All] buttons to customize the fields included in the tab order.
If you enable the Cycle checkbox at the top of the Tab Order pane, when you press the <Tab> key in the last
selected field, the cursor will return to the first selected field. You can enter additional cycles by clicking the
[New Sequence] button.
The Tab Order for User field allows you to determine if the tab order for the window is applied only to the
current user or all users.
Note: Only administrators are able to save a tab order for "All" users.
2
3. Edit Window Layout – The Edit Layout function allows you to customize the column layout in the distribution
area of the A/P Invoice Entry window.
In addition to being able to change the order in which columns are shown, you can also 'lock' certain columns
to the left or right of the window. As you scrolls through the distribution area, locked columns will stay in place
so they always remain visible. (This feature is designed for users whose distribution area has more columns
than can be displayed on windows.)
This feature is only available when adding or modifying an A/P invoice, and can be accessed by clicking the
Edit Layout icon
on the FOUNDATION toolbar.
Note: Custom layouts are user-specific.
Enabling the Edit Layout Function
To use the Edit Layout function, the feature must first be enabled for on the Security window. Please note that
this a user-specific setting. To enable the Edit Layout feature:
1. From the Main Menu select Tools > System > and Security.
2. Click the Companies folder to expand it, and select the correct company.
3. Click on the "Users" tab and enable the User-Defined Window Layouts checkbox for each user
that should have access to the feature.
Using the Edit Layout Function
When you click into the distribution area of the Enter A/P Invoices window, the Edit Layout
will become
active. Click the icon to open the Arrange Columns window. On this window, you can edit the layout of the
distribution area. The different areas/fields of the Arrange Columns window are:
•
•
•
•
Scrolling Columns -Columns listed in this area will be displayed as usual (i.e., they will move to
the left or right when you use the scrollbar).
Locked Columns - Columns listed in this area will be 'locked' in place. As you scroll through the
distribution area, these columns will remain permanently visible.
o By default, columns will be locked to the left of the distribution area, however this can be
changed using the Locked Columns on the field at the bottom of this window.
Disable Columns Layout - When this checkbox is enabled, any custom layout settings will be
turned off and FOUNDATION's default distribution layout will be used. You can enable this
checkbox at any time to turn on your custom layout settings.
Locked Columns on the -This setting determines if locked columns are shown on the left or right
of the distribution area. By default, locked columns will be shown on the left of the window.
3
4. Copying Budgets – From the Main Menu, go to Job Costing > Maintenance > Jobs > “Budgets” tab.
Note: You can also import budgets by going to Job Costing > Daily > Import Estimates. The Import needs
to pre-defined and the cost codes need to match what is in your setup, or it will create new cost codes.
Also, you can use the same methodology in setting up an AIA or unit price billing schedule of values.
4
5. Custom Documents – Adding spreadsheets, Word docs, and other links/files to your menu.
Common Uses for Custom Documents
• Custom Excel® query reports
• User manual/instructions
• Quick access to contract forms
• Quick access to websites for ordering materials
• Quick access to employee applications, timecards, blank I9 forms, etc.
5
To add a Custom link, follow these steps:
1. From the Main Menu go to Custom > Manage.
2. Click on the “Documents” tab.
3. Enter a name and choose a document group.
4. Pick a document type. Your options are:
a. File
b. Website
c. Email
5. Enter the path/location of the document type using Browse button.
6. Select “Security Option.”
7. Click [Save Changes].
8. From the Main Menu go to Custom > Documents > Move to Quick Links.
6. Green Button - Allows you to save a PDF copy of any report to a pre-assigned folder determined in the setup
below, that is time and date stamped, and can be found from the report window from which it was saved.
Setup for user-specific green button file user locations: Main Menu > Tools > Other.
Setup for company-specific green button file user locations: Main Menu > Tools > Control Files.
Click this button
when you are looking a report you want to save. The File Name dialog box will open.
Note: If you don’t change the name or allow the user to change the name, files will be stored in a consistent
and uniform fashion automatically. Please see the highlighted sample on the following page.
6
7. Drag-and-drop the J/C Activity Reports to the Quick Links menu.
Note: You must click on the report name from the dropdown menu pictured above. When a white box
appears, drag that box over to your Quick Links menu.
Also note that the report defaults will only save one way per user, so there is currently no way to save
different defaults for different reports within the J/C Activity Reports.
7
8. SQL Button - SQL is used to specify the criteria you want to search, as well as the order in which the results
should be returned.
The fields of the SQL Query Builder dialog box include:
• Field (first field) - This dropdown menu lists the fields you can search. For example, if you were
performing an SQL search for Job Records, in addition to “Job Number” and “Description,” other
fields from the Job Record, such as “Cost Basis,” “Job Type,” and “Geographical Area” will be
available for selection. Select the field for which you want to search. If there is more than one field,
select one of the fields, and then add additional rows for each field. To add a new row, click the [Add]
button.
•
Operator (second field) - From this dropdown, you will specify how the system should search the
selected field. Choose from the following options:
o “Equals” - The Value field must match the contents of the selected field exactly.
o
“Greater Than” - The contents of the selected field must be either greater than (numerically)
or later than (alphabetically) the contents of the Value field.
o
“Less Than” - The contents of the selected field must be less than (numerically) or earlier
than (alphabetically) the contents of the Value field.
o
“Greater Than or Equal” - The contents of the selected field must be greater than
(numerically), later than (alphabetically), or equal to the contents of the Value field.
o
“Less Than or Equal” - The contents of the selected field must be less than (numerically),
earlier than (alphabetically), or equal to the contents of the Value field.
o
“Doesn’t equal” - The contents of the field must not match the Value field exactly.
o
“Like” - This option compares the contents of the Value field and the contents of the selected
field to find matching records, but allows the use of wildcards. Use “%” as a wildcard to
indicate one or more unknown characters.
o
“Not Like” - This option compares the contents of the Value field and the contents of the
selected field to find records that do not match, but allows the use of wildcards. Use “%” as a
wildcard to indicate one or more unknown characters.
•
Value (third field) - Enter the value against which you want to compare the selected field. For
example, if searching for Job Records with the geographical area of “West,” select “Geographical
Area” in the first Field, “Equals” in the Operator field and “West” the Value column.
•
And/Or (fourth field) - If you want to add multiple criteria, select either “And” or “Or” in this field and
click the [Add] button to add an additional row. If both criteria need to be true, select “And.” If only one
criterion needs to be true, choose “Or.”
•
Case Sensitive - Enable this checkbox if you want FOUNDATION to consider capitalization.
8
9. User Defined Fields – Custom fields that you can add to maintenance and transaction files.
Creating User Defined Fields (Main Menu > Tools > System > Other > User Defined Fields)
•
•
•
•
•
Create an unlimited number of fields that you can add to mostly any table
o Employees – Great for Human Resources
o Vendors
o Customers
o Jobs
o Purchase Orders
o A/P Invoices
o And many more
Pick the correct table to which you want to add the field. Think “one to many” or “many to one”
Make sure the field doesn’t already exist
Pick the correct Type of field
o Character
o Numeric
o Dropdown List (Use these whenever possible)
o File Location
o Folder Location
o Integer
o Email Address
o Web Address
o Date
Make sure you set up the field correctly before you start adding data
Sample Employee UDFs
9
10. Notes – Reminders
• Task-Related Notes – Based on things that you want to remember to do, like make a phone call,
follow up with someone, to do list items, pay bills, pay taxes, send in union reports, etc.
o Turn reminders on in the Notes/Reminders Control File (Main Menu > Tools > System >
Controls > Notes/Reminders)
o User Settings
o Add Categories
o Priorities
Reminders
10
11. User Defined Sorts - User Defined Sorts (UDS) allow you to create custom sorting categories for the J/C
Activity, Job History Detail, and Over/Under Billing reports. Using this feature, you can arrange and filter Job
Costing reports based on categories that you define.
"Salesperson" or "Estimator" are examples of the types of UDS that can be defined. With an "Estimator" UDS,
for example, you can attach the job's estimator to each Job Record and then create a custom J/C Activity
Report to see which estimator has jobs that go over budget most often. Similarly, using a "Salesperson" UDS,
you could sort the Over/Under Billing Report to see which salesperson has the most commonly has jobs that
are under billed.
UDS can provide you with great insight into your company's job costing, particularly when combined with the
custom report writing features of the J/C Activity DataGenie. If you would like additional suggestions or advice
on how your company can benefit from this feature, your trainer (or one of Foundation Software's consultants)
can provide further guidance.
The steps below will walk you through the setup and use of User Defined Sorts.
Defining a UDF Sorts
1. From the Main Menu, choose Job Costing > Maintenance > User Defined Sorts.
2. Enter a short Sort Name for the category. (This field is alphanumeric.)
3. Enter a longer Description for the sort category.
4. Enter the different sort values that can be attached to your Jobs. You'll also need to tell FOUNDATION
the correct Sort Order. Please note that you can only enter numbers in the Sort Order field.
5. When you've finished entering values, click [OK] to save the record.
Attaching UDF Sorts to Jobs
1. From the Main Menu, choose Job Costing > Maintenance > Jobs.
2. Open the Job Record in Modify Mode and click on the the "Addl 2" tab.
3. In the User Defined Sort area in the bottom-left corner of the tab, add a new row by right-clicking in
this area and selecting “Add.”
4. Select the category (Sort Name) under which you want to sort this job. Next, select the Sort Value
you want to attach to this job. (You can only attach one value to each job.)
Repeat Step 4 for each UDS category you wish to attach to this job and run the J/C Activity Report.
11
12. Best Ways to Export Report Data to Excel
•
Exporting to a CSV file – This sends the raw data from a report into a comma delimited file that you
can open in Excel.
When exporting to Excel, it looks as though the column headings were cut off, but they aren’t.
If you increase the length of the header row, it will show the full description if you right-click on the
row and select “Format Cells,” click on the “Alignment” tab, then enable the Wrap Text checkbox.
•
Using a MS Query – This is the best way to send reports to Excel because the query can be
refreshed.
12
13. View/Sort Reports
On any report, you can select View > Sort from the toolbar, then choose from a number of options that might
not be available on the “Criteria” tab.
In the example below, I chose “Vendor No” and “Invoice No.”
Please note that if you want to use these sort options, you must select them each time you run the report.
14. Next Record/Quick Query
You can activate the “next record” buttons by clicking on the Quick Query icon on the FOUNDATION toolbar
while in Modify Mode.
13