1
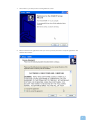
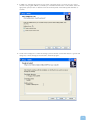
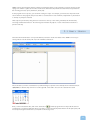
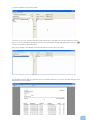
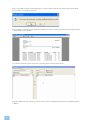
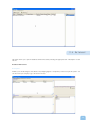
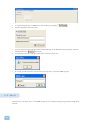
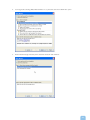
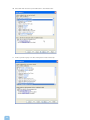
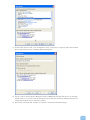
USER GUIDE:
SABRE
Stracom Pty Ltd
ABN 49 093 115 523
PO Box 142
Stones Corner QLD 4120
t f e w 1300 302 667
+61 733 242 226
[email protected]
www.stracom.net
CONTENTS
1.0
Introduction
4
2.0
Installation
4
3.0 Using SABRE
10
3.1
Email Search
11
3.2
Invoicing
13
3.4
Database
17
3.5
About
22
3.6
Help
23
3.7
Exit
23
4.0
Frequently Asked Questions
24
1.0 INTRODUCTION
SABRE (Stracom Agents Bill Recovery) is a program designed specifically for Shipping Agents using the Stracom
service to send messages via the ‘ipmsg.com’ domain. It allows you to allocate telex and fax costs against vessels and
principals without having to wait for the monthly invoice.
SABRE processes the delivery confirmations you receive in Microsoft Outlook and allocates them against various
ships. When the voyage is finished, it allows you to immediately create an invoice for the principal by compiling the
transactions to a single PDF document that can be automatically faxed.
HOW SABRE WORKS
Message Sent
Delivery confirmation for
message received
SABRE imports all nonprocessed message receipts
Cost of each message allocated
against appropriate account
BENEFITS
SABRE will save you the costs associated with
hours of unproductive time.
It will also allow you to immediately recover costs
that you have incurred when communicating with
a ship. Now if a ship leaves port on the 2nd of the
month, you can prepare their invoice for Inmarsat
messages the same day.
The ability to impose a consistent mark-up on an
individual basis.
Easy to use.
Invoice generated with appropriate markup
Integrates with Microsoft Outlook.
$$$
Savings
2.0 INSTALLATION
The SABRE program is supplied in a Zip file that automatically starts the installation process when it is decompressed.
For this reason, you will need to have a copy of WinZip installed on your computer.
The following steps explain how to install the program:
1. Locate the file titled ‘Version 1.11 Setup.zip’ and double click using the left mouse button:
4
2. Select the ‘Next’ button to proceed and answer ‘No’ to the next prompt:
3. The next screen will ask for the activity you wish to perform. Ensure the option ‘Unzip or install from
‘Version 1.11 Setup.zip’ is selected and click ‘Next’:
5
4. When asked if you want to unzip and install, ensure the appropriate option is selected and click ‘Next’:
5. Confirm that you wish to continue by selecting the ‘Install Now’ button:
6. Select ‘Yes’ to continue:
6
7. Select ‘Next’ to proceed past the following Welcome screen:
8. Please read the license agreement and if you want to proceed, select the ‘I accept the agreement’ and
click the ‘Next’ button:
7
9. You can now choose to install the program files to the default directory, or navigate to a different folder
if you wish. When you have finished, select the ‘Next’ button to proceed:
10. The name of the program shortcut will be placed in your ‘Start Menu > Programs’ titled ‘SABRE’. If you
wish to allocate the program a different name, change it here and / or select ‘Next’ to continue:
8
11. In addition to accessing the program via your ‘Start > Programs’ menu, you can also choose to have a
shortcut to the program added to your Desktop or in the Quick Launch section of the taskbar. Select the
appropriate option (or leave on default to have the shortcut placed on the Desktop) and click ‘Next’ to
continue:
12. A final screen will appear to confirm the settings you have entered. Use the ‘Back’ button to go back and
change any of these settings, else click ‘Install’ to install the program:
9
13. The program will now install and when completed, the following screen will appear. Click ‘Finish’ to start
the SABRE program straight away, or else untick the ‘Launch SABRE’ tickbox if you wish to open the
program at a later time:
3.0 USING SABRE
When you first open the SABRE program, this is what you see:
10
SABRE works by processing the delivery notification and receipt emails you get each time you send a message via the
‘ipmsg.com’ domain. It parses each of these notifications and extracts key information that will be incorporated into
the invoicing process (i.e. price, destination, sender, etc).
As the program follows a process, you can think of using it in ‘steps’. For example, you first need to import the notification emails into the program; then process them to construct the invoices and finally output them for presentation
to the ship or principal concerned.
These steps are performed by using the icons located across the top of the screen, particularly the ‘Email Search’,
‘Invoicing’ and ‘Database’ buttons. The following section details the purpose of each of these buttons and how to
perform each step.
3.1 Email Search
Select the ‘Email Search’ button to import the delivery notification emails from Outlook into SABRE for invoice processing. Please note this facility will only work with Microsoft Outlook:
Choose the date you wish to search back to by either entering it as per the format already shown in the date box (i.e.
30/06/2005) or click the drop down arrow on the right side of the field to choose from a calendar view as bel
Once you have selected the date, click on the Start button
and the program will now import all the Stracom
confirmations for messages delivered. Please note that if you have already imported emails from this period, they will
not be imported again to ensure that you only bill for the message once.
11
When the import starts, you will receive the following pop-up box from Microsoft Outlook:
Tick the ‘Allow access for’ tickbox and choose ‘5 minutes’ from the drop down box. This will allow the SABRE program
to parse the Outlook folders to locate any confirmation messages. When it has completed its operation, a confirmation box will appear to advise how many records it located. Click ‘OK’ to proceed:
A list of messages will appear in the left pane and can now be assigned to individual ships/principals:
If the @dept=name_of_ship was used in the subject field of the message, it will automatically assign the message to
the ship. Otherwise, you can now double click on each message and type in the name of vessel/office the message is
attached to:
12
As each message is assigned to a vessel, they will disappear from the list until it is empty. Select the ‘Ready to
Invoice’ tab on the top of the screen to be taken to the list of messages that have been assigned to vessels and are
waiting to be processed:
Proceed to the next section, Invoicing, to find out how you can prepare the invoices.
3.2 Invoicing
After you have assigned all of the messages to a vessel/office in the previous step, you can now raise an invoice to
the agent/company concerned. Upon selecting the ‘Invoicing’ tab, you will see the following screen (with blank fields
for Shipping Agent and Markup):
13
All ships and the number of assigned messages are shown in the ‘Messages ready to invoice’ section on the left side
of the screen. To setup the details of the party you are going invoice, select the ‘Add new’ icon
of either the ‘Shipping Agent’ or ‘Shipping Company’ fields:
Once you have completed this screen, click the ‘OK’ button and select ‘Yes’ to confirm the new data:
14
You will be returned to the following screen:
You can now ‘move’ any messages from the left side of the screen to the right side of the screen (‘Invoice’ section)
that are to be allocated against this agent/company by first selecting the message and clicking the transfer icon
which is located halfway down the screen.
Enter a price markup in the ‘Markup %’ field and the date the invoice needs to be paid by:
Use the ‘Preview Invoice’ button to check the invoice contains the information you wish to send and select the ‘Close’
button when you have finished
15
Once you are happy with the content presentation of your document, select the ‘Save Invoice’ button and confirm
that you wish to now generate an invoice:
In the final step, you will be presented with the rendered invoice that is ready to be printed, saved as a PDF document
or faxed directly to the customer:
If you need to refer back to previous invoices at any time, return to the ‘Invoicing’ screen:
Select the ‘Archived Invoices’ tab and you will see a list of previously generated invoices that can be either reprinted
or deleted:
16
3.4 Database
This screen allows you to perform database maintenance tasks by selecting the appropriate tab. A description of each
follows:
Database Maintenance
Description:
Enables you to make changes to the details of any Shipping Agents or Companies you have set up in the system. You
can also insert your company logo to be used on invoices:
17
Changing Details
1. To change any of the details for either agents, companies or ships, simply click on the field you wish to change in
the associated table. For example, if you wish to change the ‘State/Country’ of a Shipping Agent simply click on
that field in the Shipping Agents table:
2. When you have made the change, simply press Enter and the field will be updated:
Inserting your logo
1. Prior to ‘uploading’ your logo to the SABRE program so it is inserted onto each and every invoice, you need to
ensure it is in the correct format first. This requires it to be a Bitmap file (with extension .bmp) and a pixel size of
332 width x 100 height. If your company logo is not in a .bmp format, you can process it via an image editor to
convert it.
For this example, the original format of our Stracom logo is in a .jpg file. Using an image editor (in this case
Microsoft Image Composer but there are many available such as Photoshop, etc), we opened it and then resized
the image to 332x100. It was then saved as a .bmp file.
2. When you have a logo in bitmap ready, double click on the whitespace as below:
3. Navigate to the directory where your logo .b
18
4. Select the logo file and then click ‘Open’. Your logo will now be displayed in the preview area as below:
5. To delete/clear this logo at any time, select the ‘Clear Logo’ button. If you wish to replace the logo at any time,
simply repeat steps 1 to 4.
File Maintenance
Description:
The screen below allows you to perform functions on the SABRE database:
Actions that can be done include:
Back Up – every time an invoice is generated, the details are stored in the SABRE database. To ensure that you
do not lose this information, use this facility to perform a backup to an external source (such as a ZIP or CDRW
drive).
Restore – use this function to restore a back up file as created above.
Repair – a handy feature that enables you to repair the SABRE database should you get an error advising of a
database problem.
19
The next sections detail how to perform each action.
Data Backup
1. Select the ‘Save Backup’ button
.
2. From the following screen, navigate to where you would like to store the back up file and type in a name for the
back up file (i.e. SABRE). Click ‘Save’ when ready. This file will be saved with an extension of ‘.sab’ to indicate that
it is a SABRE backup file:
3. A message box will appear to confirm the backup file has been successfully saved:
Restore Backup
1. Select the ‘Open Backup’ button
.
2. Navigate to where your backup file is stored, select it and click ‘Open’:
20
3. Confirm that you wish to overwrite any existing data with the backup. Warning: this process will overwrite your
existing database. This is fine if you have freshly reinstalled the program after a computer ‘crash’ as your backup
will overwrite the new database created when reinstalling the program. However, for any other scenario, please
be aware of the danger of overwriting your existing data with a backup:
4. The following confirmation will appear if the data has been successfully restored. Click OK to finish:
Repair Database
1. Select the ‘Repair’ button
.
2. Confirm that you wish to run the database repair process by selecting the ‘Yes’ button:
3. SABRE will now attempt to repair the database and depending upon its size, you should eventually receive a
confirmation that his been completed:
4. Click ‘OK’ to finish process.
Other Options
Description
You can set a password so that only authorized persons may access the program.
21
1. To set password protection for SABRE, select the ‘Use Password’ checkbox
2. The password fields will become ‘active’:
.
3. Type your password in the ‘Enter New Password’ field and again in the ‘Repeat New Password’ field. Select the
‘Set Password’ button
when ready.
4. The following confirmation will appear when the password is correctly set:
5. As a result, you will now receive a password prompt every time you open the SABRE program:
3.5 About
Select this tab to see which version of the SABRE program you are currently running, along with other details about
Stracom.
22
3.6 Help
Select the ‘Help’ tab to view a document containing key information on the use of the SABRE program:
3.7 Exit
To exit the program, click the ‘Exit’ tab.
23
4.0 FREQUENTLY ASKED QUESTIONS
How do I ensure that ‘message delivery notifications’ for all messages sent from terminals in different locations are processed at a central location?
Answer:
The best way to achieve this kind of centralization is to use the Microsoft Outlook ‘Rules and Alerts’ feature. Please
read on for details on how to set up an email rule to forward a copy of all message delivery receipts to a central email
address so that the SABRE program can import it.
Steps:
1. Open Microsoft Outlook (this example is done in Outlook 2003).
2. Select Tools > Rules and Alerts. In some versions, this may start automatically with the Wizard and if so, please
continue to Step 4:
3. Select the ‘Email Rules’ tab, followed by the ‘New Rule’ button.
24
4. You may get the following ‘Rules Wizard’ window. If so, select the ‘Start from a blank rule’ option.
5. Ensure ‘Check messages after they arrive’ has been selected in both windows:
25
6. Select the ‘from people or distribution list’ option in the top window pane titled ‘Step 1: Select condition(s):
7. In the lower pane, (Step 2: Edit the rule description), left mouse click once on the underlined ‘people or distribution list’. In the window that appears, type in ‘[email protected]’ in the ‘From’ field:
26
8. Select the ‘with specific words in the subject’ option in the top window pane titled ‘Step 1: Select condition(s)’:
9. In the lower pane (Step 2: Edit the rule description), left mouse click once on the underlined ‘specific words’. In
the screen that appears, type in “/Delivered Copy” and select the ‘Add’ button:
27
10. Select ‘OK’ when done and you should return to the wizard screen:
11. In the top window pane, now select ‘with specific words in the body’:
28
12. In the lower window pane, click on the underlined ‘specific words’. In the window that appears, type ‘DELIVERED
COPY’ and press the add button:
13. Select OK button and you should return to the wizard:
14. Click the ‘Next’ button and in the new window that appears, select the option ‘forward it people or distribution
list’ from the upper pane ‘Step 1: Select action(s). In the lower pane, click on the underlined ‘people or distribution list’:
29
15. In the new window that appears, type the email address or addresses that you wish to have the message forwarded to. This should be typed into the ‘To>’ field. Press OK when finished:
16. The following screen will confirm your actions so far:
30
17. Click the ‘Next’ button to take you to the Exceptions screen. As there are no exceptions, please click the ‘Next’
button again and final screen of the Rules Wizard should appear:
18. Type in a name for the rule (such as Message Forward for SABRE), select the ‘Run this rule now for messages
already in “Inbox” if you wish to have all messages that meet these rules conditions currently in the Inbox forwarded, and ensure the ‘Turn on this rule’ is selected.
19. Press ‘Finish’, followed by ‘OK’. The rule is now turned on and should forward all messages
31
Can I change an invoice once it has been generated for printing?
Answer:
Unfortunately, once an invoice has been generated and is ready for printing, you are unable to make any changes to
it. If you have saved the invoice in a PDF format, one alternative is to download or purchase a PDF editor and use this
application to make any minor changes (for example, http://www.pdfill.com/).
How do I change my logo or resize it?
Answer:
The logo import in Strabill is restricted to the size and type of the image file that is used (i.e. must be a bitmap file
(.bmp) with a width no greater than 332 pixels and a height no greater than 100 pixels). To increase the size of the
logo on the invoice would mean increasing the size of the original logo bitmap file. This can be done using an image
editing program, such as Microsoft Image Composer or Photoshop.
32
33