1
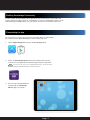
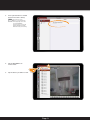
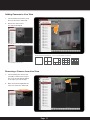
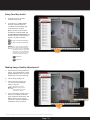
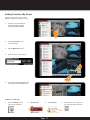
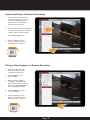
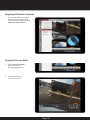
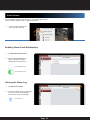
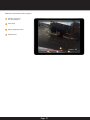
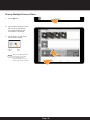
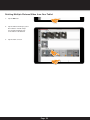
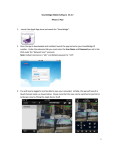
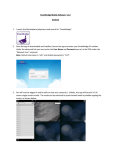
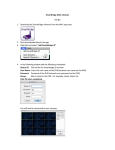
USER MANUAL Smartbridge HD Live App (For Tablets) INTRODUCTION TABLE OF CONTENTS Section Description Page# Connecting Your Device with Your Tablet 1 2 Enabling Smartbridge Functionality 4 Downloading the App 4 Creating a Smartbridge Account 5 Logging the App into Smartbridge 7 Configuration Adding Devices 9 Live View 3 Live View Feature Overview 10 Adding Cameras to Live View 11 Removing a Camera from Live View 11 Show/Hide Device Column 12 Capturing Pictures from Camera Feeds 12 Recording a Camera Feed Video Snippet 13 Muting Video Feeds 13 Using Two-Way Audio 14 Making Image Quality Adjustments 14 Controlling Alarms 15 Zooming in on a Camera Feed 15 Adding Favorites (My Cameras) 16 Adding Favorites (My Views) 17 Stopping All Camera Feeds 18 Full Screen View 18 Using PTZ Controls 19 Remote Playback 4 Remote Playback Feature Overview 20 Reviewing Recordings from a Remote Device 21 Showing/Hiding the Device Column 21 Capturing Pictures of Remote Recordings 22 Taking a Video Snippet of a Remote Recording 22 Muting Sounds 23 Pausing/Playing Remote Recordings 23 Digital Zooming 23 Stopping All Remote Playback 24 Using Full Screen 24 Page 2 INTRODUCTION TABLE OF CONTENTS Section Description Page# Alarm Features 5 Enabling Alarm Push Notifications 25 Viewing the Alarm Log 25 Picture and Video 6 Working with Pictures and Video 26 Sharing Multiple Pictures/Video 28 Deleting Multiple Pictures/Video from Your Tablet 29 Welcome Thank you for choosing First Alert for your security needs! For more than half a century, First Alert has made the home-safety and security products that make your life easier. Our products are built to the highest standard which has earned us a leadership role in the home-safety and security product categories. We are committed to serving our customers, from the professionals who install our products, to the families and businesses who count on them. First Alert has been helping families and businesses stay safe for over 50 years. By having a First Alert Security System, you’re taking the first step in protecting your home or business from damage or theft. This manual is written for the Smartbridge HD App for your Apple® or Android Tablet. A separate app is available for your mobile device. It was accurate at the time it was completed. However, because of our ongoing effort to constantly improve our products, additional features and functions may have been added since that time and on-screen displays may change. We encourage you to visit our website at www.firstalert.com to check for the latest manuals (English and Spanish), firmware updates, downloads, other security camera products and announcements. Page 3 Enabling Smartbridge Functionality In order to utilize the Smartbridge Tablet application your system must be connected to the Internet and you’ll need to register for a Smartbridge account. The Smartbridge features can be enabled through the DDNS interface on your system. See full user’s manual for instructions. Downloading the App The next step in accessing your system from your tablet device is downloading the software from the Apple iOS App Store or the Google Play store. 1. Tap the Apple iOS App Store Icon or the Google Play Store. iOS App Store Google Play Store 2. Search for Smartbridge HD Live and touch to download it. You may need to enter your Apple ID Password or Google Play Store password. NOTE : You may notice two versions of the Smartbridge Application. The version labeled Smartbridge High Definition HD is intended for tablet use. 3. Once the app is downloaded and installed, tap the Smartbridge HD Live App icon to begin. Page 4 Creating a Smartbridge Account Now that you’ve installed the Smartbridge Tablet App, you may need to create an account if you have not already done so. 1. Once the Smartbridge App is open tap Register. 2. Enter your Email and the verification code displayed on the right. Tap Get Verification Code to continue. Page 5 3. Enter the verification code received by the email submitted in the previous step and tap Next. 4. Enter your User Name and Password to create your account and tap Finish. Page 6 Logging the App into Smartbridge Now that you’ve prepared your system and downloaded the app we can connect your tablet directly to your live video feeds. The first time you launch the application you will see a blank Live View screen. 1. Begin by touching the Smartbridge Login icon in the left side toolbar. 2. Enter your User Name/Email and your password from the previous step and touch Login. Check the Auto-login button if your are on a private tablet to login automatically. Page 7 3. Your registered devices should appear in the device listing. NOTE : If you don’t see any devices, your system may not be properly connected to your Smartbridge account. Please see the full product manual for details troubleshooting connectivity. 4. Tap the Live View icon in the left bar. 5 4 5. Tap the device you’d like to view. Page 8 Configuration Within Configuration you can add and remove devices, modify favorites, add a password to the Smartbridge app, adjust Wi-Fi settings, and access the built-in help feature. 1. Tap the Configuration icon in the left side menu bar. Adding Devices 1. To add a new devices tap Devices. 2. If this is the first time you’ve added a device through the application the device listing will appear blank. Tap the + icon in the upper right to get started. 1 1 3. Choose a mode for registration. Simple DDNS is the recommenced mode for connecting your device to the Smartbridge app. a. a Alias: choose a name for your device. The device will appear with this name in the listing. b b. Register Mode: choose the method you will use to connect to your device.* (Recommended) a b c d e f c. c Server Address: type the server address for your device. d. d Device Domain: type the domain of your device. You can snap a picture of a QR Code created in the Wi-Fi settings in this field. e e. User Name: this is the user name on the actual device. f f. Password: this is the password associated with your user name on your actual device. g g. Camera No: enter the number of the cameras you’d like to access. g * For more information on settings for each Register Mode refer to your devices full user manual. Page 9 Live View Live View allows you to set up and work with your camera feeds. You can choose to show all your feeds, create favorites, take pictures and video, and more. To access Live Mode do the following: 1. Touch the Live View Tab on the left side menu bar. Live View Feature Overview Capture Video Turning Live View On/Off Record a video from the selected live video feed. Turn Off Turn On Access Full Screen View Capture Picture This button will take a still picture of the selected video feed. Hide Device Column Mute On/Off Turns the sound on/off. Remote Camera Control (PTZ) Make pan, tilt, and zoom adjustments remotely* Use Two-Way Communication* Enables two-way communication through compatible systems. Image Quality Make digital adjustments on your Live View feeds. Alarm Control Panel Allows you to remotely enable or disable alarms at your system. * Requires a compatible camera. Some features may not be available on all models. For additional info visit www.firstalert.com. Page 10 Digital Zoom* Digital zoom allows you to use your tablet to zoom in and out on a feed. Access Favorites Access your saved camera and view layouts. Adding Cameras to Live View 1. Touch and drag the Camera you’d like to view over the video feed. 2. Release the Camera over the video feed window. Drop the video feed over the existing feed to replace. Live View Camera Layout Options - 1, 4, 6, 9, and 16 simultaneous cameras. Drop the video feed into an empty window to show multiple views at once. Removing a Camera from Live View 1. Touch and drag the camera view you’d like to remove to the top of the screen. A trash bar will appear at the top as you start to drag. 2. When the trash bar highlights red, release to remove the video feed. Page 11 Show/Hide Device Column 1. Tap the Show/Hide Device Column icon once to hide devices from view. 2. Tap again to Show. Capturing Pictures from Camera Feeds 1. Tap the Camera Feed you’d like to capture an image of. The feed will show a small highlighted border when selected. Double tap to view just that feed. 2. Tap the Take Picture Icon. 1 3. Pictures and video you’ve taken are saved in the Picture & Video tab on the side bar. 2 Page 12 Recording Camera Feed Video Snippet 1. To record a video first select the Camera Feed you’d like to record video of by tapping it. Double tap to zoom into just that feed. 2. Tap the Record Video Icon. 3. While recording, the video icon will appear red and a small red dot will appear on the feed being recorded. 4. Tap the icon again to stop recording. Pictures and video you’ve taken are saved under the Pictures and Video tab in the side bar. Muting Video Feeds 1. Tap to select the video feed you’d like to mute. 2. Tap the Mute icon. Audio Enabled Audio Muted 1 3. Tap again to unmute. 2 Page 13 Using Two-Way Audio* 1. In Live View touch an audio enabled camera feed. 2. If your device is equipped with two-way communication you can utilize the Smartbridge app to talk and listen remotely. When Live View is launched the microphone will be disabled. Tap the Two-Way Communication icon to begin two-way communication, tap the icon again to disable. Two-Way Communication Disabled Two-Way Communication Enabled NOTE : If you can’t hear any sound from your camera feed first make sure the sound is on in the Smartbridge App and the volume on your tablet is turned up. If you are still having problems refer to the full owner’s manual for troubleshooting tips. Sounds On Sounds Off Making Image Quality Adjustments* 1. Tap the Camera Feed you’d like to adjust. The feed will show a small highlighted border when selected. Double tap to view just that feed. 2. Tap the image quality icon. 3. Choose from the presets you can choose Clear, Balanced, Fluent or Custom. NOTE : Adjustments you make will affect the live view as well as images you capture and video recordings. 4. The custom image settings menu allows you to adjust the Stream Type, Resolution, Frame Rate, and Bitrate. Refer to your camera’s full owner’s manual for additional information on these settings. 2 * Requires a compatible camera. Some features may not be available on all models. For additional info visit www.firstalert.com. Page 14 Controlling Alarms 1. Access the additional Live View menu items by swiping the bottom menu bar from right to left. 2. Click the Alarm Output Control icon. 3. Tap the alarm output sliders to enable or disable an alarm output. Alarm Output is On Alarm Output is Off Zooming in on a Single Feed 1. Tap the Camera Feed you’d like to zoom in on. The feed will show a small highlighted border when selected. Double tap to view just that feed. 2. Tap the Zoom Feed button. While zoomed the icon will highlight red. Zoom Enabled 3. Tap the icon again to zoom out. Page 15 Adding Favorites (My Cameras) Cameras you use frequently can be added as favorites for quicker access. 1. Begin by dragging the camera feed you’d like to create a favorite for to the Live View window. 2. Tap the feed to make sure that it is selected. 3. Tap the Favorites icon. 4. Tap the My Cameras button. 4 3 5. The favorite will now appear in the left side column under My Cameras. 5 6. You can now drag or select the camera from your favorites menu. To Remove a Favorite: 1. Tap the Settings icon in the left side menu bar. 2. Tap Favorites. 3. Tap Cameras. 4. Tap the corresponding star icon. Favorite Enabled Page 16 Favorite Disabled Adding Favorites (My Views) Sets of cameras you access can be added as favorites for quicker access. 1. Create the view you’d like to save by dragging cameras into the Live View window. 2. Touch the Favorites icon in the menu bar. 3. Tap the My Views button. 4. Choose a name for your view. 4 3 5. The favorite will now appear in the left side column under My Views. 5 To Remove a Favorite: 1. Tap the Settings icon in the left side menu bar. 2. Tap Favorites. 3. Tap Cameras. Page 17 4. Tap the trash can icon next to the view you’d like to remove. Stopping All Camera Feeds 1. Tap the Stop All button to discontinue camera feeds and reset the Live View window. Full Screen View 1. Tap the Camera Feed you’d like to view full screen. The feed will show a small highlighted border when selected. Double tap to view just that feed. 2. Tap the Enter Full Screen Mode button. Remote Camera Control (PTZ) Make pan, tilt, and zoom adjustments*. Touch and drag the silver button to make adjustments. Exit Full Screen Mode Tap to exit full screen mode and return to standard live view mode. * Requires a compatible camera. Some features may not be available on all models. For additional info visit www.firstalert.com. Page 18 Using PTZ Controls* 1. Tap the Camera Feed you’d like to make PTZ adjustments for. The PTZ controls will appear. 2. Use the following controls to make pan, tilt, and zoom adjustments. Zoom in and Out Change Focus Adjust Iris (changes the amount of light the camera is allowing in. PTZ Pan tilt and zoom movements. Auto Scan: Tap to start / stop auto scan (automatic camera rotation). PTZ Increments: Increase or decreases the pan, tilt, and zoom increments. Creating a PTZ Favorite: 1. Set the PTZ adjustments to the desired scene and tap Presets. 2. Tap the preset number you’d like to save to. 3. Use the following buttons to Reload, Save, and Delete presets. Reload the selected preset. Save the current scene to the selected preset. Delete the scene assigned to the selected preset. * Requires a compatible camera. Some features may not be available on all models. For additional info visit www.firstalert.com. Page 19 Remote Playback Remote Playback allows you to access saved video feeds from your camera system while you are away. Access the Remote Playback features by doing the following. 1. Touch the Remote Playback Tab on the left side menu bar. Remote Playback Feature Overview Playback Window Once loaded, video feeds will play in this area of the screen. Access Full Screen View Hide Device Column Timeline Drag left or right to change video playback time. Capture Picture Takes a still picture from within your recorded video. Take Video Snippet Allows you to take a snippet of video. Mute On/Off Turns the sound on/off. Pause/Play Pauses the remote video playback. * Requires a compatible camera. Some features may not be available on all models. For additional info visit www.firstalert.com. Page 20 Digital Zoom* Digital zoom allows you to use your tablet to zoom in and out on a feed. Stop All Live Views Stops all camera feeds. Reviewing Recordings from a Remote Device 1. Drag the Camera feed you’d like to review video from into the viewing window. The Timeline shows recorded video times with a blue bar. 2. Use your finger to drag the playhead (the small orange line) to the position you’d like to review. 3. You can view multiple recordings at one time by dragging additional Camera Feeds into the playback window. By selecting each feed and repositioning the timeline bar you can adjust the timeframe for playback on Camera Feeds individually. Showing/Hiding the Device Column 1. Tap the Show/Hide Device Column icon once to hide devices from view. 2. Tap again to Show. Page 21 Capturing Pictures of Remote Recordings 1. Tap the Camera Feed you’d like to Capture an image of. The feed will show a small highlighted border when selected. Double tap to view just that feed. 2. You can stop the video where you’d like to capture an image by pressing pause or take a capture while recording. 1 Tap the Take Picture icon. 3. Pictures and video you’ve taken are saved in the Picture & Video tab on the side bar. 2 Taking a Video Snippet of a Remote Recording 1. Slide the timeline bar to the location you’d like to begin recording and touch play. 2. Tap the Snippet icon to begin recording. 3. While your video snippet is recording a small red dot will appear in the upper left corner of the screen and the Snippet icon will show highlighted in red. 4. Tap the Snippet icon again to stop recording. 5. Pictures and video you’ve taken are saved in the Picture & Video tab on the side bar. 1 Page 22 Muting Sounds 1. To mute the audio of a recording tap the Mute button. Tap it again to turn the sound back on. Sounds On Sounds Off Pausing/Playing Remote Recordings 1. To pause the remote recording tap the pause button. Tap again to resume playback. Pause Playback Resume Playback Digital Zooming 1. Locate the time frame in the video playback you’d like to zoom in on and tap the Digital Zoom button. 2. ZOOM IN: with two fingers on your tablet screen pull apart to zoom in. ZOOM OUT: with two fingers on your tablet screen pinch to zoom out. SCROLL: with a feed zoomed you can scroll around the image by dragging with your finger. NOTE : Digital Zoom is not utilizing a compatible camera’s* lens to zoom in and out. If your camera is capable of lens zooming see the section on remotely controlling your camera (PTZ). 3. When digital zoom is enabled the icon will appear red. Tap the digital zoom icon to return to the original size. * Requires a compatible camera. Some features may not be available on all models. For additional info visit www.firstalert.com. Page 23 Stopping All Remote Playback 1. You can stop all Remote Playback Cameras and reset the playback window quickly by tapping the Stop All Remote Playback button. Using Full Screen Mode 1. Tap the Full Screen Mode button in the Remote Recordings playback bar. 2. Tap the button again to exit full screen mode. Page 24 Alarm Features The Smartbridge Application allows you to receive Push Notifications when an alarm is triggered and see Alarm Information. 1. Touch the Alarm Settings Tab on the left side menu bar. Enabling Alarm Push Notifications 1. Tap Alarm Push Notification. 2. Tap the on/off switch for the device you’d like to enable/ disable push notifications for. Push Notifications Off Push Notifications On Viewing the Alarm Log 1. Tap Alarm Information. 2. Information about alarms is displayed. You can clear the info by tapping the trashcan icon in the top right. Clear Alarm Log Page 25 Picture and Video You can access, remove, and share image captures and videos you’ve recorded from Live View and Remote Playback through the Picture and Video menu item. 1. Touch the Pictures and Video Tab on the left side menu bar. Working with Pictures and Video 1. Tap the video snippet you’d like to work with. a Return to thumbnails. b Begin playback. c Delete Snippet from your tablet’s memory. NOTE : d a e b This does not remove the video from your remote device. Share your video. c Share via eMail NOTE : e Save to device iOS 8.1 shown. Sharing methods are depending on your tablet device manufacturer. For details on sharing refer to your manufacturer’s manual or website. Swipe left and right to access the next saved Snippet or Photo. Page 26 d Additional Controls During Video Playback: f Capture a Picture of the video playback g Pause/Play h Adjust playback position i Mute/Unmute h f Page 27 g i Sharing Multiple Pictures/Video 1. Tap the Edit icon. 1 2. Tap the videos and images you’d like to share. A small orange check mark will appear next to the videos to be shared. 3. Tap the share icon and choose your method of sharing. Share via eMail Save to device 2 NOTE : iOS 8.1 shown. Sharing methods are depending on your tablet device manufacturer. For details on sharing refer to your manufacturers manual or website. 3 Page 28 Deleting Multiple Pictures/Video from Your Tablet 1. Tap the Edit icon. 1 2. Tap the videos and images you’d like to delete. A small orange check mark will appear next to the videos to be deleted. 3. Tap the trash can icon. 2 3 Page 29 ©2015 BRK Brands, Inc. All rights reserved. Distributed by BRK Brands, Inc., Aurora, Illinois 60504. First Alert™ is a trademark of The First Alert Trust. BRK Brands, Inc. is a subsidiary of Jarden Corporation (NYSE: JAH). Wi-Fi® is a registered trademark of Wi-Fi Alliance. App Store is a service mark of Apple Inc. Google Play is a trademark of Google Inc. 3901 Liberty Street Road, Aurora, IL 60504-8122 Phone: 630-851-7330 Tech Services: 800-323-9005 www.firstalert.com / www.brkelectronics.com M08-0544-000 02/15