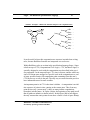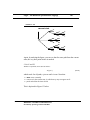
1
RuleBase
Formal Verification Tool
User’s Manual - Book I
Version 1.3
November 8, 2001
IBM Science and Technology
Haifa Research Laboratory , Israel
Provided to _____________________________ on ________________
by special agreement with IBM
contact: [email protected]
2
This product or portions thereof is manufactured
under license from Carnegie Mellon University.
IBM Haifa Research Laboratory, Israel
Provided by special agreement with IBM
3
CHAPTER 1
Introduction
CHAPTER 2
Tutorial
7
11
Specification 11
Implementation 12
Environment Modeling 13
Specifying Properties for Verification 16
Actual Verification 16
Problem Analysis 18
Fixing and Rerunning 19
Witness 19
Data-Path Rule 20
Exiting 21
Exercise 21
BUF implementation in VHDL 21
CHAPTER 3
Getting started 25
Accessing RuleBase 25
Preparing a Verification Environment
Running RuleBase 30
Design Translation 34
CHAPTER 4
Describing the Environment
26
45
Language Constructs 47
Arrays 61
Sequential Processes 67
Environment constraints 72
Linking the environment to the design 79
Overriding Design Behavior 79
Using Non-determinism and Fairness 80
Modelling Clocks 87
Modelling Reset 89
RuleBase: a Formal Verification Tool
Provided by special agreement with IBM
4
CHAPTER 5
Sugar - The RuleBase Specification
Language 91
Semantic Model 92
CTL Operators 94
Sugar Operators 105
Min/Max specifications 120
Multiple-Clocks in Formulas 120
Quantification Over Data Values 121
Writing Correct Formulas 122
Satellites - Even More Expressiveness 124
CHAPTER 6
Sugar - Formula Examples
127
Basic formulas 127
Arrays 129
Before 130
Until 131
Forall 131
Eventuality 132
More Sequences 132
CHAPTER 7
Managing Rules, Modes
and Environments 133
Rule and Mode definition 134
Using modes to limit the Environment - Example 136
Verification Project Management 138
CHAPTER 8
Size problems and solutions 141
Design Partitioning 141
Rule Partitioning 142
Behavioral Partitioning 142
Abstraction of the Environment 142
IBM Haifa Research Laboratory, Israel
Provided by special agreement with IBM
5
Gradual Enlargement 143
Abstraction of Internal Parts 143
BDD Ordering 144
Verify Safety OnTheFly 145
Efficient Use of Real Memory 147
CHAPTER 9
Debugging Aids
149
Scope waveform display tool
Vacuity 154
Witness 155
Reduction Analyzer 156
Longest Trace 159
Multiple traces 160
Prolong trace 160
Other debugging aids 161
CHAPTER 10
Graphical User Interface: Tool Controls and
Options 163
Main window - overview
Menu Bar 165
Message panel 167
Rule list 168
Quick buttons 168
Text control panel 176
CHAPTER 11
150
164
Design for Formal Verification 179
Separation of Control from Data
Design Partitioning 179
Clocking Schemes 180
Design Mapping 181
Asynchronous Logic 181
Tri-State Buffers 181
RuleBase: a Formal Verification Tool
Provided by special agreement with IBM
179
6
Parametric Designs 182
Implementation Rules 182
CHAPTER 12
Coverage Methodology
The coverage model 185
Rule writing 185
Environment writing 186
Plans and reviews 186
Design Partitioning 187
IBM Haifa Research Laboratory, Israel
Provided by special agreement with IBM
183
CHAPTER 1
Introduction
Traditionally, logic verification is done by simulation. In simulation, a test vector is applied to the logic model, and the results of the simulation are examined. Both the generation of the test vectors and the examination of the results
can be done either automatically using a special-purpose tool, or by hand.
Coverage is one of the problems of simulation. Since it is impossible to
exhaustively simulate all possible sequences of input vectors, how can we
decide when enough input vectors have been applied in order to give us reasonable confidence that our design works as intended?
Formal verification is a novel technique for logic verification of hardware
designs. It attempts to address the problem of coverage by mathematically
proving that a design is correct with respect to its specification. There are many
approaches to formal verification. RuleBase uses an approach known as
“model checking”, which is equivalent to exhaustive simulation of the circuit
for every possible input sequence. In model checking, the specification consists of a set of properties to be proved. For example, “if signal x is asserted,
then within three clocks, signal y will be de-asserted”, or “signals z and w will
never be asserted together”. If the property is true, the designer is notified. If
the property is false, a counter-example is provided. The counter-example is a
RuleBase: a Formal Verification Tool
Provided by special agreement with IBM
8
CHAPTER 1
waveform showing a simulation sequence which proves that the property is
false.
The big advantage of model checking over simulation is that the designer is
freed from the necessity of generating test vectors. Model checking will check
the properties specified for every possible input sequence. On the other hand,
most chips are not designed to accept every possible input sequence. If a given
property fails for an illegal input sequence, this is of no interest. Thus, a
method is needed to specify all the legal input sequences to the formal verification tool. This is done by specifying a model of the expected environment.
This model describes the legal input sequences to the design under test.
One of the practical problems of model checking is known as “the size problem”. Because of the size problem, complete model checking runs can verify
designs having a few hundreds of state variables (latches or flip-flops). This is
obviously not enough to be useful in real hardware designs. The RuleBase formal verification tool solves the size problem by renouncing the proof of truth
possible with model checking on small designs. By renouncing proof of truth,
RuleBase can verify designs containing up to a few thousands of state variables. Although an answer of “true” to a specification is no longer a firm indication that the design is correct, an answer of “false” with a counter-example is
an indication of a bug in the design (or specification or environment). In this
way, RuleBase can be used to provide much better verification than is possible
using simulation alone, even for designs which are too large for complete
model checking.
One of the ways of dealing with the size problem is to reduce the design under
verification. Reduction is accomplished by analyzing the environment description provided by the user as well as the specification to be checked, and eliminating any logic which has no bearing on the specification under the
environment. Using the techniques of reduction in combination with
renouncement of proof of truth is known as over-reduction. For instance,
instead of describing the complete environment of the design under test, the
user may choose to describe a subset of that environment. RuleBase will use
the environment to reduce the design to a size suitable for model checking.
IBM Haifa Research Laboratory, Israel
Provided by special agreement with IBM
Introduction
9
Then, another subset of possible behaviors can be described. Thus, the user
has complete control over the reduction process. An answer of “true” for a
specification under a specific environment indicates that in that environment,
the specification is true, but does not indicate anything about the truth or falsity
of the specification under other environments.
The remainder of this document is structured as follows:
• CHAPTER 2: Tutorial, provides a hands-on introduction to RuleBase in the
form of a tutorial. The tutorial presents a small design of a buffer and shows how to
verify it under RuleBase.
• CHAPTER 3: Getting started, explains how to access RuleBase, how to set up a
verification environment and how to prepare a design for formal verification.
• CHAPTER 4: Describing the Environment, explains how to specify environment behavior. Arrays, non-determinism, fairness, clocks and more are discussed.
• CHAPTER 5: Sugar - The RuleBase Specification Language, describes both
CTL and Sugar, and the models on which they operate.
• CHAPTER 6: Sugar - Formula Examples, includes a list of useful formula patterns, mainly for beginners.
• CHAPTER 7: Managing Rules, Modes and Environments, suggests how to
manage verification projects.
• CHAPTER 8: Size problems and solutions, discusses the techniques used to
extend the design size limit as far as possible.
• CHAPTER 9: Debugging Aids, describes various debugging aids which are part
of the RuleBase tool.
• CHAPTER 10: Graphical User Interface: Tool Controls and Options,
describes the tool controls and options available, and how to set them from the
graphical user interface.
• CHAPTER 11: Design for Formal Verification, presents some practical design
guidelines to aid in formal verification.
• CHAPTER 12: Coverage Methodology, describes some ways to approach the
problem of completely covering the block when proof of truth is not possible
because of size problems.
RuleBase: a Formal Verification Tool
Provided by special agreement with IBM
10
IBM Haifa Research Laboratory, Israel
Provided by special agreement with IBM
CHAPTER 1
CHAPTER 2
Tutorial
This chapter introduces formal verification using the RuleBase tool in the form
of a tutorial. This tutorial presents a small design of a buffer, and explains how
to verify it under RuleBase. After completing this tutorial, you should feel
comfortable enough to begin using the tool. A basic knowledge in logic design
is assumed.
All files referred to in this chapter can be found in the tutorial directory (usually $RBROOT/../tutorial). Make a private copy of this directory and run from
it. It is assumed that you have access to $RBROOT and that you did the initial
setup as described in Section 3.1.
2.1 Specification
BUF is a design block that buffers a word of data (32 bits) sent by a sender to a
receiver. It has two control inputs, two control outputs, and a data bus on each
RuleBase: a Formal Verification Tool
Provided by special agreement with IBM
12
CHAPTER 2
side, as shown by the block diagram:
StoB_REQ
Sender
BtoS_ACK
BtoR_REQ
BUF
DI(0..31)
RtoB_ACK
Receiver
DO(0..31)
Communication (on both sides) takes place by means of a 4-phase handshaking as follows:
When the sender has data to send to the receiver, it initiates a transfer by putting the data on the data bus and asserting StoB_REQ (server to buffer
request). If BUF is free, it reads the data and asserts BtoS_ACK (buffer to
server acknowledge). Otherwise, the sender waits. After seeing BtoS_ACK,
the sender may release the data bus and deassert StoB_REQ. To conclude the
transaction, BUF deasserts BtoS_ACK.
When BUF has data, it initiates a transfer to the receiver by putting the data on
the data bus and asserting BtoR_REQ (buffer to receiver request). If the
receiver is ready, it reads the data and asserts RtoB_ACK (receiver to buffer
acknowledge). Otherwise, BUF waits. After seeing RtoB_ACK, BUF may
release the data bus and deassert BtoR_REQ. To conclude the transaction the
receiver deasserts RtoB_ACK.
2.2 Implementation
An implementation of BUF, written in VHDL, is described in file BUF.vhd (see
“BUF implementation in VHDL” on page 21). It consists of four parts:
IBM Haifa Research Laboratory, Israel
Provided by special agreement with IBM
Tutorial
•
•
•
•
13
state machine SENDER_INTERFACE controls the interface with the sender state machine
RECEIVER_INTERFACE controls the interface with the receiver
OCCUPIED is a flag indicating if BUF has data
DATA_BUFFER is a register holding the 32 bit data.
Knowledge of implementation details is not mandatory, unless you want to
fully understand the bug fix in the sequel. In this case, you are encouraged to
read BUF.vhd.
Depending on the user’s design environment, RuleBase supports several automatic translation paths of the implementation to a lower level format suitable
for verification. Since no translation path is set for this tutorial, and to make
things easier for you, the VHDL file is already translated for you. Please type
setup1 in the unix command line now, to make the translated design available.
2.3 Environment Modeling
This section explains how to assign behavior to primary inputs. If inputs are
left unspecified, unexpected input sequences may induce incorrect behaviors of
the implementation. These are called false negatives - “bugs” which result
from a behavior which is impossible in the real environment.
Environment models are described in EDL (Environment Description Language). The models for this example are in the file envs. For the sake of clarity,
all models are written in a uniform style: first a module which describes the
behavior is defined, and then the module is instantiated. This is similar to
defining a function and then calling it. Models are required for both the sender
and the receiver.
The sender model (see below) has one state variable with two states - idle and
busy. It begins in the idle state, in which it has no data to send. If the previous
transaction has terminated (BtoS_ACK=0), the sender non-deterministically
RuleBase: a Formal Verification Tool
Provided by special agreement with IBM
14
CHAPTER 2
decides if it wants to send data. When it decides to send data, it goes to the
busy state and raises StoB_REQ. It stays there for an arbitrarily long time, at
least until BUF acknowledges the acceptance of data (BtoS_ACK=1). This
delay is arbitrary because the specification doesn’t force the sender to release
StoB_REQ immediately. The sender then returns to the idle state.
module sender ( reset, ack )( req ) -- two inputs and one output
“The sender initiates data transfers ‘at random’ and stays active for
an arbitrarily long time.”
-- a textual description
{
var state : { idle, busy };
-- has two states
assign
init(state) := idle;
-- begins in the idle state
next(state) :=
-- next-state function
case
reset : idle;
-- remains idle during reset
state=idle & !ack : { idle, busy }; -- if idle and ack is inactive,
-- can go to busy
state=busy & ack : { idle, busy }; -- if busy and ack is active,
-- can return to idle
else : state;
-- else stay in the same state
esac;
define req := state=busy;
-- req is active when sender is busy
}
instance sender : sender ( RST, BtoS_ACK )( StoB_REQ ); -- instance of module sender
By using non-determinism, all possible situations are checked. It is not a random selection of one or a few execution paths. The simple, abstract model represents all possible variations of a real sender, no matter how complicated they
are, provided that they adhere to the specified protocol.
The receiver model (below) is surprisingly similar to the sender (in fact this
tutorial could use the same module but they are left separate for clarity.)
module receiver ( reset, req )( ack )
IBM Haifa Research Laboratory, Israel
Provided by special agreement with IBM
Tutorial
15
{
var state : { idle, busy };
assign
init(state) := idle;
next(state) :=
case
reset : idle;
state=idle & req : { idle, busy };
state=busy & !req : { idle, busy };
else : state;
esac;
define ack := state=busy;
}
instance receiver : receiver ( RST, BtoR_REQ )( RtoB_ACK );
A behavior is assigned to the reset (RST) signal: it is asserted for one cycle at
the beginning of execution.
module reset1 ( )( RST )
“A one cycle reset at the beginning”
{
var RST: boolean;
assign
init(RST) := 1;
next(RST) := 0;
}
instance reset : reset1 ( )( RST );
Since RuleBase runs the clock itself (in the case of a design with a single
clock), the clock (CLK) is stuck at ‘1’, as follows:
define CLK := 1
For a complete explanation of clocks, see Section 4.7.
RuleBase: a Formal Verification Tool
Provided by special agreement with IBM
16
CHAPTER 2
Note that we didn’t assign behavior to data inputs, since the first rules that we
are going to write do not refer to data, and control is not affected by data. The
32 bit register and the data inputs will be dropped automatically during reduction.
2.4 Specifying Properties for Verification
Now we want to verify certain properties (rules) of BUF. The full text of these
rules can be found in the file rules. The first property claims that neither overflow (two reads without a write in between) nor underflow (two writes without
a read in between) can occur. Actually, this example claims that the input
acknowledge and output acknowledge operations are interleaved. The first formula says the following: “it is always true that if RST is not active and
BtoS_ACK is asserted, then beginning from the next state, RtoB_ACK will be
asserted before BtoS_ACK is asserted again”. The second formula is similar.
rule ack_interleaving {
formula
“No overflow: RtoB_ACK is asserted between any two BtoS_ACK assertions”
{ AG ( !RST & rose(BtoS_ACK) ->
AX ( rose(RtoB_ACK) before rose(BtoS_ACK) ) ) }
formula
“No underflow: BtoS_ACK is asserted between any two RtoB_ACK assertions”
{ AG ( !RST & rose(RtoB_ACK) ->
AX ( rose(BtoS_ACK) before rose(RtoB_ACK) ) ) }
}
2.5 Actual Verification
The file rulebase.setup describes the verification environment: VHDL file
name, VHDL entity name, the file containing environment models and rules,
and the translation path.
IBM Haifa Research Laboratory, Israel
Provided by special agreement with IBM
Tutorial
17
Everything is now ready to be run. Activate RuleBase by typing rb. (To exit
from RuleBase, select the menu option File/Quit.) First take a look at the
RuleBase front panel. This tutorial uses only three parts of the front panel:
• A list of rules to be verified (on the left). This list currently has two entries.
• A column of yellow push buttons to control verification.
• A big text window occupying most of the work area, and used to display important information.
To verify the property specified above, select the rule ack_interleaving (click
on it with the left mouse button) and then press the Run push button (upper
yellow button). While the rule is running, a log of its execution is displayed in
the text window. At present, the only interesting information is the final result:
the first formula failed and the second one passed. The failure means that there
is a case in which there are two consecutive BtoS_ACK with no RtoB_ACK in
between.
RuleBase: a Formal Verification Tool
Provided by special agreement with IBM
18
CHAPTER 2
2.6 Problem Analysis
Press the Results push button. Information about the two formulas is displayed
in the text window. Each formula’s area consists of three parts: verification
results, an English description of the verified property (simply a display of the
comment coded by the user) and the actual formula. Press and hold the left
mouse button anywhere in the area of the first formula. A pop-up menu
appears. Select Show timing diagram by dragging the mouse to this entry and
releasing the button. Wait a few seconds until the timing diagram shows up,
displaying a counter-example. All relevant signal names are shown. (To display
diagrams of other signals, use the mouse to click on their names in the left list.
For a detailed description of the waveform display too, see CHAPTER 9:
Debugging Aids.)
A counter-example is a trace which demonstrates a failure of the design to fulfill a specified requirement. Here it shows an example in which the first formula fails: BtoS_ACK is asserted in both cycles 9 and 15 while RtoB_ACK is
constantly high. You can better understand the problem by looking at the interaction between BtoR_REQ and RtoB_ACK. The four-phase handshaking is
broken in cycle 10, where BtoR_REQ is asserted although RtoB_ACK is
active. This occurs because the condition under which BUF can initiate a new
transaction to the receiver is incorrect (the relevant line in BUF.vhd is marked
IBM Haifa Research Laboratory, Israel
Provided by special agreement with IBM
Tutorial
19
with an exclamation point). BUF looks only at the OCCUPIED flag, while it
must also wait for RtoB_ACK, to become inactive.
2.7 Fixing and Rerunning
To fix the problem, the incorrect line must be replaced by the line next to it
(currently a comment) and the design must be recompiled. This is already done
for you (don’t try to do it by yourself because your translation path is not set).
Simply type setup2 now at the unix command line. Close the timing diagram
(using the File/Quit menu option), press the Run push button again, and wait a
few seconds. Both formulas will now pass.
2.8 Witness
Suppose that for some reason (a problem in either the design or the environment models) BtoS_ACK can never be asserted, or that it is asserted only once
and RtoB_ACK is never asserted. In both cases the formula will pass because
there was no violation of the property. This hides a problem you should be
aware of. This kind of problem is called a vacuous pass, and is a form of a false
positive answer. To show that the pass was not vacuous, a witness is generated.
A witness is a timing diagram that exhibits an interesting execution trace demonstrating one case in which the formula is true. An interesting execution trace
is one on which each event mentioned in the formula appears.
In our example, there is a “(w)” near the “passed” message. This means that a
witness is available. Press the Results push button, click the mouse button anywhere in the area of the first formula, and select Show timing diagram. This
time the diagram displays a witness, rather than a counter-example. You can
see that both BtoS_ACK and RtoB_ACK are asserted at least once. That is,
this trace is an interesting positive example of the truth of the formula. Close
the timing diagram.
RuleBase: a Formal Verification Tool
Provided by special agreement with IBM
20
CHAPTER 2
2.9 Data-Path Rule
Next, you will verify that the data sent to the receiver is the same data received
from the sender. The value of DI (data in) when BtoS_ACK is asserted
(moment of transfer to BUF) must be the same as the value of DO (data out) at
the next time RtoB_ACK is asserted (moment of transfer to receiver).
forall x(0..31): boolean:
formula
{ AG ( !RST & rose(BtoS_ACK) & DI(0..31)=x(0..31) ->
next_event(rose(RtoB_ACK))(DO(0..31)=x(0..31) ) ) }
(the operators are described in Chapter 5.)
Select rule keeping_data from the rule list and press the Run push button.
RuleBase stops with a fatal error: design inputs DI(0) to DI(31) are unresolved. Since DO is referred to in the formulas and the value of DI influences
DO, you must specify the behavior of DI. At first, it is given a fully free behavior, which means that it can always change its value.
var DI(0..31) : boolean;
This environment model already exists in the file envs. To activate it, remove
the two dashes in front of the line #define WRONG_DATA at the beginning of
the file envs.
Press the Run push button again and wait a few seconds. Both formulas failed.
Press the Results push button, click the mouse button on the first formula, and
then select Show timing diagram.
You can see that the value of DO when RtoB_ACK is asserted is different from
the value of DI when BtoS_ACK is asserted. This happened because our
server environment model is not adhering to requirement of keeping the data
stable while StoB_REQ is active. You will often see “bugs” that result from
incorrect modeling of the environment. A common practice to avoid such prob-
IBM Haifa Research Laboratory, Israel
Provided by special agreement with IBM
Tutorial
21
lems is writing rules that verify the correct behavior of the environment models.
The following is a fixed version of DI:
var DI(0..31) : boolean;
assign
next(DI(0..31)) :=
case
!StoB_REQ : nondets(32);
else : DI(0..31);
esac;
To activate the fix, remove the two dashes in front of the line #define
CORRECT_DATA at the beginning of the file envs and add two dashes in
front of the line #define WRONG_DATA. Press the Run push button again.
Both formulas passed. To see a witness, press Results, click the mouse button
on the first formula, and select Show timing diagram.
2.10 Exiting
To exit from RuleBase, select the File/Quit menu option.
2.11 Exercise
The rules mentioned so far in this tutorial didn’t cover the entire buffer specification. You are encouraged to think of more properties, and formulate appropriate rules. You might first want to read the rest of this manual, or at least
Chapter 5 which describes the specification language Sugar.
2.12 BUF implementation in VHDL
library IEEE;
use IEEE.std_logic_1164.all;
use IEEE.std_logic_unsigned.all;
RuleBase: a Formal Verification Tool
Provided by special agreement with IBM
22
CHAPTER 2
entity BUF is port (
CLK, RST : in std_logic;
StoB_REQ, RtoB_ACK : in std_logic;
DI
: in std_logic_vector (31 downto 0);
DO
: buffer std_logic_vector (31 downto 0);
BtoS_ACK, BtoR_REQ : buffer std_logic );
end BUF;
architecture RTL_VIEW of BUF is
type S_STATES is (S_IDLE, S_READ, S_DONE);
signal S_STATE : S_STATES;
type R_STATES is (R_IDLE, R_SEND);
signal R_STATE : R_STATES;
signal OCCUPIED, READ : bit;
begin
SENDER_INTERFACE: process
begin
wait until CLK’event and CLK=’1’;
if (RST = ‘1’) then
S_STATE <= S_IDLE;
elsif (S_STATE = S_IDLE) then
if (StoB_REQ = ‘1’ and OCCUPIED = ‘0’)
then S_STATE <= S_READ;
end if;
elsif (S_STATE = S_READ ) then
IBM Haifa Research Laboratory, Israel
Provided by special agreement with IBM
Tutorial
S_STATE <= S_DONE;
elsif (S_STATE = S_DONE ) then
if (StoB_REQ = ‘0’)
then S_STATE <= S_IDLE;
end if;
end if;
end process;
RECEIVER_INTERFACE: process
begin
wait until CLK’event and CLK=’1’;
if (RST = ‘1’) then
R_STATE <= R_IDLE;
elsif (R_STATE = R_IDLE) then
if (OCCUPIED = ‘1’)
-- !
-if (RtoB_ACK = ‘0’ and OCCUPIED = ‘1’)
then R_STATE <= R_SEND;
end if;
elsif (R_STATE = R_SEND) then
if (RtoB_ACK = ‘1’)
then R_STATE <= R_IDLE;
end if;
end if;
end process;
OCCUPIED_FLAG: process
begin
wait until CLK’event and CLK=’1’;
if (RST = ‘1’) then
OCCUPIED <= ‘0’;
elsif (OCCUPIED = ‘0’) then
if (READ = ‘1’)
then OCCUPIED <= ‘1’;
RuleBase: a Formal Verification Tool
Provided by special agreement with IBM
23
24
CHAPTER 2
end if;
elsif (OCCUPIED = ‘1’) then
if (RtoB_ACK = ‘1’ and BtoR_REQ = ‘1’)
then OCCUPIED <= ‘0’;
end if;
end if;
end process;
DATA_BUFFER: process
begin
wait until CLK’event and CLK=’1’;
if (READ = ‘1’)
then DO <= DI;
end if;
end process;
READ <= ‘1’ when (S_STATE = S_READ) else ‘0’;
BtoS_ACK <= ‘1’ when (S_STATE = S_DONE) else ‘0’;
BtoR_REQ <= ‘1’ when (R_STATE = R_SEND) else ‘0’;
end RTL_VIEW;
IBM Haifa Research Laboratory, Israel
Provided by special agreement with IBM
CHAPTER 3
Getting started
3.1 Accessing RuleBase
Before running RuleBase for the first time, you should do the following:
(The instructions below are for csh users; if you are using another shell, use
the appropriate replacements.)
• In your home directory, in the file .cshrc, add the following lines:
setenv RBROOT <directory>
alias rb “$RBROOT/guirb.bat”
where <directory> is the full path to the directory in which RuleBase binary
files are installed. Type source .cshrc in order to bring these settings into
effect.
• Make sure you have access to $RBROOT. If not, call the local RuleBase
focal point, or call us (find our email address on the cover page).
• Copy the following files from $RBROOT to your home directory:
Guirb, Scope, Cctdag, Analyze
RuleBase: a Formal Verification Tool
Provided by special agreement with IBM
26
CHAPTER 3
3.2 Preparing a Verification Environment
This section provides an example of how to quickly build a working environment. These instructions should help you create an initial environment to
experiment with, and are not meant to give you a thorough introduction to
working with RuleBase. Some of the file names (e.g, envs and rules) are only
recommendations and you may select other names for these files.
First, create a new directory where the verification process will take place.
Your verification files will be located in this directory. RuleBase will also create various files and sub-directories in this directory. Before running the first
rule, prepare:
•
•
•
•
•
The design to be verified
File rulebase.setup
File envs
File rules
File run
Each of these items is described below.
3.2.1 The Design to be Verified
RuleBase supports several hardware description languages (VHDL, DSL, Verilog) and several
translation/synthesis paths. Section 3.4: Design Translation details how to prepare the design
for verification. If your design environment is not mentioned there, please contact us. CHAPTER 11: Design for Formal Verification suggests design rules that can ease the verification
process (e.g., proper partitioning).
3.2.2 File “rulebase.setup”
This file should exist in the verification directory and must include (at least) the following four
lines:
IBM Haifa Research Laboratory, Israel
Provided by special agreement with IBM
Getting started
27
• setenv entity <DESIGN_NAME>
This is the name of the top-level entity of your design (in upper case). Section 3.4: Design Translation explains what is considered an entity in each of
the translation paths.
• setenv name <design_name>
This is the name of your top-level design file (without the extension). Section 3.4: Design Translation explains what is considered a name in each of
the translation paths.
• setenv SYNTHESIS <path>
This is your translation path: it can be either DSL, HIS, HIS_VERILOG,
SYNOPSYS, or VIM. See Chapter 3.4: Design Translation to determine
which of these to use. If you need the Compass translation path, please contact us for instructions.
• setenv database envs
The file envs is where your environment models and rules are written. The
file is described below.
File rulebase.setup is read by RuleBase only once, at the beginning, so any
change to this file requires either to exit and re-start RuleBase or to select the
“File/Read rulebase.setup” menu option.
3.2.3 File “envs”
This file should include environment models. Although it is possible to mix models and specifications, we recommend to separate them. Hence, environment models are in the envs file and
specifications are in the rules file.
On the first line of file envs write:
#include “rules”
This way, RuleBase knows it should also read the file rules. If you wish to
write your environment models in several files, connect the other files to envs
using the #include command.
RuleBase: a Formal Verification Tool
Provided by special agreement with IBM
28
CHAPTER 3
In order to start working, a behavior must be given to every input signal of
your design. If you want to provide full legal behavior for each of your input
signals, read CHAPTER 4: Describing the Environment before proceeding. It
is a good idea to read that chapter before beginning the real verification work.
If you just want to try out RuleBase, you can give a simple (probably wrong)
behavior to your input signals as follows:
For each signal choose one of three possible behaviors:
define SIGNAL1 := 0;
define SIGNAL2 := 1;
var SIGNAL3 : boolean;
The first two possibilities assign a constant value to the input signal. The third
one gives an input signal totally free behavior: SIGNAL3 may change on
every cycle. A signal given this behavior is called “a free variable”. At this
stage, do not leave too many variables free; this may cause a quick explosion of
the state space. Leaving five to ten signals as free variables is reasonable at this
stage if you just want to see your design functioning. Note that in some translation paths, all signal names of the design are converted to upper case.
Two types of signals, the reset and the clock signals, should receive special
attention. For a complete discussion on how to model these signals, read Section 4.7 and Section 4.8. For now, the simplest clocking scheme, one clock, is
assumed to be sufficient. Assign the clock signal the constant value ‘1’:
define CLOCK := 1;
-- where CLOCK is the clock name in your design
The reset signal should be assigned the following behavior:
var reset_state : 0..3; -- Assuming that three cycle reset is required
assign
init(reset_state) := 0;
next(reset_state) :=
case
reset_state < 3 : reset_state + 1;
else
: 3;
esac;
define RESET := (reset_state != 3);
-- where RESET is your reset signal
IBM Haifa Research Laboratory, Israel
Provided by special agreement with IBM
Getting started
29
If your design needs more than 3 cycles of active reset, you may increase the
cycle length by changing ‘3’ to the desired number.
3.2.4 File “rules”
Write your specifications in the rules file. Here, as in the envs file, you may write the rules in
several files and use the #include directive to connect them.
Each rule should have the following format:
rule <name> {
“ <a comment describing the rule>”
formula
“ <a comment describing the formula>”
{ <sugar-formula> }
...
formula
“ <a comment >”
{ <another sugar formula > }
}
A rule must have a unique name and may contain any number of formulas.
Comments are optional both in rules and in formulas. A rule may also contain
environment models that override the default environment. For more details
refer to Section 7.1, Rule and Mode definition.
The most important part of the rule is its specification, written as a Sugar formula. Sugar, the RuleBase specification language, is described in CHAPTER
5. To get started, choose an (important) output signal of your design, and
write the following rule in your rules file:
rule start {
“getting started”
formula
“just to see a rule running”
{ AG AF (<output-signal>) }
}
RuleBase: a Formal Verification Tool
Provided by special agreement with IBM
30
CHAPTER 3
The above formula states that on every path, always, there will exist a state
where <output-signal> has the value one.
You may write more formulas (either in rule start or in separate rules) in order
to check real properties of your design. The most simple form of a formula is
formula { AG !( <some-bad-event> ) }
where <some-bad-event> stands for a Boolean expression that should never be
true in your design. For example, if enable1 and enable2 are two signals that
should never be active at the same time, the following formula can be used:
formula { “enable1 and enable2 are mutually exclusive“ AG( !enable1 | !enable2 ) }
You can find other useful formula patterns in CHAPTER 6: Sugar - Formula
Examples.
3.2.5 File “run”
File run is only needed for batch runs. However, it is a good idea to prepare it now. This file
should be copied from $RBROOT to the working directory.
3.3 Running RuleBase
After preparing the four items described in the previous section, you are ready
to run RuleBase. Type rb in your verification directory. The RuleBase window is displayed. Your list of rule names should appear on the left side. In our
case, the rule “start” will appear. To the right of the rule list is a column of yellow push buttons that activate commonly used commands. There is also a
large text area for displaying files. At the top of the window, there is a menu
bar and a message line.
Use your mouse to select the start rule from the rule list. Then press the Run
push button. RuleBase starts running your rule.
Watch the log of your run, as it appears in the RuleBase window. If the log
scrolls too fast, you can use the scroll bar on the right hand side. When you
IBM Haifa Research Laboratory, Israel
Provided by special agreement with IBM
Getting started
31
touch the scroll bar, the bottom right Freeze button changes to Frozen and
turns red. In order to see the updated log again and free the display, press the
red Frozen button.
Follow the verification process:
First, the design is translated into an internal representation. The translated
design is kept on the disk, for use in future runs. The translation process will be
repeated only for a new version of the design.
Next, the design, the environment models and the formulas are loaded into
memory. At this time, RuleBase performs many types of checks, and gives
warning messages where necessary. Press the Warning push button to see an
assembly of all the warning messages produced during the run. After you press
the Warning button (or any other button), press the Log push button to display
the log again. You should pay attention to the warning messages as they may
indicate real problems.
Reduction takes place at this time. Reduction removes parts of the design
which are not required for the verification of the current rule’s formulas. It also
links those environment models which resolve essential input signals, to the
design. Information regarding the size of the design (in terms of flip-flops and
gates) is displayed before and after the reduction.
After reduction, the actual verification process begins. During verification, two
types of messages appear continuously, ‘nodes allocated <number>’ and ‘iteration <number>’. Whenever ‘nodes allocated’ grows too much, dynamic BDD
ordering will try to reduce the number of nodes. Hopefully, at this stage of
experimentation the reduced design is fairly small. That is, ‘nodes allocated’
are less than 500,000, ‘iteration’ is less than 200, and the total run time is a few
minutes. Otherwise you will have to reduce the design further by restricting
some free inputs, or employ more advanced methods, as described later in this
manual.
RuleBase: a Formal Verification Tool
Provided by special agreement with IBM
32
CHAPTER 3
Wait until the run ends, and then press the Results quick button. Your rule is
displayed with one of three possible results: ‘failed’, ‘passed’ or ‘vacuously’.
If you get an ‘unknown’ result, it means that you pressed the Results button
too early and your run was not finished. Press the Log push button to see the
log again.
If the result is ‘failed’, it means that your formula does not hold true in your
design, and a counter-example was produced. If the result is ‘passed’, your
formula holds true. To see the counter-example of a failed formula, click the
left mouse button near the word ‘failed’. Drag the mouse and choose Show
timing diagram. Refer to CHAPTER 9: Debugging Aids for instructions on
how to use the timing diagram browser. If the result is ‘vacuously’, no timing
diagram exists for this formula. This result may indicate a problem in the formula, environment or design (refer to CHAPTER 9: Debugging Aids for an
explanation of vacuity).
If some of the formulas failed, it is obviously because the environment behavior is wrong, as some of the free inputs have unexpected behavior. Now is the
time to refine the environment model. Either try to make use of your short
experience with the tutorial, or read CHAPTER 4: Describing the Environment to learn more about environment modeling.
After changing your environment or adding formulas, make sure that you
saved the editor’s buffer. Then select the rule that you want to run from the rule
list (if it is not already selected), and press the run button again. If the name of
a newly created rule does not appear in the rule list, select the “File/Refresh”
menu option.
Repeat the process of refinement and analysis until all the rules that should
pass really pass. You may also add rules and formulas in order to cover all the
interesting properties of your design. To learn more about formulas and rules,
read CHAPTER 5: Sugar - The RuleBase Specification Language, CHAPTER
6: Sugar - Formula Examples and CHAPTER 7: Managing Rules, Modes and
Environments. Browse through the other chapters to learn more about tools
and methods that RuleBase provides to ease successful verification.
IBM Haifa Research Laboratory, Israel
Provided by special agreement with IBM
Getting started
To exit RuleBase, select the “File/Quit” menu option.
RuleBase: a Formal Verification Tool
Provided by special agreement with IBM
33
34
CHAPTER 3
3.4 Design Translation
RuleBase supports several Hardware Description Languages (HDLs) and several translation
paths. Wherever possible, it uses existing tools of the design environment - compilers and synthesizers, to translate the HDLs into a lower level representation consisting only of basic gates
and flip-flops. The following sections describe how to translate the design in some of the environments. If none of the environments described here meets your needs, please contact us.
3.4.1 CLSI and HIS / VHDL
3.4.1.1 Setting up environment variables
Add the following lines to file rulebase.setup in your verification directory:
setenv name <TOP>
# <TOP> is the top-level entity in your design (in capital letters)
setenv entity <TOP>
# <TOP> is the top-level entity in your design (in capital letters)
setenv SYNTHESIS HIS
setenv SRC <directory>
# the directory where the VHDL files are located (optional)
setenv sources “<VHDL-files >”
# <VHDL-files > is a list of VHDL file names separated by spaces.
# The files should appear in bottom-up reference order.
# The entire list should be written as one line.
Usually setting the above environment variables is all that you have to do in
order to work with HIS/VHDL. Read the next two sections only if you
encounter problems. It is recommended to browse the HIS compilation messages in order to locate possible problems.
IBM Haifa Research Laboratory, Israel
Provided by special agreement with IBM
Getting started
35
3.4.1.2 Setting up CLSI and HIS variables
This setup is usually done only once per site by the RuleBase focal point, in
which case you may skip the rest of this section. File $RBROOT/../his_aix/
clsi.local stores site-specific settings. It contains the following information:
setenv VTIP <vtip>
# <vtip> is the directory in which the clsi compiler is located
setenv LM_LICENSE_FILE <CLSI licence file>
For each of the VHDL libraries that you use, add two lines:
setenv dls_<lib> <directory>
setenv <LIB> dls_<lib>
# <lib> is the library name in lower-case
# <LIB> is the library name in upper-case
Make sure that the libraries are CLSI-compiled, and that compilation is performed in bottom-up reference order.
You can have your own copy of file clsi.local. If clsi.local exists in the verification directory, it is read instead of the central clsi.local.
3.4.1.3 Hints
1.
If the VHDL attribute BTR_NAME is used with an entity, this entity will be
synthesized as a black box, unless attribute RECURSIVE_SYNTHESIS is
set to 1. RECURSIVE_SYNTHESIS can be specified either in entity definition or in component instantiation. There is no way to specify it globally.
2.
The GEN directive range is not supported; use left and right instead.
Wrong way: GEN: for I in DataIn’range generate
Right way: GEN: for I in DataIn’left downto DataIn’right generate
3.
HIS needs to know all the pins that should be treated as bidi’s. There are
two ways of doing this:
RuleBase: a Formal Verification Tool
Provided by special agreement with IBM
36
CHAPTER 3
• Attaching attribute IO_PHYSICAL_DESCRIPTION = BI_DIRECTIONAL
to each inout port
• Attaching attribute PHYSICAL_PINS = TRUE to the Entity (then all its
4.
inout ports are considered bidi’s).
HIS will split every bi-directional signal into two signals (input and output)
for the purposes of formal verification with RuleBase
Look for the string “DUMMY” in the log file of the compilation. If it
appears, some cell library was missing, and the compilation has considered
the cell to be a black box.
3.4.2 HIS/Verilog
3.4.2.1 Setting up environment variables
Add the following lines to file rulebase.setup in your verification directory:
setenv name <TOP>
# <TOP> is the top-level module in your design
setenv entity <TOP>
# <TOP> is the top-level module in your design (in capital letters)
setenv SYNTHESIS HIS_VERILOG
setenv SRC <directory>
# the directory where the Verilog source files are located (optional)
setenv sources “<Verilog-files >”
# <Verilog-files > is a list of Verilog file names separated by spaces.
# The entire list should be written as one line.
IBM Haifa Research Laboratory, Israel
Provided by special agreement with IBM
Getting started
37
3.4.3 TexVHDL
Note: the following information might become inaccurate as a result of compiler changes. In case of doubt consult the TexVHDL Compiler Reference
Manual.
setenv name <ENTITY>
# <ENTITY> is the top-level entity in your design
setenv entity WORK.<ENTITY>.<ARCHITECTURE>
# <ENTITY> is the top level entity in your design and
<ARCHITECTURE> is the top level architecture
(both in capital letters)
setenv SYNTHESIS TEXVHDL
setenv sources <makefile>
# <makefile> is the name of a file containing a list of VHDL
source file names, one name in each line. Files are listed in
bottom-up order - referenced files appear before the
referencing file.
setenv VHDLPATH <path>
# <path> is a list of directory names, separated by colons, where
the source VHDL files, not including library source files, reside.
setenv DBIN <path>
# <path> is a list of directory names, separated by colons, where
the compiled protos, including library protos, reside.
setenv TEXSIM_DIR <dadb_install_dir>
# If you define TEXSIM_DIR, RuleBase will load DaDb tools
from this directory. Otherwise, the tools will be loaded from
$RBROOT (the RuleBase installation directory).
RuleBase: a Formal Verification Tool
Provided by special agreement with IBM
38
CHAPTER 3
3.4.3.1Working with TexVHDL libraries
If the libraries are not compiled yet, compile them by following the instructions in the TexVHDL Compiler Reference Manual.
Then, for each library add the following to file “rulebase.setup” in the verification directory:
• Define an environment variable whose name is the library name in upper case that points to
the library source files, e.g.:
setenv IEEE .../vhdl/source/ieee
• Add the directory with the compiled protos to DBIN, e.g.:
setemv DBIN “${DBIN}:.../vhdl/protos/ieee”
Library source files should not be included in the makefile.
IBM Haifa Research Laboratory, Israel
Provided by special agreement with IBM
Getting started
39
3.4.4 Synopsys / VHDL
With the Synopsys translation path, the user must compile the design into a gate-level description outside of RuleBase. The result should be a single gate-level VHDL file, <name>.vhdl,
consisting of only not and and VHDL operators, and the component SYNOP_BASIC_FF.
The following dc_shell commands can be used to create gate-level VHDL.
1.
vhdlout_write_components = false
vhdlout_equations = true
verilogout_equation = true
4. verilogout_write_components = false
5. target_library = “gtech.db”
6. read -format vhdl { <vhdl_file1>, <vhdl_file2>, ... } /* Read VHDL files */
7. current_design = <top_level_entity_name> /* Specify name of top-level entity */
8. compile -no_map /* Compile with low effort */
9. replace_synthetic -ungroup
10. ungroup -all -flatten /* Sometimes more flattening is needed */
11. write -no_implicit -format vhdl -o <name>.vhdl /* Write gate-level VHDL */
12. quit
2.
3.
Add the following lines to file rulebase.setup in your verification directory:
setenv name <name>
# <name> is the gate-level VHDL file name without the extension
setenv entity <NAME>
# <NAME> is the same as <name> but in capital letters
setenv SYNTHESIS SYNOPSYS
3.4.5 Synopsys / Verilog
The Synopsys/Verilog path is very similar to the Synopsys/VHDL path. In fact there are two
paths:
RuleBase: a Formal Verification Tool
Provided by special agreement with IBM
40
CHAPTER 3
1.
Verilog to gate-level Verilog:
Use the instructions in Section 3.4.4, but replace ‘-format vhdl’ by ‘-format verilog’ in lines 6 and 11. Then translate gate-level Verilog to gate-level VHDL using
the v2v tool provided with RuleBase (this is a temporary workaround).
2.
Verilog to gate-level VHDL:
Use the instructions in Section 3.4.1, but replace ‘-format vhdl’ by ‘-format verilog’ in line
6.
3.4.6 DSL
RuleBase can read standard DSL files, including DSB library files. The only special preparation needed is for latches and flip-flops. If you use the master outputs of a master-slave latch,
or if you do not use master-slave latches or edge-triggered flip-flops, please contact us for
instructions on how to map your memory elements to standard RuleBase elements.
If you use master-slave latches and use only slave outputs, or if you use edgetriggered flip-flops, follow the directions in Section 3.4.6.1, to map your
latches and/or flip-flops to standard RuleBase elements.
After mapping your memory elements, follow the directions in Section 3.4.6.2
in order to set up a DSL environment for formal verification.
3.4.6.1 Mapping master-slave latches and edge-triggered flip-flops
1.
2.
Your DSL file should instantiate a device representing the memory element
(it should not make direct use of the “Register” statement of DSL).
Replace the desblo file representing your basic memory element with a desblo file that instantiates the standard RuleBase register NBITREG.
An NBITREG is a 1-32 bit memory element representing a simple
master-slave latch or D-flip-flop.
It has the following inputs:
CLK
- the clock
DATA_IN(0..N)
- the data input
ASYNC_SET
- an asynchronous set
ASYNC_RESET
- an asynchronous reset
IBM Haifa Research Laboratory, Israel
Provided by special agreement with IBM
Getting started
41
and the following output:
DATA_OUT(0..N) - the data output
If your master-slave latch or flip-flop has scan pins or other circuitry not
directly related to the functionality of the memory element, they should be
ignored (left unconnected).
Below is an example that maps a master-slave latch called “latch4l” with scan
pins to the standard RuleBase memory element NBITREG. As you can see in
the example, the scan pins as well as the slave clock are left unconnected.
/* 1 TO 32 BIT SRL REG */
SIM = SYN
CALL CHECKPARM ‘width’
CALL CHECKPARM ‘set’
CALL CHECKPARM ‘reset’
CALL CHECKPARM ‘nl2’
CALL CHECKPARM ‘hide’
CALL CHECKPARM ‘bhc’
CALL CHECKPARM ‘type’
1 32 1
010
010
010
020
030
060
GENERATE
BLOCK
INPUT
DI #bitrange#,
SHIFTCLK
MASTERCLK,
SLAVECLK
SCIN
SETL1
RESETL1_
IS B’’0’’,
IS B’’0’’,
IS B’’0’’,
IS B’’0’’,
IS B’’1’’;
OUTPUT
PL2OUT #bitrange#;
RuleBase: a Formal Verification Tool
Provided by special agreement with IBM
42
CHAPTER 3
DEVICE U : NBITREG (width=#width#)
MASTERCLK. . . . . . . | CLK
|
DI#bitrange#. . . . . . . . .| DATA_IN
|
SETL1. . . . . . . . . . . . . | ASYNC_SET
|
RESETL1_. . . . . . . . . .| ASYNC_RESET |
| DATA_OUT
| PL2OUT#bitrange#;
END BLOCK
END GENERATE
END SIM=SYN
If you have neglected to perform this step (mapping of memory elements to
standard RuleBase memory elements), RuleBase will notify you as follows:
Unknown box type: <a lowest-level register name>
3.4.6.2 Setting up environment variables
These instructions use the following notation
<top>.dessrc - the top-level DSL file.
<dir>
- the directory in which formal verification will take place.
Add the following lines to file rulebase.setup in the verification directory.
setenv name <top>
setenv entity <TOP>
# same as <top> but in capital letters
setenv SYNTHESIS DSL
setenv database envs # name of environments file
setenv sources <top>.dessrc
setenv DSLPATH .:<directories containing relevant DSL files>
setenv DSBPATH .:<directories containing relevant DSB files>:$RBROOT
setenv DSLOUT . # directories in the above lists are separated by colons
IBM Haifa Research Laboratory, Israel
Provided by special agreement with IBM
Getting started
43
3.4.6.3 Flip-flop Initialization
If you use a reset signal for initialization, connect it to the ASYNCH_SET or
ASYNCH_RESET appropriately. If another initialization scheme is used (e.g., through the
scan chain), it can be translated to a set of EDL statements (see CHAPTER 4). If you use Boeblingen-style srl initialization files, please contact us.
3.4.6.4 Compilation Errors
In the case of compilation errors, look at file compile.msg.
3.4.7 Koala Verilog compiler
RuleBase comes with a native Verilog front-end, Koala, which can be invoked by using the following settings:
setenv SYNTHESIS KOALA_VERILOG
setenv entity <TOP-LEVEL-MODULE-NAME>
# the value of this environment variable is the name of the topmost
# block in design under test
setenv name <TOP-LEVEL-MODULE-NAME>
# for historic reasons, there should also be a definition of environment
# variable $name, with exactly the same value as for $entity
setenv sources <SOURCE-FILE-LIST>
# the value of this environment variable is a blank-separated
# list of verilog source files.
Example:
setenv SYNTHESIS KOALA_VERILOG
setenv entity dunit
setenv name dunit
setenv sources “dunit.v mux16_4.v arbiter.v”
RuleBase: a Formal Verification Tool
Provided by special agreement with IBM
44
CHAPTER 3
If there are a lot of files in the model, it is frequently convenient to create a
wrapper file, for example “all_files.v”, which contains ‘include directives of
Verilog preprocessor to include all model files, and then to use
setenv sources all_files.v
3.4.8 Compass
If you wish to use the Compass translation path, please contact us for instructions.
IBM Haifa Research Laboratory, Israel
Provided by special agreement with IBM
CHAPTER 4
Describing the Environment
RuleBase will check the properties specified for every possible input sequence.
However, most chips are not designed to accept every possible input sequence.
Designers often assume a correct behavior of the target environment and simplify the design by ignoring illegal behaviors.
RuleBase must be made aware of the environment’s legal behavior, otherwise
it might produce “false negatives”: counter-examples that result from illegal
input sequences. The way to specify environment behavior is to write environment models - logic that drives the inputs of the design to be verified. Every
input of the design must be assigned some behavior. Some inputs are kept constant (e.g. configuration inputs), others remain completely free (non-deterministic), while the control signals of interest are usually assigned detailed and
exact behavior.
Environment models are written in the RuleBase Environment Description
Language (referred to as EDL), a dialect of the SMV language. EDL is somewhat similar to common hardware description languages (HDLs), but it also
supports non-determinism and multiple environments.
RuleBase: a Formal Verification Tool
Provided by special agreement with IBM
46
CHAPTER 4
Environments are linked to the design and to other environments by signal
names. Signals produced by the environment will match and drive design signals that have the same name (even if they are internal to the design - this is a
way to abstract by overriding, described later). Signals produced by the design
(both output and internal signals) will match and drive environment models
that require these signals. Note that in some translation paths, design signals
are converted to upper-case.
Writing good environment models is an art. Good environments should be
small and simple, while allowing all and only the legal behaviors. Environments should be small in order to avoid overloading the model-checker, and
simple in order to be easily written, read and maintained. Good environment
models should not produce illegal behavior, otherwise false-negative results
will be produced. On the other hand, they should model all the legal behaviors
because an un-modeled behavior is a good place for bugs to hide. An attempt
should be made to hide as much detail as possible using abstraction techniques
(as explained later).
The stages of environment modeling are:
• Study the block interfaces in detail. The behavior of every input and every relevant
output must be understood. This information can be gathered from standard bus
protocols, design documents and communication with the designers.
• Plan the hierarchical structure of the environment models, grouping related signals
and reusing components where possible.
• Decide how to model each input. Some inputs are held constant, at least during the
initial stages of verification. Usually there is a set of interesting control inputs
which need detailed modeling. We have to design and implement logic to drive
these signals.
• Code the logic in EDL.
The rest of this chapter describes the syntax and semantics of EDL constructs,
suggests modeling techniques and demonstrates them with some examples.
Before starting to write your environments, it is recommended to read CHAPTER 7: Managing Rules, Modes and Environments.
IBM Haifa Research Laboratory, Israel
Provided by special agreement with IBM
Describing the Environment
47
4.1 Language Constructs
An environment is made up of a few types of statements. These statements are
described in the following sections. The order of the statements is unimportant.
Keywords can appear in either upper or lower case.
4.1.1 Expressions
4.1.1.1 Variables and constants:
The basic expressions are numbers, enumerated constants, or variable references.
A number is a decimal if it has only decimal digits and no suffix (e.g. 1276). A
binary number consists of binary digits and ends with ‘B’ (e.g. 1011B). A
hexadecimal number begins with a decimal digit, has hexadecimal digits and
ends with ‘H’ (e.g. 7FFFH, 0FFH). Note that RuleBase infers the width of constants from the context in which they are used and not from their format. For
example, 0010B can be assigned to any bit vector that has at least two bits.
An enumerated constant is one of the symbolic values which a variable can
take on. For instance, if we declare the following:
var state: {idle, st1, st2, st3, waiting};
then each of the 5 symbolic values “idle”, “st1”, “st2”, “st3”, and “waiting” are
enumerated constants.
A variable reference has one of the following formats:
name-- simple variable
name (number)-- one bit of array
name (number..number)-- a range of bits
Variables are described in Section 4.1.2.
Arrays are described in Section 4.2.
RuleBase: a Formal Verification Tool
Provided by special agreement with IBM
48
CHAPTER 4
4.1.1.2 Operators
An expression can be a combination of sub-expressions, connected by operators:
Boolean connectives:
! exprnot
expr & exprand
expr | expror
expr ^ expr (or: expr xor expr)xor
expr -> exprimplies
expr <-> expriff (xnor)
(Boolean operations can be applied only to boolean expressions.)
Relational operators:
expr = exprequals
expr != exprnot equals
expr > exprgreater than
expr >= expr greater than or equals
expr < exprless than
expr <= exprless than or equals
(>, >=, < and <= can be applied only to integer or boolean expressions.)
Arithmetic operators:
expr - exprminus
expr + exprplus
expr * exprmultiplication
expr / expr division
expr mod exprmodulo
(Arithmetic operators can be applied only to integer and boolean expressions.)
IBM Haifa Research Laboratory, Israel
Provided by special agreement with IBM
Describing the Environment
49
4.1.1.3 Operator precedence and associativity
The following operators are listed in decreasing order of precedence (the first
ones are the strongest):
++ (concatenation)
!
(not)
+ * / mod
= != < <= > >=
Temporal operators (will be introduced in CHAPTER 5)
& (and)
|
(or)
xor ^
<-> (iff)
-> (implies)
All the operators, except ->, have left to right associativity.
Use parentheses in any case that you don’t know or don’t remember the precedence. Even if you know, others may find explicit parenthesizing easier to read
and understand.
4.1.1.4 Case and If expressions
EDL provides two constructs which express a choice between two or more
expressions. They are the case and if expressions, described below.
The case expression has the following format:
case
condition1 : expr1 ;
condition2 : expr2 ;
...
else : exprn ;
RuleBase: a Formal Verification Tool
Provided by special agreement with IBM
50
CHAPTER 4
esac
A case expression is evaluated as follows: condition1 is evaluated first. If it is
true, expr1 is returned. Otherwise, condition2 is evaluated. If it is true, expr2 is
returned, and so forth. Although the else part is not essential, it is advisable to
use it as the default entry if you are not certain that the other conditions cover
all the cases. Falling through the end of a case statement may have unpredictable results. Notice that from the description of the case expression above, it
follows that an earlier condition takes precedence over a later one. That is, if
two conditions are true, the first takes precedence.
The if expression is shorthand for a case with two entries. If has the following
format:
if condition then exprA else exprB endif
In the above if expression, exprA is returned if condition is true, and exprB is
returned if condition is false.
Note: This section deals with if/case expressions rather than statements (if/case
statements are allowed only inside sequential processes. See Section 4.3). You
cannot write, for example:
if c then assign a := x; c := y; else assign a := z; b := w; endif;
Instead, you should write:
assign a := if c then x else z endif; b := if c then y else w endif;
4.1.1.5 Non-deterministic choice
RuleBase uses non-determinism to describe many possible behaviors at once. Non-determinism is described in detail in Section 4.7. In this section, the non-deterministic constructs are
briefly mentioned for completeness. The non-deterministic constructs of RuleBase have the
following format:
{ expr1, expr2, ... , exprn }a non-deterministic choice
IBM Haifa Research Laboratory, Israel
Provided by special agreement with IBM
Describing the Environment
51
expr1 union expr2another way to express {expr1, expr2}
n1 .. n2another way to express {n1, n1+1,..., n2}
4.1.1.6 Other expressions
The following are also expressions:
( expr )a parenthesized expression
expr in {v1, v2, ... , vn}shorthand for
((expr = v1) | (expr = v2) | ... (expr = vn))
4.1.1.7 Built-in functions
The built-in functions fell() and rose() have the following functionality:
• fell(expr) is true if expr is 0, and was 1 on the previous cycle
• rose(expr) is true if expr is 1, and was 0 on the previous cycle
The usage of fell and rose results in additional state variables, one for each
expression to which they refer. However, multiple references to the same variable will add only one extra variable.
4.1.2 The var statement
A var statement declares state variables. It has the following format:
var name, name, ... : type;
name, name, ... : type;
...
The type can be one of the following:
• boolean
• { enum1, enum2, ... }
• number1 .. number2
(Arrays will be described in Section 4.2)
For instance, the following are legal var statements:
RuleBase: a Formal Verification Tool
Provided by special agreement with IBM
52
CHAPTER 4
var request, acknowledge: boolean;
var state: {idle, reading, writing, hold};
var counter: {0, 1, 2, 3};
var length: 3 .. 15;
The first statement declares two variables, “request” and “acknowledge”, to be
of type boolean. The second statement declares a variable called “state” which
can take on one of four enumerated values: “idle”, “reading”, “writing” or
“hold”. The third statement declares a variable called “counter” which can
take on the values 0, 1, 2 and 3. The fourth statement declares a variable called
“length” which can take on any of the values between 3 and 15, inclusive.
A var statement only declares state variables. The assign statement, described
below, defines the behavior of these variables.
4.1.3 The assign statement
An assign statement assigns a value to a state variable declared with a var statement. It has
one of the following formats:
assign init(name) := expression;
assign next(name) := expression;
assign name := expression;
The first statement assigns an initial value to a state variable. The second statement defines the next-state function of a state variable. A state variable is simply a memory element, or register (flip-flop or latch). The third statement
assigns a value to a combinational variable.
The following are examples of legal assign statements:
assign init(state) := idle;
assign next(state) :=
case
reset : idle;
IBM Haifa Research Laboratory, Israel
Provided by special agreement with IBM
Describing the Environment
53
state=idle : { idle, busy };
state=busy & done : { idle };
else : state;
esac
The keyword assign may be omitted for the second and following consecutive
assign statements. Thus, the following:
assign var1 := xyz;
init(var2) := abc;
next(var2) := qrs;
is equivalent to:
assign var1 := xyz;
assign init(var2) := abc;
assign next(var2) := qrs;
4.1.4 The define statement
A define statement is used to give a name to a frequently-used expression, much like a macro
in other programming or hardware description languages. The define statement has the following format:
define name := expression;
For instance, the following are legal define statements:
define adef := (q | r) & (t | v);
define bb(0) := q & t; cc := 3;
As with the assign statement, the keyword define may be omitted in second
and following consecutive define statements.
4.1.5 Difference between assign and define
A state variable (flip-flop or latch) must always be declared with the var statement. If assigned
an explicit value, the assign init() and assign next() statements are used (if either is omitted,
the initial and next values, respectively, are considered to be completely non-deterministic).
RuleBase: a Formal Verification Tool
Provided by special agreement with IBM
54
CHAPTER 4
For a combinational variable (output of combinational logic), either assign or
define may be used. Users of SMV or of previous versions of RuleBase may
recall that there were subtle differences between the assign and define statements which made it more efficient to use one or the other in certain situations.
These differences are no longer present in RuleBase, which will convert from
one to the other as needed in order to make the model checking more efficient.
The only semantic distinctions between assign and define that remain are the
following:
• assign must refer to a variable defined with var
• define must NOT refer to a variable defined with var
• An assign statement can be thought of as a variable assignment, while a define statement
should be thought of as macro text substitution. Thus, in the following:
VAR v,v1,v2,d1,d2: boolean;
assign v := {0,1};
assign v1 := v;
assign v2 := v;
define d := {0,1};
assign d1 := d;
assign d2 := d;
It is true that v1=v2, because both are equal to the value of the variable v. However, it is not
true that d1=d2, because macro text substitution has made the assignments to d1 and d2
equivalent to:
assign d1 := {0,1};
assign d2 := {0,1};
so that each non-deterministic assignment is completely independent of the other. If you
code something similar to the above, RuleBase will issue a warning that a non-deterministic define expression is multiply used.
4.1.6 The module statement
An environment file can be totally flat, with no hierarchy at all. In this case all statements are
considered to be enclosed by one big main module. However, it is usually more appropriate to
write a modular and hierarchical environment. The module and instance statements are used
for this purpose.
IBM Haifa Research Laboratory, Israel
Provided by special agreement with IBM
Describing the Environment
55
A module statement is used to define a module which can be instantiated a
number of times, as in hardware description languages. It has the following
format:
module module_name ( inputs ) ( outputs )
{
statement;
statement;
...
}
where inputs is a list of formal parameters passed to the module, outputs is a
list of formal parameters produced by the module, and statements is any
sequence of var, assign, define, fairness and instance statements. The input/
output parameters can be thought of as input/output signals. Input parameters
are produced elsewhere, and they drive the module, while output parameters
are produced by the module itself and can be used elsewhere. A signal that
appears as an output parameter of a module must be defined and assigned a
value in that module (var or define or instance output). If a signal that appears
as an input parameter of a module is not used in that module, RuleBase will
issue a warning.
For instance, the following is a legal module statement:
module delayed_and (s1, s2) (out)
{
var out : boolean;
assign
init(out) := 0;
next(out) := s1 & s2;
}
Modules cannot be declared inside other modules but they can be used (instantiated) by other
modules.
RuleBase: a Formal Verification Tool
Provided by special agreement with IBM
56
CHAPTER 4
4.1.7 The instance statement
A module statement is only a definition - it has no effect until it is instantiated
(called). The instance statement instantiates a module using the following format:
instance instance_name : module_name ( inputs ) ( outputs );
where instance_name is the name of the specific instance (one module can be
multiply instantiated), module_name is the name of the module being instantiated, inputs is a list of expressions passed as inputs to this instance and outputs
is a list of output parameters, actually connecting the instance outputs to real
signals of the design or the environment. An instance name is optional.
For example, the following is a legal instance statement, instantiating the twoinput and-gate defined in Section 4.1.6:
instance da : delayed_and(q,r)(t);
4.1.8 The fairness statement
A fairness statement is used to describe a fairness constraint. The use of fairness is described
in detail later in this chapter. Briefly, a fairness statement describes a condition that must be
met infinitely often. It is an important tool in specifying abstract environment models. The
fairness statement has the following format:
fairness expression;
The following is a legal fairness statement:
fairness state != busy;
Currently the fairness expression cannot contain temporal operators. This limitation protects users from commonly encountered mistakes. RuleBase supports other types of fairness, which are detailed in Section 4.7.3.1, Additional
(advanced) fairness types .
IBM Haifa Research Laboratory, Israel
Provided by special agreement with IBM
Describing the Environment
57
4.1.9 Scope rules
Statements inside a module cannot reference variables outside that module (no
global symbols). External signals and variables needed by the module must be
passed as parameters to the instance. A module can assign values to external
signals and variables only by passing them as output parameters.
On the other hand, it is possible to reference internal signals of an instance
from outside that instance. For example, if module M has an internal signal
Sig, and Ins is an instance of module M, one can refer to signal Sig as Ins/Sig
(‘/’ is the hierarchy character). This allows formulas to refer to the internal
state of instances without the burden of exporting state variables. It also allows
you to easily override parts of existing modules without changing the module
definition. Overriding is explained in detail in Section 4.5.
4.1.10 Comments, macros and preprocessing
There are two types of comments in environment description files: 1) Text
beginning with “--” and ending at the end of line. 2) Text beginning with “/*”
and ending with “*/”. Comment text is ignored by RuleBase. A comment can
be inserted anywhere a space is legal (except in text strings).
Before processing the environment description files, RuleBase calls a standard
preprocessor, cpp, to filter these files. The mechanisms provided by cpp can be
used to facilitate the development of environment models. The most useful
mechanisms are macros, conditional compilation (#ifdef, #if, #endif, ...) and
#include. See “man cpp” on your unix system for more details.
RuleBase provides additional preprocessing abilities in addition to cpp. These are the %for
and %if constructs described below.
RuleBase: a Formal Verification Tool
Provided by special agreement with IBM
58
CHAPTER 4
4.1.10.1 %for
The %for construct replicates a piece of text a number of times, with the possibility of each replication receiving a parameter. The syntax of the %for construct is as follows:
%for <var> %in <expr1> .. <expr2> %do
...
%end
or:
%for <var> in <expr1> .. <expr2> step <expr3> do
...
%end
-- step can be negative
or:
%for <var> in { <item> , <item> , ... , <item> } do
...
%end
-- where <item> is either a number, an identifier, or a string in double-quotes.
-- When the value of an item is substituted into the loop body (see below),
-- the double quotes will stripped.
In the first case, the text inside the %for-%end pairs will be replicated expr2expr1+1 times (assuming that expr2>=expr1). In the second case, the text will
be replicated (|expr2-expr1|+1)/expr3 times (if both |expr2-expr1| and expr3
are positive or both are negative). In the third case, the text will be replicated
according to the number of items in the list.
During each replication of the text, the loop variable value can be substituted
into the text as follows. Suppose the loop variable is called “ii”. Then, the current value of the loop variable can be accessed from the loop body using the
following three methods:
IBM Haifa Research Laboratory, Israel
Provided by special agreement with IBM
Describing the Environment
59
• The current value of the loop variable can be accessed using simply “ii” if “ii” is a separate
token in the text. For instance:
%for ii in 0..3 do
define aa(ii) := ii > 2;
%end
is equivalent to:
define aa(0) := 0 > 2;
define aa(1) := 1 > 2;
define aa(2) := 2 > 2;
define aa(3) := 3 > 2;
• If “ii” is part of an identifier, it can be accessed using %{ii} as follows:
%for ii in 0..3 do
define aa%{ii} := ii > 2;
%end
is equivalent to:
define aa0 := 0 > 2;
define aa1 := 1 > 2;
define aa2 := 2 > 2;
define aa3 := 3 > 2;
• If “ii” needs to be used as part of an expression, it can be accessed using %{<expr>} as follows:
%for ii in 1..4 do
define aa%{ii-1} := %{ii-1} > 2;
%end
is equivalent to:
define aa0 := 0 > 2;
define aa1 := 1 > 2;
define aa2 := 2 > 2;
define aa3 := 3 > 2;
The following operators can be used in pre-processor expressions:
RuleBase: a Formal Verification Tool
Provided by special agreement with IBM
60
CHAPTER 4
= != < > <= >= - + * / %
In the current version, operators work only on numeric values, i.e. it’s ok to
write
%for i in 0..3 do
i %if i != 3 %then + %end
%end
But it is not possible to write
%for command in {read, write} do
...
%if command = read %then-- doesn’t work!
...
4.1.10.2 %if
The %if construct is similar to the #if construct of the cpp preprocessor. However %if must be
used when <expr> refers to variables defines in an encapsulating %for. The syntax of the %if
construct is as follows:
%if <expr> %then
...
%end
or:
%if <expr> %then
...
%else
...
%end
4.1.11 Reserved words
The following words are keywords and should not be used as identifiers:
IBM Haifa Research Laboratory, Israel
Provided by special agreement with IBM
Describing the Environment
61
a abf abg af ag always as_in assign ax before before! before!_ before_
boolean bvtoi case define e ebf ebg ef eg else endif env envs esac ex
fairness false fell forall formula formulas if in init inherit instance itobv
mod mode module next next_event next_event! override rep zeroes ones
nondets rose rule test_pins then true u union until until! until!_ until_ var
w whilenot whilenot! within within! xor
If a keyword is prefixed with the ‘\’ character, it becomes a regular identifier.
4.2 Arrays
It is often convenient to define arrays of state variables and to apply operations
to entire arrays or to ranges of indices. Boolean arrays (buses, bundles) are the
most common, but other types of arrays (integer sub-range, enumerated constants) are also useful. Hence RuleBase is oriented mainly toward boolean
arrays, but supports other types of arrays also.
4.2.1 Defining arrays
An array of state variables is defined as follows:
var name ( index1 .. index2 ) : type ;
It actually defines (|index2-index1|+1) state variables named name(index1), ...,
name(index2), where index1 can be either greater or less than index2.
Examples:
var
addr(0..7) : boolean; -- 8 boolean variables, addr(0), addr(1), ... , addr(7)
counter(4..5) : 0..3;
-- 2 integer variables, each can have the values 0,1,2,3
status(3..0) : {empty, notempty, full };
-- 4 variables, each can have the values empty, notempty, full
RuleBase: a Formal Verification Tool
Provided by special agreement with IBM
62
CHAPTER 4
An array can also be defined with a define statement:
define name( index1 .. index2 ) := <expr>;
Example:
define masked_sig(0..3) := sig(0..3) & mask(0..3);
Note that the following line
var x(0..3) : { 5, 7, 13 };
defines an array of four integer variables, each of them can have the values 5, 7
or 13. This is not a non-deterministic bit vector. To define a bit vector and
assign to it the three values non-deterministically, do the following:
var x(0..3) : boolean;
assign x(0..3) := { 5, 7, 13 };
4.2.2 Operations on arrays
Reference:
The simplest operation on an array is a reference to a bit or a bit range. One bit of an array is
referenced as array_name(N) where N is a constant. A range of bits is referenced as
array_name(M..N). It is always necessary to specify the bit range when referencing an array.
It is possible to access an array element using variable index:
array_name(V: index1..index2) where V is a integer variable, and
index1..index2 are constants indicating its range. Example:
var source(0..7): boolean; V: 0..7;
define destination := source(V:0..7); -- assuming that the behavior of V is define elsewhere
Other operations that can be used with any type of arrays are:
:= = != if case
IBM Haifa Research Laboratory, Israel
Provided by special agreement with IBM
Describing the Environment
63
Example: aa(0..7) := if bb(0..2)=cc(0..2) then dd(0..7) else ee(1..8) endif;
The rest of the operators can be applied to boolean arrays (bit vectors) only.
Boolean connectives (bitwise): & | ^ ! -> <->
Both operands must be of the same width (unless one of them is constant). The result will
have the same width as the vector operands.
Example: v(0..7) := x(0..7) & y(0..7) | !z(0..7);
Relational: < > <= >=
Both operands must be of the same width (unless one of them is constant). The result will
be a scalar boolean value.
Examples: c := v(0..7) > x(0..7);
d := v(0..7) <= 16;
Arithmetic (unsigned):
+ - *
Both operands must be of the same width (unless one of them is constant). The result will
have the same width as the vector operands.
Examples:
define cc1(0..7) := aa(0..7) + bb(0..7);
cc2(0..7) := aa(0..7) + 1;
cc3(0..7) := 10 * aa(0..7);
In order not to lose the most significant bits of the result, pad the operands with zeroes on
the left. Examples:
define aa(0..7) := zeroes(4) ++ bb(0..3) * zeroes(4) ++ cc(0..3);
co++sum(0..7) := 0++a(0..7) + 0++b(0..7);
(++ is the concatenation operator, described below. zeroes(4) is a vector of four zeroes)
Shift:
>> <<
RuleBase: a Formal Verification Tool
Provided by special agreement with IBM
64
CHAPTER 4
The first operand must be a boolean vector and the second operand must be an integer constant or variable. The result is a boolean vector of the same width as the first operand.
These operations perform the logical shift, i.e vacated bit positions are filled with zeroes.
Examples:
define cc(0..7) := aa(0..7) << 2;
var shift_amount: 0..5;
define dd(0..7) := bb(0..7) >> shift_amount;
ee(0..8) := 0++ff(0..7) << 1;
4.2.3 Conversion of bit vectors to integers and vice versa:
Bit vector to integer:
bvtoi( a_vector )
Integer to bit vector:
itobv( an_integer )
Example:
assign next( counter(0..7) ) := itobv( bvtoi( counter(0..7) ) + 1 );
Note that constant integers are converted to bit vectors implicitly - there is no
need to apply itobv. It is recommended to use bit vectors instead of big integer
variables, if possible.
4.2.4 Construction of bit vectors from bits or sub-vectors
The concatenation operator (++) is used to make bit vectors out of bits or
smaller vectors:
expr ++ expr
Example:
define wide(0..5) := narrow(2..3) ++ bit1 ++ bit2 ++ another_narrow(0..1);
IBM Haifa Research Laboratory, Israel
Provided by special agreement with IBM
Describing the Environment
65
If expr is a constant, it should be either 0 or 1. Wider constant vectors should
be split into separate bits.
define x(0..5) := y(0..2)++1++0++z; -- allowed
define x(0..5) := y(0..2)++10B++z; -- not allowed
The concatenation operator can also appear on the left-hand-side of an assign or define statement. For instance, the following statement:
define a ++ b ++ c(0..2) := d ++ 1 ++ 0 ++ e(0..1);
is equivalent to the following four statements:
define a := d; b := 1; c(0) := 0; c(1..2) := e(0..1);
The built-in construct rep() can help to construct arrays of repeated elements:
rep (expr, N) is equivalent to expr concatenated with itself N times. For instance, to make
each bit of array ‘arr’ non-deterministic, the following assignment could be used:
assign arr(0..3) := rep({0,1},4);
-- {0,1}++{0,1}++{0,1}++{0,1}
Shorthands:
zeroes(N) is equivalent to rep(0,N)
ones(N) is equivalent to rep(1,N)
nondets(N) is equivalent to rep({0..1},N)
4.2.5 Array Notes
• The exact range must be specified in the operation. “a = b” is not equivalent to
“a(0..3) = b(0..3)”. b(0..3) represents variables b(0) through b(3) while b represents one variable with no index.
• Operands can take any ranges, provided that their widths are compatible. For
example, “a(0..3) & b(1..4)” is legal, but “a(0..3) & b(0..4)” is not.
• If one of the operands is a boolean vector and the other is a numeric constant, the
constant is considered an array of bits. For example, “a(0..1) = 10B” is equivalent
to “a(0)=1 & a(1)=0” and “a(1..0) = 10B” is equivalent to “a(1)=1 & a(0)=0”.
RuleBase: a Formal Verification Tool
Provided by special agreement with IBM
66
CHAPTER 4
• “var v(0..3): { 5, 7, 13 }” defines 4 state variables, each of them can take the values
5 or 7 or 13. This is sometimes confused with
“var v(0..3): boolean; assign v(0..3) := { 5, 7, 13 };” that defines a vector of 4 bits,
and the whole vector can take the values 5 or 7 or 13.
• Arrays can be used as formal parameters of modules and as actual parameters of
instances. The actual parameter width must match the width of the formal parameter.
• If you write “#define N 7” and later “a(0..N)”, leave a space around the two dots:
a(0 .. N). Otherwise the standard preprocessor (cpp) used by rulebase will identify
..N as a token and will not replace N by 7.
4.2.6 More array examples
var a(0..3), b(0..8), c(0..2) : boolean;
define d(0..3) := b(5..8);-- different sub-ranges
define e(0..2) := b(2..0) & c(0..2);-- different directions
var x_state(0..2), y_state(0..2): {s1, s2, s3 };
define same_state := x_state(0..2) = y_state(0..2);
var nda(0..2): boolean;
assign nda(0..2) := {001b, 010b, 111b};
-- non-deterministic assignment to an vector
assign next( a(0..2) ) :=
case
reset : 0;
a(0..2) = b(0..2) : c(1..3);
a(0..1) = 10B : d(0..2);
else : a(0..2);
esac;
var counter(0..7) : boolean;
assign
init( counter(0..7) ) := 0;
IBM Haifa Research Laboratory, Israel
Provided by special agreement with IBM
Describing the Environment
67
next( counter(0..7) ) := counter(0..7) + 1;
module and_or ( a(0..7), b(0..7), c(0..7) )( d(0..7) )
{ define d(0..7) := a(0..7) & b(0..7) | c(0..7); }
instance a1 : and_or( x(0..7), y(7..0), z(0..7) )( w(7..0) );
4.3 Sequential Processes
Process constructs of EDL are similar to “process statements” of VHDL and to
“always blocks” of Verilog. They can be useful in situations when it is awkward to write explicit concurrent definitions for signals. Using process constructs, you can write your code in the form of sequences of statements, which
are “executed” in each cycle to compute the needed values of signals. The only
statements allowed in a process are variable declarations, variable assignments,
IF statements and CASE statements.
As a simple example,
process {
var foo: boolean;
foo := d1;
if c then foo := d2; endif;
}
is equivalent to the concurrent assignment
assign foo := if c then d2 else d1 endif;
(Of course, in this example the concurrent form is simpler than the process construct).
As a slightly more realistic example, suppose for the moment that we need to
model a ripple-carry adder in EDL, but for some reason cannot use the “+”
operator:
RuleBase: a Formal Verification Tool
Provided by special agreement with IBM
68
CHAPTER 4
process {
var sum(0..7): boolean;
var carry: boolean;
carry := 0;
%for i in 7..0 step -1 do
sum(i) := x(i) ^ y(i) ^ carry;
carry := (x(i) & y(i)) | (x(i) & carry) | (y(i) & carry);
%end
}
Note that the carry signal is assigned several times in the process, and each
stanza of the loop refers to the value of carry valid for this specific stanza. if
some code outside this process refers to the carry signal, it will refer to the
``final’’ value of carry, which in this case is the overflow bit of the adder.
It is convenient to think about processes as sequential code which is “executed”
each cycle, but what happens technically is that RuleBase analyzes the process
construct, keeping track of interim assignments, and generates concurrent definitions for signals driven by the process. This means, for example, that in the
wave browser you will only be able to see the ``final’’ values of signals.
If you are familiar with VHDL or Verilog, you will notice that EDL processes
are not explicitly associated with some clock signal or a sensitivity list.
Instead, they are implicitly clocked on the “system clock”, just like the concurrent “assign next” construct.
Now we will take a closer look at the building blocks of a process construct.
1.
Variable declarations
The process construct should contain var declarations for all signals which are assigned
within the process. The var declaration of each signal should appear before the first assignment to it. Currently there is a restriction on chains of var declarations within a process:
each var declaration should start with var keyword, i.e.
“var foo: boolean; bar: boolean;”
is not allowed, but both
IBM Haifa Research Laboratory, Israel
Provided by special agreement with IBM
Describing the Environment
69
“var foo, bar: boolean” and “var foo: boolean; var bar: boolean”
are allowed.
2.
Assignments
The three usual forms of RuleBase assignments are supported:
assign S := expr;
assign next (S) := expr;
assign init (S) := expr;
The keyword assign can be omitted. Note that define constructs are illegal within process.
S is a signal or a concatenation of signals.
The assignment of the first form:
S := expr;
is similar to variable assignment of VHDL and to blocking assignment of Verilog, in that
references to S which are ``executed’’ after this assignment will already refer to the new
value of S. For example,
foo := 0;
bar := foo;
foo := 1;
will assign 0 to bar (even in spite of the fact that foo is re-assigned later on).
The assignment of the form:
next (S) := expr;
behaves more like the signal assignment of VHDL and to non-blocking assignment of Verilog, in that it doesn’t influence the values of S which can be observed in this cycle.
next (foo) := 0;
bar := foo;
will assign to bar the current-cycle value of foo, which is not necessarily 0. The next-cycle
value of foo will be 0 (in the absence of further assignments to ``next (foo)’’ in the process).
The assignment of the form:
init (S) := expr;
is very special in that it will be “executed” only in the very first cycle, and will have no
effect in subsequent cycles.
3.
CASE statements
RuleBase: a Formal Verification Tool
Provided by special agreement with IBM
70
CHAPTER 4
case
guard1: stat1;
guard2: stat2;
...
guardn: statn;
else: state;
esac;
Each guardi is a boolean expression. The else clause is optional. Each stati is either a single assignment, or an arbitrary sequence of statements enclosed in braces.
4.
IF statements.
IF statement is less general than the CASE statement and can take one of two forms:
if condition then
statements;
endif;
or
if condition then
statements;
else
statements;
endif;
We will conclude this section with an example of a process construct which
makes use of different statements:
module server (start,grant)(request,done)
{
process {
var state: { idle, wait, busy };
init(state) := idle;
IBM Haifa Research Laboratory, Israel
Provided by special agreement with IBM
Describing the Environment
next(state) := state; -- default behavior
var request, done: boolean;
-- state machine outputs
request := false; done := false; -- their default behavior
case
state=idle & start:
next(state) := wait;
state=wait: {
request := true;
if grant then
next(state) := busy;
endif;
}
state=busy: {
done := {true,false};
if done then
next(state) := busy;
endif;
}
esac;
} -- process
} -- module
RuleBase: a Formal Verification Tool
Provided by special agreement with IBM
71
72
CHAPTER 4
4.4 Environment constraints
Invar, assume, restrict and hints are environment constructs that enable setting constraints on
signals. It let you describe environment by declarative means instead of giving each signal a
functional behavior. Those environment constraints can be combined with other environment
construct (such as var, assign, define etc.).
4.4.1 Invar
The invar statement enable you specify a boolean invariant that you want to be true at any
cycle. Rulebase will force the model to hold this invariant at every cycle.
The syntax of the invar construct is as follows:
invar <expr>
-- Where <expr> is a boolean expression.
The boolean expression within the invar can include both environment and
design signals.
Example:
Given a design with the inputs request1, request2, request3, the design should work properly only under the constraint that at most one request can be active at any given cycle.
This can be specified by:
var request1, request2, request3: boolean;
invar (request1 + request2 + request3 <= 1)
request1, request2, request3 signals can have any non-deterministic behavior that hold the
above invariant.
4.4.2 Assume
Assume can be seen as an extension of the invar construct. It enables you to write more expressive assumptions on your model, telling RuleBase to force your model to hold those assumptions. The assumptions are written as Sugar properties.
The syntax of the assume construct is as follows:
IBM Haifa Research Laboratory, Israel
Provided by special agreement with IBM
Describing the Environment
73
assume {sugar_formula}
-- most of Sugar safety formulas can be used within the assume.
Examples:
- read and write are inputs to a design.
- read should not followed by a write (1 or 2 cycles later).
This can be specified by:
var read, write: boolean;
assume {AG (read -> ABG[1..2] (!write))}
Another requirement:
- The first input command must be a write
assume {write before_ read}
Another requirement:
- a sequence of three consecutive writes is illegal
assume { {[*], write[3]}(false) }
Assume can help you define complex behavior of inputs.
Using the assume construct, you can start the verification process with initial
free environment, adding environment assumptions when you encounter “false
negatives” (counter-examples that result from illegal input sequence).
Writing environment with assumptions unable you apply compositional verification on your design using the assume-guarantee approach. First you assume
that the input signals obey some assumptions, later you take those assumptions
and guarantee they hold by turning them to rules, and verifying them on the
blocks that produced them. Lets consider a design that is partitioned to two
blocks: block1, block2 (see Figure 1 ). In the verification of block1, one can
write environment assumptions on the input signals generated by block2 using
the assume construct. Later, when proceeding to the verification of block2, all
RuleBase: a Formal Verification Tool
Provided by special agreement with IBM
74
CHAPTER 4
the already written assumptions, can be turn to formulas and verified on
block2.
FIGURE 1.
using the assume construct for compositional verification
assume
envs
rules
block1
block2
Assumptions cannot be written inside module or process.
At now, Rulebase needs the environment variable RB_ASSUMPTIONS to be
set to 1 to work with assumptions (user can do this through rulebase.setup or
Menu/Setenv button in graphical user interface.)
Notes:
• In some cases, the assume construct can cause state space explosion problems by introducing a lot of variables (these variables are needed to construct a deterministic automata that
replaces the assume construct). In such cases it may be more convenient for the user to use
other constraint constructs (such as invar or restrict), or define the behavior in the usual way
(using define and assign).
• Non-deterministic variables may cause false negatives, if used in the same assume but in
different points of time, for example:
var x,y,z: boolean;
assign next(x) := x;
assume {AG(y=x -> AX(z=x))};
IBM Haifa Research Laboratory, Israel
Provided by special agreement with IBM
Describing the Environment
75
...
Then user may get a counter example to some formula where there is a cycle where the
value of y differs from the value of z on the next cycle (i.e. violates the assume).
The other example (which has the same meaning) is:
forall x assume {AG(y=x -> AX(z=x))}
It causes the same problems.
The two cases can be rewritten as follows, without causing false negatives:
assume {AG(y=0 -> AX(z=0))};
assume {AG(y=1 -> AX(z=1))};
In general, assumes are most useful in free environment.
• There is an additional case of false negatives, as it seen by users, when the counter example
does not show the restricted behavior but is final, i.e. would necessarily show such behavior
if prolonged. Such counter examples can be eliminated by writing the same assume on
“causing variables”, i.e. investigating what is the earliest possible wrong behavior of the
design or/and environment and forbidding it. Following is the simplified example of such
case:
var x, y: boolean;
assign init(x) := {0,1};
assign next(x) := x;
assing init(y) := 0;
assing next(y) := !x;
assume {AG(!y) }
formula {AG (y) }
RuleBase: a Formal Verification Tool
Provided by special agreement with IBM
76
CHAPTER 4
the user gets the counter example of length 1 where x=0 and y=0. But this trace has the
only next state where y=1 and x=0 and is forbidden according to the assumption. Thus the
trace the user gets in this example is not real. By tracing back the forbidden behavior of y,
one can see that it is forbidden for x to be 0. Replacing the existing assume by
assume {AG(x) }
on the same formula the user gets the real counter example of length 1 where y=0 and x=1
(“real” means here that it can be prolonged to any length.)
4.4.3 Restrict
The restrict environment construct is used to limit the state space exploration to certain paths.
The restrict looks like a regular expression, and its semantics resemble the semantics of regular
expression. Only paths that match a prefix of the regular expression will be checked.
The syntax of the restrict construct is as follows:
restrict {regular_expression}
-- where the regular expression events can be any of the sequence events.
Example:
restrict { !read[*], read, !read[*] }
- restrict RuleBase to check only paths with at most one read command.
Note that there is no meaning to restrict that starts with a [*], since every computation path is a prefix of such restrict, and hence this restrict will force no
limitation on the model.
There are several motivation for the use of restrict:
1.
2.
‘Guide/direct’ search to start with specific behavior.
Example: every path should start with 2 reads followed by a write
restrict {read[2], write, [*]}
Note! the [*] at the end of the above restrict is necessary; if you omit it Rulebase will check
only paths of length three.
Easy way to define an input that behaves according to a specific pattern.
Example:
bus is defined as follows:
var bus: {idle, BOP, data, EOP};
IBM Haifa Research Laboratory, Israel
Provided by special agreement with IBM
Describing the Environment
3.
77
we restrict the bus behavior to the following pattern:
restrict { {bus=idle[*], bus=BOP, bus=data[4], bus=EOP}[*] }
That is, there can be any number of transactions, with any number of idle cycles in
between, where each transaction starts with BOP, followed by four cycles of data and terminated with EOP.
A quick way to verify that a specific design failure does not exist in the ‘design after fix’:
Given a formula that failed and a trace that shows a counter example for the formula. We fix
the design and would like to verify (in a quick way) that we do not get the same failure that
we had before.
The inputs of the trace can be converted into a restriction that describes the inputs value in
each cycle in the following way:
- Click results button
- Click the formula that failed and select ‘Generate restrict (inputs)’
- Run the formula again using the restrict you generated
If the counter example does not exists anymore you will get a vacuous result for the new
run.
This run is a quick one since it restricts the search space to a very specific pattern of inputs.
4.4.4 Hints
Hint list can be seen as a generalization of invar construct. RuleBase uses each hint in the list
to restricts the search of the state space exactly as invar does, switching to the next hint in the
list when no states can be explored using the current one.
Syntax:
hint expr, ..., hint expr[NUM], ...;
Semantics:
• hint expr means continue searching reachable states with the transition relation constrained
by expr till fixpoint is reached.
• hint expr[NUM] means do only NUM of steps with the constraint.
• RuleBase automatically adds hint TRUE at the end of the list, so you do not need to do it.
• When a hint ended (either fixpoint reached or given number of cycles passes), pass to the
next one.
RuleBase: a Formal Verification Tool
Provided by special agreement with IBM
78
CHAPTER 4
In the case of liveness formulas with hints, every liveness formula is checked
on the fly at every fixpoint reached with any hint.
Examples:
var cmd: {read, write, flush, stall };
hint cmd = read, hint cmd = write, hint cmd != flush[5];
4.4.5 More environment constraints examples
1.
cmd, busy are design inputs. One cycle after cmd is active, busy will be active:
var cmd, busy : boolean;
assume {AG (cmd -> AX busy) }
2.
When sending a command, cmd should be active for three cycles, and then inactive for at
least two cycles.
var cmd: boolean;
assume { {[*], !cmd, cmd}(ABG[1..2] (cmd) }
assume { {[*], cmd[3]}(ABG[1..2](!cmd)) }
The above environment written with restrict:
var cmd: boolean;
restrict { {!cmd[*], cmd[3], !cmd[2]}[*] }
Consider a design block that should work properly under the following assumptions:
- start, end (the input signals) are pulses.
- start and end are interleaving (i.e there is always a start between two ends and vise versa).
- the first end will be proceed by a start.
var start, end: boolean;
assume { AG (start -> (AX end before start)) }
assume { AG (end ->(AX start before end)) }
assume { AG !(start & end) }
assume { start before end }
The above environment written with restrict:
var start, end : boolean;
restrict { {(!start & !end)[*], start & !end, (!start & !end)[*], !start & end}[*] }
3.
4.
5.
IBM Haifa Research Laboratory, Israel
Provided by special agreement with IBM
Describing the Environment
79
4.5 Linking the environment to the design
In RuleBase, the connection between the design and the environment is by name. Thus, in
order to give behavior to an input signal of name “reset” in your design, just give a signal of
that name behavior in your environment, using either the define statement (see Section 4.1.4),
or the var statement (see Section 4.1.2) in combination with the assign statement (see Section
4.1.3). It is important to make sure that you are using the name of the signal exactly as RuleBase knows it (including capitalization). A list of the design signals RuleBase knows can be
found under the “Debugging/Signals before reduction” menu option.
4.6 Overriding Design Behavior
The environment can be used to override the behavior of part of the design. To override the
behavior of an internal design signal, simply give it behavior using either the define statement,
or the var statement in combination with the assign statement, specifying override as follows:
define override sig := ...
or:
var override sig: boolean;
assign init(sig) := ...
next(sig) := ...
Overriding design behavior is especially useful if we have implemented a specific behavior of a signal, but want to make sure the design works for any
behavior of the signal. For instance, suppose that we have a signal called “predict” that implements a complicated predict function. Some other piece of
logic uses the “predict” signal in its calculations. Suppose our formula is the
following:
AG (predict -> AX[2] !low_priority_request)
Also suppose that this formula should be true whatever the implementation of
the predict function. We can make RuleBase’s job easier by eliminating all the
logic driving “predict”, and overriding it with a totally non-deterministic
behavior, as follows:
var override predict: boolean;
-- predict can now have any behavior
RuleBase: a Formal Verification Tool
Provided by special agreement with IBM
80
CHAPTER 4
For another example of overriding internal signals, see Section 8.6, Abstraction
of Internal Parts.
When overriding design signals, it is important to make sure that you are using
the name of the signal exactly as RuleBase knows it (including capitalization).
A list of the design signals RuleBase knows can be found under the “Debugging/Signals before reduction” menu option.
4.6.1 Overriding initial values
Sometimes, it is necessary to override the initial value of a flip-flop in the design, without modifying its next-state function. In these cases specify the initial value as follows:
assign init(abc) := 1;
assign init(def) := {0,1};
The first statement above assigns an initial value of 1 to signal abc. The second
statement assigns a non-deterministic initial value to signal def. In other
words, the value of signal def at power-on is not known.
4.7 Using Non-determinism and Fairness
It may not yet be clear to you how an environment is used to describe every
possible input sequence. This is important if we are to fulfill the promise made
that formal verification is equivalent to exhaustive simulation. To achieve this
exhaustiveness, non-determinism is used.
This section discusses non-determinism and its uses. It is necessary to understand this subject thoroughly in order to use formal verification. Afterwards,
fairness, a closely related concept, is discussed. Fairness is a way of limiting
non-determinism so that paths that we don’t want to consider are filtered out.
A non-deterministic environment is an environment in which we specify more
than one possibility for the behavior of a given variable. When we make a nondeterministic assignment, we are indicating to RuleBase that all possibilities
IBM Haifa Research Laboratory, Israel
Provided by special agreement with IBM
Describing the Environment
81
must be considered. Do not confuse a non-deterministic assignment with the
X value sometimes used in simulation, or with a don’t care assignment as used
in synthesis. A don’t care assignment gives a measure of freedom to the synthesis tool - it indicates that any value chosen by the tool is ok. In synthesis, of
course, the actual logic will have either one value or the other. A non-deterministic assignment, on the other hand, does not give any freedom. Rather, it
forces RuleBase to consider the exact outcome of all possible choices.
This section assumes that the rules checked are of the form “for all possible
execution paths, some property holds true.” If rules of this type are proven in
an abstract system, it will also hold true in every concrete system that implements the abstract system. Experience has proven that most of the rules used in
practice are of this type.
4.7.1 Coding non-determinism
4.7.1.1 Free variables
A free variable is any variable which is declared but not assigned a behavior using an assign
statement. For instance, assume the following is part of an environment which models a CPU
driving a memory bus:
var command: {read, write, none};
Since we have not specified any behavior for variable command, RuleBase
must consider all possible sequences of commands.
A non-deterministic choice between values of a variable can also be made by
enumerating all possible values. Thus, we could have made the variable command free explicitly as follows:
var command: {read, write, none};
assign command := {read, write, none};
RuleBase: a Formal Verification Tool
Provided by special agreement with IBM
82
CHAPTER 4
4.7.1.2 Non-deterministic choice
Many times, we do not want a variable to be completely free, but rather constrained in some
way while still exhibiting non-deterministic behavior in certain cases. For this purpose, we can
use non-deterministic choice among expressions. The non-deterministic choice is an expression indicating a choice between a number of values. For instance, the following expression:
{write, none}
indicates a non-deterministic choice between the values “write” and “none”.
Suppose that our CPU contains a MESI-state cache. Then, it will never issue
the read command unless it is in an invalid state. However, the write command
may be issued in any case. We would then model our CPU as follows:
var command: {read, write, none};
assign command :=
case
mesi_state = invalid: {read, write, none};
else
: {write, none};
esac;
In this environment we have specified that the command can be any of the three
declared values if the variable mesi_state equals invalid. Otherwise, the variable command can take on either the value “write” or the value “none”.
Another example: Suppose we have an arbiter which receives two commands,
c1 and c2. If both commands have the value “none”, then the arbiter outputs
“none”. If only one command is not “none”, then that command is chosen. If
both commands are not “none”, then the arbiter may choose either one nondeterministically. We could model this as follows:
module an_arbiter (c1, c2) (output_command)
{
var output_command: {read, write, none};
assign output_command :=
case
(c1 = none) & (c2 = none): none;
(c1 = none):
c2;
(c2 = none):
c1;
else
:
{c1 , c2};
IBM Haifa Research Laboratory, Israel
Provided by special agreement with IBM
Describing the Environment
83
esac;
}
4.7.1.3 Auxiliary non-deterministic variables
Notice that the arbiter shown above is rather simplistic. To complicate things,
let us assume that command c1 comes with address a1, and command c2
comes with address a2. Then, if we choose command c1, it makes no sense to
choose a2. In this case we must choose a1. One way to associate one nondeterministic choice with another is to use an auxiliary non-deterministic variable. The following example illustrates this point.
FIGURE 2.
Another arbiter
module another_arbiter (c1, a1, c2, a2) (output_command, output_address)
{
var choose: {1,2};
var output_command: {read, write, none};
var output_address: boolean;
assign output_command :=
case
(c1 = none) & (c2 = none): none;
(c1 = none): c2;
(c2 = none): c1;
else
: case choose = 1: c1; 2: c2; esac;
esac;
assign output_address :=
case
(c1 = none) & (c2 = none): {0,1};
(c1 = none): a2;
(c2 = none): a1;
else
: case choose = 1: a1; 2: a2; esac;
esac;
}
RuleBase: a Formal Verification Tool
Provided by special agreement with IBM
84
CHAPTER 4
By using the free auxiliary variable “choose”, we have tied the non-deterministic choice between c1 and c2 to that between a1 and a2. Notice that in the case
where both c1 and c2 are none, we let the address be free. This is an accurate
picture of an arbiter in which the address is undefined in the case that no command is chosen.
4.7.2 Using non-determinism to create an abstract model
Suppose we need to model an arbiter that uses a round-robin or other algorithm in order to
ensure that every requestor gets a turn. Now, further assume that this arbiter is not part of the
model under test, but rather is a piece of logic that we know is correct. Exactly modeling the
arbiter will be time-consuming and error-prone. We are likely to spend a good amount of time
debugging the model rather than verifying our design under test.
If the properties to be verified depend only upon the fact that the arbiter eventually gives every requestor a turn, and not on the specific algorithm used by the
arbiter, then we may want to use non-determinism to make our modeling job
easier. By using a non-deterministic arbiter as shown in Section 4.7.1, we
ensure that any property we prove will be true in the case that the real arbiter is
used. This is because a non-deterministic arbiter models all possible sequences
of events wherever the non-deterministic choice appears. Since the real behavior is one of the possible choices, it follows that anything proved for the nondeterministic arbiter is true for the real arbiter. A model which includes more
behavior than the entity being modeled is called an abstract model.
There is one catch to all this: since our non-deterministic arbiter models all possible behaviors,
it also models the behavior in which c1 is always chosen whenever a non-deterministic choice
is to be made. We need a way to filter out this possibility. The way to do so is fairness.
4.7.3 Fairness
Recall that the fairness statement has the following format:
fairness expression;
The meaning of the fairness statement is that we are interested only in
sequences in which the expression specified will happen infinitely often. That
IBM Haifa Research Laboratory, Israel
Provided by special agreement with IBM
Describing the Environment
85
is, we are not interested in input sequences in which at some point in time the
expression becomes false and stays that way forever.
By making the following two fairness constraints within the arbiter of Figure 2
:
fairness choose = 1;
fairness choose = 2;
we indicate to RuleBase that we are only interested in input sequences in
which choose takes on the values 1 and 2 infinitely often. That is, we filter out
sequences in which, at some point in time, choose gets stuck at either value.
4.7.3.1 Additional (advanced) fairness types
In the example above, suppose that we want choose to take on the value 1 infinitely often only on those paths where c1 is not stuck at value ‘none’ forever
(that is, on paths where at some point c1 is stuck at ‘none’ forever, we have no
requirements from choose).
For this purpose, the fairness statement described above is too strong; we need
a weaker type of fairness to filter out the paths we want.
The statement
GF->GF ( c1 != none, choose = 1 )
Will leave in the model exactly the paths we want.
The following additional fairness types are supported:
• FG p ;
Leaves in the model only paths on which from some point onwards, p holds forever.
• FG->FG p , q ;
Leaves in the model only paths on which, if there exists a point from which p holds forever,
then there also exists a point from which q holds forever.
• FG->GF p , q ;
Leaves in the model only paths on which, if there exists a point from which p holds forever,
then q holds infinitely often .
RuleBase: a Formal Verification Tool
Provided by special agreement with IBM
86
CHAPTER 4
• GF->GF p , q ;
Leaves in the model only paths on which, if p holds infinitely often, then q also holds infinitely often.
4.7.3.2 The danger of fairness
Fairness is a powerful but dangerous tool. The danger of fairness is that too many paths may
be unintentionally filtered out, some of which may include violations of our formulas. Here is
an example:
module server (start) (ready)
{
var state : { idle, busy, done };
assign
init (state) := idle;
next (state) :=
case
state=idle & start : busy;
state=busy : { busy, done };
state=done : idle;
else : state;
esac;
define ready := state=idle;
fairness state = done;
}
In the above example, we give variable “state” a non-deterministic behavior
while it is busy. We also constrained RuleBase with a fairness statement so
that it checks only paths on which the machine does not stay busy forever.
However, this is a dangerous formulation of the fairness requirement. Since
for each “done” there is one “start”, the paths left in the model also have “start”
infinitely often. If some deadlock condition in the verified design prevents
start from being asserted, this deadlock will not be detected, because the fairness constraint filtered out paths on which start is not asserted infinitely often.
To overcome the problem in the above example, the fairness statement should
be formulated in a way that prevents state from staying busy, while having no
side effects:
IBM Haifa Research Laboratory, Israel
Provided by special agreement with IBM
Describing the Environment
87
fairness state!= busy;
4.8 Modelling Clocks
To use formal verification properly, it is essential to understand the way RuleBase deals with clocks, and to choose the proper clock scheme. This section
assumes that the clock signal is generated externally and drives the verified
design through input clock pins.
The most simple case is a design having only one clock, in which only one
level or edge of the clock is used in the design. In this case, the clock input
should be held constant at the value ‘1’:
define CLK := 1;
-- CLK is the clock input pin
(*)
RuleBase understands it as the clock being active in every cycle. This works
even when some of the flip-flops are gated. The gated flip-flops will work only
when the gate is active.
The next scheme has one clock, but both levels (or edges) are used in the
design. In this case, we define the clock as having alternately values 0 and 1,
as follows:
var CLK: boolean; assign init(CLK) := 0;
next(CLK) := !CLK;
(**)
Notes:
• If your design uses master-slave latches, then the master latches will change on one level of
the clock, and the slave latches on the other. However, if the only use of the master latches
is to drive the slaves (i.e., there is no use of the master latch output other than by its slave),
then you can still use the simpler clock scheme described above, which will give you better
performance. To do this, you must model the master-slave pair as a single edge-triggered
flip-flop or latch (see CHAPTER 3 for modelling of latches).
• Although (**) may be used in designs that have one clock with one phase, model-checking
of (*) is more efficient.
• When the clock is defined as in (**), formulas should include explicit reference to the
clock signal. For example, the following formula:
“AG( p -> AX q )”
RuleBase: a Formal Verification Tool
Provided by special agreement with IBM
88
CHAPTER 4
should be rewritten as:
“AG( (p&CLK) -> next_event(CLK)(q) )”
This rewriting may also be necessary in the more complicated clock schemes described
below. If all signals in the formula refer to the same clock, as in the examples above, RuleBase can rewrite the formula automatically. To do that, simply write
AG( p -> AX q ) :: clk = CLK
See section 5.4: “Multiple-Clocks in Formulas” for more details.
Before continuing further with more clock schemes, it is important to note that
usually complex schemes contribute to size problems more than do simpler
ones. When planning the design’s micro-architecture, it is advised to partition
the design in a way that each part will have the simplest scheme possible, preferably one clock.
The next scheme has multiple synchronized clocks. For example, assume that
there are two clocks, with a 1:3 ratio between their frequencies. In this case we
fix the faster clock at value ‘1’ (always active), and generate a pulse every third
cycle for the slow clock:
define FAST_CLOCK := 1;
var clock_counter: 0..2;
assign next(clock_counter) := (clock_counter +1) mod 3;
define SLOW_CLOCK := clock_counter = 0;
In contrast to clocks in real systems, whose duty cycle is usually 50%, slow
clocks in RuleBase should be active only for one cycle each time. (If this is a
problem, because the clock is generated internally, contact us.)
A similar case is a ratio of 2:3 :
var clock_counter: 0..5;
assign next(clock_counter) := (clock_counter +1) mod 6;
define SLOW_CLOCK := clock_counter in { 0, 3 };
define FAST_CLOCK := clock_counter in { 0, 2, 4 };
IBM Haifa Research Laboratory, Israel
Provided by special agreement with IBM
Describing the Environment
89
If the clocks are not synchronized, some tricks are necessary in order to work
in a synchronous framework. One case is presented, to demonstrate the range
of possibilities. In general, even when the clocks are not synchronized, the
ratio of frequencies is kept within a limited range. Assume, for example, that
the ratio can range from 1:2 to 1:3, which means (among other things) that
sometimes the faster clock beats twice before the slower clock beats once, and
sometimes it beats three times. One possible solution is to model a slow clock
which non-deterministically generates a pulse once every two or three cycles:
define FAST_CLOCK := 1;
var clock_counter: 0..2;
assign next(clock_counter) :=
{(clock_counter +1) mod 2 , (clock_counter +1) mod 3};
define SLOW_CLOCK := clock_counter = 0;
Even if the clock scheme in your design is a complex one, it is recommended
to begin verification with the simplest scheme possible. Some of the design
errors are likely to be detected no matter what the scheme is. Only after the
simplified design seems to be error free, should you move to a more complex
and realistic scheme and try to hunt those problems that cannot otherwise be
detected.
4.9 Modelling Reset
Another important signal that appears in most of the designs is the reset signal.
Usually, reset is activated for some time after power-up, and then deactivated
for normal operation. Reset must be active long enough to initialize all memory elements with the correct values. In many designs, a few cycles (1 to 10)
are enough. The following example shows an environment model that generates a 4-cycle active-high reset:
var reset_counter : 0..4;
assign
init(reset_counter) := 0;
next(reset_counter) := if reset_counter=4 then 4 else reset_counter+1 endif;
RuleBase: a Formal Verification Tool
Provided by special agreement with IBM
90
CHAPTER 4
define RESET := reset_counter != 4;
It is important to identify the optimal duration of reset. It should be long
enough for correct operation, but not too long. A big counter may contribute to
the size problem inherent to formal verification and may result in unnecessarily
long counter examples.
IBM Haifa Research Laboratory, Israel
Provided by special agreement with IBM
CHAPTER 5
Sugar - The RuleBase
Specification Language
Sugar is the specification language of RuleBase. It is used to formally
describe properties to which the design under verification must adhere. Sugar
is an extension of the temporal logic CTL (Computational Tree Logic). CTL is
designed with academic orientation, and needs some adjustments in order to be
used in industry. Particularly, complex CTL specifications are difficult to read
and write. Sugar adds, on top of CTL, a small set of new operators that simplify formulation of complex properties. It is fully backwards compatible with
CTL.
The following sections describe both CTL and Sugar. Section 5.1, gives some
background about the underlying model on which CTL and Sugar operate (it is
not necessary for the understanding of the rest of the chapter and you can skip
it if you like). Section 5.2 and Section 5.3 describe the CTL and Sugar operators. The remaining sections offer some practical advice. Before you start to
write formulas it is recommended that you read CHAPTER 7: Managing
Rules, Modes and Environments.
RuleBase: a Formal Verification Tool
Provided by special agreement with IBM
92
CHAPTER 5
5.1 Semantic Model
RuleBase is used to verify that a given finite-state machine satisfies a given list
of properties. The machine consists of a design, usually written in a hardware
description language, composed with an EDL (Environment Description Language) description of the target environment in which the design is expected to
run. There are cases, such as in protocol verification, where both the design
and the environment are written in EDL. The finite state machine has no free
inputs; every input of the design is driven by some signal of the environment,
and every input of the environment is driven by the design. Although there are
no free inputs, the machine usually has multiple choices when moving to the
next state, because some of the state-variables, mainly those modeling the
environment, have non-deterministic behavior.
A non-deterministic finite state machine can be unfolded into an infinite tree
representing the machine’s computations. The tree root represents the initial
state of the machine, each tree node corresponds to a state in the machine, and
the edges emanating from a state are the possible transitions to other states.
The infinite paths of the tree, beginning at the root, are the machine’s computations. A machine with multiple initial states is unfolded into multiple trees.
Notice that in the unfolded tree, different nodes may correspond to the same
state of the machine. Figure 3 shows an example of a machine and its computation tree.
IBM Haifa Research Laboratory, Israel
Provided by special agreement with IBM
Sugar - The RuleBase Specification Language
FIGURE 3.
93
Example: A finite-state machine and part of its computation tree
done
done
idle
busy
busy
busy
idle
busy
idle
idle
idle
...
busy ...
done ...
busy ...
done ...
busy ...
busy ...
idle
...
It can be useful to have this computation tree structure in mind when writing
rules, because RuleBase formulas are interpreted over such trees.
Within RuleBase, rules are written in the specification language Sugar. Sugar
is built on top of CTL (Computational Tree Logic). CTL, and hence Sugar, is
specially designed to work with the computation trees described in the previous paragraphs. In the temporal logic CTL, time is discrete, and the world consists of a current state, mapped to a specific node in the computation tree, and
of many possible futures (all computation paths emanating from this state).
CTL has no way to refer to the past. The only way to reason about the past is to
have information stored in state variables.
An important premise in CTL is that time is infinite. A computation is an infinite sequence of points in time, starting at the current state. Thus, from any
point in time (any “current state”), there are many infinite computations
(branches) into the future. In Figure 4 below, the beginning of one path (recall
that all paths are infinite) is shown in bold. In this figure, and in later figures,
the only reasons that some points do not show a future is lack of space. Every
RuleBase: a Formal Verification Tool
Provided by special agreement with IBM
94
CHAPTER 5
point in time has a future. To simplify the figures, state names are sometimes
omitted from tree nodes.
FIGURE 4.
The beginning of one possible path
You are here now
5.2 CTL Operators
CTL formulas have the following syntax:
1.
Signal names and constants are CTL formulas.
2.
CTL formulas combined with boolean operators are also CTL formulas:
!f1, f1 & f2, f1 | f2, f1 -> f2, f1 <-> f2, f1 xor f2,
3.
If f, f1 and f2 are CTL formulas, then the following are also CTL formulas:
AX f, EX f, AG f, EG f, AF f, EF f, A[f1 U f2], E[f1 U f2]
These eight operators are called temporal operators.
Boolean operators have the usual meaning. Temporal operators are used to
reason about events that take place along some time interval. Each temporal
IBM Haifa Research Laboratory, Israel
Provided by special agreement with IBM
Sugar - The RuleBase Specification Language
95
operator consists of two letters. The first letter is either A or E, where A means
“the formula holds in all paths beginning in the current state”, and E means
“the formula holds in at least one path beginning in the current state”. The second letter is G, F, X or U, where G means “the formula holds from now on”, F
means “the formula holds now or will hold in the future”, X means “the formula will hold in the next point of time”, and “f1 U f2” means “f2 holds now or
f1 will hold until (but not necessary including) f2 holds”.
The temporal operator letters and their meanings are:
A-All, E-Exists, G-Globally, F-Future, X-neXt, U-Until
The following sections detail the eight temporal operators.
Temporal operators take precedence over boolean operators. Therefore, you
should use parentheses to enclose the formula to which the temporal operator
is applied.
5.2.1 AG and EG
By combining the meaning of A with the meaning of G, the resulting AG means “for all paths,
from now on”. This is depicted in Figure 5 below. The points in time affected by the operator
are marked with a black triangle.
RuleBase: a Formal Verification Tool
Provided by special agreement with IBM
96
CHAPTER 5
FIGURE 5.
AG
current state
As can be seen by looking at the figure, all points in time on paths starting in
the current state are marked. Consider an example with two signals, “read”
and “write”, which should never be active simultaneously. This fact can be
stated in CTL as follows:
AG !(read & write)
(For. 1)
Because the boolean formula “!(read & write)” is prefixed by AG, it will be
checked at every point in time starting at the current state.
EG, on the other hand, means “for some path, from now on”. This is depicted
in Figure 6 below.
IBM Haifa Research Laboratory, Israel
Provided by special agreement with IBM
Sugar - The RuleBase Specification Language
FIGURE 6.
97
EG
current state
In the figure, you can see that all points in time along one infinite path are
marked. This illustrates the fact that in order for EG to be satisfied, you need
at least one path where every point in time satisfies the demand. For example:
EG (transaction_starts -> read)
(For. 2)
states that there is a possible computation (infinite branch) in which all the
transactions are reads.
5.2.2 AF and EF
By combining the meaning of A with the meaning of F, we find that AF means “for all paths,
now or at some future point in time”. This is depicted in Figure 7 below.
RuleBase: a Formal Verification Tool
Provided by special agreement with IBM
98
CHAPTER 5
FIGURE 7.
AF
current state
By examining the figure, we can see that starting at the current state, along
every possible path, at least one future point is marked. For example, say that at
the current state, a request has been made and it requires an acknowledge. The
acknowledge may take place at different points in time, depending on the circumstances, but it must always eventually take place. This can be expressed in
CTL as:
AF ack
(For. 3)
Actually, the above formula is not very useful, since in real life a request is
made at many points in time and under many circumstances. In real life our
world would probably look more like this:
IBM Haifa Research Laboratory, Israel
Provided by special agreement with IBM
Sugar - The RuleBase Specification Language
FIGURE 8.
99
AF in the real world
current state
req
req
req
In Figure 8 , a request is made at three different points in time. Starting at each
point where a request is made, there are many infinite paths. For each one of
those paths, at least one future point is marked. This can be expressed in CTL
as:
AG (req -> AF ack)
(For. 4)
where “->” is the “implies” operator. Thus, this formulas can be read as: for all
paths, at every point in time, if there is a request, then for all paths emanating
from that point, at some future time, we must receive an acknowledge. In more
simplified terms: whenever there is a request, eventually there is an acknowledge.
There are still some open questions regarding Formula 4. Why is AG required
in Formula 4? Why not simply state:
req -> AF ack
(For. 5)
The answer is that Formula 5 refers only to the initial state. For a hardware
model, the initial state is located at power on. Thus, Formula 5 refers only to a
RuleBase: a Formal Verification Tool
Provided by special agreement with IBM
100
CHAPTER 5
request that occurs at power on. In order to express events that take place after
power on, you must always enclose the formula in one of the eight basic temporal operators (AG, AF, AX, AU, EG, EF, EX, EU). Specifically, in order to
express a request that can happen at any time, you must enclose Formula 5 in
the temporal operator AG.
EF, on the other hand, means “for some path, at some point in time”. This is
depicted in Figure 9 below.
FIGURE 9.
EF
current state
By examining the figure, you can see that there is some point in some future
path from the current state which is marked. For example, EF can be used to
express that it must always be possible for our state machine to return to state
“idle”, as follows:
AG EF (state = idle)
(For. 6)
which reads as: for all paths, at all points in time, there is some path in which,
at some point in time, the state will be idle. In simpler terms: it is always true
that there exists a path to idle. Thus, EF can be used to express a lack of deadlock.
IBM Haifa Research Laboratory, Israel
Provided by special agreement with IBM
Sugar - The RuleBase Specification Language
101
5.2.3 AX and EX
AX means “for all paths, at the next point in time”. This is depicted in Figure 10 below.
FIGURE 10.
AX
current state
In Figure 10 , along all paths starting in the current state, the very next point in
time is marked. For example, if a request is made at the current state, and an
acknowledge is required at the very next time step. This is expressed as:
AX ack
(For. 7)
As is the case with AF described above, Formula 7 is not practical, since in
real life a request is made at many points in time and under many circumstances. In real life our world would probably look more like Figure 11 .
RuleBase: a Formal Verification Tool
Provided by special agreement with IBM
102
FIGURE 11.
CHAPTER 5
AX in the real world
current state
req
req
req
In Figure 11 , a request is made at three different points in time. Starting at
each point where a request is made, there are many infinite paths. For each one
of those paths, the very next point in time is marked. This can be expressed in
CTL as:
AG (req -> AX ack)
(For. 8)
Formula 8 can be read as follows: for every request, we must get an acknowledge at the next point in time.
It is worthwhile to compare Figure 8 with Figure 11 . In the former, a request
must be acknowledged eventually. In the latter, a request must be acknowledged at the very next point in time.
EX means “for some path, at the very next point in time”. This situation is
depicted in Figure 12 below.
IBM Haifa Research Laboratory, Israel
Provided by special agreement with IBM
Sugar - The RuleBase Specification Language
FIGURE 12.
103
EX
current state
Again, by studying the figure, you can see that for some path from the current
state, the very next point in time is marked.
5.2.4 AU and EU
AU has two operands, and is used as follows:
A [q U r]
which reads: for all paths, q is true until r is true. Note that:
• r must occur eventually
• r can occur in the current state, in which case q may not appear at all
• q need not hold at the time r holds
This is depicted in Figure 13 below.
RuleBase: a Formal Verification Tool
Provided by special agreement with IBM
(For. 9)
104
FIGURE 13.
CHAPTER 5
AU
current state
q
q
q
r
r
r
q
r
q
r
r
q
r
r
r
r
r
r
r
By examining the figure, you can see that from the current state, all points on
all infinite paths are marked until a point where r holds is reached. The marked
points are those in which q must be true. For example, suppose that you want to
ensure that a busy signal is asserted from the moment a request is made up
until the time that an acknowledge is received. This is expressed in CTL as:
AG (req -> A[busy U ack])
(For. 10)
In this case, Figure 13 represents a subset of the complete time tree, with a
request occurring at the current state.
The AU operator requires that the terminating condition eventually happen.
That is, there are two ways Formula 10 can fail. First, if the busy signal is inactive somewhere between req and ack, and second, if the ack never occurs.
Because it makes a demand on its terminating conditions, AU is known as a
strong operator.
EU means “for some path, until”. The computation tree for EU is left as an
exercise for the reader.
IBM Haifa Research Laboratory, Israel
Provided by special agreement with IBM
Sugar - The RuleBase Specification Language
105
At this point, the eight basic CTL operators AG, EG, AF, EF, AX, EX, AU
and EU have been covered. While combinations of the basic CTL temporal
operators presented here can provide a lot of expressive power, complex CTL
formulas are difficult to read and write. To overcome this limitation, RuleBase
provides higher-level operators that add more expressive ability.
5.3 Sugar Operators
Sugar adds several operators on top of CTL in order to answer real needs that
arise in practical formal verification. Although many Sugar formulas can be
expressed in pure CTL, many other formulas are practically impossible to
express in CTL because they would be too complex. Sugar is stronger than
pure CTL in the theoretical aspect too, mainly in its ability to express any regular expression, as described in Section Section 5.3.6.
Experience shows that in CTL it is easy to write formulas which are syntactically correct, but their meaning is completely different from what the user had
in mind. Sugar protects you from making these kinds of mistakes in two ways.
One way is to limit the formulas syntactically. For example, in some fields of
certain Sugar operators only boolean expressions are allowed. The other way
is to produce a warning when a formula is suspected of having a wrong meaning. For more details see Section 5.7, Writing Correct Formulas.
Experience indicates that almost all useful formulas fall into the ACTL [SG90]
subset of CTL, i.e. they require that properties will hold along all paths rather
than in some paths. For this reason, the new Sugar operators should be interpreted as being applied to all paths (as if there is an A in front of them).
Another observation is that the strong versions of the CTL until operator (AU
and EU) are not suitable for the formulation of many properties. Expressing a
weak until (in which there is no demand that the terminating condition must
eventually occur) in CTL is laborious and error prone. Sugar provides the
weak until operator, and in addition it also provides both weak and strong verRuleBase: a Formal Verification Tool
Provided by special agreement with IBM
106
CHAPTER 5
sions of some higher-level operators (next_event, within, etc.). A strong operator name has ‘!’ as its last character (e.g., within!).
The following sections describe Sugar operators, beginning with the simpler
ones.
5.3.1 Bounded-Range Operators
5.3.1.1 AX[n]
The first Sugar operator is AX[n]. This is simply shorthand for n times AX. For example,
AG(req -> AX[3] ack)
(For. 11)
AG(req -> AX AX AX ack)
(For. 12)
is equivalent to
This can be read as “whenever there is a request, an acknowledge will be
received three clocks later”.
5.3.1.2 ABF
The operator ABF[i..j](f) constrains the future of the operator AF between i and j clocks from
where it is applied. For instance, the following example exhibits the rule “whenever there is a
request, an acknowledge will be received within 1 to 3 clocks”:
AG (req -> ABF[1..3](ack))
(For. 13)
The equivalent CTL expression of this simple fact is:
AG (req -> AX (ack | AX (ack | AX ack)))
(For. 14)
5.3.1.3 ABG
The operator ABG[i..j](f) constrains the future of the operator AG between i and j clocks from
now. For example, the following expresses the rule “whenever there is a request, the busy signal is locked and stays locked for the next 4 clocks”:
AG (req -> ABG[0..4](busy))
IBM Haifa Research Laboratory, Israel
Provided by special agreement with IBM
(For. 15)
Sugar - The RuleBase Specification Language
107
The equivalent CTL expression is:
AG (req -> (busy & AX (busy & AX (busy & AX (busy & AX busy)))))
(For. 16)
5.3.2 until
5.3.2.1 until
As discussed in Section 5.2.4, the AU operator is a strong operator. That is, the formula
A [p U q]
(For. 17)
means that q must eventually occur, and that p must be true on all paths until q
occurs. The until operator is the weak version of the AU operator. It is written:
p until q
(For. 18)
and means that for all paths, p is true until q occurs. However, the weak until
does not require that q eventually occur (in that case p must be true forever).
For example, to express the rule “always, once a transaction starts, there will be
no additional transaction starts before the end of the first transaction”, you can
use the following Sugar formula:
AG (trans_start -> AX (!trans_start until trans_end))
(For. 19)
Formula 19 does not require that every transaction end, only that a new one
does not start before the first one ends.
Another way to write the weak until operator is:
A [p W q]
(For. 20)
which uses syntax that mimics that of CTL.
5.3.2.2 until!
The until! operator is a strong version of the until operator. It is equivalent to the CTL operator
AU.
RuleBase: a Formal Verification Tool
Provided by special agreement with IBM
108
CHAPTER 5
5.3.2.3 until_
Formula 18 requires that p be true until, but not including, the cycle on which q is true (if there
exists such a cycle). The statement
p until_ q
(For. 21)
means “p until q” and also requires that at the first cycle where q is true (if at
all), p is also true.
5.3.2.4 until!_
The until!_ operator is a strong version of the until_ operator.
5.3.3 before
5.3.3.1 before
The before operator has the format
p before q
(For. 22)
and means that on all paths, the first p must happen before or together with the
first q. The before operator is a weak operator, that is, it does not require that p
eventually happen.
5.3.3.2 before!
The before! operator is a strong version of the before operator. Thus, the formula:
AG (req -> (data_receive before! ack))
(For. 23)
requires that after request, data_receive is asserted before or together with ack,
and data_receive must eventually be asserted.
5.3.3.3 before_ and before!_
(p before_ q) and (p before_! q) are the similar to (p before q) and (p before! q), but require
that the first p happen strictly before (and not together with) the first q.
IBM Haifa Research Laboratory, Israel
Provided by special agreement with IBM
Sugar - The RuleBase Specification Language
109
5.3.4 next_event
next_event is a conceptual extension of the AX operator. While AX talks
about the next cycle, next_event talks about the next time a certain event
occurs. Variations of next_event are extensions of the AX[n] and ABG[i..j]
operators.
5.3.4.1 next_event(p)(q)
The operator next_event(p)(q) means that the next time that p occurs, q will occur. For
instance, imagine an arbiter in which requests are processed in the order they are received,
unless there is a high priority request, in which case it must be processed immediately. For simplicity’s sake, assume that there is only one requestor that can send high priority requests. Then
a rule might be: “whenever a high priority request is received, the next grant must be to the
high priority requestor”. Here is the rule in Sugar:
AG ((req & high_priority) -> AX (next_event(grant)(dst = high_priority_requestor))) (For. 24)
It is important to note that the operator next_event(p)(q) does not require that
the event p eventually happen. It only states that if p does happen, then q must
happen. Thus, Formula 24 can be more precisely read as: “whenever a high priority request is received, if there is eventually a grant, then the first grant must
be to the high priority requestor”. Because this operator does not make any
demands on the eventual occurrence of p, it is known as the weak next_event
operator. The strong next_event operator, presented in Section 5.3.4.2, has the
added semantics of “p must eventually occur”.
There is one limitation on the use of next_event(p)(q) and all its incarnations.
While q can be any Sugar formula, p must be a boolean formula, i.e. a formula
with no temporal operators.
5.3.4.2 next_event!(p)(q)
The operator next_event!(p)(q) is called the strong next_event operator. It means the same as
next_event(p)(q) with the additional meaning that p must occur. Thus, the strong version of
Formula 24:
AG ((req & high_priority) -> AX (next_event!(grant)(dst = high_priority_requestor)))(For. 25)
RuleBase: a Formal Verification Tool
Provided by special agreement with IBM
110
CHAPTER 5
states that “whenever a high priority request is received, a grant must eventually occur, and the next grant must be to the high priority requestor”.
5.3.4.3 next_event(p)[n](q)
The operator next_event(p)[n](q) means “on the nth time that p occurs, q will occur”. For
example, suppose that for every request, 4 ready signals must be sent, and that on the last one,
a signal called last_ready must be sent. That is, after a request, the 4th ready signal must be
accompanied by the signal last_ready. This can be expressed in Sugar as:
AG (req -> AX (next_event(ready)[4](last_ready)))
(For. 26)
As with next_event(p)(q), this operator is a weak operator - it does not require
that p occur the specified number of times. For the corresponding strong operator, see Section 5.3.4.4.
5.3.4.4 next_event!(p)[n](q)
This is the strong version of the next_event(p)[n](q) operator. It has the same meaning as the
corresponding weak operator of Section 5.3.4.3, with the additional meaning that p must occur
at least n times. Thus, the strong version of Formula 26:
AG (req -> AX (next_event!(ready)[4](last_ready)))
(For. 27)
states that after a request, there must be at least 4 ready signals, and the 4th
ready signal must be accompanied by the signal last_ready.
5.3.4.5 next_event(p)[i..j](q) and next_event!(p)[i..j](q)
The formula
next_event (p)[2..4](q)
(For. 28)
states that in the second, third and fourth times that p occurs, q occurs as well.
Formula 29 is a stronger version of Formula 28 which also requires that p
should occur at least 4 times on every possible path.
next_event!(p)[2..4](q)
5.3.4.6 next_event_f(p)[i..j](q) and next_event_f!(p)[i..j](q)
The formula
IBM Haifa Research Laboratory, Israel
Provided by special agreement with IBM
(For. 29)
Sugar - The RuleBase Specification Language
next_event_f(p)[3..4](q)
111
(For. 30)
states that in one of the third or fourth times that p occurs, q should occur as
well. Formula 31 is a stronger version of Formula 30, which also requires that
p should occur at least 3 times on every path where q occurs on the third p, and
at least 4 times on others.
next_event_f!(p)[3..4](q)
(For. 31)
5.3.5 Within and Whilenot
The behavior of many reactive systems is repetitive, and consists of a few basic
types of transactions that take place again and again. In such systems, there are
properties which are interesting only within transaction boundaries. The
within and whilenot operators can help formulate such properties by limiting
the scope of formulas to given intervals. By handling boundary conditions,
within and whilenot let you focus on the actual properties to be checked, without worrying about extreme cases.
5.3.5.1 within(p,q)(r)
The operator within(p,q)(r) means that “formula r is true in the period of time starting when p
is true and ending one cycle before q is true”. For instance, we can express the requirement
“between a request and its acknowledge, the busy signal must remain asserted” as follows:
AG( within(req,ack)( AG busy ) )
(For. 32)
Compare this formula with Formula 15, where we knew exactly for how long
busy should be asserted. In Formula 32, we express the fact that the busy signal should remain asserted for a period of time without knowing in advance
exactly how many clocks that will be, or whether it is exactly the same number
of clocks each time.
within is a weak operator - it does not require that either of the conditions p or
q ever happen. But, if in some computation, p occurs and q never follows, then
the formula r should hold at p and remain true forever. For the corresponding
strong operator, see Section 5.3.5.2
RuleBase: a Formal Verification Tool
Provided by special agreement with IBM
112
CHAPTER 5
The effect of the within(p,q)(r) operator on AF is more interesting. Recall that
the standard meaning of AF is “for all paths, at some point in the future”. By
restricting the AF operator with the within(p,q)(r) operator, AF means “for all
paths, at some point (in the future) between p and q”. For instance, suppose
you want to express the fact that before an acknowledge can be sent, data must
be received. This can be done using the following Sugar formula:
AG (within(req, ack)(AF data_receive))
(For. 33)
Because the AF operator is restricted by within, its scope ends at the acknowledge. Thus, the formula expresses the fact that for all paths starting at the time
of a request, at some time in the future, but before an acknowledge signal is
asserted, data is received.
In the general case, what within(p,q)(r) does is trim the tree of computations
and check the validity of formula r on this trimmed tree rather than on the full
tree of computations. The trimmed tree contains only the cycles of every path
between p and a cycle before q. Thus, the trimmed tree could have finite paths
as well. In fact, in the strong within!(p,q) operator (Section 5.3.5.2) one may
think of the trimmed tree as having only finite branches.
5.3.5.2 within!(p,q)(r)
This is the strong version of the within(p,q)(r) operator. It has the semantics of the
within(p,q)(r) operator, with the additional requirement that p must eventually occur and q
must eventually follow (p may occur at the same time as q). Thus, the strong version of
Formula 32:
AG (within!(req,ack)(AG busy))
(For. 34)
states that “after every point in time there is a request that is followed by an
acknowledge signal, and between the request and its acknowledgment, busy
should be active”.
5.3.5.3 whilenot(q)(r)
The operator whilenot(q)(r) means that in every computation formula r is true now and stays
true at least until a clock before q is true. If q is true now then whilenot(q)(r) is also true. For
instance, Formula 32 can also be expressed as:
IBM Haifa Research Laboratory, Israel
Provided by special agreement with IBM
Sugar - The RuleBase Specification Language
AG (req -> whilenot(ack)(AG busy))
113
(For. 35)
The operator whilenot(q)(r) is a weak operator, that is, it does not require that
q eventually happen.
whilenot(q)(r) is a derivative of the within operator. It may be thought of as
within(now,q)(r).
5.3.5.4 whilenot!(q)(r)
This is the strong version of the whilenot(q)(r). It has the same meaning as whilenot(q)(r)
operator, with the addition that q must eventually happen.
5.3.6 Sequence
The sequence is a Sugar construct used to describe computation paths on
which some formula must hold. It looks like a regular expression, and its
semantics resemble the semantics of regular expressions. The sequence suits
the world of hardware design. It can be regarded as a textual representation of
a timing diagram, or as a generalized control program for simulation. Its main
advantage is the simplicity of writing certain properties which are difficult to
formulate using other CTL and Sugar operators.
The sequence has two parts, a list of events {e1, e2, ...} and a Sugar formula
(f).
{ e1, e2, ... , en } (f)
(For. 36)
The sequence can be regarded as an if statement, where the event list is a condition that indicates when to check the formula. It means “if at some computation path all the events take place in the order they are defined, then the formula
must hold on this path at the last cycle of the last event in the list (an event may
last more that one cycle). A comma between two events denotes a move of one
cycle forwards (however, if an event takes zero cycles, a comma either before it
RuleBase: a Formal Verification Tool
Provided by special agreement with IBM
114
or after it is ignored).
An event can be one of the following:
1.
2.
3.
4.
5.
6.
7.
8.
9.
a
A boolean expression ‘a’.
The expression a holds for one cycle.
a[n]
A boolean expression ‘a’ followed by ‘[n]’, where n is a positive integer.
The expression a holds for n consecutive cycles.
a[*]
A boolean expression ‘a’ followed by ‘[*]’.
The expression a holds for zero or more consecutive cycles.
a[+]
A boolean expression ‘a’ followed by ‘[+]’.
The expression a holds for one or more consecutive cycles.
true.
Skip one cycle. Equivalent to “AX”.
‘[*]’.
Skips zero or more cycles. Equivalent to “AG”.
‘goto p’
p is a boolean expression.
Go to the next time that p occurs.
Equivalent to {!p[*], p}.
Example
{req, goto ack, goto busy, end} (done)
‘p holds_until q’,
p and q are boolean expressions.
p holds (true) until q occurs
Equivalent to {(p & !q)[*], q}.
Example
{req, busy holds_until done} (ack)
The following sequences match the above one:
{req, busy, busy, busy, done}
{req, done}
‘p holds_until_ q’,
IBM Haifa Research Laboratory, Israel
Provided by special agreement with IBM
CHAPTER 5
Sugar - The RuleBase Specification Language
115
p and q are boolean expressions.
q holds until (inclusively) q occurs
Equivalent to {(p & !q)[*], p&q}.
10. Q[n]
A sub-sequence Q followed by ‘[n]’, where n is a positive integer.
The sub-sequence holds n consecutive times.
11. Q[*]
A sub-sequence Q followed by ‘[*]’.
The sub-sequence holds zero or more consecutive times.
(Note: this kind of event must be followed by a simple boolean event.)
12. Q[+]
A sub-sequence Q followed by ‘[+]’.
The sub-sequence holds one or more consecutive times.
(Note: this kind of event must be followed by a simple boolean event.)
13. P || Q
Two sub-sequences P and Q separated by ‘||’. (or-between-sequence).
Either the first sub-sequence holds, or the second sub-sequence holds. For example, the formula
AG ({p,{q,r} || {s,t},u}(v))
is equivalent to:
(AG ({p,q,r,u}(v))) & (AG ({p,s,t,u}(v)))
14. P && Q
Two sub-sequences P and Q separated by ‘&&’. (and-between-sequence).
P and Q must occur at the same time (start and end at the same cycle).
P and Q must be of the same length (same number of cycles).
Examples
If read arrives before write and both read and write are not cancelled (and get a grant) then
read will be serviced before write.
{[*],
{read, (!cancel)[*], grant_read} &&
{true, write, (!cancel)[*], grant_write}}
(operate_read before operate_write)
Exactly 3 write events should occur during the sequence:
{...... {req, read[+], flush, cancel} && {write[=3]} .......}( ... )
RuleBase: a Formal Verification Tool
Provided by special agreement with IBM
116
15.
P[i..j]
P is a subsequence
i and j are natural numbers and i>=0, j>=i, j!=0
The P holds between i to j cycles.
Examples
{read, write[7..10], flush}
{read, write[0..3], flush}
16. P[i..]
P is a subsequence
i is a natural numbers and i>=0
The P holds at least i consecutive cycles.
Example
{read, write[7..], flush}
17. p [>=i]
p is a boolean expression.
p occurs at least i times, not necessarily consecutive
Equivalent to {!P[*], P, !P[*], P, !P[*], P true[*]}
18. p [=i]
p is a boolean expression.
p occurs exactly i times, not necessarily consecutive
Equivalent to {!P[*], P, !P[*], P, !P[*], P !P}
Example
{read, write[=3], cancel}
19. p [>i]
p is a boolean expression.
p occurs more than i times, not necessarily consecutive
Examples
{read, write[>3], cancel}
20. p [<i]
p is a boolean expression.
p occurs less than i times, not necessarily consecutive
21. p [<=i]
p is a boolean expression.
p occurs at most i times, not necessarily consecutive
IBM Haifa Research Laboratory, Israel
Provided by special agreement with IBM
CHAPTER 5
Sugar - The RuleBase Specification Language
117
p [>i,<j]
p is a boolean expression.
p occurs more that i times but less than j times, not necessarily consecutive.
i and j are natural numbers ( i>=0 , j>i+1).
23. p [>=i,<j]
p is a boolean expression.
p occurs at least i times but less than j times, not necessarily consecutive.
i and j are natural numbers ( i>=0 , j>i).
24. p [>i,<=j]
p is a boolean expression.
p occurs more that i times but at most j times, not necessarily consecutive.
i and j are natural numbers ( i>=0 , j>i).
25. p [>=i,<=j]
pis a boolean expression.
p occurs at least i times but at most j times, not necessarily consecutive.
i and j are natural numbers ( i>=0 , j>=i).
22.
26.
P~Q
Two sub-sequences separated by ‘~’ (P~Q).
The first cycle of Q starts when P reaches its last cycle.
Examples
{ start, req, goto busy~done, end} (ack)
{ start, {{read, busy[*]} || {write, flush }} ~ {done, ready} } (ack)
is equivalent to
{start, {{read&done}||{read,busy[*], busy&done}} || {write, flush&done} ,ready } (ack)
27. P ->Q
Two sub-sequences separated by ‘->’ (P->Q).
If a path that is compatible with P occurs, it must be followed
(starting at the same cycle where P ends) by a path whose prefix is compatible with Q.
Examples
req -> (ack until (ready until (busy until end)))
{req} -> {ack[*], ready[*], busy[*], end}
RuleBase: a Formal Verification Tool
Provided by special agreement with IBM
118
CHAPTER 5
{start, data1, data2, error} ->
(AX(cancel_data1, &
(AX(cancel_data2 &
AX(idle until error)))))
{start, data1, data2, error} ->
{true, cancel_data1, cancel_data2, idle[*], error}
28. P =>Q
Two sub-sequences separated by ‘=>’ (P=>Q).
If some path compatible with P occurs it must be followed
(a cycle after) by a path whose prefix is compatible with Q.
Examples
{start, data1, data2, error} =>
(AX(cancel_data1, &
(AX(cancel_data2 &
AX(idle until error)))))
{start, data1, data2, error} =>
{ cancel_data1, cancel_data2, idle[*], error}
29. P ->Q!
P, Q are sub-sequences.
If a path that is compatible with P occurs, it must be followed (starting at the same cycle
where P ends) by a path who is compatible with Q and so, reaches Q’s end (i.e. reaches the
last cycle of Q):
Comments: Strong version of P->Q
Example:
{a,b} -> {c,d[*],e}! - e must happen
{a,b} -> {c,d[*], e} - e may not happen (if d is ‘forever’) i.e.
a, b&c, d, d, d, d, d,d ,d ..... - is valid sequence
req -> (ack until (ready until (busy until! end)))
{req} -> {ack[*], ready[*], busy[*], end}!
30. P => Q!
IBM Haifa Research Laboratory, Israel
Provided by special agreement with IBM
Sugar - The RuleBase Specification Language
119
The same as P->Q!, with the restriction that Q start a cycle after the end of P.
Examples:
• Another way to express AG (waiting -> AX next_event (done)( AX idle )):
{[*], waiting, !done[*], done, true}(idle)
More ways to do the same:
AG {waiting, goto done}( AX idle )
{[*], waiting, goto done, true}( idle )
• The fourth ready after start should be accompanied with result=ok:
{[*], start, { !ready[*], ready }[4] }( result=ok }
The next example is interesting from a theoretical point of view. It is a Sugar
formula that can not be expressed in bare CTL. It expresses the fact that f is
true at every even cycle (0, 2, ....):
{ {true, true}[*], true} (f)
Sequences may be useful for showing interesting paths, even if you don’t
intend to find bugs. Suppose that you want to see a scenario in which a cache
line is modified, and later becomes exclusive without being invalidated in
between. The following sequence claims that this path is impossible, and its
counter example will demonstrate such a path (if one exists):
{ [*], modified, !invalid & !exclusive[*], exclusive } (false)
False is a formula that can never be true, so a counter example will be provided
if the sequence in braces is possible.
RuleBase: a Formal Verification Tool
Provided by special agreement with IBM
120
CHAPTER 5
5.4 Min/Max specifications
RuleBase can evaluate the length of the shortest or longest path between two boolean events:
min(request, acknowledge)
(For. 37)
will compute the length of the shortest path between a request and an acknowledge in the model, and
max(request,acknowledge)
(For. 38)
will compute the length of the longest path between these events (that does not
pass through another acknowledge). If there exists a path in the model where a
request is never acknowledged, then the result of the above formula is ‘infinite’. Min or max cannot be nested in a formula. They may appear with other
formulas in the same rule. Example:
rule req-ack {
formula { min(req, ack) }
formula { AG (req -> AF(ack))}
formula { max(ack, req) }
}
Currently, min/max formulas cannot run OnTheFly.
5.5 Multiple-Clocks in Formulas
Sometimes, the design under verification has more than one clock, and it should be verified in
several clock ratios. Assume for example that there are two clocks, clk_a and clk_b, that we
want to verify in two ratios: 1:1 and 1:2. Assume also that the following formula is written for
ratio 1:1.
AG(p-> AX (q-> AX (r until s)))
(For. 39)
If signals p,q,r,s, depend only on the slower clock, clk_b, then the formula
should be written differently for ratio 1:2.
AG((p &clk_b) -> AX[2] (q -> AX[2] ((r|!clk_b) until (s&clk_b))))
IBM Haifa Research Laboratory, Israel
Provided by special agreement with IBM
(For. 40)
Sugar - The RuleBase Specification Language
121
To avoid the need to change formulas when the clock ratio is changed, the user
can specify the clock according to which the formula should behave, and the
translation will be done automatically. In our example, the user should specify
the clock as follows:
AG(p-> AX (q-> AX (r until s))) :: clk=clk_b
(For. 41)
5.6 Quantification Over Data Values
When specifying the behavior of data, it is often necessary to refer to specific
data values. For example, suppose that we want to say that the data which is
read in during a read operation will be written out in the next write operation.
One way to do it is to write a formula for each data value:
%for i in 0..31 do
-- assuming that the data type is 0..31
formula { AG( (read & data_in=i) -> next_event(write)(data_out=i) ) }
%end
This might be inefficient and even impossible if there are too many values.
The above can be done in one formula using the forall construct as follows:
forall i: 0..31:
formula { AG( (read & data_in=i) -> next_event(write)( data_out=i) ) }
The syntax of forall is:
forall variable : type :
where variable is an EDL variable which is defined only for the purpose of
quantification. It should not be defined elsewhere. type is any legal type,
including a bit vector.
More examples:
forall i(0..31): boolean:
formula { AG( (read & data_in(0..31)=i(0..31)) ->
next_event(write)(data_out(0..31)=i(0..31)) ) }
RuleBase: a Formal Verification Tool
Provided by special agreement with IBM
122
CHAPTER 5
forall i: 0..15:
formula { AG( counter=i -> AX counter=(i+1) mod 16 ) }
Although it looks natural to use forall with formulas, it is also possible to use it
anywhere else in EDL. For example:
forall i(0..31): boolean:
define data_in_is_i := data_in(0..31)=i(0..31);
data_out_is_i := data_out(0..31)=i(0..31);
formula { AG( (read & data_in_is_i) -> next_event(write)(data_out_is_i) ) }
Note that forall adds extra state variables. In many cases, this will not cause
size problems, provided that you have a good BDD order that includes these
variables.
5.7 Writing Correct Formulas
The semantic model of CTL and Sugar, described in Section 5.1, is sometimes
counter-intuitive. While reasoning about computation trees has its benefits,
users often think in terms of paths. Sugar operators are designed to prevent
problems that result from misunderstanding the semantic differences. However, there are still cases where care should be taken. This section attempts to
characterize some of these cases.
In many cases, formulas which are not causal have a meaning that does not
coincide with the intention of the user. By causal we mean formulas in which
an event B depends on event A only if event A occurs no later than event B.
For example, assume that you want to state the following rule: “every grant is
immediately preceded by a request”. Since CTL cannot reason about the past,
one may be tempted to write:
AG( (AX grant) -> request )
(For. 42)
This formulation relies on the future and is incorrect; it means “if grant holds
in all the next states of some state, request must be active in this state”. It
IBM Haifa Research Laboratory, Israel
Provided by special agreement with IBM
Sugar - The RuleBase Specification Language
123
misses all the states that have grant active on some, but not all, of their successors. The correct way is to write the following causal formula:
AG( !request -> AX !grant )
(For. 43)
It is recommended not to use CTL formulas that contain the E operator (EG,
EF, EU and EX) unless a property cannot be formulated otherwise (for example, “AG EF p” can find a weak form of deadlock). The main reason for this
recommendation is that it is impossible to produce a counter-example when an
E formula fails. Note that negation of an A formula (AG, AF, AU and AX), or
of a Sugar formula, is equivalent to some E formula, so it is also recommended
not to negate such formulas.
RuleBase employs two methods in order to protect users from these, and other
common mistakes. One method is to limit Sugar operators in a way that will
prevent unintended use. For example, the within operator can take only boolean expressions (no temporal operators) in its start and end fields. The other
method is to issue warnings for suspected formulas. The cases where such
warnings are issued are:
1.
For any type of until or before operator with two temporal operands.
2.
If the right operand of an until operator contains the ‘->’ operator.
If the operand of an AF or an EF operator contains the ‘->’ operator.
For a temporal sub-formula on the left side of an “->” or on any side of the ‘<->’ operator.
When the operator ‘|’ (boolean or) has two temporal operands.
3.
4.
5.
It should be emphasized that there are correct formulas that do not obey the
above rules. However, it is important to write these formulas very carefully,
and to use them only if you are a very experienced user. Most of the properties
which are needed in daily use can be formulated while adhering to these rules.
RuleBase can produce textual explanations of Sugar formulas as a formula
debugging aid. To see formula explanations select a rule and press the Explain
RuleBase: a Formal Verification Tool
Provided by special agreement with IBM
124
CHAPTER 5
push button. These explanations may sometimes help find errors in formulas,
just by presenting them in a different manner.
5.8 Satellites - Even More Expressiveness
Although Sugar increases expressiveness capabilities, there are still properties
that cannot be expressed, and others that are too complicated to formulate.
Satellites may provide solutions in many of these cases. A satellite is a statemachine that records events that occur in the design under verification. Formulas can then refer to these past events by accessing the satellite internal state.
Satellites do not affect the design because information flows only from the
design to the satellite (except when fairness is used in certain ways).
For example, assume that a queue of depth k reads data on one side and writes
it on the other side. Assume that we want to prove that the queue never contains more that k data items. Formulation of this property in Sugar is difficult,
but it becomes easy with a satellite. An up/down counter is defined, whose
range is 0 to k, and which is incremented on reads and decremented on writes.
It is now necessary only to verify that the counter never exceeds k. We can use
the same counter to check for an underflow: Its value should never be less than
0.
Some formulas might have become easier if one could talk about past events.
Assume that we want to state that “if p occurs, then at that time q should be
active since the last occurrence of r”. We can define the operator since as a
module:
module since( e1, e2 )( e1_since_e2 )
{
var state: boolean;
assign next(state) :=
IBM Haifa Research Laboratory, Israel
Provided by special agreement with IBM
Sugar - The RuleBase Specification Language
case
!e1 : 0;
e1 & e2 : 1;
else : state;
esac;
define e1_since_e2 := (e1 & e2) | (e1 & state);
}
and use it to formulate the required property:
instance i1 : since( q, r )( q_since_r );
formula { AG ( p -> q_since_r ) }
RuleBase: a Formal Verification Tool
Provided by special agreement with IBM
125
126
IBM Haifa Research Laboratory, Israel
Provided by special agreement with IBM
CHAPTER 5
CHAPTER 6
Sugar - Formula Examples
(Note: This chapter is brought here in a very preliminary form)
This is a first list of useful formula patterns. Its main purpose is to help the
beginner, but experienced users may also find here interesting patterns. It
should be emphasized that one need not know all these patterns in order to do
successful verification work. Most of the formulas in an average project
employ only a small set of pattern. However, you may find here ideas that will
simplify your work.
This list is intended to grow. If you have more useful patterns that may help
others, you may send them to us and they will be added to this list.
6.1 Basic formulas
• ok is always true:
AG ok
RuleBase: a Formal Verification Tool
Provided by special agreement with IBM
128
CHAPTER 6
• some_requirement is always true when reset is inactive:
AG ( !reset -> some_requirement )
Note:
•Many designs begin in an unspecified state, and are being stabilized during reset. Failure
of a formula during reset is not interesting, so we filter this time interval as shown above.
• Variable state can never have the value error:
AG( state != error )
• Variables state1 and state2 are never in the same state:
AG( state1 != state2 )
• Variables state1 and state2 are never in state critical together:
AG( state1 != critical | state2 != critical )
or
AG !( state1 = critical & state2 = critical )
• If busy is true then working is also true:
AG( busy -> working )
• If almost_done is true now, done will be true in the next cycle:
AG( almost_done -> AX done )
• If hold becomes active, it remains active for at least one more cycle:
AG( rose(hold) -> AX hold )
Note:
•rose(hold) is true if hold is currently 1 and was 0 in the last cycle.
• got should rise 3 cycles after get rises:
AG( rose(get) -> AX[3]( rose(got) ))
• If we are going_to_abort now, we abort within 0 to 4 cycles:
AG( going_to_abort -> ABF[0..4]( abort ) )
IBM Haifa Research Laboratory, Israel
Provided by special agreement with IBM
Sugar - Formula Examples
129
• If master1_needs_bus becomes active, master2_accesses_bus should be inactive for at least
3 cycles, beginning from the next cycle:
AG( master1_needs_bus -> ABG[1..3]( !master2_accesses_bus ) )
• Counter is always between 3 and 7:
AG( counter >= 3 & counter <=7 )
or
AG( counter in { 3,4,5,6,7 } )
• Status never has the values warning or error or fatal:
AG !( status in { warning, error, fatal })
or
AG( status != warning & status != error & status != fatal )
• At most one of the signals x, y or z is 1 (mutual exclusion):
AG( x+y+z <= 1 )
• If error becomes active, it will remain active forever:
AG( error -> AG error )
6.2 Arrays
• Define a bit vector vec of 4 bits that may have at any moment any of the values 3,8 or 14:
var vec(0..3): boolean; assign vec(0..3) := {3,8,14};
Note:
•The above is NOT equivalent to “var vec(0..3): {3,8,14};” which declares an array of 4
enumerated signals, each of them may have one of the values 3,8,14.
• If the head pointer of a queue is equal to the tail pointer,queue_empty must be true:
AG( (head(0..3) = tail(0..3)) -> queue_empty )
• The bitwise and of vectors vec(0..7) and mask(0..7) has at least one bit set:
AG( (vec(0..7) & mask(0..7)) != 0 )
RuleBase: a Formal Verification Tool
Provided by special agreement with IBM
130
CHAPTER 6
• Exactly one bit of the bit vector v(0..7) is 1:
AG( (%for ii in 0..7 do v(ii) + %end 0) = 1 )
The above is expanded to
AG( v(0)+v(1)+v(2)+v(3)+v(4)+v(5)+v(6)+v(7) = 1 )
6.3 Before
• If a request occurs, then an ack should occur (strictly) before the next request:
AG( request -> AX(ack before_ request) )
Notes:
•The second request may not occur, in which case ack is not required.
•before_ (with an underscore) means strictly before: request will come (if at all) at least
one cycle after ack.
•The AX means that we expect ack to come at least one cycle after request.
• Another way to formulate the above requirement, that allows more explicit specification of
boundary conditions:
{ [*], request, !ack[*], request }( false )
Notes:
•It means: The path begins with any sequence of events, then a request occurs, then
(beginning from the next cycle) ack is inactive for zero or more cycles, and finally there
is another request. The false on the right hand side means that if such a sequence exists
then the formula should fail.
•This is a useful technique that we use: Instead of specifying what should happen, specify
what should not happen (as a bad sequence of events), and require that false will be satisfied at the end of this sequence. Since false is a formula that may never be satisfied,
existence of the bad sequence in our design will cause RuleBase to produce a counter
example.
IBM Haifa Research Laboratory, Israel
Provided by special agreement with IBM
Sugar - Formula Examples
131
6.4 Until
• If request is asserted, it will remain active until (inclusive) grant:
AG( request -> ( request until_ grant ))
Notes:
•grant may never occur after this request, in which case request must stay active forever.
•until_ (with an underscore) means that request must also hold at the first cycle where
grant holds.
• Another way to formulate the above requirement:
{ [*], request & !grant, !grant[*], !request }( false )
• If request is asserted, it will remain active until (not inclusive) grant:
AG( request -> AX( request until grant ))
• Other ways to formulate the above requirement:
{ [*], request, !grant[*], !request & !grant }( false )
or
{ [*], request, !grant[*] }( request )
6.5 Forall
• If data_in(0..7) has some value during read, in the next time that write is active
data_out(0..7) will have the same value:
forall x(0..7): boolean:
AG( (read & data_in(0..7)=x(0..7)) -> next_event(write)(data_out(0..7)=x(0..7) ) )
Notes:
•forall is a mean to apply a formula to multiple values at a time. It is equivalent to writing a separate formula for each value that the forall variable can take:
AG( (read & data_in(0..7)=0) -> next_event(write)(data_out(0..7)=0) )
...
AG( (read & data_in(0..7)=255) -> next_event(write)(data_out(0..7)=255) )
•forall has its penalty - an extra state variable (8 bits in the example above) - but usually
this variable doesn’t contribute much to the size problem if the BDD order is reasonable.
RuleBase: a Formal Verification Tool
Provided by special agreement with IBM
132
CHAPTER 6
6.6 Eventuality
• If request is asserted, ack should be asserted in the future, beginning from the next cycle:
AG( request -> AX AF ack )
• If request rises, ack should be asserted at the same cycle or in the future:
AG( rose(request) -> AF ack )
• No matter what is the current state, it is always possible to reach a state where mstate=idle:
AG AF mstate=idle
6.7 More Sequences
• If grant is active, and there is no retry in the next cycle, busy must become active two cycles
after grant:
{ [*], grant, !retry }( AX busy )
or
{ [*], grant, !retry, true }( busy )
or
{ [*], grant, !retry, !busy }( false )
or
AG( grant -> AX( !retry -> AX busy ))
• The fourth data_ready after start should be accompanied by last_data:
{ [*], start, {!data_ready[*], data_ready}[4] }( last_data )
• The fourth data_ready after start should be accompanied by last_data, unless there was
abort in the middle:
{ [*], start & !abort, {!data_ready & !abort[*], data_ready & !abort}[4] }( last_data )
IBM Haifa Research Laboratory, Israel
Provided by special agreement with IBM
CHAPTER 7
Managing Rules, Modes
and Environments
There are many possible ways to structure a verification project. The basic elements of all structures are the same: EDL statements, formulas, modes and
rules. However, as the project becomes more complicated, spans a longer
period, and more people become involved, it becomes more important to use a
standard methodology.
The main contributor to project complexity is Behavioral Partitioning (see Section 8.3). Behavioral Partitioning is an effective method to attack the size
problem. In this method, the environment is degenerated in various ways in
order to reduce the size of the design to be verified. Formulas should then be
run in multiple reduced environments in order to cover the full environment.
Unless managed carefully, these multiple environments may get out of control.
This chapter suggests a methodology of managing multiple rules, modes and
environments. The methodology is a result of our experience in many formal
verification projects. Section 7.1 describes the syntax and semantics of rules
and modes. Section 7.2 shows an example of how to approach the size problem by using modes. Section 7.3 suggests how to structure a verification
project that has multiple environments.
RuleBase: a Formal Verification Tool
Provided by special agreement with IBM
134
CHAPTER 7
7.1 Rule and Mode definition
RuleBase is rule oriented: A rule is the basic entity that can run. A rule defines
a group of related formulas to be verified in one run. It may also re-define parts
of the design or environment, thereby overriding the default behavior for the
specific run.
The rule syntax is as follows:
rule name {
“optional textual description of the rule”
-- at least one formula
formula “optional textual description” { Sugar-formula }
formula “optional textual description” { Sugar-formula }
...
-- the rest of the statements are optional:
envs rule-name, rule-name, ... ;
formulas rule-name, rule-name, ... ;
test_pins signal-name, signal-name, ..., rule-name, rule-name, ... ;
inherit rule-name, rule-name, ... ;
<EDL statements (var, assign, define, instance, fairness)>
}
A mode is a rule which cannot be run by itself, and is used for grouping and
naming of formulas and/or environments. It can only be inherited by rules or
by other modes. The syntax of mode is exactly the same as the rule syntax,
except that it begins with the keyword mode instead of rule.
IBM Haifa Research Laboratory, Israel
Provided by special agreement with IBM
Managing Rules, Modes and Environments
135
A rule must contain at least one formula (not required in mode). All the other
parts are optional. The order of statements in a rule is unimportant. All kinds
of statements may appear numerous times. It is recommended to fill the textual
description of formulas and rules. This description may help during the analysis of verification results and facilitate maintenance.
Rules and modes can inherit formulas and EDL statements from other rules
and modes:
• The formulas statement inherits formulas.
• The envs statement inherits EDL statements.
• The test_pins statement forces RuleBase to keep these signals during the reduction stage,
even if they are not needed for verification of the specific rule. Sometimes these signals are
needed to provide a better understanding of counter-examples. Test pins can also be inherited.
• The inherit statement can be used to inherit the environments, formulas, and test pins. The
statement
inherit rule_name;
is equivalent to:
envs rule_name; formulas rule_name; test_pins rule_name;
Rules and modes may include EDL statements (var, assign, define, fairness
and instance). The behavior assigned to signals by these statements overrides
the signals’ behavior in the default environment (all EDL statements outside
rules or modes are considered as the default environment). A rule may inherit
EDL statements from other rules or modes using the envs statement. Inherited
statements override the default environment, but are themselves overridden by
statements written directly in the rule’s body. The exact hierarchy of behavior
is as follows:
1.
2.
3.
Signal definition in the default environment overrides the definition in the design (HDL).
Inherited signal definition overrides the definition in the default environment.
Signal definition in the running rule overrides inherited signal definition.
RuleBase: a Formal Verification Tool
Provided by special agreement with IBM
136
CHAPTER 7
7.2 Using modes to limit the Environment - Example
One way to approach the size problem is to limit the behavior of the environment, as mentioned in Section 8.3, Behavioral Partitioning. RuleBase uses information from the restricted
environment to automatically reduce the size of the model to be verified. In order to help
reductions, some signals in the environment may be set to constant values, or restricted to
some other simple behavior. This over-reduction is usually done by using modes, rather than
in the default environment, as shown in the example below.
Suppose that a design obtains from the environment, among other things, a
command and an address. The default environment will include the following
lines:
var command: { load, store, add, jmp };
define CMD(0..2) :=
-- these are the actual command inputs of the design
case
command=load : 010b;
command=store : 111b;
command=add : 011b;
command=jmp : 100b;
esac;
var CMD_VALID: boolean;
var ADDR(0..15): boolean;
assign next(ADDR(0..15)) :=
if CMD_VALID then ADDR(0..15) else nondets(16) endif;
-- ADDR is stable when CMD_VALID is active, and is free to change otherwise
Now, suppose that the design is too large, or verification takes too long,
although all basic methods to cope with size problems have been used (see
CHAPTER 8: Size problems and solutions). In this case you might want to
perform behavioral partitioning, and define modes that restrict the default
behavior. Several possibilities of such modes are shown below:
IBM Haifa Research Laboratory, Israel
Provided by special agreement with IBM
Managing Rules, Modes and Environments
137
mode load_add {
“two commands only. CMD(0..1) become constant”
var command: { load, add };
}
mode eight_addr_bits {
“bits 0..7 are 0. bits 8..15 retain their behavior”
define ADDR(0..7) := 0;
}
mode load_add.eight_addr_bits {
“combining the above two modes”
inherit load_add, eight_addr_bits;
}
mode another_way_to_do_the_same {
var command: { load, add };
define ADDR(0..7) := 0;
}
Now, rules can run in the restricted environment by inheriting the above
modes. For example:
rule some_property {
inherit load_add.eight_addr_bits;
formula { ... }
}
Since over-reduction limits the model checking run to only a subset of the possible input sequences, multiple runs of the same rule using different environments are sometimes necessary in order to provide good verification.
Managing these multiple environments is described in Section 7.3.
RuleBase: a Formal Verification Tool
Provided by special agreement with IBM
138
CHAPTER 7
7.3 Verification Project Management
A well-formed verification project usually consists of the following elements:
•
•
•
•
Default environment
Modes that define restricted environments
Modes that group related formulas
Rules
Default environment:
The default environment should model the full behavior of the environment.
When writing the default environment, it is recommended that you “forget” the
small details of how you intend to attack the size problem. This does not mean
that the environment is written without considering this problem - on the contrary: the environment models should be abstract and small. But specific
reductions should be reflected only in modes, to be written at a later stage.
Modes that define restricted environments:
In many cases the default environment does not cause enough reduction of the
design to be verified. Behavioral partitioning is one of the methods that may
help in these cases. In behavioral partitioning, multiple reduced environments
are defined, each of them is represented as a mode. Then each formula is run
in all these modes. (See Section 7.2 below.)
Modes that group related formulas:
The necessity to run each formula in multiple environments, suggests to keep
formulas in separate modes, to be inherited by rules.
Rules:
In this methodology, the list of rules is in fact a matrix of environment modes
and formula modes, where each formula may run in many environment.
IBM Haifa Research Laboratory, Israel
Provided by special agreement with IBM
Managing Rules, Modes and Environments
Example:
-- environment modes
mode read_only {
define command := read;
}
mode write_only {
define command := write;
}
-- formula modes
mode no_starvation {
formula { AG AF grant1 }
formula { AG AF grant2 }
}
mode no_collision {
formula { AG !(grant1 & grant2) }
}
-- rule matrix
rule read_only.no_starvation
rule read_only.no_collision
rule write_only.no_starvation
rule write_only.no_collision
{ inherit read_only, no_starvation; }
{ inherit read_only, no_collision; }
{ inherit write_only, no_starvation; }
{ inherit write_only, no_collision; }
RuleBase: a Formal Verification Tool
Provided by special agreement with IBM
139
140
IBM Haifa Research Laboratory, Israel
Provided by special agreement with IBM
CHAPTER 7
CHAPTER 8
Size problems and solutions
Size is one of the major obstacles to using formal verification for any design. RuleBase is limited to designs having several hundred state variables (flip-flops) after reduction, or several
thousand before reduction. The number of state variables is a rough estimate of design complexity; the size limit depends the complexity of the logic as well as the number of memory
elements. This chapter discusses techniques that can be used to push the size limit as far as
possible for your design.
8.1 Design Partitioning
The simplest method to overcome size problems is design partitioning. Thus, instead of trying
to verify the entire design at once, you may verify it unit-by-unit. See also Section 11.2,
Design Partitioning in CHAPTER 11: Design for Formal Verification. The partitioning methodology is as follows:
• Split the design into partitions of manageable size, whose interfaces are well
defined and easy to model.
• When verifying a partition, replace its neighbors by abstract models. These
models should represent only the interfaces with the verified partition, hiding unnecessary details.
• Verify the correct behavior of the abstract models of the neighbors by writing specific rules for this purpose.
RuleBase: a Formal Verification Tool
Provided by special agreement with IBM
142
CHAPTER 8
While partitioning can be quite effective, there are obviously properties that
can be verified only when the entire design is considered. Partitioning also
requires extra effort in studying internal interfaces and writing models for
neighboring blocks.
8.2 Rule Partitioning
Before beginning model checking, RuleBase performs static analysis of the design, and discards any signals that do not affect the rule being run. For example, assume that the design has
two outputs, each of which is affected by a different (possibly overlapping) set of input signals.
If you run formulas checking these two signals under the same rule, RuleBase will have to
build a representation of the entire model. However, if you separate the formulas into two
groups, where one group checks the first output and the second group checks the other output,
RuleBase can build a partial representation in each case. In effect, by partitioning the formulas into different rules, you enable RuleBase to automatically partition the design by using only
that part of the design required to check the specific rule. Note, however that accumulating
related formulas in one rule may save time if these formulas refer to the same part of the
design.
8.3 Behavioral Partitioning
Behavioral partitioning is a technique in which the input sequences of a design are restricted to
a subset of the legal input sequences. In this way, you allow RuleBase to remove parts of the
design that deal with behaviors which are not seen under the restricted inputs. For instance, if
a design has two modes, read and write, controlled by an input signal command, then you can
verify each of the modes separately. This is done by declaring two separate environments, in
one command is constantly read, and in the other it is constantly write. This is the only action
that you need to take. When input signals are set to a constant value, RuleBase will automatically eliminate the logic that is made redundant. For instance, if you set command to read, then
RuleBase will know how to eliminate all logic that is activated only under mode write.
8.4 Abstraction of the Environment
As previously explained in CHAPTER 4: Describing the Environment, writing environment
models requires much thought and attention. Models should be very abstract and general, representing all possible behaviors of the real environment, while remaining simple and small.
Models which are too detailed are not advantageous and may result in unnecessary growth of
the model.
IBM Haifa Research Laboratory, Israel
Provided by special agreement with IBM
Size problems and solutions
143
For example, assume that the verified design is a cache controller, connected to
a CPU on one side. It is not necessary to create a detailed model of the CPU.
Rather, an abstract model of the CPU can be created to model just enough of it
to produce legal sequences of commands and control signals. Only a few
dozen state variables are needed to model this behavior, as compared to the
huge number required for the concrete CPU.
8.5 Gradual Enlargement
Attacking a new design with full blown environments is not very effective when the design is
large. Experience suggests a gradual process. Begin with simple, restricted environment models that cause the design to be over-reduced. Verify the reduced design, fix errors in the environment models, correct wrong formulas and clean coarse design errors. When the reduced
design is stable enough, refine the environment. This is usually increasing the effective size of
the design. This method is most efficient during the development of environment models and
rules, since at this stage the process is iterative and the turnaround time must be short.
One main reason why this works is that the model built by RuleBase is usually
much larger for a design containing bugs than it is for a cleaner design where
the state space is less well-behaved. Thus, even if we could not verify the first
‘buggy’ design for all legal input sequences, perhaps it can be done after some
of the bugs have been removed.
As an example from architectural-level verification, consider a multi-processor
system in which a number of CPUs are attached to one or more control units.
During initial debugging, only one CPU is hooked up, in order to clean major
bugs out of the design (and environment). Once one CPU works, another is
hooked up, and so on.
8.6 Abstraction of Internal Parts
If some part of the design is too complex or memory-intensive, and if the internal logic of that part is not directly involved in the property to be verified, it can
be replaced by an abstract model. In effect, the part will now be regarded as an
environment.
RuleBase: a Formal Verification Tool
Provided by special agreement with IBM
144
CHAPTER 8
The replacement can be easily done in RuleBase. Define an abstract model to
replace the part. This model should drive all the signals driven by the original
part (it can also use signals used by the part). The remainder of the work, linking the model to the design and getting rid of the original part, is done by RuleBase. Figure 14 illustrates this method.
FIGURE 14.
Abstraction of an internal part
model
for P
o1
i1
i2
part P
o2
design
For example, if a design includes an arbiter where the rest of the design should
work regardless of the exact arbitration algorithm, that arbiter can be replaced
by an abstract one that only guarantees mutual exclusion. Such an abstract
arbiter for N devices can be modelled using log(N)+1 bits.
8.7 BDD Ordering
RuleBase uses a data-structure called a Binary Decision Diagram (BDD) to represent the
model. In a BDD, every state variable has a distinct level, from 1 to n, where n is the number
of state variables. The order in which the levels are allocated to the state variables has a large
impact on the size of the BDD. For example, a design whose verification with a good BDD
requires 30MB of memory, may require 300MB or more with a bad order. Therefore, it is
important to find a good order.
RuleBase can perform BDD reordering during model checking. This is, known
as dynamic BDD ordering. Because BDD ordering is extremely CPU-inten-
IBM Haifa Research Laboratory, Israel
Provided by special agreement with IBM
Size problems and solutions
145
sive, it is inactive by default. It should be turned on for initial runs, and the
resulting order can be fed back into RuleBase for all consecutive runs.
Since reordering is time-consuming, it is good to reserve the final order for use
in later runs of the same rule and even of other rules. To do this, open the BDD
order section of the Options dialog box. The Copy Now line has two fields:
Selecting to <rule>.order copies the final order at the end of the run to file
<rulename>.order, where <rulename> is the name of the rule. If the Use
Order File field is set to <rule>.order on the next run, this order will be used.
Clicking to orders pool will copy the order file back to a pool of orders usable
by all rules. If the Use Order File field is set to orders pool on subsequent
runs, the saved order will be considered for use by other rules using the same
or similar reductions.
Control over ordering can be automated using the various fields in the BDD
order section of the Options dialog box. See CHAPTER 10: Graphical User
Interface: Tool Controls and Options for more details.
8.8 Verify Safety OnTheFly
In its normal mode of operation, RuleBase will compute the reachable state space before
checking any formula (the reachable state space is the set of all states of the design that can be
reached from the initial states). For a class of formulas known as Safety formulas, RuleBase
can in many cases determine the falsity of the formula before it has completed the search of the
reachable state space. This method is know as Verify-Safety-OnTheFly.
The Verify-Safety-OnTheFly method has several advantages:
• A counter example or witness is produced as soon as a state is found in which the
formula does not hold true. Crude errors (that usually stem from incorrect formulas or environment models) are detected and displayed quickly.
• The iterative process of searching for the reachable states is often much more
expensive (in terms of memory and time) for states located far from the initial state.
For example, stopping after half the number of total iterations can sometimes save
90% of the total run time.
RuleBase: a Formal Verification Tool
Provided by special agreement with IBM
146
CHAPTER 8
• It is not necessary to build a full Transition Relation (TR). In normal model checking, RuleBase builds a TR that represents all possible state transitions of the
design. Since the TR is a bottleneck in large designs, the fact that you don’t have
to build it saves a lot of time and energy.
• Design errors often increase the model built by RuleBase. Models of erroneous
designs tend to grow because the reachable state-space may include many unexpected states. Finding and fixing errors in early iterations, while the state space
reached is still small, may decrease design size and allow later runs to go further.
If the Verify-Safety-OnTheFly option is enabled, RuleBase attempts to check
as many formulas as possible during the search for the reachable state space.
Formulas that cannot be verified in this mode will be identified automatically
and checked with the normal algorithm. The formulas that DO NOT suit Verify-Safety-OnTheFly can be characterized as follows:
• Formulas mixing the A and E path quantifiers.
• Formulas that contain the temporal operators AF, AU or EG, or any strong Sugar
operator (an operator whose name ends with ‘!’); these are known as liveness formulas, rather than safety formulas.
• Formulas in which there is a ‘|’ (the or operator) between temporal sub-formulas.
• Formulas in which a weak until has a temporal sub-formula on the right hand side.
The Verify-Safety-OnTheFly option will sometimes need to add auxiliary
state variables. For this reason, the option can be controlled by the user. It is
advisable to try this option and see if the additional state variables are a problem for RuleBase (because of size limitations). In most cases, this option can
be a considerable time and space saver. Keep in mind that RuleBase will not
add any state-variables for rules of the form AG(p), where p is a combinational
formula.
A useful trick when using this technique is to “and” your formulas together
into one big formula. The advantage of this technique is that the overhead for
checking formulas on the fly is reduced considerably.
RuleBase has an option to make this automatically, and transparently from the
user. To operate this option, add to your rulebase.setup file the line:
IBM Haifa Research Laboratory, Israel
Provided by special agreement with IBM
Size problems and solutions
147
setenv RB_BIG_AND 1
Using this option, all safety formulas will be anded, but the results will be
given as if they were run separately.
The RB_BIG_AND option will operate only if all formulas in the rule are
safety formulas. Otherwise it will run in regular OnTheFly mode.
To access the Verify-Safety-OnTheFly option, press the Options push button
and open the Verification section of the Options dialog box. The Verify
Safety OnTheFly option menu has two entries:
• Yes. All Safety formulas will be checked OnTheFly. The user can specify a parameter (a two digit integer number) which determines the trade-off between memory
and time consumption during the run. The default for this parameter is 10. If a bigger number is specified, the run will consume less memory, but counter-example
production will take longer. If on the other hand a smaller number is specified, the
run is likely to consume more memory, but producing counter example would be
easier. Therefore it is recommended to specify a small number if many of the formulas are likely to fail, and specify a big number if most of them are likely to pass.
A special case is when specifying 0 as parameter, which is like specifying ‘infinite’: the run will consume the as little memory as possible as long as no rule fails,
but if counter-example is needed, it will consume more time and space.
• No. Verify-Safety-OnTheFly is disabled.
8.9 Efficient Use of Real Memory
The user’s memory quota is often much less than all of the real memory available in the system. A running process might be killed by the operating system
when the quota is exceeded, although unused memory is still available. RuleBase users will usually want to override this limitation. In cshell, for example,
the limit command can be used to control and display the user’s quota. A possible setting for a computer with 256MB real memory is:
limit datasize 230000
limit memoryuse 230000
RuleBase: a Formal Verification Tool
Provided by special agreement with IBM
148
CHAPTER 8
The current limits can be viewed using the following command:
limit
RuleBase is very slow when it runs out of real memory, therefore, it is not a
good idea to increase data-size above the size of the real memory.
IBM Haifa Research Laboratory, Israel
Provided by special agreement with IBM
Debugging Aids
CHAPTER 9
When a formula fails, debugging is usually done by examining the counter-example trace
using the Scope tool, described below. However, RuleBase provides other debugging aids to
assist in the analysis of the design, whether or not a formula fails. Some of these aids are
described here in detail:
•
•
•
•
•
Section 9.1, Scope waveform display tool
Section 9.2, Vacuity
Section 9.3, Witness
Section 9.4, Reduction Analyzer
Section 9.5, Longest Trace
More debugging aids are described in other chapters:
•
•
•
•
Vacuity explanation - Section 10.5.9.2
Formula explanation - Section 10.5.8
Test generation - Section 10.5.9.1
Lists of variables and signals, before and after reduction - Section 10.2.4
RuleBase: a Formal Verification Tool
Provided by special agreement with IBM
150
CHAPTER 9
9.1 Scope waveform display tool
When a counter-example or witness is generated by RuleBase, it can be displayed by invoking
the Scope waveform display tool as described in Section 10.5.9. This section describes the
Scope waveform display tool.
9.1.1 Main Window - overview
The Scope main window is shown below. It consists of a number of areas:
• The rule and formula display in the top of the window frame displays the name of the rule
and the formula number within the rule for which this trace was generated.
• The menu bar is at the top of the window and will be green if you have setup the default
colors by copying the file Scope from $RBROOT to your home directory as described in
CHAPTER 3: Getting started.
• The signal list is the rectangular area on the left-hand side of the window.
• The waveform display window is the large rectangular area in which the waveform itself
is displayed.
• The message panel is the small rectangular window below the waveform display window.
These areas are described in detail below.
9.1.2 Menu bar
The menu bar contains the following menu items:
IBM Haifa Research Laboratory, Israel
Provided by special agreement with IBM
Debugging Aids
151
9.1.2.1 File menu option
Clicking left on the File menu option opens a sub-menu with the following items:
• Print screen: prints a copy of the waveform display to the postscript file scope.ps.
To print this file directly from Scope, add the following line to file Scope in your home
directory: “Scope*printCommand: <your print command>”, for example
“Scope*printCommand: qprt -Bnn -Pprt1 scope.ps”.
• Load state: prompts the user for a name of a Scope state file, to replace the current state.
(to learn more about the Scope current state and state files read Section 9.1.6)
A state file is created using “Save state” or “Save state as” described below.
• Append state: prompts the user for a name of a Scope state file, whose signals will be
appended to the currently displayed signals.
• Save state: saves the current Scope state, including the signals displayed, in the currently
loaded state file. The saved state will be used the next time a waveform for this rule is displayed.
(to learn more about the Scope current state and state files read Section 9.1.6)
• Save state as: prompts the user for the name of a Scope state file in which to save the state.
This state can later be loaded using “Load state” described above.
• Quit: exits the Scope waveform display tool.
9.1.2.2 Signals menu option
Clicking left on the Signals menu option opens a sub-menu with the following items:
• Add all: adds all signals to the waveform display.
• Remove all: removes all signals from the waveform display.
• Vertical text: causes signals with text values (for instance, enumerated constants) to have a
vertical display format
• Horizontal text: causes signals with text values to have a horizontal display format.
• Sort/Unsort: this option can be ignored by users of RuleBase.
9.1.2.3 View menu option
Clicking left on the View menu option opens a sub-menu with the following items:
• Zoom in: zooms in on the waveform display.
• Zoom out: zooms out on the waveform display.
• Show/Hide Toolbar: this option can be ignored by users of RuleBase.
RuleBase: a Formal Verification Tool
Provided by special agreement with IBM
152
CHAPTER 9
9.1.3 Signal list
The signal list contains a list of all signals in the design and environment that remained after
reduction. If a signal does not currently appear in the waveform display, it can be added to the
display by clicking-left on it. The location of the display of a signal’s waveform can be controlled in the following manner.
To add signal ‘a’ above signal ‘b’ in the waveform (assuming that signal ‘b’ is
already displayed), first mark signal ‘b’ by clicking-left on the name of the signal (and NOT on its waveform) in the waveform display window. Signal ‘b’
should now be marked by a rectangular box surrounding the signal name.
Now, in the signal list, click left on the name of signal ‘a’. The waveform of
signal ‘a’ should now appear above that of signal ‘b’.
To move the waveform of signal ‘a’, first mark it as above. Then drag it to its
new location and release the left mouse button.
To remove the waveform of a signal, click right on its name (and NOT its
waveform) in the waveform display window.
To add signal ‘a’ to the end of the waveform display, first unmark all signals by
clicking left on the name of the currently marked signal (the easiest way to do
this is to double click left on the name of any signal, which first marks it and
then unmarks it). Then, click left on the name of signal ‘a’ in the signal list.
The waveform of signal ‘a’ should now appear as the last signal in the waveform display.
To search for a signal name in the signal list, type its name (or part of its name)
in the small window above the signal list, and press ‘Enter’. To quickly clear
the search window, click right anywhere in it.
9.1.4 Waveform display window
The waveform display window displays an execution trace which is a counter-example or a
witness to a formula. The number bar at the top of the display counts the clock cycles of the
fastest clock. Signals which have a textual display (for instance, enumerated constant values)
IBM Haifa Research Laboratory, Israel
Provided by special agreement with IBM
Debugging Aids
153
are displayed such that only a change in the signal value is displayed. So, if no value appears
at time X, the current value can be found by looking to the left for the value at the last time the
signal changed.
9.1.4.1 Display of an infinite trace: !LOOP:
There are formulas whose counter-example or witness must be displayed as an
infinite trace. For example, consider the following formula:
AG (p -> AF q)
If this formula is false, a valid counter-example is one in which ‘p’ is asserted,
and then ‘q’ is never asserted. Never is an infinite amount of time, and thus an
infinite trace is required in order to show that this formula is false. The way
that RuleBase displays an infinite trace is by displaying a finite prefix, and then
a set of states comprising a loop.
The special signal !LOOP:, which appears as the first in the signal list, is used
to indicate the loop. A loop is indicated when the signal !LOOP: begins taking
on the values ‘=’ and ‘-’ alternately, so that the entire loop is marked by a string
of the form “=-=-=-=-=-=”.
9.1.5 Message Panel
The message panel is used for displaying various errors, warnings, and informative messages.
9.1.6 More about state files
The current state of Scope consists of various aspects of the waveform display, including the
signals displayed, the zoom factor and the window geometry. The current state can be saved in
a state file and be used in later sessions of Scope. In order to ease the user’s work, RuleBase
performs basic management of Scope state files as follows:
1.
The user can choose if state files are saved in the rule’s directory, in which case different
rules have different state files, or in the verification directory, in which case all rules share
one state file. See “Per-rule state file” in Section 10.5.3.5.
RuleBase: a Formal Verification Tool
Provided by special agreement with IBM
154
2.
3.
4.
5.
CHAPTER 9
When Scope is invoked, it loads the default state file, if one exists. If “Per-rule state
file=No”, Scope loads smv.state from the verification directory. If “Per-rule state file=Yes”,
Scope tries to load rule_<rulename>/smv.state. If this file doesn’t exist, Scope loads
smv.state from the verification directory.
After loading the default state file, signals that appear in the formulas are appended.
The current state can be saved in the current state file using the “File/Save state” menu
option, or in another file using the “File/Save state as” menu option. (See Section 9.1.2.1.)
The current state can be replaced by another state file using the “File/Load state” menu
option. Signals of another state file can be added to the current state using the “File/
Append state” menu option. (See Section 9.1.2.1.)
9.2 Vacuity
If a formula passes, but in a trivial manner, this is called vacuity, and if vacuity detection is
enabled (see Section 10.5.3.4) the status of the rule as displayed in the results window (see
Section 10.5.9) is ‘vacuously’. For instance, if the formula
AG (p -> AX q)
passes, but it is also the case that ‘p’ is never asserted, then the formula is said
to pass vacuously. Vacuity occurs when a sub-formula does not affect the truth
value of the formula. For instance, in the above, the sub-formula ‘AX q’ does
not affect the truth value of the formula, because ‘p’ is never asserted. We can
replace ‘AX q’ with any other sub-formula (even the sub-formula FALSE!),
and the rule will remain true. Since a trivially true formula is not intentionally
part of a specification, a vacuous pass usually indicates a problem in the rule,
in the environment, or in the design under verification. For this reason it is
strongly recommended not to turn off vacuity checking. If vacuity checking is
enabled, but full witness generation (see Section 9.3) is turned off, minimal
overhead is incurred.
In the above example, there is only one possible cause of vacuity. However,
sometimes the situation is more complex. For instance, in the following formula:
AG (start_transaction -> next_event(acknowledge)(read_enable | write_enable))
IBM Haifa Research Laboratory, Israel
Provided by special agreement with IBM
Debugging Aids
155
the vacuity may be because ‘start_transaction’ is never asserted, or because
‘acknowledge’ is never asserted after ‘start_transaction’. In both cases, the
sub-formula (read_enable | write_enable) does not affect the truth value of the
formula.
In order to facilitate debugging of vacuous passes of this type, an explanation
of the vacuous pass is available as described in Section 10.5.9.2, Displaying
vacuity explanation.
9.3 Witness
The knowledge that a formula passes provides only a measure of confidence in the correctness
of the design under verification. One reason for lack of confidence is that the pass may be vacuous, as discussed in Section 9.2. However, even if a formula passes non-vacuously, there is
the possibility that the formula does not express the property that was intended by the user.
One way to achieve greater confidence that the formula does indeed express the user’s intention is to examine a witness formula. A witness formula is a positive non-trivial example of
the truth of the formula. A witness formula is created when full witness generation is enabled
(see Section 10.5.3.4) and the rule passes non-vacuously. In this case, the status of the rule as
displayed in the results window (see Section 10.5.9) is ‘passed (w)’. For instance, if the formula
AG (p -> AX q)
passes non-vacuously, then the witness trace will show a case where ‘p’ is
asserted and then the following clock ‘q’ is asserted.
It is recommended that witness generation be enabled at the beginning of the
formal verification process, and that a witness trace be examined at least once
for every formula. Once a witness formula has been examined and the formula
is determined to correctly express the desired property, witness generation can
be turned off as described in Section 10.5.3.4. At this stage, model checking
becomes a fully automated process in that it is enough to determine that each
formula passes non-vacuously, without examining waveform displays for true
formulas. It is strongly recommended that vacuity detection be left on always.
RuleBase: a Formal Verification Tool
Provided by special agreement with IBM
156
CHAPTER 9
9.4 Reduction Analyzer
As explained in CHAPTER 8: Size problems and solutions, one way that RuleBase deals with
the size problem is by behavioral partitioning and overreduction, in which parts of the design
are eliminated based on the environment as well as the formulas to be checked. The reduction
phase eliminates logic which is not in the cone of influence of the formulas to be checked,
propagates constants from the environment forward and eliminates redundant logic (that either
was there from the start, or became redundant because of constant propagation). The reduction
analyzer allows insight into these reductions. Usually, there are two questions that the reduction analyzer can help to understand:
• why was signal X eliminated during reduction (why does it not affect the truth of the formulas in this rule)?
• why was signal Y not eliminated during reduction (how does it affect the truth of the formulas in this rule)?
The reduction analyzer is invoked from the ‘Debugging’ menu option as
described in Section 10.2.4. The reduction analyzer can be invoked only if creation of a circuit file was enabled as described in Section 10.5.3.5.
IBM Haifa Research Laboratory, Israel
Provided by special agreement with IBM
Debugging Aids
157
9.4.1 Main window - overview
The main window of the reduction analyzer is show in below. It consists of a number of areas:
• The menu bar is at the top of the window and will be light blue if you have setup the
default colors by copying the file Analyze from $RBROOT to your home directory as
described in CHAPTER 3: Getting started.
• The signal list is the rectangular area on the left-hand side of the window.
• The analysis display window is the large rectangular area in which the waveform itself is
displayed.
• The quick button menu is the area below the signal list.
These areas are described in detail below.
9.4.2 Menu bar
The menu bar contains the following menu item:
RuleBase: a Formal Verification Tool
Provided by special agreement with IBM
158
CHAPTER 9
9.4.2.1 File menu option
Clicking left on the File menu option opens a sub-menu with the following item:
• Quit: exits the reduction analyzer.
9.4.3 Signal list
The signal list contains a list of all signals in the design. To choose a signal, click left on it. To
search for a signal name in the signal list, type its name (or part of its name) in the small window above the signal list, and press ‘Enter’.
9.4.4 Analysis display window
The analysis display window is used to display the reduction analysis information.
9.4.5 Quick button menu
The quick button menu contains the buttons used to control the reduction analysis. Each is
described in detail below.
9.4.5.1 Operation quick button
The operation quick button is used to select the reduction analysis operation to be performed.
Choose a value, then click left on a signal from the signal list. The operation you have
requested will be performed. The depth of the analysis is controlled by the stop at quick button, described in the next section. Possible values of the operation quick button are:
• Explain: requests the reduction analyzer to explain why a signal is either dead or alive or
has a constant value. If a signal is dead (deleted by the reduction analyzer), the reason will
be shown. If it is alive, its influence on one of the formula signals or on a test pin will be
explained by showing a chain of influence from the selected signal through intermediate
signals and finally to a formula signal or test pin. If a signal has a constant value, the derivation of that constant value from the environment through the design will be shown.
• Cone: requests the reduction analyzer to show the cone of influence of the selected signal.
Some shortcuts may be taken. For instance, if signal xyz is defined as follows:
define xyz := xx & yy & zz;
and signal zz is a constant 0, then the cone of influence will not show logic beyond the first
“and” gate.
• Fullcone: requests the reduction analyzer to show the cone of influence of the selected signal without shortcuts. For instance, in the above example, despite the fact that signal zz is a
constant 0, the full cone of logic including that driving xx, yy, and zz will be shown.
IBM Haifa Research Laboratory, Israel
Provided by special agreement with IBM
Debugging Aids
159
• Sources: shows the signals which are inputs to the cone of logic driving this signal.
• Sinks: shows signals that are driven by this signal.
9.4.5.2 Stop at quick button
The stop at quick button controls the depth of the analysis of the operations described in the
previous section. Possible values are:
• Meaningful: the analysis is continued until a meaningful signal name is reached. A meaningful signal is one which was present in the original HDL code, i.e., was not added by the
synthesis tool.
• Flip-flops: the analysis is continued until a flip-flop (or latch) is reached.
• Any: the analysis stops at any signal. In other words, analysis stops at the first logic gate
driving the signal.
9.4.5.3 Write quick button
This button writes the current contents of the analysis display window to a file. You will be
prompted for the file name.
9.4.5.4 Clear quick button
This button clears the analysis display window.
9.5 Longest Trace
In model checking, the design and its environment are viewed as a finite state machine which is
traversed. If reachability analysis is enabled, the first step of the verification is a breadth-firstsearch traversal of the state space of the model, starting from the initial state or states. The
steps of this traversal are reported as “iterations” in the log file of the run. The set of initial
states is iteration 0, the set of all states reachable in one step from some initial state is iteration
1, and so on. The last iteration includes all states which are as far as possible from some initial
state. A path from some initial state to a state in the last iteration is called a “longest trace”.
A longest trace can be useful in gaining insight into the design under verification, as a trace to some state in the final iteration is in some sense one of the
most complicated traces than can be generated. Frequently, examining a longest trace can uncover a bug in the design or in the environment.
RuleBase: a Formal Verification Tool
Provided by special agreement with IBM
160
CHAPTER 9
Longest trace generation is controlled from the verification control panel as
described in Section 10.5.3.4. A longest trace can be viewed using the debugging menu option as described in Section 10.2.4.
9.6 Multiple traces
Sometimes user may want to see more than one counter example to a formula, and if counter
examples are as different one from another as possible, it helps the user to debug the design.
Rulebase provides the multiple traces feature for this aid, which uses Hamming
distance heuristic to search different traces. The user asks Rulebase for the
desired number of traces, and gets them (or less, if no enough traces exist).
The user can enable this feature by adding “-multiple_traces n” flag to $SMVFLAGS variable using File/Setenv menu as described in Section 10.2.1 (where
n is the number of traces user wants to see.)
Note:
Currently, the user can see all the traces of counter example by pressing the
Get Next Trace button in the new Scope, which is given by request and currently is not in the Rulebase package. The default Scope does not support this
feature and shows only the first trace.
9.7 Prolong trace
Looking at the counter example, which is given to the point that contradict the formula, the
user may want to know “what happens next”, i.e. what are the values of signals on the following cycle (or even on the number of following cycles).
Rulebase makes it possible providing the prolong trace feature. The user asks
Rulebase to prolong the traces by n cycles, and each trace (if any) is prolonged
by the given number of cycles, or the warning is given if it is not possible. The
latter happens if the counter example is finite and has no continuation of given
length because of environmental constraints (invars, restricts or assumes.)
IBM Haifa Research Laboratory, Israel
Provided by special agreement with IBM
Debugging Aids
161
The user can enable this feature by adding “prolong_trace n” flag to $SMVFLAGS variable using File/Setenv menu as described in Section 10.2.1 (where
n is the number of cycles to be added to each trace.)
9.8 Other debugging aids
Other debugging aids are available, under the “Debugging” menu of the RuleBase main window. They are described in detail in Section 10.2.4.
RuleBase: a Formal Verification Tool
Provided by special agreement with IBM
162
IBM Haifa Research Laboratory, Israel
Provided by special agreement with IBM
CHAPTER 9
CHAPTER 10
Graphical User Interface:
Tool Controls and Options
This chapter describes both the graphical user interface of RuleBase, and the tool controls and
options which are manipulated by it.
RuleBase: a Formal Verification Tool
Provided by special agreement with IBM
164
CHAPTER 10
10.1 Main window - overview
The RuleBase main window is shown below. It consists of a number of areas:
• The menu bar is at the top of the window and will be green if you have setup the default
colors by copying the file Guirb from $RBROOT to your home directory as described in
CHAPTER 3: Getting started.
•
•
•
•
•
The message panel is below the main control panel, and is off-white.
The rule list is the rectangular area on the left-hand side of the window.
The quick buttons are the dark yellow buttons to the right of the rule list.
The main text window is the large rectangular area to the right of the quick buttons.
The text control panel is below the main text window.
Each of the areas is described in detail below. The most frequently used area
of the RuleBase main window is the area containing the quick buttons. If you
are reading this document for the first time, it is recommended that you skip to
Section 10.5 for a description of the quick buttons before reading the remainder of this chapter.
IBM Haifa Research Laboratory, Israel
Provided by special agreement with IBM
Graphical User Interface: Tool Controls and Options
165
10.2 Menu Bar
The menu bar contains the following menu items:
10.2.1 File menu option
Clicking left on the File menu option opens a sub-menu with the following items:
• reFresh: choosing this option will update the list of rules in the rule list. This is necessary
if, for instance, you have added new rules since invoking RuleBase. There is no need to
refresh if the changes you have made do not affect the rule list. Other changes will be seen
automatically upon the next run of a rule. NOTE: the one exception to this is the file rulebase.setup. As described in CHAPTER 3: Getting started, the file rulebase.setup is read
once upon invocation of RuleBase. Therefore, any changes to this file will not be seen
automatically, nor will they be seen after choosing option reFresh. Rather, in order to see
changes to the file rulebase.setup, you must exit RuleBase and reinvoke.
• Cleanup: choosing this option will remove and/or compress log and other files from previous runs.
• Status of all rules: choosing this option will create a summary file showing the status of
each rule (formulas passed/failed on last run, run time, etc.)
• Past status of rule: choosing this option will display in the main text window the status of
previous runs of this rule: formulas passed/failed, run time, etc.
• Setenv: choosing this option will let you set environment variables. You will be prompted
for the name and value of the variable to set.
• Read rulebase.setup: choosing this option will read the current rulebase.setup file. It can
be used to update environment variables, instead of using the Setenv option described
above. Note that no ‘unsetenv’ is done, thus if a ‘setenv’ line was erased from rulebase.setup file, reading it will not change the environment variable.
• Quit: choosing this option will exit RuleBase.
10.2.2 Batch menu option
Clicking left on the Batch menu option opens a sub-menu with the following items:
• Start: choosing this option will start a batch file. You will be prompted for the name of the
batch file to be run.
It is also possible to run a batch file from the unix shell. To do so:
- Create the batch file described below under “create batch file”.
- Copy the file $RBROOT/run to the current directory.
RuleBase: a Formal Verification Tool
Provided by special agreement with IBM
166
CHAPTER 10
- Select options for the batch run, and save them as described in section Section 10.5.3.1.
- From the shell, invoke the batch file.
• Kill: choosing this option will kill the currently running batch process.
• Start at: choosing this option will schedule a delayed start of a batch file. You will be
prompted for a start time and the name of the batch file to be run.
• Kill all at: choosing this option will schedule the kill of all processes (batch or otherwise)
of this window at a later time. You will be prompted for the time at which to kill all running processes.
• Create batch file: choosing this option will create a batch file for later use. The batch file
will contain all rules, and can be edited by an external editor if only a subset of the rules are
desired. You will be prompted for the batch file name.
• Failed batch file: same as create batch file, but only rules in which at least one formula
failed on a previous run will be included.
• Aborted batch file: same as create batch file, but only rules which for some reason did not
complete the previous run will be included.
10.2.3 RunUtil menu option
Clicking left on the RunUtil menu option opens a sub-menu with the following items:
• Pause/Continue: choosing this once will freeze a running rule. Choosing it again will
continue the run. A paused rule has a P to the left of its name.
• Undo run: will undo the effects of a rule which was run by mistake. Works only if this rule
has been killed, and no other rule has been run since this rule was started.
• Adopt: if a rule was run from a unix shell or from another RuleBase window, it normally
cannot be controlled by the quick buttons or the Options dialog. Choosing adopt will allow
the run to be controlled by the RuleBase window from which adopt is performed. Note:
this will work only if the run which is to be adopted is on the same machine as the RuleBase window which wants to adopt it.
• Unlock: during execution, RuleBase locks the rule to prevent multiple simultaneous executions. Sometimes, a run may abort without removing the lock. Choosing unlock forces
lock deletion. Unlock a rule only if you are sure that it is not running (on any computer).
10.2.4 Debugging menu option
Clicking left on the Debugging menu option opens a sub-menu with the following items:
• State variables: displays the names of the state variables for this rule (valid after reduction).
IBM Haifa Research Laboratory, Israel
Provided by special agreement with IBM
Graphical User Interface: Tool Controls and Options
167
• Signals before reduction: displays names of all signals in the design. In some translation
paths some of the internal names disappear and others are added.
• Signals after reduction: Display names of signals after reduction, categorized as Deleted/
Constant/Alive. Signals that appear in “Signals before reduction” and do not appear here
are not in the cone of influence of the formula. The information to the right of the “--” can
be ignored; it is used by the reduction analyzer.
• Circuit before reduction: this option is currently not documented.
• Circuit after reduction: this option is currently not documented.
• Reduction analyzer: Invokes the reduction analyzer, useful for debugging reductions performed by RuleBase. A detailed description is provided in CHAPTER 9: Debugging
Aids. The reduction analyzer can be invoked only if creation of a circuit file was enabled as
described in Section 10.5.3.5.
• Where signal is used: Display the locations (file name and line number) where a signal
whose name matches a given pattern (wildcard is possible) is used in the environment by
the selected rule.
• Where signal is driven: Display the locations (file name and line number) where a signal
whose name matches a given pattern (wildcard is possible) is driven in the environment by
the selected rule.
• Show longest trace: Presents a timing diagram generated by the verification option “Gen
longest trace”. See Section 10.5.3.
• Save longest trace: Similar to “Show longest trace” above, but instead of being displayed,
the timing diagram is stored in file “longest.trace” for inspection by the stand-alone scope
tool.
• GenTest from longest trace: Similar to “Show longest trace” above, but instead of being
displayed, the timing diagram is stored as a control program for simulation.
10.2.5 Help button
The Help option will open the on-line help documentation.
10.3 Message panel
The message panel is used for displaying warnings, errors, and informative messages.
RuleBase: a Formal Verification Tool
Provided by special agreement with IBM
168
CHAPTER 10
10.4 Rule list
The rule list contains the list of rules coded by the user. It is derived from the database file
(usually called “envs”) pointed to by the rulebase.setup file.
10.5 Quick buttons
The quick buttons are the most frequently used buttons during verification by RuleBase. Each
is described in detail below.
10.5.1 Run quick button
This button runs the rule selected currently by left-clicking on the rule name in the rules list. A
running rule has an R to the left of its name. The R becomes D when the rule ends.
10.5.2 Kill quick button
This button kills the run of the rule selected currently by left-clicking on the rule name in the
rules list. A killed rule has a K to the left of its name.
10.5.3 Options quick button
This button opens the options box. The options box consists of the following areas, each of
which is described in more detail in the sections below:
•
•
•
•
•
•
File: this menu will allow you to store the options in file, or load them from file.
BDD order: clicking on this option will open the BDD order control panel.
Reduction: clicking on this option will open the reduction control panel.
Verification: clicking on this option will open the verification control panel.
Debugging: clicking on this option will open the debugging control panel.
Hide: clicking on this button will close the options box.
Note: many of the options buttons have a yellow “A” (apply) button next to
them. When an option is changed during a run, the change is not seen until the
corresponding apply button is clicked.
10.5.3.1 File menu
The file menu consists of the following options:
IBM Haifa Research Laboratory, Israel
Provided by special agreement with IBM
Graphical User Interface: Tool Controls and Options
169
• Load: clicking on this option will load a previously saved options configuration.
• Load <rule>.cfg: clicking on this option will load a previously saved per-rule options configuration.
• Save: clicking on this option will save the current options configuration for use by all rules.
• Save <rule>.cfg: clicking on this option will save the current options configuration for this
rule only.
• Default: clicking on this option will load the default options configuration.
10.5.3.2 BDD order control panel
The BDD order control panel consists of a number of fields. They are:
• Reorder: Enable/disable reordering. When enabled, reordering will begin only when all
the conditions below are fulfilled. Note: if this option is changed during the run of a rule,
the change will not be seen unless the yellow “A” (apply) button is clicked.
• Algorithm: Dynamic reordering algorithm. Options are one or a combination of the following:
Cheetah: this is the quickest algorithm, but in many cases achieves the poorest results.
Best combination of run time with results is achieved when this algorithm is used in combination with another.
Quick rudell: slower than Cheetah but may result in a better order.
Rudell: the slowest algorithm, but frequently gives the best results.
Note: if this option is changed during the run of a rule, the change will not be seen unless
the yellow “A” (apply) button is clicked.
• Iteration: two integers, which are lower and upper bounds on the iterations between which
the reordering algorithm should be active. Note: if this option is changed during the run of
a rule, the change will not be seen unless the yellow “A” (apply) button is clicked.
• BDD size: two integers, which are the lower and upper bounds of BDD size between
which the reordering algorithm should be active. Reordering will be activated when the
“nodes allocated” displayed in the log file has reached the lower bound, and has not yet
exceeded the upper bound. Note: if this option is changed during the run of a rule, the
change will not be seen unless the yellow “A” (apply) button is clicked.
• Low threshold: an integer. If a low threshold is defined, a BDD ordering round is stopped
when the BDD size falls below the low threshold. Note: if this option is changed during
the run of a rule, the change will not be seen unless the yellow “A” (apply) button is
clicked.
RuleBase: a Formal Verification Tool
Provided by special agreement with IBM
170
CHAPTER 10
• Laziness factor: a real number greater than 1 which controls the effort expended in reordering. The default is 3. If the movement of a variable requires more effort than the Laziness Factor permits, this variable will not be moved further, and rulebase will prefix its
name with a dot. Note: if this option is changed during the run of a rule, the change will not
be seen unless the yellow “A” (apply) button is clicked.
• Growth factor: a real number greater than 1 which controls when a second reordering
round will start. A new round will start only when the BDD size reaches last-size * growthfactor, where last-size is the BDD size (nodes allocated) at the end of the previous round.
The default is 2. Note: if this option is changed during the run of a rule, the change will
not be seen unless the yellow “A” (apply) button is clicked.
• Use order file: RuleBase may use an existing order file as its initial order. Order file
options are:
Orders pool: The best match in the orders pool is used.
<rule>.order: If such a file exists, it is used.
• Copy back after run: After every round of dynamic ordering, the order is written to a file
called temp.ord located in the rule directory. This file may be used in later runs as the initial order. Options are:
No: Don’t save the new order.
To <rule>.order: At the end of the run, copy the new order to <rule>.order.
To orders pool: At the end of the run, copy the new order to the orders pool.
To both:
At the end of the run, copy to both <rule>.order and the orders pool.
• Copy now: before a run has completed, a new order file may exist. This button allows the
new order to be copied back immediately to either <rule>.order or to the orders pool.
10.5.3.3 Reduction control panel
The reduction control panel consists of the following fields:
• Reduction effort: Determines how much effort (cpu time and memory) will be dedicated
to performing the reduction. Options are:
Low: No BDD reductions will be performed.
High: BDD reductions will be performed. Applying all BDD reductions may sometimes
require a lot of time and space. To control time and space used by the reductions, try disabling one or more of the heavy reductions, as shown below, or give a BDD node limit:
•Heavy reduction 1 NO
•Heavy reduction 2 NO
IBM Haifa Research Laboratory, Israel
Provided by special agreement with IBM
Graphical User Interface: Tool Controls and Options
171
•BDD node limit: By limiting the number of BDD nodes and using high effort with
heavy reductions, you will frequently get better reduction results than with no heavy
reductions and no BDD limit. A typical number for this limit is 300000. Leave the
limit unspecified if there are no reduction problems.
The reduction analyzer described in Section 9.4 can give insight into the reductions performed.
• SMV Reductions: when this mode is active, RuleBase performs over-approximations in
order to find constants FF’s, and to apply reductions (based on the constants-search results).
This mode is inactive by default and should be activated when a size problem is encountered. Contants that were found (in this mode) are saved in the FF pool thus it is usually
pointless to activate this mode if no new constants may be added.
10.5.3.4 Verification control panel
The verification control panel consists of the following fields:
• Reachability: determines if a search of the reachable state space of the circuit is to be done
as the first step of verification. For most designs, this should be set to “yes”.
• Verify Safety OnTheFly: determines whether safety formulas (formulas which do not
contain strong operators or the AF operator) should be checked during reachability analysis. Safety formulas can be checked on the fly only if reachability is enabled. Options are:
Yes: Check all safety formulas on-the-fly. The user can give a parameter (an integer) which
determines the trade-off between memory and time consumption during the run. If this
parameter is given a small value, the run may consume more memory, but counter-examples will be produced quicker than in the case of a big value given.
No: Do not check safety on the fly.
For more information about safety on the fly, see Section 8.8.
• Verify Liveness OnTheFly: determines whether liveness formulas (formulas containing
AF, strong until, or sugar operators ending with!) should be checked during reachability.
Unlike safety OnTheFly, the check may take a long time. Therefore, if the liveness formulas are likely to pass, it is not recommended to use this option. Options are:
Yes: Check all liveness formulas every n iterations, where n should be specified by the user.
No: Do not check liveness on the fly.
• Attempt light proof: applies the classical model checking algorithm on the rule (all possible states are considered and not necessarily the reachable ones). The square area along the
button specifies the time (in seconds) that RuleBase should invest in this mode. If the formula does not fail/pass in this period of time, RuleBase will apply the regular model checking on the rule.
Note:
RuleBase: a Formal Verification Tool
Provided by special agreement with IBM
172
CHAPTER 10
•If the formula passed (in light proof) a witness and vacuity explaination will be provided (if the user ask for it). - note that producing witness/vacuity exaplation may
more time comparing to other evaluation modes.
•If the formula failed (in light proof) the time needed to produce a counter example
will not be restricted.
•Light proof does not check vacuity. A vacuous formula will get the status ‘pass’.
•Longest trace can not be produced in this mode..
• Witness: controls whether vacuity (a trivial pass) is checked, and whether or not a witness
trace is produced. For an explanation of vacuity and witnesses, see CHAPTER 9: Debugging Aids. Options are:
Full witness: formula is checked for vacuity, and a witness trace is produced if the pass is
non-vacuous.
Vacuity only: formula is checked for vacuity, but no trace is produced in the case that the
pass is non-vacuous.
None: formula is not checked for vacuity.
Note: if this option is changed during the run of a rule, the change will not be seen unless
the yellow “A” (apply) button is clicked.
• Explain vacuous: If active and a formula is found to pass vacuously, RuleBase will point
to the pre-condition that cannot hold.
• Gen longest trace: If active, and reachability is also active, a trace will be produced to the
a state which is a far as possible from the initial state. Note: if this option is changed during
the run of a rule, the change will not be seen unless the yellow “A” (apply) button is
clicked. If the “Now” button is pushed, and reachability is also active, RuleBase will complete the analysis of the current iteration, and then generate a trace which is the furthest it
has gotten so far from the initial state. Then it will continue with reachability analysis and
checking of the remaining formulas.
• Stop after iteration: An integer indicating how far into the reachability analysis RuleBase
should go. RuleBase will stop reachability after the specified number of iterations (i.e., it
will not look at states which are farther than X steps from the initial state). Note: if this
option is changed during the run of a rule, the change will not be seen unless the yellow
“A” (apply) button is clicked. If the “Now” button is pushed, and reachability is also active,
RuleBase will complete the analysis of the current iteration, and check all remaining formulas only as they pertain to the states it has seen so far.
• Run only if change: This mode provides the ability to run a rule only if the design, environment or formula have been changed since the last run. Furthermore, if the change in the
design or environment does not affect the formula then it will not run either. When this
mode is active a signature is created for each run to be compared with the next run.
IBM Haifa Research Laboratory, Israel
Provided by special agreement with IBM
Graphical User Interface: Tool Controls and Options
173
The following options are available:
•No - mode is inactive.
•Yes - mode is active. A rule will run only in case of changes.
•Force - mode is active. A rule will run in any case but a signature will be created.
•Fictitious - RuleBase creates a signature for the rule as it was just running. If the previous log file is older then the design, does not exist or is not completed (rule did not
finish) then RuleBase will not create a fictitious signature.
10.5.3.5 Debugging control panel
The debugging control panel consists of the following fields:
• Explain timing diagram: determines if explanations of the counter-example will be shown
in the trace. Explanations are red dots that tell where to look for interesting events.
• Show formula text: determines if the counter-example or witness trace will also pop open
a window displaying the formula to which it corresponds.
• Per-rule state file: determines if the signal display configuration of the trace will be saved
per-rule or not.
•
•
•
•
Clock cycle: length of the clock cycle for test generation1 (see Section 10.5.9).
Clock name: the name of the clock for test generation.
Signal prefix: prefix for signal names for test generation.
Create circuit file: a circuit file must be created during reduction if the reduction analyzer
(see Section 9.4) is to be used.
10.5.4 ToglOrdr quick button
This button will toggle bdd ordering for the currently selected rule. If bdd ordering is currently
taking place, it will stop the current round. If bdd ordering is not currently taking place, it will
start one round. This button affects only one round of bdd ordering. In order to turn bdd ordering on or off permanently, see section Section 10.5.3.2.
1. Normally, test generation is not needed, because RuleBase generates a simulation-like trace for
debugging. This option is only needed in the case that for some reason it is desired to generate a simulation test out of the counter-example generated by RuleBase.
RuleBase: a Formal Verification Tool
Provided by special agreement with IBM
174
CHAPTER 10
10.5.5 Log quick button
This button will display the log file of the currently selected rule. If the rule is currently running, this option will work only if invoked from the machine on which the rule is currently running. If the rule has completed, the log file of the completed run will be displayed.
Two sub-buttons are given to ease analysis of the log:
n - pushing this sub-button will delete all the ‘nodes allocated’ lines from the log.
> - pushing this sub-button will delete all BDD-ordering lines.
10.5.6 Warnings quick button
This button will display any warnings of the currently selected rule.
10.5.7 Status quick button
This button will display the status of the currently selected rule. If the rule is currently running, it will display the start time of the run and the name of the machine on which the rule is
running. If the rule has completed, the results (pass/fail) of each formula and the cpu time and
memory usage will also be displayed.
10.5.8 Explain quick button
This button will display an explanation of the formulas of the currently selected rule. The
explanation is a rudimentary translation into English of the formula.
10.5.9 Results quick button
This button will display the results of the currently selected rule. Each formula will be displayed, along with information as to its status. The status of a formula is either:
•
•
•
•
•
failed: this formula is false, and a counter-example has been produced
failed(c): this formula is false, and is a contradiction in the model
passed(w): this formula is true non-vacuously, and a witness trace has been produced
passed(nv): this formula is true non-vacuously
passed(ta): this formula is true, and is a tautology in the mode, meaning that RB could
combinatoricaly determined that the rule failed, without the need to search for all the
reachable states of the model.
• passed: this formula is true, but vacuity has not been checked1
• vacuously: this formula is true vacuously
IBM Haifa Research Laboratory, Israel
Provided by special agreement with IBM
Graphical User Interface: Tool Controls and Options
175
• unknown: this formula has not yet been determined to be true or false
For a explanation of vacuity, see CHAPTER 9: Debugging Aids.
At the beginning of the run, the status of all formulas is of course unknown. If
safety on the fly has been chosen (see Section 10.5.3.4), some formulas may be
determined to be true or false before the completion of the run. Thus, it is possible to click on the Results quick button before a run has completed and see
that some formulas are either passed or failed, while others are still of
unknown status.
10.5.9.1 Displaying counter-examples and witnesses
If the status of a formulas as described above is either “failed” or “passed(w)”,
a trace is available for viewing. In the case of “failed”, this trace is called a
counter-example. In the case of “passed(w)”, it is called a witness.
Click left near the word “failed” or “passed(w)” and keep the mouse button
pressed. A menu will be displayed with the following options:
• Show timing diagram: if chosen, the counter-example or witness will be displayed by the
waveform display tool Scope. For an explanation of the Scope tool, see Section 9.1.
• Save timing diagram: if chosen, the counter-example or witness will be saved in a file of
name rule_name.N.trace, where rule_name is the name of the rule and N is the formula
number in the rule. This trace can then be viewed using the following command:
$RBROOT/scope -sf smv.state rule_name.N
NOTE: even after exiting RuleBase, the trace is available by re-invoking RuleBase, clicking Results, and selecting show timing diagram as above. Saving a trace using save timing diagram is only necessary if it is desired to keep a copy of a trace independently of
RuleBase. For instance, a copy of a failing trace may be saved in order to send it to a colleague by e-mail, or to keep in a database as documentation.
1. Checking vacuity is strongly recommended.
RuleBase: a Formal Verification Tool
Provided by special agreement with IBM
176
CHAPTER 10
• Generate test: generate a test for simulation which will produce the same trace shown in
the counter-example or witness. Formats available are Synopsys and Cadence Verilog XL.
Default format is Synopsys. To generate a test for Cadence Verilog XL, add the following
line to your rulebase.setup file:
setenv RB_TEST_VERILOG 1
NOTE: Normally, there is no reason to generate a test from a counter-example or witness,
because the counter-example or witness itself can be used for debugging. In addition, the
generated test will check only the specific failure that was found, whereas running the rule
again will check all possible failures which violate the rule. In other words, as a regression
check, re-running the rule under RuleBase gives much better coverage than re-running the
simulation test generated from a previous fail.
• Propagate values: sometimes, when analyzing counter examples, it is desired to see the
value of design signals which were removed by the reduction. If every input which drives
these signals is available, RuleBase can add them to the generated trace after the fact. To
do this, create a file called “propagate.names” in the directory from which you have
invoked RuleBase. The file should contain a list of signals, one to a line, which you would
like to add to your trace. You can use wild-cards; for example ‘*’ stands for ‘all signals’,
and ‘block2/*’ stands for all signals whose names begin with ‘block2/’. Then click on
Propagate values and wait until RuleBase computes the values. Finally, choose Show
timing diagram. The signals you requested should now be available in the menu of signal
names on the right hand side of the Scope tool.
10.5.9.2 Displaying vacuity explanation
If the status of a formula is “vacuously” and the explain vacuity facility was
enabled (see Section 10.5.3.4, Verification control panel), an explanation of the
vacuous pass is available. Click left near the word “vacuously”. Choose the
only option available, Explain vacuity. An explanation will be displayed. The
vacuity explanation is the shortest prefix of the formula which is always
true. For a detailed explanation of vacuity, see Section 9.2, Vacuity. The
vacuity explanation is the shortest prefix of the formula which is always true.
10.6 Text control panel
The text control panel contains buttons which control the display of text in the main text window. Each is described in detail below.
IBM Haifa Research Laboratory, Israel
Provided by special agreement with IBM
Graphical User Interface: Tool Controls and Options
177
10.6.1 Back text control button
This button will search backwards in the text control panel for the text typed in the text search
window to the right of the find text control button. Wild-card search is not supported here.
10.6.2 Find text control button
This button will search forwards in the text control panel for the text typed in the text search
window to the right of the find text control button. Wild-card
search is not supported here.
10.6.3 Edit text control button
This button will open a window in which an editor is invoked on the current file displayed in
the main text window. The default editor is vi. To call your preferred editor, add the following
line to file rulebase.setup:
“setenv RB_EDITOR your-editor”
examples:
“setenv RB_EDITOR emacs”
“setenv RB_EDITOR aixterm -e vi -R”
# rulebase calls “emacs file &”
# rulebase calls “aixterm -e vi -R file &”
10.6.4 Freeze text control button
This button will freeze the main text window (by default it is updated continuously as the run
progresses). This can make it easier to read the text. When clicked, this button will change its
color to red and display the message Frozen. To unfreeze, click left on it again.
The main text window will be automatically frozen when it is scrolled backwards using the scroll bar to its right. To unfreeze it, click left on the red Frozen button as above.
RuleBase: a Formal Verification Tool
Provided by special agreement with IBM
178
IBM Haifa Research Laboratory, Israel
Provided by special agreement with IBM
CHAPTER 10
CHAPTER 11
Design for Formal
Verification
RuleBase supports a wide variety of design styles and methodologies. While in
many cases special adjustments to existing design methodology are not
required, following design guidelines will further ease the verification process.
11.1 Separation of Control from Data
Although RuleBase can check both control logic and datapath, it is more effective for verifying control logic. Datapath usually has a lot of memory elements,
which might increase the size of the internal model representation beyond
RuleBase capacity. When verifying a design that includes both control and
datapath, the datapath is often replaced by an abstract model with less memory
elements. This abstraction is easier when there is a clear separation between
control and data in the design.
11.2 Design Partitioning
Design partitioning, where each partition is verified separately, is one solution
to the size limitation inherent to formal verification. Another reason for partitioning is the desire to push asynchronous signals and tri-state buffers to block
RuleBase: a Formal Verification Tool
Provided by special agreement with IBM
180
CHAPTER 11
boundaries (explained below). In many cases, the natural partitioning defined
by the designers can serve as a basis for formal verification. In cases where
design partitioning is too fine, several blocks are often combined to form a bigger partition, which is more interesting in terms of verification.
Partitioning has several consequences:
• Effort must be invested in defining, documenting and studying the internal interfaces
• Environment models for neighbor partitions must be developed
• Internal interfaces are prone to changes
• Some global rules cannot be expressed when the design is partitioned
In light of this, the recommendations for partitioning are:
•
•
•
•
Try to use the same partitioning for design and formal verification
Try to use documented or easy-to-understand interfaces
Use interfaces with stable protocols
If the basic design blocks are small, verify groups of related blocks
Experience shows that blocks with several hundreds of flip-flops of control
logic are good candidates for formal verification.
11.3 Clocking Schemes
While RuleBase supports many clocking schemes, the preferred scheme is
where each partition to be verified uses one clock. Multiple clocks, particularly if they are not synchronized, increase the size of the internal model’s representation, and are not recommended for large partitions. When using
multiple clocks, a small frequency ratio is preferred.
IBM Haifa Research Laboratory, Israel
Provided by special agreement with IBM
Design for Formal Verification
181
11.4 Design Mapping
RuleBase supports several languages and synthesis paths. Existing tools of the
design environment (synthesis) are usually used for translation into gate-level
representation. The design should be written in such a way that will not prevent the translators from mapping it into a basic library of gates and flip-flops.
For example, it is not recommended to include switch-level macros in the
design; their logic-level equivalents should be used.
Edge-triggered latches, and master/slave flip-flops whose master’s output is
connected only to the slave, are most suitable for RuleBase. If level-triggered
latches are used, or if the master’s output drives logic, special modelling is
required, depending on how they are used in the design.
11.5 Asynchronous Logic
Ideally, there should be no asynchronous logic in the parts to be formally verified. RuleBase supports the verification of models where the changes are at the
cycle level. Asynchronous signals, if present, are best handled when situated at
the verified partition boundaries. Synchronizing elements should be replaced
by a short-circuit. State machines should be synchronized by proper handshaking. Relying on absolute durations (e.g., 40 nano-seconds before response)
is not supported.
11.6 Tri-State Buffers
Ideally, tri-state buffers should be located in a separate module so they can be
easily separated from the design before formal verification. This is a common
design style. However, in some designs, for various reasons, tri-state buffers
are mixed with other logic. In these cases they should be situated at the partition boundaries. Future versions will be able to handle tri-state buffers everywhere.
RuleBase: a Formal Verification Tool
Provided by special agreement with IBM
182
CHAPTER 11
11.7 Parametric Designs
When the design includes memory arrays which highly influence the logic
(e.g., FIFOs), we might wish to verify these arrays rather than their abstract
model. However, checking them as a whole might cause the model to become
too big. To solve the size problem, you can define the array size as a parameter
which can be easily changed. In this manner, you can choose the largest size
possible within the RuleBase capacity.
11.8 Implementation Rules
Properties to be verified can be divided into two categories: specification rules
and implementation rules. While specification rules are usually extracted from
written documents, implementation rules are often not documented. It is
strongly recommended that you write these rules while developing the design.
IBM Haifa Research Laboratory, Israel
Provided by special agreement with IBM
CHAPTER 12
Coverage Methodology
(Note: This chapter is brought here in a preliminary form)
While RuleBase addresses the coverage problem of verification by simulation, it does not solve
it completely. First of all, there is the question, “Have I coded all necessary rules?” Secondly,
because of the size problem, behavioral partitioning as described in CHAPTER 8 is frequently
used. Behavioral partitioning adds to the coverage problem the question, “Have I coded
enough environments?” These two questions are discussed below.
Before proceeding, it should be emphasized that despite the fact that the second coverage question above sounds very much like the coverage problem of
simulation, this does not mean that using RuleBase with behavioral partitioning is comparable to verification by simulation. Despite the coverage problem,
verification with RuleBase can still provide much greater coverage than verification by simulation. To see this, think of the set of all possible execution
paths as inhabiting a two dimensional space. Then, a test suite covers a finite
number of points of the test space, as shown in Figure 15 below.
RuleBase: a Formal Verification Tool
Provided by special agreement with IBM
184
FIGURE 15.
CHAPTER 12
The coverage problem in simulation
.
. . . . .. . . . .
.. .
.
. . .. ... .
.
.. . .. . .
. . .
.. . . . . ... .. ... . . . . . . ..
.
.. . .. .. .... .... .
.
.. . . . .. .. .. . .. . ... .. . .
.
.. . . . .. . .
.. .... . .......... .. . ... . .
... .... . . ... .. ... .. ... .... ..... .. . ... ... .. ... . . . ..
..
..
... .. ..... . .... .... .. .. .. .... . . . ... ...... ..
.. .... . . . .. .. .. . . . ... . .
.
. .. . . . .
. .. . . ... ...... . . . ..... .. .. . ... .. . . .. .. . ... ................ . ..... ....... ..... . .... .. ... .. . .. . . ... ..
.. . . . . . . . . . . . . . . . . . .... .. . .. ...... .. .... . ... .... .... . . .. .. . . . . . .
.. ... . .. . ... ...... .. ..... .. .. ... . .. .. . . .
. . . . .. .. ... . . .. .
. .. .
.
. . . . .. .... . . . . . . .. . . .. .... .. ..... .... . .. .. .... . .. ............. .. . ... ......... .. . .... .. . . . .. ... . . .
.
. .. . .. . .. ... .. . . . ... . . .. ......... ..... .... . .. ......... ... . .... ... . ... ... ... . . . . . . . .. ....
.
.
.
.
.
.
.
.
.
.
.
.
.
.
.
. . . .. . .. . . . ... . . . .. .. . . . . ............... .
.
. ..
.
. .. . . . .... ... ....... ......... ..... ................. . . ... ..... ....
. . .. . . ... . .. . . . . . .....................
... ... . . ... . . ............................................................................................... .... ........ .. ..
. .. . . . . .. ... ... ... ... .. ... . ......... .. . .. .
.. ............. ................... . ............... . ..
. . ..
.
..
. ... . ... . .
.
...................................... ................ ...
.. ... . . ............... ...................... . .... ......... .. .. .
. . .. .
.
... .... ..... ........ ......... .. ..... .... . .
.. .. .. . .. ................................................................. .........................
.. .. . . .. ... ... . . ... ..
... .... .... ................. .. ..... .... . .
. .
. . . . . .. .
..
.
With RuleBase, on the other hand, each environment covers an infinite number
of points in the test space, as depicted in Figure 16 below.
FIGURE 16.
The coverage problem with RuleBase
Although there is not as yet a complete solution to the coverage problem, a
methodology of rule and environment writing which can help is described in
this chapter.
IBM Haifa Research Laboratory, Israel
Provided by special agreement with IBM
Coverage Methodology
185
12.1 The coverage model
The methodology is based on an attempt to obtain block Input-Output relationship coverage.
That is:
1.
2.
3.
4.
The block will be fed with every possible legal input sequence. Inputs are defined in the
environments.
All output signals will be systematically checked for correctness at all times. Outputs are
checked by the rules.
Selected internal states of the system will be checked for correctness at all times. Internal
states are checked by the rules.
The functionality of the block will be checked by the rules. For instance, if the purpose of
the block is to acknowledge requests with a “grant” signal, then this functionality should be
covered, for instance, with a formula of the format “AG(request -> AF grant)”.
12.2 Rule writing
Rules should be written in the following manner:
For every output signal and selected internal signals, and for every clock
cycle:
1.
2.
Determine the relationships of the signal to all other signals (inputs and outputs).
Write the rules that check the preservation of these relationships.
Divide the rules for each signal into three types.
1.
2.
3.
The signal will always change value when it must.
The signal will not change when it should not.
The signal will have a specific value at times that it must have that value.
Experience with Rulebase does not necessarily indicate that rules containing
complex signals find design errors more often. Neither do they cover all errors.
It is the careful and methodical coverage of all signals that makes Rulebase
effective.
RuleBase: a Formal Verification Tool
Provided by special agreement with IBM
186
CHAPTER 12
12.3 Environment writing
The following guideline is suggested:
Whenever possible keep the input signal nondeterministic, even if this causes
an illegal input sequence (as long as the block not confused by this). Restrict
inputs only when necessary because either the logic is confused by illegal
inputs, or in order to restrict the environment to less than the legal input behavior because of size problems. There is a genuine difficulty in determining how
risky a certain environment restriction is (in terms of missing design errors).
The suggested solution is to hold rule and environment reviews as described in
Section 12.4.
Because the quality of the verification is dependent on the quality of the environment, it is also recommended that rules be written which check the correct
behavior of the environment. Specifically, rules should be written which check
that events which the environment is expected to be able to generate are indeed
generated. For instance, the following rules check that both read_enable and
write_enable are assertable by the environment (assuming these are environment signals):
EF read_enable
EF write_enable
12.4 Plans and reviews
Rule and environment writing are strict engineering activities. They should therefore be
planned and reviewed. The reviews should be conducted both on the rules written and the environments. The rules should be reviewed with team mates that understand the block functionality. The environments should also be reviewed by the block designers. It is very important to
go over environment restrictions with the designers. Specifically restrictions that were added in
order to avoid state explosion. The designers may challenge the assumptions taken and may
request more effort in verifying the restricted areas.
It is also useful hold these reviews in order to describe the areas not covered by
formal verification to the other team-mates. A review can guide the simulation
team to stress those areas with simulation tests.
IBM Haifa Research Laboratory, Israel
Provided by special agreement with IBM
APPENDIX Q
Size problems and solutions
Size is one of the major obstacles to using formal verification for any design. RuleBase is limited to designs
having several hundred state variables (flip-flops) after reduction, or several thousand before reduction. The number of state variables is a rough estimate of design complexity; the size limit depends the complexity of the logic
as well as the number of memory elements. This chapter discusses techniques that can be used to push the size
limit as far as possible for your design.
12.5 Design Partitioning
The simplest method to overcome size problems is design partitioning. Thus, instead of trying
to verify the entire design at once, you may verify it unit-by-unit. See also Section 11.2,
Design Partitioning in CHAPTER 11: Design for Formal Verification. The partitioning methodology is as follows:
• Split the design into partitions of manageable size, whose interfaces are well
defined and easy to model.
• When verifying a partition, replace its neighbors by abstract models. These
models should represent only the interfaces with the verified partition, hiding unnecessary details.
• Verify the correct behavior of the abstract models of the neighbors by writing specific rules for this purpose.
While partitioning can be quite effective, there are obviously properties that
can be verified only when the entire design is considered. Partitioning also
requires extra effort in studying internal interfaces and writing models for
neighboring blocks.
RuleBase: a Formal Verification Tool
Provided by special agreement with IBM
188
IBM Haifa Research Laboratory, Israel
Provided by special agreement with IBM
215
Symbols
$RBROOT 25
%for 58
%if 60
.cshrc 25
A
ABF 106
ABG 106
abstraction 84, 142, 143
AF 97, 106
restricted 112
AG 95, 106
AG boolean 147
and between sequences 115
arrays 61
array operations 62
boolean vectors 61
concatenation 64
defining 61
nondets() 65
ones() 65
rep() 65
zeroes() 65
assign 52
assign and define, differences between 53
assume 72, 74
asynchronous logic 181
AU 103, 107
automatic elimination of logic 142
AW 107
AX 101, 106
B
batch runs 165, 194, 195
BDD ordering 144
bdd re-ordering, dynamic 144
before 108
before! 108
before!_ 108
before_ 108
binary decision diagram 144
boolean vectors 61
built-in functions and macros 51
bvtoi() 64
C
case expression 49
case statement 69
RuleBase: a Formal Verification Tool
Provided by special agreement with IBM
216
clocking schemes 180
clocks 87
clocks, multiple 180
CLSI 34
comments 57
concatenation 64
concatenation on the left-hand-side 65
constants 47
enumerated 47
control logic 179
counter-example 7, 45
coverage 7, 183
CTL 91, 93
D
danger of fairness 86
datapath logic 179
define 53
design for formal verification 179
design partitionin 141, 187
don’t care 81
DP12 198
DSL 26, 40
dynamic bdd re-ordering 144
E
EDL (Environment Description Language) 13, 45, 135
EF 97, 100
EG 95, 96
enumerated constants 47
environment 8, 45
Environment constraints 72
environments, multiple 136
envs 26, 27, 134
EU 103, 104
EX 101, 102
exhaustive simulation 7, 80
expressions 47
F
fairness 56, 80, 84
advanced fairness types 85
is dangerous 86
fairness, dangers of 86
false negative 45
false negatives 13
false positive 19
fell() 51
filtering out paths 84, 86
IBM Haifa Research Laboratory, Israel
Provided by special agreement with IBM
217
forall 121
formal verification 7
formula 134
formula examples 127
formulas 134
free variable 28, 81
G
goto 114
H
Hint 77
HIS 34
holds_until 114
holds_until_ 114
I
if expression 49
if statement 70
in 51
include 27
inherit 135
init 52
instance 54, 56
invar 72
itobv() 64
K
koala 43
L
light proof 171, 200
limiting non-determinism 80
linking environment to design 46, 79
logic verification 7
longest trace 159
M
macros 57
max formula 120
memory 147
min formula 120
mode 134
module 54
multiple clocks 88
Multiple traces 160
RuleBase: a Formal Verification Tool
Provided by special agreement with IBM
218
N
AX 106
next 52, 109, 110
next_event 109
next_event! 109
non-determinism 14, 50, 80
non-determinism, limiting 80
non-deterministic choice 82
non-deterministic enumerated constants 82
nondets() 65
O
of 8
ones() 65
operator precedence and associativity 49
operator, strong 107
operators 48
arithmetic 48
boolean 48
case expression 49
if expression 49
non-deterministic choice 50
relational 48
or between sequences 115
ordering, bdd 144
overreduction 143
override 79
overriding design behavior 79
overriding initial values 80
P
partitioning, behavioral 142
partitioning, design 141, 179, 187
partitioning, rule 142
preprocessing 57
process 67
assign statement 69
case statement 69
example 70
if statement 70
var statement 68
Prolong trace 160
R
reduction 31, 141, 143, 187
reduction analyzer 156
redundant logic 142
regular expression 113
re-ordering, bdd 144
IBM Haifa Research Laboratory, Israel
Provided by special agreement with IBM
219
rep() 65
reserved words 60
reset 89
Restrict 76
rose() 51
rule 134
rule partitioning 142
rulebase.setup 26
rules 26, 27, 29
run 26, 30
S
Safety OnTheFly 145
satellite 124
Scope 150
scope 150
scope rules 57
Sequence 113
sequence 113
sequence imlpies sequence 117
sequential processes 67
simulation 7, 183
size limit 141, 187
size problem 8
size problems 141, 187
SMV 45, 54
state variable 51
statements 47
static analysis 142
strong operator 104, 105, 107, 108, 109, 110, 111, 112, 113
Sugar 91, 105
symbolic model checking 7
Synopsys 37, 39
synthesis paths 26
T
temporal operators 94
test vector 7
test_pins 134
The 111
translation paths 26, 34
tri-state buffers 181
tutorial 11
U
uninteresting paths, filtering 80
until 107, 108
until! 107
until!_ 108
RuleBase: a Formal Verification Tool
Provided by special agreement with IBM
220
until_ 108
V
vacuity 154
vacuous pass 19
var 51
variables 47
verification 7
Verilog 26, 36, 39, 43
VHDL 26, 34, 37, 39
W
waveform display 150
weak operator 105, 107, 108, 109, 110, 111, 113
whilenot 111, 112, 113
whilenot! 113
within 111, 112
within! 112
witness 19, 155
X
X value 81
Z
zeroes() 65
IBM Haifa Research Laboratory, Israel
Provided by special agreement with IBM