1
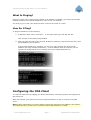
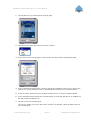
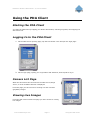
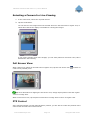
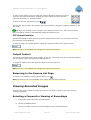
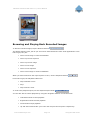
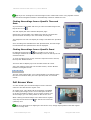
milestone XProtect PDA Client 1.0 User’s Manual Milestone XProtect PDA Client 1.0; User’s Manual Target Audience for this Document This document is aimed at users of the Milestone XProtect PDA Client application. This document provides users with detailed descriptions of PDA Client features. It furthermore provides a number of targeted “how-to” examples, guiding users through completing common tasks, including installation. Surveillance system administrators requiring information about how to install and configure the PDA Server on the surveillance system should refer to the administrator’s manual for their surveillance system. www.milestonesys.com Target Audience for this Document Milestone XProtect PDA Client 1.0; User’s Manual Copyright, Trademarks and Important Information Copyright © 2007 Milestone Systems A/S. Trademarks XProtect is a registered trademark of Milestone Systems A/S. Microsoft and Windows are registered trademarks of Microsoft Corporation. All other trademarks mentioned in this document are trademarks of their respective owners. Disclaimer This document is intended for general information purposes only, and due care has been taken in its preparation. Any risk arising from the use of this information rests with the recipient, and nothing herein should be construed as constituting any kind of warranty. Milestone Systems A/S reserve the right to make adjustments without prior notification. All names of people and organizations used in this document’s examples are fictitious. Any resemblance to any actual organization or person, living or dead, is purely coincidental and unintended. www.milestonesys.com Copyright, Trademarks and … Milestone XProtect PDA Client 1.0; User’s Manual Contents INTRODUCTION.......................................................... 5 System Requirements ........................................................................... 5 INSTALLATION & CONFIGURATION............................ 6 Installing the PDA Client....................................................................... 6 Checking the Wireless Connection ........................................................ 6 What Is Pinging?.................................................................................. 7 How Do I Ping?.................................................................................... 7 Configuring the PDA Client ................................................................... 7 USING THE PDA CLIENT ............................................. 9 Starting the PDA Client ......................................................................... 9 Logging In to the PDA Client................................................................. 9 Camera List Page .................................................................................. 9 Viewing Live Images ............................................................................ 9 Selecting a Camera for Live Viewing......................................................10 Full Screen View .................................................................................10 PTZ Control........................................................................................10 PTZ Preset Positions ........................................................................11 Output Control ...................................................................................11 Returning to the Camera List Page ........................................................11 Viewing Recorded Images .................................................................. 11 Selecting a Camera for Viewing of Recordings ........................................11 Browsing and Playing Back Recorded Images .........................................12 Finding Recordings from a Specific Time and Date ..............................13 Finding Recordings from a Specific Event ...........................................13 Full Screen View .................................................................................13 Returning to the Camera List Page ........................................................14 Logging Out of the PDA Client............................................................. 14 www.milestonesys.com Page 4 Contents Milestone XProtect PDA Client 1.0; User’s Manual Introduction Together, the PDA Client and PDA Server applications enable remote access to the Milestone XProtect surveillance system via a PDA (Personal Digital Assistant; a handheld computer device) with a wireless connection. The PDA Server is installed on the surveillance system by the surveillance system administrator. The PDA Client is used for viewing live and recorded images from the Milestone XProtect surveillance system on the PDA. Example: Viewing of live video in the PDA Client. System Requirements Operating System Microsoft® Windows® Pocket PC 2003/2003 SE/Mobile 5.0. CPU Intel® StrongARM® or 100% compatible. RAM Minimum 32 MB. Network Ethernet, 256 Kbit or higher recommended. Graphics Card Minimum 320×200, 16 bit colors. www.milestonesys.com Page 5 Introduction Milestone XProtect PDA Client 1.0; User’s Manual Installation & Configuration The PDA Client is installed on the PDA itself by using a PC with the Microsoft ActiveSync synchronization program: First you install the PDA Client on the PC, then you use ActiveSync to transfer the PDA Client from the PC to the PDA. Tip: If ActiveSync is not installed on the PC, you can download the latest version from http://www.microsoft.com/downloads/. Installing the PDA Client Note: Before using the following procedure, connect the PDA to the PC, install the ActiveSync program on the PC, and set up synchronization with the PDA. 1. On the PC, insert the Milestone XProtect software CD, wait for a short while, select required language, then click the Install Milestone XProtect PDA Client link. Alternatively, if you are installing a version downloaded from the internet, run the PDA Client installation file Setup.exe from the location you have saved it to. Tip: Depending on your security settings, you may receive one or more security warnings (Do you want to run or save this file?, Do you want to run this software?). When this is the case, click the Run button. 2. Read and accept the license agreement. 3. Select the folder in which to install the PDA Client software on the PC. 4. Click Next twice to begin the installation process. 5. When installation is complete, click the Close button. After installing the PDA Client on the PC, the ActiveSync program will display the Add/Remove Programs dialog, which lets you transfer and install the PDA Client on the PDA: 6. Click Yes to install the PDA Client in the default location on the PDA. Checking the Wireless Connection Before using the PDA Client, verify that the wireless connection to the PDA is configured and working correctly. You can quickly check the wireless connection by pinging the IP address of the PDA from a command prompt on the server on which the PDA Server is installed. www.milestonesys.com Page 6 Installation & Configuration Milestone XProtect PDA Client 1.0; User’s Manual What Is Pinging? Pinging is a quick way of determining whether an IP address is available; you simply send a small amount of data to the required IP address in order to see if it responds. The word ping, it is said, was chosen because it mirrors the sound of a sonar. How Do I Ping? To ping an IP address, do the following: 1. In Windows’ Start menu, select Run.... In the Open field, type cmd and click OK. This will open a command prompt window. 2. Now type ping followed by the required IP address (example: ping 123.123.123.123), then press ENTER on your keyboard. If the pinged IP address is available, you will see a reply message and some simple statistics (see ping example illustration 1); if the IP address does not respond, you will typically see a Request timed out message (see ping example illustration 2). Example 1: Successful pinging; pinged IP address replies Example 2: Unsuccessful pinging; ping request times out Configuring the PDA Client You start the PDA Client by tapping your PDA’s Start button, selecting Programs, then tapping the PDA Client icon. When first started, your PDA Client must be configured before it is able to connect to the PDA Server. Note: During configuration you will be asked to specify the PDA Server’s IP address, port number and virtual directory. Consult your surveillance system administrator if in doubt. www.milestonesys.com Page 7 Installation & Configuration Milestone XProtect PDA Client 1.0; User’s Manual 1. Tap anywhere on your PDA Client’s opening page: 2. Hold down the pointer pen until the a menu is shown: 3. In the menu, select Configuration. This will open the PDA Client’s configuration page: 4. In the configuration page’s Host / IP field, specify the IP address of the server running the PDA Server. In the example in step 3, the IP address of the server is 192.168.128.10. 5. In the Port field, specify the port on which the PDA Server is running. Default is 8080. 6. In the Application field, specify the virtual directory in which the PDA Server is installed (on the IIS). Default is PDAServer/. 7. Tap OK to store the configuration. You are now ready to use your PDA Client; see the next chapter, Using the PDA Client, for more information. www.milestonesys.com Page 8 Installation & Configuration Milestone XProtect PDA Client 1.0; User’s Manual Using the PDA Client Starting the PDA Client You start the PDA Client by tapping your PDA’s Start button, selecting Programs, then tapping the PDA Client icon. Logging In to the PDA Client 1. On the PDA Client’s opening page, tap the LOG IN link. This will open the login page: 2. On the login page, specify your Login Name and Password, then tap OK to log in. Camera List Page When the PDA Client has connected to the PDA Server/Image Server, a list of available cameras is displayed: From this page you have access to viewing live and recorded (playback) images. Viewing Live Images From the PDA Client’s camera list page you have access to viewing live images. www.milestonesys.com Page 9 Using the PDA Client Milestone XProtect PDA Client 1.0; User’s Manual Selecting a Camera for Live Viewing 1. In the camera list, select the required camera. 2. Tap the LIVE button. You will now see live images from the selected camera in the PDA Client’s regular view, in which about half of the display is available for viewing the images: If you require a better view of the images, you can easily switch to full screen view; this is described in the following. Full Screen View When viewing live images in the PDA Client’s regular view, tap the Full Screen icon a full screen (rotated) view: to switch to Tip: As an alternative to tapping the Full Screen icon, simply tap anywhere inside the regular view’s live image area. When in full screen view, tap anywhere inside the live image area to return to regular view. PTZ Control If the selected camera is a PTZ (Pan/Tilt/Zoom) camera, you are able to control the position of the camera with the PDA Client’s PTZ controls. www.milestonesys.com Page 10 Using the PDA Client Milestone XProtect PDA Client 1.0; User’s Manual To move a PTZ camera, tap one of the PTZ control’s direction arrows to move the camera in the required direction. Tapping the center button will move the PTZ camera to its home (i.e. default) position. To zoom in and out, tap the Zoom icons . You are also able to control the position of the PTZ camera by using the navigation buttons on the PDA itself. Tip: If you are viewing the live images in the rotated full screen view, PTZ control with the PDA’s navigation buttons is automatically rotated to match the view. PTZ Preset Positions If PTZ preset positions have been set up for the selected PTZ camera, you are able to move the PTZ camera to preset positions. To move a camera to a preset position, select the required position in the Sel preset list: Note: The list is not available when images are viewed in full screen. Output Control If manually controlled output (such as lights, sirens, etc.) has been set up for the selected camera, you are able to trigger the output from the PDA Client. To trigger an output, select the required output in the Sel output list: Note: The list is not available when images are viewed in full screen. Returning to the Camera List Page To return to the camera list page, tap the Return icon . Note: The Return icon is not available when images are viewed in full screen. Viewing Recorded Images From the PDA Client’s camera list page (see Camera List Page on page 9) you have access to viewing live images. Selecting a Camera for Viewing of Recordings 1. In the camera list, select the required camera. 2. Tap the PLAYBACK button. You are now able to browse recorded images from the selected camera: www.milestonesys.com Page 11 Using the PDA Client Milestone XProtect PDA Client 1.0; User’s Manual Browsing and Playing Back Recorded Images To browse recorded images, tap the Browse buttons: The Browse buttons work just as you are used to from Milestone’s other client applications. From left to right, they are: Move to first image in camera’s database Move to previous sequence Move to previous image Move to next image Move to next sequence Move to last image in camera’s database. When you have browsed to the required point in time, use the Playback buttons: From left to right, the Playback buttons are: Play backward in time Stop Play forward in time. To control the playback speed, use the Playback Speed slider: You are also able to control playback by using the navigation buttons on the PDA itself: Left button starts reverse playback Right button starts forward playback Center button stops playback Up and down buttons take you to the next and previous sequence respectively. www.milestonesys.com Page 12 Using the PDA Client Milestone XProtect PDA Client 1.0; User’s Manual Tip: If you are viewing the recorded images in the rotated full screen view, playback control with the PDA’s navigation buttons is automatically rotated to match the view. Finding Recordings from a Specific Time and Date If you know the exact data and time you want recorded images from, tap the Go to icon . This will display the Goto selected data/time page: Specify the required date in the Date field, and the required time (hours-minutes-seconds) in the Time fields, then tap OK. The playback view will now display an image recorded at the specified time. If no recordings are available from the specified time, the last image recorded before the specified time will be displayed. Finding Recordings from a Specific Event By tapping the Alarms icon , you are able to view a list of recordings of detected events (occasionally known as alarms) for the selected camera: To view recordings of an event, select the required event in the list, then tap the SELECT button. The list is able to display up to 16 recorded events at a time. If the list contains more than 16 recorded events, use the Browse buttons to navigate the list: The two outer buttons take you to the first/last 16 recorded events; the two inner buttons take you to the previous/next 16 recorded events. Full Screen View You will normally see recorded images from the selected camera in the PDA Client’s regular view. In regular view, only about half of the display is available for viewing the images, as the rest of the space is taken up by the navigation controls. If you require a better view of the images, you can easily switch to full screen view. When viewing recorded images in the PDA Client’s regular view, tap the Full Screen icon (rotated) view. to switch to a full screen Tip: As an alternative to tapping the Full Screen icon, simply tap anywhere inside the regular view’s live image area. www.milestonesys.com Page 13 Using the PDA Client Milestone XProtect PDA Client 1.0; User’s Manual When in full screen view, tap anywhere inside the live image area to return to regular view. Returning to the Camera List Page To return to the camera list page, tap the Return icon using regular view. . The Return icon is only available when Logging Out of the PDA Client Before closing your PDA, you must log out of the PDA Client. You log out by tapping the Logout icon on the camera list page. www.milestonesys.com Page 14 Using the PDA Client Milestone XProtect PDA Client 1.0; User’s Manual www.milestonesys.com [email protected] Milestone Systems A/S Banemarksvej 50 G, DK-2605 Brondby, Copenhagen, Denmark Tel.: +45 88 300 300 Fax: +45 88 300 301 Milestone Systems Inc. 12725 SW Millikan Way, Suite 300 Beaverton, Oregon 97005, USA Tel.: +1 503 906 7910 Fax: +1 503 961 0221 Milestone Systems UK Ltd. 118 Codnor Gate, Ripley Derbyshire DE5 9QW, England Tel.: +44 (0)1773 570 709 Milestone Italia Srl. Via Giovanni da Udine, 34 Palazzo E, Piano 2 20156 Milano, Italy Tel.: +39 02 3809 3206 Fax: +39 02 3809 3305 Milestone Systems Japan 29-6, Sarugaku-cho, Shibuya-ku, Tokyo 150-0033, Japan Tel.: +81 (0)3 3780 8749 Fax: +81 (0)3 3476 4234 Milestone Systems Pte Ltd. 30 Robinson Road 13-03 Robinson Towers Singapore 048456 Tel.: +65 6225 2686 Fax: +65 6225 1798 PDAC10-um-4-160507 www.milestonesys.com Page 15 Milestone Office Locations