1
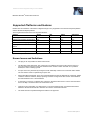
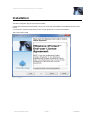
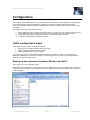
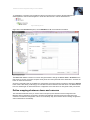
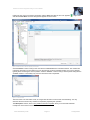
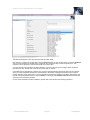
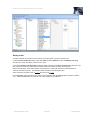
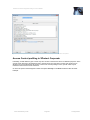
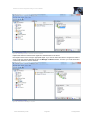
Milestone Paxton Integration Component User’s Manual XProtect Paxton Integration Plug-in User's Guide Target Audience for this Document This document is aimed at system administrators and operational users and provides a description of how to ® install, configure and use the Milestone Paxton Integration component for the Milestone XProtect Servers and ® Client products together with the Paxton Net2 Access Control product. www.milestonesys.com Page 2 Target Audience for this Document XProtect Paxton Integration Plug-in User's Guide Contents ................................................................................................................................ 1 Copyright ........................................................................................................................... 4 Trademarks ....................................................................................................................... 4 Disclaimer ......................................................................................................................... 4 GENERAL DESCRIPTION................................................................ 5 Prerequisites ..................................................................................................................... 5 Supported Platforms and features ..................................................................................... 6 Known Issues and limitations............................................................................................ 6 INSTALLATION ................................................................................ 7 LICENSING ....................................................................................... 8 CONFIGURATION ............................................................................ 9 Initial configuration steps ................................................................................................... 9 Setting up the connection between XProtect and Net2 .................................................... 9 Define mappings between doors and cameras .............................................................. 10 Remove mappings between doors and cameras. ..................................................... 12 Mapping of Net2 events to XProtect alarms ................................................................... 12 Configuration on Enterprise, Professional, Express, NVR ............................................ 14 Using Net2 events to control cameras ............................................................................ 14 Create Manual events to be triggered by Net2 events .............................................. 14 Configure the camera to react on the manual event ................................................. 15 Create a mapping of one or more Net2 events to trigger the Manual event ............. 16 Start/Stop recording on Net2 events .......................................................................... 19 Access Control Profiling in Enterprise, Professional, Express, NVR .............................. 21 Configuration on XProtect Corporate .............................................................................. 23 Configure XProtect Corporate Rules to act on Net2 events ........................................... 23 Configure Mapping of Net2 events to User Defined events ...................................... 23 Set up a rule ............................................................................................................... 24 www.milestonesys.com Page 3 XProtect Paxton Integration Plug-in User's Guide Access Control profiling in XProtect Corporate .............................................................. 25 USING THE SMART CLIENT ......................................................... 27 Setting up MAP view .......................................................................................................... 27 Setting up alarm viewing ................................................................................................... 31 INDEX ............................................................................................. 32 COPYRIGHT, TRADEMARKS & DISCLAIMERS Copyright © 2012 Milestone Systems A/S. Trademarks XProtect is a registered trademark of Milestone Systems A/S. Microsoft and Windows are registered trademarks of Microsoft Corporation. All other trademarks mentioned in this document are trademarks of their respective owners. Disclaimer This document is intended for general information purposes only, and due care has been taken in its preparation. Any risk arising from the use of this information rests with the recipient, and nothing herein should be construed as constituting any kind of warranty. Milestone Systems A/S reserve the right to make adjustments without prior notification. All names of people and organizations used in this document's examples are fictitious. Any resemblance to any actual organization or person, living or dead, is purely coincidental and unintended. This product may make use of third party software for which specific terms and conditions may apply. When that is the case, you can find more information in the file 3rd_party_software_terms_and_conditions.txt located in your Milestone surveillance system installation folder. www.milestonesys.com Page 4 General Description XProtect Paxton Integration Plug-in User's Guide General Description ® The Milestone open video management platform XProtect enables you to integrate custom, best-in-class security solutions with your surveillance, such as access control, mobile devices and video analytics. The Milestone Paxton Integration Component is an integration solution that combines Paxton Net2 Access Control monitoring with market-leading XProtect® video management software (VMS). The Milestone Paxton Integration Component integrates directly into the XProtect® Smart Client, the powerful application for viewing and controlling cameras in all XProtect VMS systems. The Milestone Paxton Integration Component allows the user to control access and monitor video surveillance from one unified interface, eliminating the need to run two separate applications. It enables you to open and close doors while simultaneously viewing video footage of the doors. The Milestone Paxton Integration Component also captures critical events from the Paxton Net2 server and registers them as alarms in the XProtect Smart Client. These alarms are automatically linked to relevant video footage from corresponding cameras. Users gain seamless control of cameras in their surveillance system based on Paxton door events, such as starting/stopping recording, changing video frame rate and moving the camera to focus on a door. Streamline your security surveillance by integrating the Milestone Paxton Integration Component into XProtect VMS. The component integration reduces the risk that operators miss important events and enables operators to more quickly investigate, react to and report critical events. A unified client application combining access control and video surveillance is not only more efficient, it also requires less training for new personnel. It enables access control operators to monitor doors and cameras as well as monitor alarm events issued by the Net2 system using only the Milestone Smart Client graphical interface. It is also possible to actively open/close the doors from the MAP interface of the Smart Client. The behavior of cameras may be linked to Paxton events by rules that, for example, start the recording on specific Paxton Events or moves the camera to a preset position. An administrative part plugs into the relevant Milestone software, for example XProtect Corporate Management Client and the Net2 Access Control Units are configured in the map function of the Milestone XProtect Smart Client. The reader of this user’s guide should have good knowledge of Paxton Net2 Access Control software and have good knowledge of the configuration of the target XProtect® server. The guide is divided into the following chapters: Installation – Initial installation of the software Licensing – How to get a license Configuration – Setting up and maintaining the configuration of the server Initial configuration steps – Initial steps to be performed common to all XProtect servers Configuration on XProtect Enterprise, Professional, Express and NVR Configuration on XProtect Corporate Using the Smart Client – How to set up the smart client to use the Milestone Paxton Integration Setting up MAP view – How to setup and use the MAP view Setting up alarm viewing - How to setup the alarm viewing. Prerequisites Paxton Net2 Access Control 4.21 or 4.22 Standard Edition or Professional must be installed on a server. A choice between: ® XProtect Corporate 5.0a (full functionality) ® XProtect Enterprise 8.0c (full functionality) ® XProtect Professional 8.0b (without the MAP functionality) ® XProtect Express 1.0b (without the MAP functionality) ® XProtect NVR 1.0 (without the MAP functionality) www.milestonesys.com Page 5 General Description XProtect Paxton Integration Plug-in User's Guide ® Milestone XProtect Smart Client 6.0d/7.0a Supported Platforms and features Beware that some features of the Paxton Integration Plugin is only supported on the XProtect Corporate platform and the XProtect Enterprise platform. This is a general overview of the most important features. Feature XPCO XPE XPPR XPEX/NVR MAP support Yes Yes No No Explicit Event Mapping Configuration Yes Yes Yes Yes Rule based Event Mapping Yes No No No Mapping Paxton Events to Milestone Alarms Yes Yes Yes Yes Alarm Management *) Yes Yes No No User Access Profiling Yes Yes Yes Yes *) The ability to edit and acknowledge alarms. Known Issues and limitations The plug-in can only handle one Paxton Net2 server. The XProtect Smart Client Map: The context menu for a Net2 Access Control Unit will not remove or grey out lockdown actions if running the standard version of Net2 in which lockdown is not possible. Instead, the action is silently ignored. An open door is only observed by issuing the Smart Client Map context menu command Status Details. The icon doesn’t switch to representing an open door. Smart Client Map functionality: There is an acknowledged issue with the Net2 Server commands, Initiate Lockdown and End Lockdown, always reporting Lockdown Configured as false. Paxton have identified this and will add the fix to a future Release. A new alarm on a door is not always show correctly in the Smart Client 6.0d i.e. with a circle around the door in the Map. The Smart Client 7.0a resolves the issue. Changes to the configuration e.g. added doors or new event mappings may not manifest themselves before the XProtect Event Server is restarted. This is done via the Control Panel. The 64 bit XProtect Corporate Management Client is not supported. www.milestonesys.com Page 6 General Description XProtect Paxton Integration Plug-in User's Guide Installation The Paxton Integration plug-in comes with an installer. Double-click EventLinkForPaxtonInstaller_x86_en-US.msi to start the installation of the Milestone Event Link for Paxton. You first have to read and accept the End User License Agreement to continue the installation. Then click Install to install. Figure 1: Installation www.milestonesys.com Page 7 Installation XProtect Paxton Integration Plug-in User's Guide Licensing A trial period of 30 days will be granted automatically when the software runs for the first time. The 30-day trial period provides time to upgrade the Milestone Software License Code (SLC) to include the MIPPaxtonIntegrationLicense. The status of the license is shown in the overview of the Paxton Integration. Figure 2: License information If license check fails when resources are added, a dialogue will appear with an error message stating that the trial has ended. The background plug-in, reacting to the Map commands and Net2 events will ignore requests after the end of the trial period and log an error message in the XProtect Event Server log. www.milestonesys.com Page 8 Licensing XProtect Paxton Integration Plug-in User's Guide Configuration This chapter provides detailed guidance in the configuration of the Milestone Paxton Integration Component with some additional basic guidance regarding the configuration of the Paxton Net2 and the XProtect servers. However, it is still recommended to obtain a detailed knowhow about the configuration of these products before proceeding. The chapter is divided into the following sections: 1) 2) 3) Initial configuration steps common to all XProtect servers. A guide on how to prepare the Net2 server for this integration and how to establish the connection from the XProtect server to the Net2 server. Configuration steps specific to XProtect Enterprise, Professional, Express and NVR Configuration steps specific to XProtect Corporate Initial configuration steps These initial steps are common to all XProtect servers: 1. 2. 3. Setting up the connection between XProtect and Net2 Define mappings between doors and cameras Mapping of Net2 events to XProtect alarms To perform these steps on the XProtect Enterprise, Professional, Express and NVR, you need to start the Management Application on the server computer. On XProtect Corporate, you need to start the Management Client and connect to the target server. Setting up the connection between XProtect and Net2 The first step is to connect XProtect to Net2. Before starting the configuration of the XProtect server, the “OEM Client” user account needs to be activated and configured on the Net2 server. On the Net2 Access Control application double-click the “OEM Client” account to set the password: Figure 3: Set OEM Client password www.milestonesys.com Page 9 Configuration XProtect Paxton Integration Plug-in User's Guide To establish the connection from the XProtect server to the Net2 server, start the XProtect Management Client/Application and use Site Navigation to locate the “Net2 Servers” node as illustrated here: Figure 4: The plug-in is found by expanding the MIP Plug-ins tree. Right click on the Net2 Servers panel, choose Add New and fill out the relevant information. Figure 5: Define a server The Name field defaults to Paxton but can be changed if needed. Change the Server name or IP address if the Net2 server is running on another computer. Finally enter the correct password for the OEM Client. Click the OK button to create the connection. Once this configuration step is completed, the configuration of the Net2 system is fetched by clicking the Refresh button. After a short delay, it will bring up an overview of the doors defined in the Net2 server. The Refresh button has to be clicked again to refresh the list if the configuration of the Net2 server is changed at a later point in time. Define mappings between doors and cameras The associations between doors (or access control units per se) and cameras must be configured for the Milestone Paxton Integration component to be able to automatically associate events from Net2 doors with cameras in the XProtect configuration. This is not a mandatory step, but it will ease the succeeding configuration and its maintenance considerably. www.milestonesys.com Page 10 Configuration XProtect Paxton Integration Plug-in User's Guide Expand the tree view for the Paxton Integration until the Doors item with the door icon appears ( and select Create New. The Door dialog should appear as shown below: ). Right-click it Figure 6: Define a door to device mapping in Enterprise Click the Camera.. button to bring a tree view with the available Milestone controlled cameras. The cameras are mapped on-demand so a short delay may occur the first time a node is expanded. Select one or more cameras, typically those monitoring the door in question. Click the Camera… button to bring a camera picker dialog with the available cameras. A short delay may occur the first time a node is expanded: Figure 7: Camera Picker The Item Picker is in auto-select mode, so a single click will select a camera and close the dialog. You may associate the door with as many cameras as required by repeating this operation. The Microphone.. button, which is only visible to XProtect Corporate, allow you to associate individual microphones in the same manner as with cameras. www.milestonesys.com Page 11 Configuration XProtect Paxton Integration Plug-in User's Guide Remove mappings between doors and cameras. You may remove the mapping between a specific door and camera by selecting the door in the item tree and then click on the camera entry in the Related Devices list. Select the Delete option. In case a door is removed from the Net2 configuration, you should also remove the whole door<->camera mapping from the XProtect configuration. Select the door in the item tree, right-click it and select Delete. If the camera is used in one or more event mappings the deletion must be confirmed. Mapping of Net2 events to XProtect alarms Net2 events may be received by the Milestone Paxton Integration Component and mapped to specific alarms in the XProtect Event Server. The alarm will contain the information from the Net2 event together with video footage from the cameras related to the event at and around the time of the event. The camera footage may be viewed by opening the alarm or simply by the mouse cursor hovering above the alarm. To enable the alarm generation, alarm definitions have to be created that will map the Paxton events to XProtect alarms. Locate the Alarm Definitions item in the item tree: Figure 8: Location of the Alarm Definitions item node Right-click the Alarm Definitions item node in the Management Client. Select the Create New option (or Add New in XProtect Corporate) to open the Alarm Definition dialog: Figure 9: Alarm Definition Dialog Open the Triggering Event drop down box and click the event to trigger the alarm: www.milestonesys.com Page 12 Configuration XProtect Paxton Integration Plug-in User's Guide Figure 10: The triggering events drop down list. The Net2 events appear in the drop down box with the “Net2” prefix. Next step is to configure the sources filter. Click the Sources button to open the item picker. Select the All Doors entry to accept events from all Net2 doors or drill down the containment tree to select a specific door. This operation may be repeated to add several specific doors to the filter. You may also add a time profile to the alarm definition, if you only want the event to trigger alarms at specific intervals of the day. Please refer to the XProtect online help for a guide. If the Net2 event is generated by a specific door, then the generated alarms will include clips from the cameras which you have associated with that door (as described in the Define mappings between doors and cameras section) around the time of the event. You may alternatively add specific cameras to the alarm. But beware, that this will overrule the default behavior. Click the Select.. to the right of the Related Cameras field and select the camera(s) to be included in the alarm. For the rest of the fields in the alarm definition, please refer to the XProtect online help for guidance. www.milestonesys.com Page 13 Configuration XProtect Paxton Integration Plug-in User's Guide Configuration on Enterprise, Professional, Express, NVR This section contains a detailed guide on how to configure the Milestone Paxton Integration component installed on either of the XProtect server products Enterprise, Professional, Express or NVR. Go through the “Initial configuration steps” before proceeding with this part of the configuration. This guide is divided into the following tasks: 1) Using Net2 events to control cameras. Enable automatic Camera control, like start/stop recoding or PTZ’ing on Paxton events. 2) Access Control Profiling. To profile the access of different operators to information and control operations. Use the Management Application to perform these tasks. Using Net2 events to control cameras It is possible to configure some special actions to take place in the XProtect server in response to Net2 events. You may for example want to move a PTZ camera to point at a specific door when e.g. a Net2 door opened event is generated. To enable this, you have to go through the following steps: a) b) c) Create Manual events to be triggered by Net2 events Configure cameras to react on the manual events Create a mapping of one or more Net2 events to trigger the Manual event. E.g. to move a camera to a specific preset PTZ position, you first have to define a “Manual Event”. Next, open the “Properties” page of the camera and configure it to move to a specific preset position when this manual event is triggered. Then, finally, create a mapping of the Net2 door opened event to trigger this Manual event. Using motion detection may be enough to ensure that the surveillance system records anything of interest. However, you may want make sure that recording is started when a specific Net2 event is generated. If the scenario is specifically to start recording, it is a bit more complicated. For this, please read the section “Start/Stop recording on Net2 events”. Create Manual events to be triggered by Net2 events To create a manual event, locate the Manual Events item node: Figure 11: The location of the Manual Events node Right-click the node and select Add New Manual Event. To open the Manual Event Properties dialog: www.milestonesys.com Page 14 Configuration XProtect Paxton Integration Plug-in User's Guide Figure 12: The Manual Event Properties dialog Before you continue, you have to decide whether this event is to be placed beneath the Global node or beneath a specific camera. If the event is to be triggered on Net2 events which are not related to a specific camera, then you should place it under the Global node, otherwise place it beneath the specific camera. This is not a mandatory approach, but it will simplify the management of the events in the future. E.g., to create a manual event to move a camera to a predefined PTZ position, select the camera in the dialog and click the Add button. Give it a unique name, e.g. “Door 1 opened”. Click the OK button to register it. Configure the camera to react on the manual event Locate the camera in the Cameras and Storage Information node: Figure 13: The location of the Camera configuration node Double-click it to open the Camera Properties dialog: www.milestonesys.com Page 15 Configuration XProtect Paxton Integration Plug-in User's Guide Figure 14: The Camera Properties dialog Select the option to be automated, e.g. PTZ on event. In this case, the Camera has been configured to go to “Position 1” when the manual event “Door 1 opened” is triggered. Most of the options offer the possibility to be controlled by manual events. In the section “Start/Stop Recording on Net2 events” guides you specifically on how to automate the Recording Properties. Create a mapping of one or more Net2 events to trigger the Manual event The final step is to create a mapping of a Net2 event to trigger the manual event. First, decide whether the manual event should be triggered on Net2 events from any door or only from one or more specific doors. If the manual event is to be triggered on Net2 events from any door, then select the specific server node. Click on the tab sheet Event Mapping to create event mappings. C.f. the figure below. To create a mapping, first click on one or more Net2 events to highlight them, then select a Milestone event. After selecting one or more Net events and a manual event, relations can be added to the event map by using the > button. Already existing mappings can be removed by highlighting the event in the Event map column and clicking the < button. www.milestonesys.com Page 16 Configuration XProtect Paxton Integration Plug-in User's Guide Figure 15: The Event Mapping Dialog If the manual event should only be triggered on Net2 events from a specific door, then select the specific door node below the “Doors” node below the Server node (named “Paxton” in the sample figure above). www.milestonesys.com Page 17 Configuration XProtect Paxton Integration Plug-in User's Guide Figure 16: The Event Mapping Dialog Click on one of the cameras associated with the door and select the Map Events menu option. The event mapping dialog appears, but only with the selected camera. To create a mapping, first click on one or more Net2 events to highlight them, then select a Milestone event. After selecting one or more Net2 events and a manual event, relations can be added to the event map by using the > button. Already existing mappings can be removed by highlighting the event in the Event map column and clicking the < button. More than one Net2 event can be selected by holding CTRL down while clicking the relevant events. Note: If the selection has more Net2 events, the Event map column only shows the common subset of Milestone events. The number of mappings between Net2 events and manual events may become very large. So to simplify the overview, the dialog Show all will show the mappings organized in a tree view based on the Net2 events. For example, try to click on the Show all button to open a tree view of the created mappings: Figure 16: Event map, collapsed www.milestonesys.com Page 18 Configuration XProtect Paxton Integration Plug-in User's Guide The symbol to the left of an event indicates the presence of a mapping between this event and one or more manual events. Click once more Show all button to expand the tree. Note that this window will stay on top. To close the window click on the X in the upper right corner or click on the Hide all button. Start/Stop recording on Net2 events The configuration required to start/stop the recording of a video stream from a specific camera based on Net2 events is a bit more complicated than the PTZ scenario above. First, you have to define a manual event in the same way as described in “Create Manual events to be triggered by Net2 events”. After the event has been created and while the event is still selected in the tree view, right-click the event and select the Properties option to open Event Properties dialog. Click the Add button to add a Timer event beneath the manual event. It should look like this: Figure 17: Manual Event Properties with a Timer Event added Adjust the timer value to the amount of time you want the recording to continue after the event has occurred. Click the OK button to save the new event setting. Locate the camera in the Cameras and Storage Information node: Figure 18: The location of the Camera configuration node Double-click it to open the Camera Properties dialog. Select the start event (e.g. “Door 1 opened”) and the stop event (e.g. “Timer Event 2”). Hit the OK button to complete the configuration www.milestonesys.com Page 19 Configuration XProtect Paxton Integration Plug-in User's Guide www.milestonesys.com Page 20 Configuration XProtect Paxton Integration Plug-in User's Guide Access Control Profiling in Enterprise, Professional, Express, NVR Potentially, several different types of users may have access to the XProtect server for different purposes. Some of these users should only be allowed access to certain resources in the Paxton system and maybe only be allowed to do some limited tasks. By means of the access control profiling function, specific users may be restricted in their access to these resources. To configure the access profiling do the following: In the left panel of the Administrator Application, expand Users and double-click on a specific user to get to the User Properties dialog. In the menu on the left side, click MIP Plug-in Authorization. Locate Paxton Integration and expand the tree below. Figure 19: Authorizing the user to control the server in Enterprise. If users are to be able to configure and use the server, make sure that the Net2 Server has Manage and Read checked. Click Paxton and see that manage and read rights are also checked here. For full access and control every check box must be checked. Next, click on the icon named Door to display the settings common to all doors. www.milestonesys.com Page 21 Configuration XProtect Paxton Integration Plug-in User's Guide Figure 20: Ensuring that the user can both open and close doors in Enterprise. If the user e.g. by default is to be granted access to the operation “Open door” on all doors, then check that option. When finished with this level, hit the OK button to save the settings. If you want to alter the user’s access profile options for one specific door, then open the User Properties dialog again as described above and expand the Paxton tree to select a specific door. Then de-select the option(s) that the user should be denied access to. When finished with this level, hit the OK button to save the settings. www.milestonesys.com Page 22 Configuration XProtect Paxton Integration Plug-in User's Guide Configuration on XProtect Corporate This section contains a detailed guide on how to configure the Milestone Paxton Integration component installed on XProtect Corporate. Go through the “Initial configuration steps” section before proceeding with this part of the configuration. This guide is divided into the following tasks: 1) 2) Configure XProtect Corporate Rules to act on Net2 events Configure Access Control Profiling To perform these tasks, start a Management client and connect it to the target server. Configure XProtect Corporate Rules to act on Net2 events XProtect Corporate offers a more advanced scheme for mapping events to camera operations based on rules. By means of a single generic rule, it is possible to define the appropriate behavior for all the cameras to a specific type of Net2 events. When the Milestone Paxton Integration component maps a Net2 event to a Milestone event, it also includes the cameras related to the source (i.e. the door as set up in “Define mappings between doors and cameras”) as socalled metadata. Milestone therefore recommends that events mapped are associated with rules where the devices are taken from metadata. This is not a requirement though, so a rule can be hardwired to use a specific camera. To setup up a rule based camera control to act on Net2 Events, go through the following steps: 1) 2) Configure Mapping of Net2 events to User Defined events Set up a rule Configure Mapping of Net2 events to User Defined events Take the scenario, that a camera associated with a specific door should be moved to point at the door using a preset PTZ position when the door is opened. First step is to define a user defined event. Select the User-define events option in the tree view: Figure 21: Location of the User-defined Events Right-click the item and select “Add user-defined event”. Select a name for the event, like “Door opened”. To map one or more Net2 events to this User Defined event, locate the Paxton node in the MIP Plugins tree, as indicated below. Click the “Event Mapping” panel to open then event mapping dialog. Select one or more Net2 event (keep the shift key down while doing it) and then select a Milestone event in the “Milestone events” panel. Finally click the ‘>’ button. This will create an entry in the “Event map” panel. Hit the diskette button in the tool bar to save what you have done until now. www.milestonesys.com Page 23 Configuration XProtect Paxton Integration Plug-in User's Guide Figure 22: An example of a Net2 event(s) to Milestone event mapping. Set up a rule To make a camera move when the “Door opened” event is invoked, you have to create a rule. Locate the Rules and Events section, right-click Rules and select Add rule to open the Manage rule dialog. Give the rule a name, like “Move Camera on door open”. In the section Edit the rule description, select the event. This opens the Select an Event dialog. Browse to the end of the list to locate the section with User-defined events and select the event “Door opened”. Back in the rule editor, in the “Select actions to be performed”, check-mark the “Move to default preset on <devices> with PTZ <priority>”. This will add a line in the Edit the rule description, like: “Move immediately to default preset on devices with PTZ priority Priority” Click the devices option and select “Use devices from metadata”. Click the Priority option and select a priority, e.g. 1. Click the Finish button to create the rule, which should now look like this: www.milestonesys.com Page 24 Configuration XProtect Paxton Integration Plug-in User's Guide Figure 23: Xprotect Corporate rule that will move cameras associated with a door to point at the door when it is opened. Access Control profiling in XProtect Corporate Potentially, several different types of users may have access to the XProtect server for different purposes. Some of these users should only be allowed access to certain resources in the Paxton system and maybe only be allowed to do some limited tasks. By means of the access control profiling function, specific users may be restricted in their access to these resources. Go to the left panel in the Management Client and expand Security to see Roles. Select the MIP tab sheet. Example: www.milestonesys.com Page 25 Configuration XProtect Paxton Integration Plug-in User's Guide Figure 24: Authorizing the user to control the server in Corporate Expand Net2 Server and observe that rights have inherited down to the server. Now expand down to Door and give appropriate rights. If you want to make users able to configure and use the server, make sure that the Net2 Server also has Manage and Read checked. To sum it up: For full access and control every check box must be checked. Figure 25: Authorize door handling in Corporate. www.milestonesys.com Page 26 Configuration XProtect Paxton Integration Plug-in User's Guide Using the Smart Client Setting up MAP view This option is not available with XProtect Professional, XProtect Express or XProtect NVR. When using XProtect Corporate and XProtect Enterprise, it is possible configure a Map layout of the installation illustrating the location of doors and cameras on the site with animation of the alarm state of the doors and cameras. It also allows for interactive operation of the doors and cameras. To configure a map layout, start the Smart Client, go to Setup and drag the Map icon onto a view. Select a picture for the Map background. Figure 26: After dragging Map onto a view. www.milestonesys.com Page 27 Using the Smart Client XProtect Paxton Integration Plug-in User's Guide In the Map view, there is a floating toolbar. Click the jigsaw puzzle icon to get the MIP settings. Figure 27: Map options. Figure 28: MIP options Expand Paxton Integration and drag the server icon onto the map at the relevant position. Figure 29: Net2 Server on the map. www.milestonesys.com Page 28 Using the Smart Client XProtect Paxton Integration Plug-in User's Guide Right-click the Paxton3 Server and choose, for example, Initiate lockdown. The functionality is to simply mimic the clicking of the Lockdown button in the Net2 UI. Figure 30: Server context menu The server must be configured to allow lockdown or the error Security lockdown not configured will appear in the log. Status Details provides an overview by counting the number of open doors, tripped alarms, etc. Figure 31: Status Details To get doors on the map: www.milestonesys.com Page 29 Using the Smart Client XProtect Paxton Integration Plug-in User's Guide Figure 32: Finally a door to open. Right-click the big door icon and select Open door Figure 33: The door’s context menu. The door will automatically close with a delay which can be configured in the Paxton Net2 software. It is also possible to close the door earlier from the context menu. www.milestonesys.com Page 30 Using the Smart Client XProtect Paxton Integration Plug-in User's Guide Setting up alarm viewing When, for example, a tampering event is received and has a matching alarm definition, an alarm indication is displayed around the door icon and a new alarm appears in the Alarm List. It is possible to add an Alarm Preview to the view and get the signal from the corresponding cameras there. Figure 34: Smart Client Alarms Figure 35: Door has been tampered with. Notice that the door being in alarm state is propagated to the Net2 server and shown as a warning. Two separate actions must be performed to quench both statuses. First, acknowledge the alarm by e.g. right-clicking the alarm in the New section and choose Acknowledge. Secondly, turn off the alarm state in Net2 by either right-clicking the door and choose Silence alarm or right-click the Paxton icon and choose Silence alarms. www.milestonesys.com Page 31 Using the Smart Client XProtect Paxton Integration Plug-in User's Guide Index —A— Access Control profiling On Corporate...................................................................................................................................................... 25 Access Control Profiling On Enterprise, Professional, Express, NVR ....................................................................................................... 21 alarm viewing set up ................................................................................................................................................................. 31 —C— Configuration On Corporate...................................................................................................................................................... 23 connection to Net2 .................................................................................................................................................................. 9 Copyright ................................................................................................................................................................. 3 Create Manual events ...................................................................................................................................... 14, 19 —D— Disclaimer ................................................................................................................................................................ 3 —E— Enterprise Configuration on ................................................................................................................................................. 14 Event Mapping ....................................................................................................................................................... 14 On Enterprise ..................................................................................................................................................... 17 Express Configuration on ................................................................................................................................................. 14 —I— Installation ................................................................................................................................................................ 7 —L— Licensing .................................................................................................................................................................. 8 lockdown ................................................................................................................................................................ 29 —M— MAP Configuration ................................................................................................................................................. 27 MAP view Set up ................................................................................................................................................................. 27 www.milestonesys.com Page 32 Index XProtect Paxton Integration Plug-in User's Guide Mapping of Net2 events to User Defined events .................................................................................................... 23 Mapping of Net2 events to XProtect alarms ........................................................................................................... 12 mappings between doors and cameras ................................................................................................................. 10 Remove .............................................................................................................................................................. 12 —N— Net2 Servers panel ............................................................................................................................................... 10 —O— Open door .............................................................................................................................................................. 30 —P— Prerequisites ............................................................................................................................................................ 5 Professional Configuration on ................................................................................................................................................. 14 —R— Rule based event mapping .................................................................................................................................... 23 Rules and Events ................................................................................................................................................. 24 —S— Security XProtect Coprorate............................................................................................................................................. 25 Setup ....................................................................................................................................................................... 9 Start/Stop recording on Net2 events ...................................................................................................................... 19 Status Details ......................................................................................................................................................... 29 —T— Target Audience....................................................................................................................................................... 2 Trademarks .............................................................................................................................................................. 3 —X— XProtect Corporate .......................................................................................................................................... 23, 27 XProtect Enterprise ................................................................................................................................................ 27 www.milestonesys.com Page 33 Index Milestone Systems offices are located across the world. For details about office addresses, phone and fax numbers, visit www.milestonesys.com.