1
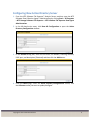
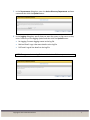
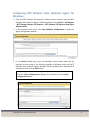
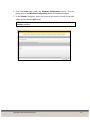
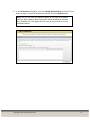
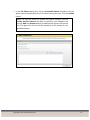
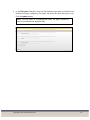
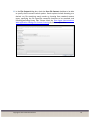
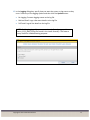
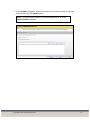
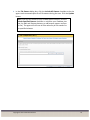
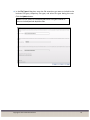
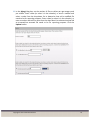
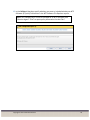
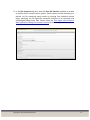
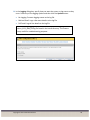
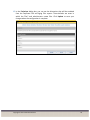
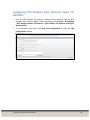
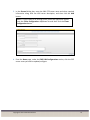
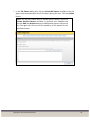
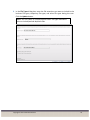
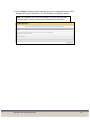
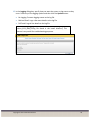
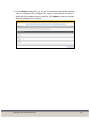
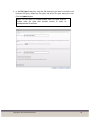
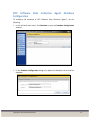
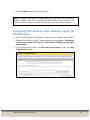
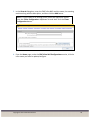
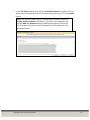
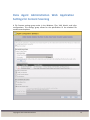
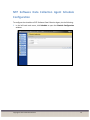
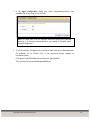
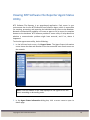
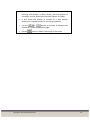
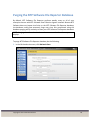
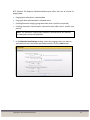
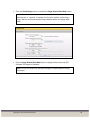
NTP Software File Reporter™ User Manual Version 7.5 - September 2015 This guide details the use of NTP Software File Reporter™. Upon completion of the steps within this document, NTP Software File Reporter will successfully report on your enterprise community. Copyright © 2011-2015 NTP Software 1 Table of Contents Executive Summary............................................................................................................. 3 Installation .......................................................................................................................... 4 In This Guide ....................................................................................................................... 4 NTP Software Data Collection Agent Administration ......................................................... 5 NTP Software Data Collection Agent Configuration ....................................................... 5 Configuring New Active Directory Server ....................................................................... 6 Configuring NTP Software Data Collection Agent for Windows ..................................... 8 Configuring NTP Software Data Collection Agent for NAS, NetApp ............................. 19 Configuring NTP Software Data Collection Agent for NAS EMC ................................... 30 Configuring NTP Software Data Collection Agent for SharePoint ................................ 41 NTP Software Data Collection Agent Database Configuration ..................................... 47 Configuring NTP Software Data Collection Agent for NAS EMC Isilon ......................... 48 Data Agent Administration Web Application Settings for Content Scanning .................. 57 NTP Software Data Collection Agent Schedule Configuration ......................................... 61 Viewing NTP Software File Reporter Agent Status Utility ................................................ 63 Purging the NTP Software File Reporter Database ........................................................... 66 About NTP Software ......................................................................................................... 69 NTP Software Professional Services ................................................................................. 69 Copyright © 2011-2015 NTP Software 2 Executive Summary Thank you for your interest in NTP Software File Reporter™. NTP Software File Reporter is a critical component of an overall file data management (FDM) architecture and is part of the NTP Software integrated suite of products. Together, these products are designed to help organizations control and report on their current and ever-growing Windows® storage infrastructure. NTP Software File Reporter provides a complete view of storage consumption within enterprise organizations. Providing reports on users, files, directories, volumes, sites, mailbox folders, and servers across your entire organization, NTP Software File Reporter is the premiere enterprise reporting application. By using the NTP Software File Reporter drill-down filtering technology, administrators can focus on the most important and growing concerns within their enterprise environments. NTP Software File Reporter reports on enterprise storage resources; for example, some of the built-in reports display data related to the following: End-user storage consumption File type utilization Prediction and trend analysis NTP Software File Reporter is different from all other storage-reporting applications in several important ways. In particular, it has the lowest labor cost, which industry analysts agree represents 75% or more of total cost of ownership (TCO). To assist with lowering costs, NTP Software provides and supports multiple installation methods for NTP Software File Reporter, including Microsoft® SMS installations, MSI installations, and Active Directory group policy object installations. NTP Software File Reporter supports virtually any installation method your organization customarily uses. Copyright © 2011-2015 NTP Software 3 Installation For installation instructions, please refer to the following: Installation Guide – NTP Software File Reporter Analysis Server _4464EF for details about installing NTP Software File Reporter™ Analysis Server. Installation Guide – NTP Software Data Collection Agent for Active Directory_4458EF for details about installing NTP Software Data Collection Agent for Active Directory. Installation Guide – NTP Software Data Collection Agent for Windows_4463EF for details about installing NTP Software Data Collection Agent Windows Version. Installation Guide - NTP Software Data Collection Agent for NAS NetApp®_4461EF for details about installing NTP Software Data Collection Agent for NAS, NetApp Edition. Installation Guide - NTP Software Data Collection Agent for NAS EMC®_4460EF for details about installing NTP Software Data Collection Agent for NAS, EMC Edition. Installation Guide – NTP Software Data Collection Agent for SharePoint Server_4462EF for details about installing NTP Software Data Collection Agent for SharePoint Server. Installation Guide – NTP Software Data Collection Agent for NAS EMC® Isilon_4595EF for details about installing NTP Software Data Collection Agent for NAS, EMC Isilon Edition. This guide covers two main topics: configuring NTP Software Data Collection Agent™ and configuring and managing NTP Software File Reporter. In This Guide The screenshots within the user manual do not necessarily reflect your environment. The screenshots here are meant to reflect all Data Collection Agents supported with NTP Software File Reporter. Copyright © 2011-2015 NTP Software 4 NTP Software Data Collection Agent Administration NTP Software Data Collection Agent™ is a critical component of an overall file data management (FDM) architecture and is part of the NTP Software integrated suite of products. Together, these products are designed to help organizations control and report on their current and ever-growing storage infrastructure. The NTP Software File Reporter supports the following Data Collection Agents: NTP Software Data Collection Agent for NAS, NetApp Edition NTP Software Data Collection Agent for NAS, EMC Edition NTP Software Data Collection Agent Windows Version NTP Software Data Collection Agent for SharePoint Server Edition NTP Software Data Collection Agent for Active Directory Edition NTP Software Data Collection Agent for NAS, EMC Isilon Edition NTP Software Data Collection Agent Configuration Depending on the platform adapted in your environment, you will have to configure one type of NTP Software Data Collection Agent from the list above. Before using NTP Software Data Collection Agent, the new configuration settings must be created for each storage unit (Filer®, VNX, etc.) that the agent will scan. Follow these steps to create a new configuration: Copyright © 2011-2015 NTP Software 5 Configuring New Active Directory Server 1. From the NTP Software File Reporter™ Analysis Server machine, open the NTP Software Data Collection Agent™ Administration by clicking Start > All Programs > NTP Storage Software File Reporter > NTP Software File Reporter Data Agent Administration. 2. In the left-hand main menu, click New AD Configuration to open the Active Directory Configuration window. 3. In the General dialog box, enter the AD server, AD domain, scanning machine, LDAP port, and description (if desired) and then click the Add button. 4. From the Home page, under the Active Directory Configurations section, click the AD server name you want to update/configure. Copyright © 2011-2015 NTP Software 6 5. In the Departments dialog box, enter the Active Directory Department attribute name and then click the Update button. 6. In the Logging dialog box, specify how you want the system to log events as they occur. Select any of the logging options and then click the Update button. No Logging: Prevents logging events to the log file. Minimal Detail: Logs a few event details to the log file. Full Detail: Logs all the details to the log file. NOTE: The agent writes to a log file located in the install directory. Copyright © 2011-2015 NTP Software 7 Configuring NTP Software Data Collection Agent for Windows 1. From the NTP Software File Reporter™ Analysis Server machine, open the NTP Software Data Collection Agent™ Administration by clicking Start > All Programs > NTP Storage Software File Reporter > NTP Software File Reporter Data Agent Administration. 2. In the left-hand main menu, click New Windows Configuration to open the Agent Configuration window. 3. In the General dialog box, enter the Windows Server Name which will be scanned, and the name of the Scanning machine (a Windows server with NTP Software Data Collection Agent, Windows Edition installed) and a description (if desired) and then click the Add button. NOTE: To copy values of an existing profile, select the application profile from the Clone Configuration dropdown list and then click the Clone Configuration button. Copyright © 2011-2015 NTP Software 8 Copyright © 2011-2015 NTP Software 9 4. From the Home page, under the Windows Configurations section, click the group name of the Windows Configuration you want to update/configure. 5. In the Volumes dialog box, select the resources you want to include in the data scan and then click the Add button. NOTE: To include all the volumes in the scanning operation, click the Include all Volumes checkbox. Copyright © 2011-2015 NTP Software 10 6. In the Directories dialog box, click the Include All Directories check box if you want the agent to report all directories scanned. Click the Update button. NOTE: You still can limit the directory depth; in this case, you need to specify a depth value at which directories will be included to minimize your Database size. The agent will still scan all the directories on the specified volumes. Copyright © 2011-2015 NTP Software 11 7. In the File Owners dialog box, click the Include All Owners checkbox to let the agent track consumed space for all file owners during the scan. Click the Update button. NOTE: You still can choose to include only specific owners; click the Include Specified Owners checkbox to minimize your Database size (use the Add and Remove buttons to add/remove owners to/from the list). The agent will still scan all files owned by all file owners for the specified volumes. Copyright © 2011-2015 NTP Software 12 8. In the File Types dialog box, enter the file extensions you want to include in the business file types, temporary file types, and other file types during the scan. Click the Update button. NOTE: You can select to include/exclude other file types entered or select to include/exclude duplicate files. Copyright © 2011-2015 NTP Software 13 9. In the Aging dialog box, set the number of files to collect per age category and per volume. Enter a date (or select it in the calendar), or enter a number and select a value from the drop-down list to determine how old a modified file needs to be for reporting purposes. Enter a date (or select it in the calendar), or enter a number and select a value from the drop-down list to determine how old an accessed/not accessed file needs to be for reporting purposes. Click the Update button. Copyright © 2011-2015 NTP Software 14 10. In the Policies dialog box, specify whether you want to include/exclude your NTP Software QFS® policy information in the NTP Software File Reporter™ reports. NOTE: NTP Software QFS must be installed on an NTP Software Data Collection Agent server to report policy information for that server. Copyright © 2011-2015 NTP Software 15 11. In the File Content dialog box, check the Scan File Content checkbox to be able to specify the file content search options. Search options include browsing to a desired .csv file containing search words or choosing from standard content types; specifying the file types/file names/file locations to be searched; and including/excluding binary files. Please check the Data Agent Administration Web Application Settings for Content Scanning for further explanation. Copyright © 2011-2015 NTP Software 16 12. In the Logging dialog box, specify how you want the system to log events as they occur. Select any of the logging options and then click the Update button. No Logging: Prevents logging events to the log file. Minimal Detail: Logs a few event details to the log file. Full Detail: Logs all the details to the log file. NOTE: Enabling logging will enter events into the DataAgent_<machine name>_YYYY_MM_DD.log file found in the install directory. This feature is very useful for troubleshooting purposes. Copyright © 2011-2015 NTP Software 17 13. In the Exclusions dialog box, you can see the directories that will be excluded from the Duplicate Files and Aging Files reports. These default directories are areas in which the server and administrator create files. Click Update to save your changes when the configuration is complete. Copyright © 2011-2015 NTP Software 18 Configuring NTP Software Data Collection Agent for NAS, NetApp 1. From the NTP Software File Reporter Analysis Server machine, open the NTP Software Data Collection Agent Administration by clicking Start > All Programs > NTP Storage Software File Reporter™ > NTP Software File Reporter Data Agent Administration. 2. In the left-hand main menu, click New Filer Configuration to open the Filer Configuration window. 3. Specify the Filer type: (Cluster-Mode or 7-Mode) 4. Fill the information required. 5. In the General dialog box, enter the Filer name and other information required along with the Filer description (if desired) and then click the Add button. NOTE: To copy values of an existing profile, select the application profile from the Clone Configuration dropdown list and then click the Clone Configuration button. 7-Mode Configuration Copyright © 2011-2015 NTP Software 19 Cluster-Mode Filer configuration: For cluster-mode filers, enter the name of your CIFS server, preferred connector IP address, cluster IP address, user name and password for account on the cluster. The account entered must be a local account on the cluster and has admin role for the ontapi application. Use the following command to create this user: $ security login create -username ntp_user -application ontapi authmethod password -role admin 6. From the Home page, under the Filer Configurations section, click the Filer® name that you want to update/configure. Copyright © 2011-2015 NTP Software 20 7. In the Volumes dialog box, select the resources you want to include in the data scan and then click the Update button. NOTE: To include all the volumes in the scanning operation, click the Scan all Volumes checkbox. Copyright © 2011-2015 NTP Software 21 8. In the Directories dialog box, click the Include All Directories check box if you want the agent to report all directories scanned. Click the Update button. NOTE: You still can limit the directory depth; in this case, you need to specify a depth value at which directories will be included to minimize your Database size. The agent will still scan all directories. Copyright © 2011-2015 NTP Software 22 9. In the File Owners dialog box, click the Include All Owners checkbox to let the agent track consumed space for all file owners during the scan. Click the Update button. NOTE: You still can choose to only include specific owners; click the Include Specified Owners checkbox to minimize your Database size (use the Add and Remove buttons to add/remove owners to/from the list). The agent will still scan all files owned by all file owners for the specified volumes. Copyright © 2011-2015 NTP Software 23 10. In the File Types dialog box, enter the file extensions you want to include in the business file types, temporary file types, and other file types during the scan. Click the Update button. NOTE: You can select to include/exclude other file types entered or select to include/exclude duplicate files. Copyright © 2011-2015 NTP Software 24 11. In the Aging dialog box, set the number of files to collect per age category and per volume. Enter a date (or select it in the calendar), or enter a number and select a value from the drop-down list to determine how old a modified file needs to be for reporting purposes. Enter a date (or select it in the calendar), or enter a number and select a value from the drop-down list to determine how old an accessed/not accessed file needs to be for reporting purposes. Click the Update button. Copyright © 2011-2015 NTP Software 25 12. In the Policies dialog box, specify whether you want to include/exclude your NTP Software QFS policy information in the NTP Software File Reporter reports. NOTE: NTP Software QFS® must be installed on an NTP Software Data Collection Agent™ Filer® to report policy information for that Filer®. Copyright © 2011-2015 NTP Software 26 13. In the File Content dialog box, check the Scan File Content checkbox to be able to specify the file content search options. Search options include browsing to a desired .csv file containing search words or choosing from standard content types; specifying the file types/file names/file locations to be searched; and including/excluding binary files. Please check the Data Agent Administration Web Application Settings for Content Scanning for further explanation. Copyright © 2011-2015 NTP Software 27 14. In the Logging dialog box, specify how you want the system to log events as they occur. Select any of the logging options and then click the Update button. No Logging: Prevents logging events to the log file. Minimal Detail: Logs a few event details to the log file. Full Detail: Logs all the details to the log file. NOTE: Enabling logging will enter events into the DataAgent_<Filer® name>_YYYY_MM_DD.log file found in the install directory. This feature is very useful for troubleshooting purposes. Copyright © 2011-2015 NTP Software 28 15. In the Exclusions dialog box, you can see the directories that will be excluded from the Duplicate Files and Aging Files reports. These defaults are areas in which the Filer® and administrator create files. Click Update to save your changes when the configuration is complete. Copyright © 2011-2015 NTP Software 29 Configuring NTP Software Data Collection Agent for NAS EMC 1. From the NTP Software File Reporter™ Analysis Server machine, open the NTP Software Data Collection Agent™ Administration by clicking Start > All Programs > NTP Storage Software File Reporter > NTP Software File Reporter Data Agent Administration. 2. In the left-hand main menu, click New VNX Configuration to open the VNX Configuration window. Copyright © 2011-2015 NTP Software 30 3. In the General dialog box, enter the VNX CIFS server name and other required information along with the VNX server description, and then click the Add button. NOTE: To copy values of an existing profile, select the application profile from the Clone Configuration dropdown list and then click the Clone Configuration button. 4. From the Home page, under the EMC VNX Configurations section, click the CIFS server name you want to update/configure. Copyright © 2011-2015 NTP Software 31 5. In the Volumes dialog box, select the resources you want to include in the data scan and then click the Update button. NOTE: To include all the volumes in the scanning operation, click the Scan all Volumes checkbox. Copyright © 2011-2015 NTP Software 32 6. In the Directories dialog box, click the Include All Directories check box if you want the agent to report all directories scanned. Click the Update button. NOTE: You still can limit the directory depth for storing in the database; in this case, you need to specify a depth value for directories to minimize your Database size. The agent will still scan all directories. Copyright © 2011-2015 NTP Software 33 7. In the File Owners dialog box, click the Include All Owners checkbox to let the agent track consumed space for all file owners during the scan. Click the Update button. NOTE: You still can choose only to include specific owners; select the Include Specified Owners checkbox to minimize your Database size (use the Add and Remove buttons to add/remove owners to/from the list). The agent will still scan all files owned by all file owners for the specified volumes. Copyright © 2011-2015 NTP Software 34 8. In the File Types dialog box, enter the file extensions you want to include in the business file types, temporary file types, and other file types during the scan. Click the Update button. NOTE: You can select to include/exclude other file types entered or select to include/exclude duplicate files. Copyright © 2011-2015 NTP Software 35 9. In the Aging dialog box, set the number of files to collect per age category and per volume. Enter a date (or select it in the calendar), or enter a number and select a value from the drop-down list to determine how old a modified file needs to be for reporting purposes. Enter a date (or select it in the calendar), or enter a number and select a value from the drop-down list to determine how old an accessed/not accessed file needs to be for reporting purposes. Click the Update button. Copyright © 2011-2015 NTP Software 36 10. In the Policies dialog box, specify whether you want to include/exclude your NTP Software QFS policy information in the NTP Software File Reporter reports. NOTE: NTP Software QFS must be installed on an NTP Software Data Collection Agent server to report policy information for that server. Copyright © 2011-2015 NTP Software 37 11. In the File Content dialog box, check the Scan File Content checkbox to be able to specify the file content search options. Search options include browsing to a desired .csv file containing search words or choosing from standard content types; specifying the file types/file names/file locations to be searched; and including/excluding binary files. Please check the Data Agent Administration Web Application Settings for Content Scanning for further explanation. Copyright © 2011-2015 NTP Software 38 12. In the Logging dialog box, specify how you want the system to log events as they occur. Select any of the logging options and then click the Update button. No Logging: Prevents logging events to the log file. Minimal Detail: Logs a few event details to the log file. Full Detail: Logs all the details to the log file. NOTE: Enabling logging will enter events into the DataAgent_<VNX name>_YYYY_MM_DD.log file found in the install directory. This feature is very useful for troubleshooting purposes. Copyright © 2011-2015 NTP Software 39 13. In the Exclusions dialog box, you can see the directories that will be excluded from the Duplicate Files and Aging Files reports. These defaults are areas in which the VNX and administrator create files. Click Update to save your changes when the configuration is complete. Copyright © 2011-2015 NTP Software 40 Configuring NTP Software Data Collection Agent for SharePoint 1. From the NTP Software File Reporter Analysis Server machine, open the NTP Software Data Collection Agent Administration by clicking Start > All Programs > NTP Storage Software File Reporter > NTP Software File Reporter Data Agent Administration. 2. In the left-hand main menu, click New SharePoint Configuration to open the SharePoint Configuration window. 3. In the General dialog box, enter the SharePoint server name and server description (if desired) and then click the Add button. 4. From the Home page, under the SharePoint Configurations section, click the server name you want to update/configure. Copyright © 2011-2015 NTP Software 41 5. In the SharePoint Root Web Sites dialog box, select the web sites you want to include in the data scan and then click the Update button. NOTE: To include all the root websites in the scanning operation, click the Include all Root Web Sites checkbox. 6. In the Lists dialog box, click the Include All Lists and Documents checkbox if you want the agent to report all folders scanned. Click the Update button. NOTE: You still can limit the lists and documents depth; in this case, you need to specify a depth value at which lists and documents will be included to minimize your Database size. The agent will still scan all lists and documents for the specified web sites. Copyright © 2011-2015 NTP Software 42 7. In the File Authors dialog box, click the Include All Authors checkbox to let the agent track consumed space for all file authors during the scan. Click the Update button. NOTE: You still can choose to only include specific authors; click the Include Specified Authors checkbox to minimize your database size (use the Add and Remove buttons to add/remove owners to/from the list). The agent will still scan all files owned by all file authors on the specified web sites. Copyright © 2011-2015 NTP Software 43 8. In the File Types dialog box, enter the file extensions you want to include in the business file types, temporary file types, and other file types during the scan. Click the Update button. NOTE: You can select to include/exclude other file types entered, exclude other file types with blocked content or select to include/exclude file versions. Copyright © 2011-2015 NTP Software 44 9. In the Aging dialog box, set the number of files to collect per root web site. Enter a date (or select it in the calendar), or enter a number and select a value from the drop-down list to determine how old a modified file needs to be for reporting purposes. Click the Update button. Copyright © 2011-2015 NTP Software 45 10. In the Logging dialog box, specify how you want the system to log events as they occur. Select any of the logging options and then click the Update button. No Logging: Prevents logging events to the log file. Minimal Detail: Logs a few event details to the log file. Full Detail: Logs all the details to the log file. NOTE: Enabling logging will enter events into the DataAgent_<server name>_YYYY_MM_DD.log file found in the install directory. This feature is very useful for troubleshooting purposes. Copyright © 2011-2015 NTP Software 46 NTP Software Configuration Data Collection Agent Database To configure the database of NTP Software Data Collection Agent™, do the following: 1. In the left-hand main menu, click Database to open the Database Configuration window. 2. In the Database Configuration dialog box, update the database server and the database. Copyright © 2011-2015 NTP Software 47 3. Click the Update button to save your changes. NOTE: To change a File Reporter’s Report Web Site to get data from the specified database, please make sure to change the ODBC System DSN located on the reports server. The name of the DSN can be found in the reports Web.Config file. Configuring NTP Software Data Collection Agent for NAS EMC Isilon 1. From the NTP Software File Reporter™ Analysis Server machine, open the NTP Software Data Collection Agent™ Administration by clicking Start > All Programs > NTP Storage Software File Reporter > NTP Software File Reporter Data Agent Administration. 2. In the left-hand main menu, click New Isilon Configuration to open the Isilon Configuration window. Copyright © 2011-2015 NTP Software 48 3. In the General dialog box, enter the EMC Isilon NAS machine name, the scanning machine along with the description, and then click the Add button. NOTE: To copy values of an existing profile, select the application profile from the Clone Configuration dropdown list and then click the Clone Configuration button. 4. From the Home page, under the EMC Isilon NAS Configurations section, click the Isilon name you want to update/configure. Copyright © 2011-2015 NTP Software 49 5. In the Volumes dialog box, enter the root share and then click the Update button. 6. In the Directories dialog box, click the Include All Directories check box if you want the agent to report all directories scanned. Click the Update button. NOTE: You still can limit the directory depth for storing in the database; in this case, you need to specify a depth value for directories to minimize your Database size. The agent will still scan all directories. Copyright © 2011-2015 NTP Software 50 7. In the File Owners dialog box, click the Include All Owners checkbox to let the agent track consumed space for all file owners during the scan. Click the Update button. NOTE: You still can choose only to include specific owners; select the Include Specified Owners checkbox to minimize your Database size (use the Add and Remove buttons to add/remove owners to/from the list). The agent will still scan all files owned by all file owners for the specified volumes. Copyright © 2011-2015 NTP Software 51 8. In the File Types dialog box, enter the file extensions you want to include in the business file types, temporary file types, and other file types during the scan. Click the Update button. NOTE: You can select to include/exclude other file types entered or select to include/exclude duplicate files. Copyright © 2011-2015 NTP Software 52 9. In the Aging dialog box, set the number of files to collect per age category and per volume. Enter a date (or select it in the calendar), or enter a number and select a value from the drop-down list to determine how old a modified file needs to be for reporting purposes. Enter a date (or select it in the calendar), or enter a number and select a value from the drop-down list to determine how old an accessed/not accessed file needs to be for reporting purposes. Click the Update button. Copyright © 2011-2015 NTP Software 53 10. In the Policies dialog box, specify whether you want to include/exclude your NTP Software QFS policy information in the NTP Software File Reporter reports. NOTE: NTP Software QFS must be installed on an NTP Software Data Collection Agent server to report policy information for that server. 11. In the File Content dialog box, check the Scan File Content checkbox to be able to specify the file content search options. Search options include browsing to a desired .csv file containing search words or choosing from standard content types; specifying the file types/file names/file locations to be searched; and including/excluding binary files. Please check the Data Agent Administration Web Application Settings for Content Scanning for further explanation. Copyright © 2011-2015 NTP Software 54 12. In the Logging dialog box, specify how you want the system to log events as they occur. Select any of the logging options and then click the Update button. No Logging: Prevents logging events to the log file. Minimal Detail: Logs a few event details to the log file. Full Detail: Logs all the details to the log file. NOTE: Enabling logging will enter events into the DataAgent_<Isilon name>_YYYY_MM_DD.log file found in the install directory. This feature is very useful for troubleshooting purposes. Copyright © 2011-2015 NTP Software 55 13. In the Exclusions dialog box, you can see the directories that will be excluded from the Duplicate Files and Aging Files reports. These defaults are areas in which the Isilon and administrator create files. Click Update to save your changes when the configuration is complete. Copyright © 2011-2015 NTP Software 56 Data Agent Administration Web Application Settings for Content Scanning A File Content settings group exists in the Windows, Filer, VNX, Hitachi, and Isilon configurations. This settings group allows for the specification of the standard file content search options. Copyright © 2011-2015 NTP Software 57 In the File Content Search Types pane, the content types that will be searched for are specified. The standard content types available are: Credit Card Number Social Security Number Email Address Custom content types can also be specified by importing a .csv file of search phrases. These custom search phrases may be a single word or multiple words separated by commas. Each phrase must match all the words specified in the phrase in order to generate a hit or occurrence (content type occurrences are reported in the File Reporter reports). If any phrase in a content type is matched, then a hit or occurrence is generated and reported in the File Reporter reports for that content type. The search that results from the .csv file is equivalent to a Boolean “or” search of all the phrases that are specified. In the File Content Indexing options pane, the types of files that will be indexed and subsequently scanned for content types are specified. Binary files may either be included or excluded from indexing. Binary files are files that are not recognized as documents. Examples of binary files include executables and file fragments or blocks of data that have been recovered or obtained by applications. If binary files are included in indexing, text will be extracted from the unrecognized files using an algorithm that scans for sequences of single byte, UTF-8, and Unicode text. Indexing binary files is recommended for use with forensic data. In addition, the option exists to index all files on the system (“Index All Available Files”) or, alternatively, to specify include and exclude filters. Include and exclude filters can be specified as a comma-separated list of file and folder filters for example: *.doc*, *.xml, myfile.txt, *\FolderName\*. A file will be indexed if it matches one of the “Include Filters” and does not match any of the “Exclude Filters.” A filter without a slash character will be matched against the file name only when the files are indexed, whereas a filter that contains a slash will be matched against the entire file path. Certain files types that are recognized as container files will automatically be treated as multiple documents, where each document within the container file is indexed and scanned for content types. Each container file that contains files with content hits will be reported in the File Reporter reports, along with information about the individual files within the container. The file types that are treated as container files are: .zip, .dbf, .csv, Microsoft Access (.mdb and .accdb), .mbox, Outlook Express (.dbx), and Outlook (.pst). Offline files are automatically skipped and will not be indexed, as they would need to be recalled to the system being scanned in order to retrieve their text. Copyright © 2011-2015 NTP Software 58 NOTES: The credit card number content type will recognize any sequence of numbers that appears to satisfy the criteria for a valid credit card number issued by one of the major credit card issuers. Credit card numbers are recognized regardless of the pattern of spaces or punctuation within the number. Numerical tests used by the credit card issuers for card validity are used to exclude sequences of numbers that are not credit card numbers. These numerical tests may detect some numbers that are not actual credit card numbers. The Social Security number content type will match a sequence of numbers that conforms to the pattern xxx xx xxxx. Since hyphens are indexed as spaces, this pattern will match U.S. Social Security numbers that contains spaces or hyphens. Since other numbers can conform to the same pattern, some numbers that are not actual Social Security numbers may be detected. In the default mode of operation, the Data Collection Agents will transfer any indexes that were created or updated locally, to the web server on which the Data Agent Administration website exists, through the Data Agent Administration web service. The location is configurable through an application setting in the web.config file of the Data Agent Administration website: <add key="IndexLocation" value="\\ServerName\INDEX"/> During installation, the “IndexLocation” in the web.config is set to the path specified by the user in the “File Content Index Location” dialog box. If the user specifies to locate the indexes within the Data Agent Administration web application installation folder, the application setting would look like this, for example: <add key="IndexLocation" value="C:\Program Reporter\ConfigService\INDEX"/> Files\NTPSoftware \File In the default mode of operation wherein index transfer functionality is enabled, the File Reporter web application requires read access and the Data Agent Administration web application requires write access to the index storage location on the web server. This is accomplished during installation for a user-specified index location if a local path on the server is chosen. If a share is specified, the installer will not be able to set permissions because by default, the File Reporter and Data Agent Administration web applications application pools are configured to run under local accounts. In this case, the web applications will need to be configured appropriately so they can access the share located on another server in addition to the permissions on the specified share. This can be accomplished, for example, by creating a domain user or users, setting the application pools for the web applications to run under these identities, and assigning the appropriate permissions to these users on the share location. Also, if the “Index Location” setting is changed from its initial value by manually modifying the web.config Copyright © 2011-2015 NTP Software 59 file in the Data Agent Administration web application, these permission requirements will need to be manually configured for the new “IndexLocation” folder and/or share. Copyright © 2011-2015 NTP Software 60 NTP Software Data Collection Agent Schedule Configuration To configure the schedules of NTP Software Data Collection Agent, do the following: 1. In the left-hand main menu, click Schedule to open the Schedule Configuration window. Copyright © 2011-2015 NTP Software 61 2. In the Agent Configuration dialog box, select daily/weekly/monthly scan schedule and set the time to run the scan. NOTE: As scans use a lot of network resources during the scanning operation, it is strongly recommended to run weekly or monthly scans instead of daily scans. 3. To run forced scan, navigate to the installation folder and run the DataAgent.exe For example: To run Hitachi scan, in the command prompt navigate to installation folder, C:\Program Files\NTPSoftware\Data Collection Agent\HNAS> Then execute the command DataAgentHNAS.exe Copyright © 2011-2015 NTP Software 62 Viewing NTP Software File Reporter Agent Status Utility NTP Software File Reporter is an agent-based application. Each server in your environment has its own NTP Software Data Collection Agent, which is responsible for scanning, processing, and reporting the individual server’s data to the database. Network communication problems can cause an agent to fail to report its complete dataset to the database. NTP Software provides a status utility to help determine whether a communication problem might have occurred, and if so, where it happened. To view the agent status utility, do the following: 1. In the left-hand main menu, click Agent Status. The Agent Status Information screen shows the date and duration of the last successful scan of each server on the network. NOTE: Click the headers of the view displayed in the figure to sort the data in ascending or descending order. 2. In the Agent Status Information dialog box, click a server name to open its details page. Copyright © 2011-2015 NTP Software 63 3. In the Agent Status Details window, you can view all the scans that have run on that server. IMPORTANT: If a scan did not complete successfully, the status utility shows a breakdown for each agent’s status to help determine where the problem occurred. NOTES: Clicking a server’s name displays a full report about the scans that have run on that server. Copyright © 2011-2015 NTP Software 64 This report includes a description of the phase (whether scanning, data analysis, or data transfer), the time duration of the phase, and the phase status (whether Success or Failed). It also shows the number of records for a data transfer operation or scanned records for a scanning operation. Use the or buttons to increase or decrease the number of records displayed per page. Use the button to obtain a hard copy of the results. Copyright © 2011-2015 NTP Software 65 Purging the NTP Software File Reporter Database By default, NTP Software File Reporter performs weekly scans on all of your enterprise servers with NTP Software Data Collection Agents installed. Because NTP Software does not impose size limits on the NTP Software File Reporter database, the database could grow extremely large over time. We recommend using the database purging utility routinely to clean your NTP Software File Reporter database. NOTE: Purging data from the database also removes the data from report displays. To purge NTP Software File Reporter database, do the following: 1. In the left-hand main menu, click Maintain Data. Copyright © 2011-2015 NTP Software 66 NTP Software File Reporter Database Maintenance offers four sets of criteria for purging data: Purging data collected on a selected date Purging all data collected about a selected server Enabling Automatic Purging (purge data older than a specific time period) Enabling Automatic Summarization (summarize data older than a specific time period) NOTE: The Automatic Purging and Automatic Summarization will execute on a daily basis at the time specified. 2. In the Maintain Data Settings window, select the purging criteria you want to apply based on the criteria sets specified previously. Click the Save button. Copyright © 2011-2015 NTP Software 67 3. Press the Enable Purge button to enable the Purge General Data Now button. NOTE: Because of the permanent nature of the data deletion, an administrator is required to enable the function before performing a purge. We also recommend performing a backup before any purge takes place. 4. Click the Purge General Data Now button to purge the data from the NTP Software File Reporter Database. NOTE: Verify your selections and make changes as needed before clicking this button. Copyright © 2011-2015 NTP Software 68 About NTP Software NTP Software puts users in charge of their file data and is the only company providing file data management solutions that deliver all of the enterprise-class features needed to understand, manage, monitor, and secure file data completely. NTP Software is a global leader and has been chosen by the majority of Fortune 1000 companies and thousands of customers in private and public sectors for providing leadership through superior solutions, professional services, experience, and trusted advice. NTP Software delivers a single solution across the entire data storage environment, from individual files and users to an entire global enterprise across thousands of systems and sites. NTP Software reduces the cost and complexity associated with the exponential growth of file data and is located on the web at www.ntpsoftware.com. NTP Software Professional Services NTP Software’s Professional Services offers consulting, training, and design services to help customers with their storage management challenges. We have helped hundreds of customers to implement cost-effective solutions for managing their storage environments. Our services range from a simple assessment to in-depth financial analyses. For further assistance in creating the most cost-effective Storage Management Infrastructure, please contact your NTP Software Representative at 800-226-2755 or 603-622-4400. Copyright © 2011-2015 NTP Software 69 The information contained in this document is believed to be accurate as of the date of publication. Because NTP Software must constantly respond to changing market conditions, what is here should not be interpreted as a commitment on the part of NTP Software, and NTP Software cannot guarantee the accuracy of any information presented after the date of publication. This user manual is for informational purposes only. NTP SOFTWARE MAKES NO WARRANTIES, EXPRESS OR IMPLIED, IN THIS DOCUMENT. NTP Software and other marks are either registered trademarks or trademarks of NTP Software in the United States and/or other countries. Other product and company names mentioned herein may be the trademarks of their respective owners. NTP Software products and technologies described in this document may be protected by United States and/or international patents. NTP Software 20A NW Boulevard #136 Nashua, NH 03063 Toll Free: 800-226-2755 International: 1-603-622-4400 E-mail: [email protected] Web Site: http://www.ntpsoftware.com Copyright © 2011-2015 NTP Software. All rights reserved. All trademarks and registered trademarks are the property of their respective owners. Doc#4395EF Copyright © 2011-2015 NTP Software 70