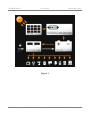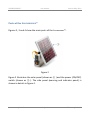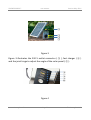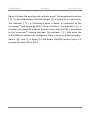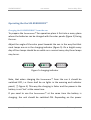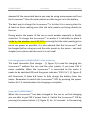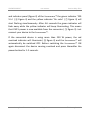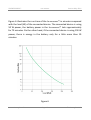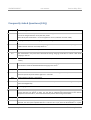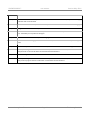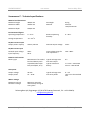
1
SOLENERGIBOX™
USER MANUAL
Version May 2011
User Manual
SOLENERGIBOX™ - POWERING THE WORLD
Welcome to the magnificent world of
SOLENERGIBOX™ product line
the new portable power station
www.solenergibox.dk
Page 1
© Solenergibox A.S.
SOLENERGIBOX™
USER MANUAL
Version May 2011
Safety guidelines
Thank you for purchasing the SOLENERGIBOX™
To get most out of it, please read this user manual carefully, paying
special attention to the safety notes! Keep the manual in a safe place for
later reference, and pass it on to any new owner.
The output of the SOLENERGIBOX™ is 230 V. Do not touch the output
connector – danger for life! Do not connect any un-isolated wires or any
devices using other than 230 V power.
Do not use the SOLENERGIBOX™ when it is wet or in the rain.
Always switch the SOLENERGIBOX™ OFF when transporting it.
Always keep the SOLENERGIBOX™ away from children.
www.solenergibox.dk
Page 2
© Solenergibox A.S.
SOLENERGIBOX™
USER MANUAL
Version May 2011
Table of contents
Safety guidelines ........................................................................................ 2
Introduction ............................................................................................... 4
Parts of the SOLENERGIBOX™ ........................................................................ 6
Operating the the SOLENERGIBOX™ .......................................................... 9
Charging the SOLENERGIBOX™ from the sun ......................................... 9
Fast-charging the SOLENERGIBOX™ without the sun........................... 10
Using the SOLENERGIBOX™ ................................................................. 10
Frequently Asked Questions (FAQ) .......................................................... 13
www.solenergibox.dk
Page 3
© Solenergibox A.S.
SOLENERGIBOX™
USER MANUAL
Version May 2011
Introduction
The brand new SOLENERGIBOX™ receives solar energy with its solar panels,
converts it to 230 V electricity and stores the electricity into its battery for
your use anytime, anywhere! Leave the SOLENERGIBOX™ in the sun for day
time and use the electricity in evenings, or whenever you need it. The
SOLENERGIBOX™ will give you absolutely green energy: there are no CO2
emissions!
The unique SOLENERGIBOX™ is a self-standing, small, portable 230 V power
station which generates electricity directly from the sun. The generated
electricity can either be used at the same time it is being generated
(direct use) or the electricity can be stored to the battery of the
SOLENERGIBOX™ to be used when needed: in evenings or on a cloudy day.
The SOLENERGIBOX™ has a powerful 14-18 W solar panel, which is able to
charge the built-in battery in only 8-10 hours of sunlight. The full battery
will give you 30 W power for approximately 3 hours to be used to watch
TV, use a laptop computer or recharge your battery operated tools. All in
all, the SOLENERGIBOX™ will give you electricity all gadgets using less than 5075 W power, such as mobile phones and iPads!
The fully charged built-in battery will give you 30 W power for 2 hours, or
15 W power for 4 hours.
Figure 1 shows the basic operation principles.
www.solenergibox.dk
Page 4
© Solenergibox A.S.
SOLENERGIBOX™
USER MANUAL
Version May 2011
Figure 1
www.solenergibox.dk
Page 5
© Solenergibox A.S.
SOLENERGIBOX™
Version May 2011
USER MANUAL
Parts of the SOLENERGIBOX™
Figures 2, 3 and 4 show the main parts of the SOLENERGIBOX™.
①
Figure 2
Figure 2 illustrates the solar panel (shown as ① ) and the power (ON/OFF)
switch (shown as ② ). The side panel (warning and indicator panel) is
shown in details in figure 4.
www.solenergibox.dk
Page 6
© Solenergibox A.S.
SOLENERGIBOX™
Version May 2011
USER MANUAL
⑤
③
④
②
Figure 3
Figure 3 illustrates the 230 V outlet connector ( ③ ), fast charger ( ④ )
and the joint hinge to adjust the angle of the solar panel ( ⑤ ).
⑥
⑦
⑧
⑨
⑩
Figure 4
www.solenergibox.dk
Page 7
© Solenergibox A.S.
SOLENERGIBOX™
USER MANUAL
Version May 2011
Figure 4 shows the warning and indicator panel. The uppermost indicator
( ⑥ ) is illuminated when the fast charger (④ in figure 3) is in operation.
The indicator ( ⑦ ) is illuminated when a device is connected to the
SOLENERGIBOX™ getting energy (230 V) from its battery. The indicator ( ⑧ ) is
red when too powerful a device (typically more than 250 W) is connected
to the SOLENERGIBOX™ causing overload. The indicator ( ⑨ ) tells when the
in-built battery needs to be changed or there is an error with the battery.
Switch ( ⑩ , also ② in figure 2) is the power (ON/OFF) button (press 1-2
seconds to switch ON or OFF).
www.solenergibox.dk
Page 8
© Solenergibox A.S.
SOLENERGIBOX™
USER MANUAL
Version May 2011
Operating the the SOLENERGIBOX™
Charging the SOLENERGIBOX™ from the sun
To prepare the SOLENERGIBOX™ for operation place it first into a sunny place
where the batteries can be charged with the solar panels (figure 2) facing
the sun.
Adjust the angle of the solar panel towards the sun in the way that that
most lamps are on in the charging indicator (figure 5). On a bright sunny
day all four lamps should be on while on a normal sunny day three lamps
may be on.
Figure 5: charging indicator
Note, that when charging the SOLENERGIBOX™ from the sun it should be
switched OFF, i.e. there shall be no lights in the warning and indicator
panel ( ⑦ figure 4). This way the charging is faster and the power in the
battery is not ‘lost’ at the same time.
If you need to use the SOLENERGIBOX™ at the same time the battery is
charging, the unit should be switched ON. Depending on the power
www.solenergibox.dk
Page 9
© Solenergibox A.S.
SOLENERGIBOX™
USER MANUAL
Version May 2011
demand of the connected device you may be using more power out from
the SOLENERGIBOX™ than the solar panels are able to give in to the battery.
The best way to charge the SOLENERGIBOX™ is to take it to a sunny place for
at least six hours making sure that the solar panels are facing directly to
the sun.
During winter the power of the sun is much weaker especially in Nordic
countries. To charge the SOLENERGIBOX™ in winter it is advisable to place it
inside by the window <see FAQ Q.9> ensuring that the solar panels get as
much sun power as possible. It is also advised that the SOLENERGIBOX™ will
be charged (either using sun and the solar panels or the mains – see next
chapter) every three months even it is not used!
Fast-charging the SOLENERGIBOX™ without the sun
The input connector (fast charger - ④ figure 3) is used for charging the
SOLENERGIBOX™ without the sun and the solar panels, if you have 230 V
mains available. When the SOLENERGIBOX™ is connected to the mains it
needs to be switched ON and the green indicator ‘220 V In’ ( ⑥ figure 4)
will illuminate. It takes 6-8 hours to fully charge the battery from the
mains. Remember to switch the SOLENERGIBOX™ OFF by pressing the power
button for 1-2 seconds when the charging is complete.
Using the SOLENERGIBOX™
When the SOLENERGIBOX™ has been charged in the sun or via fast-charging
you are able to get 230 V power from it. Switch the SOLENERGIBOX™ ON by
pressing the power button ( ② figure 2) for 1-2 seconds. In the warning
www.solenergibox.dk
Page 10
© Solenergibox A.S.
SOLENERGIBOX™
USER MANUAL
Version May 2011
and indicator panel (figure 4) of the SOLENERGIBOX™ the green indicator ‘220
V In’ ( ⑥ figure 4) and the yellow indicator ‘On solar’ ( ⑦ figure 4) will
start flashing simultaneously. After 4-6 seconds the green indicator will
fade away while the yellow indicator will keep illuminating. This means
that 230 V power is now available from the connector ( ③ figure 3). Just
connect your device to the SOLENERGIBOX™.
If the connected device is using more than 250 W power, the
overload indicator will illuminate ( ⑧ figure 4) and the SOLENERGIBOX™
automatically be switched OFF. Before switching the SOLENERGIBOX™
again disconnect the device causing overload and press thereafter
power button for 1-2 seconds.
www.solenergibox.dk
Page 11
red
will
ON
the
© Solenergibox A.S.
SOLENERGIBOX™
USER MANUAL
Version May 2011
Figure 6 illustrates the run time of the SOLENERGIBOX™ in minutes compared
with the load (W) of the connected device. The connected device is using
50 W power, the battery power in the SOLENERGIBOX™ lasts approximately
for 70 minutes. On the other hand, if the connected device is using 150 W
power, there is energy in the battery only for a little more than 10
minutes.
Figure 6
www.solenergibox.dk
Page 12
© Solenergibox A.S.
SOLENERGIBOX™
USER MANUAL
Version May 2011
Frequently Asked Questions (FAQ)
Q.1
There is no light in indicators ‘On solar’ nor ‘220 V In’
A.1
This means that the battery of the SOLENERGIBOX™ is empty. Place the SOLENERGIBOX™ in the sun for 6-8
hour to be charged from the sun by the solar panels.
Alternatively the SOLENERGIBOX™ can be charged from mains (remember to switch it ON).
Q.2
Only 1 green lamp is on in the charging indicator although there is a lot of sun shine.
A.2
This means that the SOLENERGIBOX™ is fully charged. To test if the SOLENERGIBOX™ is fully charged switch
it ON and check that one more lamp switch on.
Q.3
After the SOLENERGIBOX™ has been placed in the sun for 6-8 hours the battery runs fast empty.
A.3
The SOLENERGIBOX™ may have been switched ON during charging. Remember to switch it OFF while
charging in the sun.
Q.4
The SOLENERGIBOX™ has been connected to the mains, and still after 6 hours there is no power in the
battery.
A.4
The SOLENERGIBOX™ may have been switched OFF while charging in the mains. Remember that the
SOLENERGIBOX™ must be switched ON while charging in the mains.
Q.5
Overload lamp is illuminated.
A.5
This means that the device connected to the SOLENERGIBOX™ is using too much power. Disconnect the
device and press the power button again for 1-2 seconds.
Q.6
Replace battery indicator is illuminated.
A.6
This means that there is an error with the battery. Please contact Solenergibox company
(www.solenergibox.dk).
Q.7
The charging indicator becomes warm.
A.7
This is because the charging unit in the SOLENERGIBOX™ is delivering power to the battery, and it is
normal that the unit warms up little. The unit will be switched OFF automatically if the internal
temperature increases 60 ˚C, and it will automatically restart after having cooled down.
Q.8
The solar panel becomes warm.
A.8
It is normal that the solar panel warms up to 30-40 ˚C due to the panel’s absorbing energy from sun.
However, the solar panel operates best if it is not too hot. Try to place the SOLENERGIBOX™ in a place
www.solenergibox.dk
Page 13
© Solenergibox A.S.
SOLENERGIBOX™
USER MANUAL
Version May 2011
with little breeze.
Q.9
The SOLENERGIBOX™ has been placed inside and there is lot of sun. However, only 1 or no charging
indicator leds are illuminated.
A.9
The windows limit the sun’s power to the solar panels. Move the SOLENERGIBOX™ outside for charging.
Q.10
I forgot the SOLENERGIBOX™ outside, it started to rain and now the SOLENERGIBOX™ is wet.
A.10
Do not switch the SOLENERGIBOX™ ON! Dry it with a towel and leave it to dry for at least 3-4 hours in the
sun. Thereafter you may switch it ON again.
Q.11
It seems that there is some ‘damp’ in the charging controller.
A.11
This is because the charging controller becomes warm, and it is normal. The humidity will disappear
soon.
Q.12
I connected my alarm clock to the SOLENERGIBOX™, and now the time of the clock is wrong.
A.12
The output voltage from the SOLENERGIBOX™ is not pure 50 Hz sinus wave form, and this is the reason
why the clock is not accurate when connected to the SOLENERGIBOX™.
Q.13
There is strange noise from the radio connected to the SOLENERGIBOX™.
A.13
The output voltage from the SOLENERGIBOX™ is not pure 50 Hz sinus wave form, and this is the reason
why noise may appear from the radio when connected to the SOLENERGIBOX™.
www.solenergibox.dk
Page 14
© Solenergibox A.S.
SOLENERGIBOX™
Version May 2011
USER MANUAL
SOLENERGIBOX™ - Technical specifications
Material and dimensions
Maximum height
Maximum width
400,00 mm
410.00 mm
Maximum depth
120,00 mm
Environmental figures
Operating temperature
0 – 35 ⁰C
Storage temperature
-15 – 45 ⁰C
DC/AC inverter output
Output power capacity
DC/AC inverter input
Nominal input voltage
Input frequency
Batteries and runtime
Battery type
Solar panel
Output voltage
Output power
Winter storage
Maximum interval
between recharge
Net weight
Material
9,6 kg
Stainless
steel/Aluminium
Relative operating
humidity
0 – 80 %
210 W / 350 VA
Nominal output voltage
230 V
230 V
50 Hz
Input voltage range for
main operations
196 – 280 V
Maintenance-free sealed
lead-acid battery with
suspended electrolyte:
leak-proof (9Ah, 12 V)
Typical recharge time
with 230 V input
Typical runtime on
battery
6h
20 VDC
14 – 16 W
Typical recharge time
with solar panels
6–8h
Unit has to be switched
OFF
1 h 9 min – 50 W load
25 min – 100 W load
Maximum 3 months
Alternatively storage in
sunny place
Solenergibox ApS, Bygvænget 12, DK-4720 Præstø, Denmark, Tel: +45 31520679,
[email protected]
www.solenergibox.dk
Page 15
© Solenergibox A.S.