1
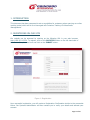
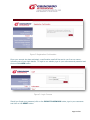
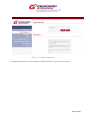
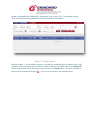
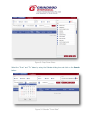
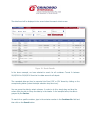
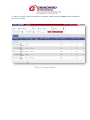
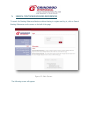
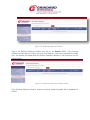
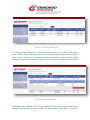
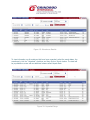
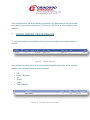
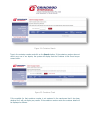
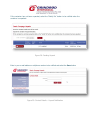
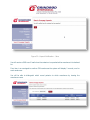
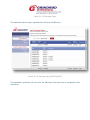
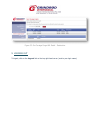
CLIENT WEB TOOL USER MANUAL (V 1.0.4538.17859 – 3) TABLE OF CONTENTS 1. INTRODUCTION .......................................................................................................... 3 2. REGISTERING ON OUR SITE ......................................................................................... 3 3. UPDATING YOUR PROFILE INFORMATION ..................................................................... 6 4. VIEWING CONTAINER HISTORY ................................................................................... 6 5. SEARCH CONTAINER BOOKING REFERENCES .............................................................. 11 6. VIEWING MANIFEST INFORMATION............................................................................ 14 7. VIEWING MANIFEST ITEM INFORMATION ................................................................... 16 8. SEARCH GROUPAGE UNPACKS .................................................................................... 17 9. LOGGING OUT ........................................................................................................... 23 Page 2 of 23 1. INTRODUCTION This document has been composed to act as a guideline for customers when querying our online tracking portal, which will in turn interrogate out Container Tracking LCL Warehouse Managements. 2. REGISTERING ON OUR SITE Our website can be accessed by opening up the following URL in your web browser: http://196.212.13.234. To register, click on the REGISTER button on the left hand side of the screen. Complete the form and click on the SUBMIT button. Figure 1: Registration Upon successful registration, you will receive a Registration Confirmation similar to the screenshot below. Our Systems Administrator will then contact you to verify your details and activate your account. Page 3 of 23 Figure 2 Registration Confirmation Once your account has been activated, a confirmation email will be sent to you from our server, informing you of your login details. To login to our website, type in your username and password and click on the LOGIN button. Figure 3: Login Process Should you forget your password, click on the FORGOT PASSWORD button, type in your username and click on the RESET button. Page 4 of 23 Figure 4: Forgotten Password An email containing your new password will then be sent to you, from our server. Page 5 of 23 Once logged into the site, you can either click on the Containers tab to view Container Tracking history, Manifest tab to view Unpack information or on the Update Profile tab to update your personal details. Figure 5: Main Screen 3. UPDATING YOUR PROFILE INFORMATION To update your personal details, make the necessary changes and click on the Update button or click on OK if no changes are to be made. Figure 6: Update Profile 4. VIEWING CONTAINER HISTORY Container history can be searched for using various criteria. You can either search for data by using the Turn-in date or the Despatch date. You must select the Source where the data should be retrieved from i.e. Live, Archive or Both. The search criteria ‘Live’ should be selected when searching for information from April 2011 to the current date. The search criteria ‘Archive’ should be selected when searching for information prior to April 2011. If the search criteria ‘Both’ is selected then the application will search through all information. Figure 7: Container Search Select the depot - You can select to search in one depot or multiple depots by placing a tick in the checkbox next to the depot name. Should you wish to search in all depots, click on the Select All button at the bottom of the drop down box and click on the Close button. If you do not select a depot, then the system will prompt ( ) you to do so as shown in the example above. Figure 8: Drop Down Menu Select the “From” and “To” dates by using the Calendar dialog box and click on the Search button. Figure 9: Calendar “From Date” The data found will be displayed in the screen below the search criteria screen. Figure 10: Search Results In the above example, we have selected to search for all containers Turned In between 01/06/2014 to 30/06/2014 from the Live data source for all depots. The requested data can then be exported into Excel, PDF or CSV format by clicking on the corresponding button (below the depot selection drop down box). You can group the data by certain columns. In order to do this, simply drag and drop the column that you wish to Group the data by in the header. In the example below, the data is grouped by the Service. To search for a specific container, type in the container number in the Container No. field and then click on the Search button. To search for stock of your containers in our depots, select the source Stock, select the depot/s and click on Search. Figure 11: Grouped Results 5. SEARCH CONTAINER BOOKING REFERENCES To search for Booking Reference Numbers without having to register and log in, click on Search Booking References on the menu on the left of the page Figure 12: Main Screen The following screen will appear: Figure 13: Booking Reference Search Type in the Booking Reference Number and click on the Search button. If the booking reference number does not exist in any one of our depots or has been completed two weeks prior, the system will display that the Booking Reference Number is Not Found as per the screen below: Figure 14: Booking Reference Number Check If the Booking Reference Number exists the booking reference details will be displayed as follows: Figure 15: Booking References The Pre-advise Date, Number of Containers Booked, Number of Containers Despatched, Vessel, Voyage, Service and Depot Name will be displayed per Booking Reference Number found. You can expand on the booking reference information to view container details pertaining to the booking reference by clicking on the plus icon on the first column of the grid: Figure 16: Expanded Results The Despatch Date, Despatch Time, On Hire Reference, Transporter and Seal Number will be displayed per container item. This information can be exported in Excel, .Pdf or .Csv format. 6. VIEWING MANIFEST INFORMATION To view information on Warehouse Unpacks, click on the Manifests tab. Select container manifest “From” and “To” dates by using the Calendar dialog box. Figure 17: Manifest Search Select the Warehouse - You can select to search in one warehouse or multiple warehouses by placing a tick in the checkbox next to the warehouse name. Should you wish to search in all warehouses, click on the Select All button at the bottom of the drop down and click on the Close button. If you do not select a warehouse, then the system will prompt you ( to do so as shown in the example below. ) Figure 18: Warehouse Check In the example below, we have searched for all containers that have been manifested and not unpacked between 24/07/2014 and 24/07/2014 for all Warehouses. This data can be exported into Excel, PDF or CSV format by clicking on the corresponding button (below the warehouse selection drop down box). Figure 19: Warehouse Results To view information on all containers that have been unpacked, select the search dates, the warehouse/s, tick the “Unpacked” checkbox and then click on Search button. The data will be populated on screen with an additional column called Unpack Date. Figure 20: Unpacked Cargo In the example above, we have selected to view data for all Warehouses where the manifest was created for a container between 01/07/2014 and 24/07/2014, and the containers were unpacked. 7. VIEWING MANIFEST ITEM INFORMATION To view the manifest item information click on the plus icon next to the container number on the grid Figure 21. Expand Manifest Once selected you will be able to view the manifest item detail that pertains to the container selected. The following information will be displayed HBL Marks & Numbers Qty Weight Cubes Final Destination Figure 22. Manifest Item Information 8. SEARCH GROUPAGE UNPACKS To search Groupage Unpacks without having to register and log in, click on Search Groupage Unpacks on the menu on the left of the page Figure 23: Main Screen The following screen will appear: Figure 24: Container Search Type in the container number and click on the Search button. If the container number does not exist in any one of our depots, the system will display that the Container is Not Found as per screen below: Figure 25: Container Check If the manifest for that container number is not captured in the warehouse that it has been destined for it will not display any results. If the container number exists the container detail will be displayed as follows: Figure 26: Groupage Unpacks You can expand on the container information to view HBL details pertaining to the container by clicking on the plus icon on the first column of the grid: Figure 27: Expanded Results The unpack date and release date will be displayed per HBL item If the container has not been unpacked, select the “Notify Me” button to be notified when the container is unpacked: Figure 28: Pending Unpack Enter in your e-mail address or cellphone number to be notified and select the Save button Figure 29: Contact Details – Unpack Notification Figure 30: Unpack Notification - Save You will receive a SMS or an E-mail when the container is unpacked at the warehouse it is destined for. If an item is on-carriaged to another GIM warehouse the system will display 2 records, one for each warehouse. You will be able to distinguish which record pertains to which warehouse by viewing the warehouse name. Figure 31: On-Carriage Cargo The warehouse that the cargo originated from will show all HBL items: Figure 32: On-Carriage Cargo HBL Detail ALL The destination warehouse will only show the HBL items that have been on-carriaged to that warehouse: Figure 33: On-Carriage Cargo HBL Detail - Destination 9. LOGGING OUT To logout, click on the Log out link on the top right hand corner (next to your login name).