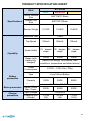
1
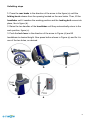
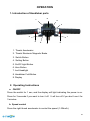
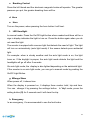
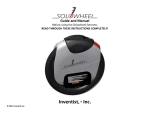
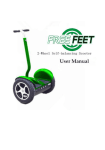
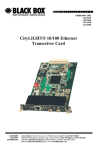
Portable Electric Scooter
Electric two wheels
A new era in urban mobility
The most economical vehicle in history
USER MANUAL
Thank you for purchasing our products
PLEASE CAREFULLY READ THE USER MANUAL AND
WARRANTY BOOK BEFORE USING
WARNING
Whenever you ride the E-Twow electric two wheel scooter you
risk serious injury from collisions, falls or loss of control. To ride
safely, YOU MUST READ AND FOLLOW ALL INSTRUCTIONS
AND WARNINGS IN THIS MANUAL.
Check local laws and regulations to see where and how you may
use your E-Twow scooter legally. Obey to all applicable laws for
vehicles and pedestrians.
This manual includes basic operational instructions for the ETwow scooter. It cannot cover all situations where injury or death
may occur. OPERATORS MUST USE GOOD JUDGMENT AND
COMMON SENSE TO DETECT AND AVOID HAZARDS AND
DANGERS that they may encounter when riding the E-Twow. By
using the E-Twow scooter, you accept of the inherent risks of
operating this product.
FAILURE TO USE COMMON SENSE AND GOOD JUDGMENT AND
HEED THESE WARNINGS CAN CAUSE SERIOUS INJURY. USE
AT YOUR OWN RISK AND WITH APPROPRIATE AND SERIOUS
ATTENTION TO SAFE OPERATION. USE CAUTION AT ALL
TIMES.
2
CONTENTS
MAIN PARTS
4
SAFETY
5
PRODUCTS
7
Folding stages
7
Folding steps
8
Unfolding steps
9
OPERATION
10
Introduction of Handlebar parts
10
Operation Instruction
10
Display Factory settings
12
RIDING OPERATION
13
Ready
13
Start
13
Brake
13
Cruise control
14
Zero start
14
BATTERY AND CHARGER
15
Battery
15
Charger
15
Charge Description
15
MAINTENANCE
16
Lubricating
16
Battery
16
Placement and daily care
16
GENERAL TROUBLESHOOTING
17
PRODUCT SPECIFICATION SHEET
18
3
MAIN PARTS
1. Handlebar
2. UBHI (Display, etc)
3. LED headlight
4. Hooter
5. Lock lever
6. Folding hook
7. Battery charging jack
8. Folding lever
9. Lock bolt
10. Rear brake
4
SAFETY
1.
The product is for adults only (above 18 years), limited for one adult. Please
do not carry two adults at the same time. Is not suitable for minors.
2.
Always inspect the scooter prior to use. Properly inspecting and maintaining
your product can reduce the risk of injury.
3.
Please wear your safety helmet and other protective equipment when
riding. Use an approved bicycle or skateboard helmet that fits properly with
the chin strap in place and protects the back of your head. Local legislations
may require riders of two wheels products to wear a helmet and other
protective gear. Never ride the scooter barefoot or in open-toed shoes or
high-heels.
4.
Do not ride in traffic lane or unsafe roads and do not break local
regulations.
5.
Please exercise in wide areas, and ride after skilled manipulation, do not
ride in traffic lane.
6.
Do not make any dangerous actions when riding or riding with one hand.
Keep your feet on the scooter.
7.
Do not attempt to ride the scooter on stairs that are above 3 cm, it may
overturn causing injuries and/or damages to the rider and/or scooter.
8.
Highest speed is 30 Km/h. For your safety, please limit the speed to 20
Km/h. Please try to avoid using it at night, if needed, please limit the speed
within 15 Km/h or less and turn the headlights on.
9.
Do not use the scooter when the outside temperature is lower than 0ºC.
10. Please slow down or get off from the scooter when riding in poor road
conditions.
11. Do not ride the scooter in oily or icy surface terrain.
12. Please adjust the handlebar according to your height to ensure a safe
riding.
5
13. To avoid damages of the electrical parts of the vehicle please do not
immerse the scooter in the water with the depth of more than 4 cm and do
not wash it with water under pressure.
14. For protection please do not ride the scooter in bad weather such as heavy
rain and high winds.
15. Do not drink alcohol and drive E-Twow scooter.
6
PRODUCTS
Folding stages
A – unfolded
B - folded handlebars
C - fully folded
7
Folding steps
1. Open the lock lever, in the direction of arrow, as shown in figure (a).
2. Press the red button, figure (b), at the same time press down handlebars as
shown in figure (c) and push the lock lever to the lock position.
3. Hold the handlebar with both hands, push buttons (1) shown in Figure (d).
Pull out the handlebar grips (figure d), up to the maximum and fold downwards
to maximum like in figure B, from previous page.
4. Push the handlebar forward when you press the folding lever in the
direction of the arrow in the figure (f).
5. Continue folding the scooter until the folding hook reaches the opening
located on the rear brake.
8
Unfolding steps
1. Press the rear brake in the direction of the arrow in the figure (a) until the
folding hook release from the opening located on the rear brake. Then, lift the
handlebar until it reaches the working position and the locking bolt comes into
place, like in figure (b).
2. Raise the two handles of the handlebar until they automatically return to the
work position, figure (c).
3. Push the lock lever in the direction of the arrow in Figure (d) and lift
handlebars to desired height. Now press button shown in Figure (e) and fix it in
one of the two holes, as desired.
a
d
b
c
e
9
OPERATION
1. Introduction of Handlebar parts
9
7
4
3
2
1
8
6
8
5
1. Thumb Accelerator
2. Thumb Electronic Magnetic Brake
3. Switch Button
4. Setting Button
5. On/Off Light Button
6. Horn Button
7. Led Headlight
8. Handlebar Fold Button
9. Display
2. Operating Instructions
a. ON/OFF
Press the switch for 1 sec, and the display will light indicating the power is on.
Press for 3 seconds if you want to turn it off. It will turn off if you don't use it for
3 minutes.
b. Speed control
Press the right thumb accelerator to control the speed (1-30km/h).
10
c. Breaking Control
Press the left thumb and the electronic magnetic brake will operate. The greater
pressure you put, the greater breaking force will be.
d. Horn
e. Horn
Turn on the power, when pressing the horn button it will hoot.
f. LED Headlight
In manual mode: Press the On/Off Light button when needed and there will be a
sign in display indicates the light is turn on. Press the button again when you do
not need the light.
The scooter is equiped with a sensor light that detects the need of light. The light
will turn on automaticaly (auto light mode) if the sensor detects poor ambiental
light.
For example: when is cloudy weather and the auto light mode is on, the light
turns on. If the daylight is proper, the auto light mode detects the light and the
headlights will go off after 5 seconds.
On auto light mode, the display is also lighted depending on the ambiental light.
If the scooter is on auto light mode, you can go to manual mode by pushing the
On/Off Light Button.
g. Mileage Show
When power off, it shows time.
When the display is powered on, It displays three modes: total, trip and time.
You can change it by pressing the settings button. In 'trip' mode, press the
setting button (S) for 3 seconds and it will clear the trip.
h. Emergency
In an emergency, it’s recommended to use the foot brake.
11
3. Display Factory Setting
To access the menu P0 and P1 please press at the same time the switch and
setting buttons. Pressing the setting button helps you switch between P0 and
P1.
Both menus have other two submenus : 0 and 1, as follows:
P00 (a) - displays the speed in km/h and temperature in Celsius degrees
P01 (b) – displays the speed in mile/h and the temperature in Farenheit degrees
P10 (c) – lights are set on manual mode
P11(d) – lights are set on auto mode
You can switch between menus 0 and 1 in P0 or P1 by pressing the on/off
button.
When you press the setting button (S) at last and the settings will be finished.
a)
c)
b)
d)
12
10
10 – Light sensor
11
11 – Speed
12 – Battery
12
13
13 – Temperature
14 – Displays the total and trip distance
14
15 - From left to right: total, trip
15
RIDING OPERATION
Ready
1. Choose a suitable venue for riding.
2. Expand the scooter in accordance with the description.
3. Adjust the T-pipe to the suitable height according to your height.
Start
1. Press the power button to turn on the power.
2. Stand one foot on the scooter and leave another foot on the ground.
3. Gently press down on the right thumb accelerator, the scooter will
immediately move forward slowly. Place the foot which is on the ground on
the scooter. With big finger of your right hand press the right thumb
accelerator, the greater pressure you put, the faster it will go.
Brake
1. Under normal circumstances, pressing the left thumb electronic magnetic
brake, the scooter will be immediately de-energized and then it will brake.
The greater pressure you put, the greater breaking force will be.
2. E-Twow also has a rear foot brake that triggers the motor brake
immediately in addition to a friction brake on the back wheel. So whatever
the situation is, if the first system is deactivated you can still use the foot
13
brake.
The electronic brake activates kinetic energy recovery system.
Cruise control
You can set up the speed as you want during the driving, and the scooter will
start moving on the same speed afterwards. Press the acceleration right thumb
and keep the same speed for 5 seconds and the cruise control will automatically
enter. You can switch the function off easily as well.
Zero start
This function is for safety . When you want to ride the scooter, you should use
your foot to slide it for a little distance, then press the right thumb accelerator,
the scooter will go ahead. When you don't use the scooter, if you press the right
thumb accelerator by mistake, the scooter can't go ahead.
14
BATTERY AND CHARGER
Each E-Twow electric scooter is equipped with a special lithium polymer battery
and special smart charger. These accessories that come with each scooter have
a dedicated number, please do not use the chargers from other brands. If the
battery or charger will be damaged owing to these, our company will not be
responsible.
Battery
When you get the E-Twow electric scooter for the first time, please charge the
battery fully before using.
The battery can be charged at any time, in order to ensure that the battery has
power, during which the battery will not charge for any damage.
Warning: do not use batteries from other brands, it will not work with ETwow scooter.
Please charge the battery once every three months if stop using the scooter.
Water immersion, collisions, and other abnormal factors will lead to battery
damage, which is not covered under warranty.
Charger
The company provides dedicated charger which has a charging protection
function, when the battery is 100% charged, the charger will automatically stop
charging. Charging time is no more than 3 hours.
Water immersion, collisions, and other abnormal factors will lead to charger
damage, which is not covered under warranty.
Charge Description
Open the charging hole rubber protective cover, put the charger connector into
the charging hole.
Connect the charger plug into the power socket.
It means it is charging when charger light is red, charger light turns green when
the battery is fully charged.
15
MAINTENANCE
Lubricating
Please add a small amount of grease or lubricants to handle folded position
every six months.
Please check scooter every three months if the screws are loose it up.
Battery
The lithium polymer batteries provided by our company can be recharged at
least 500 times, the normal use can reach more than 1,000 times.
Placement and daily care
Do not expose the scooter under the sun or wet places for too long time. Please
keep the scooter clean and dry.
For cleaning use a damp cloth and a mild detergent.
16
GENERAL TROUBLESHOOTING
Checklist
When the products have any problems, please refer to the following methods.
1. LED display black screen
Reason: Exposure under the sun for too long.
Solution: Place it in shadow and it will return to normal after a period.
2. Values from the display do not fit the actual values. Reason:
Parameters are set incorrectly or missing.
Solution: Please reset the display to the factory settings.
3. No information on digital display
Reason: Bad battery contacts or the battery is dead.
Solution: Turn off the power then restart again, if the problem still occurs,
please contact your local reseller.
In case that the product still does not operate normally, please contact your local
vendor or reseller.
17
PRODUCT SPECIFICATION SHEET
Item
Specifications
E-TWOW
MASTER
ECO
Overall Expand
Size
940*1160*135mm
Overall Fold
Size
940*330*150mm
Scooter Weight
10.7KG
10.9KG
Maximum load
Top Speed
Grade Ability
Capability
Range (with
battery fully
charged)
Battery
parameters
Motor parameters
Charger
parameters
BOOSTER
10.8KG
110KG
27km/h
15
28km/h
degree
slope
30KM
20
degree
slope
30km/h
25
40KM
degree
slope
35KM
(varied from weight, wind speed, road
conditions, temperature and other factors)
Power
Consumption
6.15W – 7.5W / Km / 75Kg
Type
Li-po Lithium Battery
Capacity
Motor type
Rated Output
Max. Power
Input Voltage
Charging time
(charger)
190W
250W
280W
Brushless DC Motor
350W
450W
500W
3-3.5hr
(2A)
110V/220V
2-2.5hr
(4A)
1.5-2hr
(3.5A)
18