1
Gemini 4:4:4 User Manual 052412.004
TABLE OF CONTENTS
OVERVIEW ........................................................................................................................ 4
PACKAGE CONTENTS ........................................................................................................................... 4
FEATURES ................................................................................................................................................ 5
GEMINI 4:4:4 ANATOMY ........................................................................................................................ 7
MENU STRUCTURE ................................................................................................................................ 8
GEMINI ................................................................................................................................................... 9
INPUTS ................................................................................................................................................. 10
RECORD .............................................................................................................................................. 10
OUTPUT ............................................................................................................................................... 11
RAW ...................................................................................................................................................... 11
MENU QUICK KEYS .............................................................................................................................. 12
MODE TOGGLE & STATUS ................................................................................................................. 13
PREPARATIONS ............................................................................................................. 14
TIPS, TECHNIQUES & RECOMMENDATIONS ................................................................................ 14
POWER .................................................................................................................................................... 16
AC Power Supply ................................................................................................................................ 16
Camera ................................................................................................................................................. 16
REGISTRATION...................................................................................................................................... 17
ARRIRAW (Paid Upgrade) ................................................................................................................ 17
Upgrade Instructions ........................................................................................................................... 17
SETTING DATE & TIME ........................................................................................................................ 17
SETTING METADATA ........................................................................................................................... 18
DPX HEADER METADATA ............................................................................................................... 18
ARRI METADATA ............................................................................................................................... 18
XML FILE .............................................................................................................................................. 18
FORMATTING SSD CARDS ................................................................................................................. 19
SSD Status Indicators ........................................................................................................................ 20
www.Gemini444.com
1|Page
Gemini 4:4:4 User Manual 052412.004
System Status Indicators ................................................................................................................... 20
RECORDING ................................................................................................................... 21
Recording Time / Media ......................................................................................................................... 21
Recording Instructions ............................................................................................................................ 21
DPX ........................................................................................................................................................... 22
WAV .......................................................................................................................................................... 22
ARI ............................................................................................................................................................. 22
PLAYBACK ...................................................................................................................... 24
TRANSFER ...................................................................................................................... 26
Transfer Station ....................................................................................................................................... 26
Second Generation Universal Transfer Station .............................................................................. 26
First Generation Transfer Station (eSATA) ..................................................................................... 26
Best User Practices ................................................................................................................................ 26
Performance............................................................................................................................................. 27
File Support .............................................................................................................................................. 27
1080p59.94/60 DPX................................................................................................................................ 28
File Structure ............................................................................................................................................ 28
Transfer Configurations .......................................................................................................................... 29
Accessing & Using the SSD on A Computer ...................................................................................... 30
POST WORKFLOW ......................................................................................................... 32
DPX Files .................................................................................................................................................. 32
Convergent Design Gemini Transfer.................................................................................................... 36
XML Files / Metadata .............................................................................................................................. 36
ARRIRAW Files ....................................................................................................................................... 36
APPENDIX ....................................................................................................................... 37
Firmware Updates ................................................................................................................................... 37
Firmware Update Instructions ............................................................................................................... 37
Specifications ........................................................................................................................................... 41
Gemini Mechanical Drawings ................................................................................................................ 42
Remote Connector Pinout...................................................................................................................... 42
www.Gemini444.com
2|Page
Gemini 4:4:4 User Manual 052412.004
Firmware Version 1.1.2 .......................................................................................................................... 43
Previous Firmware Releases............................................................................................................. 46
Trouble Shooting & Support .................................................................................................................. 49
Limited Warranty ..................................................................................................................................... 50
Obtaining an RMA ................................................................................................................................... 51
www.Gemini444.com
3|Page
Gemini 4:4:4 User Manual 052412.004
OVERVIEW
PACKAGE CONTENTS
Make sure you have the following items, supplied with your Gemini 4:4:4 upon purchase.
Hard Case
Gemini 4:4:4
Transfer Station
HDMI
Type C to Type A
HD-SDI (Qty 2)
eSATA
Data Cable
Power D-Tap
4-Pin
(transfer station power)
XLR Power Cable
4-Pin
Universal AC Power
Supply
Stylus &
Microfiber Cloth
Hot Shoe Mount
USB Mini Type A
NOTE: Only Convergent Design SSD’s will work in the Gemini 4:4:4.
These SSD’s, available in 256GB and 512GB, must be purchased separately.
Your Gemini 4:4:4 dealer is an ideal place to purchase these SSD’s.
www.Gemini444.com
4|Page
Gemini 4:4:4 User Manual 052412.004
FEATURES
The Gemini 4:4:4 is a professional, high-definition video recorder that fits in the palm of your
hand and is easily mountable on your camera. It is very light weight and small in size.
Gemini 4:4:4 functions as a high-quality monitor, with a wide viewing angle, high brightness
with great contrast, and no compromise video playback device.
The footage from the Gemini 4:4:4 can be easily incorporated into virtually any workflow
using your favorite codec or as native uncompressed DPX sequences.
With an extra cost option, Gemini 4:4:4 is also capable of recording, combining, and playing
back 3D video.
The Gemini 4:4:4 records to specially certified and tested 1.8” solid-state hard drives that
can be purchased from Convergent Design through your local dealer.
UNCOMPRESSED 4:4:4 RGB QUALITY
The Gemini 4:4:4 records in the highest quality possible; no other recorder exceeds the
image quality of the Gemini 4:4:4!
The Gemini 4:4:4 records Full Uncompressed 4:4:4 RGB and also accepts 4:2:2 camera
signals. This ensures that 100% of the quality of your video signal will be maintained. There
are no signal losses, no artifacts, and no loss of quality whatsoever.
This is especially important when recording Log video, such as Sony S-Log or LogC. The
precise values for each bit are recorded. No bit values are changed in any way, thus
preserving the full integrity of your images. Recording full 4:4:4 is the proper way to record
S-Log and Log-C. Recording 4:2:2 from a 4:4:4 capable camera is a compromise.
ARRIRAW SUPPORT (paid upgrade)
Gemini 4:4:4 is ARRI Certified, supporting ARRIRAW (.ari) 2048 x 1650, up to 60fps from
any ALEXA model camera (16:9). Supports full raster live debayer monitoring and
playback, including LUT support. No new hardware, no new SSD’s required – simple
firmware update with paid upgrade.
4:2:2 to 4:4:4 UP-CONVERSION
The Gemini 4:4:4 records in DPX file format, an industry standard for high end post
processing. To conform with widely used software that accepts the DPX file format, the
Gemini 4:4:4 automatically up-converts (up-reses) to 4:4:4.
This is accomplished by using a sophisticated routine that uses the weighted average of
nearby pixels to ensure that the 4:4:4 is of high quality, even when the source video is 4:2:2.
NOTE: The Gemini 4:4:4 will record from either a 4:2:2 or 4:4:4 camera.
A 4:2:2 signal will be up-resed to 4:4:4.
www.Gemini444.com
5|Page
Gemini 4:4:4 User Manual 052412.004
HD TOUCH SCREEN FOR RECORD AND PLAYBACK
The Gemini 4:4:4 is easily controlled using the touch screen. A Stylus is provided to prevent
the LCD Monitor from being smudged.
DUAL SSD
The Gemini 4:4:4 is unique in that it supports two SSD’s for both recording and playback.
To extend recording time, a recording can automatically span from one SSD to another.
This is fully automatic.
S-LOG and LOG-C SUPPORT
Many features are built into the Gemini 4:4:4 for supporting Log footage:
A menu option easily allows one to apply a built-in LUT (Lookup Table) to native S-Log
footage. The LUT is applied to the LCD and HD-SDI outputs.
LOG RECORDING
The Gemini 4:4:4 is ideally suited for recording Sony S-Log, ARRI C-Log, and will support
Canon Log-C in the future.
SINGLE LINK 3G & DUAL LINK 1.5G/3G
The Gemini supports both single link 3G and dual link 1.5Ghz HD-SDI Input for 4:4:4 and
ARRIRAW recording, as well as Dual 3G for recording ARRIRAW 48p, 50p, and 60p.
HIGH PERFORMANCE SSD’S
The Gemini 4:4:4 SSD’s are specially picked for their performance and reliability. These
SSD’s are capable of read speeds of 500 Mbytes/sec, making transfer of files very quick.
You’ll find these Convergent Design SSD’s available through our Dealers at affordable
rates.
FAST BOOT TIME
You can expect your Gemini 4:4:4 to power up and be ready for recording in approximately
12 seconds or less after applying power.
www.Gemini444.com
6|Page
Gemini 4:4:4 User Manual 052412.004
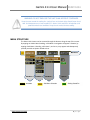
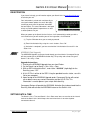
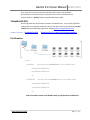
GEMINI 4:4:4 ANATOMY
SSD Drive 1
SSD Drive 2
HD Touch
Screen Monitor
Power
SDI A
IN
SDI B
IN
Audio
IN
HDMI
OUT
Audio
OUT
SDI A
OUT
SDI B
OUT
Remote
Tally
kfjaslkdjflk sdlkfjaslkdjf lkdjflksdjf
www.Gemini444.com
7|Page
Gemini 4:4:4 User Manual 052412.004
lksdjf
WARNING: DO NOT ENCLOSE THE UNIT IN AN AIRTIGHT CONTAINER
Keep the area around the cooling fins (vertical lines on the back of the Gemini) open for air
flow. Unit temperature must not exceed 65*C. Gemini 4:4:4 and SSD’s will operate at full
potential under these conditions. Keep the unit vertical for best cooling.
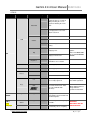
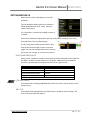
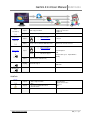
MENU STRUCTURE
The Gemini 4:4:4 menu can be accessed through the buttons along the top of the screen.
By tapping on a Main Menu heading, a Sub-Menu 1 navigation will appear. Likewise, by
tapping a Sub-Menu 1 heading, a Sub-Item 2, and so on, may appear and subsequently
provide you with an Option related to that.
Main Menu
Sub-Menu 1
Available
www.Gemini444.com
Sub-Menu 2
Sub-Menu 3
Sub-Menu Selection
Options
Setting Saved/On
8|Page
Gemini 4:4:4 User Manual 052412.004
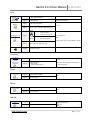
GEMINI
Sub-Menu 1
Sub-Menu 2
Sub-Menu 3
Option
Description
On
The on screen menu will
disappear after 15 seconds of
idling. Touching the screen
anywhere will bring the menu
back.
Off
The on-screen menu will always
be displayed unless the hide
button is touched.
Auto-Hide
Additional Information
2.39:1
LCD
Guides
1.85:1
None
Removes any current Guides
setting.
On
Flip the video and on-screen
display by 180˚.
Off
Flip the video and on-screen
display to normal view.
→
Adjustable in 10% increments.
Click OK to save selection.
Flip
SET
Brightness
Time
→
→
Set the appropriate time.
Date
→
→
Set the appropriate date.
Menu
→
Restore all default settings.
Great for certain mounting
options.
Note: THIS DOES NOT
FLIP THE RECORDED
IMAGE!
Reset
Resets metadata fields
Metadata
Unit
OK
Keys
Raw
ABOUT
SSD's
(cont.
next page)
Indicates your product was
successfully registered.
Requires nothing further
after initial registration.
To activate Raw feature. Enter
key code (available with
purchase).
Raw is available in Demo
Mode without purchase.
Image will have
permanent watermark.
→
→
→
Displays the firmware version,
serial number of your Gemini unit,
and warranty date.
Format
SSD 1
→
→
Permanently erases everything
on SSD 1.
Format
→
→
Permanently erases everything
www.Gemini444.com
WARNING:
DATA WILL NOT BE
RECOVERABLE!
9|Page
Gemini 4:4:4 User Manual 052412.004
SSD 2
on SSD 2.
Format Both
→
→
Permanently erases everything
from both cards.
INPUTS
Sub-Menu 1
Sub-Menu 2
SubMenu 3
Option
Description
SDI
Timecode is extracted from the SDI
signal coming from your camera.
LTC
LTC to 6 pin via remote port and
adaptor cable.
TIMECODE
Source
Additional Information
For non-zero timecode, set your
camera’s timecode output (if it has
one).
→
ARRI: Not supported in ARRIRAW
2 Channels Supported.
AUDIO
Channels
→
2
Embedded Audio ( SDI)
Sub-Item
SubMenu 3
Option
Description
Rec Button
→
→
Recording is started by touching the
record button on the Gemini screen.
→
→
The record trigger is provided by the
camera. ARRI NOTE: MEDIA MUST
BE PRESENT (v5.0). ALEXA
firmware v6.0 and newer, SYS can
be disabled.
→
→
Allows the user to set the name of the
recorded files.
ARRI: No audio provided at
p48/50/59.94/60.
RECORD
Dropdown
TRIGGER
Camera
DPX
(Clip Name)(Clip #)
(AAAAAAAA)(000)
CLIP
ARRI REC
Additional Information
Compatible cameras include Canon
C300, XF305, Sony F3, ARRI ALEXA
(via SDI Remote camera setting).
The last three digits will autoincrement from one recording to the
next. If you are using more than one
Gemini unit, it is recommended that at
least the first two characters of this
name be set different from one Gemini
unit to the next.
ARRIRAW REC
BUTTON TRIGGER
(Clip Name)(Clip #)
(AAAAAAAA)(000)
The file name is set on the Gemini.
ARRIRAW
CAMERA TRIGGER
(Clip Name)(Clip #)
(AAAAAAAA)(000)
The file name must be set on the
camera.
Information is received via SDI from
the camera.
This is recording from camera.
Camera trigger. Clip name will be
based on camera’s name.
From Camera
www.Gemini444.com
10 | P a g e
Gemini 4:4:4 User Manual 052412.004
OUTPUT
Sub-Menu
Sub-Menu 2
SubMenu 3
Option
Description
Additional Information
On
→
→
When the Gemini is recording, the SDI
and HDMI output will display a red bar
on the bottom of the screen to indicate
an active record.
Off
→
→
Nothing will be overlaid on the SDI or
HDMI output of the Gemini.
4:2:2
→
→
SDI output as 4:2:2; works in both Rec
and Play Mode.
This setting only affects the output
video. 4:2:2 Input will always be
converted to 4:4:4 for recording.
4:4:4
→
→
Incoming video will be output as 4:4:4.
Use this setting if you want to output
4:4:4 RGB, usually Dual Link HD-SDI.
(Not valid with 4:2:2 input)
On
→
→
ARRI ONLY
LCD/Output display has legalized
values.
Off
→
→
ARRI ONLY
Full range values for LCD/outputs
REC TALLY
This red bar is not recorded in the
Gemini. If you are using a separate
recorder to record the output of the
Gemini, turn this setting off.
MODE
Legalized
RAW
Sub-Menu 1
Sub-Menu 2
SubMenu 3
Option
Additional Information
ON
If selected, unit will reboot into
selected mode.
Extra cost option; purchase required
otherwise Demo Mode is showing.
Supports only ARRIRAW files (.ari)
for record and playback.
SxS MEDIA MUST BE PRESENT
OFF
If selected, unit will reboot into
selected mode.
See ‘Disable ARRIRAW’ below.
ARRI
→
Description
→
Enable ARRIRAW
In order to enable the ARRIRAW feature (not in Demo Mode), you must purchase the ARRIRAW
Upgrade to the Gemini 4:4:4 unit. The purchase is facilitated through your local dealer. Convergent
Design will provide you a unique key to activate your unit. For more details about Upgrade
Procedure, see page 44.
www.Gemini444.com
11 | P a g e
Gemini 4:4:4 User Manual 052412.004
Disable ARRIRAW (Rental Houses)
Activated ARRIRAW feature can be disabled / enabled. To disable ARRIRAW (back in Demo Mode):
1. On the Gemini, go to Gemini > Keys > Raw
2. Tap the Key’s field “OK”, the text will change to “SET DEMO”, then click “Confirm.” The
ARRIRAW feature is now in Demo Mode.
3. To re-enable ARRIRAW, simply go to the Raw Keys field in the Menu, and enter the correct
Activation Key (provided upon purchase of the ARRIRAW feature).
MENU QUICK KEYS
Menu
Click to reveal main menu structure. Click << to collapse.
Hide
Click to remove all content/buttons from the screen. Tap the monitor anywhere to reveal
Metadata (Rec Mode) / Playlist (Play Mode)
See Preparations: Setting Metadata page 18 for more information on Metatdata.
See Playback page 24 for more information on Playlist.
Set metadata prior to record.
ARRI (Rec Mode, Replaces Metadata Key)
ONLY IN RAW MODE: Click to reveal metadata (sent from camera; not editable data).
Next Take
Click to reveal Clip, Scene and Take info. Click << to collapse.
www.Gemini444.com
12 | P a g e
Gemini 4:4:4 User Manual 052412.004
MODE TOGGLE & STATUS
Across the bottom of your Gemini monitor you will find the Control Bar, including Mode
Functions and related Indicators and Buttons.
Scene & Take
Status Line
Caret
Voltage / Internal
Temp
Remaining
Record Time
Video Input Format
Video Output Format
Timecode
Record / Play / Stop Button
Mode Switch
Description
Status Line
Record / Play / Stop
Button
Scene & Take
The status line will indicate when you have
successfully changed or applied a setting.
Click to initiate the appropriate action.
Record
Stop
Play
Pause
Scene name set in Metadata; Take autoincrements from one record to the next.
Timecode
Mode Switch
Tapping will move the arrow (“>”) to toggle
between Rec and Play Mode.
Remaining Record Time
Remaining record time per card, shown as
SSD1 / SSD2.
Quick Key
Click the caret
to display options, then
click to apply.
Apply LUT
Viewing LUTs are not applied
to recorded material for
incoming LOG data (4:4:4
input only).
1:1 Pixel
For critical focus.
IN RAW MODE: ‘Apply LUT’ is a Rec709
Generic LUT. Without a LUT applied
video is in Log-C format.
www.Gemini444.com
13 | P a g e
Gemini 4:4:4 User Manual 052412.004
PREPARATIONS
TIPS, TECHNIQUES & RECOMMENDATIONS
The Gemini 4:4:4 is a sophisticated, technologically advanced device. A few simple tips,
techniques and recommendations can help ensure a successful shoot.
1. Register your unit now, as you need access to the Internet to do so.
It must be registered. Otherwise the unit is disabled.
2. Obtain the Gemini 4:4:4 and all the necessary batteries, chargers well in advance of
your shoot. Please be certain to plug the power cable into the power input, which is on
the left side, the remote control connector is on the right side. Forcing the power
connector into the remote control connector will damage the Gemini 4:4:4.
3. Obtain genuine Convergent Design SSD’s. No other SSD’s will work in the Gemini 4:4:4.
This is to ensure that the SSD’s are fast enough and have been fully tested prior to your
shoot.
4. Extra, high quality HD-SDI cables are very desirable and should be available on every
shoot. These must be good quality 75 Ohm cables with true 75 Ohm connectors. SDI
cables rated for 3G SMPTE 424M are always preferred.
5. Please read the manual, you will gain a lot of practical knowledge.
The latest version is on our website:
http://convergent-design.com/LinkClick.aspx?fileticket=CdmSeL04O18%3d&tabid=139
6. We generally recommend that you use the latest firmware.
http://convergent-design.com/FirmwareUpdates/Gemini444.aspx
7. Test the unit and the SSD’s, with your camera, in advance of the shoot.
Setup your camera, exactly as you will for the shoot, setup the Gemini 4:4:4,
create some test footage, and run this test footage through your Post workflow.
Ensure that your Post department can handle the full uncompressed workflow.
Full uncompressed video is great, it is just different. Many systems support DPX and
ARRIRAW, but not all. Please see the Workflow page on our website.
8. For editing DPX Files using Final Cut Pro, please obtain GlueTools.
http://gluetools.com/products.html Select “Cineon/DPX Pro for Final Cut Studio”.
9. Obtain a way to back up your data in the field. A good backup procedure is to have two
backups, stored on separate devices, and have all of your footage checked visually,
prior to reformatting and reusing the SSD’s.
10. Purchase enough SSD’s, plus some extras. Be certain that you have enough so that you
can shoot while the backups are being made and the footage is being checked.
11. While shooting, during breaks, playback you footage, from within the Gemini 4:4:4 to
check that everything is working fine. But, more importantly, transfer you footage to a
backup, then play the footage from the backup to ensure that all is good!
12. Feel free to call, Skype or email Support 24/7. We strive to provide world class support.
If you don’t reach us at one number, try another.
Support Contact Info: See Page 40.
13. Ensure that camera viewfinder data is not being sent to the Gemini 4:4:4.
Record a test, and then play it back. If you see viewfinder data while you are recording,
or on playback, please turn off OSD (On Screen Display), otherwise this will be recorded
in your files.
14. Do not use Beta firmware for production work!
15. Do not over-tighten the ¼” x 20 or 3/8” x 16 screws. You can damage the case.
www.Gemini444.com
14 | P a g e
Gemini 4:4:4 User Manual 052412.004
16. Please do not open the Gemini 4:4:4 case, as this voids the warranty.
17. Here is a tip to help your shoot be a success:
The most successful teams plan ahead, and check out all of their gear in advance.
18. Never format an SSD unless you are certain that the footage has been transferred, and
checked.
To be safe, wait until you have the footage in two places.
19. Never attempt to write files to the SSD, nor delete files off the SSD and then reuse the
SSD in the Gemini 4:4:4.
20. It is acceptable to upload files from an SSD, using our Transfer Station, then reinsert the
same SSD into the Gemini 4:4:4 so that you can continue shooting. But, as noted
above, do not delete files off the SSD, then attempt to shoot more.
21. Always format the SSD’s, in the Gemini 4:4:4.
Formatting an SSD in another device is not acceptable.
22. Never put the Gemini 4:4:4 in a confined enclosure, it needs access to fresh air for
cooling.
23. Never leave the Gemini 4:4:4 in hot sun without protection for an extended period of
time. If it has been in a hot car, please allow time for it to cool.
24. Protect it from rain, splashes and other inclement weather.
25. Do not leave the Gemini 4:4:4 flat on a table with the power on.
A vertical position is best as it allows air to flow naturally over the cooling fins.
26. Do not feed the Gemini 4:4:4 reverse-voltage DC, or voltages over 19 Volts.
Do not plug in the Anton Bauer D-Tap or P-Tap connectors in backwards.
Caution: Some non-Anton Bauer P-Tap power outlets allow the P-Tap or
D-Tap connector to be plugged in backwards.
If you do, then the Gemini 4:4:4 will stop working and it will have to be repaired.
27. Respect the Touch Sensitive LCD. Do not use hard objects to operate the touch screen.
A ball point or other pen should not be used. Use our provided stylus or something
similar. Caution: The Touch Screen and LCD are expensive to replace.
28. For ARRI recordings using Camera Trigger, recorded .ari files base name will match
ARRI ALEXA internal recording clip name, provided that the ALEXA and the Gemini are
set to the same date.
29. If set for ‘Camera Trigger’, make sure camera is not already recording (DPX or
ARRIRAW).
www.Gemini444.com
15 | P a g e
Gemini 4:4:4 User Manual 052412.004
POWER
There are multiple ways to power your Gemini 4:4:4;
1. Using the provided AC Power Supply which includes international power plugs
2. Using 4-Pin XLR Power, using the supplied 4-Pin XLR to 4-Pin Hirose Power Cable.
3. Using an Anton Bauer or IDX Battery with a D-Tap connection. A D-Tap to 4-Pin Hirose
Power Cable is included.
4. Using any 4-Pin Hirose Power cable as provided by Convergent Design for Gemini 4:4:4
or nanoFlash.
5. Using any suitable DC power source, 6 to 19 Volts DC, with a 4-Pin Hirose connector.
Pin 1 & 2 Must be Positive DC Voltage
Pin 3 & 4 Must be Negative or Ground
Power Supply must supply at least 20W.
WARNING! Power input is limited to 6-19 Volt DC.
Please check the voltage & polarity before using.
AC Power Supply
Simply connect the 4-pin Hirose to 4-Pin Male
XLR cable to the Female 4-Pin XLR connector
on the AC Power Supply and plug into a suitable
AC power source.
Gently turn to fit and click the Hirose connector
into the Power 6-19V connector on the left of the
Gemini 4:4:4.
Do not force the power connector into the
Remote Tally connector on the right side of
the Gemini 4:4:4.
Camera
Using the supplied HD-SDI cables, or other high quality True 75 Ohm HD-SDI cables with
True 75 Ohm connectors, connect your camera to SDI A, or to both SDI A and SDI B (for
Dual Link).
Use of 50 Ohm and/or low quality cables will cause the video signal to be
intermittent.
www.Gemini444.com
16 | P a g e
Gemini 4:4:4 User Manual 052412.004
REGISTRATION
If you haven’t already, you will need to register your Gemini 4:4:4 at www.Gemini444.com
to activate your unit.
Your information is private and used internally to
send you firmware updates via email. We highly
encourage you to enter the optional information
that we request. This extra information is designed
to help us provide product improvements as well
as better products for you.
When you power up the Gemini for the first time, it will automatically provide you with a
serial number that you will need for your on-line registration, via the website.
(1) Tap the OK button when you are ready to proceed.
(2) Enter Unit Activation Key using the + and – buttons; Press OK.
(3) Activation is complete if you have received the ‘Unit Activation Successful’ in the
Status Line.
ARRIRAW (Paid Upgrade)
The ARRIRAW Upgrade can be purchased through your local dealer. Convergent Design
will then provide you an ARRIRAW Activation Key. To input key and activate unit, go to
Gemini > Set > Keys > Raw.
Upgrade Instructions
1. Purchase the ARRIRAW Upgrade from your local Dealer.
2. On the Gemini, go to Gemini > Set > Keys > Raw
3. With an SSD inserted into Slot 1, enter value “10000000” (eight-digit) for the
Raw Key; press “OK”.
4. A Unit ID File is written to the SSD. Using the provided transfer station, save this
file to your computer.
5. Upon receipt of the ARRIRAW Upgrade order, Convergent Design will contact
you to obtain necessary contact information and the Unit ID File. This
information is used to process your unique Activation Key.
Convergent Design will provide the ARRIRAW Activation Key to be entered into the
Raw Key field and activate the ARRIRAW feature on the Gemini 4:4:4.
SETTING DATE & TIME
The Gemini > Set > Time and Gemini > Set > Date menu items are used to set the internal
clock of the Gemini 4:4:4, which keeps time even when there is no external power
connected to the unit.
www.Gemini444.com
17 | P a g e
Gemini 4:4:4 User Manual 052412.004
SETTING METADATA
When Gemini 4:4:4 is in Rec Mode, you can edit
Metadata.
Tap the ‘Metadata’ Menu Quick Key to reveal the
following editable data: Reel, Scene, Take, Day,
Camera, and Project.
This information is stored until changed or power is
removed.
Some of the metadata is displayed for each clip in Play Mode, including: Scene, Take,
Timecode, Date, Time and Shooting Day.
To edit, simply tap the field you would like to edit,
then tap the character field to reveal a character
toggle. You may edit multiple fields before choosing
OK to save your changes, or X to revert to previous.
DPX HEADER METADATA
During record, metadata is saved in various locations within the header of every DPX file.
This data is viewable in some software on a computer. Additionally, the metadata is
stored in a separate XML file alongside the DPX files for a given record.
File Field
Values for Data Input Included
DPX Slate Info
Reel, Scene, Take, Day
Input Device Name
Reel
Input Device Serial Number
Camera
Project
Project
IN ARRIRAW MODE: Metadata comes from camera; fields not editable.
ARRI METADATA
All metadata when recording ARRIRAW comes from the camera, and must be set in the
ALEXA camera.
XML FILE
All metadata fields and additional clip information are stored for each recording. See
more under Post Workflow, page 37.
www.Gemini444.com
18 | P a g e
Gemini 4:4:4 User Manual 052412.004
HANDLING SSD CARDS - READ THE FULL SAFE HANDLING DOCUMENT
Avoid touching the connector end of the SSD’s.
Avoid shocking the connector end of the SSD’s via
static electricity.
When inserting into the Gemini 4:4:4, make sure the
label is facing the front of the unit (see the proper
placement in the image below).
Please be gentle when inserting the card. Clasping
the door over the card and gently pushing in the
drawer will adequately connect the drive.
FORMATTING SSD CARDS
WARNING: BEFORE USING THE SSD’S IT IS IMPERATIVE
TO FORMAT THE SSD’S IN THE GEMINI 4:4:4
ALL EXISTING DATA WILL BE LOST DURING THE FORMAT!
Formatting is a destructive process. Any data on your SSD’s that has not already been
transferred to another medium will be lost forever. Once this process is started, there is no
way to recover the data. “Un-format Utilities” will not be able to recover the data.
Go to GEMINI > SSD’s > FORMAT SSD1 or GEMINI > SSD’s > FORMAT SSD2 or
FORMAT BOTH from the Menu to format the SSD’s.
This process will take approximately 30 seconds for a 256GB and
60 seconds for 512GB cards.
Initializing SSD Drives
If a SSD is removed from Gemini, Mac, or PC while still being accessed you may have to
wait until the drive gets reinitialized in either the Gemini, Mac, or PC. This may take up to 5
minutes.
After the SSD’s have been used to record any video, the video must be transferred to
another device, before reformatting the SSD’s, otherwise the video will be lost
forever.
www.Gemini444.com
19 | P a g e
Gemini 4:4:4 User Manual 052412.004
System Status Indicators
SSD Status Indicators
SSD Status Indicators
The LED lights associated with each SSD drive will display the following
status color indicators:
Drive needs to be formatted within the Gemini.
Drive is completely full and can be played back or formatted for a new record.
Drive is ready to record.
SSD card is initializing.
Drive is currently playing back.
Drive is currently recording. NEVER REMOVE SSD DURING RECORD OR PLAYBACK!
Powering Up; System Test
Drive has old clips which can be played back but to record new SSD’s must be formatted.
System Status Indicators
The LED lights located in between each SSD drive, in the middle of the unit, will display the
following status color indicators:
Ready for record.
Recording. IF FLASHING RED, SEE TROUBLESHOOTING BELOW.
Play Mode. CURRENTLY PLAYING.
www.Gemini444.com
20 | P a g e
Gemini 4:4:4 User Manual 052412.004
RECORDING
Recording Time / Media
DPX
Media
1080p
23.97/24
1080p25
1080p
29.97/30
1080p48
1080p50
1080p
59.94/60
256GB SSD (x1)
21
20
na
na
na
na
256GB SSD (x2)
41
40
33
21
20
na
512GB SSD (x2)
82
80
66
42
40
33
1080p48 not supported in Firmware 1.1.2
Frame rates of 29.97/30p and above require two SSD’s (256 GB or 512 GB).
Frame rates of 59.94/60p require two 512GB SSD’s.
ARRIRAW
1080p
23.97/24
1080p25
1080p
29.97/30
1080p48
1080p50
1080p
59.94/60
256GB SSD (x1)
25
24
20
na
na
na
256GB SSD (x2)
50
48
40
25
24
na
512GB SSD (x2)
100
96
80
50
48
40
Media
Frame rates of 48p and above require two SSD’s (256 GB or 512 GB).
Frame rates of 59.94/60p require two 512GB SSD’s.
It is recommended that you do not exceed 250 recorded clips per SSD.
Recording Instructions
Are you ready to capture the ultimate quality? The following will walk you through a
successful recording.
TROUBLESHOOTING. If the SSD Indicator(s) are NOT green, try the following:
Orange
Yellow
White
SSD drive is initializing. If it does not change after 30 seconds (for 256GB)/ 60 seconds (for
512GB), power cycle the unit.
Go to GEMINI > SSD’S > FORMAT SSD (1 or 2).
Card is full; remove the card and transfer the data.
(1) Assure you have an appropriate power supply.
(2) Make sure any and all necessary settings have been programmed and saved.
See Preparations: Setting Metadata, page 18.
(3) Insert at least one Convergent Design SSD card into either Slot 1 or Slot 2, or insert
one in each slot. For more information on ‘Handling SSD Cards’, visit page 19. The
LED SSD Drive Indicator light should be green. If so, proceed to step 4.
(4) If the arrow “>” is next to ‘REC’ on the Mode Toggle, you are ready to record. If not, tap
the Mode once to toggle to ‘REC’ mode.
www.Gemini444.com
21 | P a g e
Gemini 4:4:4 User Manual 052412.004
(5) Make sure the System Status Indicator is green.
(6) Tap the Record Button to begin your Clip.
(7) Your clip is now recording. Please note:
a. The System Status Indicator is red.
b. One of the SSD Status Indicators is Red. If you have two cards in, the other
light should be green.
c. The Status Bar will turn red and your time code should be incrementing.
(8) To stop recording, click the blue Stop Button. The Status Line will indicate that the
“Record is Complete”.
(9) Record again, or, to watch your clip(s), you are ready for Playback Mode.
(10)Never remove a SSD while recording or playback. See SSD Status page 20.
DPX
Gemini records video into DPX (.dpx) files. DPX is a file format that is specifically designed
for uncompressed video. Each DPX file actually only stores one single frame of video.
Therefore, each record will have a single folder that contains all of the DPX files. For NLE
workflow options, see TRANSFER, page 27.
TIP: Clip Number at the end of the Clip Name (AAAAAAA) (OOO)
will increment automatically.
This can be adjusted by the User under the RECORD | CLIP.
WAV
If audio is present on the SDI Input, Gemini records 2 channels of 24 bit audio as a WAV
(.wav) file.
ARI
If recording in ARRIRAW Mode, Gemini produces ARRIRAW (.ari) files. For higher frame
rate recordings that require two SSD’s: the data files are recorded in alternating fashion
onto between SSD’s. Before editing, combine the two sets of files into a single folder to
obtain the entire clip. ARRIRAW Mode includes .wav audio as well.
www.Gemini444.com
22 | P a g e
Gemini 4:4:4 User Manual 052412.004
NOTE: When recording ARRIRAW or LOG, we suggest you check the monitor out for image quality
(proper lighting). When shooting in LOG, the image will look very flat with high contrast.
During record, the LCD screen will partially dim to conserve power.
When recording ARRIRAW in Log-C, you must “Apply LUT” on the Gemini LCD to make
image Rec709. Also when in ARRIRAW the white balance and shutter speed can be
adjusted and the live image will update accordingly.
www.Gemini444.com
23 | P a g e
Gemini 4:4:4 User Manual 052412.004
PLAYBACK
Now that you have successfully recorded to your Gemini 4:4:4, it’s time to harness its
playback capabilities on its high-definition 800 x 480 monitor.
(1) If the “>” is next to ‘PLAY’ on the Mode Toggle, you are ready to play back. If not, tap
the Mode once to toggle to PLAY Mode. The Status Line will indicate that you are now
in Play/Review Mode.
WARNING: DO NOT REMOVE EITHER SSD CARD DURING PLAYBACK.
THIS MAY RESULT IN DATA THAT IS UNRECOVERABLE.
(2) Tap the blue Play Button.
The most recent clip taken will immediately begin playing.
(3) When Play has been initiated, the button will change to a Pause Button.
(4) When you have completed your review, tap the Mode again to toggle back to REC
Mode.
(5) For proper playback, all recorded video should be the same video format. Also, assure
that any video input present during play is the same format as the recorded material
(however, a video input is not required during playback).
WARNING: COPYING FILES TO A FORMATTED SSD FOR PLAYBACK
FROM A MAC/PC IS NOT SUPPORTED.
Note: In ARRIRAW Mode, live preview and playback for p48, 50 and 60 will be at
24, 25, and 30 respectively.
www.Gemini444.com
24 | P a g e
Gemini 4:4:4 User Manual 052412.004
PLAYLIST
For additional options in playback, you may choose the ‘Playlist’ Menu Quick Key to display
a list of clips, including metadata and other clip information.
To reveal/hide clip info, simply tab the << button.
Check the RAID Box to playback 48/50/59.94/60p in real time. If it is not checked, it will
playback at half speed.
NOTE: Any Clips recorded in RAW Mode will ONLY
play with the unit in RAW Mode.
Higher frame rate clips recorded across two SSD’s will play:
* at normal speed from a single SSD
OR
*at half-speed from both SSD’s simultaneously (if “RAID” box is checked).
(1)
Make sure your Toggle is in ‘PLAY’ Mode.
(2)
Click the Playlist Quick Key in the left, upper-third of the monitor.
(3)
Select/deselect by tapping the box next to a clip. [
a.
X]
You may choose multiple clips.
b.
(4)
Use the page arrows,
, to reveal additional and previous clips (5
clips displayed per page). Selections from previous page will not be lost
when using this function.
c.
Choose ‘ALL’ to select all available clips.
d.
Choose ‘LOOP’ to loop or continuously play selected clips.
Tap the Play Button.
a.
Tap Pause Button to pause.
b.
Toggle to REC Mode when completed to stop.
www.Gemini444.com
25 | P a g e
Gemini 4:4:4 User Manual 052412.004
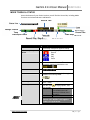
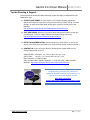
TRANSFER
Transfer Station
Second Generation Universal Transfer Station
Use only the Convergent Design Universal
Transfer Station, in combination with a
Seagate GoFlex Adapter (available in
Thunderbolt, Firewire, or USB) for
transferring data to a computer from a SSD.
Form factor designed to contour the Seagate
GoFlex Adapter Series, however, could be
used with other 2.5” SATA hard drive docks.
Power’s provided by AC.
For Thunderbolt adapters, disconnect and
reinsert the external cable to the GoFlex each
time an SSD is inserted so that the computer will recognize the SSD.
First Generation Transfer Station (eSATA)
Data from your SSD is copied over eSATA;
USB is used for ONLY powering the Transfer
Station. Data cannot be copied via USB.
If your computer is not equipped with an
eSATA port then you will need to purchase
an Adaptor, or expansion card. Additional
options include USB 3.0 to eSATA Adaptor,
or PCI eSATA Adaptor.
Best User Practices
The best way to transfer is to connect the eSATA adapter, the Transfer Station and the
SSD, then boot the computer.
Use 6 GB eSATA adapters for maximum performance.
Do not force cables or the SSD into Transfer Station. (See image for proper connectivity)
Never delete any files off an SSD from a computer, except when going through the
firmware update procedure.
www.Gemini444.com
26 | P a g e
Gemini 4:4:4 User Manual 052412.004
Performance
The Gemini 4:4:4 SSD's support read rates of 500 Mbytes/sec. Keep in mind you will be
limited by the slowest median in the transfer process. For example: eSATA 3Gbps cards
have a max performance of ~270MBps, and eSATA 1.5Gbps have a max performance of
~130MBps.
Typical Hard Drives (Non-RAID) generally perform anywhere in the range of 80-130MBps.
For maximum performance, make sure you are using eSATA 6 Gbps, USB 3.0 or
Thunderbolt to a Raid configuration.
Suggested Minimum RAID Configuration
Video Data Rate
Video Format
Mbytes/Sec
1080p24 4:4:4 10-Bit DPX
186.6
1080p25 4:4:4 10-Bit
194.4
1080p30 4:4:4 10-Bit
233.3
P50 10-Bit
400
P60 10-Bit
500
**It’s recommended to not exceed 250 clips per card.
Suggested for
Real Time Playback/Edit
FOR BEST PERFORMANCE FOR PLAYBACK OF DPX OR ARRIRAW,
WE RECOMMEND A RAID CONFIGURATION OF 300 Mbsp FOR
1080p30 AND 400-500 Mbps FOR 1080p50/60.
File Support
The Gemini 4:4:4 recorder accepts inputs from both HD-SDI 4:2:2 and 4:4:4 cameras.
To record 4:4:4, you can use HD-SDI Dual Link 1.5G or Single Link 3G (up to 1080p30).
1080p50/60 requires Dual 3G.
All DPX and ARRIRAW files are recorded so that each frame of video is a single file,
with all frames from a single recording being contained within a single file folder, including
a .xml metadata and .wav audio file for each take.
All Files Recorded by the Gemini 4:4:4 are recorded as 4:4:4 10 Bit RGB DPX Files,
as this is the industry standard.
www.Gemini444.com
27 | P a g e
Gemini 4:4:4 User Manual 052412.004
Thus, each time you start and stop a recording it will create a new file folder,
which takes the name of the Clip, as setup via a menu item in the Gemini 4:4:4:
All clips reside in a }CLIPS{ folder on the Solid State Drive (SSD).
1080p59.94/60 DPX
Due to high data rate, DPX file data is stored in a packed format. To un-pack the DPX files
(required by most computer software), use our free data transfer/un-packing tool, Gemini
Transfer from the Downloads page of our website www.convergent-design.com.
Gemini Transfer: Download for Mac
Download for PC (requires 32-bit Java Runtime)
File Structure
}CLIPS{
CLIP001001
(Assuming that the RECORD|CLIP is set to (CLIP001) (001))
CLIP0001001.0000000.DPX
CLIP0001001.0000001.DPX
Etc.
CLIP0001002
(Assuming that the RECORD|CLIP is set to (CLIP001) (002))
CLIP0001002.0000000.DPX
CLIP0001002.0000001.DPX
Etc.
DPX Frames May contain up to 60,000 Frames per Clip (Based on 512GB Drive)
www.Gemini444.com
28 | P a g e
Gemini 4:4:4 User Manual 052412.004
Transfer Configurations
This is one of many possible transfer configuration. For applying LUTS/LOOKS, and for
playback at top performance, a MyBook Studio RAID should be used in a RAID 5 fashion for
making a simultaneous backup. You can do the same setup with USB 3.0, Firewire, or
Fiber/SCS RAIDS.
Example: Data can be transferred using a Mac Mini or Laptop via Thunderbolt, Firewire 800 or
USB 3.0 to an external RAID (Pegasus Promise RAID shown) configured as a RAID 0. This
can be used for live playback creating LOOK files or applying LUTs, as well as confidence
monitoring of footage. We suggest having a secondary drive (Western Digital MyBook Studio
shown, configured as a RAID 5 redundant), which can then make two simultaneous copies of
the footage, for deliverables and archive.
www.Gemini444.com
29 | P a g e
Gemini 4:4:4 User Manual 052412.004
Accessing & Using the SSD on A Computer
SSD's used with the Gemini will report as entirely full (0 MB free) on a computer, as the
Gemini reserves the entire SSD for video only, and prevents the computer from writing to
this area. Thus the Gemini video area on the SSD is essentially read-only on a computer).
Firmware 1.1.2 and newer: To be able to write to an SSD, you must remove the
“Sandbox” file only on new code. Version 1.0.594 does not require this.
The SSD's can be used on a computer for playing video directly from the card, for copying
video onto the computer's file system, or to copy firmware update files from computer to
SSD for updating the Gemini (see the User Manual for more details on updating the
Gemini).
Note: Macs require a PCI->Sata Expansion Card to be able to attach
a SSD to the Mac via the Transfer Station.
Mac
Insert the SSD (label up) into the provided Transfer Station, and attach the Transfer Station
to the Mac via PCI->SATA port and the USB port (which only provides power).
The SSD will appear as a Volume within Finder on the Mac, and can be treated as part of
the File System. Like other Volumes on the Mac, the Volume must be dismounted within
Finder before being physically removed from the Transfer Station.
PC
For Windows 7 PC's: **Important*: First disable caching of the SSD
within Windows, to allow for consistent and correct display of files
from 1 SSD insertion/removal to the next.
To disable caching to the SSD:
1. Insert the SSD (label up) into the provided Transfer Station,
and attach the Transfer Station to the Pc via the SATA port and
the USB port (which provides power).
2. Within Windows Explorer, find the Drive Letter associated with
the just inserted SSD (256 or 512 GB SSD with ~250 MB
available).
3. Right-click the Drive Letter, in the Drop-down Menu choose
“Properties”.
4. Choose the “Hardware” tab.
5. In the available list, choose the option which begins “C400” be sure to choose the “C400” option and not a different drive.
6. Click the “Properties” button.
7. Choose the “Change Settings” button.
8. Click the “Policies” tab.
9. Turn “off” (un-check) the “Enable write-cache option”, or in
some versions of Windows 7, select (check) “Quick Removal” option.
10. Press “Ok” and you're done.
This procedure may need to be repeated if a future insertion of an SSD creates a different
Drive Letter within Windows Explorer. If the Drive Letter does not change from one
insertion to the next, the procedure does not need to be repeated.
www.Gemini444.com
30 | P a g e
Gemini 4:4:4 User Manual 052412.004
If you are unable to perform the above, For Windows 7, then you may power your computer
off, then attach the Transfer Station, SSD, and both cables, then power on your computer.
In this case, the computer should recognize your drive.
After copying files to the SSD, you may need to shut down your computer, for the Windows
Cache to be cleared (so that the files are actually written to the SSD).
Allow 10-20 seconds for Windows to recognize the SSD, after insertion.
Windows XP:
Avoid having the SSD attached at time of booting a Windows XP machine. Otherwise, if an
SSD is attached at time of Windows boot-up, Windows may try to boot from the SSD.
When removing an SSD from the Transfer Station, allow at least 15 seconds before
inserting another SSD.
Allow 10-20 seconds for Windows to recognize the SSD, after insertion.
www.Gemini444.com
31 | P a g e
Gemini 4:4:4 User Manual 052412.004
POST WORKFLOW
DPX Files
All DPX files are 10bit RGB 4:4:4. See page 13 for more information related to
1080p59.94/60 in Rec709 and LOG.
Adobe
Software
After Effects
CS4
CS5
CS5.5
CS6
Media Encoder
CS5
CS5.5
CS6
Photoshop
CS4
CS5
CS5.5
CS6
Premier Pro
CS4
CS5
CS5.5
CS6
Imp/Exp
Sound Booth
Function and General Notes
Import
Native Support for DPX
Export
• After Effects Project
• Premier Pro Sequence
• Uncompressed Quicktime Movie
After Effects Project
Premier Pro Sequence
Uncompressed Quicktime Movie
*Codec of Choice DNxHD, XDCAM,
ProRes
Export
•
•
•
•
Import
Native Support for DPX
Import
Export
Import
Export
Bridge
File Type
•
•
DPX
JPG, etc.
Native Support for DPX
Wav Audio Support
• After Effects Project
• Premier Pro Sequence
• Uncompressed Quicktime Movie
Final Production
•
•
•
•
Check Playback
Apply Color Correction
Apply LUT
Can be sent directly to Adobe Premier / Media
Encoder
For help importing /exporting and general
workflow questions, please visit the AE
forum, DVinfo forum, and DVXuser forum.
• Encode
*This will be dependent of any Codec installed on
your machine
• Viewer (individual frames)
• Used to check a Single Frame
• Be sure to select “Numbered Stills” Option….
• For optimal playback, import as After Effects
Project or import as Premier Pro Project directly
from After Effects.
(Deliverable File)
Imp/Exp
Native Support for DPX
Wav Audio Support
• Check Metadata & Preview Files
Imp/Exp
Wav Audio Support
• Edit Audio
Apple
www.Gemini444.com
32 | P a g e
Gemini 4:4:4 User Manual 052412.004
Color
1.5.3 (FCP7)
Compressor
3.5(FCP 7)
4 (FCP X)
Import
Native Support for DPX
Export
Final Cut Pro Project / Sequence
Import
Export
DPX
Plug In
•
•
• Encode
*With Glue Tools you can import DPX files,
then Encode to Codec of choice
• Check Playback
• Edit
Audio
Imp/Exp
Export to Final Cut Pro
Glue Tools (Mac)
Cineform Remaster
Import
Export
Soundtrack Pro
Glue Tools (Mac)
Cineform Remaster
*Codec of Choice: DNxHD, XDCAM, ProRes
DPX
Plug In
Final Cut Pro
6
7
X
•
•
• Check Playback
• Apply Color Correction
• Apply LUT
•
Wav Audio Support
*Plug In allows you to import DPX files
directly.
Final Production (deliverable file)
Wav Audio Support
• Edit Audio
Quicktime Pro
•
AutoDesk
Smoke
Flame
Import
• Native Support for DPX
Export
• NLE
• Uncompressed Quicktime Movie
• Final Production
• Check Playback
• Apply Color Correction
• Apply LUT
• Edit
•
www.Gemini444.com
33 | P a g e
Gemini 4:4:4 User Manual 052412.004
Avid
Avid DS 10.5
Metafuse
Import
• Native Support for DPX
• Wav Audio Supported
Export
Final Production
Import
Native Support for DPX
Export
*Codec of Choice: DNxHD, XDCAM, ProRes
• Check Playback
Export to Final Cut Pro
• Ecode
DPX
Plug In
Media Composer
5.5
6
Import
Audio
•
•
•
Metafuse
Cineform Studio
Cineform Professional
•
Wav Audio Support
• Check Playback
• Edit
*Plug In allows you to import DPX files directly
Export
Pro Tools
Imp/Exp
Final Production (deliverable file)
Wav Audio Support
CineForm
Neo Scene
Studio Premium
Studio
Professional
Remaster
Import
Native Support for DPX
Export
• CineForm 444
• ProRes 444
• (other installed Codecs)
Import
Native Support for DPX
Export
Final Production
Import
Native Support for DPX
Export
Final Production
Import
Native Support for DPX
Export
NLE / Final Production
• Encode
*Once files are converted to CineForm 444,
you can import them
Eyeon
Fusion 6
• Edit
Maxon
Cinema 4D
• Edit
NewTek
LightWave 3D
10.1
www.Gemini444.com
• Check Playback
• Apply Color Correction
• Apply LUT
• Edit
34 | P a g e
Gemini 4:4:4 User Manual 052412.004
The Foundry
Nuke 6.3
Furnace 4.2
FurnaceCore 4.3
Import
Native Support for DPX
Export
NLE / Final Production
Import
• Planned Support of Gemini DPX files
(near future)
• Wav Audio Supported
Export
Final Production
Import
• Native Support for DPX
• Wav Audio Support
Export
Final Production
Import
Native Support
Export
NLE / Final Production
Import
Native Support
Export
Uncompressed Quicktime Movie
Import
Native Support
Export
Uncompressed Quicktime Movie
Import
Native Support
Export
Jpeg, DPX, etc.
• Check Playback
• Apply Color Correction
• Apply LUT
• Edit
Sony
Vegas
• Edit
Grass Valley
Edius
5
6
• Create a new bin
• Import File
• Select ‘File As Sequence’
Black Magic
DaVinci Resolve
Resolve Lite
Media Express
• Check Playback
• Apply Color Correction
• Apply LUT
• Edit
• Check Playback
• Encode
*If you have DeckLink 3D, or 4:4:4 card, it will
playback and exp
AJA
DPX Translator
• Check Playback
• Encode
DPX Viewers
DJViwer
• Check Playback
XNView
POM DPX Head
Editor
Photoshop
www.Gemini444.com
35 | P a g e
Gemini 4:4:4 User Manual 052412.004
Convergent Design Gemini Transfer
To use 59.94/60p DPX files you will need this software to unpack the DPX frames. You can
download it from our website under the Downloads page.
XML Files / Metadata
ARRIRAW Files
www.Gemini444.com
36 | P a g e
Gemini 4:4:4 User Manual 052412.004
APPENDIX
Firmware Updates
We strongly recommend you always keep your Gemini 4:4:4
updated with the latest firmware.
We frequently add new features and bug fixes at no cost.
Firmware Update Instructions
We recommend that you print out these instructions, if possible (pages 37-40).
1. Your computer must have an internet connection so you may access our website.
2. Navigate to our website: Firmware Updates > Gemini 4:4:4
3. On the Right Side of the page, you will find “Current Firmware”.
Make a note of the firmware version that you will be downloading.
4. Format a SSD in the Gemini 4:4:4 (ensuring that no important clips are on the SSD first).
5. Insert the formatted SSD card in the transfer station.
6. Connect the transfer station to your computer.
For eSATA Transfer Station: Connect both the USB and eSATA cables to your computer
and the transfer station.If your computer does not recognize the SSD, you may need to
reboot your computer.
For Universal Transfer Station: Connect with Seagate GoFlex Adapter appropriate
cabling.
a. We recommend creating a folder named something like the following:
Gemini 444 Firmware 2012-05-24 (1.1.2). This example uses today’s date and
firmware number as listed in our webpage, but you may create a folder using a folder
name of your choice.
7. Click on the firmware version that you wish to download.
Note: You may reinstall an earlier version of the firmware, if desired.
www.Gemini444.com
37 | P a g e
Gemini 4:4:4 User Manual 052412.004
For Windows 7: (Other Windows Computers will be similar)
See below for Mac instructions
8. Click on Save As.
9. Navigate to the folder you just created.
10. Click on Save. The file you saved will be Gemini 1.1.2.zip
(or the current firmware version number)
11. Navigate to this folder and file. (You may just click on “Open Folder”)
12. Double Click on this file. It will be something like “Gemini 1.0.105.zip” but with the current
firmware number.
13. Click on Extract All Files.
14. Click on Extract.
15. Double Click on Gemini 1.0.105 (or current firmware version number).
16. Drag and Drop the }GEM_UPDATE{ folder to your SSD Drive
(Listed under Computer) on the left hand side of your screen.
Note: The SSD may be “No Name”, and it can be any Drive Letter”, but it will have a
}CLIPS{ folder on the drive.
Do not copy the firmware update into the }CLIPS{ folder.
Answer Yes to: “Do you want to copy this folder without Encryption?”
And Answer Yes to: “Do you want to copy this file without Encryption?”
Skip over “For Mac” instructions to finish the update.
www.Gemini444.com
38 | P a g e
Gemini 4:4:4 User Manual 052412.004
For Mac
8. Start with Steps 1 through 7 above.
9. Double click on the }GEM_UPDATE{.zip
10. Copy or Drag }GEM_UPDATE{ folder to SSD.
For Both Mac and Windows (PC continued)
1. If done successfully, you will have:
}CLIPS{
}GEM_UPDATE{
}GEMINI{.UPD
(An Empty Folder)
(The Update Folder)
(The Actual Firmware Update File)
2. Use the “Safely Remove Hardware” option or shutdown/restart your computer gracefully, to
ensure that the firmware has been completely transferred to the SSD.
3. Otherwise, the firmware update may not be successfully copied to the SSD, and then the
Gemini 4:4:4 will not find the firmware update.
11. Ensure that you have adequate power to power the Gemini 4:4:4, either battery or AC
Power. The firmware update takes approximately 5 minutes, but please ensure that you
have at least 30 minutes of battery time remaining to ensure safety.
12. Power up the Gemini 4:4:4.
13. Removing any video input cables.
14. Remove all SSD’s.
15. Insert the SSD with the firmware update.
16. Then power on the unit.
17. You will see a Firmware Update screen if the file is on the SSD properly.
18. Follow the On-Screen Prompts to complete the firmware update.
19. When complete it will say: “DONE – PLEASE REMOVE UPDATE DRIVE”
(Please remove the SSD; The unit will then power off and back on automatically).
www.Gemini444.com
39 | P a g e
Gemini 4:4:4 User Manual 052412.004
20. If you wish to then reuse this SSD (normally the case, unless you have additional Gemini
4:4:4’s to update):
a. Insert the SSD back into the Gemini 4:4:4
b. Click on Cancel (to avoid performing the Firmware Update again)
c. Reformat the SSD (Click on Menu, then Gemini, then SSD’s, then Format SSD1
or Format SSD2)
This step is very important:
Then power off the Gemini 4:4:4, then Power it back on.
If you fail to perform this step to power cycle the unit, then all
features of the Gemini 4:4:4 may not work properly.
TROUBLE SHOOTING: ! UPDATE FAILED ! or ! EMERGENCY UPDATE !
Check your power source, pull the power, and then run the update again. MAKE SURE THERE IS NO VIDEO
SOURCE plugged into the unit, and that there is only ONE SSD PRESENT.
If this process fails twice, contact Support.
www.Gemini444.com
40 | P a g e
Gemini 4:4:4 User Manual 052412.004
Specifications
Specification
Feature
Video I/O Ports
Video Standards
Video Formats
REC 709
ARRIRAW**
Record Options
Compressed
Uncompressed
RAW Formats
Multi-Stream (x2)
Live Preview / Playback
Single Stream
Stereo 3D*
Log Viewing LUTs
Playback Control
Metadata
Media
Transfer Station
Built-In LCD Monitor
Menu System
Timecode
Digital Audio I/O
Analog Audio I/O
Power Requirements
Size, Weight
Environmental
Gemini Production Kit
Optional Accessories
Notes
Four SDI ports: 2-In (HD-SDI Single Link/Dual Link/3G), 2-Out (HD-SDI Single
Link/Dual Link), HDMI-Out
HD-SDI, SMPTE 292M; HD-SDI 3G, SMPTE 424M; HD-SDI Dual-Link, SMPTE 372M
RGB 444 / YCC 422 1080p up to 60fps
ARRI Alexa: 16:9 (2880x1620) up to 60fps
Avid DNxHD support (QT) for 1080p YCC 422 up to 30fps (3rd Qtr 2012 Release)
1080p 10-Bit RGB 444 up to 60fps (DPX) with TC and metadata, audio recorded as wav
file
ARRIRAW
Parallel recording of two RGB 444 Streams up to 1080p30 (with 3D Option)
Real time decompressed / debayered output with / without LUT applied
Individual output of each stream or combined streams: Side by Side, Line by Line,
Anaglyph, 50/50 Composite
Support for S-Log, Log-C with user programmable 1D LUTs
Play, Rewind, Fast-Forward, Pause, and Step Control
Reel Number, Scene Number, Take Number and Project Name
Two Slots for 1.8" Solid State Drives (SSD), 256GB / 512GB sizes
1.8" SSD Transfer Station compatible with Seagate GoFlex Adapters (USB 3, FW-800,
Thunderbolt)
5" high brightness LCD, sunlight viewable, 800 cd/m², 800 x (RGB) x 480 Pixels, 24-Bit,
900:1 True Contrast, Wide +/-85⁰ Viewing Angle (IPS Technology)
1:1 Pixel Option, with user positioning of desired window via touch control
Touch Sensitive menu system with user-defined presets and customizable level of onscreen data
HD-SDI Embedded (SMPTE RP-188) or LTC via the remote control option
HD-SDI Embedded 4-Channels, uncompressed, 24-Bit, 48K
3.5 mm output jack, headphone or consumer line level
6 to 19 Volts DC, 6 to 15 watts
138 x 120 x 37 mm (5.4 x 4.7 x 1.45"); 612 grams (1.35 lb); Milled Aluminum Case
Ambient Temp: -10 to +40 ⁰C (Operating) / -20 to +70 ⁰C (Storage)
Gemini 444 Recorder + SSD Transfer Station + HD-SDI cables + HDMI Cable +
Hotshoe with 1/4"x20 Ball Mount + Universal AC Power Supply + 4-Pin XLR Power
Cable + D-Tap Power Cable; all packaged in a Custom Fitted Hard Plastic Case
256GB / 512GB SSD Media, Sun-Screen, Remote Control (with pushbutton start/stop,
tally light and LTC I/O)
**ARRIRAW and Stereo 3D are extra cost options
All Specifications subject to change without notice.
Record Times - See Page 21.
www.Gemini444.com
41 | P a g e
Gemini 4:4:4 User Manual 052412.004
Gemini Mechanical Drawings
Useful for your mounting needs and designs, please find below mechanical drawings of the
Gemini 4:4:4.
Remote Connector Pinout
(1)
(2)
(3)
(4)
POWER PINOUT
Power: +6.5 ~ +19V,
Power: +6.5 ~ +19V
Ground
Ground
www.Gemini444.com
REMOTE PINOUT
(1) 232 - RX
(2) Remote
(3) LTC-I/O
(4) GPI
(5) GND
(6) 232 - TX
42 | P a g e
Gemini 4:4:4 User Manual 052412.004
Firmware Version 1.1.2
Version 1.1.2 Features, 25-May-12
NOTE: Due to changes in formatting in the firmware release, any SSD to be used for recording
with the new firmware will first require a fresh formatting within the Gemini Recorder
(with the new firmware installed). Additionally, clips recorded with previous firmware may not
• A
play out of Gemini with newer firmware.
•
•
•
• Added “Camera” Record Trigger ( Record > Trigger > Camera ). This enables
compatible cameras to send Record Start and Record Stop signals to the Gemini
via the camera’s menu (see page xx).
• Added support for 1080p29.97 and 1080p30 4:4:4 10-bit DPX recording. Recording
is split (RAIDED) across two SSD’s (due to the high data rate), recorded at the full
frame rate. The “Odd” numbered files are placed on SSD1 and the “even”
numbered files are placed on SSD2. Any audio is placed on SSD2. Playback is
from the two SSD’s at the full frame rate. Before editing, combine the two sets of
files into a single folder when copying onto a computer to obtain the entire clip in a
single, descending file format folder.
• Added support for 1080p50/59.94/60 4:4:4 10-bit DPX recording. Recording is split
(RAIDED) across two SSD’s (due to the high data rate), recorded at the full frame
rate. The “odd” numbered files are placed on SSSD1 and the “eve” numbered files
are placed on SSD2. Any audio is placed on SSD2. Playback is either combined
from both SSD’s at half speed (by choosing the “RAID” checkbox in the Playlist,
see page 25) with no audio, or played as just the “even” frames (SSD2, with audio)
or “odd” frames (SSD1, no audio) at regular speed. Before editing, combine the
two sets of files into a single folder when copying onto a computer, to obtain the
entire clip in a single folder. (For 1080p59.94/60 two 512 GB SSD’s required.)
• Due to the high data rate of 1080p59.94/60 DPX files, the DPX data is stored as
“packed”. To un=pack the data (required for compatibility with most computer
software), use our free un-packing tool, Gemini Transfer, available on our website
on the Downloads page. All other DPX formats are recorded as un-packed on the
Gemini, and are directly accepted by all DPX compatible software. Both packed
and un-packed DPX data retain full quality.
• Convergent Design has received formal ARRI Certification, and added support for
ARRIRAW recording and playback for ALEXA Series cameras (16:9). Support
includes:
www.Gemini444.com
43 | P a g e
Gemini 4:4:4 User Manual 052412.004
Recording ARRIRAW progressive video formats at p23.98/24/25/29.97/30
(.ari) to single SSD (frame counter for files is based on the timecode), 2channel audio recorded as .wav (if audio is present on the incoming SDI
stream).
o Recording ARRIRAW progressive video formats at p48/50/59.94/60 (.ari).
Two SSD’s are required.as data files alternate between two SSD’s (frame
counter for files is based on the timecode). No audio is available for
p59.94/60.
o Playback of ARRIRAW.
o Support for Gemini “Camera” Record Trigger setting with ALEXA (on
ALEXA: Menu > Recording > Rec Out > SDI Remote > set to On).
o In the Gemini’s “Camera” Trigger and “Timecode” Trigger modes: Gemini
clips follow the same naming convention as the ALEXA internal recording,
provided that the Date (year/month/day) on the ALEXA and the Gemini
match exactly (Date is set separately on the ALEXA and the Gemini).
o A limited amount of ALEXA settings are available for viewing on the LCD
Screen of the Gemini during Live Preview, including Shutter Speed,
Exposure Index, White Balance, and Color Correction.
o A limited amount of ALEXA Metadata is available for viewing in the Gemini
Playlist including Location and Take.
o ARRIRAW is in LOC C format. A generic LUT may be applied to the
incoming video (for viewing only, not applied to the recorded video) by
selecting the “Apply LUT” option in the Pop-up menu of the Gemini.
o If recording at high frame rates (p48 and above) across two SSD’s:
combine the two sets of files into a single folder before editing, to obtain the
entire clip of a given recording.
o Activated ARRIRAW feature can be disabled / enabled (see Disable
ARRIRAW, page 10).
ARRIRAW is available to all Gemini Users in Demo Mode. A gray bar appears
across any recording. To activate ARRIRAW for Production Use:
o Purchase the ARRIRAW Upgrade from your local Dealer.
o On the Gemini, go to Gemini > Set > Keys > Raw
o With an SSD inserted into Slot 1, enter value “10000000” (eight-digit) for
the Raw Key; press “OK”.
o A Unit ID File is written to the SSD. Save this file to your computer.
o Upon receipt of the ARRIRAW Upgrade order, Convergent Design will
contact you to obtain necessary contact information and the Unit ID File.
This information is used to process your unique Activation Key.
o The ARRIRAW Activation Key will be sent to be entered into the Raw Key
field and activate the ARRIRAW feature on the Gemini 4:4:4.
o
•
www.Gemini444.com
44 | P a g e
Gemini 4:4:4 User Manual 052412.004
•
•
•
•
•
•
•
Convergent Design is phasing out the original Transfer Station (eSATA), and
replacing it with a Universal Transfer Station Adapter (available June 2012). While
this adapter is provided with the unit, it is intended for use with the Seagate
FreeAgent GoFlex Adapter, which is available as Thunderbolt, Firewire, or USB).
• If using the Thunderbolt adapter you must un-plug and re-plug the
Thunderbolt cable from the adapter each time an SSD is inserted, in order
for the computer to recognize the SSD.
Only use Convergent Design provided transfer stations, do not use any other such
adapter, when offloading video through the GoFlex Adapters.
A Pre-Activation File is written to the SSD, email this file along with Proof of
Purchase to cd support @ convergent-design .com. An Activation Key will be
emailed back, enter this key into the Raw Key field to activate the ARRIRAW
feature on the Gemini (see page xx).
Fixed bug in which the number of audio samples recorded did not correspond
precisely with the number of video frames recorded (audio was off by 1 to 3
seconds). The audio file recorded now has the correct number of samples with
respect to video frames recorded.
Fixed bug in the Unit Activation Key calculation (Activation Key is acquired and
entered as part of the unit registration process).
Added option to clear Metadata fields back to default values (Gemini > Set > Reset
> Metadata).
Added a partial (50%) dimming of LCD Screen during Record to help conserve
power usage and reduce temperature.
All SSD space is now pre-allocated when formatted on the Gemini, meaning no
free space is available on a computer. This changes the update procedure for the
Gemini, for future updates:
NEW FIRMWARE UPDATE PROCEDURE (for future updates, post-v1.1.2)
1.
2.
3.
4.
Format an SSD on the Gemini
Take to computer, delete the “SANDBOX” file from the SSD
Copy the new firmware onto the SSD
Insert the SSD back to the Gemini and follow the prompt to update the
firmware
5. After updating, return the SSD to the computer and delete the firmware
update
6. Format the SSD again on the Gemini for recording
7. NOTE: We recommend never to delete the “SANDBOX” file or any files
from an SSD on a computer, unless you are loading a firmware update or
other essential file from the computer to the SSD.
www.Gemini444.com
45 | P a g e
Gemini 4:4:4 User Manual 052412.004
•
Added a “Format Both” option to format (erase) both SSD’s (Gemini > SSD’s >
Format Both).
We also recommend never to use the Convergent Design SSD’s for general
purpose usage on a computer – only use the SSD’s for offloading video recorded
on the Gemini (or for transferring firmware updates or other essential files to the
Gemini from a computer).
Known Issues / Limitations
• During playback of clips from the Gemini Recorder: the only functions available are
“play” and “Stop” (both functions are available via the Play/Stop bottom on the
bottom of the screen). At this time no other Play functions (such as Pause or Trick
Play functions ) are available.
• HDMI Output and Analog Audio Input are not functioning at this time.
• Single-link video inputs must be attached to the “SDI A In” port on the Gemini.
• When using Timecode Trigger as the Record Trigger, repeated timescodes may be
experienced on the final 2 or 3 frames of a given recording.
• The “Apply LUT” option only applies to 4:4:4 or RAW inputs. “Apply LUT” does not
work in 1080p50/60 DPX or any 4:2:2 single source.
• 1080p48 DPX is not supported at this time
• Video may shift when formatting SSD’s.
• 3D is not enabled at this time.
• Files recorded with previous firmware on the Gemini may not play out of Gemini
that has newer firmware.
• Playback may not work properly from SSD’s with mixed video formats. Additionally,
playback may not work properly if a video input is present at the time of Play, which
is different from the recorded material’s video format.
Previous Firmware Releases
Version 1.0.594 Features, 10-Feb-12
• Added support for 1080p 24.00 frame rate (in addition to the already supported 1080p23.98
and 1080p25). Additionally, 1080p23.98 is reported more precisely as 23.98 in the Input
Status window of the LCD screen.
• The DPX file naming convention was changed:
o For the character preceding the frame counter digits, we replaced the “.” with a “_”
o Files now begin at “0000000” instead of “0000001”, and count forward as before.
Example: For a clip named CLIP0000001, the DPX files will be named:
CLIP0000001_0000000.DPX
CLIP0000001_0000001.DPX
CLIP0000001_0000002.DPX …etc.
www.Gemini444.com
46 | P a g e
Gemini 4:4:4 User Manual 052412.004
• Fixed Outputs: Mode setting to be correctly saved when the setting is changed.
• Added a “Next Take” info button on the left side of screen, which when chosen displays
the Clip, Scene, and Take which will be used for the next recording.
(Please refer to the Metadata discussion below).
• Fixed bug in which timecode would inappropriately repeat or skip from one DPX file to the
next within a recording.
• Fixed rare (0.000001% ) pixel repetition within video frames.
• Lessened the sensitivity of scroll buttons when scrolling and adjusting values on the LCD
screen.
• Added Support for CineFlex cameras with earlier firmware versions that do not comply with
SMPTE Specs. Dual-link HD-SDI signals will now be recognized appropriately from these
cameras.
• Added Metadata functionality:
o Metadata may be entered and edited through the “Metadata” tab along the left side
of LCD screen (in Live/Rec Mode).
o The “Scene” and “Take” fields (along with the Clip Name) for the next recording are
displayed just above the timecode display, which is located along the bottom row of
the LCD screen, when the “Next Take” info button is selected (on the left bottom of
LCD).
o During Record, Metadata is saved in various locations within the header of every
DPX file (the Metadata within the DPX header is viewable within some software
programs on a computer), and additionally the Metadata is stored in a separate
XML file (alongside the DPX files for a given recording).
o Also, the Metadata is stored, within the DPX header:
• the “Reel”, “Scene”, “Take”, and “Day” values are placed in the “Slate Info” defined field in
the DPX header
• the “Reel” value is additionally placed in the “Input Device Name” field of the DPX header
• the “Camera” value is placed in the “Input Device Serial Number” field of the DPX header
• the “Project” value is placed in the “Project” field of the DPX header
• Most Metadata is displayed for each clip in the Play List (in “Play/Review” mode on the
Gemini Recorder). This includes Scene, Take, Timecode, Date, Time, and Shooting Day.
• Added 2-channel audio support over SDI, recorded as WAV files (and placed alongside the
DPX files for a given recording). WAV file will only be produced if audio is present over the
incoming SDI stream during record.
• Added Play List / Play Selection functionality:
Clips may be selected for Playback out of the Gemini via the “Play List” tab along
the left side of the LCD screen (in Play/Review mode).
o All selected clips will be played in sequence, and optionally the playback will loop
continuously (if the “Loop” option is selected), until manually stopped.
o The default behavior of the Play List is to play and loop the last recorded clip.
• Added Screen Flip function (Gemini->Set->LCD->Flip) to flip the Video and On-Screen
Display by 180 degrees. This is to allow more flexibility of mounting the Gemini 4:4:4, as it
can now be mounted upside down, while still viewing the image and menus in the upright
position. This does not flip the recorded image. Flipping of the recorded image will come
with the 3D Option.
• Added LCD Screen / LED Brightness setting (Gemini->Set->LCD->Brightness) :
20% to 100% Brightness, adjustable in 10% increments.
• Added LTC timecode input source (via remote port and adaptor cable)
o
www.Gemini444.com
47 | P a g e
Gemini 4:4:4 User Manual 052412.004
(Inputs->Timecode->Source).
o LTC Timecode may be used in conjunction with the Record->Trigger->Timecode
setting to start and stop recordings on the Gemini (via incrementing Timecode for
starting record, and stopped Timecode for stopping record), in the same manner as
with Embedded SDI Timecode.
• Added current time/date display via the System Status button (lower left corner of LCD
touch-screen, press button to bring up a larger System Status Info box).
• Beta support for 3G video inputs is included in this release.
NOTE: Due to the addition of audio files, XML files, and Play List in this firmware release,
any SSD to be used for recording with the new firmware will first require a fresh formatting
within the Gemini Recorder (with the new firmware installed). Additionally, for any SSD's
containing clips recorded on previous firmware, the Gemini Recorder will not provide a Play
List for these clips – the only Play function will be “Play All”. In order to play clips recorded
with earlier firmware, you must select the “All” function in the Play List, and insert SSD's
with the older clips only after powering the unit.
Known Issues – 1.0.594
• During playback of clips from the Gemini Recorder: if the “Loop” option is selected, the
video/audio can get out of sync with respect to each other over time. Additionally during
“Loop” play, the audio may disappear altogether. These are only limitations of the “Loop”
play; the actual recorded video/ audio files are intact and in sync.
• During playback of clips from the Gemini Recorder: the only functions available are “Play”
and “Stop” (both functions are available via the Play/Stop button on the bottom of screen).
At this time no other Play functions (such as Pause or Trick Play functions) are available.
• During playback: on rare occasions, the video can shift vertically. Restarting the Play will
correct the video shift. This is only present while playing from the Gemini; the actual
recorded video files are intact.
• HDMI Output and Analog Audio Input are not supported at this time.
(Future firmware release).
• Single-Link video inputs must be attached to the “SDI A In” port on the Gemini.
• When using Timecode Trigger as the Record Trigger, repeated timecodes may be
experienced on the final 2 or 3 frames of a given recording.
• For the Metadata fields, no method exists to clear these fields back to default values.
• Firmware Version 1.0.105 drives cannot be recorded to with firmware version 1.0.594.
• Copying files to SSD’s from a computer source for playback is not supported.
www.Gemini444.com
48 | P a g e
Gemini 4:4:4 User Manual 052412.004
Trouble Shooting & Support
Please read the User Manual before contacting support. We highly recommend that you
follow these steps:
(1) UPDATE YOUR GEMINI: Visit the Gemini 4:4:4 Firmware Updates page on the
website and confirm that you are running the latest version. Please refer to ‘Firmware
Updates’ on page 22 for more about checking the system for current version and
updating.
http://www.convergent-design.com/ProductUpdates/Gemini444.aspx
(2) VISIT OUR FORUM: We have a very active forum and you may find the answer you
are looking for, as well as support from the Convergent Design community.
http://www.dvinfo.net/forum/convergent-design-nanoflash/
(3) REFER TO DOCUMENTATION: Please read all of this User Manual, as well as our
Gemini 4:4:4 FAQs which document basic usage and help answer common questions.
(4) CONTACT US: If you still haven’t found a solution to your support needs we are
always happy to help you 24/7!
Support E-Mail: c ds u pp o r t ( at) c on v er ge n t- d es i gn .c om
Sales E-Mail:
c ds a l es ( a t) c o n ver g e nt- des i g n .c om
Main Telephone: ++(720) 221-3861
Sales and After Hours Support Telephone: ++ (719) 930-1376, ++803-278-0941
Web Site: http://www.convergent-design.com & www.Gemini444.com
We appreciate your questions, comments,
feedback! We ARE listening! To reach out to us,
look for this link on our website, or visit
http://www.convergentdesign.com/ProductUpdates/WereListening.aspx
www.Gemini444.com
49 | P a g e
Gemini 4:4:4 User Manual 052412.004
Limited Warranty
Convergent Design warrants Gemini 4:4:4, and all included accessories, against defects in
material and workmanship for a period of 2 years (for registered units), 1 year (for nonregistered units), and 3 months (for units used as rentals) from the original date of
purchase.
Convergent Design disclaims all other warranties.
Convergent Design will not be liable for damages of any kind, including, but not limited to,
compensation or reimbursement on account of failure of the unit, or any of its accessories,
or its recording media, external storage systems, or any other media or storage systems to
record or playback content of any type. Also Convergent Design will not be liable for a
failure of the unit to properly record or play back for any reason. Convergent Design’s total
liability, in all cases, is limited to the actual purchase price.
If you discover a defect, please refer to our Return Merchandise Policy below.
During the warranty period, Convergent Design, at its option, will repair or replace product
or product components, which in its opinion prove defective, provided the unit is returned,
freight charges prepaid, to Convergent Design. Parts and components used in the repair
process may be recycled or repaired, at Convergent Design’s sole discretion. This warranty
service will be performed at no charge to the registered owner, provided the product is
shipped prepaid to Convergent Design.
Convergent Design reserves the right to determine whether a needed repair is subject to
the warranty as per its provisions stated herein. Transit damage caused by inadequate
packing violates the warranty. The warranty will be void if, in the opinion of Convergent
Design, the product has been damaged through accident, misuse, misapplication, or as a
result of service or modification not authorized in writing by Convergent Design.
Opening the unit and breaking the warranty seals, voids the warranty, unless specifically
authorized in advance by Convergent Design.
WARNING: THE FOLLOWING ARE NOT COVERED UNDER WARRANTY, AND
ARE ITEMS FOR WHICH CONVERGENT DESIGN DOES NOT ACCEPT ANY RESPONSIBILITY:
• Damage due to the use of an AC power supply, other than the one supplied, or use of
any inappropriate power source.
• Damage due to overheating conditions. The unit will attempt to shut down, if powered
on, in the event of overheating, before damage can occur.
• Damage due to exposure to water, or other liquids, or excessive dust or sand.
• Damage caused by dropping or other rough handling.
• Damage caused by any overvoltage conditions or reverse voltage conditions.
www.Gemini444.com
50 | P a g e
Gemini 4:4:4 User Manual 052412.004
• Any physical damage to the LCD and/or Touch Screen including scratches.
• Damage to any connector by using excessive force or rough handling.
• Any loss or corruption of video or audio data recorded on the unit, or any loss or
corruption of data which is in any way associated with the Gemini 4:4:4.
Obtaining an RMA
It is our policy that all material and repair returns, whether in warranty or not, are only
accepted if an RMA (Return Merchandise Authorization) Number has been issued for the
products being returned.
E-mail Convergent Design at cdsupport (at) convergent-design .com to obtain an RMA
number for a faulty unit, or call ++720-221-3861 (7:30 am to 5 pm Colorado, USA time).
Items must be returned within 15 days of receiving your RMA number.
Returned product must be securely packaged and must have the RMA number clearly
marked on the outside of the package.
RMA numbers and return address may be obtained from Technical Support.
Convergent Design RMA # _______________
4465 Northpark Drive, #400
Colorado Springs, CO 80907
EMAIL: [email protected]
WEBSITE: www.convergent-design.com or www.gemini444.com
Phone ++(720) 221-3861 (Preferred, Mountain Time) or
++(866) 654-0080 or
++(803) 278-0941 (For After Hours Support 24/7)
++(719) 930-1376 (For After Hours Support 24/7)
Transit damage caused by inadequate packaging also invalidates the warranty agreement.
Please ship the unit in its original packaging, if possible.
Within the United States, the unit may be shipped directly to Convergent Design once an
RMA is obtained.
Outside the United States, please coordinate with your dealer, which will then coordinate
with our distributor for your part of the world. Our goal is to ensure that the units are
shipped properly and that the units will clear customs without incurring extra charges. In
some cases your local dealer or distributor may be able to provide you with a loaner unit.
All products must be shipped prepaid to Convergent Design, or preferably through the
dealer from which the unit was purchased (if outside the US). If you purchased the unit
www.Gemini444.com
51 | P a g e
Gemini 4:4:4 User Manual 052412.004
from a dealer outside of your normal trading zone, then you may be charged for return
shipping to your location.
For insurance reasons, Convergent Design cannot accept any product that is returned via
U.S. Postal Service. Returns will be accepted from Federal Express, UPS, DHL, or other
comparable freight carrier.
Products repaired out-of-warranty are shipped at customer’s expense.
www.Gemini444.com
52 | P a g e