1
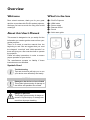
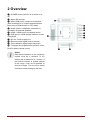
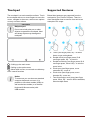
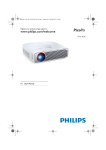
Register your product and get support at www.philips.com/welcome PPX4935 EN User Manual Table of Contents Overview ...............................................................3 Welcome ...............................................................3 About this User’s Manual ......................................3 What’s in the box ..................................................3 Product highlights ..................................................4 1 General Safety Information ............................5 Setting up the Device ............................................5 Automatic Temperature Control ..........................5 Repairs ...................................................................6 Wireless Network (WIFI) .....................................6 Dolby Digital..........................................................6 Power Supply .........................................................6 2 Overview ........................................................7 Touchpad ...............................................................8 Supported Gestures ..............................................8 Virtual On-Screen Keyboard .................................9 Remote Control ..................................................10 Overview of the Main Menu ...............................11 Overview of the Options Menu ..........................11 3 4 5 2 Initial Operation ...........................................12 Setting up the Device ..........................................12 Connect Power Supply / Charge Battery ............12 Installing or Changing the Batteries of the Remote Control ................................................................12 Using the Remote Control ..................................13 Initial Setup ..........................................................14 Turning off the Projector.....................................14 Standby Mode ......................................................14 Indication of different POWER button LED color .............................................................................14 Connect to various Playback Devices..........15 Connecting to Devices with HDMI Output .......15 Connecting to an iPhone/iPad/iPod .....................15 Connecting to an Android Smartphone or Tablet via MHL cable ......................................................16 Screen Mirroring – Connect Phones or Tablets wirelessly to share its contents ...........................16 Connecting Headphones or external Speakers (cable connection) ...............................................17 Memory........................................................18 Inserting a Memory Card ................................... 18 Connecting an USB Storage Device ................... 18 Connect to a Computer (USB) .......................... 19 6 Internet Connection, Wireless Network (WIFI) 20 Switching Wireless Networking (WiFi) on/off ... 20 Setting up a Wireless Network (WiFi) .............. 20 Setting up a Wireless Network (WiFi) using the Wizard ................................................................ 21 Wifi Hotspot ...................................................... 21 Activating WiFi Hotspot .................................... 21 Setting up a WiFi Hotspot ................................. 21 DLNA (Digital Living Network Alliance) ........... 22 Switching DLNA on and off................................ 22 Play Media Using DLNA ..................................... 22 7 Bluetooth ..................................................... 23 Activate Bluetooth ............................................. 23 Set up Bluetooth Parameters ............................. 23 8 Media Playback ........................................... 24 Media Folder ....................................................... 24 How to Navigate in the Media Folder ................ 24 Picture viewer, Slideshow ................................... 25 Music Playback .................................................... 25 File Operations in the Media Folder .................. 25 9 Web Browser ............................................... 27 10 Android / APPs ............................................ 28 Starting installed Android Apps.......................... 28 Exiting Android ................................................... 28 Installing Android-Apps ...................................... 28 11 Settings ....................................................... 29 Overview of the Menu Functions ....................... 29 12 Service ........................................................ 31 Care Instructions for the Battery ....................... 31 Charge the Device .............................................. 31 Cleaning .............................................................. 31 Troubleshooting .................................................. 32 13 Appendix ..................................................... 34 Technical Data .................................................... 34 Accessories....................................................... 34 Overview Welcome What’s in the box Dear valued customer, thank you for your great decision to purchase this PicoPix pocket projector. We hope you have as much fun using it as we did creating it! ❶—PicoPix Projector ❷—HDMI cable ❸—Power supply ❹—Remote control ❺—Pouch ❻—Quick start guide About this User’s Manual This manual is designed to let you easily find the information you need to get the most out from your pocket projector. There is no need to read the manual from the beginning to end. But we suggest that you read the chapter’s “overview” and “initial operation” as these will give you a first overview how to operate the projector Follow all safety instructions in order to ensure proper operation of your device. The manufacturer accepts no liability if these instructions are not followed. Symbols Used Troubleshooting Tips and tricks that will help you to use your device more effectively and easily. CAUTION! Damage to the device or loss of data! This symbol gives warning of damage to the device and possible loss of data. DANGER! Danger to persons! This symbol gives warning of danger to persons. Physical injury or damage can result from improper handling. Philips PPX4935 3 Product highlights Smart Engine LED technology • HD resolution (720p) • Amazing 350 lumens brightness • Keystone correction • Texas Instruments DLP® IntelliBright™ technology which intelligently boosts image brightness, resulting in brighter, more dynamic images. Built-in 3W power speaker • brilliant sound with deep bass performance • 6 Equalizer settings for perfect sound Bluetooth audio-out with aptX® • aptX® Low Latency audio codec ensures high audio quality and wireless audio/video synchronization Wired connectivity • HDMI connector for all kind of input devices • MHL support to share content from your Smartphone or Tablet • Headphone connector for external speaker or headphones • High power USB to connect external USB and HDD drives Wireless connectivity • WIFI b/g/n to easily connect to private or public WIFI networks • DLNA support to access media files stored on network drives • WiFiDisplay (Miracast compatible) to wirelessly share content of your Smartphone or Tablet • Built-in web-browser to share or play internet contents 4 Multimedia player • Supports all widely used picture, audio and video formats • Micro SD support to have all your media contents always available Built-in touchpad • Multi-touch support for easy navigation • Pinch & zoom support for pictures and websites 1 General Safety Information Do not make any changes or settings that are not described in this user manual. Physical injury or damage to the device or loss of data can result from improper handling. Take note of all warning and safety notes indicated. Setting up the Device The unit is for indoor use only. The device should be placed securely on a stable, flat surface. Position all cables in such a way that no one will stumble on them, thus avoiding possible injuries to persons or damage to the device itself. Do not plug in the device in moist rooms. Never touch the mains cable or the mains connection with wet hands. The device must have sufficient ventilation and may not be covered. Do not put your device in closed cabinets or boxes. Do not place the machine on soft surfaces such as tablecloth or carpets and do not cover the ventilation slits. Otherwise the device could overheat or catch fire. Protect the device against direct sunlight, heat, large temperature fluctuations and moisture. Do not place the device in the vicinity of heaters or air conditioners. Observe the information on temperature and humidity in the technical data. Do not allow liquids to enter into the device. Switch off the device and disconnect it from the mains supply if liquids or foreign substances end up inside the device. Have the unit inspected by a technical service department. Always handle the unit with care. Avoid touching the lens. Never place heavy or sharp objects on the projector or the power cable. If the projector gets too hot or emits smoke, shut it down immediately and unplug the power cable. Arrange for your device to be investigated by a technical service centre. To prevent the spread of fire, open flames should be kept away from the device. Philips PPX4935 Under the following conditions a layer of moisture can appear inside the device which can lead to malfunctions: if the device is moved from a cold to a warm area after a cold room is heated when this device is placed in a damp room. Proceed as follows to avoid any moisture build-up: 1. Seal this device in a plastic bag before moving it to another room, in order for it to adapt to room conditions. 2. Wait one to two hours before you take the device out of the plastic bag. The device should not be used in a very dusty environment. Dust particles and other foreign objects may damage the unit. Do not expose the device to extreme vibrations as internal components my get damaged. Do not allow children to handle the device without supervision. The packing materials should be kept out of the hands of children. Automatic Temperature Control This device includes an automatic thermal management controller. If the internal temperature gets too hot, the fan speed will automatically increase (noise increase), if the temperature still continue to growth, the brightness of your product will decrease and finally the current symbol will appear. 5 The product will automatically switch off the display after displaying this message during 5s. This kind of behavior should not arrive except if the outside temperature is very high (>35°C). Repairs Do not repair the device yourself. Improper maintenance can result in injuries or damage to the device. Your device must be repaired by an authorized service center. Find details of authorized service centers on the warranty card. Do not remove the type label from the device as this would void the warranty. Wireless Network (WIFI) The function of security systems, medical equipment or sensitive devices can be disrupted by the transmission power of the device. Observe any usage regulations (or restrictions) in the vicinity of such equipment. The use of this device can affect the operation of insufficiently shielded medical devices and hearing aids and pacemakers through the release of high frequency radiation. Also consult a doctor or the manufacturer of the medical device to establish whether these are sufficiently shielded from external high frequency radiation. Dolby Digital Manufactured under license from Dolby Laboratories. Dolby and the double-D symbol are trademarks of Dolby Laboratories. Power Supply Use only the enclosed power adapter (see chapter Appendix / Technical Data). Check whether the mains voltage of the power supply matches the mains voltage available at the setup location. This equipment complies with the voltage type specified on the unit. The capacity of the battery diminishes with time. If the device functions only with the power supply contact an authorized service center to replace the battery. Do not try to replace the battery yourself. Incorrect handling of the battery or using the wrong type of battery can cause damage to the device or cause injury. DANGER! Risk of explosion with incorrect type of batteries Do not try to replace the battery yourself as there is a risk of explosion if the incorrect battery type is used. Switch the device on or off using the power switch before removing the power supply from the socket. Turn off the device and remove it from the power supply before cleaning the surface. Use a soft, lint-free cloth. Never use liquid, gaseous or easily flammable cleansers (sprays, abrasives, polishes, alcohol). Do not allow any moisture to reach the interior of the device. DANGER! High Power LED This device is equipped with a high power LED (Light Emitting Diode), which emits very bright light. Possible hazardous optical radiation emitted from this device. Do not stare at operating light source. May be harmful to the eyes. DANGER! Danger of hearing damage Do not use the device over a longer time at high volume - especially when using headphones. 6 2 Overview ❶—POWER button (hold for 3s to switch on or off) ❷—Micro-SD card slot ❸—Micro-USB port to connect to a computer (data exchange) or to connect external devices like mouse or keyboard via an OTG cable ❹—Audio output - headphone connection or connection for external speakers ❺—HDMI - HDMI port for a playback device ❻—USB port for a USB storage medium, mouse or keyboard ❼—DC-IN - Power supply port ❽—Remote control signal receiver window ❾—Focus wheel to adjust image sharpness ❿—Touchpad for navigation and operation of the PicoPix without remote control Notice Note that the distance to the projection surface must be a minimum of 0.5 meters and a maximum of 5 meters. If the Pocket Projector is located outside of this range, it will not be possible to focus the image. Turn the focus wheel carefully to avoid damage to the lens. Philips PPX4935 7 Touchpad Supported Gestures The touchpad is a touch-sensitive surface. Touch the touchpad with one or more fingers to move the cursor, navigate in the menu, select menu options or carry out other actions. Below listed gestures are supported from the touchpad of your PicoPix Projector. There is a short description how to execute it as well as an example of it’s usage. CAUTION! Ballpoint pen! Do not use a ball-point pen or other objects to operate the touchpad. Hard and sharp objects may damage the touchpad. —Calling up the main menu —Calling up the option menu —Move back in menu, move back one directory level / cancel functions Notice To enter text you can also use standard computer keyboard or mouse. It is possible to use wired models (USB) as well as wireless models (or a wireless Keyboard & Mouse combo) with USB-receiver. 8 a. Touch (one-finger press, lift) – to select items or type on keyboard b. Double touch (one-finger press, lift & one-finger press, lift) – to zoom in c. Double-touch drag (one-finger press, lift & one-finger press, move & lift) – to scroll or zoom in/out d. Pinch open (two-finger press, move outwards, lift) - zoom in e. Pinch close (two-finger press, move inwards, lift) - zoom out f. Two-finger swipe, scroll, drag (two-finger press, move, lift) – scroll in lists or websites, select multiple items Virtual On-Screen Keyboard When you need to enter text (e.g.: when using the web-browser or when required to enter a password), the projector displays a virtual keyboard which can be operated by the touchpad or the remote control. 1. 2. 3. Click in the input field using the touchpad, external mouse or the remote control The software keyboard appears. Use the touchpad/mouse/remote control to enter the text on the software keyboard. Philips PPX4935 9 Remote Control ❶—Short press: set PicoPix to standby mode / wake it up from standby mode Long press: Power off the projector ❷—Direction Buttons : Confirms selection / , / : Navigation keys / navigation in the menus / modify settings / : Modify settings / access quick settings / during music playback: select previous or next title / : During video playback back/next, fast forward/backward ❸—Move back in menu, move back one directory level / cancel functions ❹—Volume keys : Decrease the volume : Mute the sound : Increase the volume ❺—Call up the option menu ❻—Call up the main menu 10 Overview of the Main Menu 1. 2. Switch on the device using the POWER button (hold it for 3 seconds). After the PicoPix has started up, the main menu appears (if you switch on the PicoPix the very first time you will be guided through a short setup procedure) WiFi Display— Display wirelessly multimedia content from your Smartphone or Tablet on PicoPix (Miracast compatible) WWW—Opens an Internet web-browser. APPs—Shows installed APPs (Android operating system) Settings—Configure settings of the device. Overview of the Options Menu 3. 4. 5. 6. 7. 8. Select the desired menu using the navigation keys / , / on your remote control or use the touchpad to navigate the cursor Confirm with OK on the remote control or tap once using the touchpad By pressing the key you will return to the main menu. To move back one step in sub-menus use the key To modify important settings quickly use the key to enter the options menu To change important settings quickly, you can use the Options Menu, which can be accessed via the key. The Options Menu is accessible also via movie playback or during a slideshow to change settings without the need to stop playback and enter the Settings Menu. To browse in menus up/down use the / keys in the remote control or use 2-finger move on the touchpad HDMI/MHL—Switch to the external video input HDMI or MHL. Media Folder—Display the content of the internal memory and the inserted memory Micro-SD card or USB stick (movies, pictures, music, folder view). Display the content of network drives connected via WIFI/DLNA Philips PPX4935 11 3 Initial Operation Setting up the Device Installing or Changing the You should position the device so that it stays flat on a table in front of the projection surface. In case you need to tilt the projector upwards you can correct the projected image with the built-in keystone correction (Options Menu). The distance between the projector and the screen determines the actual size of the image. Batteries of the Remote Connect 1. To access the battery, disengage the locking mechanism (❶) and slide out the battery compartment (❷). 2. Insert the new battery with the positive pole as shown on the back of the remote control. Power Supply / Control DANGER! Risk of Explosion with Incorrect Type of Batteries Only use batteries of type CR2025. Charge Battery CAUTION! Mains Voltage at the Site of Installation! Check whether the mains voltage of the power supply matches the mains voltage available at the setup location. 1. 2. 3. 4. 12 Insert the small plug of the power supply into the socket on the rear side of your device. Plug the power supply into the mains. During the charging process, the indicator light on the side of the device will be red. When the battery is fully charged, it will turn green. Charge the built-in battery completely before using for the first time. This will prolong the life of the battery. Using the Remote Control Point the remote control at the remote sensor on the back of the device. The remote can be used within an angle of 60 degrees and up to 5 meters from the device. When using the remote control, no obstacle should be placed between the remote control and remote sensor. 3. Push the battery compartment back into the remote control until the locking mechanism engages. CAUTION! Notice Normally the battery will last for around one year. If the remote control stops working, please replace the battery. Philips PPX4935 The improper use of batteries can lead to overheating, explosion, risk of fire and injury. Leaking batteries can possibly damage the remote control. Never expose the remote control to direct sunlight. Avoid deforming, dismantling or charging the batteries. Avoid exposure to open fire and water. Replace empty batteries immediately. If the device is not used for a long time, take out the batteries to prevent leakage and possible damage to the remote control. Used batteries should be disposed of according to the recycling regulations of your country. 13 Initial Setup Standby Mode 1. Press the POWER button for 3 seconds to turn the device (the power indicator light will light up). Set your PicoPix in Standby Mode if you would like to switch it on very quickly again. To switch the PicoPix to Standby Mode press the POWER button on the device or on the remote control shortly (1s). To wake up your PicoPix from Standby Mode, press shortly again on the POWER button. 2. Turn the device towards a suitable projection surface or wall. Note that the distance to the projection surface must be a minimum of 0.5 meters and a maximum of 5 meters. Make sure the projector is in a secure position. Use the focus wheel on the right side to adjust the image sharpness. If you switch on the PicoPix the very first time you will be guided through a short setup procedure which includes following settings a) Select language. b) Set time zone and time. c) Select usage of projector (Home or Shop). Home: for normal use at home Shop: when you choose this option, the projector starts in demonstration mode and automatically displays pictures or videos stored in the internal memory in a loop. d) Set up WIFI connection. 3. 4. Notice The PicoPix will need some power in Standby Mode. If kept a long time the battery can be empty. CAUTION! Indication of different POWER button LED color 1. PicoPix in power off status a) Notice The demonstration mode can be activated or deactivated in the menu Settings/ Maintenance/ Demo mode. b) c) 2. 3. No light: AC power adaptor not connected, or internal battery defect. Green: Internal battery full charged. Red: Internal battery under charging. PicoPix in power on status a) b) c) Turning off the Projector To turn off the PicoPix completely press the POWER button for 3 seconds on the device or on the remote control. Please take care to switch your PicoPix completely off before you transport it in a bag as only a short push of the Power button will switch it on and the packed unit can get very hot or damaged. No light: Internal battery defect. Green: Internal battery normal working. Red: Internal battery in low capacity. PicoPix in standby status a) Green flash: Standby status. b) Red light with green flash: Internal battery in low capacity. 14 4 Connect to various Playback Devices Supplied cables HDMI cable Connecting to an iPhone/iPad/iPod Cables available as accessories PicoPix MHL cable .................... (PPA1340 / 253641800) Mini DisplayPort cable .............. (PPA1270 / 253520069) Connecting to Devices with HDMI Output Use the HDMI cable to connect the projector to laptop, DVD/BR player or others devices. 1. Switch the device on using the POWER button. 2. Connect the mini-HDMI plug of HDMI cable to the projector's mini-HDMI socket. 3. Connect the HDMI plug of HDMI cable to the HDMI socket of the playback device. 4. From the main menu, select HDMI/MHL. Philips PPX4935 Use the iPhone/iPad/iPod-HDMI adapter cable (not supplied) and HDMI cable to connect the projector to an iPhone/iPad/iPod. 1. Switch the device on using the POWER button. 2. Connect the mini-HDMI plug of HDMI cable to the projector's mini-HDMI socket. 3. Connect the HDMI plug of HDMI cable to HDMI socket of iPhone/iPad/iPod-HDMI adapter cable. 4. Connect the iPhone/iPad/iPod-HDMI adapter cable to the playback device. 5. From the main menu, select HDMI/MHL. 15 Connecting to an Android Screen Mirroring – Connect Smartphone or Tablet via Phones or Tablets wirelessly MHL cable to share its contents Use the HML cable (available as accessory) to connect the projector to your Android Smartphone or Tablet. Make sure that your Phone/Tablet is MHL compatible (www.mhlconsortium.org) The screen mirroring feature allows you to mirror your phone or tablet screen on to your projector screen wirelessly to show content stored on your handheld device. 1. 2. 3. 4. Notice PicoPix and your device must be connected to the same WiFi network Switch the device on using the POWER button. Connect the mini-HDMI plug of MHL cable to the projector's mini-HDMI socket. Connect the MHL plug of MHL cable to the playback device. From the main menu, select HDMI/MHL. Android Make sure that your Phone/Tablet is Miracast compatible. Please check on the Wi-Fi Alliance-website: (www.wi-fi.org/product-finder) Open Quick Settings (swipe from top to bottom) and activate ScreenMirroring Windows Make sure that your laptop runs at least Win8.1 and is compatible with Miracast hardware requirements 1. Notice When MHL is working without AC power supply, the USB power output will be switched off. 16 2. iOS Screen mirroring can be accessed easily on your iDevice in the Control Center (swipe up from the bottom of screen) – and select “EZCast” Switch the device on using the POWER button. Select Screen Mirroring from the main menu 3. Select the appropriate operating system of your mobile device in the next screen Connecting Headphones or external Speakers (cable connection) 1. 2. a) Android/Windows (Miracast compatible) • Select on the Wifi Display (Miracast) application of the external device to search for the projector connection • Example for mobile phones: open Quick Settings - swipe from top to bottom- and activate ScreenMirroring • In the pop-up menu of the projector select OK to accept the connection. b) iOS • Activate Screen mirroring on your iDevice and select “EZCast Screen” to share your screen • Example for mobile phones: open Control Center (swipe up from the bottom of screen) – and select “EZCast Screen” on right side 3. Before connecting the headphones, turn down the volume on the device. Connect the headphones to the projector's headphone slot. The device speakers deactivate automatically when the headphones are connected. After connecting the headphones, increase the volume to a comfortable level. DANGER! Danger of Hearing Damage Do not use the device over a longer time at high volume – especially when using headphones. This could lead to the risks of hearing damage. Before connecting the headphones, turn down the volume on the device. After connecting the headphones, increase the volume to a comfortable level. Philips PPX4935 17 5 Memory Inserting a Memory Card Connecting an USB Storage Device 1. 2. 3. 4. Insert a microSD-card with the contacts facing upwards into the microSD slot at the side of the device. Insert the Micro-SD card into the slot and push until it snaps into position with a “click” Open Media Folder on the main screen to access the contents of the memory card To remove the memory card push on it (until you hear a “click”) and it will eject automatically 1. 2. Connect the USB storage medium to the USB port on the back of the device. Open Media Folder on the main screen to access the contents of the USB medium DANGER! Inserting a Memory Device! Never pull out the memory device while the device is accessing it. This could cause data to be damaged or lost. Switch the device off in order to make sure that the device does not access the memory. 18 Connect to a Computer (USB) The User Manual and drivers are stored on the internal memory of the PicoPix - use a microUSB cable to connect the Projector to a computer to access these files. In this way, you are able to copy files back and forth between the internal memory, an inserted memory card and the computer. 1. Switch the device on using the POWER button. 2. After switching on the device the main menu appears. 3. Connect the micro-USB plug to the Pocket Projector and the USB plug to the computer. Notice You cannot use the memory for media playback when the Pocket Projector is connected to a computer via USB. 4. If a memory card has been inserted, it will be displayed as another disk drive. 5. You can move, copy or delete data from the computer, the memory card (if inserted) and the internal memory. Philips PPX4935 19 6 Internet Connection, Wireless Network (WIFI) The projector can be connected to the Internet via a wireless (WiFi) connection. Use the procedure below appropriate to the type of connection you want. DANGER! Information on Using WIFI! The functioning of security systems, medical equipment or sensitive devices can be disrupted by the transmission power of the device. Observe any usage regulations (or restrictions) in the vicinity of such equipment. The use of this device can affect the operation of insufficiently shielded medical devices and hearing aids and pacemakers through the release of high frequency radiation. Also consult a doctor or the manufacturer of the medical device to establish whether these are sufficiently shielded from external high frequency radiation. Switching Wireless Networking (WiFi) on/off Wireless networking is deactivated by default. You have the option of turning this function on. 1. Switch the device on using the POWER button. 2. After switching on the device the main menu appears. 3. Use the navigation keys to select Settings. 4. Confirm with OK. 5. Using / to select Wireless and Networks. 6. Confirm with OK. 20 7. 8. Using / to select WIFI. Confirm with OK. 9. Modify the settings with / . 10. Confirm with OK. The key takes you one step back in the menu. Setting up a Wireless Network (WiFi) 1. 2. 3. 4. 5. 6. 7. 8. 9. Switch the device on using the POWER button. After switching on the device the main menu appears. Use the navigation keys to select Settings. Confirm with OK. Using / to select Wireless and Networks. Confirm with OK. Using / to select WIFI Selection. Confirm with OK. Use / to select the desired wireless network. 10. Confirm with OK. 11. If your wireless network is password protected, an input window appears. Select the input field using the navigation keys of the remote control and press OK. 12. Enter the password with the virtual keyboard using the navigation keys of the remote control or with an external keyboard. 13. Click on Connect. The key takes you one step back in the menu. Setting up a Wireless Wifi Hotspot Network (WiFi) using the Notice The projector can work as an access point, if no, or only a 3G wireless network is working in the location of use. You can use the portable Wi-Fi hotspot to share the device’s network connection with computers or other devices through the Wi-Fi network. Wizard You can integrate your device very quickly and easily into an existing wireless network using WiFi Protected Setup (WPS) or using a wireless network scan. Using WPS, all important settings like network name (SSID) are automatically configured and the connection protected with secure WPA Encryption. Notice When the WiFi hotspot mode is activated, it takes priority over other connections. Using Wi-Fi Protected Set-up (WPS) Using WiFi Protected Setup (WPS), you can integrate your device into an existing wireless network in two different ways very quickly and easily. You can activate the login with a pin code or using Push Button Configuration (PBC), if your access point (Access Point, Router) supports this method. Using WPS with Push Button Configuration (PBC) 1. 2. 3. 4. 5. 6. 7. 8. Switch the device on using the POWER button. After switching on the device the main menu appears. Use the navigation keys to select Settings. Confirm with OK. Using / to select Wireless and Networks. Confirm with OK. Using / to select WIFI Selection. Confirm with OK. 9. Use / to select the desired wireless network. 10. Confirm with OK. 11. Activate Push Button Configuration on the WIFI access point. The WIFI access point and device connect automatically and create a WPA protected connection. Philips PPX4935 Activating WiFi Hotspot 1. Switch the device on using the POWER button. 2. After switching on the device the main menu appears. 3. Use the navigation keys to select Settings. 4. Confirm with OK. 5. Using / to select Wireless and Networks. 6. Confirm with OK. 7. Using / to select WIFI Hotspot. 8. Confirm with OK. 9. Using / to select Portable WiFi Hotspot. 10. Confirm with OK. 11. Use / to select On. 12. Confirm with OK. The projector is now visible by other Wifi devices. Setting up a WiFi Hotspot To modify the WiFi hotspot name and define the security level. 1. Switch the device on using the POWER button. 2. After switching on the device the main menu appears. 21 3. 4. 5. Use the navigation keys to select Settings. Confirm with OK. Using / to select Wireless and Networks. 6. Confirm with OK. 7. Using / to select WIFI Hotspot. 8. Confirm with OK. 9. Using / to select Setup WiFi Hotspot. 10. Confirm with OK. 11. Modify the settings based on actual situation. Item Network SSID Security Password Show password Description Name of the WiFi hotspot. This is the name used to identify your projector when it is detected by another WiFi device. To modify the name, select the field and press OK. With the keyboard, enter the new name. Select among the 3 levels of security. • Open (without security) • WPA PSK • WPA2 PSK Select the field and press OK. With the keyboard, enter the new password. Check the box to display the password. 12. Using / to select Save. 13. Confirm with OK. DLNA (Digital Living Network Alliance) This device supports DLNA (Digital Living Network 22 Alliance) to easily share data over a home network, such as videos and photos. Depending on the DLNA-compatible devices you own, you will be able to e.g.: stream films from your laptop or server to your PicoPix Projector. Switching DLNA on and off The DLNA function is switched on by default. You have the option of turning this function off. 1. Switch the device on using the POWER button. 2. After switching on the device the main menu appears. 3. Use the navigation keys to select Settings. 4. Confirm with OK. 5. Using / to select Wireless and Networks. 6. Confirm with OK. 7. Using / to select DLNA. 8. Confirm with OK. 9. Modify the settings with / . 10. Confirm with OK. The key takes you one step back in the menu. Play Media Using DLNA If DLNA enabled devices are located in the connected network, then you can access them in media playback and file management by accessing Media Folder from Main Menu 7 Bluetooth Your PicoPix comes with aptX® Low Latency audio codec which ensures high audio quality and wireless audio/video synchronization. Just activate the built-in Bluetooth function to connect external speakers to the projector. Set up Bluetooth Parameters 1. Notice The Option menu provides only quick access to prior connected (paired) devices in Bluetooth settings. To pair a device you need to enter settings on the main screen to do the basic setup. Activate Bluetooth 1. Switch the device on using the POWER button. 2. After switching on the device the main menu appears. 3. Use the navigation keys to select Settings. 4. Confirm with OK. 5. Using / to select Wireless and Networks. 6. Confirm with OK. 7. Using / to select Bluetooth. 8. Confirm with OK. 9. Using / to select On. 10. Confirm with OK. Switch the device on using the POWER button. 2. After switching on the device the main menu appears. 3. Use the navigation keys to select Settings. 4. Confirm with OK. 5. Using / to select Wireless and Networks. 6. Confirm with OK. 7. Using / to select Bluetooth Selection. 8. Confirm with OK to enter detailed settings menu 9. Activate “Pairing” on your external Bluetooth speaker 10. Click “Search for devices” in order to initiate searching for your external speaker 11. Click on the found speaker shown in the device list to initiate pairing process 12. If you are asked to enter a Pairing Code please use the code provided from the speaker manufacturer (you can try 0000 or 1234) 13. The external speaker will be shown as “connected” in the device list. Philips PPX4935 23 8 Media Playback structure. Exits to main screen. Media Folder In general the Media Folder is used to select movie, picture or music files for playback in the built-in media player. Enter Media Folder in order to • access files located in o internal memory o connected USB memory devices o microSD card o network locations (DLNA) • select installable “APK” files to install 3rd party APPs • perform file operations (copy, move and delete files) In order to optimize the navigation, you can select a file type on the list: • FOLDERS to view all files (photo, audio, video and installable APPs). • MOVIES to view videos files only. • PICTURES to view photo files only. • MUSIC to view audio files only. 1. Switch the device on using the POWER button. 2. After switching on the device the main menu appears. 3. Use the navigation keys to select Media Folder. 4. Confirm with OK. 5. How to Navigate in the Media Folder To navigate in the Media Folder, use the following keys: Keys Action To select folders or files in the or displayed list. For directories, goes one level or OK down. For files, starts the selected media file. Goes one level up in the or directory 24 6. 7. 8. Using / to select Folders, Movies, Pictures or Music. Confirm with OK. Using / to select subfolder or file to be played. Confirm with OK. Notice Only those videos that are compatible with the projector will be displayed. Picture viewer, Slideshow Music Playback If you play music files the projection screen will be switched off automatically if no touchpad or remote control input is detected. As soon as you press any key the screen will be switched on again immediately. You can modify this behavior in Settings or Option Menu by changing Screen mode setting in Music section. Keys Action Start / Stop the picture slideshow Calls up the Option Menu. Select Picture viewer to setup the slideshow options (see below) Select music files to start a picture slideshow with background music Rotate the picture Exits to main screen. Philips PPX4935 File Operations in the Media Folder or OK/ Double touch & hold: selects a file (marked with a green tick) Remote control: long-press OK button to select first file then use right arrow to select others Single touch: marks other files (only works if at least one file has been selected already) Calls up the Option Menu for file operations (copy, move or delete) 25 *.bmp *.png *.tif Supported video file formats Container *.3gp *.asf *.avi *.flv *.m2ts, .ts *.mkv *.mp4 *.mov *.mts *.rm, *.rmvb *.wmv Video codec MPEG-4, H.263 WMV3 MPEG-4, DivX, XviD, H.263, H.264, VC-1, WMV3 H.263, H.264 H.264, VC-1 H.264, WMV3 MPEG-4, H.263, H.264 MPEG-4, H.263, H.264 H.264 RV 8/9/10 WMV3 Supported audio file formats Container *.mp3 *.wma *.wav *.ogg, *.oga *.flac *.alac *.ape *.aac Audio codec MPEG-1, MPEG-2, MPEG-2.5, Audio Layer 1/2/3 WMA 7/8/9 PCM, ADPCM, U-Law Vorbis FLAC ALAC APE AAC, AAC+ Supported Photo File Formats Container *.jpg, *.jpeg 26 Image codec JPEG, GIF BMP PNG TIF 9 Web Browser Your PicoPix has a preinstalled WebBrowser which you can access easily from the main menu by clicking on the globe icon (WWW). Notice To easily browse the internet and enter various links or web addresses we recommend connecting an USB mouse or an USB keyboard to the USB port of the projector. Philips PPX4935 27 10 Android / APPs Your projector uses an Android operating system allowing you to install additional applications. This enables you to add additional functionality to your device. Notice As there are a millions of different applications (APPs) available we cannot guarantee that each single one works on your PicoPix projector. Starting installed Android Apps 1. 2. 3. 4. 5. Switch the device on using the POWER button. After switching on the device the main menu appears. Use the navigation keys to select APPs. Confirm with OK. Select the APP you want to use and confirm with OK. Exiting Android Press the key to return to the main menu. Installing Android-Apps CAUTION! Trusted Sources! Apps from third party sources may be malicious. Only use installation packets from trusted sources. To install other APPs you have 2 options: install the APK file manually or use the pre-installed 28 Aptoide Store to download and install the APPs directly on the device Manual installation of APK files: 1. Download the APK file and save it onto a Micro-SD card or USB stick. 2. Insert the Micro-SD card or USB stick into the device. 3. Switch the device on using the POWER button. 4. After switching on the device the main menu appears. 5. Use the navigation keys to select Media Folder. 6. Confirm with OK. 7. Use the navigation keys to find and select the previously downloaded APK file and confirm with OK. 8. Follow the installation procedure on the screen Installation of APPs via Aptoide Store: 1. Switch the device on using the POWER button. 2. After switching on the device the main menu appears. 3. Use the navigation keys to select APPs. 4. Confirm with OK. 5. Select the Aptoide APP and confirm with OK. 6. In the store you can use the search function to find and install your desired application. 11 Settings Notice With the -key you can call up the Options Menu which provides the most important settings. The Options Menu is also accessible during media playback to do adjustments right away. Overview of the Menu Functions Wireless and Network WiFi – switching the wireless network (WiFi) off and on. WiFi Selection – select the wireless network with which the device is to connect. WiFi Hot Spot – activate and deactivate WiFi tethering. VPN settings – set up parameters of VPN. Mobile networks – set up parameters about mobile networks. DLNA – switching DLNA off and on. Bluetooth – switching the Bluetooth connection off and on. Bluetooth Selection – set up parameters of Bluetooth connection. the ceiling in an upside-down position; the image is rotated by 180 degrees. Rear ceiling – the device is located behind the projection surface, hanging from the ceiling in an upside-down position; the image is rotated by 180 degrees and reflected horizontally. Wall color correction – color correction of the projected image to adjust to colored projection surfaces. Smart Settings – select predefined settings for brightness / contrast / color saturation. If you modify these settings, the setting is switched to Manual. Brightness – adjust the brightness of image. Contrast – adjust the contrast of image. Saturation - adjust the color saturation of image. IntelliBright – switching the intelliBrightTM function off and on. * intelliBrightTM is a technique from TI (Texas Instruments) DLP® that adaptively enhances dim regions of an image, resulting in brighter and more dynamic image. Sound Volume – adjust the volume. Deep Bass – switching the deep bass on and off. Equalizer – select the equalizer mode. Key beep – turn key tones on and off. Image Video Player Keystone correction – use / to skew the output image, thereby making it rectangular. Fit Screen – use / to select the screen mode. Projection mode Front – normal projection; the device is located in front of the projection surface/screen. Rear – rear projection; the device is located behind the projection surface; the image is reflected horizontally. Front Ceiling – the device is hanging from Language – Select the language of video file. Subtitle – Set the subtitle of video file, or switch off. Repeat mode – Set the repeat type for video files: Repeat deactivated (Off), repeat only the current video (Movie), repeat all videos in a directory (Directory), repeat all videos (All). Philips PPX4935 Music Player Screen mode – Activate or deactivate the projection during playback. Repeat – Set the repeat type for music files: 29 Repeat deactivated (Off), repeat only the current song (Song), repeat all songs in a directory (Directory), repeat all songs (All). Shuffle – Activate this function for random playback. Otherwise, playback will take place in sequence. Picture Viewer Time per slide – Image viewing time during slide show. Repeat – Set the type of repeat for slide show photos: Repeat off (Off), repeat all photos in the directory (Directory), repeat all stored photos (All). Transition effect – Set image transitions. Slideshow order – Play slide show in order or randomly. System Settings Date and time – set date and time. Android Settings – set Android system. Wall paper – Select background images. Sleep mode – With this function, the projector automatically goes to ECO mode after a specified period of time or at the end of a movie. Brightness mode – select different brightness mode. Language Select the desired language for the menu. Maintenance Reset settings – Reset settings to factory defaults. Online firmware update - Update firmware. The firmware package will be downloaded from Internet. Demo mode – switching demo mode on and off. Information – Display free space in the internal memory and information on the device (Firmware version / Device name / Model / MAC address / IP address / serial number). 30 12 Service Care Instructions for the Charge the Device Battery The capacity of the battery diminishes with time. You can prolong the life of the battery if you observe the following points: Without a power supply, the device operates from the built-in battery. When the battery does not have sufficient capacity, the device turns off. Connect the device to the power supply. When the battery does not have sufficient capacity, it will be indicated by the color of the power switch and the battery symbol in the display. Charge the battery regularly. Don’t store the device with a completely discharged battery. Keep the device and the battery away from sources of heat. DANGER! Do not Replace the Battery Yourself Do not try to replace the battery yourself. Incorrect handling of the battery or using the wrong type of battery can cause damage to the device or cause injury. Connected to the power adapter Device off Device on The indicator light on the side of the device turns red. Device remains turned on. Fast charging within about 3 hours. When charging is completed the indicator light turns off. Slow charging within about 10 hours. When charging is completed the indicator light turns green. Cleaning DANGER! Instructions for Cleaning! Use a soft, lint-free cloth. Never use liquid or easily flammable cleansers (sprays, abrasives, polishes, alcohol, etc.). Do not allow any moisture to reach the interior of the device. Wipe over the surfaces gently to avoid scratches to the surface.. Cleaning the Lens Use a lens brush or lens cleaning paper for cleaning the lens of the projector. DANGER! Do not use any Liquid Cleaning Agents Do not use any liquid cleaning agents for cleaning the lens, to avoid damaging the coating film on the lens. Philips PPX4935 31 Troubleshooting Power Cycling 2. 3. If a problem occurs that cannot be corrected with the instructions in this user manual (see also the help below), follow the steps given here. 4. Switch the device off using the POWER Problems The Pocket Projector is unresponsive or hung up. The Pocket Projector cannot be switched on. button. Wait at least ten seconds. Switch the device on using the POWER button. If the problem cannot be solved, please contact our customer service or your retailer. 1. No sound. No sound from the external connected device. Bad sound quality with a computer connection. Only the initial screen appears and not the image from the external device. Only the initial screen appears and not the image from the connected computer. Device turns off 32 Solutions Long press the POWER button for 10 seconds until the projector is forced to power off. Switch the projector on again. Connect the supplied power supply to recharge the internal battery. Wait for 10 minutes, then switch on the projector. Adjust the volume using the / keys on the remote control. Check the cables to the external device. Set the volume on the external device. Only the original cables from the device manufacturer may work properly Check if the audio cable is connected to the computer line-out socket. The volume setting on the computer should not be too high. Check if the cables are connected to the right sockets. Please check that the external device is switched on and output is set to HDMI Check if the cables are connected to the right sockets. Check if the resolution of the computer is set to 1280*720. When the device is running for a long period of time, it may get hot and a warning symbol appears on the screen. The device automatically turns off when it gets too hot. After the device has cooled down, it can be switched on and used again. When the battery does not have sufficient capacity, the device turns off. Connect the device to the power supply. Device changes from maximum level of brightness to a lower level of brightness during playback. Bad image or color quality when connecting with HDMI. The device cannot read a microSD card or USB stick. Philips PPX4935 The projector has APD (Auto Power Down) mode for power saving. If stays in main menu for 30 minutes without any operation, the projector will go to stand-by mode automatically. When the environment temperature is too high, the device turns automatically from maximum level of brightness to a lower level of brightness in order to protect the high power LEDs. Use the supplied HDMI cable. Third-party cables may cause signal distortions. The device does not support exFAT file system, please use FAT format instead. 33 13 Appendix Technical Data Dimensions (L×H×W ............115 × 32 × 115 mm Weight .................................................. 0,351 kg Recommended Ambient ...................... 5 – 35 ºC Relative Humidity ............................................... .............................. 15 – 85 % (non-condensing) File format ......................... 3gp, *.asf, *.avi, *.flv, ...................... *.m2ts, *.ts, *.mkv, *.mp4, ........... *.mov, *.mts, *.rm, *.rmvb, *wmv Photo formats .......... JPEG, BMP, PNG, GIF, TIF Music formats ............... MP2, MP3, WAV, WMA, .................... OGG, OGA, FLAC, ALAC, .................................... APE, AAC, M4A Video connection .................... Mini-HDMI socket Headphone connection Stereo, .................................................... 3.5 mm socket Internal speaker.................................. mono 3 W Internal memory ......................................... 4 GB Compatible Memory Card ... Micro-SD (TF) card Standard USB port max. power ................................................ 5 V , 1000 mA Micro USB port max. power ........ 5V , 500mA MHL port max. power ............... 5V , 1000 mA Technology / optical Display technology ................... 720P 0.3" DLP® Light source ........................................ RGB LED Native resolution............ 1280 x 720 Pixel (16:9) Supported Resolutions .........VGA/SVGA/WVGA ........................................ XGA/WXGA/FULL HD Projected image size ..................... 15 - 150 inch ....................................................... 38 – 381 cm Screen distance.................................... 0.5 - 5 m Display refresh rate .............................. 60/50 Hz 34 Power supply Model No ............................... HKA04519024-XA Input ................ 100-240 V, 50/60 Hz, max. 1.2 A Output ......................................... 19 Vdc, 2.37 A Manufacturer ......................................... Huntkey Built-in rechargeable battery Battery type ............................. Lithium-Polymer Capacity .................................... 2000 mAh 7.4 V Charging time ................................................ 3 h Operating time ........................................... 1.5 h Manufacturer ................................. Fujian United Accessories Following accessories are available for your device: PicoPix MHL cable ..... (PPA1340 / 253641800) Mini DisplayPort cable . (PPA1270 / 253520069) PicoPix cover ............... (PPA4400 / 253641813) All data are provided for reference purposes only. Sagemcom Documents SAS reserves the right to make any changes without prior notice. wrapping recycled or dispose of it in the non-recyclable waste, depending on the requirements in your country. The CE marking certifies that the product meets the main requirements of the European Parliament and Council directives 1999/5/CE, 2006/95/CE, 2004/108/CE and 2009/125/CE on information technology equipment, regarding safety and health of users and regarding electromagnetic interference. The declaration of compliance can be consulted on the site www.picopix.philips.com. Preservation of the environment as part of a sustainable development plan is an essential concern of Sagemcom Documents SAS. The desire of Sagemcom Documents SAS is to operate systems observing the environment. The desire of Sagemcom Documents SAS is to operate systems observing the environment and consequently it has decided to integrate environmental performances in the life cycle of this products, from manufacturing to commissioning use and elimination. Packaging: The presence of the logo (green dot) means that a contribution is paid to an approved national organization to improve package recovery and recycling infrastructures. Please respect the sorting rules set up locally for this kind of waste. Batteries: If your product contains batteries, they must be disposed of at an appropriate collection point. Product: The crossed-out waste bin stuck on the product means that the product belongs to the family of electrical and electronic equipment. In this respect, the European regulations ask you to dispose of it selectively: • At sales points in the event of the purchase of similar equipment. • At the collection points made available to you locally (drop-off center, selective collection, etc.). In this way you can participate in the re-use and upgrading of Electrical and Electronic Equipment Waste, which can have an effect on the environment and human health. The paper and cardboard packaging used can be disposed of as recyclable paper. Have the plastic Philips PPX4935 Trademarks: The mentioned references in this manual are trademarks of the respective companies. The lack of the trademarks ® and TM does not justify the assumption that these dedicated terminologies are free trademarks. Other product names used herein are for identification purposes only and may be trademarks of their respective owners. Sagemcom Documents SAS disclaims any and all rights in those marks. Neither Sagemcom Documents SAS nor its affiliates shall be liable to the purchaser of this product or third parties for damages, losses, costs, or expenses incurred by the purchaser or third parties as a result of accident, misuse, or abuse of this product or unauthorized modifications, repairs, or alterations to this product, or failure to strictly comply with Sagemcom Documents SAS operating and maintenance instructions. Sagemcom Documents SAS shall not be liable for any damages or problems arising from the use of any options or any consumable materials other than those designated as original Sagemcom Documents SAS / PHILIPS products or Sagemcom Documents SAS / PHILIPS approved products. Sagemcom Documents SAS shall not be held liable for any damage resulting from electromagnetic interference that occurs from the use of any interface cables other than those designated as Sagemcom Documents SAS / PHILIPS products. All rights reserved. No part of this publication may be reproduced, stored in a retrieval system or transmitted in any form or by any means, electronic, mechanical, photocopying, recording, or otherwise, without the prior written permission of Sagemcom Documents SAS. The information contained herein is designed only for use with this product. Sagemcom Documents SAS is not responsible for any use of this information as applied to other devices. This user manual is a document that does not represent a contract. Errors, printing errors and changes are reserved. Copyright © 2015 Sagemcom Documents SAS 35 PHILIPS and the PHILIPS’ Shield Emblem are registered trademarks of Koninklijke Philips N.V. and are used by Sagemcom under license from Koninklijke Philips N.V. © 2015 Sagemcom Documents SAS All rights reserved Sagemcom Documents SAS Documents Business Unit Headquaters: 250, route de l’Empereur 92848 Rueil-Malmaison Cedex FRANCE Tel: +33 (0)1 57 61 10 00 Fax: +33 (0)1 57 61 10 01 www.sagemcom.com Simplified Joint Stock Company Capital 8.479.978€ 509 448 841 RCS Nanterre PPX4935 EN VERSION A