1
SIMATIC
S7-PLCSIM V5.2
User Manual
Edition 11/2002
2809918-0003
Safety Guidelines
This manual contains notices which you should observe to ensure your own personal safety, as well as to
protect the product and connected equipment. These notices are highlighted in the manual by a warning
triangle and are marked as follows according to the level of danger:
Danger
Indicates an imminently hazardous situation which, if not avoided, will result in death or serious
injury.
Warning
Indicates a potentially hazardous situation which, if not avoided, could result in death or severe
injury.
Caution
Used with the safety alert symbol indicates a potentially hazardous situation which, if not avoided,
may result in minor or moderate injury.
Caution
Used without the safety alert symbol indicates a potentially hazardous situation which, if not avoided,
may result in property damage.
Notice
NOTICE used without the safety alert symbol indicates a potential situation which, if not avoided,
may result in an undesirable result or state.
Qualified Personnel
The device/system may only be set up and operated in conjunction with this manual. Only qualified
personnel should be allowed to install and work on this equipment. Qualified persons are defined as persons
who are authorized to commission, to ground, and to tag circuits, equipment, and systems in accordance
with established safety practices and standards.
Correct Usage
Note the following:
Warning
This device and its components may only be used for the applications described in the catalog or the
technical descriptions and only in connection with devices or components from other manufacturers
which have been approved or recommended by Siemens.
This product can only function correctly and safely if it is transported, stored, set up, and installed
correctly, and operated and maintained as recommended.
Trademarks
®
®
Siemens and SIMATIC are registered trademarks of SIEMENS AG.
STEP 7™ and S7™are trademarks of SIEMENS AG.
®
®
®
®
®
®
®
Microsoft , Windows , Windows 95 , Windows 98 , Windows NT , Windows ME , and Windows 2000
are registered trademarks of Microsoft Corporation.
Copyright Siemens Energy & Automation, Inc. 2002
All rights reserved
The reproduction, transmission or use of this document or its
contents is not permitted without express written authority.
Offenders will be liable for damages. All rights, including
rights created by patent grant or registration of a utility model
or design, are reserved.
Disclaimer of Liability
We have checked the contents of this manual for
agreement with the hardware and software described.
Because deviations cannot be precluded entirely, we
cannot guarantee full agreement. However, the data in this
manual are reviewed regularly and any necessary
corrections included in subsequent editions. Suggestions
for improvement are welcomed.
Siemens Energy & Automation, ISBU
1 Internet Plaza
Johnson City, TN 37602-4991, USA
© Siemens Energy & Automation, Inc. 2002
Technical data subject to change.
Contents
Contents
Product Overview................................................................................................1
Introduction ..................................................................................................................1
What's New in S7-PLCSIM, Version 5.2 .......................................................................4
Getting Started .............................................................................................................5
Differences from a Real S7 PLC...................................................................................7
S7-PLCSIM Main Window ............................................................................................9
CPU Operating Modes ...............................................................................................10
CPU Indicators ...........................................................................................................11
Memory Areas............................................................................................................11
Basic Tasks .......................................................................................................12
Starting the Simulation ...............................................................................................12
Using Help..................................................................................................................13
Opening a Simulated PLC ..........................................................................................15
Opening a Layout .......................................................................................................16
Selecting Scan Mode Options ....................................................................................17
Changing CPU Operating Modes ...............................................................................18
Using the Slider Control..............................................................................................20
Using S7-PLCSIM to Debug Your Program ................................................................21
Using Interrupt OBs in Your Program .........................................................................22
Modifying Your Hardware Configuration .....................................................................23
Downloading the Modified Configuration ....................................................................24
Resetting the CPU Memory........................................................................................24
Resetting Timers ........................................................................................................24
Using Symbolic Addressing........................................................................................25
Configuring an MPI Address.......................................................................................25
Using Record/Playback ..............................................................................................26
Troubleshooting Tips .............................................................................................................. 27
Monitoring the Scan Cycle..........................................................................................29
Saving a Layout..........................................................................................................29
Saving a Simulated PLC.............................................................................................30
Closing a Simulated PLC............................................................................................31
iii
Contents
Ending the Simulation Session ...................................................................................31
View Objects......................................................................................................32
S7-PLCSIM View Objects...........................................................................................32
CPU View Object........................................................................................................33
ACCUs & Status Word View Object............................................................................33
Block Regs View Object .............................................................................................33
Stacks View Object ....................................................................................................34
Input Variable View Object .........................................................................................34
Output Variable View Object ......................................................................................35
Bit Memory View Object .............................................................................................35
Timer View Object ......................................................................................................36
Counter View Object ..................................................................................................36
Vertical Bits Variable View Object ..............................................................................37
Error and Interrupt OBs ....................................................................................38
Overview ....................................................................................................................38
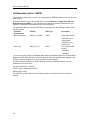
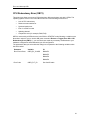
Hardware Interrupt (OB40-OB47)...............................................................................39
I/O Redundancy Error (OB70) ....................................................................................40
CPU Redundancy Error (OB72) .................................................................................41
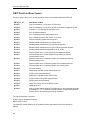
OB72 Fault Ids (Error Codes) .....................................................................................42
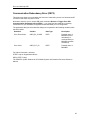
Communication Redundancy Error (OB73) ................................................................43
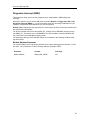
Time Error (OB80)......................................................................................................44
Diagnostic Interrupt (OB82) ........................................................................................45
Insert/Remove Module Interrupt (OB83).....................................................................47
Priority Class Error (OB85).........................................................................................48
Rack Failure (OB86)...................................................................................................49
Reference Information ......................................................................................52
S7-PLCSIM Toolbars .................................................................................................52
S7-PLCSIM Menus.....................................................................................................53
File Menu ...................................................................................................................54
Edit Menu ...................................................................................................................56
View Menu .................................................................................................................57
Insert Menu ................................................................................................................58
PLC Menu ..................................................................................................................59
iv
Contents
Execute Menu ............................................................................................................60
Tools Menu ................................................................................................................62
Window Menu ............................................................................................................63
Help Menu..................................................................................................................64
Help Button ............................................................................................................................. 64
S7-PLCSIM Numeric Data Formats............................................................................65
Troubleshooting Tips..................................................................................................66
v
Product Overview
Product Overview
Introduction
The S7-PLCSIM software enables you to run and test your program on a simulated
programmable logic controller (PLC) that exists on your computer or programming device (such
as a PG 740, Power PG or Field PG). Because the simulation exists completely within the STEP
7 software, you do not need to be connected to any S7 hardware (CPU or I/O modules). With the
simulated S7 PLC, you can test and debug programs for both the S7-300 and S7-400 CPUs as
well as WinLC.
S7-PLCSIM provides a simple interface for monitoring and modifying different parameters used
by the program (such as for turning inputs on and off). You can also use the various applications
of the STEP 7 software while you are running your program on the simulated PLC. This allows
you to use such tools as the variable table (VAT) to monitor and modify variables.
S7-PLCSIM Features
S7-PLCSIM simulates an S7 controller, and contains the following memory areas:
Memory Area
Description
Timers
T 0 to T 511
Memory bits
131,072 bits (16 Kbytes) of M memory
Total
131,072 bits (16 Kbytes) of I/O memory
addressable I/O
memory
Process image
(setable;
updated every
scan)
Maximum: 131,072 bits (16 Kbytes)
Local data
(setable)
Maximum: 64 Kbytes
Preset: 8192 bits (1024 bytes)
Preset: 32 Kbytes
2048 function blocks (FBs) and functions (FCs)
Logic blocks
and data blocks 4095 data blocks (DBs)
System function SFB0, SFB1, SFB2, SFB3, SFB4, SFB5, SFB8, SFB9, SFB12, SFB13, SFB14,
blocks (SFBs) SFB15, SFB16, SFB19, SFB20, SFB21, SFB22, SFB23, SFB32, SFB33, SFB34,
SFB35, SFB36, SFB37, SFB41, SFB42, SFB43, SFB44, SFB46, SFB47, SFB48,
SFB49, SFB52, SFB53, SFB54, SFB60, SFB61, SFB62, SFB63, SFB64, and
SFB65.
Note that SFB12, SFB13, SFB14, SFB15, SFB16, SFB19, SFB20, SFB21, SFB22,
SFB23, SFB41, SFB42, SFB43, SFB44, SFB46, SFB47, SFB48, SFB49, SFB60,
SFB61, SFB62, SFB63, SFB64, and SFB65 are NOPs (do not perform any
operation). You do not need to modify a program that calls a NOP.
1
Product Overview
Memory Area
Description
System
functions
(SFCs)
SFC0, SFC1, SFC2, SFC3, SFC4, SFC5, SFC6, SFC7, SFC9, SFC10, SFC11,
SFC12, SFC13, SFC14, SFC15, SFC17, SFC18, SFC19, SFC20, SFC21, SFC22,
SFC23, SFC24, SFC25, SFC26, SFC27, SFC28, SFC29, SFC30, SFC31, SFC32,
SFC33, SFC34, SFC35, SFC36, SFC37, SFC38, SFC39, SFC40, SFC41, SFC42,
SFC43, SFC44, SFC46, SFC47, SFC48, SFC49, SFC50, SFC51, SFC52, SFC54,
SFC55, SFC56, SFC57, SFC58, SFC59, SFC60, SFC61, SFC62, SFC64, SFC65,
SFC66, SFC67, SFC68, SFC69, SFC72, SFC73, SFC74, SFC79, SFC80, SFC81,
SFC82, SFC83, SFC84, SFC87, SFC90, SFC102, SFC103, SFC105, SFC106,
SFC107, SFC108, SFC126, SFC127, SFC65091, SFC65092, SFC65093,
SFC65094, SFC65095, SFC65096, SFC65098, SFC65099, SFC65102, and
SFC65103
For SFC26 and SFC27, S7-PLCSIM supports only an input parameter of 0.
Note that SFC7, SFC11, SFC12, SFC25, SFC35, SFC36, SFC37, SFC38, SFC48,
SFC60, SFC61, SFC62, SFC65, SFC66, SFC67, SFC68, SFC69, SFC72, SFC73,
SFC74, SFC81, SFC82, SFC83, SFC84, SFC87, SFC102, SFC103, SFC105,
SFC106, SFC107, SFC108, SFC126, and SFC127 are NOPs (do not perform any
operation). You do not need to modify a program that calls a NOP.
Organization
blocks (OBs)
OB1 (free cycle)
OB10 to OB17 (time-of-day interrupt)
OB20 to OB23 (time-delay interrupt)
OB30 to OB38 (cyclic interrupt)
OB40 to OB47 (hardware interrupt)
OB55 (status interrupt)
OB56 (update interrupt)
OB57 (manufacturer specific
interrupt)
OB61 to OB64 (synchronous cycle
interrupt)
OB70 (I/O redundancy error)
OB72 (CPU redundancy error)
OB73 (communication error)
OB80 (time error)
OB81 (power supply error)
OB82 (diagnostic interrupt)
OB83 (insert/remove interrupt)
OB84 (CPU hardware fault)
OB85 (priority class error)
OB86 (rack failure)
OB87 (communication error)
OB88 (processing interrupt)
OB90 (background OB)
OB100 (warm restart)
OB101 (hot restart)
OB102 (cold restart)
OB121 (programming error)
OB122 (I/O access error)
Note that OB55, OB56, OB57, OB61, OB62, OB63, OB64, OB81, OB84, OB87,
OB88, and OB90 are NOPs (do not perform any operation). You do not need to
modify a program that calls a NOP.
2
Product Overview
In addition, S7-PLCSIM provides the following features:
A button on the SIMATIC Manager turns the simulation on or off. Clicking on the simulation
button opens the S7-PLCSIM software with its simulated CPU. When S7-PLCSIM is
running, any new connection goes automatically to the simulated CPU.
The simulated PLC runs programs intended for either the S7-300 or S7-400 CPU module.
You can create "view objects" that allow you to access the input and output memory areas,
accumulators, and registers of the simulated PLC. You can also access memory through
symbolic addressing.
You can choose to have the timers run automatically or set and reset them manually. You
can reset timers individually or all at once.
You can change the CPU operating mode (STOP, RUN, and RUN-P) as with a real CPU. In
addition, S7-PLCSIM provides a Pause feature that allows you to halt the CPU momentarily
without affecting the state of the program.
You can use interrupt OBs with the simulated PLC to test the behavior of your program.
You can record a series of events (manipulate input and output memory areas, bit memory,
timers and counters) and play back your recording in order to automate program tests.
You can use all of the STEP 7 tools to monitor and modify the activities of the simulated PLC, and to
debug your program. Although the simulated PLC exists entirely in software (requiring no special
hardware), STEP 7 works as if the simulated PLC were a real piece of hardware, with few
differences.
3
Product Overview
What's New in S7-PLCSIM, Version 5.2
The new features of version 5.2 of S7-PLCSIM are described below.
PLCSIM V 5.2 supports:
PLCSIM now supports the following programs and operating systems:
STEP7 Lite V 2.0
Machines with Windows XP Home
Machines with Windows XP Professional
PCS7 V6.0 (supports SFB35 - Alarm-8P, SFB31 - Notify-8P)
Support for Fault-Tolerant Systems
S7-PLCSIM supports downloading the following blocks required by the S7400H CPU, and the FSystem I/O (fault-tolerant system).
SDB99, SFC65091, SFC65092, SFC65093, SFC65094, SFC65095, SFC65096, SFB65098,
SFC65099, SFC65103, and SFC65102
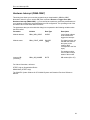
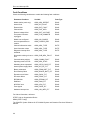
New CPU Firmware Support
In addition to the currently supported CPU types, S7-PLCSIM supports downloading the SDB set
for the following CPUs with V3.0 and V3.1 firmware.
CPU
MLFB
318-2
6ES7-318-2AJ00-0AB0
412-2 PCI
6ES7-612-2QH00-0AB4
416-2 PCI
6ES7-612-2QL00-0AB4
412-1
6ES7-412-1XF03-0AB0
412-2 DP
6ES7-412-2XG00-0AB0
414-2 DP
6ES7-414-2XG03-0AB0
414-3 DP
6ES7-414-3XJ00-0AB0
416-2 DP
6ES7-416-2XK02-0AB0
416-3 DP
6ES7-416-3XL00-0AB0
417-4
6ES7-417-4XL00-0AB0
H-System CPU projects (for example 414-4HJ00 and 417-4HL01) can be downloaded, but the HFeatures can not be simulated fully in this version of PLCSIM.
4
Product Overview
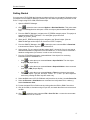
Getting Started
If you are new to S7-PLCSIM, the following procedures will help you get started. Simulation mode
is available from the SIMATIC Manager, provided you don't have any existing connections to real
PLCs. To begin using S7-PLCSIM, follow these steps:
1. Open the SIMATIC Manager.
2. Click
or select the menu command Options > Simulate Modules. This action starts
the S7-PLCSIM application and opens a CPU view object (with the default MPI address
of 2).
3. From the SIMATIC Manager, navigate to the S7_ZEBRA example project. This project is
supplied with the STEP 7 software, V 5.x and higher (project file name
ZEN01_09_STEP7_Zebra).
4. Within the S7_ZEBRA example project, navigate to the "Blocks" object. (See the
SIMATIC Manager online Help for an overview of STEP 7 objects.)
5. From the SIMATIC Manager, click
or select the menu command PLC > Download
to download the "Blocks" object to the simulated PLC.
6. At the prompt, "Do you want to load the system data?", choose No if you do not want to
download a hardware configuration to the simulated PLC, or Yes in order to download a
hardware configuration (for instance, in order to use clock memory).
7. From the S7-PLCSIM application, create additional "view objects" for monitoring
information from the simulated PLC:
Click
or select the menu command Insert > Input Variable. The view object
displays IB0 (Input Byte 0).
Click
or select the menu command Insert > Output Variable to insert a second
view object, QB0 (Output Byte 0).
Click
or select the menu command Insert > Timer three times to insert three
Timer view objects. Type 2, 3, and 4 (for Timers T 2, T 3, and T 4) in their respective
text boxes, pressing the Enter key after each entry.
8. Select the PLC menu in S7-PLCSIM and verify that there is a bullet (•) beside Power On.
9. Select the Execute > Scan Mode menu command and verify that there is a bullet (•)
beside Continuous Scan.
10. Put the simulated CPU in RUN mode by clicking either the RUN or RUN-P check box.
11. Click bit 0 of IB0, to simulate turning on input 0.0, and watch the effect on the timers and
on QB0.
12. Click
or select the menu command File > Save PLC As... to save the current state
of the simulated PLC as a new file.
5
Product Overview
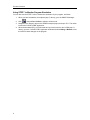
Using STEP 7 to Monitor Program Simulation
You can also use the STEP 7 tools to monitor the simulation of your program, as follows:
1. When you have created the view objects (step 7, above), go to the SIMATIC Manager.
2. Click
or select View > Online to switch to online mode.
3. Navigate to the "Blocks" object in the ZEBRA example project, and open FC1. This action
invokes the "LAD/STL/FBD" application.
4. When the simulated CPU is in RUN mode and you have turned on bit 0 of IB0 (step 11,
above), go to the "LAD/STL/FBD" application window and select Debug > Monitor to see
the effect of these changes on the program.
6
Product Overview
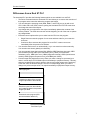
Differences from a Real S7 PLC
The simulated PLC provides the following features which are not available in a real PLC:
The Pause command halts the simulated CPU and allows you to resume the execution of
the program at the instruction where the program was halted.
You can change the operating mode (RUN, RUN-P, and STOP) as you do with a real
CPU. Unlike with a real CPU, however, putting the simulated CPU in STOP mode does
not change the state of the outputs.
Any change that you make with a view object immediately updates the contents of the
memory location. The CPU does not wait until the beginning or end of the scan to update
any changed data.
Execution control options allow you to select how the CPU runs the program:
Single Scan executes the program for one scan and then waits for you to start the
next scan.
Continuous Scan executes the program like a real PLC: it starts a new scan
immediately after the previous one finishes.
You can allow the timers to run automatically, or you can enter timer values manually.
You can also reset timers globally or individually.
You can manually trigger the interrupt OBs: OB40 to OB47 (hardware interrupt), OB70
(I/O redundancy error), OB72 (CPU redundancy error), OB73 (communication
redundancy error), OB80 (time error), OB82 (diagnostic interrupt), OB83 (insert/remove
module), OB85 (program sequence error), and OB86 (rack failure).
Process image and peripheral memory: When you make a change to a process input
value in a view object, S7-PLCSIM copies it immediately to peripheral memory. This way,
when the peripheral input value is written to the process image register at the beginning
of the next scan, the desired change is not lost. Correspondingly, when you make a
change to a process output value, it is copied immediately to peripheral output memory.
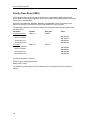
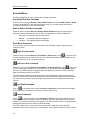
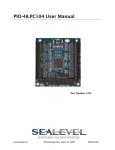
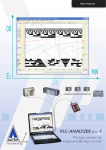
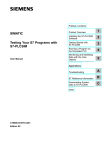
Startup program
…
Transfer the values of the processimage output table to the modules
Read the inputs from the modules
and update the data in the processimage input table
Execute the user program (OB1
and all the blocks called in it)
…
Free Scan Cycle
7
Product Overview
S7-PLCSIM also differs from a real PLC in the following ways:
Diagnostic buffers: S7-PLCSIM does not support all of the error messages written to the
diagnostic buffer. For instance, bad batteries in the CPU or EEPROM errors cannot be
simulated. However, most I/O and program errors can be simulated.
A transition in operating mode (such as from RUN to STOP) does not change the I/O to a
"safe" state.
Function modules (FMs) are not supported.
Peer-to-peer communication (such as between two S7-400 CPUs in the same rack) is not
supported.
S7-PLCSIM supports four accumulators like an S7-400 CPU does. For certain special
cases, a program running on S7-PLCSIM with four accumulators can have different
behavior from the same program running on an S7-300 CPU, which uses only two
accumulators.
Differences with I/O
Most of the CPUs in the S7-300 family autoconfigure I/O: once a module has been inserted into a
physical controller, it is automatically recognized by the CPU. It is not possible to replicate the
autoconfiguration feature with a simulated PLC. If you download a program to S7-PLCSIM from
an S7-300 CPU that autoconfigures I/O, the system data does not include an I/O configuration.
Consequently, when you use S7-PLCSIM with S7-300 programs, if you want to define which
modules are supposed to be available to the CPU, you must first download a hardware
configuration.
To download a hardware configuration to S7-PLCSIM, you can create a project for one of the S7300 CPUs that does not autoconfigure I/O, such as the CPU 315-2DP, CPU 316-2DP, or CPU
318-2. Put a copy of your hardware configuration into this project and download the hardware
configuration to S7-PLCSIM. Once you have done this, you can download program blocks from
any of your S7 projects and the I/O will be handled correctly.
8
Product Overview
S7-PLCSIM Main Window
The main window of S7-PLCSIM includes the workspace, title bar, status bar, window controls,
and S7-PLCSIM menus and toolbars.
The S7-PLCSIM workspace is where you display different types of view objects to monitor and
modify data in the simulated PLC.
To open the simulated PLC, click on the Simulation On/Off
button on the toolbar (menu
command Options > Simulate Modules) in the SIMATIC Manager. S7-PLCSIM starts and loads
a CPU view object for your simulated PLC.
You can also create a new simulated PLC, or open one that you have previously saved.
To create a new PLC for simulation, select the menu command File > New PLC.
To open a previously saved PLC, select the menu command File > Open PLC....
To get familiar with S7-PLCSIM, use the procedures described in Getting Started.
9
Product Overview
CPU Operating Modes
RUN-P mode
The CPU runs the program and you can change the program and its parameters. In order to use
the STEP 7 tools for modifying any of the parameters of the program while the program is
running, you must put the CPU in RUN-P mode. You can still use the "view objects" created
within S7-PLCSIM to modify any data used by the program.
RUN mode
The CPU runs the program, by reading the inputs, executing the program, and then updating the
outputs. You cannot download any program or use the STEP 7 tools to change any parameters
(such as input values) when the CPU is in RUN mode. You can still use the view objects created
within S7-PLCSIM to modify any data used by the program.
STOP mode
The CPU does not run the program. Unlike STOP mode for real CPUs, the outputs are not set to
predefined ("safe") values but remain at the state they were in when the CPU changed to STOP
mode. You can download programs to the CPU while the CPU is in STOP mode. Changing from
STOP mode to RUN mode starts execution of the program from the first instruction.
The CPU operating modes, the CPU indicators, and the Memory Clear/Reset button are all
displayed on the CPU view object. You can set the CPU operating mode with the Key Switch
Position command. You can pause execution of the simulated PLC program when the CPU is in
RUN or RUN-P mode.
10
Product Overview
CPU Indicators
The CPU view object provides a set of indicators that correspond to the LED indicators on a real
CPU:
SF (system fault) alerts you that the CPU encountered a system error, causing a change
in the operating mode.
DP (distributed peripherals, or remote I/O) indicates the status of communication with
distributed (remote) I/O.
DC (power supply) indicates whether power to the CPU is on or off.
RUN indicates that the CPU is in RUN mode.
STOP indicates that the CPU is in STOP mode.
Memory Areas
You access data in the S7 PLC by addressing specific areas of memory. These areas perform
specific functions:
PI (peripheral input): provides direct access to the input modules.
I (input): provides access to the process image of the peripheral inputs. These values are
updated by the CPU at the beginning of every CPU scan cycle.
PQ (peripheral output): provides direct access to the output modules. These values are
updated by the CPU at the end of every CPU scan cycle.
Q (output): provides access to the process image of the outputs.
M (bit memory): provides storage for data used within the program.
T (timer): provides storage for timers.
C (counter): provides storage for counters.
You can also access data stored in the data blocks (DBs).
11
Basic Tasks
Basic Tasks
Starting the Simulation
There are several ways to start S7-PLCSIM:
From the Windows Start menu, select the menu command Simatic>STEP 7>S7-PLCSIM
Simulating Modules.
From the SIMATIC Manager toolbar, click the Simulation On/Off
Options > Simulate Modules menu command.
Create a shortcut to the program file. ([CD]:\Siemens\PLCSIM\s7wsi\s7wsvapx.exe,
where [CD] represents the installation drive)
button or select the
When the Simulation On/Off button is turned on
, any new connection goes automatically to
the simulated PLC. Any program that you download goes to the simulated PLC if the MPI address
of the simulated PLC matches that of the STEP 7 project containing the program. If you click the
Accessible Nodes button, the Accessible Nodes window shows the node address for the
simulated PLC that you have created.
When the simulation button is turned off
, any new connection goes to the real PLC. If you
click the Accessible Nodes button, the Accessible Nodes window shows the network of real
PLCs.
After you start S7-PLCSIM, you can open a simulated PLC or monitor the simulated program.
You can continue PLC simulation until you end the simulation session.
Notes
Simulation mode is not available if you have any existing connections to real PLCs.
You can have only one simulated PLC active at a time.
12
Basic Tasks
Using Help
You can access the S7-PLCSIM Help through the Help menu or in any of the following ways:
You can get Help about an item in the S7-PLCSIM window. Click the Help button
the toolbar, and then click the item.
You can get help about any dialog box or error message. Click the Help button in the
dialog or message box, or press F1.
on
The Help window provides the following buttons, menu commands, and tabs:
Help Buttons
Hide Button / Show Button
Toggles the display of the navigation area (Table of Contents, Index, and Search tabs). To
reduce the overall size of the help window, you can hide the navigation area; when you are ready
to search for new topics, click the Show button to restore the navigation area.
Back Button
If you have examined more than one topic, this button allows you to move back to the previous
topic(s).
Print Button
Allows you to send a selected topic, or an entire book, to any printer that you have installed.
Options Button Menu Commands
Hide Tabs / Show Tabs: Toggles the display of the Table of Contents, Index, and Search tabs.
To reduce the overall size of the help window, you can hide the tabs; when you are ready to
search for new topics, you can show the tabs.
Back: If you have examined more than one topic, this option allows you to move back to the
previous topic(s).
Forward: If you have moved back in the sequence of topics examined, this option allows you to
move forward until you reach the topic that you were viewing when you started moving back.
Home: Takes you to the web page that is defined as the home page for the S7-PLCSIM online
help.
Stop: Allows you to stop the browser from retrieving any more information pertaining to the
current help page. This command is useful if a page contains a great deal of information (for
example, large graphic files) that causes the page to take a long time to display completely.
Refresh: Refreshes the display of the current help page.
Internet Options: Allows you to define options for Internet browsing.
Print: Allows you to send a selected topic, or an entire book, to any printer that you have
installed.
Search Highlight Off / Search Highlight On: Toggles the display of highlighting for topics that
contain a term that you have specified in the Search field. The highlighting enables you to see
exactly where in a given topic the term appears.
13
Basic Tasks
Help Browser Tabs
Contents Tab
Choose this tab to view the table of contents for the help system. Double-click any book icon to
expand it and view the topics that it contains.
Index Tab
Choose this tab to view an alphabetical list of index keywords for the help system.
Search Tab
Choose this tab and type in a term that you wish to find. Then click the List Topics button to see
whether any topics in the help system contain the specified term. Select a topic from the list and
click the Display button to view the topic. By default, the term is highlighted every place that it
appears in the topic, to make it easy to locate the term. To toggle highlighting off or on before
displaying a topic, use the Options button.
14
Basic Tasks
Opening a Simulated PLC
When you start S7-PLCSIM, the simulator opens with a new, untitled, simulated PLC. If this is
your first time using S7-PLCSIM, you see only a CPU view object; otherwise, S7-PLCSIM
displays the view objects from your previous work session.
At this point, you have two choices:
You can begin work in S7-PLCSIM using the new simulated PLC.
You can open a simulated PLC that you have previously saved: use either the File >
Recent Simulation command or the File > Open PLC... command to select the
appropriate .PLC file. The work that you did with this PLC (such as downloading a
program or hardware configuration, or assigning values through a view object) is saved in
the archived simulation, so when you open the simulation, you do not have to repeat
those steps. You can begin work where you left off the last time.
After you decide whether to work with a new or an archived PLC simulation, you can add or
change the view objects displayed in S7-PLCSIM. If a layout is displayed when you open
S7-PLCSIM, you can close it. You can use the toolbar or the View and Insert menus to add new
view objects. You can use the menu command File > Open Layout to select a different layout if
you have archived more than one. Changes to your layout do not cause changes to your program
information; they only affect the way that the information is displayed.
Note
When you open a new or archived PLC simulation, any view objects that were displayed in
S7-PLCSIM are automatically closed. If you intend to open an archived layout as well as a new or
archived PLC simulation, open the simulated PLC before opening the layout.
What Is the Difference between a .PLC File and a .LAY File?
A .PLC file is used to save information about work that you do with a CPU view object (that is, a
simulated PLC). It also records changes you make to data: if you assign a value to a memory
area using any view object, that change is saved in the .PLC file.
A .LAY file is used to save the physical layout of your workspace in S7-PLCSIM. If you arrange
your view objects in a certain order and want to preserve that order for future work sessions, save
the layout before you close S7-PLCSIM. The next time you open S7-PLCSIM, the view objects
will be displayed in that order. (However, if you open a new or archived PLC simulation during
that work session, S7-PLCSIM automatically closes your layout. If you want to use the same
layout with the simulated PLC that you have opened, just re-open the .LAY file.)
15
Basic Tasks
Opening a Layout
To open a previously saved layout of S7-PLCSIM view objects, select the menu command File >
Open Layout....
A layout is simply an arrangement of view objects. In other words, the .LAY file archives only the
position and selected data format of the view objects in your simulation; the data values that are
displayed in the view objects are not saved as part of the layout.
When you work in S7-PLCSIM, you can open both a .PLC file and a .LAY file (if you have
previously saved your simulated PLC and the layout of your view objects). These are not mutually
exclusive actions; you do not have to choose only one. However, it is more efficient to open the
simulated PLC (.PLC file) before the layout (.LAY file), because any time you open a new or
archived PLC simulation, S7-PLCSIM automatically closes the open layout. You can also save a
layout, save a simulated PLC, and close a simulated PLC.
16
Basic Tasks
Selecting Scan Mode Options
S7-PLCSIM offers you options for running the simulated program:
Single Scan: The CPU executes one scan and then waits for you to initiate another scan.
Each scan consists of the CPU reading the peripheral inputs (PI), executing the program,
and then writing the results to the peripheral outputs (PQ). The CPU then waits for you to
run the next scan (using the Execute > Next Scan menu command or
).
Continuous Scan: The CPU executes one complete scan and then starts another scan.
Each scan consists of the CPU reading the peripheral inputs (PI), executing the program,
and then writing the results to the peripheral outputs (PQ).
To choose Single Scan mode, click
or select the menu command Execute > Scan Mode >
Single Scan. Accessing a program one scan at a time allows you to see the changes in each
scan. While a real CPU can execute faster than the editor can display data, the S7-PLCSIM
Single Scan option allows you to "freeze" the state of the program from scan to scan.
To choose Continuous Scan mode, click
or select the menu command Execute > Scan
Mode > Continuous Scan. (The default setting is Continuous Scan.)
17
Basic Tasks
Changing CPU Operating Modes
You can change the operating modes for the CPU. The simulated PLC responds to changes in
the operating mode just like a real PLC. The check boxes on the view object of the simulated PLC
show the current operating mode. To change the operating mode, click the desired checkbox or
use the menu command Execute > Key Switch Position > [mode].
The CPU operating modes on the simulated CPU function like the key switch on a real CPU: if
you use the STEP 7 tools to change the operating mode, or if the CPU automatically changes
mode (for example, encounters an error condition that causes the CPU to change from RUN to
STOP), the checkboxes on the simulated CPU view object do not change. The LED indicator
changes, but not the key switch. This alerts you that the CPU operating mode changed, possibly
because of some error in the program.
18
Basic Tasks
Monitoring the Simulated Program
You can display different types of view objects that allow you to monitor and modify the program
running in the simulated PLC.
The following seven view objects are activated from the Insert menu:
Input Variable: allows you to access the data stored in the process input (I) memory
area. The default address is byte 0 (IB0).
Output Variable: allows you to access the data stored in the process output (Q) memory
area. The default address is byte 0 (QB0).
Bit Memory: allows you to access the data stored in the bit memory (M) area. The
default address is byte 0 (MB0).
Timer: allows you to access the timers used by the program. The default timer is T 0.
Counter: allows you to access the counters used by the program. The default counter is
C 0.
Generic: allows you to access any of the memory areas in the simulated CPU, including
the data blocks (DBs) for the program.
Vertical Bits: allows you to see the symbolic or absolute address of each bit and to
monitor and modify data. The vertical bits variable view object can be used to show a bit
representation of peripheral input and output variables, process image input and output
variables, bit memory, and data blocks.
You can also use symbolic addressing to address any of these view objects.
The following three view objects are activated from the View menu:
Accumulators: allows you to display the data in the different accumulators within the
simulated CPU, as well as the status word and address registers. This view object
displays four accumulator fields to accommodate the four accumulators of the S7-400
CPU. Programs for an S7-300 CPU use only two accumulators.
Block Registers: allows you to display the contents of the data block address registers
within the simulated CPU. It also displays the number of the logic block that is currently
being executed and the number of the previous logic block, along with the number of the
instruction (step address counter, or SAC) being executed.
Stacks: allows you to display the data stored in the nesting stack and the master control
relay (MCR) stack within the simulated PLC.
You can also simultaneously monitor the program in the STEP 7 "LAD/STL/FBD" application:
1. In the SIMATIC Manager, click
or select View > Online to switch to online mode.
2. Navigate to the "Blocks" object in the S7_ZEBRA example project, and open FC1.
3. The "LAD/STL/FBD" application displays the program that is being executed by the
simulated PLC. Use the menu commands to view the status of the instructions.
19
Basic Tasks
Using the Slider Control
The slider control allows you to simulate values that change gradually or have a specific range,
such as analog values. You can use the slider control for the following view objects:
Input Variable
Output Variable
Bit Memory
You can access the memory area with either a memory address or a symbolic address. To
specify a slider control for one of the variable view objects, you select a slider format
representation from the Select Numeric Format drop-down list. You also select whether to
represent the values as decimal (positive integers), integer (positive and negative integers), or
real numbers. The selection options are determined by the size of the memory location being
accessed:
Byte (B): decimal
Word (W): decimal and integer
Double word (D): decimal, integer, and real
You can use either the mouse or the arrow keys to change the position of the slider control
indicator. Changing the position of the indicator changes the value of the variable stored in the
memory location. You can also enter a specific value in the “Value” field.
You can also configure a minimum and maximum value for the slider control. Selecting a range of
values does not affect the values that can be stored in the variable: the minimum and maximum
values affect only the values that can be entered or displayed by the slider control. Selecting a
range of values provides the following benefits:
You can simulate a specific range of values, for example, the range of values that would
be generated by a specific analog module.
By limiting the range of values between the minimum and maximum, you can provide
better resolution for entering data with the slider. You can always enter an exact value in
the Value field of the view object.
To select a minimum value for the slider, select Min from the Display Value, Min, or Max dropdown list of the view object. Then, enter the numeric value for the minimum in the Min field.
To select a maximum value for the slider, select Max from the Display Value, Min, or Max dropdown list of the view object. Then, enter the numeric value for the maximum in the Max field.
20
Basic Tasks
Using S7-PLCSIM to Debug Your Program
S7-PLCSIM provides the following features to help you debug your program:
The Pause command halts the simulated CPU immediately and allows you to resume the
execution of the program at the instruction where the program was halted.
Any change that you make with a view object immediately updates the contents of the
memory location. The CPU does not wait until the beginning or end of the scan to update
any changed data.
Execution control options allow you to select how the CPU runs the program:
Single Scan executes the program for one scan and then waits for you to start the
next scan.
Continuous Scan executes the program like a real PLC; it starts a new scan
immediately after the previous one finishes.
21
Basic Tasks
Using Interrupt OBs in Your Program
You can use S7-PLCSIM to test how your program handles different interrupt OBs. S7-PLCSIM
supports the following:
OB40 to OB47 (hardware interrupt)
OB70 (I/O redundancy error) {417-H systems only}
OB72 (CPU redundancy error) {417-H systems only}
OB73 (communication redundancy error) {417-H systems only}
OB80 (time error)
OB82 (diagnostic interrupt)
OB83 (insert/remove module)
OB85 (priority class error)
OB86 (rack failure)
Use the menu command Execute > Trigger Error OB... to select a specific OB, and enter the
header information in the dialog box. When you click the "OK" or "Apply" button, the simulated
PLC generates the appropriate event and runs the program in the associated OB. The OBs that
are available to be triggered from the Trigger Error OB menu depend on the I/O configuration for
the simulated PLC.
Input/Output Considerations
If your project matches either of the following descriptions, you must make modifications and
download your modified hardware configuration to S7-PLCSIM:
An S7-300 project with any CPU other than the CPU 315-2 DP, CPU 316-2 DP, or CPU
318-2
An S7-400 project that uses DP I/O with a CP instead of using a CPU model that
explicitly supports DP I/O
In order to simulate interrupt OBs, you must download a hardware configuration that contains
your I/O. For some cases your I/O is automatically included in the system data that STEP 7
downloads to S7-PLCSIM; in other cases, you must modify the configuration to one that does.
S7-300 CPUs
S7-300 CPUs such as the CPU 315-2DP, CPU 316-2DP, and CPU 318-2 download an I/O
configuration; other S7-300 CPUs autoconfigure the I/O to match the physical I/O installed in the
rack. Projects already configured for one of the CPUs named above do not require modifications
to the hardware configuration.
For other CPUs, you must copy your hardware configuration and put the data into a project for a
CPU that does not autoconfigure I/O, namely an CPU 315-2DP, CPU 316-2DP, or CPU 318-2
project. When you download the I/O information from the project, you can simulate interrupt OBs
in S7-PLCSIM (and S7-PLCSIM is also able to detect any I/O referencing errors that your
program may contain).
S7-400 CPUs
If you use a CP with PROFIBUS-DP I/O, you cannot download this I/O configuration and use it to
simulate an interrupt OB in S7-PLCSIM. However, you can copy your I/O configuration into a
second project and replace the S7-400 CPU with an S7-400 CPU model (such as the CPU 416DP) that explicitly supports DP. Once you download the hardware configuration from this second
project to S7-PLCSIM, you can simulate interrupt OBs and detect I/O referencing errors.
22
Basic Tasks
Modifying Your Hardware Configuration
In order to simulate the handling of interrupt OBs in your program, your I/O configuration must
use a CPU 315-2 DP, CPU 316-2 DP, CPU 318-2, or an S7-400 CPU that directly supports DP
I/O. S7-PLCSIM supports only one DP master system; you cannot use hardware configurations
with more than one DP master system. If your CPU is not of the type mentioned above, you can
use the following procedure to create and modify a copy of your hardware configuration:
1. Insert a new SIMATIC station to hold the modified configuration that you are going to
create. Name it something descriptive, such as SIM_IO.
2. Navigate to your station.
3. Open the Hardware Configuration of your station.
4. Copy the central rack from your Hardware Configuration.
Warning
Be certain only to copy, not cut, from the configuration of your original project to the
configuration of the SIM_IO project. If you cut items from your original configuration, your
Hardware Configuration will no longer work in real field applications.
5. Leaving the Hardware Configuration of your station open, navigate back to the SIM_IO
station and open its Hardware Configuration.
6. Paste the central rack from your original configuration into the SIM_IO configuration.
7. In the SIM_IO configuration, edit the rack to replace the existing CPU.
If the existing CPU is an S7-300, replace it with a CPU 315-2 DP, CPU 316-2 DP, or
CPU 318-2.
If the existing CPU is an S7-400, replace it with a CPU that directly supports DP.
(The extension "DP" should appear in the name of the model that you select.)
Note
When you insert a new CPU in the central rack, the STEP 7 hardware configuration
software issues a series of messages prompting you to assign a network. If your original
project was not networked, answer "No" to these prompts. The STEP 7 hardware
configuration software displays the message "Cannot assign a PROFIBUS network to the
DP master." Because you do not need a PROFIBUS network, this message is not a
problem.
8. If your configuration previously used a CP for DP communications, delete the CP from
the SIM_IO configuration. The CP is not necessary after you put a DP CPU into the
configuration.
9. If you have expansion racks or PROFIBUS slaves in your original configuration, copy
them into the SIM_IO configuration.
10. Carefully check the addresses assigned by STEP 7 to the modules in the SIM_IO
configuration and make any necessary changes.
11. Save and close the SIM_IO configuration.
12. Close the original configuration.
After you make the required modifications, you can download the modified configuration to S7PLCSIM.
23
Basic Tasks
Downloading the Modified Configuration
After you create a modified I/O configuration to be used with S7-PLCSIM, you can download the
resulting system data.
1. In the SIMATIC Manager window, navigate to the SIM_IO project and open the blocks
object. A System Data object and an OB1 block are displayed.
2. Delete the OB1 block object from the SIM_IO project. This ensures that you cannot
unintentionally download an empty OB1 to S7-PLCSIM from the SIM_IO project.
3. Download your Hardware Configuration to S7-PLCSIM.
Note
It does not matter whether you download your program blocks before or after you
download the SIM_IO Hardware Configuration. However, if you do download program
blocks after downloading the SIM_IO Hardware Configuration, be sure that you answer
"No" to the prompt, "Do you want to load the system data?" If you inadvertently load the
system data from your original project, the SIM_IO Hardware Configuration is overwritten.
Resetting the CPU Memory
To reset the memory of the simulated CPU, select the menu command PLC > Clear/Reset, or
click the MRES button on the CPU view object. This action resets the memory areas, deletes the
program blocks, and deletes the hardware configuration of the simulated PLC.
When you perform a memory clear/reset, the CPU automatically goes to STOP mode.
Resetting Timers
The Reset Timers dialog box allows you to reset any or all of the timers used in your program to
their default values. Selecting "All Timers" resets all of the timers in the program; you can also
select specific timers to reset.
To reset all of the timers in your program, use the Reset Timers
To reset an individual timer, use the Reset Timers
specific timer.
24
toolbar button.
button on the timer view object for the
Basic Tasks
Using Symbolic Addressing
To use symbolic addressing in your simulated program:
1. Select the menu command Tools > Options > Attach Symbols.... This menu command
invokes a dialog box.
2. Browse to the STEP 7 symbol table to be referenced.
3. Click the OK button.
4. Create view objects for variables that you want to address symbolically.
5. To turn on symbols for all view objects, select the menu command Tools > Options >
Show Symbols. To hide the symbols, select the command again.
For the Vertical Bits view object, bit values are displayed vertically, and the symbolic or absolute
address is displayed beside each bit. For all other view objects, symbol tooltips are available for
the address fields. Point to a field with the mouse to see its symbolic address and comment
(separated by a colon) in a tooltip box.
Configuring an MPI Address
Use the MPI Address dialog box (menu command PLC > MPI Address...) to configure the
simulated PLC for a specific network node address. The new address is stored with the
configuration of the simulated PLC when you use the Save PLC or Save PLC As... menu
commands.
Ensure that the node address for the offline program matches the node address for the program
in the simulated PLC.
When the Simulation On/Off
button on the SIMATIC Manager toolbar is turned on, clicking
the Accessible Nodes button shows you that the simulated PLC that is currently open.
Note
You cannot change the node address for the simulated PLC while you are using STEP 7
applications to monitor the program. Close these applications before changing the node address.
25
Basic Tasks
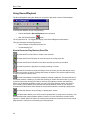
Using Record/Playback
The Record/Playback dialog box allows you to record or play back a series of data changes.
To access this window, do one of the following:
Choose the Tools > Record/Playback menu command.
Click the Record/Playback
button.
The key sequence Alt + F5 toggles the display of the Record/Playback toolbar button.
This topic discusses the following subjects:
How to Record or Play Back an Event File
Troubleshooting Tips
How to Record or Play Back an Event File
Click the New Event File button to create a new event file.
Click the Open Event File button to locate and open an existing event file.
Click the Save Event File button to save the events that you have just recorded.
Click the Play button to play back an existing recording of events.
Click the Record button to begin recording a series of events. Use the view objects in your
simulation to turn bits on and off or assign data values as desired. The recorder captures every
change you make to memory areas.
Click the Pause button to temporarily suspend recording or playback. The pause function is
convenient because it allows you to pause the recording of events and resume later. If you need
to perform some other activity (for instance, add new view objects or answer the telephone)
before you are finished generating events, you can click Pause and thus avoid a long delay in
your recording. Pause allows you to minimize the time lag between events as you record, in
contrast to the Delta button, which affects the overall rate at which the recording is played back.
Click the Stop button to stop recording, or playing back, events.
The Delta button allows you to select a rate of speed before you play back a recording. Your
selection affects the overall playback duration. However, if some events were recorded closer
together, or further apart than others, the relative time intervals are preserved even as the overall
playback time is reduced or increased by your Delta selection.
26
Basic Tasks
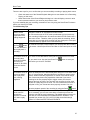
There are two ways for you to confirm that you are successfully recording or playing back events:
Check the status bar of the Record/Playback dialog box to see whether it is in Recording,
Playing, or Idle mode.
Watch the title bar of the Record/Playback dialog box. It should display a numeric value
that increments each time you record or play back an event.
If you are satisfied with your recording, remember to save it by using the Save Event File button
before you close S7-PLCSIM.
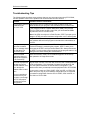
Troubleshooting Tips
Problem
Solution
I tried to record
events, but when I
played them back,
nothing happened.
Change the mode of S7-PLCSIM from STOP to RUN.
You can record events in STOP mode provided that you had previously
been recording in RUN mode. All events recorded in STOP mode have a
Delta value of zero. Therefore, when you play back the recording, all the
events that you recorded during a single scan are displayed in such rapid
succession that they appear to occur simultaneously.
You must have an open event file before you can play back the recording
The Play
button of the events. Use the Open Event File button to select and open an event
is de-activated and I file.
cannot play back a
recording.
I recorded a series of If you close S7-PLCSIM without saving the recorded events in an event
events and then
button to save your
closed S7-PLCSIM. file, your work is lost. Use the Save Event File
work before you close S7-PLCSIM.
The next time I
opened S7-PLCSIM,
I could not find the
events.
I recorded a series of
events, but when I
tried to play them
back, nothing
happened.
Check the status bar of the Record/Playback dialog box to see what mode
it is in. If it says Playing, watch the title bar to see when a numeric value
appears. When events are played back, a counter in the title bar keeps
track of how many have been played back. Note that if you start a
recording but do not promptly begin to trigger events, the recorder
captures the time lag. When you play back the recording, the first event
will take an equally long time to occur. You can examine the event file to
verify that in fact, your events have been properly recorded. You can
adjust the playback speed of the recording by using the Delta
I cannot remember
which event file
contains the
sequence of events
that I want to play
back.
button.
You can use long, descriptive file names to help differentiate your event
files. If necessary, you can use a text editor to examine your files and
locate the one with the correct sequence. The default storage location for
event files is C:\Siemens\Step7\PLCSIM\S7EVENTS. However, if you
upgraded from version 3.0 or 4.0 of S7-PLCSIM, the default storage
location is C:\Siemens\STEP7\S7wsi\S7EVENTS.
27
Basic Tasks
Troubleshooting Tips, continued
Problem
Solution
I changed a single
bit, but when I played
back my recording,
the entire byte
changed.
If an Input Variable, Output Variable, Bit Memory, Generic Variable, or
Vertical Bits View Object shows only one bit (e.g., Q0.0, Bits), a bit change
is recorded correctly as only a change in that particular bit. However, if the
view object displays all eight bits (e.g., QB0, Bits), a change to a single bit
is recorded as a change in byte value instead of a change in that bit only.
Consequently, it becomes possible that during playback of the recording,
other bits within the byte could be represented as changing (for instance,
process flags or Boolean inputs), when in fact they would not be affected
during operation of a real PLC.
I am trying to record When recording events with the CPU view object in Single Scan mode,
events in Single Scan note the following:
mode but the
recorder does not
function as I would
expect.
You cannot start a recording in Single Scan mode unless you click
button to increment the scan count. The first
the Next Scan
event in your recording must have a Delta value of 1 or higher.
The Delta value is based on the number of scan cycles that have
occurred since the previous event (which in this case was when
you clicked the Record button). However, if you are beginning the
recording in Single Scan mode, no scan cycles have elapsed. You
must increment the scan.
When you record events in Single Scan mode, they have a Delta
value of zero (because they are all occurring within the same
scan). Therefore, when you play back the recording, all the events
that you recorded during a single scan are displayed in such rapid
sequence that they appear to occur simultaneously. To provide a
discernable time lag between events, you would have to click the
Next Scan button or switch between Continuous Scan mode and
Single Scan mode for each event.
My event file contains Events are recorded with German mnemonics in S7-PLCSIM regardless of
German mnemonics your STEP 7 selection. You can disregard this phenomenon.
even though that is
not my selection in
STEP 7.
28
Basic Tasks
Monitoring the Scan Cycle
The menu command Execute > Scan Cycle Monitoring … opens a dialog box that allows you to
enable or disable scan cycle monitoring (watchdog timer) and set the maximum scan cycle
monitoring time for the simulation. The maximum scan cycle time is the maximum time the
process is allowed to take for one full scan cycle of the S7 user program in the OB1 and update
of the relevant I/O. If this time is exceeded, the simulated PLC goes into STOP mode.
Because program execution may be significantly slower in S7-PLCSIM than with an actual CPU
(especially when other applications are running at higher priority), you can experience annoying
timeouts. This dialog box makes it possible for you to disable or extend the scan cycle monitoring
without modifying the program for the target PLC.
Note that this dialog box does not reflect the monitoring time set in the hardware configuration,
and any changes affect the simulation only.
If "Enable Scan Cycle Monitoring" is selected, you can set the monitoring time to any value
between 1 second (1000 ms) and 1 minute (60000 ms), inclusive. The default scan cycle
monitoring time is 20000 ms.
Saving a Layout
To save the current layout of S7-PLCSIM view objects, select the menu command File > Save
Layout. A layout is simply an arrangement of view objects. In other words, the .LAY file archives
only the position and selected data format of the view objects in your simulation; the data values
that are displayed in the view objects are not saved as part of the layout.
You can save both the layout (.LAY file) and the PLC simulation (.PLC file) when you work. They
are not mutually exclusive. For information about what is archived if you save a PLC simulation
(.PLC file), see Saving a Simulated PLC.
29
Basic Tasks
Saving a Simulated PLC
You can store the current state of the simulated PLC in one of the following ways:
Use the menu command File > Save PLC to archive the configuration of the PLC to the
current file name.
Use the menu command File > Save PLC As... to archive the configuration of the PLC to
a new file.
The following elements are saved when you save the PLC:
Program
Hardware configuration
The checkbox selection (key switch position) for the operating mode indicated on the
CPU view object: namely, RUN-P, RUN, or STOP
Execution control option (continuous scan, single scan)
The status of the I/O
Timer values (T memory)
Symbolic addresses
Power on/off setting
When you open a simulated PLC, whether it is a new PLC simulation or an archived PLC
simulation, the simulated PLC is in STOP mode.
If you archived a simulated PLC in RUN or RUN-P mode, when you open the archive, the
checkbox of the CPU view object indicates your selection, but the CPU indicators show that the
actual mode of the simulated PLC is STOP mode. To restore the simulated PLC to RUN or RUNP mode, you must use the checkboxes in the CPU view object or the Execute > Key Switch
Position command to cycle the simulated PLC to STOP mode and then back to RUN or RUN-P
mode.
If you have attached symbols, when you save the simulated PLC, the symbolic addresses are
saved. However, by default when you open the archived PLC simulation, symbolic addresses are
not displayed. To display symbolic addresses, use the Tools > Options > Show Symbols
command.
To save the configuration of the view objects, use the File > Save Layout menu command.
Saving a simulated PLC does not close the simulated PLC.
30
Basic Tasks
Closing a Simulated PLC
Use the menu command File > Close PLC to end the simulation of the program. This command
closes the CPU view object and all opened views..
Closing a simulated program can result in errors in applications which are currently connected to
the simulator. Closing the simulated PLC does not end the simulation session. You can either exit
S7-PLCSIM, or open another simulated PLC.
Ending the Simulation Session
After saving any simulated PLC or layout configuration, follow these steps to exit the S7-PLCSIM
application:
1. Close any STEP 7 applications involved in the monitoring of the simulation.
2. Select the menu command File > Exit.
Exiting S7-PLCSIM, like closing a simulated PLC, can result in errors in applications which are
currently connected to the simulator.
31
Basic Tasks
32
View Objects
View Objects
S7-PLCSIM View Objects
S7-PLCSIM provides several view objects that allow you to monitor and modify various
components of the simulated PLC. These view objects are:
CPU View Object
ACCUs & Status Word View Object
Block Regs View Object
Stacks View Object
Input Variable View Object
Output Variable View Object
Bit Memory View Object
Timers View Object
Counters View Object
Generic Variable View Object
Vertical Bits Variable View Object
You can use symbolic addressing with view objects. If you do, tooltips are available for all view
object fields that have symbols assigned to them. You can point to a view object field with the
mouse to see its symbolic address and comment (separated by a colon) in a tooltip box.
32
View Objects
CPU View Object
This view object is present by default when you open a new simulation. It allows you to view the
status and change the operating mode of the simulated CPU.
The operating modes on the CPU view object function like the key switch on a real CPU: if you
use the STEP 7 tools to change the operating mode, or if the CPU automatically changes mode
(for example, encounters an error condition that causes the CPU to change from RUN to STOP),
the RUN/STOP indicators change, but not the key switch. This alerts you that the CPU changed
operating mode, possibly because of some error in the program.
The MRES button allows you to reset the memory and to delete the blocks and the hardware
configuration of the simulated PLC.
ACCUs & Status Word View Object
To add this view object to a simulation, do one of the following:
Choose the menu command View > Accumulators
Click CPU Accumulators
button
This view object allows you to monitor the information that the CPU uses to execute the program:
Accumulators: allows you to monitor the contents of the CPU accumulators. The view
object displays four accumulator fields to accommodate the S7-400 CPU; programs for
the S7-300 CPU use only two accumulators.
Status word: allows you to monitor the bits of the status word.
Address registers: allows you to monitor the contents of the two address registers (AR1
and AR2). These address registers are used for the indirect addressing of data.
Block Regs View Object
To add this view object to a simulation, do one of the following:
Choose the menu command View > Block Registers
Click the Block Registers
button
This view object allows you to monitor the contents of the data block address registers (DB1 and
DB2). This view object also displays the number of the current logic block and the previous logic
block, along with the number of the instruction (step address counter, or SAC) for each block.
33
View Objects
Stacks View Object
To add this view object to a simulation, do one of the following:
Choose the menu command View > Stacks
Click the Nesting Stacks
button
This view object allows you to monitor information stored in the following stacks of the CPU:
The nesting stack stores up to seven entries. For each entry, the nesting stack stores the
states of the RLO and OR bits of the status word. An entry in the nesting stack is made
for each instruction that starts a new logic string. These instructions are: And (A), And
Not (AN), Or (O), Or Not (ON), Exclusive Or (X), and Exclusive Or Not (XN).
The MCR stack stores up to eight levels of nesting for a master control relay (MCR).
Each level shows the status of the RLO bit for an MCR instruction, which begins an MCR
area.
Input Variable View Object
To add this view object to a simulation, do one of the following:
Choose the menu command Insert > Input Variable
Click on the Insert Input Variable
button
This view object allows you to monitor and modify the following data:
Peripheral (external) input variables: you can access the peripheral input (PI) memory
areas of the CPU.
Process-image input variables: you can access the input (I) memory areas of the CPU.
The CPU overwrites the I memory with the PI memory at the beginning of every scan. If
you change an I memory value, the simulator immediately copies the changed value to
the peripheral area. This way, the desired change is not lost when the peripheral value
overwrites the process input value on the next scan.
The CPU reacts immediately to any changes made with this view object. (Any modifications made
with a STEP 7 variable table take effect at the proper time in the CPU scan: inputs are read at the
beginning of the scan, and outputs are written at the end.)
You can choose the numeric data format for the input variable and you can also use symbolic
addressing if you have attached symbols. You can also view input variables with a Vertical Bits
View Object.
34
View Objects
Output Variable View Object
To add this view object to a simulation, do one of the following:
Choose the menu command Insert > Output Variable
Click the Insert Output Variable
button
This view object allows you to monitor and modify the following data:
Peripheral (external) output variables: you can access the peripheral output (PQ) memory
areas of the CPU.
Process-image output variables: you can access the output (Q) memory areas of the
CPU. During the scan cycle, the program calculates output values and places them in the
process-image output table. At the end of the scan cycle, the operating system reads the
calculated output values from this table and sends them to the process outputs. The
process-image output table maps the first 512 bytes (CPU-dependent) of the peripheral
output memory.
The CPU reacts immediately to any changes made with this view object. (Any modifications made
with a STEP 7 variable table take effect at the proper time in the CPU scan: inputs are read at the
beginning of the scan, and outputs are written at the end.)
You can choose the numeric data format for the output variable and you can also use symbolic
addressing if you have attached symbols. You can also view input variables with a Vertical Bits
View Object.
Bit Memory View Object
To access this view object, do one of the following:
Choose the menu command Insert > Bit Memory
Click on the Insert Bit Memory
button
This view object allows you to monitor and modify bit memory: you can access the variables
stored in the bit memory (M) area of the CPU.
The bit memory (M) area provides storage for interim results calculated in the program. You
designate what data format to use to access the data.
You can choose the numeric data format for the bit memory and you can also use symbolic
addressing if you have attached symbols. You can also view bit memory with a Vertical Bits View
Object.
35
View Objects
Timer View Object
To add this view object to a simulation, do one of the following:
Choose the menu command Insert > Timer
Click the Insert Timer
button
This view object allows you to monitor and modify the timers used by your program. The timer
view object displays the name of the timer, the actual timer value, and the time base.
Note
If you change the time base, the actual timer value changes also, while the displayed value
remains the same. This is because the actual timer value is the product of the displayed value
and the time base. For example, if the value of timer T 0 is 600 and the time base is 10ms, this
represents a timer of 6 seconds. If you change the time base to 100ms, then the actual timer
value becomes 60 seconds. (600 * 100ms = 60 seconds)
To reset all of the timers in your program, use the Reset Timers
To reset an individual timer, use the Reset Timers
toolbar button.
button on the view object for that timer.
You can use symbolic addressing if you have attached symbols. You can also configure the
timers to be under either automatic or manual control from commands on the Execute menu, .
Counter View Object
To add this view object to a simulation, do one of the following:
Choose the menu command Insert > Counter
Click the Insert Counter
(or
in German mnemonics) button
This view object allows you to monitor and modify the counters used by your program. It opens
with a default memory location of C 0.
You can choose the numeric data format for the counter and you can also use symbolic
addressing if you have attached symbols.
36
View Objects
Generic Variable View Object
To add this view object to a simulation, do one of the following:
Choose the menu command Insert > Generic
Click the Insert Generic Variable
button
This view object allows you to monitor and modify the following data:
Peripheral (external) input and output variables: you can access the peripheral input (PI)
and peripheral output (PQ) memory areas of the CPU.
Process-image input and output variables: you can access the input (I) and output (Q)
memory areas of the CPU. The CPU overwrites the I memory with the PI memory at the
beginning of every scan. If you change an I memory value, the simulator immediately
copies the changed value to the peripheral area. This way, the desired change is not lost
when the peripheral value overwrites the process input value on the next scan.
Bit memory: you can access the variables stored in the bit memory (M) area of the CPU.
Timers and counters: you can access the timers and counters used by the program.
Data blocks: you can access the data stored in the data blocks of the program, for
example, DB1.DBX 0.0 or DB1.DBW 0.
The CPU reacts immediately to any changes made with this view object. Any modifications made
with a STEP 7 variable table take effect at the proper time in the CPU scan; inputs are read at the
beginning of the scan, and outputs are written at the end.
You can choose the numeric data format for the generic variable and you can also use symbolic
addressing if you have attached symbols.
Vertical Bits Variable View Object
To add this view object to a simulation, do one of the following:
Choose the menu command Insert > Vertical Bits
Click the Insert Vertical Bits button
The Vertical Bits view object allows you to see the symbolic or absolute address of each bit and
to monitor and modify the following data:
Peripheral (external) input and output variables: you can access the peripheral input (PI)
and peripheral output (PQ) memory areas of the CPU.
Process-image input and output variables: you can access the input (I) and output (Q)
memory areas of the CPU. The CPU overwrites the I memory with the PI memory at the
beginning of every scan. If you change an I memory value, the simulator immediately
copies the changed value to the peripheral area. This way, the desired change is not lost
when the peripheral value overwrites the process input value on the next scan.
Bit memory: you can access the variables stored in the bit memory (M) area of the CPU.
Data blocks: you can access the data stored in the data blocks of the program.
The CPU reacts immediately to any changes made with this view object. Any modifications made
with a STEP 7 variable table take effect at the proper time in the CPU scan; inputs are read at the
beginning of the scan, and outputs are written at the end. You can use symbolic addressing if you
have attached symbols for variables represented with a Vertical View Object.
37
Error and Interrupt OBs
Error and Interrupt OBs
Overview
S7-PLCSIM supports the following interrupt and error OBs:
38
OB40 to OB47 (hardware interrupt)
OB70 (I/O redundancy error) {417-H systems only}
OB72 (CPU redundancy error) {417-H systems only}
OB73 (communication redundancy error) {417-H systems only}
OB80 (time error)
OB82 (diagnostic interrupt)
OB83 (insert/remove module)
OB85 (priority class error)
OB86 (rack failure)
Error and Interrupt OBs
Hardware Interrupt (OB40-OB47)
This dialog box allows you to test the program that you downloaded in OB40 to OB47.
Note that in order for you to use this OB (menu command Execute > Trigger Error OB >
Hardware Interrupt (OB40-OB47)...), you must first have made any necessary modifications to
your hardware configuration and downloaded your I/O configuration. The operating mode of the
simulated CPU must be either RUN or RUN-P.
The parameters that you select with this dialog box are passed to the following variables when
the OB is called:
Parameter
Variable
Data Type
Description
Module address
OB4x_MDL_ADDR
WORD
Logical base address
of the module that
triggers the interrupt.
Module status
OB4x_POINT_ADDR
DWORD
(Hex)
For digital modules: bit
field with the status of
the inputs on the
module. (Bit 0
corresponds to the first
input.)
For analog modules,
CPs or FMs: interrupt
status of the module.
Interrupt OB
(read-only)
OB4x_OB_NUMBR
BYTE
OB number (40 to 47).
For further information, reference:
STEP 7 Help on Organization Blocks
OB40-OB47 (STEP 7 Help)
The SIMATIC System Software for S7-300/400 System and Standard Functions Reference
Manual.
39
Error and Interrupt OBs
I/O Redundancy Error (OB70)
This dialog box allows you to test the loss of redundancy of PROFIBUS-DP and can only be used
with H CPUs.
Note that in order for you to use this OB (menu command Execute > Trigger Error OB > I/O
Redundancy Error (OB70)...), you must first have made any necessary modifications to your
hardware configuration and downloaded your I/O configuration.
The parameters that you select with this dialog box are passed to the following variables when
the OB is called:
Parameter
(Input/Output)
Variable
Data Type
Description
Error Event Class
OB70_EV_CLASS
BYTE
Event class and IDs:
* B#16#72: event
entering state
* B#16#73: event
leaving state
Error Code
OB70_FLT_ID
BYTE
Error code (possible
values):
* B#16#A2
* B#16#A3
You must also enter values for DP Master Base Address, DP Master System ID, DP Slave Base
Address, and DP Station Number. Each field needs to match the value that was assigned in the
STEP 7 hardware configuration of the project that you are simulating.
The DP Slave Base Address, DP Station Number, and the Input/Output selection are only
available for Error Code 0xA3.
For further information, reference:
STEP 7 Help on Organization Blocks
OB70 (STEP 7 Help)
The SIMATIC System Software for S7-300/400 System and Standard Functions Reference
Manual
40
Error and Interrupt OBs
CPU Redundancy Error (OB72)
This dialog box allows you to test a CPU redundancy failure and exists only with H CPUs. The
operating system of the H CPU calls OB72 when one of the following events occurs:
Loss of CPU redundancy
Reserve-master switchover
Synchronization error
Error in a SYNC module
Updating aborted
Comparison error (for example, RAM, PIQ)
OB72 is executed by all CPUs that are in the RUN or STARTUP mode following a suitable event.
Note that in order for you to use this OB (menu command Execute > Trigger Error OB > CPU
Redundancy Error (OB72)...), you must first have made any necessary modifications to your
hardware configuration and downloaded your I/O configuration.
The parameters that you select with this dialog box are passed to the following variables when
the OB is called:
Parameter
Variable
ID
Error Event Class
OB72_EV_CLASS
B#16#73
B#16#75
B#16#78
B#16#79
Error Code
OB72_FLT_ID
See fault ID table
41
Error and Interrupt OBs
OB72 Fault Ids (Error Codes)
The error code in OB72_FLT_ID indicates which event occurred that caused the OB72 call:
OB72_FLT_ID
Start Event of OB72
B#16#01
Loss of redundancy (1 of 2) due to a CPU failure
B#16#02
Loss of redundancy (1 of 2) due to STOP on the reserve triggered by user
B#16#03
H system (1 of 2) changed to redundant mode
B#16#20
Error in RAM comparison
B#16#21
Error comparing process image output value
B#16#22
Error comparing memory bits, timers, or counters
B#16#23
Different operating system data recognized
B#16#31
Standby-master switchover due to master failure
B#16#33
Standby-master switchover due to operator intervention
B#16#34
Standby-master switchover due to sync module connection problem
B#16#35
Standby-master switchover triggered by 90 "H_CTRL"
B#16#40
Synchronization error in user program due to elapsed wait time
B#16#41
Synchronization error in user program due to waiting at different
synchronization points
B#16#42
Synchronization error in operating system due to waiting at different
synchronization points
B#16#43
Synchronization error in operating system due to elapsed wait time
B#16#44
Synchronization error in operating system due to wrong data
B#16#50
No SYNC module
B#16#51
Modification at SYNC module without Power On
B#16#52
SYNC module removed/inserted
B#16#53
Modification at SYNC module without reset
B#16#54
SYNC module: rack number assigned twice
B#16#55
SYNC module error/eliminated
B#16#56
Illegal rack number set on the SYNC module
B#16#C1
Updating aborted
B#16#C2
Abort of update attempt because a monitoring time was exceeded during the
n-th attempt (1 <= n <= maximum possible number of update attempts after
an abort due to the monitoring time being exceeded)
For further information, reference:
STEP 7 Help on Organization Blocks
OB72 (STEP 7 Help)
The SIMATIC System Software for S7-300/400 System and Standard Functions Reference
Manual
42
Error and Interrupt OBs
Communication Redundancy Error (OB73)
This dialog box allows you to test when the first loss of redundancy occurs in a fault-tolerant S7
connection and exists only with H CPUs.
Note that in order for you to use this OB (menu command Execute > Trigger Error OB >
Communication Redundancy Error (OB73)...), you must first have made any necessary
modifications to your hardware configuration and downloaded your I/O configuration.
The parameters that you select with this dialog box are passed to the following variables when
the OB is called:
Parameter
Variable
Data Type
Description
Error Event Class
OB73_EV_CLASS
BYTE
Possible value of
B#16#73 (loss of
redundancy in
communication) or
B#16#72 (problem
eliminated)
Error Code
OB73_FLT_ID
BYTE
Possible value of
B#16#E0
For further information, reference:
STEP 7 Help on Organization Blocks
OB73 (STEP 7 Help)
The SIMATIC System Software for S7-300/400 System and Standard Functions Reference
Manual
43
Error and Interrupt OBs
Time Error (OB80)
This dialog box allows you to test the program that you downloaded in OB80 (Time Error). The
parameters that you select with this dialog box are passed to the following variables when the OB
is called:
Parameter
Variable
Data Type
Description
Cycle time exceeded
OB80_FLT_ID
BYTE
Error code: B#16#01
Requested OB is still
being processed
OB80_FLT_ID
BYTE
Error code: B#16#02
OB call buffer overflow OB80_FLT_ID
for the current priority
class
BYTE
Error code: B#16#07
Expired time of day
interrupt:
* due
* on
to a time jump
OB80_FLT_ID
BYTE
Error code: B#16#05
return to run after
hold
OB80_FLT_ID
BYTE
Error code: B#16#06
For further information, reference:
STEP 7 Help on Organization Blocks
OB80 STEP 7 Help
The SIMATIC System Software for S7-300/400 System and Standard Functions Reference
Manual
44
Error and Interrupt OBs
Diagnostic Interrupt (OB82)
This dialog box allows you to test the program that you downloaded in OB82 (Diagnostic
Interrupt).
Note that in order for you to use this OB (menu command Execute > Trigger Error OB > CPU
Diagnostic Interrupt (OB82)...), you must first have made any necessary modifications to your
hardware configuration and downloaded your I/O configuration.
Default Tests: (Optional) In this drop-down box, choose from the list to set the fault conditions for
the desired test automatically.
For all fault conditions the event class (OB82_EV_CLASS) is set to B#16#39 (incoming event)
and OB82_FLT_ID uses the error code B#16#42. If no fault condition is selected (Module OK),
the event class is set to B#16#38 (outgoing event).
The parameters that you select with this dialog box are passed to the following variables when
the OB is called:
Module Address Parameter
The module address is the logical base address of the module that triggers the interrupt. It is the
first input, if any; otherwise, it is the first output address. (Example: PIB 0)
Parameter
Variable
Data Type
Module address
OB82_MDL_ADDR
INT
45
Error and Interrupt OBs
Fault Conditions
Check the following checkboxes to enable the following fault conditions:
Parameter Checkbox
Variable
Data Type
Module defect (read-only)
OB82_MDL_DEFECT
BOOL
Internal fault
OB82_INT_FAULT
BOOL
External fault
OB80_EXT_FAULT
BOOL
Channel fault
OB82_PNT_INFO
BOOL
External voltage failed
OB82_EXT_VOLTAGE
BOOL
Front panel connector
unplugged
OB82_FLD_CONNCTR
BOOL
Module not configured
OB82_NO_CONFIG
BOOL
Incorrect parameters on
module
OB82_CONFIG_ERR
BOOL
Channel information exists
OB82_MDL_TYPE
BYTE
User information exists
OB82_MDL_TYPE
BYTE
Diagnostic interrupt from
substitute
OB82_MDL_TYPE
BYTE
Submodule missing or has an OB82_SUB_MDL_FAULT
error
BOOL
Communication problem
OB82_COMM_FAULT
BOOL
Operating mode is STOP
OB82_MDL_STOP
BOOL
Watchdog timer responded
OB82_WTCH_DOG_FLT
BOOL
Internal power supply failed
OB82_INT_PS_FLT
BOOL
Battery exhausted
OB82_PRIM_BATT_FLT
BOOL
Entire backup failed
OB82_BCKUP_BATT_FLT
BOOL
Expansion rack failure
OB82_RACK_FLT
BOOL
Processor failure
OB82_PROC_FLT
BOOL
EPROM fault
OB82_EPROM_FLT
BOOL
RAM fault
OB82_RAM_FLT
BOOL
ADC/DAC error
OB82_ADU_FLT
BOOL
Fuse tripped
OB82_FUSE_FLT
BOOL
Hardware interrupt lost
OB82_HW_INTR_FLT
BOOL
For further information, reference:
STEP 7 Help on Organization Blocks
OB82 (STEP 7 Help)
The SIMATIC System Software for S7-300/400 System and Standard Functions Reference
Manual
46
Error and Interrupt OBs
Insert/Remove Module Interrupt (OB83)
This dialog box allows you to test the program that you downloaded in OB83 (Insert/Remove
Module Interrupt).
Note that in order for you to use this OB (menu command Execute > Trigger Error OB >
Insert/Remove Module Interrupt (OB83)...), you must first have made any necessary
modifications to your hardware configuration and downloaded your I/O configuration.
For all fault conditions, the event class (OB83_EV_CLASS) is set to B#16#39 (incoming event). If
no fault condition is selected (Module OK), the event class is set to B#16#38 (outgoing event).
The parameters that you select with this dialog box are passed to the following variables when
the OB is called:
Parameter
Variable
DataType
Value / Description
Module removed or not OB83_FLT_ID
responding
BYTE
B#16#61
Module inserted:
module type OK
OB83_FLT_ID
BYTE
B#16#61
Module inserted:
incorrect module type
OB83_FLT_ID
BYTE
B#16#63
Module inserted: type
ID cannot be read
OB83_FLT_ID
BYTE
B#16#64
Module inserted: error
in module parameter
assignment
OB83_FLT_ID
BYTE
B#16#65
Module address
OB83_MDL_ADDR
WORD
The logical base
address of the module
that triggers the
interrupt: the first input,
if any; otherwise, the
first output address.
Example: PQW 0
For further information, reference:
STEP 7 Help on Organization Blocks
OB83 (STEP 7 Help)
The SIMATIC System Software for S7-300/400 System and Standard Functions Reference
Manual
47
Error and Interrupt OBs
Priority Class Error (OB85)
This dialog box allows you to test the program that you downloaded in OB85 (Priority Class
Error). OB85 is automatically triggered if an error occurs while the operating system is accessing
a block (error code B#16#A3).
Note that events B#16#A1, B#16#A2, B#16#B1, and B#16#B2 must be generated by other
means, for example, by deleting one of the required blocks from your program.
The parameters that you select with this dialog box are passed to the following variables when
the OB is called:
Parameter
Integrated function:
No error resolution
Block not loaded
Area length error
Write protect error
Variable
OB85_Z1
IEC timer:
No error resolution
Block not loaded
Area length error
Write protect error
OB85_Z1
Data Type
WORD
Value
W#16#0100
W#16#0101
W#16#0102
W#16#0103
WORD
W#16#0200
W#16#0201
W#16#0202
W#16#0203
For further information, reference:
STEP 7 Help on Organization Blocks
OB85 (STEP 7 Help)
The SIMATIC System Software for S7-300/400 System and Standard Functions Reference
Manual
48
Error and Interrupt OBs
Rack Failure (OB86)
This dialog box allows you to test the program that you downloaded in OB86 (Rack Failure).
Note that in order for you to use this OB (menu command Execute > Trigger Error OB > Rack
Failure (OB86)...), you must first have made any necessary modifications to your hardware
configuration and downloaded your I/O configuration.
For all fault conditions the event class (OB86_EV_CLASS) is set to B#16#39 (incoming event). If
no fault condition is selected (Rack Return, Rack Return with Discrepancy, DP Station Return
and DP Station OK), the event class is set to B#16#38 (outgoing event).
The two tabs of the dialog box provide the following options:
Expansion Rack FailureTab
The parameters that you select in this tab are passed to the following variables when the OB is
called:
Parameter
IM address
Variable
OB86_MDL_ADDR
Data Type
WORD
Value
Address of the
interface module to
which expansion racks
are connected.
Failure
OB86_FLT_ID
BYTE
B#16#C1
Return
OB86_FLT_ID
BYTE
B#16#C1
Return with
discrepancy
OB86_FLT_ID
BYTE
B#16#C2
Expansion rack
OB86_FLT_ID
operational again but
error in module
parameter assignment
BYTE
B#16#C6
Rack Status
ARRAY OF BOOL
Shows the status of up
to twenty-one
expansion racks
connected to the
interface module (IM).
In the array, you must
select the rack with the
fault conditions.
OB86_RACKS_FLTD
Green = Good
Red = Fault
Gray = Not configured
50
Error and Interrupt OBs
DP Failure Tab
This tab allows you to test for DP system failure and view the status of the DP under various error
conditions. The parameters that you select in this tab are passed to the following variables when
the OB is called:
Parameter
Variable
Data Type
Value
Subnet
OB86_MDL_ADDR
WORD
Logical base address
of the DP master
system.
Failure of DP master
system
OB86_FLT_ID
BYTE
B#16#C3
Station failure
OB86_FLT_ID
BYTE
B#16#C4
Station fault
OB86_FLT_ID
BYTE
B#16#C5
Station return
OB86_FLT_ID
BYTE
B#16#C4
Station OK
OB86_FLT_ID
BYTE
B#16#C5
Station operational
again but error
OB86_FLT_ID
BYTE
B#16#C7
Station return with
discrepancy
OB86_FLT_ID
BYTE
B#16#C8
DP Status
OB86_RACKS_FLTD
ARRAY OF BOOL
Shows the status of up
to 126 DP stations. In
the array, you must
select the rack with the
fault conditions.
Green = Good
Red = Fault
Gray = Not configured
For further information, reference:
STEP 7 Help on Organizational Blocks
OB86 (STEP 7 Help)
The SIMATIC System Software for S7-300/400 System and Standard Functions Reference
Manual
50
Error and Interrupt OBs
51
Reference Information
Reference Information
S7-PLCSIM Toolbars
S7-PLCSIM includes the toolbars pictured below. You can use the View > Toolbars... command
to hide or display any of the toolbars. From the online help, click any button from any of the
following toolbar pictures for detailed information, or reference the appropriate menu topic:
Standard:
The standard toolbar contains selected commands from the File Menu, Edit Menu, View Menu,
and Window Menu as well as "What's This" help.
Insert:
The insert toolbar contains selected commands from the Insert Menu or the View Menu.
CPU Mode:
The CPU Mode toolbar contains selected commands from the Execute Menu.
Record/Playback Files:
The Record/Playback Files toolbar button is also accessible from the Tools Menu.
Toolbar Shortcut Key Combinations
You can toggle the display of any of these toolbars by concurrently pressing the Alt key and a
function key. The following shortcut key combinations are available:
ALT + F1 Toggles the display of the Standard toolbar.
ALT + F2 Toggles the display of the Insert toolbar.
ALT + F3 Toggles the display of the CPU Mode toolbar.
ALT + F4 Closes S7-PLCSIM.
ALT + F5 Toggles the display of the Record/Playback toolbar.
52
Reference Information
S7-PLCSIM Menus
S7-PLCSIM includes the following menus for performing operations with the simulated PLC:
File
Edit
View
Insert
PLC
Execute
Tools
Window
Help
53
Reference Information
File Menu
The S7-PLCSIM File menu contains the following commands:
New PLC Command
Click on
or select the menu command File > New PLC to create a new simulated PLC.
Open PLC... Command
To find and open an existing (saved) simulation of a PLC, click
File > Open PLC....
or select the menu command
Close PLC Command
Select the menu command File > Close PLC to close the currently open simulated PLC. This
command closes the CPU view object and all other currently open view objects.
Closing a simulated program can result in errors in applications which are currently connected to
the simulator.
Save PLC Command
Click
or select the menu command File > Save PLC to save the current state of the
simulated PLC.
Save PLC As... Command
Select the menu command File > Save PLC As... to save the current state of the simulated PLC
as a new file.
Open Layout... Command
To open a previously saved layout of S7-PLCSIM view objects, select the menu command File >
Open Layout....
54
Reference Information
Close Layout Command
To close the current layout of S7-PLCSIM view objects, select the menu command File > Close
Layout.
Save Layout Command
To save the current layout of S7-PLCSIM view objects, select the menu command File > Save
Layout.
Save Layout As... Command
To save the current layout of S7-PLCSIM view objects as a new file, select the menu command
File > Save Layout As....
Recent Simulation Command
Use the menu command File > Recent Simulation to open a list of your four most recently used
programs. Select file 1, 2, 3, or 4 from the list of recent simulations.
Recent Layout Command
Use the menu command File > Recent Layout to select from a list of your four most recently
used layouts. Select file 1, 2, 3, or 4 from the list of recent layouts.
Exit Command
Select the menu command File > Exit to close the simulated PLC and to exit the S7-PLCSIM
application.
Exiting S7-PLCSIM can result in errors in applications which are currently connected to the
simulator.
55
Reference Information
Edit Menu
The S7-PLCSIM Edit menu contains the following commands:
Undo Command
Select the menu command Edit > Undo to reverse the last action you performed. Undo only
applies to editable text/numeric fields and to the commands of the Edit, Insert, and Window
menus.
The Undo command is also available from the right-click menu of any editable text field.
Cut Command
Select the Edit > Cut command or click
to remove selected text and put it on the clipboard.
Copy Command
Select the Edit > Copy command or click
to copy selected text and put it on the clipboard.
Paste Command
Select the Edit > Paste command or click
to insert the contents of the clipboard (whatever
was last cut or copied) at the location of the cursor.
56
Reference Information
View Menu
The S7-PLCSIM View menu contains the following commands:
Accumulators Command
Select the menu command View > Accumulators or click
to create an ACCUs & Status
Word view object. This view object allows you to monitor accumulators, status word bits and
address registers.
Block Registers Command
Select the menu command View > Block Registers or click
or to create a Block Regs view
object that allows you to monitor the contents of the data block address registers (DB1 and DB2).
This view object also displays the number of the current logic block and the previous logic block,
along with the number of the instruction (step address counter, or SAC) for each block.
Stacks Command
Select the menu command View > Stacks or click
or to create a Stacks view object that
allows you to monitor the nesting stack and the master control relay (MCR) stack.
Toolbars... Command
Select the menu command View > Toolbars... to choose which S7-PLCSIM toolbars you want to
display. From the Toolbars dialog box, check or uncheck the selections corresponding to the
following toolbars:
Standard
Insert
CPU Mode
Record/Playback Files
Status Bar Command
Select the menu command View > Status Bar to toggle on/off the display of ths S7-PLCSIM
status bar. The status bar, as shown below, appears at the bottom of the S7-PLCSIM window and
contains information and messages that help you use S7-PLCSIM.
Always On Top Command
Select the menu command View > Always On Top or click
to keep S7-PLCSIM in front of
any other concurrently running applications. Repeat the action to return S7-PLCSIM to its normal
state.
57
Reference Information
Insert Menu
The S7-PLCSIM Insert menu contains the following commands:
Input Variable Command
Click on
or select the menu command Insert > Input Variable to create a view object that
allows you to monitor and modify variables in the process input (I) memory area. This view object
opens with a default memory location of IB0.
Output Variable Command
Click on
or select the menu command Insert > Output Variable to create a view object that
allows you to monitor and modify variables in the process output (Q) memory area. This view
object opens with a default memory location of QB0
Bit Memory Command
Click on
or select the menu command Insert > Bit Memory to create a view object that
allows you to monitor and modify variables that are stored in the bit memory (M) area of the CPU.
This view object opens with a default memory location of MB0.
Timer Command
Click on
or select the menu command Insert > Timer to create a view object that allows you
to monitor and modify the timers that are used by the program. This view object opens with a
default memory location of T 0.
Counter Command
Click on
(
in German mnemonics) or select the menu command Insert > Counter to
create a view object that allows you to monitor and modify the counters that are used by the
program. This view object opens with a default memory location of C 0.
Generic Command
Click on
or select the menu command Insert > Generic to create a view object that allows
you to monitor and modify any of the variables used by the program, such as the input (I) or
output (Q) memory areas. You can also access the data stored in the data blocks (DBs).
Vertical Bits Command
Click on
or select the menu command Insert > Vertical Bits to create a view object displays
the symbolic or absolute address next to each bit and allows you to monitor and modify any of the
variables used by the program, such as the input (I) or output (Q) memory areas. You can also
access the data stored in the data blocks (DBs).
58
Reference Information
PLC Menu
The S7-PLCSIM PLC menu contains the following commands:
Power On Command
Select the menu command PLC > Power On to simulate turning on the power to the PLC.
Power Off Command
Select the menu command PLC > Power Off to simulate turning off the power to the PLC.
Clear/Reset Command
Select the menu command PLC > Clear/Reset, or click the "MRES" button on the CPU view
object to reset the memory, delete the program blocks, and delete the hardware configuration of
the simulated PLC.
When you perform a memory clear/reset, the CPU automatically goes to STOP mode.
MPI Address... Command
Select the menu command PLC > MPI Address... to modify the network node address for the
simulated PLC. The new address is stored with the configuration of the simulated PLC when you
use the Save PLC or Save PLC As... menu commands.
59
Reference Information
Execute Menu
The S7-PLCSIM Execute menu contains the following commands:
Key Switch Position Command
Select the menu command Execute > Key Switch Position and choose RUN-P, RUN, or STOP
to put the simulated PLC in the desired operating mode. You can also change the mode by
clicking the check-boxes in the CPU view object.
Startup Switch Position Command
Select the menu command Execute > Startup Switch Position and pick a restart option to
determine what the simulated CPU will do when it is switched from STOP to RUN mode:
Warm Start : the operating system calls OB100
Hot Start :
Cold Start : the operating system calls OB102
the operating system calls OB101
Scan Mode Command
You can choose from two modes of execution for your simulated program: Single Scan and
Continuous Scan.
Single Scan Command
Select the menu command Execute > Scan Mode > Single Scan or click
to set up the CPU
for executing the program one scan at a time. The CPU executes the complete program for one
scan, then waits for you to request the next scan.
Continuous Scan Command
Select the menu command Execute > Scan Mode > Continuous Scan or click
to set up the
CPU for executing the program in a continuous cycle (in the same way that OB1 is executed by
the CPU). The CPU executes the program when the operating mode is set to RUN, and stops
when the operating mode is set to STOP.
The scan starts by reading the peripheral inputs (PI) and updating the process-image input (I)
memory. The CPU then executes the instructions of the program and updates the memory areas.
The scan ends by writing the process-image output (Q) memory to the peripheral-output (PQ)
memory.
Next Scan Command
Click on
or select the menu command Execute > Next Scan to request that the simulated
CPU execute the next scan (if the simulation is set for Single Scan).
Pause Command
Click on
or select the menu command Execute > Pause to momentarily halt the execution
of the program in the simulated PLC without changing any of the data (such as the state of the
outputs). To resume the execution of the program, turn off the Pause function. The program then
starts at the instruction where execution had been halted.
If a STEP 7 application is connected to the simulated PLC, using Pause may cause the
application to time out and disconnect. If this happens, turn off the Pause function and reconnect
60
Reference Information
the STEP 7 application.
Automatic Timers Command
The timers in the simulated PLC can be set to either automatic or manual.
Select the menu command Execute > Automatic Timers to set up the CPU for executing the
timers automatically in the program.
Manual Timers Command
Select the menu command Execute > Manual Timers to set up the CPU to allow you to enter a
specific value or to reset the timers in the program. To return to running the timers automatically,
select the menu command Execute > Automatic Timers.
Reset Timers... Command
The menu command Execute > Reset Timers... opens a dialog box allowing you to set the time
value for each timer to its default value. You can reset all of the timers used by the program, or
you can reset timers individually.
To reset all of the timers in your program, use the Reset Timers
To reset an individual timer, use the Reset Timer
toolbar button.
button on the view object for that timer.
Trigger Error OB Command
The menu command Execute > Trigger Error OB allows you to test how your program handles
different interrupt OBs.
Scan Cycle Monitoring... Command
The menu command Execute > Scan Cycle Monitoring... opens a dialog box allowing you to
enable or disable scan cycle monitoring (watchdog timer) and set the maximum scan cycle
monitoring time (in milliseconds) for the simulation. The maximum scan cycle time is the
maximum time the process is allowed to take for one full scan cycle of the S7 user program in
OB1 and for the update of the relevant I/O. If this time is exceeded, the simulated PLC goes into
STOP mode.
61
Reference Information
Tools Menu
The S7-PLCSIM Tools menu contains the following commands:
Record/Playback Command
Click on
or select the menu command Tools > Record/Playback to record or play back a
sequence of events. The key sequence Alt + F5 toggles the display of the Record/Playback
toolbar button.
Options Command
The menu command Tools > Options contains the following options:
Attach Symbols...
Show Symbols
Reference Data
Symbol Table
Attach Symbols…
Select the menu command Tools > Options > Attach Symbols... to use symbolic addressing in
your simulated program. This menu command invokes a dialog box where you can choose the
STEP 7 symbol table to be referenced.
Once you have attached a symbol table, you can use the Show Symbols, Reference Data, and
Symbol Data options.
Show Symbols
Select the menu command Tools > Options > Show Symbols to display the symbolic
addresses used in your program. To hide the symbols, select the command again.
This menu command is only available when a STEP 7 symbol table has been attached to the
simulated program using the Attach Symbols option.
Reference Data
Select the menu command Tools > Options > Reference Data to open the Displaying S7
Reference Data application of STEP 7. You can use this application to debug your simulated
program.
This menu command is only available when a STEP 7 symbol table has been attached to the
simulated program using the Attach Symbols option.
Symbol Table
Select the menu command Tools > Options > Symbol Table to open the STEP 7 Symbol Editor
and view the currently attached symbol table.
This menu command is only available when a STEP 7 symbol table has been attached to the
simulated program using the Attach Symbols option.
62
Reference Information
Window Menu
The S7-PLCSIM Window menu contains the following commands:
Cascade Command
To arrange windows so that they overlap (starting in the upper-left corner of the S7-PLCSIM
window), click
or select the menu command Window > Cascade.
Tile Ordered Command
To arrange the S7-PLCSIM view objects side by side, with the CPU view object in the top left,
click
or select the menu command Window > Tile Ordered.
Arrange Icons Command
The menu command Window > Arrange Icons arranges all minimized view objects (view object
icons) along the bottom edge of the S7-PLCSIM window.
1, 2, 3... 9 Command
You can activate an open view object by selecting it from an alphabetical list in the Window
menu. Select the number that corresponds to the desired view object. The currently active view
object is indicated by a check mark.
If you have more than 9 view objects open, you can select More Windows... to see a dialog box
with a complete list.
63
Reference Information
Help Menu
The S7-PLCSIM Help menu contains the following commands:
Contents... Command
The menu command Help > Contents... opens the Contents screen of the S7-PLCSIM Help.
From the table of contents, you can expand any book and click any topic to view help on S7PLCSIM.
Introduction Command
The menu command Help > Introduction opens a Help topic that gives a general overview of
S7-PLCSIM and the tasks you can perform with it.
Getting Started Command
The menu command Help > Getting Started opens a Help topic that helps you get started when
you begin working with S7-PLCSIM for the first time.
Using Help Command
The menu command Help > Using Help provides information on using the online Help system,
useful if you are new to software products based on Microsoft Windows. Windows Help systems
are designed to serve as online manuals.
About... Command
The menu command Help > About... gives you information on the version of the software and on
the copyright.
Help Button
To get information about S7-PLCSIM toolbars and features, follow these steps:
1. Click
. The mouse pointer changes to a question-mark pointer
.
2. Click the part of the screen about which you want more information. S7-PLCSIM displays
the Help topic on that item.
64
Reference Information
S7-PLCSIM Numeric Data Formats
Refer to the table below for the numeric data formats supported by S7-PLCSIM.
Numeric Data Format
Size
Example
Bits
Bit, Byte
= off = on
Binary
Byte, Word
1001_0011
Decimal
Byte, Word, Double Word
232
Hex (Hexadecimal)
Byte, Word, Double Word
9A
S7 Format
Byte, Word, Double Word
dw#16#9a2ff23
Integer
Word, Double Word
632, –2370
BCD (Binary-coded Decimal)
Word, Double Word
400
Real
Double Word
1.234567e+023
Char (Character)
Byte, Word, Double Word
'C', 'AB'
String
254 Alphanumeric Characters
This is a string
DT (DATE_AND_TIME)
8 Bytes
1993-12-25-08:01:01
Note: The DT numeric data format
does not support milliseconds.
S5TIME
Word
3m5s00ms
Date
Word
1998-06-18
Time
Double Word
9h26m53s703ms
TOD
Double Word
9:26:53.702
Slider: Dec
Byte, Word, Double Word
Slider: Int
Word, Double Word
Slider: Real
Double Word
65
Reference Information
Troubleshooting Tips
The following table describes some problems that you can encounter when using S7-PLCSIM,
and lists possible causes of the problem and recommended corrective actions.
Problem
Possible Causes or Corrections
Your program does not Verify that the CPU is in either STOP mode or RUN-P mode. You
download to the
cannot download your program if the simulated CPU is in RUN mode.
simulated CPU.
If your program contains a System Data Block (SDB), verify that the
CPU is in STOP mode. As with a real CPU, you can download SDBs
only when the CPU is in STOP mode.
Note: If the CPU view object is in RUN-P mode, STEP 7 prompts you to
change to STOP so that the hardware configuration can be downloaded.
Verify that the CPU and the program use the same node address. The
node address defined for the program must match the node address of
the CPU.
When you attempt to
close the simulated
CPU, a message alerts
you that there is a
connection open.
If you attempt to close the simulated CPU while one of the STEP 7 tools
(such as S7 Status) is monitoring the program, STEP 7 alerts you to
disconnect the STEP 7 tool from the simulated CPU. Always disconnect
any STEP 7 tool by turning off the monitoring of the program status or by
closing the tool before closing the simulated CPU.
The S7-PLCSIM
application does not
respond and appears
to be "locked up."
Check the execution mode. S7-PLCSIM can appear to be locked up
when paused or in Single Scan mode.
You enter a peripheral
variable and get an
"Invalid Address" error,
even though the
address value is valid.
Only the CPU 315-2DP, CPU 316-2DP, and CPU 318-2 CPUs download
an I/O configuration. If you download a program from another S7-300
CPU, the system data does not include the I/O configuration. This
causes errors when you attempt to access peripheral I/O in S7-PLCSIM.
- or You get a peripheral
access error in your
program, even though
your S7-300 project
contains the correct
configuration.
66
To correct this, create an CPU 315-2DP, CPU 316-2DP, or CPU 318-2
station and put a copy of your hardware configuration into it. Download
the hardware configuration from the CPU 315-2DP, CPU 316-2DP, or
CPU 318-2 to S7-PLCSIM.
Index
Index
A
About, 63
Accumulators, 6, 18, 32, 56
ACCUs & status word view object, 32
Activate view object, 62
Address registers, 32
Always on top command (view menu), 56
Arrange icons command (window menu), 62
Attach symbols... command (tools menu), 61
Autoconfigured I/O, 21, 37
Automatic timers command (execute menu),
59
B
Back button, 12
BCD (Binary-coded decimal), 64
Binary, 64
Binary-coded decimal (BCD), 64
Bit memory, 10, 18, 35, 36
Bit memory command (insert menu), 57
Bit memory view object, 34
Bits, 64
Block registers, 18, 32, 56
Block registers command (view menu), 56
Block regs view object, 32
Byte, 64
C
C (counter), 10
Cascade command (window menu), 62
Changing CPU operating modes, 17
Character (Char), 64
Clear/Reset command (PLC menu), 23, 58
Close layout command (file menu), 53
Close PLC command (file menu), 30, 53
Cold restart support, 3
Communication redundancy error (OB73),
21, 37, 42
Configuring an MPI address, 24
Contents Tab, 12
Contents... Command (Help Menu), 63
Continuous Scan, 16, 20, 59
Copy command (edit menu), 55
Counter command (insert menu), 57
Counters, 10, 18, 34, 35, 36, 57
Counter view object, 34
CPU accumulators, 32
CPU indicators, 9, 10, 32
Index-1
CPU mode toolbar, 51
CPU operating modes, 9, 32
changing, 17
CPU redundancy error (OB72), 21, 37, 40
CPU view object, 4, 9, 32
Cut command (edit menu), 55
Cycling power for a simulated CPU, 17
D
Data blocks, 10, 35
Data formats, 64
Data types, 3
Date, 64
DATE_AND_TIME (DT), 64
DC indicator, 10
Debugging with S7-PLCSIM, 20
Decimal, 64
Diagnostic Interrupt (OB82), 21, 37, 44
Differences from a real S7 PLC, 6
Double word, 64
Downloading problems, 65
Downloading the modified configuration to
S7-PLCSIM, 23
DP failure tab, 48
DP indicator, 10
DT (DATE_AND_TIME), 64
E
Edit menu, 55
Enable scan cycle monitoring, 28
Ending the simulation session, 30
Error OBs
OB70 (I/O redundancy error), 39
OB72 (CPU redundancy error), 40
OB73 (communication redundancy error),
42
OB80 (rime error), 43
OB85 (priority class error), 47
OB86 (rack failure), 48
Event file playback, 25
Execute menu, 59
Exit command (file menu), 53
Expansion rack failure tab, 48
F
Fault-tolerant H systems, 3
Features of S7-PLCSIM, 1
File menu, 53
Formats
Index
numeric data, 64
G
Generic command (insert menu), 57
Generic variable, 18
Generic view object, 35
Getting Started, 4
Getting started command (help menu), 63
H
Hardware configuration, 21, 22, 23, 37
downloading, 23
modifying, 22
Hardware interrupt (OB40-OB47), 21, 37, 38
Help button, 63
Help buttons
Back, 12
Hide, 12
Print, 12
Show, 12
Help menu, 63
Help on help, 12
Hexadecimal (Hex), 64
Hide button, 12
Hot start command (execute menu), 59
I
I (input), 10
I/O (input/output), 6
I/O redundancy error (OB70), 21, 37, 39
Index tab, 12
Input, 10
Input variable command (insert menu), 57
Input variable view object, 18, 33
Input/output considerations, 21, 37
Insert menu, 57
Insert toolbar, 51
Insert/remove module interrupt (OB83), 21,
37, 46
Integer, 64
Interrupt OBs, 6, 21, 22, 37
OB40-OB47 (hardware interrupt), 38
OB82 (diagnostic interrupt), 44
OB83 (insert/remove module interrupt), 46
Introduction, 1
Introduction command (help menu), 63
K
Key switch position, 9, 32
Key switch position command (execute
menu), 59
L
Layout
opening, 15
saving, 28
Layout 1 2 3 4 command (file menu), 53
LED, 10
Locked-up S7-PLCSIM, 65
M
M (bit memory), 10
Main window, 8
Manual timers command (execute menu),
59
Maximum slider value, 19
MCR, 32
Memory
peripheral, 6
process, 6
Memory areas, 10, 33, 35
Memory clear/reset, 9, 23, 58
Menus, 8, 52
edit, 55
execute, 59
file, 53
help, 63
insert, 57
PLC, 58
tools, 61
view, 56
window, 62
Minimum slider value, 19
Modifying bit memory, 34
Modifying your hardware configuration, 21,
22, 37
Monitor program simulation, 4
Monitoring the scan cycle, 28
Monitoring the simulated program, 18
More windows, 62
MPI address, 11, 24, 58
MPI address... command (PLC menu), 58
MRES, 23, 32, 58
N
Nesting stacks, 32
New PLC command (file menu), 53
Next scan command (execute menu), 59
Numeric data formats, 64
Numeric format
slider control, 19
Index-2
Index
O
OB102, 3
OB40 to OB47, 21, 37, 38
OB70, 21, 37, 39
OB72, 21, 37, 40
OB73, 21, 37, 42
OB80, 21, 37, 43
OB82, 21, 37, 44
OB83, 21, 37, 46
OB85, 21, 37, 47
OB86, 48
OBs, 39, 48
communication redundancy error (OB73),
42
CPU redundancy error (OB72), 40
diagnostic interrupt (OB82), 44
OBs, continued
hardware interrupt (OB40-OB47), 38
I/O redundancy error (OB70), 39
insert/remove module interrupt (OB73), 46
priority class error (OB85), 47
rack failure (OB86), 48
time error (OB80), 43
using interrupts, 21, 37
Open connection message, 65
Open layout... command (file menu), 53
Open PLC... command (file menu), 53
Opening a layout, 14, 15
Opening a simulated PLC, 14
Operating Modes, 6, 32
changing, 17
CPU, 9
Options, 61
Options button, 12
Output, 10
Output variable command (insert menu), 57
Output variable view object, 18, 33
P
Paste command (edit menu), 55
Pause, 6, 9, 20, 59
Pause command (execute menu), 59
Peripheral access error, 65
Peripheral variables, 6, 10, 35, 36
Input, 33
Output, 33
PI (peripheral input), 10
Playback, 25
PLC
closing, 30
saving, 29
Index-3
PLC menu, 58
Power cycle, 17
Power off command (PLC menu), 58
Power on command (PLC menu), 58
PQ (peripheral output), 10
Print button, 12
Priority class error (OB85), 21, 37, 47
Process image memory variables, 6
input, 33
output, 33
Program simulation, 4
Q
Q (output), 10
R
Rack failure (OB86), 21, 37, 48
Real data format, 64
Real S7 PLC, 11
Differences from, 6
Recent layout command (file menu), 53
Recent simulation command (file menu), 14,
53
Record/playback, 3, 25
Record/playback command (tools menu), 61
Reference data command (tools menu), 61
Reset timers... command (execute menu),
59
Resetting the CPU memory, 23
Resetting timers, 23, 34
RUN, 9, 10
RUN command (execute menu), 59
RUN-P command (execute menu), 59
S
S5TIME, 64
S7 format, 64
S7-300 CPUs, 21, 22, 37
S7-400 CPUs, 21, 22, 37
S7-PLCSIM
features, 1
menus, 52
modifying your hardware configuration, 22
numeric data formats, 64
toolbars, 51
view objects, 31
Save layout as... command (file menu), 53
Save layout command (file menu), 53
Save PLC as... command (file menu), 53
Save PLC command (file menu), 53
Saving a layout, 28
Index
Saving a simulated PLC, 29
Scan
continuous, 6, 16, 20
cycle monitoring, 28
single, 6, 16, 20
Scan cycle monitoring... command (execute
menu), 59
Scan mode command (execute menu), 59
Scan mode options
selecting, 16
Search highlighting, 12
Search tab, 12
Selecting
maximum slider value, 19
minimum slider value, 19
Numeric Format, 19
scan mode options, 16
SF indicator, 10
Shortcut key combinations, 51
Show button, 12
Show symbols
symbolic addressing, 24, 61
Show symbols command (tools menu), 61
SIMATIC manager, 4
Simulate modules, 11
Simulate Modules, 4, 8
Simulated PLC
closing, 30
opening, 14
saving, 29
Simulated Program
monitoring, 18
Simulation
ending, 30
starting, 11
Simulation on/off button, 11
Single scan, 6, 16, 20
Single scan command (execute menu), 59
Slider control
using, 19
Slider numeric format, 64
Stacks, 18
Stacks command (view menu), 56
Stacks view object, 32
Standard toolbar, 51
Starting the simulation, 11
Startup switch position command (execute
menu), 59
Status bar command (view menu), 56
Status word, 32
STOP, 9, 10
STOP command (execute menu), 59
String, 64
Symbol table command (tools menu), 61
Symbol tooltips, 24, 31
Symbolic addressing, 24
T
T (timer), 10
Tile ordered command (window menu), 62
Time data format, 64
Time error (OB80), 21, 37, 43
Timers, 10, 18, 35, 36, 57, 59
resetting, 23
Timer view object, 34
Toolbars, 8, 51
Toolbars... command (view menu), 56
Tools menu, 61
Tooltips, 24
Trigger error OB command (execute menu),
59
Troubleshooting Tips
general, 65
record/playback, 25
Turning Simulation On, 11
U
Undo command (edit menu), 55
Using
help, 12, 63
interrupt OBs in your program, 21, 37
record/playback, 25
S7-PLCSIM to debug your program, 20
slider control, 19
symbolic addressing, 24
V
Variable view object (generic), 35
Variable view object (vertical bits), 36
Vertical bits command (insert menu), 57
Vertical bits variable view object, 3, 24, 36
View menu, 56
View objects, 4, 8, 15, 18, 19, 24, 31
ACCUs & status word, 32
bit memory, 34
block regs, 32
counters, 34
CPU, 32
generic variable, 35
input variable, 33
output variable, 33
stacks, 32
timers, 34
Index-4
Index
vertical bits, 36
W
Warm start command (execute menu), 59
What's new in S7-PLCSIM
Index-5
V 5.0, 3
Window 1, 2, 3... 9 command (window
menu), 62
Window Menu, 62
Word, 64
Index
Index-6
Response Form
Your comments and recommendations will help us to improve the quality and usefulness of our
publications. Please take the first available opportunity to fill out this questionnaire and return it to
Siemens.
Please give each of the following questions your own personal mark within a range from 1 (very
good) to 5 (very poor).
Do the contents meet your requirements?
Is the information you need easy to find?
Is the text easy to understand?
Does the level of technical detail meet your requirements?
Please rate the quality of the graphics and tables.
Additional comments:
__________________________________
__________________________________
__________________________________
__________________________________
__________________________________
__________________________________
__________________________________
__________________________________
__________________________________
__________________________________
__________________________________
__________________________________
__________________________________
__________________________________
__________________________________
__________________________________
__________________________________
Please check any industry that applies to you:
Automotive
Chemical
Electrical Machinery
Food
Instrument and Control
Non electrical Machinery
Petrochemical
Pharmaceutical
Plastic
Pulp and Paper
Textiles
Transportation
Other ___________________________
Mail your response to:
SIEMENS ENERGY & AUTOMATION, INC
ATTN: TECHNICAL COMMUNICATIONS
ONE INTERNET PLAZA
PO BOX 4991
JOHNSON CITY TN USA 37602-4991
Include this information:
From
Name: _ _ _ _ _ _ _ _ _ _ _ _ _ _ _ _ _ _ _ _ _ _ _ _ _ _ _ _ _ _ _
Job Title: _ _ _ _ _ _ _ _ _ _ _ _ _ _ _ _ _ _ _ _ _ _ _ _ _ _ _ _ _ _ _
Company Name _ _ _ _ _ _ _ _ _ _ _ _ _ _ _ _ _ _ _ _ _ _ _ _ _ _ _ _ _ _ _
Street: _ _ _ _ _ _ _ _ _ _ _ _ _ _ _ _ _ _ _ _ _ _ _ _ _ _ _ _ _ _ _
City and State: _ _ _ _ _ _ _ _ _ _ _ _ _ _ _ _ _ _ _ _ _ _ _ _ _ _ _ _ _ _ _
Country: _ _ _ _ _ _ _ _ _ _ _ _ _ _ _ _ _ _ _ _ _ _ _ _ _ _ _ _ _ _ _
Telephone: _ _ _ _ _ _ _ _ _ _ _ _ _ _ _ _ _ _ _ _ _ _ _ _ _ _ _ _ _ _ _