1
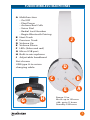
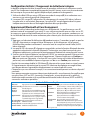
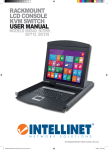
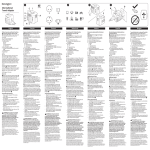
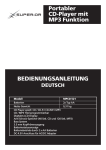
FUSION WIRELESS
HEADPHONES
INSTRUCTIONS
MODELS 178150, 178167
manhattan-products.com
Important: Read before use. • Importante: Leer antes de usar.
MAN-178150/178167-UM-ML-1213-02-0
FUSION WIRELESS HEADPHONES
A
B
C
D
E
F
G
H
J
Multifunction
-On/Off
-Play/Pause
- Answer/End Calls
- Voice Dial
- Redial Last Number
- Begin Bluetooth Pairing
Next Track
Previous Track
Volume Up
Volume Down
LEDs (blue and red)
Micro USB port
Built-in microphone
Adjustable headband
Not shown:
USB type A-to-micro
charging cable
J
D
B
C
F
G
E
H
A
Range: 10 m
Music: up to 10 hours
Talk: up to 11 hours
Standby: 250 hours
3
Initial Setup / Built-in Battery Charging
Prior to initial use as a wireless headset, the built-in battery needs to be charged. A full
charge can take up to 3 hours, but you can listen to music or make phone calls while
charging.
1 Use the included USB-to-micro USB cable to connect the headset (G) to a powered
computer or other charging device.
2 The red LED (F) lights while charging; the blue LED (F) lights when the charge is
complete. Note: The red LED flashes twice to indicate low voltage. Recharge the battery
as soon as you can.
Bluetooth Pairing & Operation
This product utilizes the latest in Bluetooth wireless technology; wireless performance
may vary from device to device. If using this product with a Mac or PC, ensure that your
Bluetooth driver is up to date. If it isn’t, visit your computer manufacturer’s website for
details and updates.
1 Press the Multifunction button (A) for about 7 seconds, until the LEDs (F) alternately
flash red and blue. Note: Pressing the Multifunction button for just 3 seconds will put
the headset in Standby mode (the blue LED flashes).
2 With the headset LEDs (F) alternately flashing red and blue, activate your device’s
Bluetooth function and search for Bluetooth devices. Refer as needed to the manual of
your phone, tablet, computer, etc. regarding its Bluetooth operation.
3 Once the device finds “manhattanFUSION” an on-screen prompt will ask if you’re ready
for pairing. Click or press OK or Confirm to continue. Note: If the device prompts you
to enter a PIN, enter 0000 and click or press Yes or Confirm to continue.
•After a successful connection is made, the blue LED (F) will flash and the headset will
beep. If the pairing has failed and the LEDs are still alternately flashing red and blue, the
pairing procedure needs to be re-initiated on your source device.
•This headset can connect with two types of devices: those using a Hands-Free or Headset
Profile (HFP or HSP), such as smartphones; and those using an Advanced Audio
Distribution or Audio/Video Remote Control Profile (A2DP or AVRCP), such as laptops.
•Every time the headset is turned on, it will automatically connect to the last connected
device.
Quick Reference Guide
Power on / Standby* Press the Multifunction button (A) about 3 seconds. The blue LED (F) flashes.
Power off*
Press the Multifunction button (A) about 5 seconds. Both the red and the blue LEDs (F)
flash with an audio confirmation.
Pairing*
Press the Multifunction button (A) about 7 seconds (until the LEDs alternately flash red
and blue).
Answer/End a call* Briefly press the Multifunction button (A).
Last number redial In Standby mode, press the Multifunction button (A) twice.
Play/Pause
Press the Multifunction button (A) to play or pause music.
Volume up/down Press + (D) or – (E) to increase or decrease the volume.
Previous
Briefly press < (C) to play the previous song in a playlist.
Next
Briefly press > (B) to play the next song in a playlist.
Voice dial
In Standby mode, press the Multifunction button (A) and listen for the beep that indicates
you can start to voice dial. (Not all phones feature this option.)
* with voice prompt
4
ENGLISH
Ersteinrichtung / Aufladung des integrierten Akkus
Vor der ersten Verwendung als kabelloses Headset muss der integrierte Akku aufgeladen
werden. Eine vollständige Aufladung dauert bis zu 3 Stunden, aber Sie können während des
Ladevorgangs Musik hören oder telefonieren.
1 Schließen Sie das Headset (G) über ein USB-auf-Micro-USB-Kabel an einen einge schalteten
Computer an oder andere Ladegeräte an.
2 Die rote LED (F) leuchtet während des Akkuladevorgangs; die blaue LED leuchtet wenn der
Akku vollständig geladen ist. Hinweis: Die rote LED zweimal blinkt, um einen niedrigen
Ladezustand anzuzeigen. Laden Sie den Akku sobald wie möglich wieder auf.
Bluetooth-Verbindung & Betrieb
Dieses Produkt verwendet die aktuellste Bluetooth Wireless Technologie. Die kabellose Performance
kann von Gerät zu Gerät abweichen. Falls Sie dieses Produkt mit einem Mac oder PC verwenden,
stellen Sie sicher, dass sich der Bluetooth-Treiber Ihres Geräts auf dem neuesten Stand befindet.
Details und Treiber-Updates finden Sie auf der Webseite Ihres Computerherstellers.
1 Halten Sie die Multifunktionstaste (A) ca. 7 Sekunden gedrückt, bis die LEDs (F) blinken
abwechselnd rot und blau. Hinweis: Halten Sie die Multifunktionstaste nur 3 Sekunden
gedrückt, wird das Headset in den Standby-Modus versetzt (die blau LED blinkt).
2 Wenn die Headset-LEDs (F) blinken abwechselnd rot und blau, aktivieren Sie die Bluetooth Funktion Ihres Geräts und suchen Sie nach Bluetooth-Geräten. Mehr über den Bluetooth-
Betrieb Ihres Smartphones, Tablets, PCs etc. finden Sie im Handbuch Ihres jeweiligen Geräts.
3 Sobald Ihr Gerät das “manhattanFUSION” erkennt, werden Sie gefragt, ob Sie dieses verbinden
möchten. Klicken Sie auf OK oder Bestätigen, um fortzufahren. Hinweis: Wenn Sie aufgefordert
werden, einen PIN einzugeben, verwenden Sie den PIN “0000” und klicken Sie auf Ja oder
Bestätigen, um fortzufahren.
•Sobald die Verbindung hergestellt wurde, blinkt die blaue LED (F) und das Headset gibt ein
akustisches Signal. Sollte die Verbindung nicht hergestellt werden und die LEDs immer noch
abwechselnd rot und blau blinken, muss der Verbindungsvorgang auf Ihrem Quellgerät erneut
initialisiert werden.
•Dieses Headset kann mit zwei Gerätetypen gekoppelt werden: Geräte, die ein “Hands-Free” oder “Headset”-Profil (HFP/HSP) verwenden, z. B. Smartphones. Außerdem Geräte, die ein
“Advanced Audio Distribution”- oder “Audio/Video Remote Control” -Profil (A2DP oder AVRCP)
verwenden, z. B. Notebooks.
•Bei jedem Einschalten wird das Headset versuchen, sich mit dem zuletzt gekoppelten Gerät zu
verbinden.
Kurzübersicht
Einschalten/Standby*
Ausschalten*
Koppeln
Anruf annehmen/
beenden*
Wahlwiederholung*
Play/Pause
Lautstärke +/–
Zurück
Weiter
Sprachwahl
Drücken Sie die Multifunktionstaste (A) 3 Sek. gedrückt. Die blaue LED (F) blinkt.
Drücken Sie die Multifunktionstaste (A) 5 Sek. gedrückt. Die rote LED und die blaue LED (F) blinkt und es
ertönt ein akustisches Signal.
Drücken Sie die Multifunktionstaste (A) 7 Sek. gedrückt (bis die LEDs abwechselnd rot und blau blinken).
Drücken Sie kurz die Multifunktionstaste (A).
Im Standby-Modus, drücken Sie zweimal die Multifunktionstaste (A).
Drücken Sie die Multifunktionstaste (A) zum Abspielen oder Pausieren von Musik.
Drücken Sie die Taste + (D) die Lautstärke zu erhöhen. Drücken Sie die Taste – (E) die Lautstärke zu senken.
Drücken Sie kurz < (C), um zum vorherigen Track zu wechseln.
Drücken Sie kurz > (B), um zum nächsten Track zu wechseln.
Im Standby-Modus, drücken Sie die Multifunktionstaste (A). Sie hören dann einen Piepton hören. (Diese
Funktion wird nicht von allen Handys unterstützt.)
* mit Ansage
DEUTSCH
5
Configuración inicial / Carga de la Batería Integrada
Antes de utilizar los audífonos en modo inalámbrico, la batería integrada necesita
recargarse. Una carga completa puede tomar hasta 3 horas, pero puede escuchar música
o realizar llamadas telefónicas mientras se esta cargando.
1 Utilice el cable incluido USB a micro USB para conectar los audífonos (G) a una
computadora encendida u otro dispositivo de carga.
2 El LED rojo (F) enciende mientras se carga; el LED azul enciende cuando termina de
cargar. Nota: El rojo LED parpadeara dos veces indicando un bajo voltaje. Recargue la
batería tan pronto sea posible.
Sincronización Bluetooth y Operación
Este producto utiliza lo último en tecnología Bluetooth; el rendimiento puede variar de
dispositivo a dispositivo. Si utiliza este producto con una Mac o PC, asegúrese que su
controlador Bluetooth está actualizado. Si no es así visite el sitio del fabricante para más
detalles y actualizaciones.
1 Presione el botón Multifunción (A) por 7 segundos aproximadamente, hasta que los
LEDs (F) parpadeen alternativamente en rojo y azul. Nota: Presionando el botón
Multifunción durante 3 segundos pondrá el auricular en modo de Espera/Standby (el
LED azul parpadeara).
2 Los LEDs del auricular (F) parpadeará alternativamente en rojo y azul, active la función
Bluetooth en su dispositivo y busque nuevos dispositivos Bluetooth. Haga referencia,
según sea necesario al manual de su teléfono, tableta, computadora, etc. En relación
sobre el funcionamiento Bluetooth de su dispositivo fuente.
3 Una vez que el dispositivo encuentre a “manhattanFUSION,” le preguntará si esta listo
para emparejar. Haga clic o presione Aceptar o Confirmar para continuar. Nota: Si el
dispositivo solicita un PIN, ingrese 0000 y haga clic en Aceptar o Confirmar para continuar.
•Una vez realizada la conexión exitosa, los LEDs (F) destellará en azul y el auricular emitirá un
beep. Si la sincronización falla y los LEDs siguen parpadeando alternadamente entre rojo y azul, comience nuevamente el procedimiento de emparejamiento desde su dispositivo.
•Cada vez que el auricular está encendido, se conectará automáticamente al último
dispositivo conectado.
•Este auricular puede contentarse a 2 tipos de dispositivos: aquellos que usan manos
libres o perfil de auriculares (HFP o HSP), tales como smarthphone; y los que utilizan una
distribución avanzada de audio o audio / vídeo remoto Control Profile (A2DP y AVRCP),
tales como laptops.
Guía Rápida de Referencia
Encendido / Modo Presione el botón Multifunción (A) durante 3 segundos. El LED azul (F) parpadeara.
en espera (Standby)*
Apagado*
Presione el botón Multifunción (A) durante 5 segs. Los LEDs (F) parpadearán con una confirmación de audio.
Sincronización* Presione el botón Multifunción (A) durante 7 segs. (hasta que los LED parpadean alternativamente rojo
y azul).
Contestar/Finalizar Presione brevemente el botón Multifunción (A).
llamada*
Remarcación del Dentro del Modo de espera, presione el botón Multifunción (A) dos veces.
último número
Tocar/Pausa
Brevemente presione el botón Multifunción (A) tocar ó pausar la música.
Volumen +/–Presione + (D) para incrementar el volumen. Presione – (E) para reducir el volumen.
Anterior
Presione brevemente < (C) para reproducir la canción anterior en una lista de reproducción.
Siguiente
Presione brevemente > (B) para reproducir la siguiente canción de una lista de reproducción.
Marcación por voz En modo de espera, presione el botón Multifunción (A) se escuchará un pitido para iniciar la
marcación por voz. (No todos los teléfonos cuentan con esta opción.)
* con indicación de voz
6
ESPAÑOL
Configuration Initiale / Chargement de la Batterie Intégrée
La batterie intégrée doit être chargée avant la première utilisation du casque en mode
sans fil. Un chargement complet peut prendre jusqu’à 3 heures, mais vous pouvez écouter
de la musique ou passer des appels téléphoniques pendant le chargement.
1 Utilisez le câble USB vers micro USB pour raccorder le casque (G) à un ordinateur sous
tension ou un autre dispositif de chargement.
2 Le voyant DEL rouge (F) s’allume lors du chargement; le voyant DEL bleue s’allume
lorsque celui-ci est terminé. Remarque : le voyant DEL rouge clignote deux fois pour
indiquer une tension basse. Rechargez la batterie dès que possible.
Appariement Bluetooth et Fonctionnement
Ce produit utilise la dernière technologie sans fil Bluetooth ; les performances sans fil
peuvent varier d’un appareil à un autre. Si vous utilisez ce produit avec un Mac ou un PC,
assurez-vous que votre pilote Bluetooth est à jour. Dans le cas contraire, rendez-vous sur
le site Web du fabricant de votre ordinateur pour obtenir plus d’informations et des mises
à jour.
1 Appuyez sur le bouton Multifunction (A) pendant environ 7 secondes, jusqu’à ce que les
DELs (F) clignotent en rouge et bleue. Remarque : le fait d’appuyer sur le bouton
Multifunction pendant seulement 3 secondes met le casque en mode Veille (la DEL
bleue clignote).
2 Lorsque les DELs du casque (F) clignote en rouge et bleu, activez la fonction Bluetooth de votre
appareil et recherchez les dispositifs Bluetooth. Si nécessaire, consultez le manuel de votre
téléphone, tablette, etc. concernant le fonctionnement Bluetooth de votre dispositif source.
3 Une fois que le dispositif détecte “manhattanFUSION”, un message apparaît à l’écran et vous
demande si vous êtes prêt à procéder à l’appariement. Cliquez ou appuyez sur Confirm ou OK pour continuer. Remarque : si le dispositif vous invite à entrer un numéro d’identification
personnel, saisissez 0000 et cliquez ou appuyez sur Yes ou sur Confirm pour continuer.
•Une fois la connexion établie, la DEL bleue (F) clignote et le casque émet un signal sonore.
Si l’appariement a échoué et que le voyant DEL continue de clignoter en rouge et bleu,
vous devez relancer la procédure d’appariement sur votre dispositif source.
•Chaque fois que vous allumez le casque, il se connecte automatiquement au dernier dispositif
connecté.
•Vous pouvez connecter ce casque à deux types de dispositifs : ceux disposant d’un profil casque
ou mains libres (HFP ou HSP), comme les smartphones ; et ceux disposant d’un profil de
distribution audio avancée ou d’un profil de contrôle audio/vidéo à distance (A2DP ou AVRCP),
comme les ordinateurs portables.
Guide de Référence Rapide
Mise sous
Appuyez sur le bouton Multifunction (A)
tension/Standby pendant environ 3 secondes. Le voyant DEL
(Veille)*
bleu (F) clignote.
Mise hors
Appuyez sur le bouton Multifunction (A)
tension*
pendant environ 5 secondes. Les DELs (F)
clignotent avec une confirmation audio.
Appariement* Appuyez sur le bouton Multifunction (A)
pendant environ 7 secs. (jusqu’à ce que le
voyant DEL clignote en rouge et bleu).
Répondre/Mettre Appuyez brièvement sur le bouton
fin à un appel* Multifunction (A).
Recomposition du En mode Veille, appuyez sur le bouton
dernier numéro Multifunction (A) deux fois.
Lecture/
Appuyez sur le bouton Multifunction (A) pour
Pause
lire de la musique ou mettre le dispositif en pause.
Le Volume +/– Appuyez sur + (D) pour augmenter le volume.
Appuyez sur – (E) pour diminuer le volume.
Précédent
Appuyez brièvement sur < (C) pour lire la
chanson précédente d’une playlist.
Suivant
Appuyez brièvement sur > (B) pour lire la
chanson suivante d’une playlist.
Numérotation En mode veille, appuyez sur le bouton
vocale
Multifunction (A) et attendez le signal sonore
vous indiquant que vous pouvez commencer à
procéder à la numérotation vocale. (Tous les
téléphones ne disposent pas de cette option.)
* avec guide vocal
FRANÇAIS
7
Ustawienia Początkowe / Ładowanie Wbudowanego Akumulatora
Przed pierwszym użyciem w trybie słuchawek bezprzewodowych wbudowany akumulator
musi zostać naładowany. Ładowanie do pełnego poziomu może zająć do około 3 godzin,
jednak w trakcie ładowania można słuchać muzyki lub wykonywać połączenia.
1 Użyj dołączonego kabla USB na micro USB aby podłączyć słuchawki (G) do zasilonego
komputera lub ładowarki USB.
2 Czerwona dioda (F) świeci się na podczas ładowania; niebieska dioda świeci się na po jego
zakończeniu. Uwaga: Czerwona dioda miga dwa razy na sygnalizując niski poziom
naładowania akumulatora. Należy naładować akumulator jak tylko będzie to możliwe.
Parowanie Bluetooth & Obsługa
Produkt ten wykorzystuje najnowszą technologię bezprzewodową Bluetooth; w zależności od
urządzenia, wydajność bezprzewodowa może być różna. W przypadku używania tego produktu
z komputerem MAC lub PC, upewnij się, że masz zainstalowany aktualny sterownik Bluetooth.
Jeśli tak nie jest, wejdź na witrynę producenta komputera po aktualizację tego sterownika.
1 Wciśnij i przytrzymaj przez około 7 sekund przycisk wielofunkcyjny (A), aż diody (F) zaczną
naprzemiennie migać na czerwono i niebiesko. Uwaga: Wciśnięcie i przytrzymanie przycisku
wielofunkcyjnego tylko na 3 sekundy spowoduje przejście słuchawek w tryb gotowości
(niebieska dioda migać).
2 Gdy diody (F) słuchawkowych będą naprzemiennie migać na czerwono i niebiesko, włącz w
swoim urządzeniu funkcję Bluetooth i uruchom opcję wyszukiwania urządzeń Bluetooth. W
razie potrzeby zapoznaj się z instrukcją obsługi telefonu, tabletu, komputera, itd. dotyczącą
obsługi Bluetooth urządzenia źródła dźwięku.
3 Gdy urządzenie znajdzie „manhattanFUSION”, na ekranie wyświetlone zostanie zapytanie o
gotowości do parowania. Wybierz OK lub Potwierdź, aby kontynuować. Uwaga: Jeśli urządzenie
poprosi o podanie kodu PIN, wpisz 0000 i wybierz Tak lub Potwierdź, aby kontynuować.
•Po udanym nawiązaniu połączenia dioda niebiesko (F) zaświeci się i z słuchawek
wydobędzie się sygnał dźwiękowy. Jeśli nawiązanie połączenia się nie powiodło i diody w
dalszym ciągu będą miga naprzemiennie na czerwono i niebiesko, procedura parowania
musi zostać powtórzona.
•Za każdym razem, gdy słuchawki zostaną włączone, automatycznie połączone zostaną z
ostatnim połączonym urządzeniem.
•Słuchawki można połączyć z dwoma typami urządzeń: wykorzystującymi profile Hands-Free
oraz Headset (HFP oraz HSP), takimi jak smartfony, oraz wykorzystującymi profile Advanced
Audio Distribution oraz Audio/Video Remote Control (A2DP oraz AVRCP), takimi jak laptopy.
Skrócona Instrukcja Obsługi
Włączanie / Wciśnij i przytrzymaj przez 3 sek. przycisk
tryb
wielofunkcyjny (A). Dioda niebiesko (F)
gotowości* zacznie migać.
Wyłączanie*Wciśnij i przytrzymaj przez 5 sek. przycisk
wielofunkcyjny (A). Obie diody (F) zaczną
migać oraz słyszalny będzie sygnał dźwiękowy.
Parowanie* Wciśnij i przytrzymaj przez 7 sek. przycisk
wielofunkcyjny (A) (aż diody (F) zaczną
naprzemiennie migać na czerwono i niebiesko).
Obieranie/ Wciśnij na krótko przycisk wielofunkcyjny (A).
Kończenie
połączenia*
Wybieranie W trybie gotowości dwukrotnie wciśnij
ostatniego przycisk wielofunkcyjny (A).
numeru
8
POLSKI
Odtwarzanie Wciśnij na przycisk wielofunkcyjny (A) aby
/Pauza
rozpocząć lub wstrzymać odtwarzanie muzyki.
Głośność +/–Wciśnij + (D) aby zwiększać poziom głośności.
Wciśnij – (E) aby zmniejszyć poziom głośności.
Poprzedni Wciśnij na krótko przycisk < (C) aby przejść do
poprzedniego utworu na liście odtwarzania.
Następny Wciśnij na krótko przycisk > (B) aby przejść do
następnego utworu na liście odtwarzaniat.
Wybieranie W trybie gotowości słuchawek, naciśnij
głosowe* przycisk wielofunkcyjny (A) i poczekaj na
sygnał dźwiękowy, wskazujący, że można
rozpocząć wybieranie głosowe. (Nie wszystkie
telefony obsługują tę funkcję.)
* z komunikatu głosowego
Settaggio Iniziale / Ricarica dalla Batteria Incorporata
Prima di utilizzare la cuffia come periferica wireless, è necessario effettuare la ricarica della
batteria incorporata. Una carica completa può richiedere fino a 3 ore, ma è possibile utilizzare la
cuffia per ascoltare musica o effettuare telefonate anche durante la ricarica.
1 Utilizzare il cavo USB-a-micro USB incluso per collegare la cuffia (G) ad un computer alimentato
o ad un’altra periferica di ricarica.
2 Il LED rosso (F) si illumina durante la carica; il LED blu si illumina quando la carica è completa.
Nota: Il LED rosso lampeggia due volte indica che la batteria è scarica. Ricaricare la batteria
non appena possibile.
Operazioni di Pairing Bluetooth eFunzionamento
Questo prodotto utilizza la più recente tecnologia wireless Bluetooth; la prestazione wireless
potrebbe variare da un dispositivo all’altro. Se si utilizza questo prodotto con un Mac o un PC,
assicurarsi che il driver Bluetooth sia aggiornato. Se non lo fosse, visitate il sito del produttore
del computer per dettagli e aggiornamenti.
1 Premere il tasto Multifunzione (A) per circa 7 secondi, fino a quando i LED (F) lampeggiano
alternativamente rosso e blu. Nota: Premere il tasto Multifunzione per appena 3 secondi
metterà la cuffia in modalità Standby (il LED blu lampeggia).
2 Con i LED della cuffia (F) che lampeggiano alternativamente in rosso e blu, attivate la funzione
Bluetooth della vostra periferica e la ricerca delle periferiche Bluetooth. Se necessario fate
riferimento al manuale del vostro telefono, tablet, computer, ecc. Riguardo il funzionamento
del Bluetooth della vostra periferica sorgente.
3 Appena la periferica trova la “manhattanFUSION” apparirà un avviso sullo schermo che richiede la conferma per procedere al pairing. Cliccare o premere OK o Confirm per continuare. Nota: se
viene richiesto un codice PIN, inserire 0000 e cliccare o premere Yes o Confirm per continuare.
•Quando la connessione è stata effettuata con successo, il LED blu (F) lampeggerà e la cuffia
emetterà un segnale acustico. Se il pairing non è avvenuto con successo e i LED lampeggiano
ancora alternativamente di rosso e blu, la procedura di pairing deve essere rilanciata sulla
periferica sorgente.
•Ogni volta che la cuffia viene accesa, automaticamente si connetterà all’ultima periferica con
cui era collegata.
•Questa cuffia può essere connessa con due tipi di periferiche: quelle che usano un Hands-Free
o Headset Profile (HFP or HSP), come gli smartphone; e quelle che usano un Advanced Audio
Distribution o Audio/Video Remote Control Profile (A2DP or AVRCP), come i laptop.
Guida Rapida di Riferimento
Accensione/ Premere il tasto Multifunzione (A) per circa
Standby* 3 secondi. Il LED blu (F) lampeggia.
Spegnimento* Premere il tasto Multifunzione (A) per circa
5 secondi. Entrambi i LED (F) lampeggiano
con una conferma audio.
Pairing*
Premere il tasto Multifunzione per circa 7
secondi (fino a che i LED lampeggiano
alternativamente in rosso e blu).
Rispondere/ Premere brevemente il tasto Multifunzione
Chiudere una (A).
telefonata*
RipetizioneIn modalità Standby, premere il tasto
dell’ultimoMultifunzione (A) due volte.
numero
chiamato
Volume +/–Premere + (D) per aumentare il volume.
Premere – (E) per ridurre il volume.
Riproduzione/ Premere il tasto Multifunzione (A) per avviare
Pausa
la riproduzione musicale o per metterla in
pausa.
Precedente Premere brevemente il tasto < (C) per
riprodurre la canzone precedende in una
lista di brani.
Successivo Premere brevemente il tasto > (B) per
riprodurre la canzone successiva in una lista
di brani.
Chiamata
In modalità Standby, premere il tasto vocale
Multifunzione (A) e attendere di udire il
beep che indica che si può effettuare la
chiamata vocale. (Non tutti i telefoni
supportano questa funzione.)
* con messaggio vocale
ITALIANO
9
WARRANTY INFORMATION
English: For warranty information, go to:
Deutsch: Garantieinformationen finden Sie unter:
Español: Si desea obtener información sobre la garantía, visite:
Français: Pour consulter les informations sur la garantie, visitez:
Polski: Informacje dotyczące gwarancji znajdują się na stronie:
Italiano: Per informazioni sulla garanzia, accedere a:
manhattan-products.com/warranty
En México: Póliza de Garantía Manhattan – Datos del importador y responsable
ante el consumidor IC Intracom México, S.A.P.I. de C.V. • Av. Interceptor Poniente #
73, Col. Parque Industrial La Joya, Cuautitlán Izcalli, Estado de México, C.P. 54730,
México. • Tel. (55)1500-4500
La presente garantía cubre los siguientes productos contra cualquier defecto de
fabricación en sus materiales y mano de obra.
A. Garantizamos los productos de limpieza, aire comprimido y consumibles, por 60
dias a partir de la fecha de entrega, o por el tiempo en que se agote totalmente su
contenido por su propia función de uso, lo que suceda primero.
B. Garantizamos los productos con partes móviles por 3 años.
C.Garantizamos los demás productos por 5 años (productos sin partes móviles),
bajo las siguientes condiciones:
1. Todos los productos a que se refiere esta garantía, ampara su cambio físico, sin
ningún cargo para el consumidor.
2. El comercializador no tiene talleres de servicio, debido a que los productos
que se garantizan no cuentan con reparaciones, ni refacciones, ya que su
garantía es de cambio físico.
3. La garantía cubre exclusivamente aquellas partes, equipos o sub-ensambles
que hayan sido instaladas de fábrica y no incluye en ningún caso el equipo
adicional o cualesquiera que hayan sido adicionados al mismo por el usuario
o distribuidor.
Para hacer efectiva esta garantía bastará con presentar el producto al distribuidor
en el domicilio donde fue adquirido o en el domicilio de IC Intracom México, S.A.P.I.
de C.V., junto con los accesorios contenidos en su empaque, acompañado de su
póliza debidamente llenada y sellada por la casa vendedora (indispensable el
sello y fecha de compra) donde lo adquirió, o bien, la factura o ticket de compra
original donde se mencione claramente el modelo, número de serie (cuando
aplique) y fecha de adquisición. Esta garantía no es válida en los siguientes casos:
Si el producto se hubiese utilizado en condiciones distintas a las normales; si el
producto no ha sido operado conforme a los instructivos de uso; o si el producto
ha sido alterado o tratado de ser reparado por el consumidor o terceras personas.
WASTE ELECTRICAL & ELECTRONIC EQUIPMENT
Disposal of Electric and Electronic Equipment (applicable in the European Union and other European countries with separate collection systems)
English: This symbol on the product or its packaging indicates that this product shall not be treated as household waste. Instead, it should be taken
to an applicable collection point for the recycling of electrical and electronic equipment. By ensuring this product is disposed of correctly, you will
help prevent potential negative consequences to the environment and human health, which could otherwise be caused by inappropriate waste
handling of this product. If your equipment contains easily removable batteries or accumulators, dispose of these separately according to
your local requirements. The recycling of materials will help to conserve natural resources. For details about recycling this product, contact
your local city office, your household waste disposal service or the shop where you purchased this product. Outside the EU: To discard this product,
contact your local authorities and ask for the correct manner of disposal.
Deutsch: Dieses auf dem Produkt oder der Verpackung angebrachte Symbol zeigt an, dass dieses Produkt nicht mit dem Hausmüll entsorgt werden
darf. In Übereinstimmung mit der Richtlinie 2002/96/EG des Europäischen Parlaments und des Rates über Elektro- und Elektronik-Altgeräte (WEEE) darf
dieses Elektrogerät nicht im normalen Hausmüll oder dem Gelben Sack entsorgt werden. Wenn Sie dieses Produkt entsorgen möchten, bringen Sie es
bitte zur Verkaufsstelle zurück oder zum Recycling-Sammelpunkt Ihrer Gemeinde.
Español: Este símbolo en el producto o su embalaje indica que el producto no debe tratarse como residuo doméstico. De conformidad con la Directiva
2002/96/CE de la UE sobre residuos de aparatos eléctricos y electrónicos (RAEE), este producto eléctrico no puede desecha se con el resto de residuos no
clasificados. Deshágase de este producto devolviéndolo a su punto de venta o a un punto de recolección municipal para su reciclaje.
Français: Ce symbole sur Ie produit ou son emballage signifie que ce produit ne doit pas être traité comme un déchet ménager. Conformément à la
Directive 2002/96/EC sur les déchets d’équipements électriques et électroniques (DEEE), ce produit électrique ne doit en aucun cas être mis au rebut
sous forme de déchet municipal non trié. Veuillez vous débarrasser de ce produit en Ie renvoyant à son point de vente ou au point de ramassage local
dans votre municipalité, à des fins de recyclage.
Polski: Jeśli na produkcie lub jego opakowaniu umieszczono ten symbol, wówczas w czasie utylizacji nie wolno wyrzucać tego produktu wraz z odpadami komunalnymi. Zgodnie z Dyrektywą Nr 2002/96/WE w sprawie zużytego sprzętu elektrycznego i elektronicznego (WEEE), niniejszego produktu
elektrycznego nie wolno usuwać jako nie posortowanego odpadu komunalnego. Prosimy o usuniecie niniejszego produktu poprzez jego zwrot do
punktu zakupu lub oddanie do miejscowego komunalnego punktu zbiórki odpadów przeznaczonych do recyklingu.
Italiano: Questo simbolo sui prodotto o sulla relativa confezione indica che il prodotto non va trattato come un rifiuto domestico. In ottemperanza alla
Direttiva UE 2002/96/EC sui rifiuti di apparecchiature elettriche ed elettroniche (RAEE), questa prodotto elettrico non deve essere smaltito come rifiuto
municipale misto. Si prega di smaltire il prodotto riportandolo al punto vendita o al punto di raccolta municipale locale per un opportuno riciclaggio.
REGULATORY STATEMENTS
FCC Class B
This equipment has been tested and found to comply with the limits for a Class B digital device, pursuant to Part 15 of Federal Communications Commission (FCC) Rules. These limits are designed to provide reasonable protection against harmful interference in a residential installation. This equipment
generates, uses and can radiate radio frequency energy, and if not installed and used in accordance with the instructions may cause harmful interference
to radio communications. However, there is no guarantee that interference will not occur in a particular installation. If this equipment does cause harmful
interference to radio or television reception, which can be determined by turning the equipment off and on, the user is encouraged to try to correct the
interference by one or more of the following measures: reorient or relocate the receiving antenna; increase the separation between the equipment and
the receiver; connect the equipment to an outlet on a circuit different from the receiver; or consult the dealer or an experienced radio/TV technician.
CE / R&TTE
English: This device complies with the requirements of R&TTE Directive 1999/5/EC. The Declaration of Conformity for this product is available at:
Deutsch: Dieses Gerät enspricht der Direktive R&TTE Direktive 1999/5/EC. Die Konformitätserklärung für dieses Produkt finden Sie unter:
Español: Este dispositivo cumple con los requerimientos de la Directiva R&TTE 1999/5/EC. La declaración de conformidad para este producto esta disponible en:
Français: Cet appareil satisfait aux exigences de la directive R&TTE 1999/5/CE. La Déclaration de Conformité pour ce produit est disponible à l’adresset :
Polski: Urządzenie spełnia wymagania dyrektywy R&TTE 1999/5/EC. Deklaracja zgodności dostępna jest na stronie internetowej producenta:
Italiano: Questo dispositivo è conforme alla Direttiva 1999/5/EC R&TTE. La dichiarazione di conformità per questo prodotto è disponibile al:
manhattan-products.com
10
North & South America
IC Intracom Americas
550 Commerce Blvd.
Oldsmar, FL 34677 USA
Asia & Africa
IC Intracom Asia
Far Eastern Technology Center
7-F No. 125, Section 2, Da Tong Rd.
Shijr, Taipei • Taiwan, ROC
Europe
IC Intracom Europe
Löhbacher Str. 7
D-58553 Halver, Germany
All trademarks and trade names are the property of their respective owners. For specifications, go to manhattan-products.com.
Alle Marken und Markennamen sind Eigentum Ihrer jeweiligen Inhaber. Die Spezifikationen finden Sie auf manhattan-products.com.
Todas las marcas y nombres comerciales son propiedad de sus respectivos dueños. Para más especificaciones, visite manhattan-products.com.
Toutes les marques et noms commerciaux sont la propriété de leurs propriétaires respectifs. Vous trouvez les spécifications sur manhattan-products.com.
Wszystkie znaki towarowe i nazwy handlowe należą do ich właścicieli. Pełną specyfikację produktu znajdziecie Państwo na stronie manhattan-products.com.
Tutti i marchi registrati e le dominazioni commerciali sono di proprietà dei loro rispettivi proprietari. Per ulteriori specifiche, visita il sito manhattan-products.com.
© IC Intracom. All rights reserved. Manhattan is a trademark of IC Intracom, registered in the U.S. and other countries.
Printed on recycled paper.