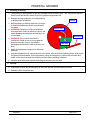
1
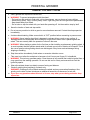
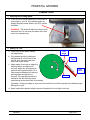
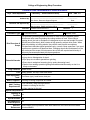
College of Engineering Shop Procedure
PEDESTAL GRINDER PROCEDURE
Dept: Multi-department
Authored by:
Laboratory: Student Machine Shop
________________________________________
Rm: HML 113
____________
Dick Sevier, Research Support Engineer
Reviewed and Approved by:
________________________________________
Date:
____________
Matt Lundgren, EH&S Lab Safety Officer
Filename:
Procedure Type
Brief Overview &
Scope
Potential Hazards
Engr. Controls
PPE
Pedestal Grinder 03-Oct-11
Process/Protocol
Chemical
Revision:
1
Hazard Class
This procedure provides general instructions on how to use the pedestal grinder.
Grinders are often used for grinding the cutting surfaces of tools. When using a
grinding wheel, the tool or workpiece is held against a tool rest and brought in contact
with the face of the wheel, which rotates at high speed by a direct drive motor. When
fitted with polishing or buffing wheels, they can be used to polish a workpiece.
This document describes typical operations only; consult a shop supervisor if you need
to perform an operation not described here. Changing wheels and maintenance of the
tool are beyond the scope of this document due to the skill required and diversity of
tools and processes associated with these operations.
•
•
•
•
•
Injury due to entanglement with grinding wheel
Injury due to disintegration of wheel.
Eye injury due to debris ejected from grinding.
Burns due to workpiece becoming hot or sparks showering hand.
Sparks from sanding operation igniting flammable materials nearby or dust in a
dusty environment.
Wheel covers
Safety glasses, non-slip, close-toed shoes
Add'l Equipment,
Tools:
Tool fixture (opt.), hand broom, dust pan
Mat’ls, Supplies:
Polishing or buffing compound as needed
Add’l Training
Requirements
Date:
• All mandatory shop training modules
• Hands-on training for this tool
• Video training for this tool
Special Requirements:
Handling &
n/a
Facilities
Spill & Incident
Decontamation/
Waste Disposal
Sources/
References
n/a
n/a
Some content for this procedure have been taken from the user manual for Baldor
Grinders MN903.
PEDESTAL GRINDER
TABLE OF CONTENTS
TOOL COMPONENTS .................................................................................................................... 2
GENERAL TOOL SAFETY RULES ................................................................................................ 3
COMMON TASKS .......................................................................................................................... 4
1. Stopping the Grinding Wheel ................................................................................................. 4
2. Setting up Tool ....................................................................................................................... 4
3. Turning Machine On ................................................................................................................ 5
4. Grinding a Cutting Tool or Workpiece ................................................................................... 5
5. Polishing or Buffing ................................................................................................................ 6
6. Cleanup .................................................................................................................................... 6
TOOL COMPONENTS
Flip Up
Eye Shield
Motor
Wheel
Cover
Wheel
Face
Wheel
Flange
Tool
Rest
On/Off
Switch
2/28/2014
Page 2 of 6
PEDESTAL GRINDER
GENERAL TOOL SAFETY RULES
a. Safety glasses are required to use this tool.
b. WARNING: To prevent entanglement with the wheel:
- Tie back long hair and tuck under shirt, roll up long sleeves, remove gloves or loose clothing.
- Remove any gloves, rings, or other jewelry. Note: Tight fitting latex or nitrile gloves are permissable.
- Keep hands away from wheel.
- Do not slow or stop the wheel with your hand after powering off. Let the machine stop by itself.
c. Know the location of start and stop switch.
d. Do not use any machine in which a guard or cover has been removed. Contact the shop supervisor
immediately.
e. Avoid accidental starting. Make sure switch is in “OFF” position before connecting to power source.
f.
WARNING: Never install a wheel that is damaged, such as a chip or crack on any surface. A
damaged wheel can disintegrate while rotating at a high RPM or when work is placed against the
wheel. This can severely harm the operator or others in the area.
g. WARNING: When starting a grinder for the first time,or after installing a replacement grinding wheel, it
is most important that the operator stand aside for at least one minute of rotation at full speed. This is
the correct practice since grinding wheels can disintegrate if they have received damage during
shipping or handling.
h. Stop the machine immediately if odd noises or excessive vibration occurs.
i.
Take care to not allow the workpiece to become so hot it burns your fingers if it is handheld.
j.
WARNING: This tool may generate sparks. Clear the area of any material that could be ignited from a
stray spark from the sanding operation. Do not use this tool in a dusty environment that could be
ignited by sparks.
k. Wear slip-resistant shoes to maintain a secure footing and balance.
l. Grind on grinding face (periphery) of wheels only.
WARNING: Grinding on side of wheel weakens the wheel and may cause wheel breakage. Also,
grinding on the side of wheel introduces an additional hazard due to absence of a tool rest.
m. If you have any questions about this tool or its use, stop what you are doing and ask a shop
supervisor.
2/28/2014
Page 3 of 6
PEDESTAL GRINDER
COMMON TASKS
1. Stopping the Grinding Wheel
a. In the course of normal operation or in the event of
an emergency, turn off the pedestal grinder by
flipping the power switch down in the OFF position
as shown.
WARNING: The wheel will take some time to slow
down and stop. Do not touch the wheel until it has
come to a complete stop.
2. Setting up Tool
a. Power off machine before making
any adjustments.
Tool
Angle
b. If the desired grinding, polishing or
buffing wheel is not mounted to the
grinder, have the shop supervisor
mount the correct wheel.
c. Adjust angle of tool rest on support to
desired position and tighten nut
securely. Adjust tool rest support on
guard to attain approximately 1/8" or
less clearance between tool rest and
grinding wheel and tighten nut
securely. If the grinding operation is
extensive, the tool rest may require
repositioning as the wheel face is worn away.
Cutting
Tool
Tool
Rest
Wheel
If grinding a cutting tool edge, be sure to set rest so that the tool will be ground at the desired angle.
See figure to right.
d. Adjust eyeshield to position aligning center of eyeshield in line of sight to tool rest.
2/28/2014
Page 4 of 6
PEDESTAL GRINDER
3. Turning Machine On
a) Flip the on/off switch to ON.
WARNING: When starting a grinder, particularly after installing a replacement grinding wheel, it is
most important that the operator stand aside for at least one minute of rotation at full speed in case a
wheel disintegrates at startup.
WARNING: Turn the machine off and stand aside immediately if odd noises or excessive vibration
occurs
4. Grinding a Cutting Tool or Workpiece
a. WARNING: Sparks could result in fire or explosion if combustible materials, vapors have not been
removed. Be sure there are no flammable or combustible vapors or dust near the grinder.
b. Carefully bring the tool in contact with face of the wheel. Do not apply excessive force; let the wheel
do the grinding.
WARNING: Do not grind on side of wheel, as such grinding can cause wheel to weaken and
disintegrate.
c. If there is an abundant shower of sparks, stop the operation and put on tight-fitting nitrile or latex
gloves.
WARNING: Do not put on loose fitting gloves, as they may become entangled in the grinding wheel.
d. Every few seconds, cool the tool or workpiece in the water bath.
WARNING: Failure to cool the tool could result in burns to the fingers or hands or inability to hold
workpiece.
CAUTION: Excessive heat can make reduce its hardness. Be sure when grinding to quench the tool
tip frequently.
e. Avoid wearing grooves in wheel face. If workpiece is narrow, move it from side to side to distribute the
wear across the grinding wheel face.
f.
If the cutting tool has been significantly dulled, first grind with a coarser wheel, then finish with a finer
wheel. If the tool only requires a light touch up, the finer wheel will be sufficient.
g. Turn the switch to the OFF position when grinding is completed. Wait for wheel to come to a complete
stop before leaving machine.
2/28/2014
Page 5 of 6
PEDESTAL GRINDER
5. Polishing or Buffing
a. The polishing or buffing wheel is typically operated without a wheel cover. This, and the fact that the
wheel is soft and flexible, makes for a much greater entanglement risk.
b. Request the shop supervisor to install polishing
or buffing wheel as needed.
c. Before polishing or buffing, make sure your part
is cleaned beforehand to avoid contaminating
the wheel.
Wheel
Unsafe Area
d. WARNING: Polishing or buffing a workpiece
with large holes, hooks or tabs may result in the
wheel grabbing the workpiece and pulling it out
of your hand.
e. WARNING: Do not use a wheel that is
excessively frayed or torn as it may grab the
workpiece and pull it out of your hand or
disintegrate and strike the user or others in the
shop.
f.
Workpiece
Safe Area
Apply the appropriate compound to the wheel
sparingly.
g. Hold the workpiece firmly, and introduce it to the wheel, with the front end pointing down. Work only in
the green Safe Area below. With light pressure, bring the workpiece in contact with the wheel and
rotate so the wheel contacts the workpiece surface where polishing is desired.
h. Have the shop supervisor replace the buffing wheel when you are done.
6. Cleanup
a. Wipe down or brush any accumulation of dust from the tool and surrounding surfaces.
b. Sweep the floor around the tool.
2/28/2014
Page 6 of 6