1
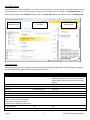
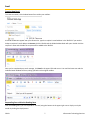
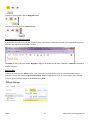
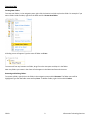
iM Microsoft Outlook Web App (OWA) CSULB 1 Information Technology Services CSULB 2 Information Technology Services Table of Contents Introduction .......................................................................................................................... 4 Logging In ............................................................................................................................................................................ 4 The OWA Interface.............................................................................................................................................................. 5 Feature Differences............................................................................................................................................................. 5 Email ..................................................................................................................................... 7 Creating New Email ............................................................................................................................................................. 7 Responding from within the Reading Pane ........................................................................................................................ 7 Responding from within the email ..................................................................................................................................... 8 Deleting Mail ....................................................................................................................................................................... 8 Organizing Mail ................................................................................................................................................................... 9 Creating New Folders ...................................................................................................................................................... 9 Renaming and Deleting Folders ...................................................................................................................................... 9 Contacts .............................................................................................................................. 10 Personal Contacts ............................................................................................................................................................. 10 CSULB Campus Contacts ................................................................................................................................................... 10 Calendar .............................................................................................................................. 11 Viewing Your Calendar ...................................................................................................................................................... 11 Creating New Calendar Entries ......................................................................................................................................... 11 Receiving Meeting Invites ................................................................................................................................................. 12 Getting Help ........................................................................................................................ 13 CSULB 3 Information Technology Services Introduction Outlook Web App (OWA) is the web-based version of the Outlook 2010 email client. To access OWA, you need a web brower and an internet connection. Logging In Go to http://mail.csulb.edu. Enter your Email address ([email protected]) and Password. Click Sign In. If this is your first time logging in, you’ll be prompted to select a Language and Time Zone. For low vision or screen reader users, you can opt to use the blind and low vision experience by checking the box. Otherwise, click OK to continue. CSULB 4 Information Technology Services The OWA Interface OWA operates in a multi-pane window, very similar to the Outlook client. You can collapse, expand, drag and increase or decrease each pane’s size or shape. Each pane is dynamic; for example, if you click a folder in the Navigation Pane, the folder contents open in the View Pane. Select an item in the View Pane and the item details open in the Reading Pane. Navigation Pane View Pane Reading Pane Feature Differences Most features found in the full Outlook client are also found in Outlook Web App (OWA). The following table highlights the major differences between features in OWA and the full client. Feature Supported in Outlook Supported in Outlook Web App Search folders Full functionality Message editing tools Notes Journal Monthly calendar view Searching Custom dictionaries Import and export data from other data sources, such as .pst files, database files, other messaging and contact systems, other calendaring applications .pst file support Send to Office OneNote Full functionality Full functionality Full functionality Full functionality Full functionality Yes Yes You can't create Search folders. You can view default Search folders. You can also view custom Search folders that you previously created using Outlook. Limited View only View only View and edit. You can't print. Not available in Calendar No No Yes Yes No No CSULB 5 Information Technology Services Feature Supported in Outlook Supported in Outlook Web App Hierarchical address book Delegate control RSS subscription and management Voting buttons Propose new time for meetings Related search through right-click Natural language search Windows SharePoint Services lists Outlook Today page To Do Bar Customize navigation pane Pasting inline images Task request Automatic formatting of calendar items Secondary time zone in calendar view Yes Yes Yes Yes Yes Yes Yes Yes Yes Yes Yes Yes Yes Yes Yes No No No No No No No No No No No No No No No CSULB 6 Information Technology Services Email Creating New Email To create new email, click the New button from within your mailbox. A second window will appear with your blank email. Type the recipient’s email address in the To field. If you need to lookup a recipient’s email address in Contacts, click the To link and the Global Address Book will open. Double-click the recipient’s name and click Ok. The recipient will be added to the To field. Once you’ve completed your email message, click Send in the upper left hand corner. Your mail has been sent and the individual email window will close, taking you back to the original mailbox. Responding from within the Reading Pane From the Reading Pane, you can respond to an email, using the buttons in the upper right corner. Reply to only the sender by clicking the Reply button. CSULB 7 Information Technology Services To Reply to All recipients, click the Reply All button. To forward an email, click the Forward button. Jk Responding from within the email If you double-click and email from the navigation pane, it will open in a secondary window. The respond commands are located in the upper left corner of the window: Click Reply to reply to only the sender, Reply All to reply to the sender and all other recipients or Forward to forward to another recipient. Deleting Mail To delete an email, click the Delete button in the View pane. The item will be moved to the Deleted Items recycle container. You can also choose to Ignore Conversation. New messages that are part of a conversation that a user has chosen to ignore are sent straight to the deleted items folder. CSULB 8 Information Technology Services Organizing Mail Creating New Folders To create mail folders, in the navigation pane, right-click the location in which to place the folder. For example: If you want a folder inside the Inbox, right-click the Inbox and click Create New Folder. A blinking cursor will appear. Type the name of folder and Enter. To move mail from any location to a folder, drag it from the view pane and drop it in the folder. Note: Any folders you create in the client will also appear in the OWA interface and vice versa. Renaming and Deleting Folders To rename a folder, right-click on the folder in the navigation pane and click Rename. The folder name will be highlighted. Type the new folder name and key Enter. To delete a folder, right-click it and click Delete. CSULB 9 Information Technology Services Contacts Personal Contacts When you click on the Contacts button in the navigation pane, you will be taken to your personal contacts by default. To add a contact, select New > Contact. Complete the information and click Save and Close in the upper left hand corner of the window. CSULB Campus Contacts To view the Global Address List, click the address book icon next to “Find Someone” from anywhere within OWA. From here, you can browse the entire campus employee community. CSULB 10 Information Technology Services Calendar Once you have entries on your calendar, upon login reminder alerts will appear in a dialog box. The number in the upper right hand corner indicates how many total alerts you have. You can choose to Dismiss the alert, Dismiss All at once, Open Item or Snooze. Clicking Snooze will remind you again in five minutes (default). Viewing Your Calendar To view your calendar, click the Calendar button in the navigation pane. View your calendar in different formats by clicking the Day View, Work Week View, Week View, or Month Vew button. Scroll to different months by either clicking the forward and backward arrows in the navigation pane, or by clicking the month itself. Creating New Calendar Entries To create a new calendar entry, double-click a time slot or day on your calendar. Please note that in Day, Work Week or Week view, the default entry type is an appointment. In the Month view, the default calendar entry type is an “All Day Event” – you will have to uncheck the All Day Event box to specify start and end times. To invite others to a meeting, click the Scheduling Assistant tab. Enter the recipient’s name under your own. To see a list of campus contacts to invite, click the address book icon next to “Select Attendees.” CSULB 11 Information Technology Services When you have completed your entry, click Send (or Save and Close if you didn’t invite other recipients). The calendar entry will appear on your calendar. Receiving Meeting Invites Calendar invites will arrive in your mailbox. The calendar icon in the upper left hand of the mail item indicates it is a calendar invite. Within the body of the notification, you can click the check sign mark CSULB to request more information from the sender or the ‘x’ 12 to accept a meeting, the question to decline the meeting. Information Technology Services Getting Help For additional help using Outlook, the following resources are available: CSULB Microsoft OWA Help icon for online assistance http://training.csulb.edu for training, self-help guides and video instruction Your local technical coordinator 13 Information Technology Services