1
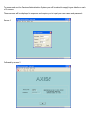
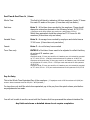
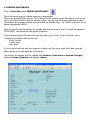
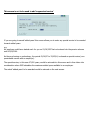
Employer Internet
User manual
Local Government Pension Scheme
Version 5
Last updated:
12/05/2009
If you have any queries, please contact the Pensions Unit on telephone number 01642 727777
1.0 Introduction
Employer Internet has been introduced to allow employers to connect to the Pension Fund’s
administration system. Once connected, employers are able to:
View, create and amend member data
Perform Benefit Calculations
Produce & View documents
Connections are made to the Pension Fund’s system via the internet using a web client. The web client
runs through a web browser and is secured using 128 bit encryption.
2.0 Accessing the System
To access the system you will need user accounts and passwords, these will be issued by the Pensions
Unit. If new users are required please send an email to the Pensions Unit requesting access to
Employer Internet. The user accounts will be allocated to an individual and must not be shared with
other people as an audit log is produced to show entries made on the system.
You will need to supply the following details:
Name of User, telephone number and email address.
Logging On
Open you web browser and enter the site name (URL) as follows:
https://portal.middlesbrough.gov.uk
The homepage of the site will be displayed as follows:
Enter your Username and Password, select your connection speed appropriate to your organisation’s
Internet connection and then click ‘Log In’.
Your desktop will then be displayed within the browser window:
To open up the Pensions Administration System click (single click) on the Pensions Icon
applications panel.
in the
To access and use the Pensions Administration System you will be asked to supply logon details on each
of 2 screens
These screens will be displayed in sequence and require you to input your user name and password:
Screen 1
Followed by screen 2
After successfully entering your username and password the main menu for Employer Internet is
displayed as follows:
General interrogation screen, search
for members, access different data
views within a member record, update
data, request information, perform
estimates etc…
New member creation screen
Your inbox, lists all items that
require action. The list is in
date and priority order. Out of
date items are colour coded
Menu facilities to access the
icons above and change your
password
3.0 Using the Pensions Admin System
3.1 NEW STARTERS
From the Main Menu select NEW STARTER
The first thing you must enter is the National Insurance number of the employee.
When entered, AXISe will search to check a record does not already exist on the system.
If there is already a record on the system, the starter screen will appear with all the fields completed,
this is displaying the existing record on AXISe.
If a record does not already exist, the screen will appear as below
The Scheme and Emper No are defaulted to the Employer Internet scheme and your employer code.
This screen should be completed as below.
The Address should be
completed in CAPITALS
using a separate line for
each part of the address and
without any punctuation or
abbreviations.
The address, as input, will be
dropped onto any documents
printed from the member’s
record
Part Time & Part Time % / Hours
Whole Time
This field is left blank to indicate a full-time employee (works 37 hours
Per week 52 weeks of the year. (if term-time only see below)
Part-time
Enter Y - & Part time hours worked by the employee. These should
always be entered as decimals in the following format: 18.75/37.00
( Employee works 18hrs 45mins per week over a whole time of 37hrs )
Whole time equivalent should be entered as 37.00 hours for ALL
members (if term-time only see below)
Variable Time:
Enter V - & average hours worked by employee and whole time as
37.00 hours. (if term-time only see below)
Casual:
Enter C - do not list any hours worked
Term Time only
ENTER Y in Part-time. Hours need to be adjusted to reflect that they
do not work 52 weeks a year.
Examples;
Employee works 17 hours per week for 44.4 weeks a year, this should be recorded
as 17 x 44.4 / 52.14 = 14.48 per week and entered on system as 14.48/37.00
Employee works whole-time, 30 hours per week for 44.4 weeks a year, this should
be recorded as 30 x 44.4 / 52.14 = 25.55 per week and entered on the system as
25.55/37.00
Employee works 37 hours per week for 44.4 weeks a year, this should be recorded
as 37 x 44.4 / 52.14 = 31.51 per week and entered on the system as 31.51/37.00
Pay On Entry
This is the Whole-Time Equivalent Pay of the employee. ( If employee works 18.50 hrs and earns £10,000 per
annum. Amount entered would be £20,000 – WT Equivalent )
For term time only staff the whole time equivalent pay is the pay from the spinal column point before
any adjustments are made.
You will not be able to see the record until the Pensions Unit has processed the relevant interface file.
Any fields not shown or detailed above do not require completion.
3.2 MEMBER MAINTENANCE
From the Main Menu select MEMBER MAINTENANCE
This is the starting point for member enquiries or amendments.
Type in the employees NINo and click ‘OK’ to search for their pension record. Alternatively, you can use
any of the various fields to lookup the member record. You can enter full or part references to search
on, wildcards are entered by putting an asterisk after the wildcard entry. E.g. BROW* will search for all
names beginning with BROW…
Once you have located the member, the member maintenance screen is used to view all the associated
‘DATA VIEWS’, view documents and update information.
To ensure easy access to the data views you may need to go to ‘View’ on the top tool bar, select
‘Toolbars’ from the drop-down list and tick;
AXISe Tool Bar
Current Views
User Views
If you log out at this point and ‘save changes to System’ and then log on again these data views will
always appear at the right hand side of the screen.
This screen is the starting point for; dealing with Variations (Contractual or Personal Changes)
producing Pension Estimates and inputting Leavers.
3.3 VARIATIONS (Contractual or Personal Changes)
Amendments to records are instigated from the Interface icon
fall into the following areas:
located on the AXIS toolbar and
Select the option you want and click ‘OK’.
Part Time Hours Change
The current or last notified hours are shown towards the top of the screen.(If the employee had been
whole-time the PT Hours/Percentage would be blank)
To show a change ‘right click’ within the box and select ‘Insert’. Enter the date the hours changed and
then the new PT Hours/Percentage.(example 1)
If the member is going from p/t to w/t, enter the date the hours changed and then leave the PT
Hours/Percentage blank (example 2)
Example 1
Example 2
You can use this screen to ‘Insert’ up to 10 changes in hours at a time.
If you want to check the full service details of an employee you will need to go to the Service History.
General Amendments
This screen allows you to make changes to the member ’personal’ information.
The screen below shows the fields that can be updated by using the drop-down options or overtyping
the information currently held.
If you update the surname (if the members changes their name e.g. marriage, deed poll) you must
Tick the ‘Update Prev Surname’ box, this ensures that we maintain a permanent record of all names
that have been used by this employee.
If you update the address you must tick the ‘Historise Amendment’ box to ensure that we maintain a
permanent record of all previous addresses used by this employee.
The Address should be completed in CAPITALS using a separate line for each part of the address and
without any punctuation or abbreviations.
The address, as input, will be dropped onto any documents printed from the member’s record
3.4 PENSION ESTIMATES
Using the ‘Member Maintenance’ button locate the employees pension record.
Before calculating a pension estimate you will need to check if there is a ‘Divorce PSO Debit Screen’
or a ‘Divorce Earmarking Screen’ shown on the Current Data Views list.
If there is you should not produce an estimate of pension entitlement for this employee as the wrong
figures will be generated, instead you should send an Estimate Request form to the Pensions Unit.
You will then need to ensure that the employees personal information (address, marital status etc.) is
up to date and that the dates and hours recorded on the Service History screen are correct.
Incorrect service details will produce an incorrect benefits and costing forecast.
You will also need to calculate and make a note of the pensionable pay at the proposed date of leaving.
As benefits can be calculated using the best of the last 3 years pay, (or longer if a ‘Certificate of
Reduction in Pay’ has been issued) you will need to check whether this applies to this employee, and if
so make a note of the higher pensionable pay figure and the year to which it relates.
To produce the estimate of pension entitlement click on the Benefit Calculation icon
AXIS toolbar, and the following screen will become available;
on the
The ‘Type of Calculation’ will be ‘Prospective’.
The ‘Date of Event’ will be the proposed date of retirement, and the ‘Date for calculation’ box can
be left blank.
In the ‘Event’ box select the type of estimate that you require;
‘Pension’ for early retirement with consent or normal retirement cases, or
‘Redundancy / Efficiency’ for people over the age of 50 who are leaving under this criteria.
Click ‘OK’
** See Leavers section for more information on redundancy cases
This screen is not to be used to add ‘augmented service’
If you are going to award ‘added years’ this screen allows you to enter any special service to be counted
towards added years.
e.g.
An employee could have started work for you on 01/04/1997 but not entered into the pension scheme
until 01/04/2004.
As they are leaving on redundancy, the period 01/04/97 to 31/03/04, is classed as special service (nonpensionable service with an employer).
The special service, in this case 07/000 years, would be entered into this screen and is then taken into
consideration when AXIS calculates the maximum added years available to an employee.
The actual ‘added years’ to be awarded would be entered on the next screen.
The ‘Final Pay’ box will need to be overtyped with the whole-time Pensionable Pay at the date of
leaving.
Do not change the ‘IR Max Final Pay’ figure.
The other boxes do not need altering unless one of the following applies;
If a higher pay figure from a previous year is to be used in the calculation (best of the last 3 years or
longer if a ‘Certificate of Reduction in Pay’ has been issued) this should be input in the ‘Prev Yrs Final
Pay’ box.
If a previous years pay is used then the ‘Effective Date’ will be the year to which the higher pay figure
relates
(remember the day and month must be as the date of leaving i.e 31/12/2004 in the example above)
If the employee owes arrears of pension contributions the amount should be input in the ‘Dedn from
Lump Sum’ box.
The ‘Benefit Conversion’ and ‘Waive any Actuarial Reduction’ boxes will default to ‘N’ but this
can be changed to a ‘Y’ if estimates with these options are required.
When complete click the ‘Thumbs Up’ icon on the AXIS toolbar and ‘Save’ data when prompted.
The next screen will show the calculation details, click on the ‘Pen Nib’ icon on the AXIS toolbar and a
box will appear called ‘Quotation Storage’, click on the ‘No’ box.
(an employee could have several quotes calculated on different scenarios and saving all the details
would ‘clog up’ the system)
Go back to the ‘Member Summary’ screen.
Click on ‘Documents’ on the top tool bar,
then select ‘Document List –All’ from the drop-down list.
The documents take several seconds to load but if the screen ‘sticks’ on ‘Merging Documents’
(the system is merging a ‘Word’ document into ‘AXIS’) then hold down the ‘Alt’ and ‘Tab’ keys together,
and ‘tab’ along to the ‘Word’ icon.
The documents list will then appear.
The documents relating to the calculation that you have just completed will be shown at the top of the
list.
You will need to print off the documents shown with the current date and time of the calc.
Select and open the documents one at a time by clicking once to highlight the required document and
then clicking on the ‘Consecutive Display’ button at the bottom of the page.
To print the calculation, wait until the document has opened then click on ‘Session’ on the top tool bar
and select ‘Print’ from the drop-down list.
To print the ‘word’ documents (EARLYCOSTY & ESTRETW), wait until the document has opened then
click on ‘File’ on the top tool bar and select ‘Print’ from the drop-down list.
The documents should then be produced by your office printer.
3.5 LEAVERS
From the User Data View toolbar select the MEMBER LEAVING screen.
This screen is split into three pages:
1
2
3
Leaving Details / Pensionable Pay
Early Retirement / Refund
Misc Leaver Info / Reduced Service
Work through each page and enter the relevant information relating to the selected reason for leaving
‘Leaving Details’
If there isn’t a specific ‘box’ to match the
reason for leaving,
i.e. ‘Dismissal’ or ‘Transfer to…’
enter ‘Y’ in the ‘Voluntary Resignation’
box as reason for leaving and when the
EMPLEAVE document opens, overtype
‘Voluntary Resignation’ with the actual
reason for leaving ie. “Dismissal” etc.
**Redundancy Cases
Employees under the age of 50 are not
entitled to the immediate payment of their
pension.
In these cases, as above, enter ‘Y’ in the
‘Voluntary Resignation’ box as reason for
leaving and when the EMPLEAVE
document opens, overtype ‘Voluntary
Resignation’ with ‘Redundancy’
We do not need details of redundancy
payments in these cases.
Employees aged 50 or over are entitled to
have their pension paid immediately
tick the appropriate box ‘Compulsory
Redund’ or ‘Voluntary Redund’ and
enter details of any enhancements in the
‘Early Retirement’ section on page 2.
Once the Member Leaving screens are completed go to the Interface icon
toolbar and then select Leavers from the available options.
located on the AXIS
Enter the Date of Leaving in the box provided.
If the member address has changed from that which is currently displayed on AXISe, update the
address and check “Historise Amendment”. ( Not to be ticked if address has not changed )
The Address should be completed in
CAPITALS using a separate line for
each part of the address and without
any punctuation or abbreviations.
The address, as input, will be
dropped onto any documents printed
from the member’s record
When you exit the screen by clicking Member Summary from the toolbar, you will be taken directly
into the document Generation menu where a document called EMPLEAVE will be created.
Action:
Select GENERATE
Click OK and the document will be created through AXIS-Word Integration..
Example of merged EMPLEAVE document (This is a 2 page document)
Page 1 - LEAVING DETAILS
The details shown in red ink are automatically put onto the document from the information input on the
member leaving screens, however if alterations are needed they can be overtyped as appropriate.
Pension Contributions: This needs to be completed if the member has left with less than 3 months
service and will therefore be entitled to a refund from the Pensions Unit.
Outstanding Pension Contributions: This needs to be completed if there are arrears of contributions
owed by the employee.
Misc Information: This section can be typed into, to provide any relevant leaver information that
cannot be input on the Member Leaving Screens, such as unauthorised absences or authorised
absences where the unpaid pension contributions have not been repaid.
Page 2 – PENSIONABLE PAY
Both the ‘Actual Pensionable Pay’ and ‘Whole-Time Equivalent Pensionable Pay’ is to be
completed to show the figures that were used to calculate the Pensionable Pay Amounts on Page 1.
As benefits can be calculated using the best of the last 3 years pay, (or longer if a ‘Certificate of
Reduction in Pay’ has been issued) you will need to check whether this applies to this employee, and if
so show details of the higher pensionable pay figure and the year to which it relates. (In these cases we
also still need to know the pensionable pay at the date of leaving)
Shift Allowances,etc. should be shown in the ‘Any other Pensionable Earnings box’
The EMPLEAVE document is generated to ensure a “snap-shot” in time of the information that was provided by
the employer & user. The document does not need to be printed and is permanently stored on the member
record.
Once you have checked the details on the document, click the
AXISe button on the toolbar
and you will be asked to “Save Changes” – choose YES. You will then be returned to AXIS and the
summary screen showing details of your EMPLEAVE document.
To exit out you can now hit the
button and return to the Member Maintenance screen.
A ‘task indicator’ will be automatically generated on the employees record to signal to the
Pensions Unit that the member is a leaver and further action is needed from them.
Please note: You will not be able to see any changes to the member record until the Pensions Unit
have processed the relevant interface file.
If after completing the EMPLEAVE document you realise you have input some incorrect data, you can
re-open the document and make amendments.
From the ‘Member Summary’ screen click the web-style link ‘Documents’ (single click ).
You will then be taken to the Document List for that member. The documents are listed in date and time
order and also display the user who created it.
Simply single click the document you created to mark it and then hit the ‘Consecutive Display’ button
at the bottom of the screen to open it.
Word will now launch and your document will open. As with any WORD document, you can now make
amendments as required.
Once satisfied, click the
button on the toolbar and you will be asked to “Save Changes” –
choose YES. You will then be returned to an AXISe summary screen showing details of your EMPLEAVE
document. From here you can now leave the record.


![Mercury Phase 2 Modeller - User guide v8.8.ppt [Compatibility Mode]](http://vs1.manualzilla.com/store/data/006892540_1-e3f28b1bf2a388b24cd40307f49b3ac3-150x150.png)