1
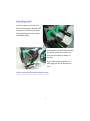
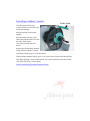
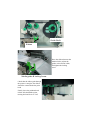
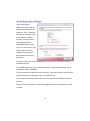
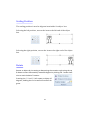
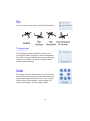
Version 4.1.11 Mar 2015 Ribbon Print Handbook Pro Printer 1 Ribbon Print Handbook Your System ...................................................................... 4 Setting up Your Printer ..................................................... 5 Inserting a Foil .................................................................. 7 Inserting the ribbon .......................................................... 8 Head Pressure ................................................................. 10 Foil Spreader ................................................................... 10 Installing the software .................................................... 11 Activating your software ................................................ 12 Medal Print ..................................................................... 14 Designing panel, Rulers & Units ..................................... 15 Ribbon Width & Length .................................................. 16 New Ribbon / New Medal Print...................................... 17 Design Templates ........................................................... 18 Software Updates & Manual Download ......................... 18 Text Box .......................................................................... 19 Merge Text...................................................................... 20 Images............................................................................. 21 Clipart ............................................................................. 22 Maintain Aspect / Fit to Box ........................................... 23 Rotate Image .................................................................. 24 Flip Image / Transparent Images .................................... 25 2 Nudge Image ................................................................... 25 Skew & Curve Text .......................................................... 26 Moving & Resizing Objects ............................................. 27 Object Alignment ............................................................ 28 Borders ............................................................................ 29 Medal Rim ....................................................................... 30 Export to PDF / Print Preview ......................................... 31 Multi-print Adapters ....................................................... 33 Print Settings ................................................................... 34 Temperature Guide ......................................................... 36 Printer care ..................................................................... 38 FAQs ................................................................................ 38 Contacts Us & Warranty Details ..................................... 39 Shortcut Keys .................................................................. 40 The Ribbon Print System Thank you for purchasing a Ribbon Print system. Please read this guide to get the most out of your Ribbon Print system. Ribbon Print software has been designed to perform in the same way as many other graphics packages, allowing you to import your frequently used images, save projects for use at a later date and speedy design. We aim to continually improve the package, so please feel free to offer suggestions. The following guide will help you setup your system and allow you to start printing personalised ribbon. 3 Your System Please check that you have received the following Ribbon Print Pro Printer USB Cable Power Cable User Manual Foil, ribbon and head cleaning pen CD with Ribbon Print software 4 Setting up your printer Remove any packaging material from the printer. Attach the power cord to the printer, turning on both the mains and printer. The display screen will take a couple of seconds to activate. Connect the USB lead to the printer and to a spare USB port on your computer. Please ensure that all of the connecting cables are pushed in firmly and securely as far as they will go. 5 USB Releasing the Print Head Block 1. Turn off the power and open the Top Cover. 2. Turn the Head Lever to FREE position, then release the Transfer Foil Shaft Holder Plate. Free Tag 3. Open the Print Head Block. 6 Inserting a foil Grasp the tabs on the top and bottom of the green Transfer Foil Stoppers and move the Transfer Foil Stoppers back to the end of the Ribbon Shaft Leaving plenty of slack between the foil spools, place the transfer foil onto the foil Shafts as shown on the left. A glue stick can be used here to help apply the foil to the take-up core Video instructions @ www.ribbonprint.com 7 Inserting a ribbon / media Guide Shaft Turn the green locking ring counter clockwise and remove the black ribbon flange. Place the ribbon on the media spindle. Pass the ribbon over the guide shaft, then pull the ribbon towards the front of the printer. (See diagram inside the print hood) Replace the ribbon flange pushing firmly until the ribbon is centred. Attach the locking ring to secure the ribbon When printing multiple ribbons, place a core spacer between the individual ribbons. NB. When printing a single 15mm ribbon, core spacers should be placed on either side of the ribbon for a secure fitting Video instructions @ www.ribbonprint.com 8 Guide Shaft Ribbon Place the ribbon between the Media Guides, adjust the guides to the ribbon width, and tighten the locking screw. Media guide & locking Screw Check that the ribbon path through the printer is straight. The ribbon should be centred under the print head Finally lower the printhead and lift the foil-shaft holder plate, turning the head lever to TAG 9 Head Pressure The Pro printer is capable of adjusting the pressure applied by the printhead on the ribbon. We recommend using the highest head pressure setting for best results There are 2 adjustments for head pressure 1) The Green Lever on the side of the print head has 2 pressure settings, “Label” for low pressure and “Tag” for high pressure. We recommend setting the printer to “Tag” 2) The 2 small black levers located just above the printhead at the front of the printer allow fine adjustment of the head pressure. Moving the levers from left to right increases the head pressure. We recommend setting both levers to the right. Foil Spreaders Print defects are often encountered when printing with a single ribbon that is significantly smaller than the foil The defects are usually lines or arcs on the printed ribbon The printer is equipped with a foil spreader located on the metal bar at the front of the printer, just above the printhead. Sliding the spreader in line with centre of the ribbon will eliminate any defects. When not required slide the spreader outside of the foil path 10 Installing the software The Ribbon Print software has been designed especially for ribbon printing and supports all Windows operating systems from XP up to and including Windows 8.1 Insert the software CD, it should start automatically. If necessary open the CD folder and double click the RibbonPrint V4 file. Follow the prompts to run the installation process. (The latest version is available at www.ribbonprint.com ) Click next at each of the installation steps There is no need to install or setup any windows drivers. Ribbon Print’s V4.1 software communicates directly with the printer allowing for a simpler experience and giving a greater level of control of the printer. 11 Activating your software Upon opening the software the user will be prompted to activate the software. Click “Retrieve Password” and enter your email address. Within minutes you will receive your password from [email protected]. If this is a trial version you will be able to run the software for the next 7 days without entering a password. The trial version, has a 10 second delay to print that is not present in the activated version. The software permits up to 3 licenced installs. A separate activation will be created for each installation. If you uninstall the software from a machine , you can reinstall it on the same machine without it counting to your 3 machine limit. The computer must be connected to the internet for the activation process to work. Please contact ribbonprint if you have upgraded your PC and require a limit increase. 12 Test Print From the HOME Tab menu select New Ribbon Set the dimensions of your project. Type in the width of the Ribbon you installed earlier , and select a length, 10cm is a good start. Now Click the TEXT Tab and click “Text”, type a short message and click “Ok” Click on the Corners to adjust the size of the box Now drag a Clipart image from the lower screen into the design space. You can adjust the size just like you did with Text. You are now ready to print, click the Print Tab. Make sure the printer selected is the Toshiba B-EX4T1, then select a heat setting of Semi-Resin 2 / +6 and select 1 copy, then click “Print” The printer green light will start flashing but may take a couple of seconds to start printing. If you have any issues printing, please check through the instructions again and read the hints and tips section. 13 Medal Print The Medal Print system allows you to create personalised labels with your ribbon printer The labels can be used for a wide range of applications. Rosette Centres Medallions Trophy Plinths Wedding Favours Glassware Sealing Presents The medal print system is very easy to use, it can create up to 100 labels per minute. Labels material Clear Metallised Silver or Gold Gloss Colour There are currently 12 different label shapes, see the website for the full list Medal Print Foils are available in black for the Pro Printer Medal print differs to ribbon printing is a couple of ways: 1) Only use a Medal Print transfer foil with Medal Print labels 2) When you change label, retrain the printer to the label by holding the feed button while turning the printer on, until the label feeds starts. 3) Use the X & Y offset commands to centre the label 4) Set zoom to 100% For more advice about Medal Print or for help with printing, fell free to contact ribbon print. 14 Design Panel The Design Panel is where projects are created, the toolbars and clipart contain the functions and images that help create the project. Rulers Vertical and horizontal rulers located on the side of the Design Panel allow you to fine tune the placement of your design. Units Use the “Unit” dropdown to change the ruler units between Metric and Imperial. 15 Ribbon Width Adjust ribbon width in the toolbar by either selecting the up/down arrows or by entering the desired width. The width can be set to any value between 5mm and 100mm (in 1mm increments) or 0.19 inch and 3.94 inches. Ribbon Length Adjust ribbon length in the toolbar by either selecting the up/down arrows or entering the desired length. Alternatively drag the length Indicator (red dotted line) across the Design Panel. The ribbon length can be set to any value between 0cm and 99.99cm. Zoom Drag the slider to the right to zoom in and to the left to zoom out. Minimising the toolbars Click the arrow on the far right of the ribbon bar to minimise and maximise the ribbon bar. 16 Home Toolbar New Ribbon Click “New Ribbon” to start a new ribbon design, select the appropriate width and lengths of your project New Medal Print Project Select “New Medal” to start a new Medal Print project. Select the template that matches your material. The Designer now shows a medal print template. In the image to the right, the red circle represents the size of the medal print label. Opening a Saved Project The software will prompt the user to find the existing Ribbon Project that they want to open. Note that the default folder displayed in the open dialog will be the users “My Ribbon Projects‟ folder. V4 software can open any design file saved from V4, V1 and V2. However V3 files are not supported. 17 Opening Templates The master templates include example ribbon and medal print designs. The templates are a quick way to create your design while also giving inspiration for the different effects available. Saving a Project (CTRL+S) Saving a project works the same as any office program. We recommend saving your projects in the “My Documents/My Ribbon Projects” folder. Display / Reset Clipart Window To reactivate the clipart window after it has been closed, press the “display clipart window” button. “Reset Clipart Window” sets the design and clipart windows to their default settings. Manuals Click on the manuals to download the latest manual Check for Updates From time to time we release new versions of the software, clicking “check for updates” will download the latest version of the software. Important versions 4.1.0.5 & 4.1.10 of the software were major updates. The update software button will not update to these versions, you need to download and install the latest version of the software from www.ribbonprint.com . 18 Common Design Functions The Text, Image, Merge Text and Object toolbars are used create and adjust your design. Commonly used functions are repeated on each of the toolbars. Text To create a new text box, click “Text” on the far left of any of the Text, Image, Merge Text or Object toolbars. An existing text box can be edited by double clicking or right clicking the text box and selecting “edit text properties”. To create multiple lines of text, create additional rows by pressing enter after each line of text. Select left, centre or right to align the rows of text within the text box . Text alignment only selectable when multiple rows of text have been created. is 19 Merge Text To create a new merge text box, click “Merge Text” on the far left of any of the Text, Image, Merge Text or Object toolbars. The Merge text function works similar to a mail merge. A list of names is combined with a ribbon project so that each print of the project will print a design with a different name. Type or copy/paste a list of names into the text panel, with new row for each name. a With each print the text will resize dependent on the length the name. For example Jim Jones will print in a larger font than Elizabeth Montgomery of Before entering names into the merge text box, run a test with text in only the first row. Otherwise you will print for every line of text. Ensure the list of names has been checked for spelling mistakes. Names can be copied from any email, spreadsheet or word document. The Merge Text functions work in the same way as the standard text functions with the exception of the Skew, Curve and Maintain Aspect functions. Merge text items can be split over multiple lines by adding the ` character between text. 20 Image Images can be added to the design panel by either dragging an image from the Clipart window into the Design Panel, or clicking “Image” on the far left of any of the Text, Image, Merge Text or Object toolbars. Clicking image brings up the import image window. This will convert your picture into black and white for use with the software. The original is displayed on the left, the Import Preview displays what the image will look like once imported. Adjust the three sliders to pro- duce the best black and white image. Invert the image by selecting the Invert Image box . For images that you will use more than once, “import” the image into the MyClipart folder instead, this will save the image for future projects. Imported images should be at least 300 dpi to achieve best quality results. Most image types are supported with the exception of vector files (Corel Draw and Adobe Illustrator). 21 Imported images will be saved in the “My Ribbon Clipart” folder. Please do not save your images directly in the clipart folder as this has the potential to corrupt the software and cause you problems. Clip art The software’s Clipart can be accessed using the Clipart window. Drag and drop an image from the clipart windows to use in the design panel. The software comes with a large range of standard clipart installed. The “Import” function converts and adds images to your “My Clipart” folder. Click on “New Folder” to add sub-folders the “my Clipart” folder. The images are saved by default to My Documents / My Ribbon Clipart. NB. Do not copy an image directly into the clipart folder via your desktop, as this may produce poor printing results or slow the software Copy/Paste The copy / paste commands allow you to quickly duplicate an item. Ctrl + C -Copies a selected object Ctrl + V - Paste the object (top left of design panel) 22 Undo/Redo The redo / undo commands allow you to undo your previous changes Ctrl + Z- Undoes the last action. Ctrl + R– Reapplies the last action Maintain Aspect / Fit to Box Select “Fit to Box” to allow the object to stretch in any direction or “Maintain aspect” to preserve the object’s default proportions. “Maintain Aspect” is selected by default. 23 Scaling Position The scaling position is used to align an item inside it’s object box Selecting the left position, moves the item to the left end of the object box Selecting the right position, moves the item to the right end of the object box Rotate Rotate an object by increasing or decreasing the rotation angle using the up & down arrows. Alternatively rotate 90 degrees by clicking the “rotate clockwise or anti clockwise” buttons. Pressing the “<“ and “>“ will rotate an object 15 degrees, holding the Ctrl as well will rotate 5 degrees 24 Flip Invert or Reverse an object with the Flip function. Transparent The transparent function allows objects to be overlapped. When an object is made transparent, any objects layered behind the transparent image will become visible in both the design window and the printed design. Nudge The nudge function allows you to fine tune object positions, 0.2mm per click in the same way as using the keyboard’s W,S,A & Z keys or the 2,4,6,8 numeric keys. Shift+nudge = micro nudge (0.1 mm) & Alt+nudge = macro nudge (1mm) 25 Text Toolbar In additional to the common design functions, the text toolbar contains the following text related functions: Skew The skew function allows text to be angled in any direction. Select the desired angle by selecting a point on the circles’ edge Alternative click the arrow buttons to rotate the skew by 45 degree. The 3rd button resets the text to horizontal. (For best results use a monospace font for skewed and vertical text.) Curve Use the slider to curve the text either up or down. Curve text is only active with a single row of text. Text & Font Select a font type and style in the font pane. The fonts shown are those currently installed on your computer. There is no limit to the amount of fonts you can use. Simply download and install any true type font file. Line & Letter Spacing Line spacing sets the gap between multiple rows of text in a text box Letter spacing set the kerning or space between letters in a text box 26 Object toolbar In addition to the common design functions, the object toolbar allows objects to be arranged on the design window. Moving Objects Objects can be moved around the design panel by either dragging with the mouse, the nudge buttons or using the number pad (↑8,↓2,←4,→6, ↖7,↗9,↘3 &↙1) alternatively (↑W,↓Z,←A,→S) can be used on a laptop without a number pad. NB. Please ensure you press the NUMLOCK as the movement functions are linked to the number keys not the arrow keys. Resizing Objects Resize an object by moving the cursor over an edge or corner of the text box until you have a double-headed arrow. Click and drag to increase or decrease the object size. Objects maintain their aspect by default. When you click on “Fit to Box”, dragging an edge or corner will stretch the object in that direction. Increased font size is achieved by resizing the text box. Group Objects Drag a box around several objects to group them, once grouped all objects can be moved together by dragging with the mouse or using the nudge buttons. Clicking on an object while holding Ctrl will add it to the group, clicking on a grouped item with Ctrl will remove it from the group. The select all command will select every item in the design panel 27 Aligning Grouped Objects Select a group of objects. Hover over the object that you want to align the remaining objects to and right click. Select the alignment function required: Design Panel Position Align an object within the Design Panel by selecting an alignment option, this is only for single objects Object Order Move overlapped objects forwards and backwards using the control box. This option can be used in conjunction with the “transparent “ function to allow overlapping images to print. 28 Borders The border tab allows you to add a border around your design. 1)Select which border(s) you wish to add 2)Adjust the offset (gap from the edge of the design) 3)Determine the border width 4)Select the border style 29 Medal Rim For circular templates you can add text to the rim of the design. 1) 2) 3) 4) 5) Enter the text you want to show on the rim of the medal. Rotate the text to your requirements The Outer Circle Diameter sets how close to the edge of the label the text will be printed. The Inner Circle Diameter sets how far from the edge of the label the text will start. Use this function to increase the size of the text Adjust the letter spacing to open the gap between each letter. There are 2 medal rim text boxes 1) Text in the 1st text box will be right way up when it is located at the top of the circle 2) Conversely, text in the 2nd text box will be right way up when it is located at the bottom of the circle 30 Print Toolbar Export to PDF Select “Export to PDF” to save a copy of your design as a PDF. The PDF will show the same image as the print preview. The file can be emailed to customers for their approval before starting a print job. Print Preview Select Print Preview and press “OK” on any printer selected. The design to be printed is shown inside the red box Do not use the Print button to send your design to the ribbon printer. Printing from Print Preview is only for printing the image to a standard A4 printer. Print When you are ready to print click the “Print” button. Any settings you change will be remembered for the next print even if you close the program. Port Select the appropriate USB port. Usually USB 1 31 Printer Shows the Printer model connected, only adjust this if you have multiple printers connected. It should show B-EX4T1 Speed For most printing, use full speed (14 IPS), sometimes slowing down the print will improve the print quality of metallic foils Adapter The Pro Printer is available with several multi-adaptors. Using an adapter: 1. Create your design as normal selecting the appropriate ribbon width 2. Install the adapter and load the ribbon (s) 3. Select the adapter you are using in the dropdown 4. Select in the adapter configuration which of the adapter slots have been loaded with a ribbon 5. Press Print, your design will be replicated on each of the ribbon 6. If the print is not aligned, adjust the adapter settings to get perfect alignment 32 Multi adaptor printing The multi-adapters allow printing on narrow or multiple ribbons at the same time. There are 7 multi-adapters for the Pro printer, they are suitable for 7mm, 10mm, 15mm and 25mm, 38mm, 45mm & 48mm respectively Open the green ribbon guides to the widest position and insert the multiadapter. Tighten the brass screw until the adaptor is firmly in place. The ribbon adapter configuration allows the fine tuning of the placement of multiple ribbons The default offset and width settings will usually print perfectly. However if required the settings can be fine tuned. The offset is the gap between ribbons, while the groove width reflects the width of ribbon slots in the multi-adapter. The 1st offset adjusts the location of the left most ribbon, the 2nd offset adjusts the location of the 2nd ribbon from the left, while the last offset adjusts the location of the right most ribbon. When making adjustments always start from the left most ribbon 33 Energy Setting Set the appropriate heat setting for your ribbon / foil combination. As per the temperature guide table If the print is incomplete or faint, select the next highest energy level ie Semi Resin 2 Slowing the print speed may also improve print quality However if the heat setting is too high, the foil will stick to the ribbon and tear. Print Density/Darkness You can fine tune the Print Density by going + or— in the density settings Sash Feed This setting allows the printing of multiple sashes (up to 2 metres long) without the need lift the print-head between each print. Number of Copies Select the number prints required from 1 to 9999 NB. When using the Merge Text option this will multiply the total project. ie if you entered 10 different names it will print 100 designs. Gap after Design Enter the required gap before the next design starts printing. Note the printer will always include a 2mm between prints even if you select a gap lower than 2mm. 34 Offset The offset function allows the printed design to be fine tuned with the location of the ribbon. Increasing the “X” offset will move the design to the right, reducing it ill move the design to the left. The “Y” offset adjusts where a medal print design will start. Increasing the “Y” offset move the design closer to the top of the label. Information Includes the length of the project, this is the total job length including any gaps between copies. Also includes warnings if the design is larger than the print area Cancel Cancels the print and returns to the design panel Pausing the print To pause a print while printing, press the pause button for a second and then release. NB. Avoid switching the printer off during printing as this may damage the printer. Printer Reset If the printer becomes unresponsive, you can reset the printer by holding the “menu” button, select “reset” and press then “enter” button. 35 Temperature Guide Each print is affected by the individual printer, the room temperature, the transfer foil (type, batch and age) and ribbon (type and batch). The guide below suggests an appropriate temperature for each combination of foil and ribbon. We recommend you test each ribbon when you load it as even our supplies can vary slight The Print Density setting allows for fine tuning of the energy setting, select between –20 and +10 for each Energy Setting Media Ribbon Ribbon Ribbon Labels Foil Jet Black Solid Colours Metallic MP Black Heat SR2 –10 SR2-6 SR2+1 R1+0 36 Speed 14IPS 14IPS 14IPS 10IPS Head Tag R+R Tag R+R Tag R+R Tag R+R Ribbon Types Supported Ribbon Print stocks 3 makes of ribbon that have been designed to work with the Ribbon Print system. Polyester—Slit edged ribbon Elan SFS— A premium woven edged Single Faced Satin designed by Ribbon Print ELAN DFS— A premium woven edge Double Faced Satin designed by Ribbon Print The Density of Ribbon impacts the quality of print, as such please only use ribbon print ribbon to ensure a consistent high quality of print Acetate, Organza and Grosgrain ribbon will not print in this type of printer. Other Media Types The Ribbon Print system can also print a range of labels, Medal Print designed by Ribbon Print are pre-cut labels that can be printed at high speed (100 per minute), while Crystal Label and Iron On material can be used to create labels to any size. 37 FAQS Cleaning Clean your print head and front roller weekly with a Ribbon Print cleaning pen to deliver the best results Optimal Room Temperature The temperature of the room that the printer operates in will affect the print quality. A comfortable room temperature will give the best print although the printer can technically operate between 4C & 38C. Low temperatures in particular will generate patchy results, high temperatures can make the foil “stickier”. Turn your machine off when not in use Turn off your machine when not in use to increase the lifetime of your print head. Difficulty Printing Please visit the FAQS & DOWNLOADS section of the ribbon print website for a full list of potential print problems and their solutions. 38 Contact Us Phone (9am to 5pm UK time) +44 (0) 203 397 4117 Email [email protected] Website www.ribbonprint.com Warranty Ribbon Print offers a 12 month Warranty covering manufacturing faults or defects. This warranty does not include any damage to the printer caused by miss-use. Printer consumables are not covered under warranty i.e. Print Head. 39 Move Commands File Commands Ctrl + P Print Ctrl + N New Ribbon Ctrl + M New Medal Print Ctrl + O Ctrl + S A or 4 Move left W or 2 Move up S or 6 Move right Z or 8 Move down Alt+ Macro Move Shift+ Micro Move Object Commands Open Saved Project <,> Save Project Text Commands Ctrl + <, > Rotate 15 degrees Rotate 5 degrees Ctrl + A Select All Ctrl + B Bold Font Ctrl + L Align objects to left Ctrl + I Italic Font Ctrl + R Align objects to right Ctrl + U Underline Ctrl + T Align object to top L Left justify Ctrl + G R Right justify Align object to bottom C Centre justify Ctrl + F Flip Object Horizontal Function Commands Ctrl + C Copy Ctrl + V Paste Del Delete Ctrl + Z Undo Ctrl + R Redo \ / ¦ 40 Move object above other objects Move object behind other objects Maintain Aspect / Fit to Box