1
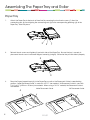
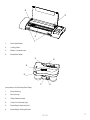
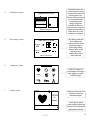
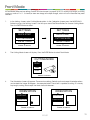
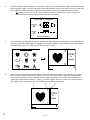
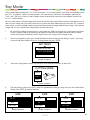
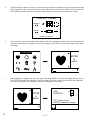
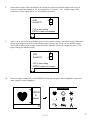
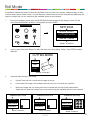
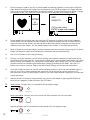
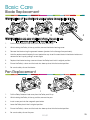
User Manual
Contents
Safety Information………………………....….2
Package Contents …………………..............
3
Assembling the Paper Tray & Roller…..........
4-5
Powering Your eCraft..................……............5
Getting Started…………………………....…....
6 - 22
Your eCraft............................................
6-7
Inserting the SD Card...........................
8
LCD Display Screen...............................
8 - 10
Detailed Button Diagram…………........
10
Modes ………………….…......................
11 - 22
Front Mode………………….….…..
11 - 14
Tray Mode………………..…...........
15 - 18
Roll Mode.........................….........
19 - 22
Functions…………………...….........................
23 - 24
Shadow..................................................
23
Tab Settings……………………....…........23
Blade Depth Settings............................
24
Kiss-Cut..................................................
24
Multi-Cut................................................24
Other Functions.....................................
24
Basic Care…………………………..…..............
25 - 26
Blade Replacement……………….........
25
Pen Replacement………………….........
25
Cutting Plate Replacement…….....…..
26
Cleaning Your eCraft....………….....…..
26
FAQs………………………….…………..............27
Troubleshooting………………………..............27
Limited Warranty.............................................
28
License Agreement........................................
29
Image Card Previews.....................................
30 - 32
Be sure to check out craftwellusa.com for video tutorials,
products, and more!
R.1.02
1
Safety Information
To reduce the risk of injury, read the following section
carefully for important safety information.
1.
Do not place fingers or other objects in the eCraft Electronic Cutter while it is connected to an electrical outlet, switched on, or during cutting.
2.
The eCraft contains small components; keep away from children to avoid choking hazard.
3.
Keep the eCraft away from water and other liquids.
4.
When connecting to a power supply, use a grounded outlet. If you do not know whether the outlet is grounded, check with a qualified electrician.
5.
Be aware of the power adapter cable to avoid tripping.
6.
Handle with care when moving or transporting to avoid damaging or disabling the eCraft.
7.
Be sure to unplug the eCraft before attempting to replace the blade or pen. Refer to the ‘Basic Care’ section of the manual for blade and pen replacement instructions and additional safety information.
8.
Do not leave the blades unattended. Be sure to handle blades properly and with care.
9.
Keep the eCraft in sight while in use.
10.
If you experience any abnormality with device function, power off, and unplug it immediately.
11.
To avoid injury, do not attempt to disassemble the eCraft.
12.
Turn off and unplug the eCraft before cleaning.
Warning
1.
Only use SD cards made for the eCraft. Any other non-Craftwell SD cards will not work and may
damage the eCraft/SD Card.
2.
Tampering (attempting to add or remove files) with any SD Card may result in loss of files or
damage.
3.
Use only Craftwell or authorized software with your eCraft. Any other unauthorized software will void your
warranty and may damage the eCraft.
4. Use only the power adapter provided with the eCraft. Non-Craftwell power adapters may disable or
damage the eCraft.
2
R.1.02
Setting Up Your eCraft
Package Contents
eCraft Electronic Cutting Machine
Paper Guide
Paper Tray
c
b
a
Paper Support Insert
d
Storage Compartment
a. Grooved Tweezers
b. (4) Blades (Fifth Blade Pre-loaded In Trolley)
c. SD Card-Fundamentals 1
d. (1) Black Pen (Second Pen Pre-loaded In Trolley)
(2) Roller End Caps
1
L S
T A
E N
A M
N D
F U
Roller
Power Adapter
(2) Roller Support Stands
R.1.02
User Manual & Fundamentals 1 Brochure
3
Assembling The Paper Tray and Roller
Paper Tray
1. Attach the Paper Tray to the back of the eCraft by removing the two thumb screws (1) from the
connecting rods (2) and aligning the connecting rods (2) to the corresponding openings (3) of the Paper Tray. Slide into place.
3
2. 2
1
Reinsert thumb screws and tighten (3) on both sides of the Paper Tray. Be sure the tray is securely in
place and thumb screws have been aligned correctly (straight). Otherwise they will not attach properly.
3
3
3.
Place the Paper Support Insert (4) in the Paper Tray as well as the Placement Guide in coordinating
position. ‘Letter Placement Guide’ is used with 8.5”x11” size material. ‘A4 Placement Guide’ is used with 11.69” x 8.27” (297mm x 210mm) size material. When using a 12”x12” material, the Placement Guide is not needed.
A4 Placement Guide
Letter Placement Guide
4
4
R.1.02
Roller Attachment
1. Assemble the Paper Tray as previously shown.
2.
Insert the Roller Support Stands (1) into the openings on the right and left sides of the Paper Tray. The indentation of the stands should face inward.
3. There are two options for the Roller –
a. For smaller rolls, put the Roller on the Roller Support Stands.
b. For larger rolls, press the Roller End Caps within each side of your paper/vinyl roll and slide
the Roller through the opening within the center of the Roller End Caps. Place the roll on the grooves located on the top of the Roller Support Stand (1).
1
1
Powering Your eCraft
Using the Power Cord
1. Connect the Power Adapter to the power supply (1).
2.
Connect the power cord to the eCraft as indicated below (2).
3. Connect the power cord to a grounded power outlet (3).
1
3
2
R.1.02
5
Getting Started
Your eCraft
10
7
3
9
1
11
2
6
5
1.
Power Plug Port
2. SD Card Slot
3.
LCD Display Screen
4.
ON/OFF Button
5.
RESET Button
6.
MODE/BACK Button
7.
Cut Arrow Buttons
8.
Enter Arrow Buttons
9. Storage Compartment
10. Security Slot
11. USB Port
12.
Scrap Removal Access Panel
6
4
8
12
R.1.02
4
3
2
1
1.
Front Feed Rollers
2.
Cutting Plate
3.
Battery Compartment
4.
Blade/Pen Trolley
4
6
5
3
1
2
Components of the Blade/Pen Trolley
1.
Blade Housing
2.
Pen Housing
3.
Trolley Release Knob
4.
Clear-Cut Indicator Light
5.
Blade Depth Selection Dial
6.
Blade Depth Setting Window
R.1.02
7
Inserting the SD card
1.
Insert the SD Card (1) with the label facing up before powering on your eCraft. You must insert the
SD Card before turning on the eCraft. If you turn the eCraft on before inserting an SD Card, power off and insert the SD Card before powering back on. The SD Card is stored in the
Storage Compartment (2) located on the back of the eCraft.
2
1
LCD Display Screen
1.
eCraft Welcome Screen
COME!
L
E
W
V 2.00
2.
Settings Screen
(Mode Selection/Tab Setting)
SETTINGS
QUICK START
CUTTING MODE
TAB SETTINGS
“ENTER” TO SELECT
3. Cutting Mode Screen
CUTTING MODE
FRONT
TRAY
ROLL
“ENTER” TO SELECT
8
R.1.02
Selecting Quick Start
defaults to the most
recently selected Cutting
Mode setting and Tab
setting. For new eCrafts,
the default setting is
Front Mode with a low
number of tabs and the
smallest size of tabs.
Cutting Mode specifies
how to feed paper into
the eCraft. ‘Front’
indicates user-fed paper
from the front of the
eCraft, ‘Tray’ indicates
automatic tray-fed paper
from the back of the
eCraft, and ‘Roll’ indicates
automatic roller-fed
paper from the Roller
Accessory.
4.
Orientation Screen
ORIENTATION
PORTRAIT
LANDSCAPE
MAXIMIZE
“ENTER” TO SELECT
5.
Tab Settings Screen
TAB SETTINGS
AMOUNT
WIDTH
“ENTER” TO SELECT
6.
Orientation allows the
user to rotate an image
or adjust the position of
the image to be cut.
‘Portrait’ positions images
on a horizontal plane,
‘Landscape’ rotates
images 90 degrees
vertically for banners,
and ‘Maximize’ positions
images automatically to
utilize the most space
available on the paper.
Tab Settings allow the
user to adjust the
number and size of tabs
that keep images in
place while cutting.
‘Amount’ refers to the
number of tabs.
‘Width’ refers to the
size of each tab.
CATEGORIES
Categories Screen
Each SD Card has up
to 9 categories of images.
Each category contains
multiple images.
7.
Images Screen
SHAPES
001
ENTER
to
select
Scroll up or down to view
all images within the
selected category.
Scroll right or left to
select images within the
queue. Press enter to edit
highlighted selection.
R.1.02
9
8.
Edit Image Screen
Size lets you select the
size of the image in
inches.
SIZE
QUANTITY
MULTI-CUT
3
1
1
Quantity lets you select
the number of images
that will be cut.
Multi-Cut lets you cut a
single image multiple
times in the same place.
Thicker materials may
require multiple cuts to
cut cleanly through.
CUT to start cutting
ENTER to add more images
Size, Quantity, and Multi-Cut
only refers to the highlighted
image in the Queue.
*Front Mode ‘Edit Image Screen’ shown.
In Tray and Roll Modes, Multi-Cut is not an option because thick materials must be fed in the front of the eCraft.
Detailed Button Diagram
5
4
3
1
1.
ON/OFF: The ON/OFF Button turns the eCraft on2and off. Press the button once to turn the eCraft on. Press again to turn the eCraft off.
2.
RESET: The RESET Button restarts the eCraft, clears the display, and then returns to the Settings Screen.
3.
MODE/BACK: The MODE/BACK Button accesses the Settings Screen or returns to the previous screen.
4.
Cut Arrow Buttons: Cut Arrow Buttons allow you to position the Trolley. Press the CUT Button to cut/draw your selection. In Front Mode, use the left and right Cut Arrow Buttons to move the position of the Trolley. Use the up and down Cut Arrow Buttons to feed the material in or out of the eCraft and position where the eCraft will start cutting. Pressing the CUT button during an active cutting process will pause the cut,
allowing you to adjust the Blade Depth Setting on the Trolley. Press and hold the CUT Button for 3 seconds to cut a ‘shadow’ of the selected image. Refer to the ‘Shadow’ section for more information.
5.
Enter Arrow Buttons: Enter Arrow Buttons allow you to navigate through your selections on your LCD Screen. The ENTER Button chooses selections.
10
R.1.02
Front Mode
In Front Mode there are two settings, Portrait and Landscape. Use paper up to 12” wide by any length, including
scraps as small as 2” x 3”. Cut and/or draw one image or multiple images, which will cut in the order they were
selected.
1.
2.
In the Settings Screen, select Cutting Mode option. In the Categories Screen, press the MODE/BACK Button to access the Settings Screen. Use the up or down Enter Arrow Buttons to choose Cutting Mode. Press the ENTER Button to select.
SETTINGS
SETTINGS
QUICK START
QUICK START
CUTTING MODE
CUTTING MODE
TAB SETTINGS
TAB SETTINGS
“ENTER” TO SELECT
“ENTER” TO SELECT
The Cutting Mode Screen will display. Press the ENTER Button to select Front Mode.
CUTTING MODE
FRONT
TRAY
ROLL
“ENTER” TO SELECT
3.
The Orientation Screen will appear. There are two settings, Portrait and Landscape. Orientation allows you to rotate the image 90 degrees. See example below. The eCraft is capable of cutting 12” wide by any length, making ‘Landscape’ the ideal choice for banners.
ORIENTATION
ORIENTATION
PORTRAIT
PORTRAIT
LANDSCAPE
LANDSCAPE
“ENTER” TO SELECT
“ENTER” TO SELECT
R.1.02
11
4.
The Tab Settings Screen will display. Use the left or right Enter Arrow Buttons to adjust the number of tabs to be used per image. Use the up or down Enter Arrow Buttons to adjust the width of the individual tab. Press ENTER to confirm selections. Refer to the Tab Settings section for more information on tabs.
TIP - If performing a Kiss-Cut, or using a stabilizer with thin material, set the tab amount to 0.
Refer to the Blade Depth Setting section for more information
TAB SETTINGS
AMOUNT
WIDTH
“ENTER” TO SELECT
5. Once selected, you will automatically be entered into the Categories Screen to view the categories. Use
the left or right Enter Arrow Buttons to highlight the desired category. Press ENTER to select the category you would like to view. This will bring you to the Images Screen.
SHAPES
CATEGORIES
001
ENTER
to
select
6.
Press the up and down Enter Arrow Buttons to view the individual images in the category you select.
While you are viewing the individual images, you will see the name of the category in the upper left
corner of the screen (1) and the number of the image (for reference in the brochure) located in the upper right corner of the screen (2). There is a vertical progress bar (3) to show you where you are in the category that you are viewing. Press ENTER to select the desired image.
1
SHAPES
2
3
001
ENTER
to
select
12
R.1.02
7.
Use the left and right Enter Arrow Buttons to change the size of the selected image. While using SD Cards, the image size changes in 1/2” increments from 1/2” up to 11 1/2”. Certain images have a minimum size set higher than a 1/2” to maximize cut quality. While using eCraftshop Pro Software,
image size can range from 1/16” up to 11 3/4”, adjusting in any increment desired.
SIZE
QUANTITY
MULTI-CUT
3
1
1
CUT to start cutting
ENTER to add more images
8.
Use the up or down Enter Arrow Buttons to access the quantity settings. Use the left or right Enter Arrow Buttons to change the quantity to the desired number of times you wish to cut the selected image.
SIZE
QUANTITY
MULTI-CUT
3
1
1
CUT to start cutting
ENTER to add more images
9.
Use the up or down Enter Arrow Buttons to access the Multi-Cut settings. Use the left or right
Enter Arrow Buttons to change the number of Multi-Cuts. Refer to the Blade Depth Settings section for more information.
SIZE
QUANTITY
MULTI-CUT
3
1
1
CUT to start cutting
ENTER to add more images
R.1.02
13
10.
From the Images Screen, If you wish to edit or delete a confirmed selection, use the right or left Enter
Arrow Buttons to highlight the image listed in the Queue. Press ENTER to confirm this image selection.
Use the up or down Enter Arrow Buttons to highlight quantity. Using the left Enter Arrow Button, change
the quantity to zero. Press ENTER to confirm, and you will be returned to the Images Screen.
11.
The previous screen (Images Screen) will now display. This allows you to choose other images in the same category; you can also choose images in other categories by pressing the MODE/BACK button. This will return you to the Categories Screen.
4 Inches Tall
4 Inches Tall
12.
Feeding Material to be cut - Press the up and down Cut Arrow Buttons to position the material (1),
feeding through the Front Rollers. Next position the cut - align the blade (2) to the bottom left of where
you would like the image to be cut. When drawing, align the pen (3) to the bottom left of where you
would like the image to be drawn. Positioning the material and Trolley determines where your cutting/
drawing begins. The eCraft begins to cut at the bottom left of the image. For example (4), a four inch
images requires four inches of available space to the right of the Trolley as well as to the back of the
Trolley.
Correct Trolley Placement
Incorrect Trolley Placement
x
x
4 Inches Wide
1
2
4
3
Trolley Placement
Trolley Placement
13. After you have confirmed all selections, press CUT.
14.
During a cut, if your intention is to cut cleanly through your paper or material, be sure to look for the blue Clear-Cut Indicator Light. If you notice the blue light is not illuminated, the blade is not cutting entirely through the material. This may require a higher blade depth setting. Press the CUT button to
pause the eCraft, and increase your blade depth setting located on the Trolley. Press the CUT button again to continue. Refer to the Blade Depth Setting section for more information.
15.
Once the image has been cut, you will notice the Trolley positions itself in the next available space. If you wish to cut your current selection one more time, wait for the process to end and press CUT. Your selections will be cut/drawn again. Otherwise, you can choose another image (this will clear your current selection).
16.
After the eCraft has finished cutting/drawing, you can trim your paper by pressing MODE/BACK to return to the Categories Screen and press the CUT button.
TIP Portrait Mode - All layers are cut in proportion to the original image.
Landscape Mode - All layers are cut at actual size when selected
and cut individually. However, all layers are cut in proportion when selected with the
original image. 14
4 Inches Wide
Example:
Original Image
Corresponding Layer
Original Image
Corresponding Layer
Original Image
Corresponding Layer
Example:
Example:
Font - Some lower case font, numbers, or symbols may display an asterisk on the LCD Screen. The
asterisk indicates the image will be cut in proportion to an upper case letter chosen at that size. Example: All images cut at 1” without the asterisk indicator- Example: All images cut at 1” with the asterisk indicator-
R.1.02
August
Tray Mode
In Tray mode, there are three sizes, 12 x 12, A4, and Letter. ‘12 x 12’ automatically ‘maximizes’ the available space
on a 12” x 12” (305mm x 305mm) sheet of paper. ‘A4’ automatically maximizes the available space on an
11.69” x 8.27” (297mm x 210mm) sheet of paper. ‘Letter’ automatically maximizes the available space on an
8.5” x 11” sheet of paper.
You can select one or multiple images and the eCraft will feed your material from the tray and begin the cut. It
does so in the image sizes you have chosen, but in a particular order determined by the eCraft. This is done to
make the best use of available material, maximizing the number of images able to fit on a page. The order the
images are cut out is determined automatically to maximize space.
1.
Be sure that the Paper Support Insert is in the Paper Tray. When using letter or A4 sized paper, the Paper Guide is needed. Refer to ‘Assembling the Paper Tray and Roller” for proper placement for the Paper Guide. Insert paper horizontally into the Paper Tray so it fits snugly with the Paper Guide.
2.
From the Categories Screen, press the MODE/BACK button to return to the Settings Screen. Use the up or down Enter Arrow Buttons to access Cutting Mode and press ENTER.
SETTINGS
QUICK START
CUTTING MODE
TAB SETTINGS
“ENTER” TO SELECT
3.
From the Cutting Mode Screen, use the up or down Enter Arrow Buttons to select Tray.
CUTTING MODE
FRONT
TRAY
ROLL
“ENTER” TO SELECT
4.
The Size Settings Screen will display. Select the appropriate setting by using the up or down Enter Arrow Buttons. Press ENTER to confirm selection.
SIZE
SIZE
SIZE
12*12
12*12
12*12
A4
A4
A4
LETTER
LETTER
LETTER
“ENTER” TO SELECT
“ENTER” TO SELECT
R.1.02
“ENTER” TO SELECT
15
5.
The Tab Settings Screen will display. Use the left or right Enter Arrow Buttons to adjust the number of tabs to be used per image. Use the up or down Enter Arrow Buttons to adjust the width of the individual tab. Press ENTER to confirm selections. Refer to the Tab Settings section for more information on tabs.
TAB SETTINGS
AMOUNT
WIDTH
“ENTER” TO SELECT
6. Once selected, you will automatically be entered into the Categories Screen to view the categories. Use
the Enter Arrow Buttons to highlight the desired category. Press ENTER to select the category you would like to view.
SHAPES
CATEGORIES
001
ENTER
to
select
7.
After choosing a category, use the up or down Enter Arrow Buttons to select the image you want to cut. Press ENTER to confirm your selection. The Edit Image Screen will display. You will notice your selection has been highlighted in the Queue, located at the bottom of the screen.
SHAPES
001
SIZE
QUANTITY
ENTER
to
select
16
3
1
CUT to start cutting
ENTER to add more images
R.1.02
8.
Use the left and right Enter Arrow Buttons to change the size of the selected image. While using SD Cards, the image size changes in 1/2” increments from 1/2” up to 11 1/2”. Certain images have a minimum size set higher than a 1/2” to maximize cut quality.
SIZE
QUANTITY
3
1
CUT to start cutting
ENTER to add more images
9.
Use the up or down Enter Arrow Buttons to access the quantity settings. Use the left or right Enter Arrow
Buttons to change the quantity to the desired number of times you wish to cut the selected image. Press ENTER to return to the Images Screen for further selections within that category or press CUT to begin cutting the selected image.
SIZE
QUANTITY
3
1
CUT to start cutting
ENTER to add more images
10.
From the Images Screen, press the MODE/BACK button once to return to the Categories Screen and select images in other categories.
SHAPES
001
CATEGORIES
ENTER
to
select
R.1.02
17
11.
From the Images Screen, If you wish to edit or delete a confirmed selection, use the right or left Enter Arrow Buttons to highlight the image listed in the Queue. Press ENTER to confirm this image selection. Use the up or down Enter Arrow Buttons to highlight quantity. Using the left Enter Arrow Button, change
the quantity to zero. Press ENTER to confirm, and you will be returned to the Images Screen.
SHAPES
001
SIZE
QUANTITY
ENTER
to
select
3
0
CUT to start cutting
ENTER to add more images
12.
Press the CUT button to start cutting/drawing.
13.
During a cut, if your intention is to cut cleanly through your paper or material, be sure to look for the blue Clear-Cut Indicator Light (1). If you notice the blue light is not illuminated, the blade is not cutting entirely through the material. This may require a higher blade depth setting. Press the CUT button to pause the eCraft, and increase your blade depth setting (2) located on the Trolley. Press the CUT button once more to continue. Refer to the Blade Depth Settings section for more information.
1
2
14.
Once the image has been cut, you will notice the Trolley positions itself in the next available space. If you wish to cut your current selection one more time, wait for the process to end and press CUT. Your selections will be cut/drawn again. Otherwise, you can choose another image (this will clear your current selection).
15.
After the eCraft has finished cutting/drawing, you can trim your material by pressing MODE/BACK to return to the Categories Screen and press the CUT Button.
TIP ‘Tray Mode’ does not allow the orientation option of ‘Portrait’ or ‘Landscape’. Orientation is set at
‘Maximize’ automatically. In ‘Maximize’, images are cut starting from the immediate left, and the eCraft
automatically determines the order the images are cut out, maximizing the available space to save material.
18
R.1.02
Roll Mode
In Roll Mode, material will always be fed from the Roller Accessory. You can cut/draw multiple images, in order,
in either Landscape or Portrait mode. Choose Maximize mode to have the eCraft automatically determine the
order the images are cut out, maximizing the available space to save material.
1.
From the Categories Screen, press the MODE/BACK button to return to the Settings Screen. Use the down Enter Arrow Buttons to select Cutting Mode and press ENTER.
CATEGORIES
SETTINGS
QUICK START
CUTTING MODE
TAB SETTINGS
“ENTER” TO SELECT
2. Use the down Enter Arrow Buttons to select Roll from the Cutting Mode Screen. Press ENTER to confirm selection.
CUTTING MODE
FRONT
TRAY
ROLL
“ENTER” TO SELECT
3.
There are three settings in Roll Mode:
a.
Portrait: The eCraft will cut one row of images at a time.
b.
Landscape: The images will be rotated vertically and cut in the order you selected.
c.
Maximize: Images are cut starting from the immediate left, and the eCraft automatically
determines the order the images are cut out, maximizing the available space to save material.
ORIENTATION
ORIENTATION
ORIENTATION
PORTRAIT
PORTRAIT
PORTRAIT
LANDSCAPE
LANDSCAPE
LANDSCAPE
MAXIMIZE
MAXIMIZE
MAXIMIZE
“ENTER” TO SELECT
“ENTER” TO SELECT
R.1.02
“ENTER” TO SELECT
19
4.
The Tab Settings Screen will display after confirming Orientation. Use the left or right Enter Arrow Buttons
to adjust the number of tabs to be used per image. Use the up or down Enter Arrow Buttons to adjust the width of the individual tab. Press ENTER to confirm selections. Refer to the Tab Settings section for more information on tabs.
TAB SETTINGS
AMOUNT
WIDTH
“ENTER” TO SELECT
5.
Once selected, you will automatically be entered into the Categories Screen to view the categories. Use
the right or left or up or down Enter Arrow Buttons to highlight the desired category. Press ENTER to select
the category you would like to view.
CATEGORIES
6.
Press the up or down Enter Arrow Buttons to view the categories, highlighting the selection. Press ENTER to confirm and access the individual images within that category. The Images Screen will display.
7.
Press the up and down Enter Arrow Buttons to view the individual images in the category you select.
While you are viewing the individual images, you will see the name of the category in the upper left
corner of the screen (1) and the number of the image (for reference in the brochure) located in the upper right corner of the screen (2). There is a vertical progress bar (3) to show you where you are in the category that you are viewing. Press ENTER to select the desired image.
1
2
SHAPES
3
001
ENTER
to
select
20
R.1.02
8.
Use the left and right Enter Arrow Buttons to change the size of the selected image. While using SD Cards, the image size changes in 1/2” increments from 1/2” up to 11 1/2”. Certain images have a minimum size set higher than a 1/2” to maximize cut quality.
SIZE
QUANTITY
3
1
CUT to start cutting
ENTER to add more images
9.
Use the up or down Enter Arrow Buttons to access the quantity settings. Use the left or right Enter Arrow
Buttons to change the quantity to the desired number of times you wish to cut the selected image. Press ENTER to return to the Images Screen for further selections within that category or press CUT to begin cutting the selected image.
SIZE
QUANTITY
3
1
CUT to start cutting
ENTER to add more images
10.
From the Images Screen, press the MODE/BACK button once to return to the Categories Screen and select images in other categories. Use the right or left or up or down Enter Arrow Buttonss to navigate through the multiple categories. Press ENTER to access the highlighted category. Press ENTER to access the Images Screen.
SHAPES
001
CATEGORIES
ENTER
to
select
R.1.02
21
11.
From the Images Screen, If you wish to edit or delete a confirmed selection, use the right or left Enter Arrow Buttons to highlight the image listed in the Queue. Press ENTER to confirm this image selection. Use the up or down Enter Arrow Buttons to highlight quantity. Using the left Enter Arrow Button, change
the quantity to zero. Press ENTER to confirm, and you will be returned to the Images Screen.
SHAPES
001
SIZE
QUANTITY
ENTER
to
select
3
0
CUT to start cutting
ENTER to add more images
12.
13.
To feed paper from the Roller, press and hold the CUT button for 3 seconds while in the Categories
Screen. Make sure the edge of the rolled material has been positioned fully into the Paper Tray and
against the back of the eCraft. If you are not able to feed the material in properly, the edge of the material may not be straight. Trim the material edge into a shallow ‘V’ and feed into the eCraft.
14.
Press the CUT button to start cutting/drawing.
15.
During a cut, if your intention is to cut cleanly through your paper or material, be sure to look for the blue Clear-Cut Indicator Light (1). If you notice the blue light is not illuminated, the blade is not cutting entirely through the material. This may require a higher blade depth setting. Press the CUT button to pause the eCraft, and increase your blade depth setting (2) located on the Trolley. Press the CUT button once more to continue. Refer to the Blade Depth Settings section for more information.
16.
Once the image has been cut, you will notice the Trolley positions itself in the next available space. If you wish to cut your current selection one more time, wait for the process to end and press CUT. Your selections will be cut/drawn again. Otherwise, you can choose another image (this will clear your current selection).
17.
After the eCraft has finished cutting/drawing, you can trim your paper by pressing MODE/BACK to return to the Categories Screen and press the CUT Button.
TIP Portrait Mode - All layers are cut in proportion to the original image.
While in Portrait or Landscape Modes, position the blade and pen manually by pressing the Cut Arrow Buttons (in Maximize mode, the eCraft positions the blade and pen automatically).
Example:
Original Image
Corresponding Layer
Landscape Mode - All layers are cut at actual size when selected and cut individually. Example:
Original Image
Corresponding Layer
However, all layers are cut in proportion when selected with the original image. Example:
22
Original Image
Corresponding Layer
R.1.02
Functions
Shadow
The Shadow function cuts an image proportionately larger for placement behind the original image, creating
a Shadow effect.
Original Shape
Final Result, Layered
Shadow of Shape
(Original Shape placed on top of Shadow of Shape)
1.
When an image is selected, a shadow of that image can be cut by holding the CUT button.
The indicator “SHD” will appear on LCD Screen (1) while cutting to confirm Shadow has been selected.
SHAPES
001
ENTER
to
select
SHD
1
Tab Settings
In order to stabilize material without a mat, the eCraft leaves behind “tabs” which keep an image in place
during the cutting process. Once the cut is completed, the image is easily removed from the sheet of paper,
leaving a smooth, clean edge.
1.
To change the current Tab settings, press the MODE/BACK button to return to the Settings screen.
The Width (size of tabs) has a setting range of 1-3. Amount (number of tabs) has a setting range of 0-2. WIDTH
AMOUNT
2.
Select the Amount by pressing the left and right Enter Arrow Buttons. Use a higher Amount setting to
add more tabs to your image. In general, larger images, banners, very detailed images and images cut
from the software generally require a higher Amount tab setting.
3.
Select the Width by pressing the up and down Enter Arrow Buttons. Use a higher Width setting to
increase the size of the tabs. In general, the smaller the image, the smaller size Width tab required.
4.
Press ENTER to confirm.
Note: When performing a Kiss-Cut, or using a stabilizer, Tabs are NOT needed. Set Width and Denisty to 0.
R.1.02
23
Blade Depth Settings
When using materials of different thicknesses, you may need to adjust the Blade Depth of the blade. To adjust
the Blade Depth setting, turn the Blade Depth Selection Dial (1) on the Trolley. Your selection is displayed in the
Blade Depth Setting window (2). The settings range from levels 1 to 8 and you can increase the Blade Depth
by half level increments. Do not attempt to turn the Blade Depth Selection Dial higher than the level 8 setting
or lower than the level 1 setting. Too much force could damage the Trolley. As the level increases, more of the
blade will be exposed, allowing you to cut thicker materials. The thickest material the eCraft can cut is 1mm,
and the thinnest is 0.1mm. To cut thin or flexible materials, you may need a stabilizer. To cut thicker materials,
you may need to remove the blade cover.
3
2
Kiss-Cut
1
When working with adhesive backed material, the eCraft allows you to Kiss-Cut. The Kiss-Cut function cuts only
the top layer while leaving the backing intact. This is useful when creating intricate designs, wall art, banners,
etc. To Kiss-Cut, set the Tab Amount to 0, turn the Blade Depth Selection Dial to level 1, and follow basic
operating instructions. (Levels 2 or 3 might be necessary for thicker materials).
Multi-Cut
The eCraft can cut materials up to 1mm in thickness. Some materials may need more than one pass of the
blade to achieve a clear cut. In Front Mode, you can change the Multi-Cut quantity to more than one, and the
eCraft will cut the same image in the same position for the selected number of times. The Clear-Cut Indicator
Light (3) lights up when the blade cuts all the way through. If the Clear-Cut Indicator Light flashes on and off, or
doesn’t light up at all, it means the blade did not make a clear cut, and a Multi-Cut is necessary (except when
doing a Kiss-Cut, in which case the Clear-Cut Indicator Light should not light up).
Other Functions
1.
TRIM: To trim your paper in all Front or Roll Modes, press the CUT button once while in the Categories Screen.
2.
DELETE: While in Front, Tray, or Roll Modes, you are able to delete an image you have previously selected. Move the cursor to the image you want to erase by pressing the right and left Enter Arrow Buttons. Press ENTER. Change the quantity to 0. Press ENTER to confirm and delete the image.
3.
EDIT SELECTED IMAGE: To edit an image you’ve selected, move the cursor to the image you want to edit
by pressing the right and left Enter Arrow Buttons in the Queue. Then, press ENTER. Make your desired
changes and press ENTER to confirm.
4.
FONT: The first set of upper and lower case font, numbers, and symbols will be cut to the size
selected. The second set of lower case font, numbers, and symbols (indicated by an asterisk on the LCD Screen) will be cut in proportion to an upper case letter, as opposed to the actual size selected.
5.
PAUSE: To pause the eCraft in the middle of a cut/draw, press the CUT button. Press the CUT button once more to continue.
6.
CANCEL: Pressing the RESET button at any time will cancel the action and return the eCraft to the
eCraft Welcome Screen.
24
R.1.02
Basic Care
Blade Replacement
Warning:Turn off the eCraft and unplug before changing the blade.
1
2
Warning:Blades are very small and sharp. Be sure to use
the tweezers provided to handle blades.
3
1.
Pull the Trolley Release Knob away from the Trolley and lift up.
2. While holding the Trolley in the up position, remove the blade housing cover.
3.
Remove the blade using the grooved tweezers (located in the Storage Compartment).
4. Hold the replacement blade by the red protective cap. Insert the new blade in the blade holder and
remove the red cap by pulling it on an angle.
5. Replace the blade housing cover and lower the Trolley back into its original position.
6.
Ensure the Trolley is down and the knob has been pushed into the locked position.
7.
Be sure to safely discard the blade.
Pen Replacement
1
2
1.
Pull the Trolley Release Knob away from the Trolley and lift up.
2.
While holding the Trolley in the up position, remove the pen.
3.
Insert a new pen into the magnetic pen holder.
4.
Lower the Trolley back into its original position.
5.
Ensure the Trolley is down and the knob has been pushed into the locked position.
6.
Be sure to safely discard the pen.
R.1.02
25
Cutting Plate
Blade
Abrasion
Significant
Abrasion
Remove &
Rotate the
Cutting Plate
Second
Use
Although rare, if you notice dents or abrasions on the Cutting Plate, it may need to be rotated or replaced.
Each Cutting Plate can be rotated allowing another new cutting surface before needing replacement.
Cutting Plate Rotation
1.
Use the left Navigation arrow button in Front Mode to move the Trolley all the way to the left side of
the eCraft.
2.
Lift up the fastener (located against the right side of the Cutting Plate) to release the plate.
3.
Carefully, hold the end of the Cutting Plate and gently remove it from the eCraft. To avoid damage to
the plate, do not force or bend the plate while removing.
4.
Return the Cutting Plate to the eCraft, sliding it back in place and returning the fastener to its downward position.
Cleaning Your eCraft
1
Warning: Unplug the eCraft while cleaning.
Gently wipe the eCraft with soft fabric.
Don’t wipe the eCraft with chemicals, alcohol, or a coarse cloth.
To remove any paper scraps from the eCraft, unscrew the Scrap Removal Access Panel (1) and empty the
compartment.
26
R.1.02
FAQ’s
What can the eCraft cut? Paper (standard, flocked, glitter, magnet, adhesive backed), card stock, vellum, vinyl,
felt, organza, flexible chipboard, wood veneers, and many other materials under 1mm thick. We recommend
stabilizers (such as iron-on, tear-away, or freezer paper) for thin material.
What paper sizes does the eCraft cut? The eCraft can handle materials up to 12” wide by ANY length! You can
cut smaller pieces as well. However, it is not recommended to use sizes smaller than 2” x 3”.
What is the largest/smallest image size the eCraft can cut? Although the eCraft can handle materials up to
12’’ wide, the maximum width of an image you can cut is approximately 11 ½”. All Images on our SD cards
have been tested and a predetermined set minimum size for each image. Depending on how intricate the
cut is, some images will not go smaller than 3” whereas others can go as small as half an inch. While using
eCraftshop Pro Software, image size can range from 1/16” up to 11 3/4”, adjusting in any increment desired.
How long do the blades last? The eCraft comes with high quality, high performance blades. Their life-cycle
varies depending on frequency of use and thickness of materials cut.
Does it draw and cut in one step? Yes, a pen and a blade are in the Trolley at the same time. Our images come
with preset draw and cut lines. The eCraft draws first and then cuts without having to stop and swap or reset
anything. Draw without cutting or cut without drawing is also an option with eCraftshop Pro Software.
Does the eCraft shut off automatically? Yes, it will shut off 1 hour after last use with electric power as well as on battery power.
Are there Blade Depth Setting recommendations? Blade Depth settings will vary depending on the material
being cut. However, as a general rule of thumb, the following are suggested: Thick cardstock requires higher
Blade Depth settings (6-8), thin scrapbooking paper requires medium Blade Depth settings (4-6), and to kisscut vinyl requires lower Blade Depth settings (1-3). Do not attempt to turn the Blade Depth Selection Dial higher
than the level 8 setting or lower than the level 1 setting. Too much force could damage the Trolley.
For a complete list of FAQ’s and tips visit our website at www.craftwellusa.com
Troubleshooting
Problem: The eCraft will not turn on
Solution: Check that the Power Adapter is securely connected to the Power Supply and plugged into the outlet.
Problem: The LCD screen is not functioning properly
Solution: Verify that the SD card is properly inserted press RESET.
Problem: Paper is ripping
Solution: Press reset to stop cutting, then manually feed the paper out of the eCraft. Your settings on the Trolley
are not set properly. If your paper is ripping, this is usually because the Blade Depth setting it too high, or your
image is intricate and needs a tab setting. Also, if your paper is thin, try placing a piece of 60lb cardstock
under the thin piece and setting your Blade Depth setting low so you cut the paper and not the cardstock. The
eCraft has an ideal cutting thickness of .4mm, and raising the thin paper slightly assures a perfect cut. You
may also want to change your blade, as it may be dull.
Problem: Paper is not feeding from the tray
Solution: Push paper toward the eCraft in the tray. The paper may be too far away for paper rollers to catch.
Problem: I changed the image card and I can’t access the images
Solution: You need to press RESET when switching image cards so the eCraft can re-read the card.
For additional assistance review video tutorials on craftwellusa.com or email us at [email protected]
R.1.02
27
LIMITED WARRANTY
Limited Warranty and Duration
Craftwell Incorporated (“Craftwell”) warrants that the eCraft Cutting Machine, eCraft SD Image Card, and any eCraft parts and consumables
(collectively and individually referred to as “Product(s)”) will be free from defects in material and workmanship. This limited warranty will extend for a
period of ninety (90) days from the date of purchase for SD Image Cards, and for the eCraft Cutting Machine, one (1) year from date of purchase for
electronic parts, such as motors, wiring, switches and LCD screen, and ninety (90) days from date of purchase for all other parts and consumables.
The limited warranty period for all labor will extend for a period of ninety (90) days from date of purchase. This limited warranty applies only to
Products purchased from Craftwell, an authorized Craftwell distributor, or authorized Craftwell reseller (collectively referred to as “Craftwell Seller”),
and purchased and used in the United States. This limited warranty runs exclusively to the initial retail purchaser of the Product and may not be
transferred or assigned. This limited warranty gives purchaser specific legal rights. Purchasers may have other legal rights which vary from
jurisdiction to jurisdiction.
TO THE FULLEST EXTENT PERMITTED BY LAW, THESE WARRANTIES ARE EXCLUSIVE AND IN LIEU OF ALL OTHER WARRANTIES, EXPRESS OR
IMPLIED, INCLUDING, BUT NOT LIMITED TO, THE IMPLIED WARRANTIES OF MERCHANTABILITY, FITNESS FOR A PARTICULAR PURPOSE AND
NON-INFRINGEMENT. SOME STATES DO NOT ALLOW LIMITATIONS ON IMPLIED WARRANTIES, SO THE ABOVE LIMITATION MAY NOT APPLY
TO ALL PURCHASERS. IN SUCH EVENT, THE TERM OF SUCH IMPLIED WARRANTIES ARE LIMITED TO THE LIMITED WARRANTY PERIOD
IDENTIFIED IN THE ABOVE PARAGRAPH. THIS LIMITED WARRANTY IS VOID IF THE LABEL BEARING THE PRODUCT’S SERIAL NUMBER IS
REMOVED OR ALTERED. ANY TECHNICAL OR OTHER SUPPORT P ROVIDED BY CRAFTWELL IS “AS IS” AND WITHOUT WARRANTIES OF ANY
KIND. SOME STATES DO NOT ALLOW LIMITATIONS ON HOW LONG AN IMPLIED WARRANTY LASTS, SO THE ABOVE LIMITATION MAY NOT
APPLY TO ALL PURCHASERS.
Exclusive Remedies
Remedies under this limited warranty are limited, at Craftwell’s sole discretion, to replacement or repair of defective Product/parts at Craftwell’s
expense. All defective Products/parts replaced under this limited warranty become the property of Craftwell. Craftwell will repair or replace defective
Product/parts with new Product/parts, or used Product/parts that are at least functionally equivalent to the replaced Product/parts. If a Product/part
is determined not to be defective, Craftwell will return the Product/part to purchaser without replacement or repair. Unless otherwise required by law,
this is purchaser’s sole and exclusive remedy for breach of this limited warranty.
Exceptions
Craftwell does not warrant that the Products will meet specific requirements of purchaser or end user or that it will operate error-free or uninterrupted.
This limited warranty does not cover Product defects or failure resulting from: (1) improper or unreasonable use or maintenance; (2) failure to follow
operating instructions; (3) business or commercial use (except for eCraft Pro Cutting Machine); (4) accident; (5) improper storage or operating
conditions, including, but not limited to, excess moisture, lightning, power surges and connections to improper voltage supply; (6) unauthorized
alteration or modification of original condition; (7) inadequate packing or shipping by purchaser; (8) alteration, loss of, damage to, or corruption of
stored data; or (9) use with non-Craftwell products that cause damage to the Products.
Limitation of Liability
CRAFTWELL IS NOT LIABLE FOR ANY SPECIAL, INDIRECT, INCIDENTAL, CONSEQUENTIAL, OR PUNITIVE DAMAGES, INCLUDING, BUT NOT
LIMITED TO, LOST PROFITS, LOST REVENUES OR LOST SAVINGS, REGARDLESS OF CAUSE OR LEGAL THEORY, EVEN IF IT HAS BEEN
ADVISED OF THE POSSIBILITY OF SUCH DAMAGES. IN ANY EVENT OF LIABILITY, CRAFTWELL’S LIABILITY WILL NOT EXCEED THE AMOUNT
OF THE PRICE PAID BY PURCHASER FOR PRODUCT. SOME STATES DO NOT ALLOW EXCLUSION OR LIMITATION OF INCIDENTAL OR
CONSEQUENTIAL DAMAGES, SO THE ABOVE LIMITATION MAY NOT APPLY TO ALL PURCHASERS.
Governing Law and Venue
The laws of the State of New York will govern the validity, interpretation and enforcement of this limited warranty and any claims between the parties,
without regard to conflicts of law principles. Venue for any dispute arising under this limited warranty or any claims between the parties will
exclusively be a state or federal court of competent jurisdiction located in Queens, New York. The United Nations Convention on Contracts for the
International Sale of Goods is specifically excluded and will not apply. All claims against Craftwell will be brought within two (2) years from
purchaser’s date of purchase, or one (1) year from the date of the occurrence, whichever is shorter.
Obtaining Warranty Service
To obtain warranty service, the purchaser shall contact Craftwell Customer Service at (888) 315-8885 or by visiting www.craftwellusa.com, and
adhere to the instructions provided by Craftwell Customer Service. Purchaser shall return or ship the defective Product/parts to Craftwell, freight and
all fees, including, but not limited to, duty, tax and freight (“Shipping Fees”), prepaid by purchaser. Purchaser remains responsible for Product/parts
while in transit to and from Craftwell. Product/parts shall be accompanied, to the extent possible, by: (1) proof of purchase; (2) Return Merchandise
Authorization number (RMA #), which must be clearly displayed on the outside of the shipping carton or a similar package affording an equal degree
of protection; and (3) written document with (i) clear explanation of problem, (ii) date of purchase, (iii) name and address of Craftwell Seller, and (iv)
model and serial number of Product. Craftwell will ship repaired or replaced Product/parts to purchaser, freight prepaid, unless Product/parts are
determined not to be defective by Craftwell, or purchaser is outside of the US, in which case purchaser is responsible for all Shipping Fees. Repair or
replacement of Product/parts to purchaser, freight prepaid, unless Product/parts are determined not to be defective by Craftwell, or purchaser is
outside of the US, in which case purchaser is responsible for all Shipping Fees. Repair or replacement of Product/part does not extend the original
limited warranty period.
Model __________________________________ Serial #____________________________________ Purchase Date __________________
Please write your Model Name, Serial #, and Purchase Date above for your records.
28
R.1.02
R.1.02
29
Previews of our Image Card Collection
Fundamentals 2
Swirls & Flourishes
Year of Celebration
Home & School
6
5
4
3
2
1
Font Frenzy
Water Life
30
R.1.02
Previews of our Image Card Collection
Fonts Galore
Jen Allyson Designs
Jen Allyson Celebrates
Destination USA
Sacramento
Albany
New York
Michigan
Lansing
California
Dress Up Dolls & Pets
Entertainment
R.1.02
31
Previews of our Image Card Collection
In Love
Banner Expressions
Sports Life
Laina Lamb Office Essentials
Laina Lamb Boarderlines
Debra Valencia Bohemian
32
R.1.02
craftwellusa.com
888-315-8885
[email protected]