1
Logitech®
Surround Sound Speakers Z906
User’s Guide
Logitech® Surround Sound Speakers Z906
Contents
2
English
3
Español
15
Français
27
Português
39
Logitech® Surround Sound Speakers Z906
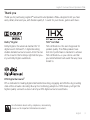
Thank you
Thank you for purchasing Logitech® Surround Sound Speakers Z906—designed to let you hear
every detail, all around you, with theater-quality 5.1 sound for your movies, games and music.
Dolby® Digital
Dolby Digital is the universal standard for 5.1
digital sound. Onboard 5.1 digital decoding
enables detailed surround sound—from the roar
of the crowd to the footsteps right behind you—
in your Dolby Digital soundtracks.
THX® Certified
THX certification is the seal of approval for
speaker quality. The Z906 speakers have
met strict performance standards to achieve
THX certification—so you can be sure that
your entertainment will sound the way it was
meant to.
DTS Digital Surround™
DTS is dedicated to making digital entertainment exciting, engaging and effortless by providing
state-of-the-art audio decoding. Blu-ray Disc technology adoption of DTS means you’ll get the
highest quality surround sound—in all of your DTS digital surround soundtracks.
For information about safety, compliance, and warranty,
please see the Important Information document.
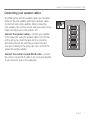
English 3
User’s guide
®
Z906
Logitech Sound Speakers
d
Surroun e
User’s Guid
t
rtan
po
Im
n
atio
rm
info
nty
rra
d wa
, an
ce
ian
mpl
, co
fety
Sa
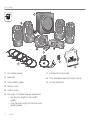
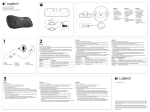
1. Four satellite speakers
7. 6-channel direct input cable
2. Subwoofer
8. Three AAA alkaline batteries (remote control)
3. Center satellite speaker
9. User documentation
4. Remote control
5. Control console
6. Five lengths of standard 18-guage speaker wire:
• Two 7.6-meter lengths for rear satellite
speakers
• Three 4.6-meter lengths for front and center
satellite speakers
4 English
Logitech® Surround Sound Speakers Z906
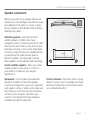
Speaker placement
Before you position your speakers, take a look
around your room and figure out the best setup
(see diagram to the right). It’s easiest to place
all your speakers in the desired locations before
attaching any cables.
Subwoofer
Satellite speakers – Place the two front
satellite speakers on either side of your
computer monitor or television, about the same
distance from each other as they are from your
listening position (e.g., the couch). Angle them
to face you. Place the two rear speakers behind
you and about the same distance apart as
the front speakers. You may want to mount
these speakers on the wall (see Wall mounting).
Couch
Center satellite speaker – Place your center
satellite speaker on your desk, or in front of
your monitor or television; you may also
wall-mount it.
Subwoofer – You can place the subwoofer
anywhere in relation to the other speakers.
To get the strongest bass, place your subwoofer
near a wall or corner, or under a desk. Make sure
that nothing is closer than 16 cm to the driver
or the bass port because it will affect your
sound. It’s also important to have adequate
ventilation around the subwoofer.
Control console – Place the control console
where it’s easy to reach. And make sure the IR
window is in plain view so the remote control
can communicate with it.
English 5
User’s guide
Subwoofer
1
2
2
INPUTS
1
4
5
CONSOLE
3
REAR LEFT
SPEAKERS
REAR RIGHT
FRONT LEFT
FRONT RIGHT
CENTER
CENTER
12
Subwoofer back panel
Inputs
Console
Speakers
Power
1. 6-channel direct
(PC sound card)
6. DB-15 pin connector
7. Rear left
12. Cable
8. Rear right
2. RCA (stereo)
9. Front left
3. Digital optical
10. Front right
4. Digital optical
11. Center
5. Digital coaxial
6 English
Logitech® Surround Sound Speakers Z906
Connecting your speaker cables
The Z906 comes with five speaker cables: two 7.6-meter
cables for the rear satellites and three 4.6-meter cables
for the front and center satellites. When connecting
your speakers, the control console, and your audio source,
make sure the power to the system is off.
REAR RIGHT
SPEAKERS
Connect the speaker cables – Connect your satellites
to the subwoofer using the speaker cables. Push the tab
on the spring clip, insert the wire into the connector,
and release the tab. Be sure that you match the wire
color (red or black) to the spring clip colors on both the
subwoofer and the satellite.
REAR LEFT
FRONT LEFT
FRONT RIGHT
CENTER
CENTER
Connect the control console DB-15 cable – Connect
the control console DB-15 cable to the corresponding DB15 pin connector jack on the subwoofer.
English 7
User’s guide
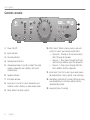
Control console
INPUT
DECODE
1
12
2
3
STEREO
4
3D
5
4.1
INPUT
EFFECT
1. Power On/Off
2. Input indicator
3. Decode indicator
4. Volume/Level indicator
5. Volume/Level adjust: Use this to adjust the main
volume, subwoofer, rear satellites, and center
channel levels.
6. Speaker indicator
7. IR remote window
8. Level select: Use this to select subwoofer, rear
satellites, center channel, or main volume levels.
9. Mute: Mutes the whole system.
8 English
13
2.1
AUX
MUTE
LEVEL
10. Effect select: When a stereo source is present,
use this to select your desired sound effect:
• Stereo 3D – Provides a 3D surround sound
effect through all speakers
• Stereo 4.1 - Plays stereo through both front
and both rear satellites, plus the subwoofer
• Stereo 2.1 – Plays stereo through both the
front satellites and the subwoofer
11. Input select: Use this to select your audio source
(6-channel direct, stereo, optical, coax, and Aux).
12. Headphone jack (side of console): When you plug
your headphones in, all other outputs will be
automatically muted.
13. Aux input (side of console)
Logitech® Surround Sound Speakers Z906
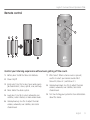
Remote control
INPUT
MUTE
LEVEL
EFFECT
Control your listening experience without ever getting off the couch.
1. Battery door: Install the three AAA batteries
2. Power On/Off
3. Input select: Use this to select your audio source
(6-channel direct, stereo, optical, coax, and Aux).
7. Effect select: When a stereo source is present,
use this to select your desired sound effect:
Stereo 3D, Stereo 4.1, and Stereo 2.1.
4. Mute: Mutes the whole system.
8. Volume/Level down: Use this to adjust the main
volume, subwoofer, rear satellites, and center
channel levels
5. Level select: Use this to select subwoofer, rear
satellites, center channel, or main volume levels.
9. Test: See Testing your system for more information
about this mode.
6. Volume/Level up: Use this to adjust the main
volume, subwoofer, rear satellites, and center
channel levels
English 9
User’s guide
Connect the subwoofer power cable
Plug the subwoofer power cable into an
electrical outlet.
Adjust volume
Set volume to the nine o’clock position to test;
adjust thereafter as needed.
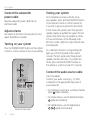
Turning on your system
Press the POWER ON/OFF button on the remote
control or control console to turn on your Z906.
1
2
2
INPUTS
1
4
5
CONSOLE
3
To test whether you have correctly set up
your speakers, press and hold the INPUT button
on the remote control or control console for
5 seconds to put your system into test mode.
In test mode, the system cycles through each
speaker, playing an audible test signal. The test
signal comes from only one speaker at a time,
in 5-second intervals, in the following order:
left front, center, right front, right rear, left rear,
and subwoofer.
As a channel is tested, its corresponding LED
lights up on the front panel of the control
console. The test signal cycles through each
speaker one time and stops. To re-enter test
mode, press and hold the INPUT button on
the remote or control console for 5 seconds.
Connect the audio source cable
Turn off speakers
Connect your audio source (e.g., TV, DVD,
computer) to the appropriate input jack on
your subwoofer.
•For computer sound cards, use the 6-channel
input
(cable included).
•For stereo devices, use the Stereo RCA input
(cable not included).
Subwoofer back panel
10 English
Testing your system
•For digital devices, use the digital inputs
(cable not included).
Logitech® Surround Sound Speakers Z906
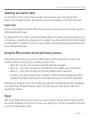
Selecting your audio input
Use the remote control or the control console to select an input source. Pressing the INPUT
button cycles through the various audio input sources, which will always cycle in the same order.
Digital input
If you’re using a digital connection, follow the instructions on your audio source to make sure you’re
getting digital audio output.
For digital content, the control console automatically detects and displays the Digital stream as long
as the device is connected to a digital input. For example, if you have selected the DTS Digital Sound
or Dolby Digital 5.1 stream for a DVD you want to watch, it will be detected automatically when you
choose the applicable input.
Using the Effect select control with stereo sources
When playing stereo audio, you can use the Effect Select control on the remote control or the
control console to choose the type of sound you want to hear.
• Stereo 3D – Provides a 3D surround sound effect through all speakers
• Stereo 4.1 – Plays stereo through both front and both rear satellites, plus the subwoofer
• Stereo 2.1 – Plays stereo through both the front satellites and the subwoofer
• No Effect – Plays audio format of your computer’s sound card without applying any effects.
Available for 6 channel input only and is represented by having no Effect LEDs illuminated
Whenever you change the input, the last effect you selected is automatically restored. For example,
if you select Stereo 3D while listening to Input 2, the next time you select Input 2, Stereo 3D is
automatically selected.
Enjoy!
After you’ve made sure that you’ve set up your system correctly—and the selected input and effect
are correctly displayed on the control console—you’re ready to go. Just press play and get immersed
in your new Z906 speaker system.
English 11
User’s guide
Frequently asked questions
Q: I can’t hear any sound out of my Z906 speakers, and I see flashing lights on the front of the
control console. How can I resolve this?
A: a) The Z906 uses DTS Digital Sound/Dolby Digital decoding to process data into 5.1 surround
sound. If the Z906 receives neither DTS Digital Sound nor Dolby Digital decoding data, the Z906
will not be able to decode the signal. You can resolve this issue by making sure the Z906 receives
only a DTS Digital Sound or Dolby Digital signal from the host device (for example, DVD/Blu-ray
player, game console, or home computer). Please refer to your equipment manufacturer’s support
documentation for additional details.
A: b) Most DVD and Blu-ray Disc movies have audio encoded in both DTS Digital Sound and Dolby
Digital. Check the on-disc Audio menus to make sure the movie is playing either a DTS Digital Sound
or Dolby Digital signal.
Q: Where can I learn more about my speakers?
A: Visit the Logitech web site at www.logitech.com. If none of the above answers resolve the
problem, please contact Logitech Customer Support.
Error states
•No data – If you select a digital input and no digital stream exists for that input, the Effect and
Decode indicators on the control console will not be illuminated.
•Unknown data – The Decode and Effect LEDs will cycle continuously when you select a digital
input and its data stream cannot be decoded because the digital content is neither DTS Digital
Sound nor Dolby Digital.
Wall mounting
You can mount your satellite speakers with the appropriate hardware (not included). When attaching
a satellite speaker to a wall mount, make sure not to overtighten the mounting screw. Doing so may
damage the screw threads inside the speaker’s mounting lug.
12 English
Logitech® Surround Sound Speakers Z906
Performance specifications
•Total watts (RMS): 500 watts
- Subwoofer: 165 watts (6 ohms, at 52 Hz, at 10% THD)
- Satellites: 335 watts RMS (5 x 67 watts per channel {4 ohms at 3.85kHz, at 10% THD})
•Maximum SPL: >110 dBC
•Frequency response: 35 Hz – 20 KHz
•Amplifier: Ultra Efficient Class D
•Input Impedance: 8,000 ohms, min
•Signal to Noise ratio, A-weighted: >95dB
•Drivers:
- Satellites: 3” polished aluminum phase plug drivers
- Subwoofer: 8” high-excursion ported driver with 6th-order bass reflex enclosure
•Supported digital formats: Dolby Digital and DTS Digital Sound
•Source inputs:
- Digital Coaxial
- Digital Optical (2)
- 6-channel direct (3 x 3.5mm)
- Stereo (RCA)
- Analog stereo-mini (3.5mm)
English 13
User’s guide
What do you think?
Please take a minute to tell us.
Thank you for purchasing our product.*
www.logitech.com/ithink
* The sample customer survey shown here is in English. Logitech supports many languages on its Web site.
14 English