1
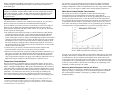
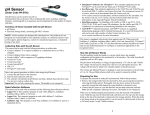
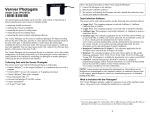
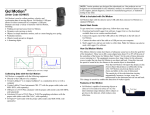
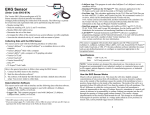
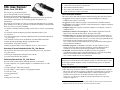
CO2 Gas Sensor (Order Code CO2-BTA) The Vernier CO2 Gas Sensor measures gaseous carbon dioxide levels by monitoring the amount of infrared radiation absorbed by carbon dioxide molecules. Very important: Do not place the sensor directly into any liquid. IT is intended only for measuring gaseous, not aqueous, CO2 concentration. The sensor has two settings: low range (0–10,000 ppm) and high range (0–100,000 ppm). Students can use the CO2 Gas Sensor to measure the change in carbon dioxide levels for a variety of systems, including: A chamber containing small living things such as crickets, worms, or germinating seeds. A terrarium of plants undergoing respiration and photosynthesis cycles. A classroom. An enclosed atmosphere containing sodium hydroxide or potassium hydroxide as CO2 scavengers. The chemical reaction between hydrochloric acid and sodium bicarbonate. Carbon dioxide gas diffusing through a gas diffusion tube. Fermentation or respiration of sugars. Human respiration under various conditions (at rest vs. after exercise). Inventory of Items Included with the CO2 Gas Sensor Check to be sure that each of these items is included with your CO2 Gas Sensor: CO2 Gas Sensor 250 mL gas sampling bottle (Nalgene bottle with lid) CO2 Gas Sensor booklet (this booklet) Collecting Data with the CO2 Gas Sensor This sensor can be used with the following interfaces to collect data. Vernier LabQuest® 2 or original LabQuest® as a standalone device or with a computer Vernier LabQuest® Mini with a computer Vernier LabPro® with a computer or TI graphing calculator Vernier Go!®Link Vernier SensorDAQ® CBL 2TM TI-Nspire™ Lab Cradle Here is the general procedure to follow when using the CO2 Gas Sensor: 1. Connect the CO2 Gas Sensor to the interface. 2. Start the data-collection software1. 3. The software will identify the CO2 Gas Sensor and load a default data-collection setup. You are now ready to collect data. Data-Collection Software This sensor can be used with an interface and the following data-collection software. Logger Pro 3 This computer program is used with LabQuest 2, LabQuest, LabQuest Mini, LabPro, or Go!Link. Logger Pro 2 This computer program is used with ULI or Serial Box Interface Logger Lite This computer program is used with LabQuest 2, LabQuest, LabQuest Mini, LabPro, or Go!Link. LabQuest App This program is used when LabQuest 2 or LabQuest is used as a standalone device. DataQuest™ Software for TI-Nspire™ This calculator application for the TINspire can be used with the EasyLink or TI-Nspire Lab Cradle. EasyData App This calculator application for the TI-83 Plus and TI-84 Plus can be used with CBL 2 and LabPro. We recommend version 2.0 or newer, which can be downloaded from the Vernier web site, ww.vernier.com/easy/easydata.html, and then transferred to the calculator. See the Vernier web site, www.vernier.com/calc/software/index.html for more information on the App and Program Transfer Guidebook. DataMate program Use DataMate with LabPro or CBL 2 and TI-73, TI-83, TI-84, TI-86, TI-89, and Voyage 200 calculators. See the LabPro and CBL 2 Guidebooks for instructions on transferring DataMate to the calculator. LabVIEW National Instruments LabVIEW™ software is a graphical programming language sold by National Instruments. It is used with SensorDAQ and can be used with a number of other Vernier interfaces. See www.vernier.com/labview for more information. NOTE: Vernier products are designed for educational use. Our products are not designed nor recommended for any industrial, medical, or commercial process such as life support, patient diagnosis, control of a manufacturing process, or industrial testing of any kind. Important Additional Information This model CO2 Gas Sensor with two ranges (introduced in March 2007) will autoID correctly, but will not be properly recognized by experiment files in versions of Logger Pro prior to 3.5 (available in May 2007). Contact technical support for assistance if you need to use one of these files prior to the release of 3.5. Logger Pro 3.5 will be a free update for anyone who already owns a previous version of Logger Pro 3. 1 If you are using Logger Pro 2 with either a ULI or SBI, the sensor will not auto-ID. Open an experiment file for the CO2 Gas Sensor in the Probes & Sensors folder. 2 Allow the CO2 Gas Sensor to warm up for about 90 seconds2 before collecting data. The CO2 Gas Sensor refreshes its reading every second, but the changes in its measurements are so gradual that the recommended sampling rate is 4 seconds per sample or slower. Gas must diffuse through the holes in the sensor tube before the sensor detects any changes in concentration. Because diffusion of gases is a slow process, there can be delays in the readings. The sensor cannot take readings at a CO2 concentration higher than 10,000 ppm on the low setting and 100,000 ppm on the high setting. If the sensor is reading at or near these maximum values, the CO2 concentration may be exceeding the maximum value for the setting. To collect data in a controlled environment, we recommend that you use the 250 mL Nalgene collection bottle that is included with your sensor. To collect data in a controlled environment and use with our O2 Gas Sensor, we recommend purchasing either the BioChamber 250 (250 mL capacity) (order code BC-250) or the BioChamber 2000 (2 L capacity) (order code BC-2000). Each BioChamber has a second, opening with a grommet so that you can insert two probes at once. Because the sensor operates on the basis of reading IR radiation, you should avoid using the sensor in direct sunlight as much as possible. Even though the IR detector is shielded, it is best to avoid the possibility of reflected light affecting the readings by keeping the sensor in the shade when used outdoors. Very important: Do not place the sensor tube directly into any liquid. The sensor is intended only for measuring gaseous, not aqueous, CO2 concentration. Only one CO2 gas Sensor can be connected to an interface at a time. If the results of another adjacent location are desired, it will require a second interface to operate that sensor. Using two CO2 Gas Sensors connected simultaneously will invalidate both sets of data. There is no algorithm or equation to clean up such data, the experiment will need to be run again with the proper set-up. Specifications Measurement range of CO2 Gas Sensor Low range: 0 to 10,000 ppm CO2 High range: 0 to 100,000 ppm CO2 Typical Accuracy (at standard pressure, 1 atm) Low range: 0 to 1,000 ppm ±100 ppm 1,000 to 10,000 ppm ±10% of reading High range: 0 to 1,000 ppm ±100 ppm 1,000 to 100,000 ppm ±20% of reading Response time: 95% of full-scale reading in 120 seconds Warm-up time: 90 seconds Pressure effect: 0.19% of reading/mm of Hg from standard pressure 2 While the CO2 Gas Sensor is warming up, you will see the readings start near 0 ppm and then slowly increase to the CO2 level to which the sensor is exposed. 3 Output signal range: 0–4.0 V Input potential: 5 V (±0.25 V) Gas sampling mode: diffusion Normal operating temperature range: 25°C (±5°C) Operating humidity range: 5–95% (non-condensing) Storage temperature range: –40 to 65°C Typical resolution 13-bit resolution (SensorDAQ,) 0 to 10,000 ppm CO2: 1.5 ppm 0 to 100,000 ppm CO2: 15 ppm 12-bit resolution (LabPro, LabQuest 2, LabQuest. LabQuest Mini, Go!Link, or TI-Nspire Lab Cradle) 0 to 10,000 ppm CO2: 3 ppm 0 to 100,000 ppm CO2: 30 ppm 10-bit resolution (CBL 2) 0 to 10,000 ppm CO2: 12 ppm 0 to 100,000 ppm CO2: 120 ppm Stored calibration, linear (y = bx + a) Low Range: High Range: a=0 a=0 b = 2,500 b = 25,000 How the CO2 Gas Sensor Works The Vernier CO2 Gas Sensor measures gaseous carbon dioxide levels in the range of 0 to 10,000 ppm (low range setting) or 0 to 100,000 ppm (high range setting) by monitoring the amount of infrared radiation absorbed by carbon dioxide molecules. The sensor uses a small incandescent light bulb to generate infrared radiation (IR). The IR source is located at one end of the sensor’s shaft. At the other end of the shaft is an infrared sensor that measures how much radiation gets through the sample without being absorbed by the carbon dioxide molecules. The detector measures infrared radiation in the narrow band centered at 4260 nm. The greater the concentration of the absorbing gas in the sampling tube, the less radiation will make it from the source through the sensor tube to the IR detector. The temperature increase in the infrared sensor produces a voltage that is amplified and read by a Vernier interface, CBL 2, or the TI-Nspire Lab Cradle. Carbon dioxide gas moves in and out of the sensor tube by diffusion through the twenty vent holes in the sensor tube. The CO2 Gas Sensor measures gaseous carbon dioxide concentration in units of parts per million, or ppm. In gaseous mixtures, 1 part per million refers to 1 part by volume in 1 million volume units of the whole. A concentration of 600 ppm for CO2 would simply mean that there are 600 L of CO2 gas for every 1,000,000 L of air (or 0.6 mL of CO2 per 1 L of air). As a comparison, the level of carbon dioxide in the 4 Earth’s troposphere has gradually increased from 317 ppm in 1960 to current levels of nearly 380 ppm. Exhaled human breath has a carbon dioxide concentration of about 50,000 ppm. This sensor is equipped with circuitry that supports auto-ID. When used with LabQuest 2, LabQuest, LabQuest Mini, LabPro, Go! Link, SensorDAQ, TI-Nspire Lab Cradle, EasyLink, or CBL 2, the data-collection software identifies the sensor and uses pre-defined parameters to configure an experiment appropriate to the recognized sensor. Optional Calibration Procedure You should not have to perform a new calibration when using the CO2 Gas Sensor. We have set the sensor to match our stored calibration before shipping it. If you do find that you need to reset your CO2 Gas Sensor, it can be reset using one known CO2 level. Note: This calibration method is different from the usual twopoint calibration performed with other Vernier sensors. To reset the CO2 Gas Sensor in units of parts per million (ppm): The calibration will be based on a sample of outside air having a carbon dioxide concentration of about 380 ppm.3 If you cannot actually perform the calibration outside, obtain outside air in the 250 mL collection bottle (included with your sensor). Either place it in the air outside your building long enough to ensure that its contents are replaced with fresh air, or fill it to the brim with water, take it outside and dump the water to ensure it is filled with fresh air. While still outdoors, insert the sensor into the gas sampling bottle containing fresh outside air. You can now take the bottle and sensor to the location where the calibration is to be done (either outside or back in the classroom). Connect the CO2 Gas Sensor to the data-collection interface. Start the datacollection program. Let the sensor warm up for at least 90 seconds. When the CO2 Gas Sensor has warmed up (readings should have stabilized), use a paper clip to press down the calibration button. Release the button as soon as the red light starts to blink. After about 30 seconds, the reading should stabilize at a value of approximately 380 ppm (40 ppm). If the reading is significantly lower or higher than 380 ppm, simply press the button again to repeat the process. Temperature Considerations The CO2 Gas Sensor is somewhat sensitive to temperature changes. In most cases, variations in CO2 readings due to temperature changes are small (<100 ppm on Low Range, <1000 ppm on High Range). With good experimental design, the variation in CO2 readings due to a temperature change will be negligible compared to the overall change in CO2 concentration. If an entire experiment is to be conducted at a constant temperature, you could improve the accuracy of the readings by calibrating the sensor at that temperature. The sensor is designed to operate between 20°C and 30°C. It can be used outside of this temperature range; however, the readings will be less accurate, even if you calibrate the sensor at the lower or higher temperature. This does not prohibit taking readings using incubation temperatures or outdoor readings at temperatures warmer or colder than the 20 to 30°C range. Allow enough time for your CO2 Gas Sensor to stabilize at the desired operating temperatures. More about Carbon Dioxide Concentration The average increase in the concentration of carbon dioxide in the Earth’s atmosphere has been well documented. The graph below shows that the concentration increased from about 320 to over 380 ppm during the past 40 years. Locally, especially in urban areas, it is not uncommon for this concentration to be above 380 ppm due to emissions from fossil fuel combustion. The calibration value of 380 ppm for ambient outside air used with the CO2 Gas Sensor is very close to these values. The ability of carbon dioxide to act as a greenhouse gas by absorbing increasing amounts of infrared radiation is a growing environmental concern. Increasing global atmospheric carbon dioxide levels (Source: Earth System Research Laboratory, NOAA) You can use the CO2 Gas Sensor within your classroom or other parts of your school building to demonstrate to students the increased levels of carbon dioxide that occur in confined spaces. We often find that carbon dioxide levels within offices with several people will reach as high as 1000 to 1200 ppm CO2. You can use the sensor to show that levels are generally higher in lower regions of a room than in the upper reaches. It is also possible to show the effect of turning on air conditioning, room ventilation, or simply opening a car window. Measuring Human Respiration with the CO2 Sensor This new model of our CO2 Sensor, introduced in April 2007, has two settings. The high-range setting, 0–100,000 ppm, can be used for measuring human respiration. We recommend three methods of collecting CO2 readings while a person is breathing normally. 3 The carbon dioxide concentration in the Earth’s atmosphere has steadily increased to an average level of 380 ppm in 2006 according to the Earth Institute at Columbia University. Levels in your area may be slightly higher due to localized influences such as automobile or industrial emissions of carbon dioxide. 5 6 Method One: This method is the easiest to perform, but it is also the least precise. Simply place the sensor about 5 cm (2 inches) away from the subject to be tested and collect readings while the subject gently blows on the sensor. Method Two: This method is much more precise than Method One but requires a BioChamber 250 (order code BC-250). Blow into a BioChamber 250 to replace all the gas in the BioChamber with exhaled breath. Immediately seal the side opening of the BioChamber with a size 6 stopper. Place the CO2 Sensor in the other opening, and then start the data collection. Warranty Vernier warrants this product to be free from defects in materials and workmanship for a period of five years from the date of shipment to the customer. This warranty does not cover damage to the product caused by abuse or improper use. Method Three: This method is the most precise. Use a bread bag (or a produce bag), scissors, plastic drinking straw, and twist tie. Cut a small hole in the end of the bag the size of the CO2 sensor’s tip. Feed the sensor through the hole and use a twist tie to hold the bag in place so that no air can escape. Use a utility clamp to connect the sensor to a ring stand. Blow through the straw into the bread bag to inflate the bag. Twist the bottom of the bag to close it off and start the data collection. Accessories for the CO2 Gas Sensor In addition to the 250 mL gas sampling bottle that ships with the CO2 Gas Sensor, the following accessories are available for purchase separately: BioChamber 250 order code BC-250 BioChamber 2000 order code BC-2000 The BioChambers have two openings, with grommets, so that you can insert both the CO2 Gas Sensor and the O2 Gas Sensor to take measurements of the atmosphere inside the BioChamber simultaneously. Cleaning the Gas Sampling Bottle It is recommended that you wash the gas sampling bottles by hand. If you do choose to wash the bottles in a dishwasher or labware washing machine, the manufacturer recommends the following: Keep the dishwasher cycle time to a minimum. Use the plastics cycle and set the water temperature at 135˚F (57˚C) or lower. Remove the labware as soon as possible after cooling is complete. Avoid excessive abrasion of plastics by covering metal spindles with soft material such as plastic tubing. Plastic labware should be weighted down and held in place with accessory racks. Vernier Software & Technology 13979 S.W. Millikan Way Beaverton, OR 97005-2886 Toll Free (888) 837-6437 (503) 277-2299 FAX (503) 277-2440 [email protected] www.vernier.com Rev. 5/3/2012 Logger Pro, Logger Lite, Vernier LabQuest 2, Vernier LabQuest, Vernier LabQuest Mini, Vernier LabPro, Go! Link, Vernier EasyLink and other marks shown are our trademarks or registered trademarks in the United States. TI-Nspire, CBL 2 and CBL, TI-GRAPH LINK, and TI Connect are trademarks of Texas Instruments. All other marks not owned by us that appear herein are the property of their respective owners, who may or may not be affiliated with, connected to, or sponsored by us. Printed on recycled paper. 7 8