1
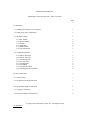
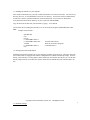
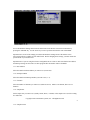
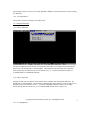
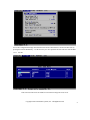
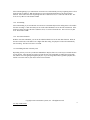
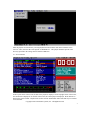
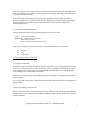
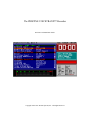
The PRISTINE VOICETRAXX™ Recorder
Reference and Installation Guide
Copyright 1994-1999 Pristine Systems, Inc. All Rights Reserved
PRISTINE SYSTEMS, INC.
PRISTINE VoiceTraxx™ Recorder - Table of Contents
Page
---1.0 Installation
1.1 Installing the Software on your Computer
1
1.2 Setting up the Antex Audio Board
1
1.3 Hardware Settings
2
1.3.1
1.3.2
1.3.3
1.3.4
1.3.5
1.3.6
Base Address
Interrupt Number
Channels
Sample Rate
Sample Format
Test Audio Board
2
2
2
2
3
3
1.4 Configuration Settings
3
1.4.1 Path for .MM Files
1.4.2 Path for .SPC Files
1.4.3 User Management
1.4.4 Top of Hour ID
1.4.7 Trim Beginning
1.4.8 Trim Ending
1.4.9 Auto Start Threshold
1.4.10 Including File ID's in Playlists
3
3
3
5
6
6
6
6
2.0 Play List Recorder
7
2.1 Screen Features
7
2.2 Navigating in the Playlist Recorder
8
3.0 Copying & Recording of Audio Files
8
3.1 Copying of Audio Files
8
3.2 Direct Recording on Network Server
8
Copyright 1994-1999 Pristine Systems, Inc. All Rights Reserved
1.0 Installation
1.1 Installing the Software on your computer
First, decide in which directory you want to install The Pristine VoiceTraxx™ Recorder. You can use any
directory, however, we recommend that you use the \VT directory. It can also be useful to install Pristine
VoiceTraxx a directory which is included in your PATH statement, so you can access The Pristine
VoiceTraxx Recorder from any directory on your system (like \MUSICMGR).
Copy all files from the disk onto your hard disk, by typing:: A:VT-SETUP
Create a batch file for loading the Antex driver. You can do this by using the standard MS-DOS editor
EDIT.
Example "PSI-VT.BAT":
@ECHO OFF
CLS
CD \VT
C:\AUDIODRV\SX25 /U
C:\AUDIODRV\SX25 /B32
VT.EXE
C:\AUDIODRV\SX25 /U
CLS
(Load the Antex driver)
(Start the VoiceTraxx program)
(Unload the driver)
1.2 Setting up the Antex Audio Board
Install the Antex audio board into one of your computer's available 16 bit ISA slots. The newer Antex SX
series audio boards are equipped with software configurable base address and interrupt settings. For these
boards, you do not have to set any jumpers on the board itself, the software does this for you. On all other
boards, jumpers must be set on the board. Please consult the user manual that came with the board to do
this.
Copyright 1994-1999 Pristine Systems, Inc. All Rights Reserved
1
1.3 Hardware Settings
Access the Hardware Settings menu from the main menu of The Pristine VoiceTraxx™ Recorder by
pressing the "ENTER" key. Use the arrow keys to move up/down and select the item with ENTER.
Important note: Not all of the settings provided in the Hardware settings menu of the Pristine Voice
Traxx™ Recorder are available on each audio board. Before changing these settings, you must consult the
specifications of your audio board.
Important note: If you are using the software configurable SX-23 or SX-35 make sure that the base address
and interrupt settings are the same as in other programs like the Pristine Audio Commander.
1.3.1 Base Address
Select the audio board base address you want to use (180 or 280).
1.3.2 Interrupt Number
Select the audio board interrupt number you want to use (2 - 5).
1.3.3 Channels
Select the number of channels you want to use (Mono or Stereo). Mono is one channel, Stereo is two
channels.
1.3.4 Sample Rate
Set the sample rate you want to use (usually 32000, 44100, or 48000). This sample rate is used for creating
new audio files.
Copyright 1994-1999 Pristine Systems, Inc. All Rights Reserved
2
1.3.5 Sample Format
Set the sample format you want to use (usually DOLBY or MPEG). This sample format is used for creating
new audio files.
1.3.6 Test Audio Board
This routine is used to reset and test your audio board.
1.4 Configuration Settings
1.4.1 Path for .MM Files
The Path for .MM files tells the Pristine VoiceTraxx Recorder where it can find the Pristine MusicPlus™
playlist files. The default path is C:\MUSICMGR\. The path must be entered ending with a backslash.
Also, the path may be defined as your On-Air network server, i.e., your Pristine playback machine (i.e.
O:\MUSICMGR\ or O:\RAPID\PLAYLIST).
1.4.2 Path for .SPC Files
The Path for .SPC files tells Pristine VoiceTraxx™ where it should store the hard disk audio files. The
default path is C:\MUSICMGR\. The path must be entered ending with a backslash. Also, the path may be
defined as your On-Air network server, i.e., your Pristine RapidFire playback machine, for recording
directly onto the On-Air network server (i.e. O:\MUSICMGR\) Please refer to chapter 3.0).
Copyright 1994-1999 Pristine Systems, Inc. All Rights Reserved
3
1.4.3 User Management
Access the Configuration Settings menu from the main menu of The Pristine VoiceTraxx™ Recorder by
pressing down on the ENTER key. Use the arrow keys to move up/down and select the item with ENTER.
1.4.3.1 User ID
This section is where Jocks are added to VoiceTraxx™ and given access levels.
Copyright 1994-1999 Pristine Systems, Inc. All Rights Reserved
4
Enter the User ID you want to create. Separate User IDs may be set up for each person using Voice
Traxx™, or just a few User IDs may be created (one supervisor and one for recording).
1.4.3.2 Password - Enter a password for this User ID.
1.4.3.3 Title MM-PLUS
The Title field is used for identifying which playlist items may be recorded by this User ID. First, the
recorder checks if the file is an audio file. Then, it checks if the Title String is equal to the left part of the
"Description" of the playlist item.
For instance: if Title String was set to "*** J", then only hard disk audio items beginning with "*** J" may
be recorded by this User ID.
1.4.3.4 Supervisor Rights
Enter a "Y" if you want to give this user Supervisor Rights. Supervisor status will allow this User to change
any and all Hardware and Configuration settings. An entry of "N" will only allow this User ID to record
VoiceTraxx™, and not have access to any other parts of the software.
1.4.4 Top of Hour ID
In the playlist recorder, an indicated time is displayed on the top right of the screen. This time has no
technical meaning: it is simply for the announcer if he wants to tell the time. This time is the time
calculated if the playlist was started at the exact top of the hour. If you are not using time triggered "Auto
Break"
commands, then it is possible that this time may be a couple of minutes off. The number of seconds you can
enter under Time Indication Offset is subtracted from the time displayed at the top right of the playlist
recorder screen.
Copyright 1994-1999 Pristine Systems, Inc. All Rights Reserved
5
1.4.7 Trim Beginning
Select Trim Beginning if you want Pristine VoiceTraxx™ to automatically trim any beginning silence off an
audio file after recording it. With Trim Begin you can set the audio threshold level for the trim begin
function. If the audio level at the beginning of the file is under this level, it is removed from the file. The
level set is by dB level. The default is 48dB.
1.4.8 Trim Ending
Select Trim Ending if you want Pristine VoiceTraxx™ to automatically trim the ending silence off an audio
file after recording it. With Trim End you can set the audio threshold level for the trim end function. If the
audio level at the tail end of the file is under this level, it is removed from the file. The level set is by dB
level. The default is 48dB.
1.4.9 Auto Start Threshold
With the Auto Start Threshold, you can set the audio threshold level for the Auto Start function. When in
the auto record mode, if the audio level is higher than this setting, the playlist recorder will automatically
start recording. The auto level start is set in dB.
1.4.10 Including File ID's in the Play Lists
Depending on how you create your Pristine MusicPlus™ Playlist, there are several ways to include file ID's
in your playlist. These file ID's are used to prevent the user from accidentally recording the wrong audio
file, and for ease of navigating through the playlist. If you are using Music Plus to generate playlists, then
add the voice track items in your music format or break format.
Copyright 1994-1999 Pristine Systems, Inc. All Rights Reserved
6
2.0 Play List Recorder
Enter the playlist recorder mode by selecting Playlist Recorder from the main menu of Pristine Voice
Traxx™. Then, enter the date of the playlist as "MM/DD/YY". This playlist should be present in the
directory specified in the settings menu as Path for .MM Files.
2.1 Screen Features
In the top left corner of the screen, the date of the playlist is displayed. In the top right corner of the screen,
the current time is displayed. On the left of the screen, the current playlist is displayed. Hour markers are
displayed as green on black. Playlist items as white on blue and hard disk audio items that may be recorded
as red on black.
Copyright 1994-1999 Pristine Systems, Inc. All Rights Reserved
7
If the current item may be recorded, a status box is displayed on the right of the screen. Depending on the
status, it will display the function keys, ' Press SPACE to Start recording', 'Recording, press SPACE to stop'
or 'Playing, press SPACE to stop.
A time box is displayed at the right of the screen, displaying the time of the recording. The file box
displays information on the currently selected audio file. Displayed are File Name, Sample Rate, Sample
Format, and Number of Channels. At the bottom of the screen, a large VU meter is displayed for
monitoring audio levels.
2.2 Navigating in the Playlist Recorder
When in the playlist recorder mode, the following navigation keys may be used:
TAB
= Move to the next hour
SHIFT-TAB = Move to the previous hour
+
= Move to the next event
= Move to the previous VoiceTraxx™ event
If currently a recordable VoiceTraxx™ audio file is selected, the following keys may be used:
F5 = Record
F6 = Play
F7 = Auto record
3.0 Copying & Recording of Audio Files
3.1 Copying of Audio Files
Currently, the only audio boards that supports copying of audio files to the server during playback of audio
by the server are the Antex Series 3 (SX-7, SX-9, SX-34, SX-35). We highly recommend the use of these
audio boards, because of their stability, low system demands, and audio quality when using the DOLBY
AC-2 and MPEG Layer II data compression formats.
The best way to copy audio files from production to the On-Air computer is by using the Pristine Transfer
Plus™ program.
If you are not using a Antex Series 3 audio card, DO NOT transfer audio files during the on-air playback of
hard disk audio.
3.2 Direct Recording on Network Server
We have successfully tested recording directly on the server, while the server was playing back audio, using
the Antex Series 3 audio boards with both DOLBY and MPEG compressed audio. Results may vary with
system performance.
Copyright 1994-1999 Pristine Systems, Inc. All Rights Reserved
8