1
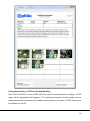
OptiPix Database
User's Manual
This manual describes how to use OptiPix Database software
1
Table of Contents
1. Installation and Startup (First time).................................................................................. 3
1.1. How to Install OptiPix................................................................................................ 3
1.2. Using OptiPix for the first time .................................................................................. 3
1.3. Language .................................................................................................................. 4
1.4. Device Resolution and Properties............................................................................. 4
1.5. Preferences .............................................................................................................. 5
2. OptiPix Database Overview ............................................................................................ 6
2.1. Project Database and its Security ............................................................................. 6
2.2. Database Components ............................................................................................. 7
3. Starting OptiPix Database ............................................................................................. 11
4. Case Management ........................................................................................................ 12
4.1. Adding a new case ................................................................................................. 12
4.2. Opening a Case ...................................................................................................... 13
4.3. Finding a Case........................................................................................................ 13
5. Working with a Case ..................................................................................................... 14
5.1. Managing Inspections ............................................................................................. 14
5.2. Capturing an Image ................................................................................................ 14
5.3. Writing Notes .......................................................................................................... 14
5.4. Writing notes for the image ..................................................................................... 15
5.5. Recording Audio ..................................................................................................... 16
5.6. Reporting and Exporting Cases .............................................................................. 16
6. Working with Local Files................................................................................................ 20
7. Open and Save Images ................................................................................................. 21
8. Magnifications and Calibrations .................................................................................... 22
8.1. Magnification........................................................................................................... 22
8.2. Calibration
........................................................................................................ 23
9. Measurement and Analysis ........................................................................................... 24
9.1. Measurements ........................................................................................................ 24
9.2. Annotation .............................................................................................................. 25
9.3. Tools ....................................................................................................................... 26
9.4. Zoom and Panning ................................................................................................. 29
10. Notes ............................................................................................................................. 30
11. System Requirements ................................................................................................... 32
2
1.
Installation and Startup (First time)
1.1. How to Install OptiPix
Prior to installing OptiPix the user needs to install camera Device Drivers.
To install OptiPix the user has to run the provided installer file. Double-click on it and a
new window will be displayed.
1) Click “Next” to continue.
2) Choose a folder in which to install OptiPix. Click “Next” and “Next” again to start the
installation.
3) When the installation is complete click “Close” to exit the window.
1.2. Using OptiPix for the first time
1) Insert the software protection dongle into a free USB port on computer. If a full
version of the software has been ordered, the protection dongle will be found inside
the product box.
2) From Windows main menu, click “Start/All Programs/Optilia/OptiPix” and run
OptiPix.
3) Select language from the list.
4) From the “Introduction” dialog box, select:
a. “Full Version” if a full license has been ordered with the software protection USB
dongle. All software functions will be enabled.
b. “Lite Version” if a lite version has been ordered only image view, capture,
annotation and distance measurement on image will be enabled.
c. 30 days trial version for trying the software for 30 days. All software functions will
be enabled for 30 days. Skip part 5 (license number).
5) Fill in license number (found in the package) and the other requested information.
6) PLEASE READ THE LICENSE AGREEMENT CAREFULLY before using OptiPix.
Select device from the Input Device list. The software will start showing live image from the
camera.
3
1.3. Language
It is possible to set language for OptiPix upon first start up. Alternatively, the language
settings can be changed from the “File/Preferences” menu.
1.4. Device Resolution and Properties
A device has to be chosen upon the first start of the program. This device is stored in the
register and will be automatically loaded at next start of OptiPix. It is possible to change
input device later from “Device/Input Device”.
To change device resolution click on this icon
or select “Device/Device Resolution”.
To change device properties click on this icon
or select “Device/Device Properties”.
Note: To quickly change Input Device, right click on the camera status label and choose desired device.
4
1.5. Preferences
1.5.1. OptiPix Preferences
In Preferences, the user can change line thickness, measurement units (between metric
and imperial) and define custom categories for the “Count” function. Change the
preferences from “File/Preferences”.
1.5.2. Database Preferences
In database preferences, user can change the database location and also add the
additional information for new cases.
5
2. OptiPix Database Overview
OptiPix Database is a database module to OptiPix. It allows users to create, manage and
archive pictures and data. The Database together with OptiPix is a user-friendly image
capture, analysis and archiving system for video microscopes.
2.1. Project Database and its Security
Inserting the provided dongle in a USB port of the computer where the software is installed
will activate software. This dongle will also be the key to database security. The database
can only be accessed if the correct dongle is used.
It is important to have a password-protected Windows login to the PC where the software
is installed.
6
2.2. Database Components
Menu
Case
information
Toolbar
Measurement
results
Inspection
folder
NotePad
7
2.2.1. File Menu
New Inspection: Create a new inspection for current case
Export Case: Export case data from database to windows file system.
Create Report: Create a PDF report of the inspection.
2.2.2. Case information
In “case information view” the name, id-number, company and operator of the current case
are displayed. Inspection date and previous examinations are also displayed. For more
information about management of the examinations, please refer to “Working with a Case”
2.2.3. Inspection folder
Double-click on a picture or document to open it.
8
Right clicking a picture will open a pop-up menu where the user can open the image, open
the text file associated text file for writing comments about the image, save a copy or
delete the image.
2.2.4. Toolbar
The toolbar includes the functionality to record audio.
Record Audio
9
2.2.5. Notepad
Write notes about the current inspection in the notepad. Written text will be saved and
loaded automatically for each inspection.
10
3. Starting OptiPix Database
1. Make sure to have the USB Dongle for OptiPix Database plugged in to an available
USB Port.
2. Start the software. Case manager will be opened automatically.
3. Load one of the existing cases or click “New Case” to add a new case. To get more
help with case manager, please refer to Section 4: “Case Management”.
4. The Case Manager can be closed and the user can work with the local Windows file
system without having a connection to database. Refer to “Section: 6 Working with
Local Files” to get more help on working with file system.
11
4. Case Management
Case Manager allows the user to add new cases or search and open an existing case in
the database.
Search Category
Search Field
Cases
Case Manager is opened automatically when the software starts. It can also be opened
from the menu; “Database/Open Case Manager” or by clicking this icon
.
4.1. Adding a new case
To add a new case, click “Database/New Case” or on this icon
and fill in the relevant
information. A new examination folder with the current date will be created and a case will
be opened automatically.
12
4.2. Opening a Case
Open case manager. Double click an existing case or click Open Case.
4.3. Finding a Case
Search the database by Case Name, Case ID, Case Company, Case Operator. The
search result will be displayed as the name is being typed.
13
5. Working with a Case
Inspection folder contains all data of each inspection. Open the Case Manager to create a
new or load an existing case.
5.1. Managing Inspections
When a new case is created, a new inspection folder is also labeled with current date and
time. If an existing case is opened, the most recent inspection will be loaded. All other old
inspections can be loaded by selecting them from the drop-down inspection list.
To add a new inspection to the case, click “File/ New Inspection” from the database menu.
5.2. Capturing an Image
Capture an image by pressing F11 of your computer keyboard, pressing the foot pedal or
the image capture button of the Flexia Definition. For live and still image functions, please
refer to “Section 7: Open and Save Images” .
When a user double clicks a recorded image in the folder, the image will be displayed for
measurement or analysis. For measurement tools, please refer to “Section 9:
Measurement Analysis”.
5.3. Writing Notes
Comments and text for the current inspection can be written in the Notepad.
14
5.4. Writing notes for the image
Comments and text can be written for a specific image by right clicking on the image and
choose “Open text file”. A new window will be opened, showing information about the
image, where the user can write comments about the image. These comments will also be
part of the report if the image is included.
15
5.5. Recording Audio
To record an audio memo, connect your microphone before starting OptiPix and click this
icon
in the Database toolbar.
Audio level bar will be displayed. Click stop icon to stop recording. An audio file will be
created in the folder. Audio recording will stop automatically in 3 minutes.
To listen to an audio memo, click on the audio file and default media player will start
playing the recorded audio.
Audio File
Note: OptiPix uses default audio recording device of the computer. If the audio level bar doesn’t respond to
your voice, check the default audio recording device from Window Control panel and set to microphone input
if it is not already selected.
5.6. Reporting and Exporting Cases
5.6.1.Exporting Case
To export the documents from the database, click “File / Export Case” on the database
menu. For each examination, all images and reports will be exported to a user selected
folder.
5.6.2.Exporting Image
To only export a single image, click “File\Save a Copy” or this icon
.
16
5.6.3.Creating Report
The user can create an inspection report interactively by clicking “File/Create Report” on
the database menu.
There are four main sections in the report,
Menu
Save and load report templates as well as saving a PDF report for printing and/or emailing.
Title
User can add logo and title to a report by clicking on the respective area. To save
the logo and title as a template, click “File/Save Template”. To open a saved
template, select the desired template by clicking “File/Open Template”. By clicking
File/New Template, the user creates an empty template.
Inspection Details
All the case information and the notes from the inspection will be automatically
shown in this area.
Image Area
User can add up to12 images by clicking on them in the inspection folder. To
remove any image from the report, click on the image in the report.
17
Menu
Title
Inspection
details
Image area
18
Saving Examination in PDF for Printing/Emailing
Click “File/ Save PDF” to save a PDF file of the report for printing and/or e-mailing. A PDF
report will be generated and displayed. The detailed information of each image such as
measurement and comments will be added automatically to the report. A PDF reader must
be installed on the PC.
19
6. Working with Local Files
In the folder structure, the user can choose the folder destination in which to save or recall
images. Choose a destination folder by selecting “File/Set Destination Folder”. The images
in this folder are displayed as thumbnails beneath the folder structure. To hide the folder
structure, click this icon
.
To create a new folder, click this icon
or right click inside the box to choose new folder.
The created folder will now be the destination folder.
Note: By right clicking in the file structure or on the thumbnails user can choose from a number of different
tools like copy/paste and rename.
20
7. Open and Save Images
To open an image but keeping the destination folder click this icon
or select “File/Open
Image”, then choose which image to be opened.
To load a thumbnail image or a document from the destination folder, double-click on it or
right click and choose open. If the image contains measurement objects, the measurement
results will also be loaded. Note that these measurements are part of the image and
cannot be changed as they are “burnt into” the image.
To save an image, there are two options:
Save the image with a user specified name. The measurement results will be saved
with the same name. The image is stored as a .jpg file and the results as .txt file. This
is done by clicking on this icon
or selecting “File/Save Image”. Hot key: Ctrl + S.
Take a snapshot of the image. The file will be automatically labeled with date and
serial number. This is done by clicking this icon
. Hot key: F11.
To export the measurement results only, right click on the measurements results table and
choose “Export Measurement Results” or select “Measurements/Export Measurement
Results”. This file will be saved in the destination folder.
21
8. Magnifications and Calibrations
8.1. Magnification
To create a new magnification, select “Magnifications /Edit User Magnifications”, and then
click on the “Add…” button to add a new magnification. See picture below. Select the new
magnification and click on the OK button. To start calibrating, click on the calibrate icon.
See next section for further instructions.
For quick selection of magnification, right click on the Magnification (bottom of the OptiPix
window) and choose desired magnification.
22
8.2. Calibration
To calibrate a selected magnification, place a Micrometer Scale or a Ruler (depending on
the magnification of current optics) in the live image and focus. To calibrate, select
"Magnification/Calibrate Magnification". The image of the Micrometer Scale or the Ruler
will be frozen and a new dialog window will appear. See image below.
On the image, click-and hold to drag the desired distance.
Type in the distance and select the desired unit. If imperial units are selected in the
preferences, imperial units are shown in the calibration window. Selected calibration ratio
will be seen on the status bar at the bottom of the OptiPix window.
Note 1: Predefined magnifications cannot be calibrated.
Note 2: The last calibration used will always be stored upon closing the program, and reloaded when starting
the program.
Note 3: The selected calibration will always be saved together with the image.
23
9. Measurement and Analysis
9.1. Measurements
There are several ways measure on the picture. It is possible to measure distances,
radius, curve length, areas and angles. If no magnification has been selected the
measurement results will be presented in pixels.
Before making measurements, current magnification (e.g. optical lens) should be
calibrated in the software. See section Magnification and Calibration.
Distance
To measure a distance click on the icon or select "Measurements / Distance “. Click and drag
the distance to measure in the image.
Radius
To measure a radius, there are two different methods: either by selecting three points on the
perimeter, or by dragging the radius. In order to use the first method, press the icon or select
"Measurements/Radius/Radius 3 Points". In order to use the second method, select
"Measurements /Radius/Radius By Radius".
Angle
To measure an angle, there are two different methods: either by selecting three points or by
drawing two lines. In order to use the first method, press the icon or select
"Measurements/Angle/Angle 3 Points". In order to use the second method, select
"Measurements/Angle/Angle 2 Lines".
Curve
To measure a length of a curve, press the icon or select "Measurements / Curve". Click and
draw the curve in the picture.
Area
To measure an area click on the icon or select "Measurements / Area". Click and draw the
perimeter of the area. The area will close when releasing the mouse button.
Polygon
To measure using a polygon click on the icon or select “Measurements/Polygon”. Click the
polygon’s corners and double-click to close it.
24
Count
To count objects click on the icon or select "Measurements / Count". A new window
will appear where users can choose a category. When user has chosen desired
category, start counting objects in the image by clicking on them. When you name a
category, the counting object will be marked with the first letter of that name in a
certain colour. In the measurement results window, however, the full name will be
displayed. To count using another category, simply choose another category in the
category window. When finished counting objects, press done. To modify the name
of the categories, go to “File/Preferences”.
Note: Make sure not to close the category window while counting.
Select
To use the selection tool click on the icon or select “Measurements/Select”. Select an
object (measurement) on the image to change, move or delete it.
Note: When selected, right click on the object to change or delete it.
Export Measurement Results
Measurement results are recorded in a “text” file with same name as the image file in
current destination folder. The results can also be exported to a new text file and/or
renamed.
9.2. Annotation
Text
To write text in an image click on the icon or select "Measurements/Text". Click on
the image to put the text. A new window appears where user input the text.
Annotation with Line
To write an annotation with a line, click on the icon or select
"Measurements/Annotation Line". Draw the line and a text window will appear. Write
a text or leave it blank.
Note: Leave the text blank to just draw a line.
25
9.3. Tools
Compare Images
To compare images click on the icon or select “View/Compare Images”. A new
window will appear. Select “View” and choose between 1, 2 or 4 images. To start
comparing images drag one thumbnail and drop it onto one a frames in the compare
window or double-click the thumbnail, see image below. To clear the compare view,
right click on the image to clear, or click to “File/Clear Window” to clear all images.
The user can Zoom In/Out and rotate each individual image. Slide the rotation bar or
click the rotation buttons to rotate the image up to 180 degrees.
Compare Live Image
To compare the live image with a reference image, click on the icon or select
“View/Compare Live Image”. A new window will appear. To start comparing images
drag a thumbnail and drop it onto the reference image frame in the compare window,
or double-click to the thumbnail.
The reference image can be saved and reloaded by clicking “File/Save Compare Live
Window” and “File\Load Compare Live Window”.
26
Image Adjustment
To adjust colour, contrast and other graphics properties of the image, click on the
icon or select “View/Image Adjustment”. A new window will appear. If OptiPix is in live
or still image mode different windows will be shown.
In live image mode user can only flip the image and change the contrast.
In still image mode user can also change the red, green and blue colour mix as
well as brightness and contrast.
Note: Select both flip horizontal and flip vertical to rotate the image 180°
27
Ruler
To show the ruler click the icon or select "Measurements/Show Ruler". The size of
the ruler depends on the current calibration. To rotate the ruler, select the object and
right click on it.
Grid
To project the grid on the screen, click on the icon or select "Measurements/Show
Grid". A new window will appear to input the size of each grid cell in mm or inches.
Crosshair
To
project
the
crosshair
on
the
screen,
click
on
the
icon
or
select
"Measurements/Show Crosshair".
Rectangle
To project the rectangle on the screen, click on the icon or select "Measurements /
Rectangle". A new window will appear to input the length of the sides of the rectangle
in mm or inches.
Graticule
To project a reference (semi-transparent) image on screen, click on the icon and
select the reference image with exactly the same resolution as the live image.
OptiPix will automatically switch to full screen and project the graticule over the live
image. Press ESC to exit full screen.
Change Font & Color
To change the font click on the icon. A new window appears where user can choose
font type, colors for the text. This will be stored in the register.
Change Color of objects
To change the color of the objects click on the icon. A new window appears where
user can choose colors of the objects. This does not affect the color of the grid nor
the crosshair.
28
9.4. Zoom and Panning
There are four ways to zoom digitally, both in live and still image mode: zoom in, zoom out,
zoom to fit and full size. Turning the wheel of the mouse zooms in/out, using the cursor as
centre of the image.
Zoom In
Zoom in by clicking on the icon or select “View /Zoom In”.
Hot key: F4.
Zoom Out
Zoom out by clicking on the icon or select “View /Zoom Out”.
Hot key: F3.
Zoom to Fit
Zoom to fit the screen size by clicking on the icon or select “View /Zoom to Fit”.
Hot key: F2.
Full Size
To apply full size (no digital zoom) select “View/Full Size”.
Hot key: F5
Full Screen
Zoom to full screen by clicking on the icon or select “View/Full Screen”. Hot key: F6.
To close the full screen view press ESC. The snap and the trigger functions will
work as usual even under full screen view. In Full Screen mode, the user can
browse through images by turning the wheel of the mouse. A right click will give the
option to exit Full Screen mode.
Panning
To pan the image when zoomed in, use the middle button of the mouse, or click on
the icon.
29
10. Notes
30
31
11. System Requirements
Component
Computer
System recommendation
Intel Core i5 2,3 GHz or similar
Recommended systems:
Station: HP Pro 3500 MT, Win7P or similar
Laptop: HP ProBook 4740s 17.3" HD+ LED or similar
Operating System
Memory
Windows XPP, Windows 7P (32 or 64 bit
1GB or higher of RAM,
Recommended: 2 GB
Minimum: 10 GB of Free Space
Recommended: 100 GB of Free Space
Laptop: 15,6 " / 1600x900 (HD+)
PC: 22” /1920 x 1080 (Full HD)
Recommended:
Laptop: 15,6 " / 1600x900 (HD+)
PC: 24” /1920 x 1200
Direct X compatible graphics card is recommended to
avoid unnecessary load on the CPU. Avoid using
integrated simple graphics cards.
Hard disk
Display
Graphic card
Recommended:
ATI Radeon HD 5000/6000 Series
nVIDIA GTX 500 Series
Other
Three USB2.0 ports. PCI express x1
………………………………………………………………………………………………………………………….
All rights reserved. The information contained herein is designed only for use with Optilia Instrument´s systems.
Optilia Instruments is not responsible for any use of this information for other purposes. Optilia Instruments shall
not be liable to the purchaser of this product or third parties for damages, losses, costs or expenses incurred by
the purchaser or third parties as result of: accident, misuses, or abuse of this product or unauthorized
modifications, repairs or alternations to this product, or failure to strictly comply with Optilia Instrument´s operating
and maintenance instructions. Optilia Instruments shall not be liable for any damages or problems arising from the
use of any options or any consumable products other than those designated as original Optilia products or Optilia
approved products by Optilia Instruments. Optilia Instrument shall not be held liable for any damages resulting
from electromagnetic interference that occurs from the use of any interface cables or devises other than those
provided by or designated as Optilia-approved Products by Optilia Instruments.
OptiPix © and OptiPix Database Software are developed by Optilia Instruments AB
Djupdalsvägen 22
S-192 51, Sollentuna
Sweden
Phone:
Fax:
e-mail:
web:
Revision B August 2012
+46 (0)8 35 33 60
+46 (0)8 35 33 63
[email protected]
www.optilia.eu
Copyright@ 2012 Optilia Instruments AB
32